1
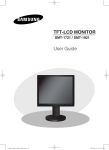
User’s Manual
The anytime, anywhere scanner for notebook computers.
DECLARATION OF CONFORMITY
We Antec Incorporated, 47900 Fremont Blvd, Fremont, CA 94538 USA,
Telephone: 510-770-1200, declare under our sole responsibility that the produc
PID - 100
complies with part 15 of the FCC Rules. Operation is subject tothe following two
conditions:
(1) This device may not cause harmful interference and (2) this device must accept
any interference that may cause undesired operation.
Note: This equipment has been tested and found tocomply with the limits for
Class B digital device, pursuant to Part 15 of the FCC Rules. These limits are
designed to provide reasonable protection against harmful
interference in a residential installation. This equipment generates, uses and
can radiate radio frequency enegry and, if not installed and used in accordance
with the instruction, may cause harmful interference to radio communications.
However, there is no guarantee that interference will not occur in a particular
installation. If this equipment does cause harmful interference to radio or television reception, which can be determined by turning the equipment off and
on, the user is encouraged to try to correct the interference by one or more of
the following measures:
*
*
*
*
Attaché User's Manual
Trademarks
IBM, PC and VGA are registered trademarks of International Business
Machines Corporation.
MMX is a registered trademark of Intel Corporation.
MS-DOS, Windows, Windows 95, Windows 98, Windows NT and
Microsoft are registered trademarks of Microsoft Corporation.
All other trademarks are the properties of their respective owners.
Contents
- Installation and Calibration
- Pre-defined Setting
- Custom Setting
- Information Window
Reorient the receiving antenna.
Increase the separation between the equipment and receiver.
Move scanner away from the receiver.
Connect the equipment into an outlet on a circuit different from
that to which the receiver is connected.
1
Attaché User's Manual
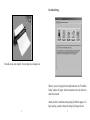
Installation and Calibration
Trademarks
IBM, PC and VGA are registered trademarks of International Business
Machines Corporation.
MMX is a registered trademark of Intel Corporation.
MS-DOS, Windows, Windows 95, Windows 98, Windows NT and
Microsoft are registered trademarks of Microsoft Corporation.
All other trademarks are the properties of their respective owners.
1. Insert the CD>select CD device>run Setup.
2. Follow the installation instructions.
3. Connect the Attaché with the PCMCIA interface card.
4. Insert the card into the PCMCIA slot on your notebook or PCMCIA
device on your desktop computer. (such as Antec Datachute)
5. Run PageManager or other applications which are TWAIN compliant.
Contents
- Installation and Calibration
- Pre-defined Setting
- Custom Setting
- Information Window
Your Windows98 has a built in program "Imaging" which is TWAIN
compliant. Go[Start]>[Programs]>[Accessories]>[Imaging] to run the
program.
6. Use the pull-down menu from [File]>Click [Select Source] and select
[Antec] as the device source.
7. Click [Acquire] to enable Attaché. A window with the title "Pre-defined
Setting" will appear on your screen with the "Calibration Page" window
on top of it.
8. Insert the calibration sheet into the Attaché as instructed to set up the
calibration data. This is for the first time on your computer. To make
sure you can always get the best image, this "Calibration Page" will
appear periodically to remind you to calibrate your computer. You can
always click on "Custom Setting" button to enter the setting window
and click on "Calibrate" button to set up the calibration at any time
you want.
Note: Insert the paper to the side with arrow marks on the Attaché.
2
3
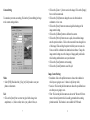
Pre-defined Setting
9. Attaché set-up is now complete. You may begin to scan images now.
Whenever you click [Acquire] from the pull down menu, the "Pre-defined
Setting" window will appear. Insert the document to the side with arrow
marks on the Attaché.
Attaché provides 5 predefined scanning settings for different purposes. To
begin scanning, you need to choose the setting by clicking on the icon.
4
5
• [Fax] Mode
Fax mode is the best choice to scan documents to be faxed. It scans in
200dpi black/white, A4 size {8.3² x 11.7²}
• [E-Mail] Mode
It scans in 150 dpi gray, A4 size {8.3² x 11.7²}
• [OCR] Optical Character Recognition Mode
To scan documents to be processed by OCR software and convert
them into editable text. It scans in 300dpi black/white, letter size
{8.5² x 11.0²}
• [Photo] Mode
To scan color photos or graphics in 150dpi Color, photo size {3.0² x 5.0²}
• [Magazine] Mode
To scan pictures from magazines, books or other printed materials, use
Magazine mode. It scans in 75dpi Color, A4 size {8.3² x 11.7²} with
"Descreen" filter applied to remove the moiré pattern.
Note: If these pre-defined settings do not meet your scanning needs, you
can right click the icon you want to change to modify pre-setting
values or use "Custom Setting" window to fine-tune your scanning
parameters.
5
6
Custom Setting
To customize your own scan setting, Click on the [Custom Setting] tab to go
to the custom setting window.
Mode:
• Select [B/W] (black & white), [Gray] or [Color] mode to scan your
photos or documents.
Tool:
• Click on the [Invert] box to convert any pixel in the image to its
complement, i.e., black to white, red to cyan, yellow to blue, etc.
7
• Click on the [Zoom +/-] box to zoom in the image. Click on the [Range]
box to exit the zoom mode.
• Click on the [Unit] button to change the scan size from inches to
centimeters or vice versa.
• Click on the [Reset ] button to resume using default settings of the
image control setting.
• Click on the [Calibrate] button to calibrate the scanner.
• Click on the [Preview] button to scan a quick, low-resolution image
onto the preview window. Click on the zoom tool for an enlarged view
of the image. Click and drag the pointer to define your own scan size.
Your scan will be confined to the dotted selection frame. Change the
image control settings to see the changes of image quality and decide
which setting combination to scan your document.
• Click on the [Scan] button to start scanning.
• Click on the [Cancel] button to cancel the job.
Image Control Setting:
• Resolution: click on the pull down menu to choose the resolution in
which you are going to scan. It shows in dpi (dot per inch).
• Scan size: Click on the pull down menu to choose the pre-defined scan
area that you are going to scan.
• Filter: Click on the pull down menu to activate the "Descreen" filter to
remove the moiré pattern which is usually generated when scanning
printed materials. This function is not available for B/W mode.
8
• Brightness: This is for B/W mode only. The brightness value ranges
from -100% to 100%. It changes the highlight value of an image when
scanning in B/W mode.
• Contrast: Again the contrast value ranges from -100% to 100%.
• Gamma: The gamma value ranges from 0.1 to 9.9. It defines the mid-tone
point of an image. It is recommended to set the value to 1.0 or larger to
make the image brighter.
• Highlight: The highlight value ranges from 1 to 255. It defines the white
point of an image. You can reduce the value to make the image lighter or
increase the value to make it darker.
• Shadow: The shadow value ranges from 0 to 254. It defines the black
point of an image. You can reduce the value to make the image darker or
increase the value to make it lighter.
Information Window
Useful information related to the Attaché and TWAIN driver software can
be found in this window.
Note: It is recommended to set the shadow value lower than the high
light value.
9
10