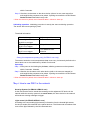
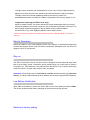
1
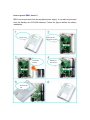
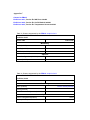
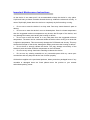
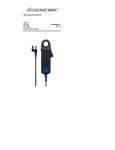
Motion Detector User Manual Model: ZB01 series Motion Detector Z-B01C Related Netvox devices Power outlet -Z80x series Security -Z601A, Z210, Z201B (CIE) Light sensitivity adjustor Binding Key Network indicator Sensor indicator Power jack Click-in pit Introduction ZB01 series is a motion detector for triggering other device remotely via wireless communication. Depends on which model you purchased, for ZB01A is a motion detection for intrusion alarm system; ZB01B is a on/off control lighting switch, where as ZB01C is a temperature sensor plus those two features of ZB01A and ZB01B. When the Infrared detects movement, it sends the message to the network for specific task. In ZigBee network ZB01 device act as an end-device node which does not permit any device to join through it. It enters to sleep mode when not triggered by movement to save power. When triggered by movement it sends message and status notification to the network for specific application. What is ZigBee? ZigBee is a short range wireless transmission technology which defined for a minimum complexity, low power consumption, low data rate, cost effective wireless solution. ZigBee lies in between wireless markup technology and Bluetooth. ZigBee is based on IEEE802.15.4 standard, the mutual co-ordination between thousands of sensors to exchange data. Sensor to sensor or node-to-node communication is achieved through relays of control data between devices with only a fraction of energy use which denoted for highly transmission efficiency. Note: Wireless communication, in some real use cases, can be limited by the signal blockage. Please consult your service provider or place of purchase. Product Specification Fully IEEE 802.15.4 compliant Utilizes 2.4GHz ISM band, up to 16 channels Up to 70 meters non-obstacle wireless distance Simple operation and device configuration Setting up the ZB01 and network Setting Up Summary (1) Join it into the existed network. (2) Featuring the device by pairing between two or more devices or zone registration for security system (3) How to use it Step 1. Startup and Network Association To allow ZB01 to function, it must first join to a ZigBee network. When it is given powered it will automatically start searching for an existed network. So before you give power to ZB01 make sure it is within the wireless coverage distance (~70 meters or less) and make sure first you have the permit-join feature enabled either on a coordinator or a router device in the network so that ZB01 will join to the network through it; then give power to ZB01 and it will join into the network by itself. *On how to enable permit-join please refer to the router or coordinator device user manual Operation: Step 1: enable permit-join on either a coordinator or a router device. Step 2: give power to ZB01 device so it can start search for a network to join. Step 3: at this time if a network is found it will join automatically. The two LED indicators on the ZB01 will flash 5 times if successful otherwise the indicator stays dark. How to power ZB01 device? ZB01 can be powered from the supplied power supply. It can also be powered from the backup two CR123A batteries. Follow the figures bellow for battery installation. Open the lid from the click-in Front view Install the battery Restore the lid Battery in the device Feature Description Before we move on to the next step there are several things to know. This will help you in the next step as to which sub-steps you will need and why you need them. As mentioned earlier in the manual, ZB01 comes with 3 models. There are different features in each model. Feature such as Zone, On/Off and Temperature give each model different specific tasks. Zone, for example, will feature the device to work as a zone sensor for the security system to notify the security system or called CIE device -Control & Indication Equipment in the network to trigger a siren or a silent alarm. This device will require security system enrollment (registration). On/Off, for example, will feature the device to work as a motion-triggered light or power switch. In many cases it is use for door or stairway lighting application. This device will require device pairing. Temperature, for example, will feature the device to work as a temperature reporting device. It reports the temperature reading to a paired display device. This device will require device pairing. From your purchase order you have the model name written on the purchased order. From the table you will know what feature you have for your device. Model name Features ZB01A Zone (only) ZB01B On & Off (only) ZB01C Zone/On&Off/Temperature Step 2. Featuring the device by pairing For ZB01A user please read part A. For ZB01B read part B; and for ZB01C read A and B. (A) Zone registration This step is only applicable for ZB01A and ZB01C device security system user. For ZB01B device user please go to sub-step (B) Device pairing. Automatic zone registration ZB01A and ZB01C contain zone feature to work with the security system in the network. After it has joined to the network, the device needs to register itself to the security system called CIE (Control and Indicating Equipment). The registration is an automatic process followed by network join. All you need is to observe whether it has successfully registered. Observing registration to the CIE: (1) If CIE device does not exist in the network the LED indicator flashes twice. (2) If CIE device is found and successfully enrolled, it flashes 6 times otherwise flashes 4 times meaning enrollment failed. (B) Device pairing (Binding) If you are a ZB01B and ZB01C user, this is for you. There are 2 types of pairing namely pairing for light switch control and pairing for temperature reporting. Pairing for light switch control only To make ZB01 to control one or more power outlets, it is required to pair with them. This is more like a stairway or a drive away lighting application (i.e. Netvox Z800, Z805, Z806). When ZB01 detects motion it turns on a light. The light stays on for 30 seconds by default. The light would turn off when 30 seconds expired. To avoid frequent or unstable light switching, ZB01 stays inactive to movement for a 30second period by factory default. Any movement within this period will not be noticed. In the situation of drive way application where sky light threshold is a common feature, you can adjust the light sensitivity from the sensitive adjustor to set the light threshold. Operation: Step 1: Short press on the binding key 2 times; valid key presses must be operated within 5 seconds. Step 2: Likewise, do the same on the other device (refer to its own user manual) to exchange binding requests to be paired. If pairing successful the LED indicator flashes 5 times otherwise it stays unlit. * When the device is paired, the Infrared will take 1 minute to warm up. Unbinding operation: Unbinding procedure is exactly the same as binding operation. The device will reverse pairing by itself. Threshold information: Threshold range Adjustor position Lowest light sensitivity @ 300Lux to trigger Turn clock-wise direction Mid-range light sensitivity @ 50 Lux to trigger Mid position Highest light sensitivity @ 27 Lux to trigger Turn anticlock-wise direction Pairing for temperature reporting only (for ZB01C user only) The sensor sends the current temperature data once every 3 minutes by default to the bound device or to the coordinator by default if not bound. Operating: Step 1: Short press on the binding key 3 times; valid key presses must be operated within 5 seconds. Likewise, Step 2: Likewise, do the same to the other device (refer to its own user manual) to exchange binding requests to be paired. If pairing successful the LED indicator flashes 5 times otherwise it stays unlit. * When the device is paired, the Infrared will take 1 minute to warm up. Step 3. How to use ZB01 in the network Security System (for ZB01A & ZB01C user) At the time that the device sends alert message to the registered CIE device in the network while the security system is at armed status, the siren device in the network will receive a warning message to trigger. Light control (for ZB01B & ZB01C user) According to the surrounding light intensity information from the internal light sensor, the device sends ON command to the paired devices. The 30seconds countdown timer turns off the light followed by the ON command sent. The light sensor sensitivity can be adjusted to fit your need. From the light sensitivity adjustor turn clock-wise for lower sensitivity and anti-clockwise for higher sensitivity. The light control is functional regardless whether the security system is in armed/disarmed mode or whether the ZB01 is registered to the security system or not. Temperature reporting (for ZB01C user only) Again as mention earlier, the sensor sends the current temperature data once every 3 minutes by default to the bound device or to the coordinator by default if not bound. The device sends captured temperature data to paired machine which installed ZiG-BUTLER or any other ZigBee enabled in-home display device. * When the device is powered up after left without power, Infrared will take 1 minute to warm up. Device Tampering ZB01A and ZB01C come with tampering alarm. Any attempt of unauthorized tampering such as removing the device cover the device sends alarm messages to the CIE device to trigger the siren in the network. Stay on The ZB01 is featured to be an end device and is designed to enter temporal sleep after idle to save battery power. Sometimes during system setup you would want to retrieve information (i.e. IEEE address, short address) from the device so you need to press keys to allow the device to enter wake mode to stay connected. Operation: Press binding key for more than 3 seconds until the indicator give two short flashes. The device will broadcast its short address and its device physical IEEE address. Low Battery Notification When ZB01 uses battery to power, the device will not work if the battery is bellow 5.2Vdc. The device broadcasts low battery message to the network notifying the user. Restore to factory setting ZB01 is capable of storing and saving includes network routing information. If you wish to remove ZB01 from an exited network, you would need to clear the saved routing and other information to join to a new network by simply reset the device to restore to the factory setting. Operation: Step 1: Remove the power source or battery from the device. Step 2: Then, while hold press the binding key, give power to the device. You should see the status LED flashes quickly indicating factory restored setting has achieved. To join ZB01 to a new network simply remove the power then give power again. Now It should start scanning and search for the network to join. Make sure you have the coordinator or a router permit-join enabled to join. Please refer to Startup and Network Association in the beginning of this manual. [Next Page: Device Attributes Description for developers only] Device Attributes Description Appendix A: Clusters of Home Automation for ZB01A Appendix B: Clusters of Home Automation for ZB01B Appendix C: Clusters of Home Automation for ZB01C Clusters of Home Automation for ZB01 Appendix A Cluster for ZB01A Table 1: Clusters supported by the ZB01A endpoint 0x01 Device ID: IAS Zone 0x0402 EndPoint: 0x01 Server side Client side Mandatory Basic (0x0000) Identify (0x0003) Ias Zone (0x0500) Optional Power Configuration (0x0001) None Alarms (0x0009) Appendix B Cluster for ZB01B Table 2: Clusters supported by the ZB01B endpoint 0x01 Device ID: On/Off Switch 0x0000 EndPoint: 0x01 Server side Client side Mandatory Basic (0x0000) On/Off Switch (0x0006) Identify (0x0003) On/Off Switch Configuration (0x0007) Optional Power Configuration (0x0001) Alarms (0x0009) None Appendix C Cluster for ZB01C EndPoint: 0x01 ; Device ID: IAS Zone 0x0402 EndPoint: 0x02 ; Device ID: On/Off Switch 0x0000 EndPoint: 0x03 ; Device ID: Temperature Sensor 0x0302 Table 3: Clusters supported by the ZB01C endpoint 0x01 Device ID: IAS Zone 0x0402 EndPoint: 0x01 Server side Client side Mandatory Basic (0x0000) Identify (0x0003) IAS Zone (0x0500) Optional Power Configuration (0x0001) None Alarms (0x0009) Table 4: Clusters supported by the ZB01C endpoint 0x02 Device ID: On/Off Switch 0x0000 EndPoint: 0x02 Server side Client side Mandatory Basic (0x0000) On/Off Switch(0x0006) Identify(0x0003) On/Off Switch Configuration(0x0007) Optional Power Configuration(0x0001) Alarms(0x0009) None Table 4: Clusters supported by the ZB01C endpoint 0x03 Device ID: Temperature Sensor 0x0302 EndPoint: 0x03 Server side Client side Mandatory Basic (0x0000) Identify(0x0003) Temperature Measurement(0x0402) Optional Power Configuration(0x0001) Alarms(0x0009) None Important Maintenance Instructions As the device is not water proof it is recommended to keep the device in a dry place. Liquid and heavy moisture contains minerals that may oxidize the electronic circuitry. In case of liquid spill, please leave the device to completely dry before storing or using. Do not use or store the device in a dusty area. Dust may cause electronic parts to destroy. Do not use or store the device in an over heated place. Store in a hotter temperature than the suggested maximum temperature may shorten the life span of the device; and may damage the battery and causing the housing to deform. Do not use or store the device in a very cold place than the suggested minimum temperature. The water can be condensed inside the device when moving to an area that is higher in temperature. This can severely damage the PCB board and circuitry. This may shorten the life span of the device; damage the battery and cause the housing to deform. Do not throw or strongly vibrate the device. This may damage connectivity of the electronic parts and other sensitive components on the PCB board. Do not use any strong chemical or washing to cleanse the device. Do not use any coloring materials on any removable parts which my cause poor connections and may keep the device from function properly. All the above applies to the purchased products, battery and other packaged items. If any unusable or damaged items are found please return the product to your nearest authorized repairing center.