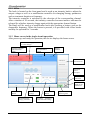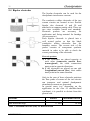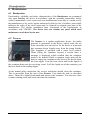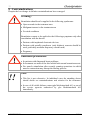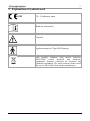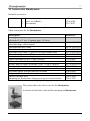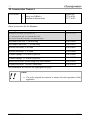
1
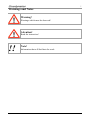
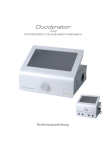
Duodynator and Combination Duodynator-Neoserv Instructions for use Duodynator 2 This manual was created by gbo Medizintechnik AG and checked for accuracy. However, it does not claim to be complete. All information and data is subject to change without notice. No part of this manual may be reproduced for any purpose without the express written permission of gbo Medizintechnik AG, regardless in which way or by any means, electronic or mechanical, are used. © gbo Medizintechnik AG Part-No: 032-7-0018 Edition Version: 1.2 Date of issue: 2015-01-21 Manufacturer: gbo Medizintechnik AG Kleiststraße 6 D-64668 Rimbach gbo Medizintechnik AG Version 1.2 Duodynator 3 Contents 1 INTRODUCTION...................................................................................... 6 1.1 Intended use ......................................................................................... 6 1.2 Note concerning the operating personnel .............................................. 6 1.3 Admission.............................................................................................. 6 1.4 Device description Duodynator .............................................................. 6 1.5 Device description Neoserv ................................................................... 7 2 START OF OPERATION ........................................................................ 8 2.1 Unpacking, transport and installation ..................................................... 8 2.2 Combination with the Neoserv ............................................................... 8 2.3 Connect and switch on .......................................................................... 8 2.4 Placing out of operation ......................................................................... 9 3 OPERATION .......................................................................................... 10 3.1 Overview ............................................................................................. 10 3.1.1 3.1.2 3.1.3 3.1.4 3.1.5 3.1.6 Touchscreen display ................................................................................. 10 Knob .......................................................................................................... 11 Home screen in the single-circuit operation .............................................. 11 Home screen panels in the interference operation .................................... 12 Screen for selecting an indication ............................................................. 13 Screen for selecting other therapies.......................................................... 13 3.2 Suction flyout ....................................................................................... 14 3.3 Direct help ........................................................................................... 15 3.4 Settings ............................................................................................... 16 4 THERAPY .............................................................................................. 18 4.1 General guidelines for therapy............................................................. 18 4.2 Selection of therapies .......................................................................... 18 4.2.1 4.2.2 4.2.3 4.2.4 Selection of therapy by Other therapies .................................................... 18 Selection of therapy by indications ........................................................... 18 Selection of therapy from the favorites list ................................................ 19 Individual settings ...................................................................................... 19 4.3 Implementation of the treatment .......................................................... 20 4.3.1 4.3.2 Treatment with interference currents......................................................... 20 Therapy with single channel currents ........................................................ 20 4.4 Combination therapy with ultrasound .................................................. 21 4.4.1 4.4.2 General information ................................................................................... 21 Procedure for combination therapy ........................................................... 22 5 ELECTRODES....................................................................................... 23 5.1 Electrode positioning ........................................................................... 23 5.2 Single-pole electrodes ......................................................................... 24 5.3 Suction electrodes ............................................................................... 25 gbo Medizintechnik AG Version 1.2 4 Duodynator 5.4 Bipolar electrodes................................................................................ 26 6 MAINTENANCE..................................................................................... 27 6.1 Duodynator.......................................................................................... 27 6.2 Neoserv ............................................................................................... 27 6.3 Safety checks ...................................................................................... 28 6.4 Disposal of equipment and accessories .............................................. 28 6.5 Cleaning, Disinfection and carePreventive inspection ......................... 29 6.5.1 6.5.2 6.5.3 6.5.4 6.5.5 6.5.6 6.5.7 Cleaning the unit ....................................................................................... 29 Cleaning of the Electrodes ........................................................................ 29 Disinfecting the Electrodes ........................................................................ 29 Cleaning of the Suction Electrodes ........................................................... 29 Disinfecting of the Suction Electrodes ....................................................... 30 Cleaning of the elastic straps .................................................................... 30 Cleaning of the Electrode Sponges and Electrode Pockets ...................... 30 7 WARNINGS AND HAZARDS ................................................................ 31 8 CONTRAINDICATIONS......................................................................... 32 9 EXPLANATION OF SYMBOLS USED .................................................. 33 10 TECHNICAL DATA ............................................................................... 34 11 ACCESSORIES DUODYNATOR ........................................................... 35 12 ACCESSORIES NEOSERV ................................................................... 36 13 TROUBLESHOUTING ........................................................................... 37 13.1 Further errors ................................................................................... 37 15 EMC HINTS ........................................................................................... 38 16 ANNEX I LIST OF LOW FREQUENCY CURRENTS ............................. 41 17 ANNEX II LIST OF THE MEDIUM-FREQUENCY-CURRENTS ............. 42 18 ANNEX III LIST OF MEDIUM-FREQUENCY-PROGRAMS ................... 43 19 INDEX .................................................................................................... 44 gbo Medizintechnik AG Version 1.2 Duodynator 5 Warnings and Notes Warning! Warnings which must be observed! Attention! Read the instruction! !! gbo Medizintechnik AG Note! Information that will facilitate the work. Version 1.2 6 Duodynator 1 Introduction 1.1 Intended use Therapy with low-, medium- and interference currents. 1.2 Note concerning the operating personnel The operation of the device must be performed only by trained medical professionals. 1.3 Admission We recommend that the operator should be trained when using the unit. 1.4 Device description Duodynator The Duodynator is a microprocessor controlled electrical stimulation device for electrotherapy. The application makes the device ideal for use in the physiotherapy department of hospitals and in the modern and well-equipped practice. The Duodynator is a therapeutic device for the classic electro-therapy with singlecircuit currents, particularly in multi-channel operation, as well as for therapy with two-dimensional interference currents. If two middle-frequency electrical circuits of different frequencies, or those which are phase shifted towards each other, transpose, a new frequency – the interference frequency – is generated at the intersection point through superpositioning of the superposed amplitudes. Duodynator uses this two-dimensional interference method. This allows the desired highest possible low-frequency stimulation from the immediate area surrounding the electrode to be shifted into deeper regions, since this is where it is generated. Apart from the two-dimensional interference currents, Duodynator offers a selection of single circuit currents and provides a therapy with medium sine waves. This therapy is absolutely free of d.c. components. There are two channels available The carrier frequency can be set from 4000 to 10000 Hz in steps of 2000 Hz. Furthermore, the Duodynator offers the classical Low Frequency currents including the galvanic current (d.c.). The galvanic current is used to stimulate the circulation in the area to be treated. gbo Medizintechnik AG Version 1.2 Duodynator 7 The Duodynator thus is well suited for: Pain Muscle relaxation Muscle training Muscle stimulation (increase energy consumption) Rehabilitation and mobilization Lymphatic drainage Lipolysis (breakdown of fat cells in the epidermis tissue) Cellulite Treatment Edema treatment Fat burning. Also the operation of the Duodynator is facilitated by programs, which automatically adjust the therapeutic frequencies and the treatment time. 1.5 Device description Neoserv The Neoserv is a suction-wave therapy unit designed for use with 1 - 4 suction electrodes. The device is especially useful as an accessory for Duodynator and in the combined operation “stimulation current with ultrasound“ additionally, with the ultrasound therapy device Sonostat. The Neoserv works as suction wave massage unit. Liquids, dirt or bacteria which are sucked up by the suction electrodes are caught in a space-consuming and frequentlyto-be-drained water separator. In the areas where the suction electrodes are applied, increased hyperemia occurs. As a consequence, tissue conductivity is improved beneath the electrodes. Moreover, the patient’s sensitivity to the electric current is significantly masked by the pulsating sucking action of the electrodes - a fact that makes the device particularly useful in cases where electro stimulation treatment needs to be administered to patients who are specially sensitive to electric currents. The suction electrodes can be applied in a fast and easy manner, and they also pleasantly adapt themselves to the skin surface. Optimum skin contact is ensured by the flexible edges of the electrodes. Because the Neoserv is an accessory device for Duodynator, which may not work alone, it is described within this manual. gbo Medizintechnik AG Version 1.2 Duodynator 8 2 Start of operation 2.1 Unpacking, transport and installation After unpacking check all components for external integrity. The unit may be placed on any flat surface. It must not be placed on the floor. Keep a wall distance of at least 20 cm. The device should neither be placed in front of radiators nor should it be covered by pillows or blankets while in operation. The device is not made for outdoor operation. Duodynator and Neoserv meet the requirements for electrical safety according to EN 60601-1 and are both devices of protection class I. Within the scope of the Medical Devices Directive (MDD), Class IIa is assigned for the Duodynator. The Neoserv is an accessory for Duodynator. The combination Duodynator-Neoserv is in Class IIa Warning! Note for use in the clinical area: The unit is not designed to be operated in places with the inherent risk of explosions. If it is used in dangerous areas of anesthesia departments, the possibility of an explosion cannot be excluded. If the patient and/or the patient cable is directly exposed to a radiator of a medical device for high frequency heat therapy, damage of the device or danger to the patient cannot be excluded. As a rule, a clearance distance of 3 m is sufficient. 2.2 Combination with the Neoserv When the Neoserv is used as an accessory, Duodynator must be placed above the Neoserv and screwed on the back. Do this, slide the Duodynator from behind the retaining tab on the lid of Neoserv. Align both devices and screw the two devices on the back of each other. In the case of the combination with Neoserv the Duodynator is supplied with mains voltage from Neoserv. Thus, a line input on Neoserv is enough to power both devices. A detailed pictorial instruction is supplied with the Neoserv. 2.3 Connect and switch on The Duodynator and the combination Duodynator-Neoserv are designed for connection to a supply voltage of 100 to 240 V and are automatically set to the correct mains voltage. Regardless of the supply voltage, the device is suited for power frequencies of 50 to 60 Hz. gbo Medizintechnik AG Version 1.2 Duodynator 9 Warning! To avoid the risk of electric shock, the Duodynator and also the combination of devices Duodynator-Neoserv must only be connected to the mains with protective earth! Turn on the Duodynator by the power button on the rear panel. When Neoserv is connected and should also be used, it must also be turned on using the power switch on the back. ON / Off switch for Duodynator Data connection between Duodynator and Neoserv AC power connector with fuse for Duodynator AC power connector with fuse for Neoserv ON / Off switch for Neoserv The Duodynator is equipped with a SD card slot, located to the right of the display. This port is intended only for service purposes. SD card slot 2.4 Placing out of operation In order to disconnect the device just disconnect it from the mains power supply. No other measures are to be taken. gbo Medizintechnik AG Version 1.2 Duodynator 10 3 Operation The Duodynator has a touchscreen display, a knob, an on/off switch and a socket for a patient cable or Neoserv. The operation of the Duodynator is done by the controls of the touch screen and the knob. Is the Neoserv connected and shall be used, its operation is realized in Duodynator. Touchscreen Display Knob Connection for patient cable or Neoserv Connection for suction lines for channel 1 Connection for suction lines for channel 1 Connection for suction lines for channel 2 Connection for suction lines for channel 2 3.1 Overview 3.1.1 Touchscreen display The touch screen should be operated with a distinct pressure of the fingertip. Sharp objects are unsuitable for operation and can damage the screen. The individual panels (buttons) are clearly labeled. Visually accessible buttons are distinguished from non-use buttons. gbo Medizintechnik AG Version 1.2 Duodynator 11 3.1.2 Knob The knob is located on the front panel and is used as an intensity knob to adjust the output voltage as well as a modification controller for changing therapy parameters such as treatment duration or frequency. The intensity controller is activated by the selection of the corresponding channel. After a timeout of 20 seconds, the intensity controller becomes inactive and must be released for a further intensity change again with the appropriate channel button. The Knob will be used as a modification knob after pressing a button, such as the changeable frequency. When the button is pressed, it is provided with a blue border and may be operated for 3 seconds. 3.1.3 Home screen in the single-circuit operation After power-up, and ready for operation, the device displays the home screen. Save the set therapy parameters as "own therapy" Channel I selection and information button Channel II selection and information button Therapy duration Achilondynie Selection Favourite list Tennis elbow Selection More therapies Selection Indications Selection Single-circuit interference Direct aid Button Button settings Detailed Settings therapy parameters gbo Medizintechnik AG Suction Button Single-circuit is selected (green) Swelling parameters with activated swelling Version 1.2 12 Duodynator 3.1.4 Home screen panels in the interference operation After power-up, and ready for operation, the device displays the home screen. Save the set therapy parameters as "own therapy" Channel selection and information button Here is presented linking both channels Achilondynie Selection Favourite list Tennis elbow Selection More therapies Selection Indications Selection Single-circuit interference Button settings Direct aid Button Suction Button Interference is selected (green) Detailed Settings therapy parameters ! ! gbo Medizintechnik AG Note! In the interference mode, both channels are adjusted simultaneously with the intensity controller. Note! If the Neoserv is switched on and connected to the current stimulation output of Duodynator, suction will automatically switched on when selecting a current from the Favorite list. Version 1.2 Duodynator 13 3.1.5 Screen for selecting an indication After pressing the button “indications”, the device displays the following screen. Return to the Home screen without saving the indication Return to the Home screen with the acquisition of indication Indication image Display of electrode placement Indication list in alphabetical order Range selection to restrict the list of indications 3.1.6 Screen for selecting other therapies After pressing the button “other therapies”, the device displays the following screen. Return to the Home screen without applying their own therapy Return to the Home screen with assumption of personal therapy Delete the selected therapy Rename the selected therapy Parameters for the selected list entry gbo Medizintechnik AG List of own therapies in alphabetical order Pre-selection of the current type Version 1.2 Duodynator 14 3.2 Suction flyout When using the Duodynator together with the Neoserv the suction operation will be activated after the Neoserv is switched on. Pressing the suction button, a flyout folded up in which you can set the parameters for the suction. The suction, which means the negative pressure in the suction electrodes, can be adjusted from -40 to -300 mbar. The suction massage can be adjusted between 0 and 20 pulses / minute. Suction strength suction massage Suction Button ! ! gbo Medizintechnik AG Suction on-off switch Note! If the suction is to be used, the Neoserv must be switched on with its power switch on the back of the unit before. If the Duodynator is switched off using the power switch, the Neoserv sounds a warning signal which indicates that the Neoserv is still on and must be switched off. Note! If the Neoserv is switched on and connected to the current stimulation output of Duodynator, suction will automatically switched on when selecting a current from the Favorite list. Version 1.2 Duodynator 15 3.3 Direct help The user of the Duodynator is guided on the screen. The direct help menu provides information about the selected buttons directly on the screen. To open the direct help menu, first touch the “?“-button and then the button about which you desire information. A window opens where the information is shown. Touch to the help window in order to close it. Direct Help window Example here: Button requency !! gbo Medizintechnik AG Note! Available buttons are indicated in light grey. Unavailable buttons are indicated in dark grey. If you push an unavailable button, information about the use of this button is shown on the screen automatically. Version 1.2 Duodynator 16 3.4 Settings Using the Settings button to access the setup menu of the Duodynator. In this menu, parameters such as languages, output of different sounds, eg for the end of treatment and various treatment parameters are defined. Also the access to service is located in the settings menu. Only if no therapy is active, you can switch to the setup menu. !! Note! Only if no therapy is working, you can switch to the setup menu. The following items are available in the Settings menu: Display - Setting the national language - Calibration of the touch screen. Audio - Setting the system sounds like the end of therapy-tone, error tone, etc. The sounds can be heard and assigned to the corresponding functions. A sound can also be switched off. - Repetition of the therapy end sound (Never, 2 Minutes, 10 Minutes) - Breaks between the repeated therapy end sound (Yes/No) - Repetition of the error sound (Never, 2 Minutes, 10 Minutes) - Breaks between the repeated error sound (Yes/No) gbo Medizintechnik AG Version 1.2 Duodynator 17 Therapy - Setting the carrier frequency (2 to 10 kHz in 2 kHz steps) - Temporary deactivation of the intensity monitoring until the next switching on the device (On/Off) - Automatic pump stop after the end of treatment. (On/Off) - Automatic switch on the pump when selecting a current from the Favorites list (On/Off) Service - Access to the service area Service area with access to service. The service is reserved for service partners and helps in the search for faults in the hardware. Release of the software. Resetting to the factory settings. gbo Medizintechnik AG Version 1.2 18 Duodynator 4 Therapy 4.1 General guidelines for therapy Always observe the instructions given to the electrode positioning (see Chapter5.1). The maximum output power per channel is 5000 mW. When this value is reached, the intensity can not be further increased. Depending on the selected current type limits for the current value can be considered (see Appendix for details). Please note the maximum current density for the electrode which are defined in Table 1, Table 2 and Table 3. Depending on the particular application plate electrodes or the suction electrodes can be used. When plate electrodes are used, they are connected to the patient cable. Channel I is indicated by the red color. Channel II is indicated by a blue color. According to the used channel the red or blue channel must be selected on the unit to change the current for this channel. If suction electrodes are used, a Neoserv must be present and connected. Instead of the patient cable, the cable of the Neoserv is connected to the socket of the Duodynator. The suction function is operated using the suction flyout. In the suction flyout the suction can be switched on and off, the suction strength can be chosen within certain limits and the suction massage frequency can be set. 4.2 Selection of therapies 4.2.1 Selection of therapy by Other therapies In this selection all low, all medium-and all self-defined currents are filed. The selection is made from a list which is filtered. Thus, only low-frequency monophasic, only low-frequency biphasic, only medium frequency or user-defined currents can be displayed from the appropriate list and then selected. If Interference is used, the selection is only between standard and Own therapies. 4.2.2 Selection of therapy by indications In Duodynator an indication menu is integrated. This provides a list of programs with pictures indication to the electrode positioning specify the parameters (current form, possibly modulating frequency and duration). This treatment parameters are indicative and recommendations are the responsibility of the treating physician. gbo Medizintechnik AG Version 1.2 Duodynator 4.2.3 Selection of therapy from the favorites list The Favorites list can be filled by the user as desired. Thus, the users can define the order of his frequently used therapies by himself. Indications own therapies and individual treatment settings may be transferred to the Favorites list. A simple push on the button loads the therapy from the favorite list as current therapy. 19 Spondylitis Achilondynie Tennis elbow The Favorites list can be easily filled. Select a treatment from the list of indications, the list of other therapies or set the parameters individually. This therapy can now be selected by pressing and holding ( 2.5 seconds) the corresponding button on the right location of the favorites list. One no longer required entry can be easily deleted by push away to the right. 4.2.4 Individual settings In the home screen there is the possibility to change parameters for a selected current waveform within certain limits. The duration can be changed accordingly. The current form as newly generated can be directly applied. It can be stored in the Favorite list. There is also the possibility to save this modified current form as "Own Therapy" under a user-specified name. These self-defined therapies can then be retrieved by the use of the button "Other therapies" with the sub-selection "Own therapies". !! !! !! gbo Medizintechnik AG Note! After switching on the device the therapy last used will be loaded automatically. Note! After the change between single-circuit and interference therapies and therapies previously used will be reloaded each. Note! For the polarity of the connection cable applies: White cable connector or the interrupted circle on Neoserv Black cable connector or closed circle on Neoserv Version 1.2 Duodynator 20 4.3 Implementation of the treatment 4.3.1 Treatment with interference currents 1. Turn on the power switch on the back of the unit. 2. The unit performs an automatic self-test of all functions. 3. Error free self-test is completed by displaying the Home screen. 4. Connect the accessory for interference currents to the socket on the right side, if necessary, connect the cable of the Neoserv. 5. Apply the electrodes to the patient (see section 5.1). 6. 7. 8. 9. 10. Press the button interference = . The last selected therapy is automatically loaded. If necessary, change the therapy as described in chapter 4.2 "Selection of therapies" If necessary, change the parameters and the duration for therapy. Turn the intensity up slowly until the interference current is clearly perceptible, but not loosen muscular contraction duration from. At the end of treatment, the Therapy-end signal sounds and the intensity automatically goes to "0.0". 4.3.2 Therapy with single channel currents 1. Turn on the power switch on the back of the unit. 2. The unit performs an automatic self-test of all functions. 3. Error free self-test is completed by displaying the Home screen. 4. Connect the accessory for single-circuit currents in the socket on the right side, if necessary, connect the cable to the Neoserv. 5. Apply the electrodes to the patient (see chapter). 6. 7. 8. 9. 10. 11. Press the button single channel = . The last selected therapy is automatically loaded. Select a channel button channel I or II. The selected channel is connected to the detail window. If necessary, change the therapy as described in chapter 4.2 "Selection of therapies" If necessary, change the parameters and the duration for therapy. Turn on the intensity knob until the desired stimulus success occurs. At the end of treatment, the Therapy-end signal sounds and the intensity automatically goes to "0.0". gbo Medizintechnik AG Version 1.2 Duodynator 21 4.4 Combination therapy with ultrasound 4.4.1 General information The Duodynator may only be operated with the Sonostat of gbo Medizintechnik AG. When operating the Duodynator in combination with other devices gbo Medizintechnik AG assumes no product liability and warranty. !! Note! If a different ultrasound device is connected, the combination have to be approved according EN 60601-1 as a system. The necessary connection between the two devices is the input jack on the back side of the Sonostat. The device's internal flow path is activated for the selected ultrasound probe. Warning! !! gbo Medizintechnik AG Observe the operating instructions of the ultrasonic therapy device (Sonostat)! The ultrasound therapy must not be operated with the current form of electroplating due to the acidification of the contact gel. A current density of 2 mA/cm2 should not be exceeded. Disable the current monitoring (Chapter 3.4 Settings) so that a smooth course of therapy is possible. Note! Combination therapy should be performed only with biphasic currents. We recommend medium frequency currents for the combination therapy. Use a conductive electrode gel to ensure a flow of current. Version 1.2 22 Duodynator 4.4.2 Procedure for combination therapy 1. Select the current form from the Duodynator. 2. Set the desired modifications. 3. White plugs has a positive polarity in the primary position, while the counter electrode - the metallic surface of transducer - is negative. Connect the white plug of the patient cable to the neutral electrode and the black one with the Sonostat. 4. Apply the neutral electrode. 5. Select the desired treatment head by pressing the button head left and head right. 6. Choose an own therapy, an indication or the individual setting on Sonostat. 7. Bring plenty of contact gel to the sonicated area of the patient. Move the transducer surface under light pressure to the skin. 8. Set the current intensity so that the patient experiences a significant irritant effect on the stimulation current therapy unit by turning the intensity knob. If the patient feels a pain, reduce the stimulation current intensity. 9. Press the Start button to begin the Sonostat to the ultrasonic treatment now. 10. Move the transducer surface under light pressure with circular or straight even strokes on the area to be sonicated. 11. At the end of treatment, the selected in the settings Therapy-end signal is heard. The power is automatically turned off and the ultrasonic intensity is automatically set to 0.0. 12. Clean the probe from the contact means. 13. When the treatment duration of the Duodynator is the elapsed, the selected in the settings Therapy-end signal and the intensity is automatically set to 0.0 sound. gbo Medizintechnik AG Version 1.2 Duodynator 23 5 Electrodes The therapy can be realized without any problem with suction electrodes, conductive rubber electrodes or self-adhesive electrodes. Conductive rubber electrodes are appropriate for large-area treatments. 5.1 Electrode positioning The positioning of the patient and/or muscle to be treated is very important. The therapy shall always be carried out in a comfortable and relaxed position. The joints shall be located in an angular position, so that they are placed in a mid-position, from which both the flexor as well as the extensor muscles can be stimulated. In general the preparation and application of the electrodes is carried out as follows: 1. 2. 3. 4. 5. 6. 7. 8. Always put a wet electrode intermediate layer or electrode pocket between the electrode and the skin in order to avoid current sensations on the skin. The layer must always be about 1 cm larger than the electrode itself. Put the electrode completely into the electrode pocket, so that the pocket protrudes on the open side with about 1 cm. After multiple use the electrode intermediate layer or electrode pocket can slightly shrink. If the distance of about 1 cm is no longer given, the intermediate layer or pocket must be replaced. Prior to the initial use, the macroporous intermediate layers and pockets made of viscose sponge must be thoroughly washed out under running water to remove manufacturing residues. To moisten the intermediate layer or pocket put them into normal tap water, or better into 1% salt solution. The intermediate layers or pockets should be soaked; remove them and let them drop; do not wring them out. If necessary, flatten deformed electrodes, insert them into the pocket and/or put them on the intermediate layer. Put them on the area to be treated and fit them to the given body surface. Use only thick and well moistened sponges. Apply the holding strap in a way that the electrode fits completely. The sponge pockets or intermediate layers have to be cleaned after the expiration of treatment, see chapter 6.5.7. ! gbo Medizintechnik AG Note! Analogously, the above described also for use with suction electrodes. Version 1.2 Duodynator 24 Warning! Do not apply the electrodes on skin injuries. Even minor abrasions can cause a burning to the patient. Herewith the intensity of current by the patient can be erroneously judged. If this cannot be avoided, apply zinc ointment to cover. The electrodes must adhere completely to the skin in order to avoid excessive local current density. Otherwise erythemas, and sometimes even burns may occur. Current densities exceeding 2 mA/cm² require the special attention to the operator. It is recommended not to exceed the current density of 0,2 mA/cm2 in case of galvanization and 0.1 mA/cm2 in case of iontophoresis. If currents with galvanic portions are used special attention have to be kept. Keep care that the electrode sponges are always moistened very good. Do not use one way (self adhesive) electrodes in case of currents with galvanic portion, there is the danger of acid burns!! Pieces of jewellery and glasses have to be taken off during the treatment. 5.2 Single-pole electrodes Single-pole electrodes are applicable for all therapy currents. For large-area treatment we recommend to use large plate or conductive rubber electrodes. Both electrode types have to be connected to the device with a patient cable. The electrode positioning is realized as described in chapter 5.1. The electrode size depends on the area that should be passed by the current. Under small electrodes the current flow will be more concentrated and more localized than when applying large electrodes. The application area depends on the clinical picture. Electrode Surface Rubber electrodes 8 cm x 12 cm Rubber electrodes 11.5 cm x 17.5 cm 96 cm2 201 cm2 Maximum current / Galv / iontophoresis 192 mA 19.2 9.6 400 mA 40 20 Table 1: Maximum currents (rms) for Rubber electrodes gbo Medizintechnik AG Version 1.2 Duodynator 25 5.3 Suction electrodes Instead of the above-mentioned electrodes, suction electrodes can be used for faster application, in connection with the suction massage device. Single-pole suction electrodes are applicable for all therapy currents. For this please plug in the connection cable of the Neoserv to the socket of the current stimulation device Duodynator. Suction electrode Surface Electrode plate 60 mm with sponge 60 mm Electrode plate 90 mm with sponge 90 mm 28 cm2 63.5 cm2 Maximum current 56 mA 127 mA Table 2: Maximum currents (rms) for suction electrodes gbo Medizintechnik AG Version 1.2 Duodynator 26 5.4 Bipolar electrodes The bipolar electrodes can be used for the duodynamic interference currents. The conductive rubber electrodes of the two current circuits are located in two flexible bipolar duo electrode (I and II) and attached to a common patient cable. There are two sizes available (small and standard). Electrode pockets are necessary for application and fixing material for bandage (see accessories). Each bipolar electrode is placed into a well wetted pocket so that the black conductive rubber electrodes face the humidity carrier. The reverse side of the pocket consists of transparent synthetic material in order to be able to check the correct positioning of the electrode. Electrode position: A) If the electrodes are placed opposite to each other (transverse current flow, transregional), the cable connections must point in opposite directions. B) If the electrodes are placed on one side (longitudinal current flow), their cables must point in the same direction. Only in the case of these electrode positions the flow paths of current of the two circuits can transpose and optimal duodynamic stimulation currents are generated. In special cases (e.g. depending on the application in the case of shoulder-hand syndrome) it is possible to deviate from this general rule. Electrode Duo-Electrode small Duo-Electrode large Surface Maximum current 12 cm2 24 mA 27 cm2 54 mA Table 3: Maximum currents (rms) for Duoelektroden gbo Medizintechnik AG Version 1.2 Duodynator 27 6 Maintenance 6.1 Duodynator Functionality, reliability and safety characteristics of the Duodynator are guaranteed only upon handling the device in accordance with the operating instructions. Safety control, maintenance work, repair work and modifications must only be carried out by the manufacturer or by service agents authorized by him. In case of a failure, parts which influence the safety of the device must only be replaced by original spare parts of the manufacturer. The electric installation must correspond to the requirements in accordance with VDE/IEC. The device does not contain any parts which need maintenance work done by the user. 6.2 Neoserv The Neoserv is a suction application device. An under pressure is generated in the device which sucks the air from electrodes into the device. In the device a water-and dirt separator keeps liquids away from the pump liquids. This container is provided with a water level control. When filling the container beyond a certain limit, a message is displayed which recalled that the container needs to be drained. Hold a container ready and pull the hose to empty the container at the back of the device from the lock nipple. Turn the hose down and let the liquid of the container drain into the receiving vessel. Is all the liquid out of the container, put the hose back on the sealing nipple. At the annual safety inspection, the service technician should clean the container. This is accessible from the rear of the Neoserv. First drain the tank as described above. Then tilt it slightly backwards and unscrew the container. You can now clean it under running water and screw back into the machine. gbo Medizintechnik AG Version 1.2 28 Duodynator 6.3 Safety checks The device is subject to the provisions of the Medical Device Directive. The safety controls have to be carried out on the basis of this directive. Thereby, the operator regulation has to be observed in particular. Irrespective of the legal rules or beyond the scope of the Medical Device Directive, it is madatory to have the device checked at 12-months intervals by the manufacturer or by a maintenance service authorized by him. The review must consist at least of the following criteria: Electrical safety check in accordance with the test plan of the manufacturer Review of the device in respect of external integrity Review of all display and operating elements in respect of damages Review of all inscriptions in respect of immaculate legibility Review of power supply cord and all patient connecting cables Functional check 6.4 Disposal of equipment and accessories According to the WEEE Directive 2002/96/EG (waste electrical and electronic equipment) this device must not be disposed of with the domestic waste. The device must be returned to the manufacturer for disposal. The manufacturer is committed to guarantee the disposal of all devices marketed. This is also indicated by the WEEE sign (crossed out waste container). gbo Medizintechnik AG Version 1.2 Duodynator 29 6.5 Cleaning, Disinfection and carePreventive inspection 6.5.1 Cleaning the unit Clean the device with a clean, lint-free cloth dampened with water and mild detergent. Please do not use abrasive cleaners. Fingerprints on the display can be removed with a dry cloth or isopropanol. Warning! Do not hold the device under running water and do not use liquid cleaners! Before cleaning or disinfecting always pull out the mains plug from the wall outlet! The Duodynator is suitable for wipe disinfection. It is important to ensure that no liquids get into the unit. Do not wet plugs or sockets. The device must not be sprayed for cleaning or disinfecting. The device and its accessories are not suitable for heat sterilization or sterilization with gases. 6.5.2 Cleaning of the Electrodes You can clean the electrodes after a treatment by using some warm water (appr. 40 °C) and a soap suds on the conductive (black) side. Dry the electrodes with a cleaning tissue or let them air-dry. The cleaning process removes the film left by the Aloe spray or the contact spray and the electrodes will regain a good conductivity. 6.5.3 Disinfecting the Electrodes The rubber electrodes can be disinfected by spray/wipe disinfection. Spray onto the black side of the electrodes, leave to soak and wipe off with a lint free cloth. (Please follow the recommendations of the manufacturer.) We recommend Bacillol-AF for the disinfection of the electrodes. !! Note! The conductivity of the electrodes is optimized by the use of a certain amount of graphite. Consequently, when using and disinfecting the electrodes, black color may come off. 6.5.4 Cleaning of the Suction Electrodes You can clean the electrodes after a treatment by using some warm water (appr. 40 °C) and a soap suds. Dry the electrodes with a cleaning tissue or let them air-dry. gbo Medizintechnik AG Version 1.2 30 Duodynator 6.5.5 Disinfecting of the Suction Electrodes The suction electrodes can be disinfected by spray/wipe disinfection. Spray onto the black side of the electrodes, leave to soak and wipe off with a lint free cloth. (Please follow the recommendations of the manufacturer.) We recommend Bacillol-AF for the disinfection of the electrodes. 6.5.6 Cleaning of the elastic straps The eleastic straps can be washed in a washing machine. Please observe the washing instructions of the sewed label or the instructions on the label of the packaging. 6.5.7 Cleaning of the Electrode Sponges and Electrode Pockets The Electrode sponges and pockets can be washed in a washing machine with 95 °C. or be disinfected with disinfectant solution. We recommend Dismozon® pur (chemical agent: Magnesium monoperoxyphthalat Hexahydrat). !! Note! After desinfection the sponges and pockets have to be wringed out closely at least 6 times under warm running water! gbo Medizintechnik AG Version 1.2 Duodynator 31 7 Warnings and hazards Warning! For patients with implanted electronic device electrical stimulation treatment is to be carried out only after having checked any risks. Turn off cellular phones and radiophones or place them in a distance of 3 m from the device. Cardiac pacemakers are extremely vulnerable. Here the therapy should only be carried out under continuous pulse and ECG control. If the patient and/or the patient cable is in the direct range of a highfrequency, short-wave or micro-wave therapeutic device, a damage to the device or an injury to the patient cannot be excluded. Please keep a clearance distance of 3 m. A simultaneous connection of the patient to a high-frequency surgery device can lead to burns under the electrical stimulus electrodes. The unit is not designed to be operated in places with the inherent risk of explosions. If it is used in dangerous areas of anesthesia departments, the possibility of an explosion cannot be excluded. Current densities exceeding 2 mA/cm² require the special attention to the operator. It is recommended not to exceed the current density of 0,2 mA/cm2 in case of galvanization and 0.1 mA/cm2 in case of iontophoresis. If currents with galvanic portions are used special attention have to be kept. Keep care that the electrode sponges are always moistened very good. Do not use self-adhesive electrodes at currents with galvanic portion; they contain corrosive! The electrodes must be (fully covered) rest with the entire electrode surface in order to avoid local current density peaks. Otherwise, skin redness may occur in severe cases even burns. !! gbo Medizintechnik AG Note! In case of any visible failure contact gbo Medizintechnik AG or one of the service agencies authorized by gbo Medizintechnik AG immediately. Version 1.2 Duodynator 32 8 Contraindications Despite the low dosage is definite contraindications have emerged. Warning! Stimulation should not be applied in the following syndromes: Open wounds in the treatment area Malignant tumors in the treatment area Feverish conditions Stimulation current to be applied to the following symptoms only after consultation with the doctor: Patients with implanted electronic devices Patients with metallic prostheses (only biphasic currents should be used, preferably medium-frequency current used) Pregnancy Additional precautions! In patients with diagnosed heart problems In treatment on areas of the skin which lack normal sensation assets For muscle stimulation after recently running operations in which muscle contraction may disrupt the healing process !! Note! This list is not exhaustive. In individual cases the attending doctor should decide on contraindications and criterias for the treatment. In case of all visible failures contact gbo Medizintechnik AG or one of the service agencies authorized by gbo Medizintechnik AG immediately. gbo Medizintechnik AG Version 1.2 Duodynator 33 9 Explanation of symbols used 0123 CE - Conformity mark Read the instruction! Caution! Application part of Type BF (floating). This product complies with WEEE Directive 2002/96/EG (waste electrical and electronic equipment). Separate collection for electrical and electronic equipment. The waste removal at the end of the service life will be done by the manufacturer. gbo Medizintechnik AG Version 1.2 Duodynator 34 10 Technical Data Mains voltage and Frequency: Power consumption: Main fuses: Max output Power Accuracy of values displayed Permissible load impedance Suction Neoserv Suction massage Neoserv Applied part Protection Mode of operation: Protection class: Degree of protection: Protection class of housing: Dimensions: Duodynator: 100 - 240 V / 50-60 Hz Neoserv: 100 - 240 V / 50-60 Hz Duodynator: Max 65 VA Neoserv: Max. 105 VA (incl. Duodynator) Duodynator: T 2A H 250V Neoserv: T 5A H 250V 5000 mW = 100mA to 500 ohms per channel Current: + / - 10% 30 8 k 40-300 mbar 0-20 pulses / min Contact surfaces at the electrodes. IP X7 (Duodynator and combination) Continuous operation (Duodynator and combination) I BF (Duodynator and combination) IP X0 (Duodynator and combination) Duodynator 27 cm × 19.3 cm × 28 cm (W × H × D) combination Duodynator and Neoserv 27 cm × 27 cm × 28 cm (W × H × D) Weight (without Duodynator: 4,4 kg accessories): Combination Duodynator-Neoserv: 7.7 kg Display: 10.1 "TFT LCD with touch screen Environmental conditions: Operation Temperature range +10 ° C ... +35 ° C of the relative humidity 30 ... 75% device: Transport Temperature range -10 ° C ... +50 ° C and relative humidity <90%, non-condensing storage: By request of technical personnel gbo Medizintechnik can offer spare part lists and circuit diagrams. The IEC connector is used for all-pole disconnection from the mains. gbo Medizintechnik AG reserves the right to change design and specifications without prior notice. gbo Medizintechnik AG Version 1.2 Duodynator 35 11 Accessories Duodynator Included accessories: 032-0-2000 1 1 Power cord (Black) User manual Article no. 027-4-6001 032-7-0017 Other accessories for the Duodynator: Description Therapy set Duodynator (connection cable, 4 conductive rubber electrodes 8 x 12 cm, 10 sponge bags, 4 Velcro) Duo-electrode set, standard (Duo electrode pair standard, electrodes bags, rubber bands) Duoelektroden pair, small Duoelektroden-pair standard, Electrodes bag, small (10 pieces) for Duoelektrode small Electrodes bag, standard (10 pieces) for Duoelektrode standard Connection cable for Duodynator rubber electrodes 8 cm x 12 cm (2 pieces) rubber electrodes 11.5 cm x 17.5 cm (2 pieces) Sponge bag for rubber electrodes 8 cm x 12 cm (10 pieces) Sponge bag for rubber electrodes 11.5 cm x 17.5 cm (2 pieces) Elastic strap with velcro blue (2 pieces) Electrode handle with ball and disc electrode Adapter cable for handle electrode Device cart basic rack Mounting kit Duodynator (Equipment storage and electrode holder) Recommended accessories are highlighted in grey! Article no. 032-0-2020 45-38-310EH720 45-38-781EH725 45-38-773EH725 45-38-807EH725 45-38-799EH725 032-0-2010 017-0-0047 017-0-0046 45-38-203EH725 020-453813 011-0-0033 014-0-0088 017-0-0064 026-0-3000 026-0-3030 The picture shows the device cart for the Duodynator It consists of the baseic rack and the mounting kit Duodynator gbo Medizintechnik AG Version 1.2 Duodynator 36 12 Accessories Neoserv 032-0-4000 1 1 Power cord (Black) Installation Instructions Article no. 027-4-6001 032-7-0019 Other accessories for the Neoserv: Description Standard suction electrodes set Article no. 032-0-2110 (2 x electrode hose red, 2 x electrode hose blue, 4 x suction electrode 60 mm, 4 x contact sponge) Electrode hose red, 1750 mm long 014-0-0050 Electrodes blue hose, 1750 mm long 019-0-0053 Suction electrode, 60 mm 014-0-0083 Suction electrode, 90 mm 014-0-0084 Contact sponge, 60 mm (4 pieces) 014-0-0086 Contact sponge, 90 mm (4 pieces) 014-0-0087 Short-circuit hose (when using only one channel) 014-0-0026 Connection cable "Neoserv ultrasound" Recommended accessories are highlighted in grey! 014-0-0014 !! gbo Medizintechnik AG Note! Use only original accessories to ensure the safe operation of the appliance. Version 1.2 Duodynator 37 13 Troubleshouting Each problem that occurs during operation of the unit will be shown in a message window on top of the display and also signalized by an acoustic tone. Most of the problems can be solved by the instructions displayed. In general: 1. The malfunction is shown on the display. 2. An acoustic signal is heard. 3. Follow the instructions on the display. Suggestions: Turn off and turn on the unit. A full selftest of all device functions is performed and the unit is reinitialized. If the unit does not come up to normal state, please call your local service. 13.1 Further errors symptom cause and action Device cannot be switched on, no display shown. Please check the main plugs and sockets. If necessary; contact your service agents or the manufacturer. No acoustic signal is heard. (End of therapy…) Please check the settings of the acoustic tones in the menu. The volume must be greater than 0. Please contact your service agent or the manufacturer if the problems cannot be solved by the measures mentioned above. Note! !! gbo Medizintechnik AG Please note that the unit must be placed on a plane horizontal surface. The device should neither be placed in front of radiators nor should it be covered with pillows or blankets while in operation. Do not cover the ventilation slots on the bottom of the unit either. Version 1.2 38 Duodynator 15 EMC Hints Comments According to the Medical Device Directive The Duodynator is a mains operated current stimulation device of protection class I. The device is in accordance with the EC Medical Device Directive (93/42/EEC) and therefore carries the CE-sign with the number of the ”notified body for medical devices”. The respective graphical symbol is placed on the type plate. According to the Medical Device Directive, Duodynator is a device of class IIa. The manufacturer is only responsible for the security, operational reliability and functionality of the device if: * the device is used in accordance with the user manual; * the electrical installation of the location where the device will be used corresponds to the respective current requirements of electrical safety; * the device is not used in hazardous environments and humid locations; * the mountings, add ons, internal adjustments, modifications or repairs are realized only by personnel authorized by the manufacturer; * the operator regulation of this EC-directive is observed within the scope of the Medical Device Directive. You may obtain technical support by the manufacturer or the dealers or service authorized by the manufacturer. The manufacturer projects a product life of 7 years. Duodynator is an electronic device. Disposal has to be done according to regulations for electronic devices. Consumables have to be disposed as residual waste. On request, the manufacturer will provide you with further technical descriptions for all serviceable parts of the device, such as circuit diagrams, spare part lists and adjustment instructions as far as these are of use for the qualified technical staff of the user. Comments on electromagnetic compatibility (EMC) Medical, electrical devices are subject to special precautions concerning the EMC. They must be installed and operated according to the EMC-advice given in the accompanying documents. In particular medical, electrical devices may be influenced by portable and mobile RF-communication devices. The manufacturer guarantees the conformity of the unit with the EMC-requirements only when using accessories which are listed in the EC declaration of conformity. The usage of other accessories may cause an increased emission of electromagnetic disturbances or may lead to a reduced electromagnetic immunity. The unit must not be arranged physically close to other devices or stacked with them. If such an order is necessary nevertheless, the unit must be observed in order to check it for the intentional operation. You find more EMC-comments in the chapter “Warnings and Safety Precautions” of this manual as well as in the Technical Information on the next two pages. gbo Medizintechnik AG Version 1.2 Duodynator 39 In accordance with the EMC-regulations for medical products we are obliged by law to provide the following information. Guidance and manufacturer’s declaration — electromagnetic emissions The equipment is intended for the use in the electromagnetic environment specified below. The customer or the user of the equipment should ensure the compliance with this stipulation Emissions test Compliance Electromagnetic environment – guidance RF emissions, CISPR 11 Group 1 The equipment uses RF energy only for its internal function. Therefore, its RF emissions are very low and are not likely to cause any interference in nearby electronic equipment. The equipment is suitable for use in all establishments, including domestic establishments and those directly connected to the public lowvoltage power supply network that supplies buildings used for domestic purposes. RF emissions, Class B CISPR 11 Harmonic emissions, Class A IEC 61000-3-2 (*) Voltage fluctuation/flicker complies emissions, IEC 61000-3-3 (*) (*) Note: For devices with a power consumption between 75 W and 1000 W only. Guidance and manufacturer’s declaration — electromagnetic immunity The equipment is intended for the use in the electromagnetic environment specified below. The customer or the user of the equipment should ensure the compliance with this stipulation . Immunity test IEC 60601- test level Compliance level Electrostatic discharge (ESD), 6 kV contact IEC61000-4-2 8 kV air Electromagnetic environment – guidance 6 kV contact Floors should be made of wood, concrete or ceramic tile. If floors are covered with synthetic material, the relative humidity 8 kV air should be at least 30 %. Electrical fast transient/burst, 2 kV for power supply 2 kV for power supply Mains power quality should be that of a IEC 61000-4-4 typical commercial or hospital lines lines environment. 1 kV for input/output lines 1 kV for input/output lines Surge, Mains power quality should be that of a 1 kV differential mode 1 kV differential mode IEC 61000-4-5 typical commercial or hospital environment. 2 kV common mode 2 kV common mode Voltage dips, short interruptions <5% U Mains power quality should be that of a <5% U and voltage variations on power for ½ cycle typical commercial or hospital for ½ cycle supply input lines, environment. (>95% dip) (>95% dip) IEC 61000-4-11 If the user of the equipment requires 40% U 40% U continued operation during power mains for 5 cycles for 5 cycles interruptions, it is recommended that the 60% dip) 60% dip) equipment be powered from an uninterruptible power supply or a battery. 70% U 70% U for 25 cycles for 25 cycles 30% dip) 30% dip) <95% U for 5 s (>5% dip) Power frequency (50/60 Hz) 3 A/m magnetic field, IEC 61000-4-8 <95% U for 5 s (>5% dip) 3 A/m Power frequency magnetic fields should be at levels characteristic of a typical location in a typical commercial or hospital environment. Note: U is the a.c. mains voltage prior to application of the test level. gbo Medizintechnik AG Version 1.2 Duodynator 40 Guidance and manufacturer’s declaration — electromagnetic immunity The equipment is intended for the use in the electromagnetic environment specified below. The customer or the user of the equipment should ensure the compliance with this stipulation. Immunity test IEC 60601- test level Compliance level Electromagnetic environment – guidance Portable and mobile RF communications equipment should be used no closer to any part of the equipment, including cables, than the recommended separation distance calculated from the equation applicable to the frequency of the transmitter. Conducted RF, IEC 61000-4-6 Radiated RF, IEC 61000-4-3 3 Vrms 150 kHz to 80 MHz 3 V/m 80 MHz to 2.5 GHz Recommended separation distance: d=1.2P 3 Veff 3V/m d=1.2P for 80 MHz to 800 MHz d=2.3P for 800 MHz to 2.5 GHz Where P is the maximum output power rating of the transmitter in watts according to the transmitter manufacturer and d is the recommended separation distance in meters (m). Interference may occur in the vicinity of equipment marked with the following symbol: Recommended separation distances to portable and mobile RF communication equipment The equipment is intended to be operated in an electromagnetic environment where radiated RF interference is controlled. The user can help to avoid interferences by meeting the minimum separation distances between portable and mobile RF communication equipment (transmitters) according to the maximum output power of the communication equipment. Rated power of the Separation distance according to the tranmission frequency (m) transmitter (W) 150 kHz to 80 MHz 80 MHz to 800 MHz 800 MHz to 2.5 GHz d=1.2P d=1.2P d=2.3P 0.01 0.12 0.12 0.23 0.1 0.38 0.38 0.73 1 1.2 1.2 2.3 10 3.8 3.8 7.3 100 12 12 23 gbo Medizintechnik AG Version 1.2 Duodynator 41 16 Annex I List of low frequency currents Current form Graphic Galvanic current Pulse duration in ms Pause duration in ms DC portion in% Frequency in Hz Maximum Voltage Vpeak Maximum Current in mApeak - - 100 0 100 50 Ultra Stimulation 2.0 5.0 28.6 143 100 70 Faradic current 1.0 19.0 2.5 50 100 100 DF Diphase fixed - - 63 100 100 70 CP Courtes périodes - - 47.25 50/100 100 70 MF Monophasé fixed LP Longues périodes MM Monophasé modules RS Rhythme syncope Impulse galvanization IG 30 Impulse galvanization IG 50 Frequency modulation FM / 7 - 14 Hz Surged current aS Surged current aSL Tens 10 10 31.5 50 100 70 - - 46 50/100 100 70 - - 20 100 100 70 - - 15.25 50 100 70 30.0 50.0 18 12.5 100 70 50.0 70.0 0.3 8.3 100 70 0.5 70.9 to 0.4 142.4 7-14 100 100 - - 32 0.2 100 70 - - 45 00:09 100 70 1.5 to 200 100 100 0.2 4.8 to 666 <3.5 Tens burst 1 4-666 <10 1.5 to 200 100 100 E100 100,0 500,0 7,14 1,67 100 100 E200 200,0 1000,0 7,14 0,83 100 100 !! gbo Medizintechnik AG Note! All low frequency currents except Galvanic current are also available as metal- acceptable biphasic variant. Version 1.2 Duodynator 42 17 Annex II List of the medium-frequency-currents Current form Graphic Pulse duration T in ms Pause duration R in ms DC share in% Frequency in Hz Maximum Voltage Vpeak Maximum Current in mApeak single-circuit Russian stimulation (Kots) Gym Current MF sinusmodulated 10 800 10 0 50 0 0,25 0,5 0.1 200 0 100 100 - 100 100 to 100 100 to 100 100 to 100 100 to 100 100 double circuit Interference 0 Dipole vector 0 Isoplanar Vector 0 gbo Medizintechnik AG 0.1 200 0.1 200 0.1 200 Version 1.2 Duodynator 43 18 Annex III List of medium-frequency-programs Program Step 1 Lipolysis 2,5 - 3,5 Hz Cellulite 2,5 - 3,5 Hz 10 min 2,5 - 3,5 Hz 8 min 2,5 - 3,5 Hz 5 min Fat Burning Body Shaping Electric massage 0.5 to 3 Hz Shaking 3-10 Hz Sports 20 Hz 5 s / 5 s / 20 s 0.2 to 0.5 Hz Rehab Mobilization Muscle pump Trauma Lymphatic drainage Edema Pain Universal Step 2 10 - 20 Hz 5 min 10-30 Hz 2 min 20 - 30 Hz 05/05/20; min Remark 150-200 Hz 5 5 min 1.5 Hz * Adjustment phase 0.5 Hz 14 s 0.3 Hz 1-8 Hz 22 s 10 Hz 1/2 Time. 0.3 Hz 10 min 10 Hz 100 Hz 1/2 Time 10 Hz 10 min 90-110 Hz 1 s / Freq. 0.1 to 200 Hz 1 s / Freq. Step 3 1.5 Hz * Adjustment phase 1.5 Hz * Adjustment phase 1.5 Hz * Adjustment phase 10-30 Hz 10 min 1.5 Hz * Adjustment phase * Adjustment phase 4 seconds Note! !! gbo Medizintechnik AG This list also applies also for interferential currents. Currents for muscle stimulation are excluded in the Interference treatment. Version 1.2 Duodynator 44 19 Index A Accessories Duodynator 35 Accessories Neoserv 36 B Bipolar electrodes 26 C care 29 Cleaning 29 Combination therapy 21 Connect and switch on 8 Contraindications 32 D Desinfection 29 Device description Duodynator 6 Device description Neoserv 7 Direct help 15 E Electrode positioning 23 Electrodes 29 EMC Hints 38 H Home screen 11 Home screen interference 12 I indications 13 installation 8 Intended use 6 gbo Medizintechnik AG low frequency currents 41 M mains voltage 8 Maintenance 27 medium- frequency-currents 42 medium-frequency-programs 43 O Operation 10 P polarity 19 precautions 32 protective earth 9 S Safety checks 28 SD card 9 Settings 16 Single-pole electrodes 24 suction electrodes 25 Suction flyout 14 symbols 33 T Technical Data 34 Therapy 18 transport 8 Troubleshouting 37 W K Knob 11 L Warning 21 warnings 8, 31 Warnings 24 Version 1.2 Duodynator 45 Notes gbo Medizintechnik AG Version 1.2 46 Duodynator Notes gbo Medizintechnik AG Version 1.2 Duodynator gbo Medizintechnik AG 47 Version 1.2