1
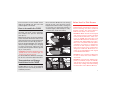
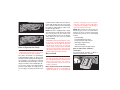
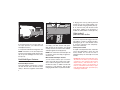
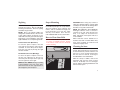
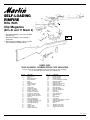
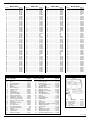
Owner's Manual
SELF-LOADING
RIMFIRE
Rifle With Clip Magazine
(22 L.R. and 17 Mach 2)
IMPORTANT
This manual contains operating, care and maintenance instructions. To
assure safe operation, any user of this firearm must read this manual
carefully. Failure to follow the instructions and warnings in this manual
can cause accidents resulting in injury or death. This manual should
always accompany this firearm, and be transferred with it upon change
of ownership.
The warranty card attached to the cover must be filled out and mailed
within 10 days of purchase.
State
City
City
Zip Code
(signature of owner)
Date of Purchase
State
Your Occupation
❑ Farm
❑ Student
❑ Office
❑ Industrial
❑ Professional
❑ Managerial
Was this product a gift?
❑ Yes
❑ No
Your Age Group
❑ Under 18
❑ 18-24
❑ 25-34
❑ 35-49
❑ 50+
Which of these influenced your purchase?
❑ Previous experience with product
❑ Brand reputation
❑ Marlin web site
❑ Marlin advertisement
❑ Marlin catalog
To help us provide new and better products we would appreciate your answers to the following questions.
Name of Store where purchased
e-mail
Address
Owner
Please Print
Serial Number
I have read the Owner’s Manual
and request registration of my warranty.
Model _______________________________________________________________________________________________________
To insure warranty protection, this card must be completed and mailed within 10
days of purchase.
WARNING: KEEP THIS FIREARM OUT OF THE REACH OF CHILDREN,
UNAUTHORIZED INDIVIDUALS, AND OTHERS UNFAMILIAR WITH THE
SAFE HANDLING OF FIREARMS.
LIMITED WARRANTY AND CERTIFICATE OF OWNERSHIP
WIT
H 5WAR
Y
RANEAR
TY
LIMITED WARRANTY
The Marlin Firearms Company
FIVE YEAR LIMITED WARRANTY AGAINST
DEFECTS IN MATERIAL & WORKMANSHIP
MFC
P.O. Box 248
North Haven, CT 06473-0903
This firearm warranty is good only to the ORIGINAL OWNER who has registered his ownership with The Marlin Firearms Company at 100 Kenna Drive, North Haven, Connecticut.
WARRANTY and CERTIFICATE OF OWNERSHIP card must be completed and mailed
to The Marlin Firearms Company at the above address WITHIN TEN (10) DAYS of
purchase to insure the protection of the warranty. NOTICE of defect in materials
and/or workmanship must be received by the company WITHIN FIVE (5) YEARS from
the date of purchase.
Normal wear, or damage resulting from neglect, abuse, alteration, or repairs not
made or authorized by The Marlin Firearms Company or use of non-Marlin parts are
not covered by the warranty.
THIS WARRANTY GIVES YOU SPECIFIC LEGAL RIGHTS, AND YOU MAY ALSO HAVE
OTHER RIGHTS WHICH VARY FROM STATE TO STATE.
MARLIN'S PERFORMANCE UNDER
THE ABOVE WARRANTY
1. After notice of defect in material and/or workmanship is received by The Marlin Firearms Company, Marlin shall
send instructions for shipment of the firearm; and repairs will be made and the firearm returned within a
reasonable time after the firearm is received. Cost of shipping, insurance charges, etc. involved in returning the
firearm to the company shall be prepaid by the original owner.
2. Cost of parts and labor performed shall be provided without charge by The Marlin Firearms Company.
3. If The Marlin Firearms Company, after receipt of the firearm, determines that the defects in material and/or
workmanship were the result of abuse and/or neglect, or otherwise not covered by the warranty set forth
above, Marlin shall notify such owner to that effect and give an estimate for repair. In such cases, repair, return
shipping and insurance charges, etc. shall be paid by such owner.
4. In the event that The Marlin Firearms Company is unable to make warranty repairs to the firearm, it shall, within
a reasonable time after its receipt, notify the owner to that effect and give him the option either to receive a
replacement of the same model, if then available in its inventory, or to receive a refund, either of which,
if feasible, will be made through the store of purchase.
The Marlin Firearms Company
100 Kenna Drive, North Haven, CT 06473-0905
www.marlinfirearms.com
The instructions in this shaded section
apply to the 70PSS only. The rest of this
manual applies to all models.
How to Assemble the 70PSS
The 70PSS was shipped “taken-down” in
two parts. The stock, action and magazine comprise one part, the barrel the
other (See 1).
Match the flat surface on the rear (chamber)
end of the barrel with the flat surface in the
front end of the receiver, and insert the barrel
into the receiver as far as it will go. (See 2).
Turn the knurled takedown nut clockwise
with your fingers until tight. If you are going
to shoot extensively, tighten the nut
securely with the spanner wrench (provided), or a coin (See 3).
• WARNING: Check the takedown nut frequently to be sure it remains tight. If it
loosens, the rifle may not fire.
To disassemble the 70PSS for reinsertion
into its case, reverse the above instructions.
Transportation and Storage
Instructions for the 70PSS
If your 70PSS will be subjected to rough
handling while in its case, we recommend
that you use the foam insert provided, for
maximum protection.
Do not store the 70PSS in its case for long
periods of time, since moisture can be
trapped and condense inside, causing rust
or corrosion. For long term storage, it
should be lightly oiled and kept in a dry,
ventilated area, under lock and key.
Before You Use This Firearm
It is very important that you read and
understand this manual before using your
firearm. Warnings should be read and
heeded carefully. Also follow “Marlin's
Guide to Gun Safety”, in this manual.
• WARNING: Marlin firearms are designed
and manufactured to handle standard
factory-loaded ammunition which conforms to SAAMI (Sporting Arms and
Ammunition Manufacturers’ Institute Inc.)
standards with dependability and safety.
Due to the many bullet and load options
available, the element of judgement
involved, the skill required, and the fact
that serious injuries have resulted from
dangerous handloads, Marlin does not
make any recommendations with regard
to handloaded ammunition.
1
2
• WARNING: It is a violation of federal law
to alter or deface the serial number of
any firearm.
Inserting the barrel
3
• WARNING: Your rifle was shipped completely assembled (except the 70PSS)
and should not be used or disassembled
without fully reading and understanding
the instructions in this Owner's Manual.
Tightening the takedown nut
1
A
Safe Position
B
Fire (Off Safe) Position
How to Operate the Safety
• WARNING: Prior to firing, know and
understand the operation of the safety
by practicing with the rifle unloaded.
The safety mechanism is a round button
located behind the trigger. To put your rifle
on SAFE, hold it in the normal shooting position, pointed in a safe direction, and push
the safety button from left to right as far as it
will go. The safety is now on SAFE (See A).
To move the safety to the FIRE position,
push the safety button from right to left as
far as it will go. A red ring around the safe2
ty button will be visible when the safety is
in the FIRE position (See B). If the magazine is in place and the bolt is forward and
the trigger is pulled with the safety in this
position, the gun will fire.
NOTE: This rifle is equipped with a magazine disconnector. It will not fire if the magazine is not in place. Do not, however, use
the magazine disconnector as the primary
safety and never as a reason for unsafe
firearm handling.
• WARNING: Never disassemble the safety.
It has been correctly designed, fitted and
tested, and is not reversible. Any mechanical device can fail, however, so never rely
on the safety to justify careless handling.
Never use a firearm with a safety that does
not function properly. (See instructions for
factory maintenance in this manual.)
How to Load
Velocity cartridges only (not HyperVelocity); it will not function with Shorts,
Longs or Shot cartridges, and damage or
injury may result from their use.
NOTE: Our testing has shown that the
following types of 22 L.R. ammunition
produce the most consistent functioning
and the best accuracy in our self-loading
22 rifles:
• CCI Mini-Mag
• CCI Mini-Mag Hollow Point
• Federal Classic High Velocity
• Remington High Velocity
(Not Thunderbolt)
• Winchester Super X High Velocity
Rifles chambered for 17 Mach 2
ammunition:
Any commercially available 17 Mach 2
ammunition will function in your rifle.
• WARNING: Never attempt to load your
rifle with ammunition that does not meet
the cartridge designation stamped on the
barrel. Use only clean, dry, factoryloaded ammunition which conforms to
industry standards.
Rifles chambered for 22 L.R. ammunition:
• WARNING: Your rifle is a self-loading .22
caliber designed for .22 Long Rifle High
C
Releasing the magazine
D
Loading the magazine
• WARNING: Before loading your rifle,
always check the bore and chamber to
be sure they are free of grease, oil or
any other obstruction.
• WARNING: Your self-loading rifle is not
designed to be single-loaded and IT
WILL NOT FIRE unless the magazine is
locked in place. Always load cartridges
through the magazine as directed. Never
use the magazine disconnector as the
primary safety or as an excuse for
unsafe firearm handling.
1. Place safety on “SAFE”.
2. Depress the magazine release latch
(See C) and remove the magazine from
the rifle.
3. Pull bolt charging handle back and hold.
4. Push the bolt control lever up to the
“OPEN” position as indicated on the trigger guard (See G).
5. Insert up to 10 cartridges (7 for the
70PSS) as shown in D. With the rifle pointed in a safe direction, replace the loaded
magazine, being sure it locks in place.
6. Keeping fingers away from the trigger,
push the bolt control lever down to the
“CLOSE” position as indicated on the trigger guard (See H).
NOTE: Allow bolt to slam shut freely. Do
not attempt to assist the closing of the bolt
with your hand.
E
Cocked and Ready
1. Your self-loading rifle is cocked for firing as soon as the bolt is closed during the
loading operation as described above.
2. The rifle is ready to fire as soon as the
safety is pushed to the “FIRE” (off
“SAFE”) position.
Action locked open
How to Fire
How to Unload
1. Push the safety to the “FIRE” position
and, with the rifle pointed at the target,
squeeze the trigger. Since your rifle is
self-loading, it is ready to fire again after
each shot.
2. If you have not fired all cartridges in
the magazine at the target, be sure to
move the safety to the “SAFE” position
until you are ready to shoot again.
• WARNING: Before you unload, be sure
that the safety is on “SAFE” and the rifle is
pointed in a safe direction. Also, keep your
fingers away from the muzzle of the rifle.
• WARNING: Because of its self-loading
action, if the bolt of your rifle is completely
closed, you must assume that it is cocked
and loaded.
1. Depress the magazine release latch
as shown in C and pull the magazine out
of the rifle.
3
F
G
3. Engage the lock by pushing the bolt
control lever up and, while holding it up,
release the bolt charging handle (See G).
4. To close the bolt, push the bolt control
lever down. (NOTE: If the magazine is
loaded, this will chamber a round.) (See H)
What to do if
your rifle fails to fire
Clearing the action
2. Pull the bolt to the rear and lock it in
the open position (see “Manual” Bolt
Hold-Open Feature.)
3. Inspect the chamber and magazine well.
NOTE: If the bolt is in the closed position,
pull the bolt charging handle back manually to eject the cartridge left in the chamber (See F).
Bolt Hold-Open Features
Automatic “Last Shot”
Bolt Hold-Open Feature
This safety feature, as shown in F, is activated when the last shot in the rifle has been
fired (i.e. when the magazine and chamber
4
Manual bolt hold-open feature
are empty). The bolt will lock fully open.
With the bolt in this position, you should
visually check to be sure that the chamber
and clip magazine are empty (See E).
NOTE: The “automatic” bolt hold-open will
not function unless the empty magazine is
still in the rifle.
Manual Bolt Hold-Open Feature
1. This feature enables you to lock the
action open with live rounds in the magazine or with the magazine out of the rifle.
2. With the safety on “SAFE” and the rifle
pointed in a safe direction, pull the bolt
charging handle all the way back and hold it.
Misfires
If you have squeezed the trigger and nothing happens, remain in shooting position,
pointing the gun in a safe direction. Count
to 10, then unload the rifle completely.
(See “How to Unload”).
Underpowered Shot
A “squib” or underpowered shot, should not
occur if the ammunition is clean, dry, and
factory loaded. You can tell if a shot is
underpowered by the unusually low sound
it makes.
• WARNING: Because the bullet may actually still be in the barrel, you must unload
completely, (See “Manual” Bolt HoldOpen feature.) and determine, with a
cleaning rod, if there is an obstruction. If
there is, it should be removed by a qualified gunsmith. Otherwise, personal injury
or damage could result.
Sighting
Scope Mounting
Your rifle has been sighted-in and testfired at the factory. Due to individual
shooting characteristics, however, sighting
should be range verified.
Your rifle has a grooved receiver designed
to handle tip-off-type 22 scope bases.
They are made by Tasco, Weaver, and
others, and are available through your
local gun dealer. You may also order
directly from Marlin Gun Service.
Call 1-800-544-8892 for more information.
NOTE: Since the Model 7000 was
designed for varmint hunters, who use telescopic sights almost exclusively, it was
made with a receiver grooved for the appropriate rings. If you would like to have open
sights installed, see a competent gunsmith.
Vertical Correction (Elevation)
To raise the point of impact, raise the
rear sight, by moving the sight elevator
rearward. To lower the point of impact,
lower the rear sight, by moving the sight
elevator forward.
How to Clean Your Rifle
NOTE for stainless steel models:
Although stainless steel is corrosionresistant, it can rust. If the rifle gets wet,
dirty, or is subject to excessive handling, wipe down metal parts with oil or
a rust-inhibitor.
• WARNING: Never attempt to wipe down
or clean a loaded firearm. Follow
instructions under “How to Unload”
before cleaning.
Minor scratches can be “buffed out” of
stainless steel with a “Scotch-BriteTM Very
Fine” pad, available in hardware and
automotive supply stores.
Cleaning the bore
Horizontal Correction (Windage)
To move the point of impact to the left,
tap the rear sight base to the left. To
move the point of impact to the right, tap
the rear sight base to the right.
CAUTION: Before using any solvent or
other gun cleaning product, read the label
carefully to be sure it will not damage either
the finish, or any parts of this firearm.
H
Since modern ammunition burns very
cleanly, with normal use it is not necessary
to clean the bore of your rifle. However, if it
gets wet, or if any foreign material gets
into the action or barrel, cleaning as
described below is recommended.
With the safety on SAFE, remove the
magazine and clear the action several
times to be doubly sure no cartridges
remain. Pull the charging handle back and
lock the action open.
NOTE for the 70PSS: During assembly
or disassembly of the rifle, if the takedown nut moves the rear sight elevator, it
will change the point of impact.
Closing the bolt
5
I
M
K
Remove takedown screws
To clean the bore and barrel, use any
standard .22 caliber commercial cleaning
rod and cleaning patches. Clean the barrel
with powder solvent and wipe lightly with
gun oil after cleaning.
Cleaning the action
We recommend that you wear safety
glasses while disassembling this rifle.
We recommend cleaning the inside of the
receiver, bolt face, extractors, and breech
end of the barrel (around the chamber)
Remove action
after firing each 250 rounds. (Frequency of
cleaning may depend on brand of ammunition used.) A toothbrush and commercial
gun cleaning solvent will simplify the job.
(Be sure to follow manufacturer of gun
cleaner’s directions, as some chemicals
may damage the synthetic trigger guard.)
The steps listed below should be followed
carefully to assure proper disassembly,
cleaning and reassembly.
Step #1 — With the safety on SAFE,
remove the magazine and clear the
Remove charging handle, recoil spring,
and spring guide
action several times to be sure the chamber is empty. Close the bolt (See H).
Step #2 — Unscrew takedown screws A
and B as shown in I. (For the 70PSS, one
end of the spanner wrench is a screw driver.) Remove the trigger guard assembly.
Separate the rifle into two segments, the
stock and the barreled action.
Release assembly post by squeezing and
pushing in slotted end. Pull post free of
N
J
L
Remove assembly post
6
Lift muzzle end of bolt from receiver
Support recoil spring to prevent kinking
action. (See J). Remove action by sliding it
to the rear and up (See K).
O
Step #3 — With the action removed, the
bolt, charging handle, recoil spring and
spring guide may now be removed.
Reinstall the trigger guard assembly and
tighten takedown screws.
• WARNING: Recoil spring is compressed
at this point and, if not handled properly,
can fly from the receiver.
Pull the charging handle back slightly
and, with the forefinger of your other
hand, lift the muzzle end of the bolt from
the receiver (See L).
As you begin to lift the bolt out, the charging handle will become free and can be
removed. The recoil spring and spring
guide are now within easy reach for
removal (See M).
Step #4 — The barrel, receiver and action
are now ready for thorough cleaning. The
action should be cleaned in solvent, dried,
and oiled sparingly prior to reassembly.
Further disassembly of the action is not recommended and should only be attempted
by a qualified gunsmith or the factory.
Step #5 — (Reassembly is easier if gun is
secured in a padded vise, or held by an
assistant.) To reassemble, place recoil
spring guide into one end of the recoil
as far back in the stock as it will go while
tightening the takedown screw. Otherwise,
the rifle may not fire.
Pulling charging handle back to replace action
spring, then place opposite end of spring
into breech bolt. Next, put recoil spring
guide into hole at the rear of the receiver.
To prevent kinking the spring, hold breech
bolt and recoil spring in one hand and use
the other hand to support the spring as
shown in N, while compressing spring until
guide enters breech bolt.
Step #6 — The charging handle can now
be positioned through the ejection port. To
complete the insertion of the breech bolt,
be sure the charging handle fits into the
slot provided for it in the bolt.
Reinstall the action by pulling the charging
handle all the way back and locking it in
the open position, and reversing the action
disassembly procedure (See O).
When reassembling the barreled action
and stock, be sure the receiver is seated
When reassembling the barreled action to
the stock, take care not to bend or damage
the magazine release lever as you insert it
through the slot in the trigger guard.
• WARNING: Never attempt to wipe down
or clean a loaded rifle.
For the 70PSS, if you intend to use your
rifle after cleaning, replace the barrel as
described in “How to Assemble the
70PSS.”
Use a very thin coat of light oil during below
freezing conditions. Condensation droplets
will form soon after the rifle is brought into a
warm room, or it may become wet during
inclement weather. In any case, all moisture
should be removed. Exterior metal finishes
may be wiped down with a slightly oiled
cloth. For long term storage, lightly oil the
bore, barrel and action with gun oil. Your
rifle should be completely unloaded and
stored in a dry area. Never store your rifle in
a carrying case.
7
Repair Instructions
Non-Warranty Repairs
Your firearm has been designed, engineered and manufactured in accordance
with Marlin's rigid quality control standards.
However, any mechanical device may
occasionally require adjustment or repair.
A competent gunsmith may be able to
repair your firearm. If not, ship it to the factory, following the “Shipping and Handling”
instructions in this manual.
After receiving your firearm, we will send
you an estimate of the repair cost. Repairs
will begin upon receipt of your check or
money order. If repairs are not possible,
your firearm will be returned.
Questions regarding the performance and
serviceability of your firearm should be
addressed to Marlin Gun Service. You
should include the Serial Number, Model
Number and a full description of the conditions and problems involved.
Warranty Repairs
Our Warranty policy covers all our firearms
against defects in workmanship or material
for a period of five years from the date of
purchase to the original owner. See the
inside front cover of this manual for warranty details.
Firearms requiring warranty repairs should
be returned to the factory. Be sure to follow the “Shipping and Handling” instructions in this manual.
8
Shipping and Handling
When sending your firearm to the factory,
please follow these instructions:
1. Prior to shipping, be absolutely certain
that the firearm is completely unloaded
(See “How to Unload” in this manual).
2. Pack your firearm carefully. Use
ample cushioning material and a sturdy
outer cardboard box. Do not ship in a
special container which you want
returned.
3. Accessories such as scopes, scope
mounts, gun case, quick-detach type
swivels, slings, etc. should be removed
prior to returning the firearm.
4. Inside the box, include the following
information: model number, serial number,
description of damage or problem, and
under what conditions problem occurs.
5. Keep a record of your serial number
when returning a firearm.
6. Clearly mark your return address on
the outside of the box and on your
instruction sheet.
7. Do not ship live ammunition under any
circumstances.
8. Ship your firearm via insured Parcel
Post or U.P.S. Shipment must be prepaid
and addressed to:
MFC INC.
ATTN: SERVICE DEPT.
100 KENNA DRIVE
NORTH HAVEN, CONN. 06473
IMPORTANT
If you have any questions or problems
relating to your new Marlin, would like
additional information on safe operation,
or wish to order parts or accessories, just
call our Customer Service Center. A
Service Representative can be reached at
the number listed below, between 8 A.M.
and 4:30 P.M. (Eastern Time), Monday
through Friday.
1-800-544-8892
(Toll Free)
The Fascinating History of Marlin
W
ritten by the late William S. Brophy, Marlin’s Senior Technical
Manager and Official Company Historian for many years, this
prodigious book details the history of the Marlin
Firearms Co. and its products. The hardbound
volume contains more than 600 pages and
over 1000 illustrations. Must reading for anyone interested in all the models — pistols,
rifles and shotguns — made by Marlin, and
in the story of more than a century of
firearms production in America.
Please record the firearm serial number, date
of purchase and where purchased below.
Serial #: _____________________________________
Date of Purchase: __________________________
Purchased From: _____________________
For more information, write:
Marlin Firearms Co.
Department OM
100 Kenna Drive
North Haven, CT 06473
____________________________________
In case of loss or theft, supply this
information to the proper authorities.
9
Marlin's Guide to Gun Safety
1. Read and understand the owner’s manual before using a firearm.
2. If you are unfamiliar with firearms, attend a firearms safety class taught by a
certified instructor.
3. Handle every firearm as if it were loaded and ready to fire.
4. Control the muzzle, and never point a firearm at anything you don’t want to shoot.
5. Keep the safety on SAFE until you are ready to shoot.
6. Unless you are hunting, carry your firearm empty, with the action open.
7. Before shooting, be sure you have an adequate backstop. All ammunition is
dangerous beyond your line of sight.
8. Avoid ricochets by never shooting at water or any hard, flat surface.
9. Do not run, climb, or jump over an obstacle with a loaded firearm.
10. Do not climb into or out of a tree or tree stand with a loaded firearm.
Do not allow others to pass loaded firearms to you while in a tree stand.
11. Do not enter or ride in a motor vehicle with loaded firearms.
12. Do not lean a loaded firearm against anything.
13. Do not bump, drop or jar a loaded firearm.
14. Do not pull a firearm toward you by the muzzle.
15. Wear hearing protectors when shooting.
16. Wear impact-protective glasses when shooting, disassembling or cleaning firearms.
17. Avoid alcoholic beverages and drugs before and during shooting.
18. Use only ammunition of the correct gauge, caliber, size and bullet shape
for your firearm.
19. Do not use damaged, dirty, modified, or improperly handloaded ammunition.
20. Keep the barrel and mechanism of the firearm free of obstructions.
21. Do not use a firearm that fails to function properly. Do not try to force a jammed action.
22. Be sure no one is in the path of ejecting shells or cartridges.
23. Do not interchange parts between firearms, and be sure disassembly and reassembly are correct and complete.
24. Before cleaning, be sure the chamber, action and magazine are completely
unloaded.
25. Unload firearms before storing, transporting, or leaving unattended.
26. Store firearms and ammunition separately, locked and out of the reach of children.
Failure to follow these rules, or other instructions in this manual,
can result in personal injury.
Printed in U.S.A.
WARNING
Children are attracted to and can operate firearms
that can cause severe injuries or death.
Prevent child access by always keeping guns locked
away and unloaded when not in use. If you keep a loaded
firearm where a child obtains and improperly uses it, you
may be fined or sent to prison.
ADVERTENCIA
A los niños los atraen las armas de fuego y las pueden
hacer funcionar. Ellos pueden causarses lesiones graves
y la muerte.
Evite que los niños tengan acceso a las armas de fuego
guardándolas siempre con llave y descargadas cuando no
las esté utilizando. Si usted tiene un arma de fuego cargada
en un lugar en que un niño tiene acceso a ella y la usa indebidamente, le pueden dar una multa o enviarlo a la carcel.
Health Warning: Discharging of firearms in poorly ventilated areas
and handling ammunition may cause exposure to lead and/or lead
compounds. Exposure may cause cancer, birth defects or damage
to the kidney, nervous, blood forming and reproductive systems.
Have adequate ventilation at all times, especially in confined areas.
Wash hands thoroughly after shooting, handling ammunition, or
cleaning a firearm. Do not eat or smoke during these activities.
Safety Warning: Marlin strongly recommends that you take a hunter
safety course, taught by a certified instructor, before you use this
firearm. Your State Fish & Game Dept. or a local gun shop can suggest courses in your area.
Safety Warning: Keep this firearm out of the reach of children,
unauthorized individuals, and others unfamiliar with the safe handling of firearms.
2/05
407002
39
SELF-LOADING
RIMFIRE
Rifle With
Clip Magazine
**40
15
16
41
49
19
13
34
47
11
44
46
33
35
24
* Restricted availability—Part sent to qualified
gunsmith only.
** Restricted availability—Parts installed at
factory only.
*** Non-restricted availability—Part may require
some final fitting, sanding or filing.
22
8
7
6
21
17
4 18
43
36
23
3
14
12
**2
20
1
42
(22 L.R. and 17 Mach 2)
37
38
10
5
9
28
48
30
25
26
7
27
54
31
45
29
50
32
53
51
52
PARTS LIST
SELF-LOADING CARBINE WITH CLIP MAGAZINE
For parts prices, call 1-800-544-8892 (8 A.M. to 4:30 P.M., Eastern Time, Weekdays)
Be sure to mention gun serial number when ordering parts
ILL. NO.
PART NAME
1 . . . . . . . Assembly Post
**2 . . . . . . . Barrel
3 . . . . . . . Barrel Retaining Pin
4 . . . . . . . Breech Bolt Only
5 . . . . . . . Buffer
6 . . . . . . . Buffer Pin
7 . . . . . . . Buffer Pin Rings (2)
8 . . . . . . . Charging Handle
9 . . . . . . . Detent
10 . . . . . . . Detent Spring
11 . . . . . . . Disconnector Spring
12 . . . . . . . Extractor, Left Hand
13 . . . . . . . Extractor, Right Hand
14 . . . . . . . Extractor Pin, Left Hand
15 . . . . . . . Extractor Pin, Right Hand
16 . . . . . . . Extractor Spring, Left Hand
17 . . . . . . . Extractor Spring, Right Hand
18 . . . . . . . Firing Pin
19 . . . . . . . Firing Pin Retaining Pin
20 . . . . . . . Front Sight Ramp Base
21 . . . . . . . Front Sight Ramp Base Screw
22 . . . . . . . Front Sight Ramp Hood
23 . . . . . . . Front Sight Ramp Insert
24 . . . . . . . Hammer
25 . . . . . . . Hammer Spring
26 . . . . . . . Hammer Strut
27 . . . . . . . Hammer Strut Bridge
ILL. NO.
PART NAME
28 . . . . . . . Hammer Strut Pin
29 . . . . . . . Hammer Pin Ring
30 . . . . . . . Hammer Spacer
31 . . . . . . . Last Shot Hold Open Assembly
32 . . . . . . . Magazine Complete
33 . . . . . . . Magazine Guide
34 . . . . . . . Magazine Latch & Ejector
35 . . . . . . . Magazine Latch Pin
36 . . . . . . . Magazine Lever Assembly
37 . . . . . . . Rear Sight Base
38 . . . . . . . Rear Sight Elevator
39 . . . . . . . Rear Sight Folding Leaf
**40 . . . . . . . Receiver
41 . . . . . . . Recoil Spring
42 . . . . . . . Recoil Spring Guide
43 . . . . . . . Retaining Ring
44 . . . . . . . Sear
45 . . . . . . . Sear Pin Ring
46 . . . . . . . Sear Spring
47 . . . . . . . Sideplate Sub-Assembly, Left Hand
48 . . . . . . . Sideplate, Right Hand
49 . . . . . . . Spring Washer
50 . . . . . . . Stock
51 . . . . . . . Takedown Screw, Front
52 . . . . . . . Takedown Screw, Rear
53 . . . . . . . Trigger Guard Complete
2/05
459001
Model 795SS
ILL. NO.
1 ...................................
**2 ...................................
3 ...................................
4 ...................................
5 ...................................
6 ...................................
7 ...................................
8 ...................................
9 ...................................
10 ...................................
11 ...................................
12 ...................................
13 ...................................
14 ...................................
15 ...................................
16 ...................................
17 ...................................
18 ...................................
19 ...................................
20 ...................................
21 ...................................
22 ...................................
23 ...................................
24 ...................................
25 ...................................
26 ...................................
27 ...................................
28 ...................................
29 ...................................
30 ...................................
31 ...................................
32 ...................................
33 ...................................
34 ...................................
35 ...................................
36 ...................................
37 ...................................
38 ...................................
39 ...................................
**40 ...................................
41 ...................................
42 ...................................
43 ...................................
44 ...................................
45 ...................................
46 ...................................
47 ...................................
48 ...................................
49 ...................................
50 ...................................
51 ...................................
52 ...................................
53 ...................................
Model 795
PART NO.
407997
107371
307897
107014
407182
307698
407178
207006
407753
407294
407196
320269
320369
320798
307097
407895
407895
407699
307198
220939
321091
316145
407444
407173
407094
407179
307075
407199
407178
420176
507483
407135
207449
307348
320797
507583
520041
330442
214142
107260
307496
307071
407178
307151
407178
407995
507464
207763
416052
407630
307191
307792
507758
ILL. NO.
1 ...................................
**2 ...................................
3 ...................................
4 ...................................
5 ...................................
6 ...................................
7 ...................................
8 ...................................
9 ...................................
10 ...................................
11 ...................................
12 ...................................
13 ...................................
14 ...................................
15 ...................................
16 ...................................
17 ...................................
18 ...................................
19 ...................................
20 ...................................
21 ...................................
22 ...................................
23 ...................................
24 ...................................
25 ...................................
26 ...................................
27 ...................................
28 ...................................
29 ...................................
30 ...................................
31 ...................................
32 ...................................
33 ...................................
34 ...................................
35 ...................................
36 ...................................
37 ...................................
38 ...................................
39 ...................................
**40 ...................................
41 ...................................
42 ...................................
43 ...................................
44 ...................................
45 ...................................
46 ...................................
47 ...................................
48 ...................................
49 ...................................
50 ...................................
51 ...................................
52 ...................................
53 ...................................
Model 7000
PART NO.
407997
107370
307897
107013
407182
307698
407178
207005
407753
407294
407196
320269
320369
320798
307097
407895
407895
407599
307198
330144
320593
NA
NA
407173
407094
407179
307075
407199
407178
420176
507683
407135
207449
307348
320797
507583
220641
320942
NA
107160
307496
307071
407178
307151
407178
407995
507464
207763
416052
407638
307091
307392
507278
ILL. NO.
1 ...................................
**2 ...................................
3 ...................................
4 ...................................
5 ...................................
6 ...................................
7 ...................................
8 ...................................
9 ...................................
10 ...................................
11 ...................................
12 ...................................
13 ...................................
14 ...................................
15 ...................................
16 ...................................
17 ...................................
18 ...................................
19 ...................................
20 ...................................
21 ...................................
22 ...................................
23 ...................................
24 ...................................
25 ...................................
26 ...................................
27 ...................................
28 ...................................
29 ...................................
30 ...................................
31 ...................................
32 ...................................
33 ...................................
34 ...................................
35 ...................................
36 ...................................
37 ...................................
38 ...................................
39 ...................................
**40 ...................................
41 ...................................
42 ...................................
43 ...................................
44 ...................................
45 ...................................
46 ...................................
47 ...................................
48 ...................................
49 ...................................
50 ...................................
51 ...................................
52 ...................................
53 ...................................
Model 70PSS
PART NO.
407997
107070
307897
107013
407182
307698
407178
207005
407753
407294
407196
307269
307369
320798
307097
407895
407895
407599
407198
NA
NA
NA
NA
407173
407094
407179
307075
407199
407178
420176
507683
407135
207449
307348
320797
507583
NA
NA
NA
107160
307496
307071
407178
307151
407178
407995
507464
207763
416052
407738
307091
307392
507278
ILL. NO.
1 ...................................
2 ...................................
3 ...................................
4 ...................................
5 ...................................
6 ...................................
7 ...................................
8 ...................................
9 ...................................
10 ...................................
11 ...................................
12 ...................................
13 ...................................
14 ...................................
15 ...................................
16 ...................................
17 ...................................
18 ...................................
19 ...................................
20 ...................................
21 ...................................
22 ...................................
23 ...................................
24 ...................................
25 ...................................
26 ...................................
27 ...................................
28 ...................................
29 ...................................
30 ...................................
31 ...................................
32 ...................................
33 ...................................
34 ...................................
35 ...................................
36 ...................................
37 ...................................
38 ...................................
39 ...................................
**40 ...................................
41 ...................................
42 ...................................
43 ...................................
44 ...................................
45 ...................................
46 ...................................
47 ...................................
48 ...................................
49 ...................................
50 ...................................
51 ...................................
52 ...................................
53 ...................................
Model 70PSS only
Model 717M2 only
ILL. NO. PART NAME
PART NO.
1 . . . . Assembly Post ...................................407997
**2 . . . . Barrel .................................................107018
3 . . . . Barrel Retaining Pin...........................307897
4 . . . . Breech Bolt Only................................107019
5 . . . . Buffer .................................................407007
6 . . . . Buffer Pin ...........................................307698
7 . . . . Buffer Pin Rings (2) ...........................407178
8 . . . . Charging Handle................................207007
9 . . . . Detent ................................................407753
10 . . . . Detent Spring.....................................407294
11 . . . . Disconnector Spring ..........................407196
12 . . . . Extractor, Left Hand...........................320269
13 . . . . Extractor, Right Hand ........................320369
14 . . . . Extractor Pin, Left Hand ....................320798
15 . . . . Extractor Pin, Right Hand ..................307004
16 . . . . Extractor Spring, Left Hand ...............407495
17 . . . . Extractor Spring, Right Hand.............407495
18 . . . . Firing Pin ...........................................407699
19 . . . . Firing Pin Retaining Pin .....................307198
20 . . . . Front Sight .........................................330144
21 . . . . Front Sight Screw ..............................320593
22 . . . . Front Sight Ramp Hood............................NA
23 . . . . Front Sight Ramp Insert ...........................NA
24 . . . . Hammer .............................................407173
25 . . . . Hammer Spring .................................407094
26 . . . . Hammer Strut ....................................407179
27 . . . . Hammer Strut Bridge.........................307075
ILL. NO. PART NAME
PART NO.
407997
107119
307897
107014
407182
NA
407178
207006
407753
407294
407196
307269
307369
320798
307097
407895
407895
407699
307198
207039
320991
316145
230744
407173
407094
407179
307075
407199
407178
420176
507483
404046
207449
307048
320797
507583
520142
330442
214142
107360
307496
307071
407178
407151
407178
407995
507464
207763
416052
407226
307191
307792
507758
PART NO.
28 . . . . Hammer Strut Pin ..............................407199
29 . . . . Hammer Pin Ring ..............................407178
30 . . . . Hammer Spacer ................................420176
31 . . . . Last Shot Hold Open Lever ...............307003
32 . . . . 7 Shot Magazine................................407246
33 . . . . Magazine Guide ................................207449
34 . . . . Magazine Latch & Ejector .................307005
35 . . . . Magazine Latch Pin ...........................320797
36 . . . . Magazine Lever Assembly.................507583
37 . . . . Rear Sight..........................................220641
38 . . . . Rear Sight Elevator ...........................320942
39 . . . . Rear Sight Folding Leaf............................NA
**40 . . . . Receiver.............................................107023
41 . . . . Recoil Spring .....................................307496
42 . . . . Recoil Spring Guide...........................307071
43 . . . . Retaining Ring ...................................416252
44 . . . . Sear ...................................................307151
45 . . . . Sear Pin Ring ....................................407178
46 . . . . Sear Spring........................................407995
47 . . . . Sideplate Sub-Assembly, Left Hand ..207014
48 . . . . Sideplate, Right Hand........................207013
49 . . . . Spring Washer ...................................416000
50 . . . . Stock..................................................120523
51 . . . . Takedown Screw, Front .....................307191
52 . . . . Takedown Screw, Rear......................307792
53 . . . . Trigger Guard Complete ....................507758
54 . . . . Last Shot Hold Open Pivot Pin..........407009
56
**53
57
54
55
Ill. No.
Part Name
**53 Receiver Adapter ................
54 Takedown Nut.....................
55 Spanner Wrench.................
56 Case Only...........................
57 Foam Packing.....................
Part No.
307366
307766
207012
807005
445705
2/05
459001