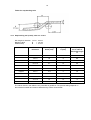
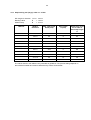
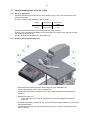
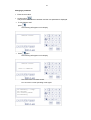
1
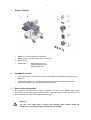
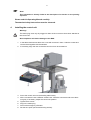
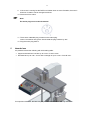
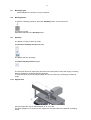
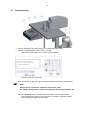
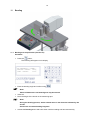
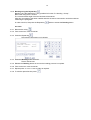
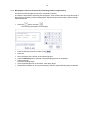
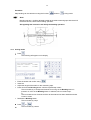
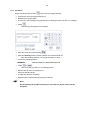
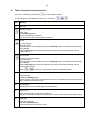
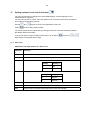
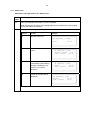
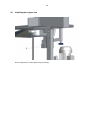
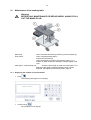
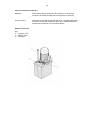
Operating Manual
for
Bending Table
BGD5eco
42380\B01eng
0808
Contents
Safety regulations
1 Scope of supply........................................................................................................ 1
2 Introductory notes .................................................................................................... 1
3 Basic safety information ........................................................................................... 1
4 Installing the control unit .......................................................................................... 2
5 Intended use ............................................................................................................ 3
6 Technical data.......................................................................................................... 5
7 Special safety instructions ....................................................................................... 6
8 Important general information on bending ............................................................... 6
8.1 Thrust pads (3) ............................................................................................... 6
8.2 Bending radius and bending mandrel............................................................. 7
8.3 Control bar ...................................................................................................... 7
8.4 Measuring scale.............................................................................................. 7
8.5 Smallest bending radius ................................................................................. 7
8.6 Smallest shank length..................................................................................... 7
8.7 Bending angles ............................................................................................... 8
8.8 Bending button................................................................................................ 8
8.9 Stand-by.......................................................................................................... 8
8.10 Support arm .................................................................................................... 8
9 Keyboard description ............................................................................................... 9
10 Commissioning....................................................................................................... 10
11 Bending .................................................................................................................. 12
11.1 Bending and compensation (function F1)..................................................... 12
12
13
14
15
16
11.2 Bending using the Repeat key
.............................................................. 14
11.3 Bending bars less than 5 mm thick (F4 bending without compensation) ..... 15
Step bending tools ................................................................................................. 16
12.1 Range of application ..................................................................................... 16
12.2 Installing the step bending tool ..................................................................... 16
12.3 Inching mode ................................................................................................ 17
12.4 Stroke............................................................................................................ 18
12.5 Step bending tool (small), order no.: 31671 ................................................. 19
12.6 Step bending tool (large), order no.: 31188.................................................. 20
Upright bending tool, order no. 31221 ................................................................... 21
13.1 Range of application ..................................................................................... 21
13.2 Installing the upright bending tool ................................................................. 21
13.3 Procedure ..................................................................................................... 22
Additional bending tool for small lug lengths, order no.: 31850............................. 23
14.1 Range of application ..................................................................................... 23
14.2 Installing the additional bending tool ............................................................ 23
14.3 Bending......................................................................................................... 23
Hydraulic unit HA3 BGD 400V ............................................................................... 24
Table of functions/ brief instructions ...................................................................... 25
17 Setting options for the user in the menu
........................................................ 26
18
19
20
21
22
17.1 User Level..................................................................................................... 26
17.2 Setter Level................................................................................................... 29
Adjusting the bending factor .................................................................................. 32
Error messages...................................................................................................... 35
Installing the support arm....................................................................................... 36
Maintenance of the bending table.......................................................................... 37
21.1 Displaying the number of previous bends .................................................... 37
Maintenance of the hydraulic unit HA3 BGD 400V................................................ 39
1
1
2
3
Scope of supply
•
BGD 5eco (1) with hydraulic unit attached
•
Bending radii 7.5mm (2), 10mm (9) and 15mm (3)
•
Control bar (4)
•
Attachments:
Step bending tools (7)
Upright bending tool (8)
Bending hinge (10)
Introductory notes
•
In the following text, the keys which need to be pressed are indicated by bold type, e.g. F,
Enter etc.
•
Text printed in italics, e.g.: The display will indicate, contains instructions or sequence
descriptions related to the previously described operation.
Basic safety information
The following pictograms will be used to highlight sections of text. Please follow these
instructions and act with special caution in these cases. All working safety instructions must
also be passed on to other users/ specialist technicians.
Warning!
For your own safety and to protect your bending table, please follow the
instructions in the text passages marked with this symbol.
2
Note!
This information is directly linked to the description of a function or an operating
sequence.
Please read this Operating Manual carefully.
The attached safety instructions must be observed.
4
Installing the control unit
Warning!
The mains plug must only be plugged in when all the connectors have been attached to
the control unit.
Non-compliance will lead to damage to the BGD.
1. In the table reinforcement there are 2 nuts with 2 screws in them. Undo the screws and
remove them together with the washers.
2. If necessary, align the nuts so that the control unit can be screwed on.
3. Screw the control unit onto the bending table loosely.
4. All the connectors have a different socket insert. Insert the connectors and screw them
on tightly. If necessary, adjust the control unit position.
5. Tighten the 2 screws.
6. Plug in the mains plug.
7. Pull out the emergency off button.
8. Set the zero point (see Commissioning section).
3
9. If the motor is running but the BGD’s tool holder does not move forwards, the motor’s
direction of rotation can be changed as follows.
10. Disconnect from mains.
Note!
The mains plug must not be dismantled.
11. There are 2 rotateable plug contacts on the mains plug.
Insert a screwdriver into groove X and rotate the plug contacts by 180°.
12. Plug the mains plug back in.
5
Intended use
It is possible to bend the following with this bending table:
• Copper and aluminium bus bars up to a max. of 160 x 13mm.
• Flat steel bars up to 100 x 10 mm with a strength of up to a max. of 370 N/ mm².
If no special tool is used, the bars may only be inserted and bent in the way shown.
4
Warning!
• Upright bending of bars is only permitted when using the appropriate special tool.
• Once bent, a bar may not be bent back again.
Non-compliance will lead to damage to the BGD.
Any other or additional use is regarded as non-intended.
Novopress is not liable for any resulting consequences or damage. Neither is it liable for tools of
other manufacturers nor for any damage caused by such tools.
Intended use also includes observance of the Operating Manual, adherence to the inspection
and maintenance conditions as well as compliance with all the relevant safety regulations.
5
6
Technical data
BGD5eco
Height:
Width:
Depth:
Table height:
Voltage:
approx. 1330 mm
approx. 830 mm
approx. 950 mm
approx. 1080 mm
see rating plate
Hydraulic unit HA3-BGD 400V
Electrics:
Motor:
Supply voltage:
Frequency:
see rating plate
see rating plate
Frequency
RPM
Power consumption
50 Hz
2800 min –1
750 W
60 Hz
3300 min –1
900 W
50 Hz
3.5 l/min
60 Hz
2.5 l/min
Hydraulics:
Pump:
Frequency
Delivery rate
Operating pressure:
max. 200 bar
Dimensions:
Height:
Width:
Depth:
approx. 460
approx. 250
approx. 290
Hydraulic oil:
mm
mm
mm
Oil used at the factory for this unit:
ISO VG 10 DIN 51519
(suitable for ambient temp. range of -5 to +35° C)
Oil suitable for use:
Oil of viscosity class:
ISO VG DIN 51519 from 10 to 46
(Viscosity in CSt 7.4 - 30 at 50° C.)
Oil suitable for temperatures below -5 ° C:
ISO VG 5 DIN 51519
6
7
Special safety instructions
Warning!
• Bus bars over 13 mm in thickness may not be bent.
• Upright bending of bars is only permitted when using the appropriate special tool.
• Once bent, a bar may not be bent back again.
Non-compliance will lead to damage to the BGD.
8
Important general information on bending
8.1
Thrust pads (3)
Warning!
• Bars with a width > 120 mm or with a thickness > 10 mm
These bars must be bent without thrust pads (3).
•
Bars up to 120 mm in width or up to 10 mm thick (inclusive)
These bars must be bent with attached thrust pads (3).
Non-compliance will lead to damage to the BGD.
Example:
Bar
Bar
40 x 8
120 x 12
with thrust pads (3)
with thrust pads (3)
Bar
Bar
Bar
100 x 13
160 x 10
160 x 13
without thrust pads (3)
without thrust pads (3)
without thrust pads (3)
7
Procedure for attaching and removing the thrust pads (3)
• Switch off the EMERGENCY OFF button (push).
• Unscrew the thrust pads (3).
• Set the zero point (see Point 10 Commissioning).
• Perform bending operation.
When bending is completed, replace the thrust pads (3) for smaller bars.
• Switch off the EMERGENCY OFF button (push).
• Screw on the thrust pads (3).
Ensure that there is no dirt between the thrust pads.
• Set the zero point (see Point 6 Commissioning).
• Perform bending operation.
8.2
Bending radius and bending mandrel
When delivered, the 10 mm bending radius is attached to the bending mandrel.
Warning!
• The zero point may only be set with the 10mm bending radius.
• There is a straight pin located in the bending mandrel for aligning the bending
mandrel to the bending tool. This straight pin must engage in the hole of the bending
mandrel mounting.
Non-compliance will lead to damage to the BGD.
8.3
Control bar
Warning!
The control bar must only be used for setting the zero point.
Non-compliance with this instruction will lead to damage to the control bar and
the BGD.
Only a slight amount of force is needed for calibration when setting the zero point.
The bending process produces a maximum force of 150 kN.
8.4
Measuring scale
In order to determine the shank length more easily, a measuring tape is fitted into the workplate.
8.5
Smallest bending radius
8.6
Cu bars:
Bending radius no smaller than thickness of the bar.
Al bars:
Bending radius no smaller than 1.5 x the thickness of the bar.
Smallest shank length
45 mm
8
8.7
Bending angles
Values between 0.5° and 93.0° may be entered.
8.8
Bending button
To perform a bending operation, press the “Bending button” on the control unit.
This button is green.
Hereinafter referred to as "Bending button".
8.9
Stand-by
The display is empty in stand-by mode.
To switch the stand-by function on press
.
.
.
The display will then be empty.
To end the stand-by function press
.
The zero point has to be reset every time there is an interruption to the power supply, including
after the emergency off button has been pressed.
To avoid having to do this the bending table can be put in stand-by. The display will then be
empty.
8.10 Support arm
Use the support arm (S) for shank lengths "ls" of 1m to 2m.
For shank lengths “ls” of more than 2m, support the end of the bar with a stand or something
similar.
9
9
Keyboard description
F9 Calibrating
Place cal.-block
push bending
Bending and compensation
Stroke
Inching mode
Repeat of F1.
Bending is performed without compensation.
Allows the input of code numbers
Delete an input
Input confirmation.
As long as the input has not been confirmed, the value
entered will flash and it can be adjusted.
Menu access
Changes the prefix
Is used to enter a value after the decimal point
,
Are used to scroll forwards or backwards
10
10
Commissioning
• Connect the BGD to the power supply (for voltage see rating plate).
• Activate the EMERGENCY OFF button (11) (pull).
The following will appear on the control unit (10) display.
F9 Calibrating
Place cal.-block
push bending
The zero point has to be reset.
• Insert control bar (4) with the V groove pointing towards the bending mandrel (12).
Note!
Always use the control bar supplied to set the zero point.
The 10mm bending radius (9) must be attached to the bending mandrel (12).
• Press the Bending button, and hold until the hydraulic unit switches itself off.
The tool holder (2) moves to the control bar (4) and then moves back again.
The following will appear on the display.
11
F1
F2
F3
F4
Bending + Comp.
Stroke
Inching Mode
Bending
Zero point setting for the bending operation has been completed.
• Remove the control bar (4).
Note!
The control bar must only be used for setting the zero point.
Only a slight amount of force is needed for calibration when setting the zero point. The
bending process produces a maximum force of 150 kN.
Non-compliance with this instruction will lead to damage to the control bar and
the BGD.
Note!
The zero point has to be reset every time there is an interruption to the power supply,
including after the emergency off button has been pressed.
To avoid having to do this the bending table can be put in stand-by. The display will then
be empty.
12
11
Bending
11.1 Bending and compensation (function F1)
Procedure
•
button.
Press the
The following will appear on the display.
F1 Bending + Comp.
Actual value: 0.0°
nom. value:
0.0°
•
Enter the bending angle and confirm using
.
Note!
Values of between 0.5 and 93.0 degrees may be entered.
•
•
Insert bar.
Place the length of the shank on the measuring tape.
Note!
During the bending process, the bar shanks move in the direction indicated by the
arrows.
Protect this area when bending long bars.
•
Actuate the Bending button and hold it down until the bending tool has retracted fully.
13
Bending operation sequence
•
•
•
•
•
Press the Bending button and hold.
The bar is pre-bent.
The computer interrupts the bending process for a short while and measures bar
springback.
The bar is repeatedly bent until the angle value entered is attained.
Once the bending process is complete, release the Bending button.
Re-bending bars already bent (compensation)
If a bar that has already been bent has to be bent again, enter the required angle and bend
using
.
Example:
- Re-bend 11 degrees
- Bar is already bent to 30 degrees
- Enter 41 degrees
14
11.2 Bending using the Repeat key
Bending using the Repeat key is only possible for function F1 “Bending + Comp.”.
Bend a bar using the F1 function.
The corrected bend angle of the bar bent last will be stored.
After this, bars made of the same material and with the same cross section can be bent without
measuring the springback.
In order to do this, first press the Repeat key
and then actuate the Bending button.
Procedure
11.2.1 Bend the bar using
.
11.2.2 Take out the bar. Insert a new bar.
.
11.2.3 Press the Repeat key
The following will appear on the display.
F1 Repeat
Actual value: 0.0°
nom. value:
30.0°
11.2.4 Press the Bending button and hold.
The bar will be bent.
11.2.5 Release the Bending button as soon as the bending process is complete.
11.2.6 Take out the bar. Insert a new bar.
11.2.7 Repeat points 11.2.4 to 11.2.5 as often as required.
11.2.8 To exit the repeat function press
.
15
11.3 Bending bars less than 5 mm thick (F4 bending without compensation)
For these bars the springback cannot be measured accurately.
The bars are bent without measuring the springback. Then measure the bent angle and enter a
larger angle if necessary before bending again. Repeat this procedure until the required angle
has been attained.
•
button and then
.
Press the
The following will appear on the display.
F4 Bending
Actual value:
nom. value:
•
•
•
•
•
•
•
0.0°
0.0°
.
Enter the bending angle and confirm using
Insert bar.
Place the length of the shank on the measuring tape.
Press the Bending button and hold until the bending process is completed.
Take out the bar.
Check the bending angle.
If the required angle was not achieved, set a larger angle.
Repeat the procedure for as long as necessary until the required bending angle is attained.
16
12
Step bending tools
12.1 Range of application
Copper and aluminium bars can be bent using the step bending tools.
The maximum cross-section is as follows:
for step bending tool (small), order no.: 31671
for aluminium:
120 x 10
for copper:
80 x 8
60 x 10
for step bending tool (large), order no.: 31188
for aluminium:
120 x 10
for copper:
120 x 10
The maximum step height for the relevant cross-sections can be taken from the table.
Smaller step heights can also be achieved by limiting the stroke accordingly.
The stroke settings for
step height = material thickness
are also listed in the table.
The values shown in the table are only intended as guidelines. The precise settings depend on
the individual material and must be determined by means of test bends.
12.2 Installing the step bending tool
• Pull the bending mandrel out of the workplate (19).
• Install part 2 of the step bending tool (B) in the tool holder (2) (screw M 6 x 70).
• Insert part 1 of the step bending tool (A) in the bending mandrel holder.
17
Procedure
Step bending can be carried out using the functions
Stroke or
Inching mode.
Note!
Bending tool part 1 shall be adjusted parallel to the table measuring tape with the aid of
the bar to be bent, before each bending operation.
Disregarding this instruction will falsify the bending operation.
12.3 Inching mode
•
.
Press
The following will appear on the display.
F3 Inching Mode
Actual value: 0.0mm
nom. value:
0.0mm
•
•
•
•
•
•
or:
.
Enter the stroke and confirm using
Insert bar.
Adjust the length of the shank on the measuring tape.
Press and hold the Bending button until the required step is bent.
The tool holder (2) is transported forwards for as long as the Bending button is
pressed. As soon as the Bending button is released, the tool holder stops.
or:
The tool holder moves forwards until the stroke entered has been attained and then
comes to a halt.
Release the Bending button.
The tool holder (2) stops.
or
.
Press
The tool holder (2) returns.
18
12.4 Stroke
•
Press
.
The following will appear on the display.
F2 Stroke
Actual value:
nom. value:
0.0mm
0.0mm
•
•
•
•
Enter the stroke and confirm using
.
Insert bar.
Adjust the length of the shank on the measuring tape.
Press and hold the Bending button until the required step is bent.
The tool holder (2) is transported forwards for as long as the Bending button is
pressed. As soon as the Bending button is released, the tool holder is transported
backwards.
or:
The tool holder moves forwards until the stroke entered has been attained and then
moves back.
•
Release the Bending button.
The tool holder (2) returns now if it has not done so before.
19
Tables for step bending tools
12.5 Step bending tool (small), order no.: 31671
Min. length for insertion L min = 23 mm
Bending radius
R
= 7.5 mm
Width of step
B
= 21 mm
Material
Width x
thickness
Max. step height
Hmax (mm)
Step height
H (mm)
Stroke (mm) to be
set in order to
bend step height
H
Aluminium
50 x 4
16
4
9
40 x 8
18
8
6.8
80 x 8
18
8
6.8
60 x 10
21
10
5.8
120 x 10
9
-
-
60 x 5
17.5
5
7.8
40 x 8
20
8
6.8
80 x 8
18
8
6.8
40 x 10
19
10
6
60 x 10
10
10
6
Copper
The values shown in the table are only intended as guidelines. The precise settings depend on
the individual material and must be determined by means of test bends.
20
12.6 Step bending tool (large), order no.: 31188
Min. length for insertion L min = 39 mm
Bending radius
R
= 10 mm
Width of step
B
= 37 mm
Material
Width x
thickness
Max. step height
Hmax (mm)
Step height
H (mm)
Stroke (mm) to be
set in order to
bend step height
H
Aluminium
50 x 4
22
4
9
40 x 8
25
8
6.2
80 x 8
25
8
6.2
120 x 10
28
10
4.2
40 x 6
23.5
6
6.8
80 x 6
23.5
6
6.8
60 x 8
25
8
6
80 x 8
25
8
6
40 x 10
26
10
4.8
120 x 10
25.5
10
4.8
Copper
The values shown in the table are only intended as guidelines. The precise settings depend on
the individual material and must be determined by means of test bends.
21
13
Upright bending tool, order no. 31221
13.1 Range of application
Copper and aluminium bars with a max. cross section of 50 x 10 mm can be bent using the
upright bending tool.
The max. bending angle depends on the bar width.
Width
Thickness
Up to 40 mm
50 mm
Up to 10 mm
Up to 10 mm
Max. bend.
angle
90°
45°
The bar thickness determines which thrust pads (18) are to be used.
There is a set of thrust pads available for bars with widths of 20 and 30 mm and one for those
with widths of 40 and 50 mm.
The bar thickness is indicated on the thrust pads (18).
13.2 Installing the upright bending tool
• Pull the bending mandrel and both plastic plugs out of the workplate (19).
• Put the upright bending tool on the workplate (19).
• Pull the securing plates (17) apart and move the upright bending tool towards the tool
holder (2).
• Release the plates (17).
The holding pins (15) on the securing plates (17) should engage behind the tool
holder (2).
• Insert the thrust pads (18) required, e.g. for the bars with a width of 40/50 mm, with the face
side towards the bar.
Use the thrust pads for bars with a thickness of 20/30 mm to bend Z angles if the stroke
does not suffice.
22
13.3 Procedure
Only the Inching mode function
may be used for upright bending
• Push the bar into the upright bending tool.
• Determine the shank length.
• Fix the bar in the bending tool by tightening the clamping screws (12) and (12.1) slightly.
• Press
.
The following will appear on the display.
F3 Inching mode
Actual value: 0.0mm
nom. value:
0.0mm
• Enter the stroke and confirm using
.
• Press the Bending button until the hydraulic unit switches itself off.
After the bending operation, the upright bending tool stops.
• Loosen the clamping screws.
WARNING!
Loosen screw 12.1 first, then screw 12.
or
.
• Press
The tool holder (2) returns to its starting position.
• Remove the bar from the bending tool.
Check the bending angle.
• Increase the stroke if necessary.
• Repeat until the required bending angle is achieved.
Note!
On dismantling the upright bending tool, insert the two plastic stops into the
workplate.
23
14
Additional bending tool for small lug lengths, order no.: 31850
14.1 Range of application
Using the additional bending tool, order no.: 31850, small lug lengths up to 25 mm can be bent.
The maximum cross-section is as follows:
for aluminium: 120 x 10
for copper
120 x 6
80 x 8
60 x 10
14.2 Installing the additional bending tool
• Pull the bending mandrel (12) out of the workplate (19).
• Unscrew bending radius (round) (9).
• Screw on drop-shaped bending radius.
• Insert the bending mandrel (12) into the workplate (19).
• Insert the additional bending tool in front of the thrust pads (3). Ensure that the additional
bending tool grips behind the top of the thrust pads.
Note!
Use drop-shaped bending radius only in conjunction with additional bending tool.
14.3 Bending
See “Bending” section
24
15
Hydraulic unit HA3 BGD 400V
Construction
An oil-filling screw with bleeder valve (3) and an oil gauge (4) are mounted on the oil tank cover.
Oil gauge (4)
The oil gauge dipstick must be between the two markings. If the dipstick is at the lowest
marking, oil needs to be added.
Bleeder valve (3)
The bleeder valve closes if the tank is on a slant (no oil can emerge).
In vertical position (operating position), a slight oil vapour may be carried with the escaping air.
The oil film which is thus created on hydraulic equipment should be removed from time to time.
Warning!
The unit must not be switched on when lying horizontally. There is a risk that the
pump will not draw in oil and is damaged as a result.
Operation
• Pushing the Bending button on the BGD bending table puts the unit into operation.
Note!
• Care should be taken to ensure that the oil temperature does not exceed 70 °C during
operation.
• Pressure can only be built up again once the button has been released and actuated
again.
25
16
Table of functions/ brief instructions
A function is selected by pressing the
key and entering a number.
The following keys are available for functions F1, F2 and F3:
Fct
Meaning
F0
Stand-by
,
,
F1 or Bending + Comp.
Enter angle.
Actuate Bending button.
The bar springback is measured.
The bar is bent until the angle entered is attained.
F2 or Stroke
For step bending
Enter the stroke.
The tool holder moves forwards as long as the Bending button is actuated or until the stroke
set is attained.
After the Bending button has been released or the stroke set has been attained, the tool
holder retracts.
F3 or Inching mode
For step and upright bending
Enter the stroke.
The tool holder moves forwards as long as the Bending button is actuated or until the stroke
set is attained.
After the Bending button has been released or the stroke set has been attained, the tool
holder comes to a halt.
Press
F4
or
in order for the tool holder to return to its starting position.
Bending
Enter the angle.
Actuate the Bending button.
The bar is bent to the angle entered without measuring and adjusting the springback (for bars
with a thickness of less than 5 mm).
F5
Current angle
Is displayed if a bar is pressed against the thrust pieces.
F6
Retract in F1;
Enter the stroke value for the return stroke limit.
After the next bending operation the bending tool comes to a halt at the stroke value entered.
F9
Calibrating
Insert the control bar.
Actuate the Bending button.
The bending tool’s zero position is reset.
26
17
Setting options for the user in the menu
You can use the menu to change some of the BGD settings, such as language, unit of
measurement for length etc.
You only have access to “User Level” and “Setter Level”. The other menu items are blocked
and cannot be accessed by the user.
Use the
and
keys to move from one parameter to the next.
Press
to save newly entered values.
You should note down any values that you change so that you can reset the bending table to
the default values if necessary.
If you do not want to save the newly entered value, do not press
keys instead. The original value is kept.
. Press the
17.1 User Level
Parameters and input options for “User Level”
Paramete
r
Function
P0
Factor for the bending operation (to adjust the factor see page 32)
P1
Factor for the stroke (default value 1800)
P2
Switching from inch to mm
P5
Setting
Display in
0
mm
1
inch
Language
Setting
Language
0
English
1
German
P6
Unit code, indicates the hardware version (cannot be changed)
P7
Current software version of the unit (cannot be changed)
P99
Total number of strokes/ bends performed (cannot be changed)
or
27
Proceed as follows to access “User Level”.
•
.
Press
The following will appear on the display.
User Level
•
.
Confirm using
1502, for example, appears on the display.
P
0
User Level
1502
The individual “User Level” parameters can be viewed using the following keys
,
.
Changing a parameter
•
Enter the new value.
•
.
Confirm using
The previous value will be overwritten and the next parameter is displayed.
28
•
To exit “User Level”
press
The following will appear on the display.
User Level
•
Press
again.
The following will briefly appear on the display.
User Level
Save to EEProm
The values have now been saved.
You are now in normal operating mode again.
F1
F2
F3
F4
Bending + Comp.
Stroke
Inching Mode
Bending
29
17.2 Setter Level
Parameters and input options for “Setter Level”
Para
meter
Function
P3
Zero point adjustment for stroke. 0.0 mm is standard.
After changing the zero point, the bending table has to be switched on and off again
so that the change is activated.
P6
Display in F1 bending mode
Setting
Display
0
Nominal value only
Example
F1 Bending + Comp.
Sol:
1
Nominal value and actual
value
30.0°
F1 Bending + Comp.
Actual value: 1.9°
nom. value:
30.0°
2
3
For bending, the springback
value after the first bending
attempt is displayed. This
function is for service
purposes
The angle actually bent is
displayed
F1 Bending + Comp.
Bend1
nom. value:
23.2°
30.0°
F1 Bending + Comp.
Angle:
nom. value:
30.1°
30.0°
30
Proceed as follows to access the “Setter Level” menu
•
.
Press
The following will appear on the display.
User Level
•
Press
.
The following will appear on the display.
Setter Level
0
Enter Code
•
The code is 4040.
•
Confirm using
.
The following will appear on the display.
P
Setter Level
3
0.0
The individual “Setter Level” parameters can be viewed using the following keys
or
.
31
Changing a parameter
•
Enter the new value.
•
Confirm using
.
The previous value will be overwritten and the next parameter is displayed.
• To exit “Setter Level”
.
press
The following will appear on the display.
Setter Level
• Press
again.
The following will appear on the display.
Setter Level
Save to EEProm
The values have now been saved.
You are now in normal operating mode again.
F1
F2
F3
F4
Bending + Comp.
Stroke
Inching Mode
Bending
32
18
Adjusting the bending factor
If the angle bent is always one constant unit smaller or bigger than the input value,
e.g.
bent angle: always
59.5°
input angle
60°
then the conversion factor (angular moment/degree) needs to be corrected.
This value has been set at the factory and should only be changed if there actually is a
deviation.
Adjusting the bending factor
•
.
Press
The following will appear on the display.
User Level
•
.
Confirm using
The following will appear on the display.
P
User Level
0
1502
The factor is displayed: 1502
33
• Correct the factor as follows:
Difference = input angle minus bent angle
60 deg.
59.5 deg.
-59.5 deg.
-60 deg.
+ 0.5 degrees
- 0.5 degrees
input angle
bent angle
Difference
0.06 deg.
1 pulse equals 0.06°.
= Pulses
Example: +0.5 degrees: 0.06° = app. +8 pulses Example: -0.5 degrees: 0.06° = app. – 8 pulses
If the bent angle is larger than the input
angle, the calculated pulses are
deducted from the input factor.
If the bent angle is smaller than the
input angle, the calculated pulses are
added to the input factor.
This means: input factor plus 8 pulses.
Example: - input factor is
plus
- New input factor:
input factor minus 8 pulses.
1502
8
1510
minus
• Enter the new factor. The complete number must be entered.
Note!
• Only values from 1470 to 1530 inclusive can be entered.
• Confirm using
. The next parameter is displayed.
• To save the value you have entered
.
press
The following will appear on the display.
User Level
1502
8
1494
34
again.
• Press
The following will briefly appear on the display.
User Level
Save to EEProm
The values have now been saved.
You are now in normal operating mode again.
F1
F2
F3
F4
Bending + Comp.
Stroke
Inching Mode
Bending
35
19
Error messages
BGD display
F1 Bending + Comp.
Actual value: 1.9°
nom. value:
30.0°
Bending aborted
F2 Stroke
Actual value: 0.0mm
nom. value: 150.0mm
Max:
100.0mm
F1 Bending + Comp.
Actual value: 0.0°
nom. value:
94.0°
Min:
0.5°
F1 Bending + Comp.
Actual value: 0.0°
nom. value:
94.0°
Max:
93.0°
F9 Calibrating
Actual value: 0.0°
Reference aborted
Setter Level
4711
Enter Code
Description
Remedy
The bending operation
was not completed.
Actuate the Bending button
again and hold it down until
bending has been
The Bending button was
completed.
released too early.
The stroke entered is too Enter a smaller stroke
large.
A max. of 100 mm is
possible
The angle entered is too
small.
Enter a larger angle.
A min. of 0.5° is possible
The angle entered is too
large.
Enter a smaller angle.
A max. of 93° is possible
The zero point has not
been set.
The Bending button was
released too early.
The code has been
entered and the display
does not change for the
next stage. The code
was wrong.
Actuate the Bending button
and hold it down until the
bending tool retracts
Enter the correct code.
36
20
Installing the support arm
Fix the support arm to the bracket using 2 bolts (X).
37
21
Maintenance of the bending table
Warning!
BEFORE ANY MAINTENANCE OR REPAIR WORK, ALWAYS PULL
OUT THE MAINS PLUG!
When dirty:
Every week:
Clean area between bending mandrel (1) and tool holder (2).
Clean complete bending bench.
Grease the workplate (3).
Clean the keyboard (4) with a mild cleaning agent, e.g. a
solution of water and kitchen detergent, using a slightly moist
cloth.
After approx. 1000 bending ops:
Check the bend angle by means of a test bend. If it is
different to the angle entered the bending factor must be
adjusted. See Adjusting the bending factor, page 32.
21.1 Displaying the number of previous bends
•
.
Press
The following will appear on the display.
User Level
•
.
Confirm using
P0 will appear on the display.
38
P
User Level
0
1502
•
•
Now move on to parameter 99.
The number of previous bending operations will be displayed.
•
Press
twice to access the normal operating mode.
39
22
Maintenance of the hydraulic unit HA3 BGD 400V
We recommend that our authorised NOVOPRESS specialist workshops be used for repair and
maintenance work.
Have the unit maintained by a specialist only.
Warning!
ALWAYS PULL OUT THE MAINS PLUG BEFORE CARRYING OUT
MAINTENANCE AND REPAIR WORK.
Checking the oil level
The dipstick of the oil gauge (4) must be between the two markings. If the
dipstick is at the lowest marking, oil needs to be added.
Top up the oil if necessary.
Oil change
First oil change:
after about 1,000 starts or after 3 months
Subsequent oil changes: after every 15,000 starts but at least once
a year.
Oil volume:
5.5 litres
Hydraulic oil:
See Technical data
Oil filter:
The oil filter is the suction strainer with a mesh
width of 0.06 mm.
• Unscrew the oil filling screw with the bleeder valve (3) on the oil tank cover.
• Draw off the old oil by means of suction.
• Fill with new oil.
Note!
The dipstick of the oil gauge (4) must be between the two markings.
Cleaning:
Remove the oil film from the hydraulic unit every month.
Hydraulic hose:
The hydraulic hose must be checked for damage every month.
Replace the hydraulic hose
- if any cracks, pinches or kinks are visible on the outer layer
- if blister formation is visible
- if pressurised fluid is escaping
- if the hose connector is damaged
- if any discolouration of the outer layer is visible,
e.g. due to the effect of solvents.
Hydraulic hoses must be replaced after 5 years,
even if there is no visible damage.
40
Visual and electrical inspection
Regularly:
Check mains cable including plug and extension cord with plug
connectors for visible damage and have repaired, if necessary.
Every 6 months:
Inspection in accordance with DIN VDE 0701-1 and DIN VDE 0702-1
for electric devices with protection class I, by a qualified electrician,
an authorised workshop or by Novopress Neuss.
Hydraulic drive unit
Key:
2 = Hydraulic hose
3 = Bleeder valve
4 = Oil gauge
Repairs/ service
Scharnhorststrasse 1
D-41460 Neuss
Postf. 10 11 63
D-41411 Neuss
Tel.
02131/288-0
Fax
02131/288-55
http://www.novopress.de
E-mail: [email protected]