1
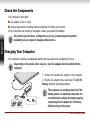
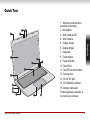
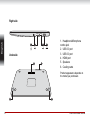
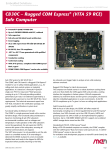
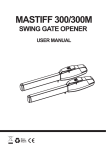
User Information Guide
TOSHIBA CB30
Check the Components
Your computer comes with:
■ AC adaptor (2-pin or 3-pin)
■ Several documents, including Instruction Manual for Safety and Comfort.
If any of the items are missing or damaged, contact your dealer immediately.
English
All product specifications, configurations, prices, system/component/options
availability are all subject to change without notice.
Charging Your Computer
Your computer contains a rechargeable battery that may need to be charged prior to use.
Depending on the model, either a 2-pin or 3-pin AC adaptor will be bundled with the
computer.
1. Connect the provided AC adaptor to the computer.
2. Plug the AC adaptor into a wall outlet. The DC IN/
Battery indicator should glow amber.
2pin
2pin
2
3pin
3pin
The computer can not be powered on if the
battery power is completely exhausted. It is
recommended to charge the battery pack by
connecting the AC adaptor for 30 minutes
before turning on the power.
User Information Guide
Turning on/off the Power
You can turn on the power by opening the display panel or by pressing the Power button.
The Power indicator located on the Power button glows white when the computer is on.
To turn the computer off:
■ Shut down: press and hold
the Power button until the Power
indicator is off.
■ Sleep mode: close the
display panel.
Automatic Sleep Mode
By default, the system is set to automatically enter sleep mode after some minutes of inactivity to save
power. The Power indicator then flashes white to indicate that the computer is in the sleep mode.
To manually enter sleep mode, you can just close the display panel. To resume from sleep mode, simply
open the display panel or press any key on the keyboard.
User Information Guide
3
English
To open the display, slowly lift the
display panel while holding down
the palm rest with one hand.
Then adjust the angle of the
display panel for optimum clarity.
Initial Setup
When using the computer for the first time, there are a few basic steps to go through before the
computer is ready for use.
1. Choose your preferred system language. If there are more than one keyboard for this language,
you’ll need to select one from the drop-down list.
2. Connect your computer to a nearby Wi-Fi network for Internet connection.
English
3. Once the computer gets connected, click Continue. You’ll need to accept the terms of service and
the system will then download any available updates so you automatically get the latest features.
4. Sign in with a Google Account. If you don’t have one, click create a Google Account and follow
the instructions to complete the creation. You can also use the computer without a Google
Account, that is, as a guest by clicking browse as Guest.
5. Choose a picture or take a photo with the built-in web camera to represent your account, and you
will be logged in with your Google account.
Getting More Tips
To find more tips on using your computer, please follow the steps below:
1. Connect your computer to a nearby Wi-Fi network with Internet access.
2. Sign in with a Google Account. If you don’t have one, register a new Google Account.
3. Press
4
on the keyboard which brings up the App list and then click Get Started
app.
User Information Guide
Quick Tour
3
1
4
2
8
9
6
7
6
12
13
14
15
User Information Guide
10
11
English
5
1. Wireless communication
antennas (not shown)
2. Microphone
3. Web Camera LED
4. Web Camera
5. Display screen
6. Display hinges
7. Keyboard
8. Power button
9. Power indicator
10. Touch Pad
11. Touch Pad control button
12. Security lock
13. DC IN 19V jack
14. DC IN/Battery indicator
15. Memory media slot
Product appearance depends on
the model you purchased.
5
English
Right side
1
2
3
1. Headphone/Microphone
combo jack
2. USB 3.0 port
3. USB 3.0 port
4. HDMI port
5. Speakers
6. Cooling vents
4
Underside
6
6
Product appearance depends on
the model you purchased.
5
6
5
User Information Guide
Keyboard Features
The keyboard on your computer provides several buttons to help you quickly access common functions.
Button
Description
Button
Description
Decrease screen brightness.
Go to the next page.
Increase screen brightness.
Reload your current page.
Mute the sound.
Maximize your window.
Decrease the volume.
Go to the thumbnails of all your
open apps.
Increase the volume.
■ Power on/off the computer.
Search the apps from the App list.
English
Go to the previous page.
■ Lock the screen: press until the
sign-in screen appears.
User Information Guide
7
DC IN/Battery Indicator
English
The DC IN/Battery indicator on the left side of the computer indicates the power conditions as detailed in
the following table.
Amber
Indicates the AC adaptor is connected and the battery is charging.
Green
Indicates the AC adaptor is connected and the battery is fully charged.
No light
Under any other conditions, the indicator does not light.
Battery Charging & Exhausting Time
The approximate time required to fully charge a discharged battery is as follows:
Power off (sleep, shut down): about 3 hours
When you turn off the power of your computer with the battery fully charged, the battery will be
exhausted within the following approximate period:
Power off (sleep, shut down): about 43 days
Power on: up to 9 hours
The computer’s battery is not accessible by the user.
8
User Information Guide
Connecting Peripheral Devices
Memory media
The computer is equipped with a memory media slot that can accommodate some kinds of memory
media such as Secure Digital (SD) Card and MultiMediaCard (MMC).
Please note that not all memory media have been tested and verified to work correctly.
Therefore, it is not possible to guarantee that all memory media will operate properly.
1. Turn the memory media so that the contacts (metal
areas) face down.
2. Insert the memory media into the memory media
slot on the computer.
3. Press the memory media gently until it clicks into
place.
User Information Guide
9
English
The following instructions apply to all types of supported media devices. To insert memory media, follow
the steps below:
HDMI device
HDMI (High-Definition Multimedia Interface) port digitally transfers both video and audio data without
reducing the quality.
To connect an HDMI-compatible display device, follow the steps as detailed below:
English
1. Plug one end of the HDMI cable into the HDMI in port of the
HDMI display device.
2. Plug the other end of the HDMI cable into the HDMI port on
your computer
3. Turn the HDMI display device's power on.
Not all the port operations of HDMI display devices have been confirmed, some HDMI
display devices may not function properly.
Security lock
A security lock enables you to anchor your computer to a desk or other heavy object in order to help
prevent unauthorized removal or theft. To connect a security cable to the computer, follow the steps as
detailed below:
1.Turn the computer so its left side faces you.
2.Align the security cable with the lock slot and secure it in
place.
10
User Information Guide
Specifications
The following table shows the physical dimensions and other relevant specifications of the computer.
Size
328.6 (w) x 227 (d) x 13.7/20.2 (h) millimeters
(not including parts that extend beyond the main body and the
dimensions may vary depending on the model you purchased)
Ambient temperature
Operating: 5°C (41°F) to 35°C (95°F)
English
Non-operating: -20°C (-4°F) to 60°C (140°F)
Relative humidity
Operating: 20% to 80% (noncondensing)
Non-operating: 10% to 90% (noncondensing)
Altitude (from sea
level)
Operating: -60 to 3,000 meters
Non-operating: -60 to 10,000 meters maximum
Battery type
Battery pack (52Wh, 4 cell)
Power requirements
AC adaptor: 100-240V AC, 50 or 60 Hz (cycles per second)
Computer: 19V DC
User Information Guide
11
Copyright
© 2013 by TOSHIBA Corporation. All rights reserved. Under the copyright laws, this manual cannot be
reproduced in any form without the prior written permission of TOSHIBA. No patent liability is assumed,
with respect to the use of the information contained herein.
English
First edition December 2013
Disclaimer
This manual has been validated and reviewed for accuracy. The instructions and descriptions it contains
are accurate for your computer at the time of this manual’s production. However, succeeding computers
and manuals are subject to change without notice. TOSHIBA assumes no liability for damages incurred
directly or indirectly from errors, omissions or discrepancies between the computer and the manual.
Trademarks
Google, Chrome, Chromebook and the Chrome logo are registered trademarks or trademarks of Google
Inc.
The terms HDMI and HDMI High-Definition Multimedia Interface, and the HDMI Logo are trademarks or
registered trademarks of HDMI Licensing LLC in the United States and other countries.
All other product names and service names in this manual may be trademarks or registered trademarks
of their respective companies.
12
User Information Guide
EU Declaration of Conformity
This product is carrying the CE-Mark in accordance with the related European Directives.
Responsible for CE-Marking is TOSHIBA EUROPE GMBH, Hammfelddamm 8, 41460
Neuss, Germany. The complete and official EU Declaration of Conformity can be found on
TOSHIBA’s web site http://epps.toshiba-teg.com on the Internet.
Following information is only valid for EU-member States:
The crossed out wheeled dust bin symbol indicates that products must be collected and
disposed of separately from household waste. Integrated batteries and accumulators can
be disposed of with the product. They will be separated at the recycling centres.
The black bar indicates that the product was placed on the market after August 13, 2005.
By participating in separate collection of products and batteries, you will help to assure the
proper disposal of products and batteries and thus help to prevent potential negative
consequences for the environment and human health.
For more detailed information about the collection and recycling programmes available in
your country, please visit our website (http://eu.computers.toshiba-europe.com) or contact
your local city office or the shop where you purchased the product.
User Information Guide
13
English
Disposal of products
Disposal of batteries and/or accumulators
The crossed out wheeled dust bin symbol indicates that batteries and/or accumulators
must be collected and disposed of separately from household waste.
If the battery or accumulator contains more than the specified values of lead (Pb), mercury
(Hg), and/or cadmium (Cd) defined in the Battery Directive (2006/66/EC), then the
chemical symbols for lead (Pb), mercury (Hg) and/or cadmium (Cd) will appear below the
crossed out wheeled dust bin symbol.
English
By participating in separate collection of batteries, you will help to assure the proper
disposal of products and batteries and thus help to prevent potential negative
consequences for the environment and human health.
For more detailed information about the collection and recycling programmes available in
your country, please visit our website (http://eu.computers.toshiba-europe.com) or contact
your local city office or the shop where you purchased the product.
These symbols may not stick depending on the country and region where you
purchased.
14
User Information Guide
REACH - Compliance Statement
The new European Union (EU) chemical regulation, REACH (Registration, Evaluation, Authorization and
Restriction of Chemicals), entered into force on 1 June 2007. TOSHIBA will meet all REACH
requirements and is committed to provide our customers with information about the chemical
substances in our products according to REACH regulation.
Disposing of the Computer and the Computer's Battery
Contact an authorized TOSHIBA service provider for details regarding how to dispose of the computer
and the battery.
User Information Guide
15
English
Please consult the following website www.toshiba-europe.com/computers/info/reach for information
about the presence in our articles of substances included on the candidate list according to article 59(1)
of Regulation (EC) No 1907/2006 („REACH“) in a concentration above 0.1 % weight by weight.
ENERGY STAR® Program
Your Computer model may be ENERGY STAR® compliant. If the model you
purchased is compliant, it is labeled with the ENERGY STAR logo on the computer
and the following information applies.
English
TOSHIBA is a partner in the ENERGY STAR Program and has designed this
computer to meet the latest ENERGY STAR guidelines for energy efficiency. Your
computer ships with the power management options preset to a configuration that will
provide the most stable operating environment and optimum system performance for
both AC power and battery modes.
To conserve energy, your computer is set to enter the low-power Sleep Mode which shuts down the
system within 30 minutes and the display within 8 minutes of inactivity in AC power mode. TOSHIBA
recommends that you leave this and other energy saving features active, so that your computer will
operate at its maximum energy efficiency. You can wake the computer from Sleep Mode by pressing the
power button.
Products that earn the ENERGY STAR prevent greenhouse gas emissions by meeting strict energy
efficiency guidelines set by the US EPA and the EU Commission. According to the EPA, a computer
meeting the new ENERGY STAR specifications will use between 20% and 50% less energy depending
on how it is used.
Visit http://www.eu-energystar.org or http://www.energystar.gov for more information regarding the
ENERGY STAR Program.
16
User Information Guide
Information for Wireless Devices
Wireless devices and your health
Wireless products, like other radio devices, emit radio frequency electromagnetic energy. The level of
energy emitted by Wireless products however is far much less than the electromagnetic energy emitted
by wireless devices like for example mobile phones.
In some situations or environments, the use of Wireless products may be restricted by the proprietor of
the building or responsible representatives of the organization. These situations may for example
include:
■ Using the Wireless products equipment on board of airplanes, or
■ In any other environment where the risk of interference to other devices or services is perceived or
identified as harmful.
If you are uncertain of the policy that applies on the use of wireless devices in a specific organization or
environment (e.g. airports), you are encouraged to ask for authorization to use the Wireless device prior
to turning on the equipment.
User Information Guide
17
English
Because Wireless products operate within the guidelines found in radio frequency safety standards and
recommendations, TOSHIBA believes Wireless products is safe for use by consumers. These standards
and recommendations reflect the consensus of the scientific community and result from deliberations of
panels and committees of scientists who continually review and interpret the extensive research
literature.
Canada - Industry Canada (IC)
This device complies with RSS 210 of Industry Canada.
Operation is subject to the following two conditions: (1) this device may not cause interference, and (2)
this device must accept any interference, including interference that may cause undesired operation of
this device.
The term "IC" before the equipment certification number only signifies that the Industry Canada technical
specifications were met.
English
USA-Federal Communications Commission (FCC)
This equipment has been tested and found to comply with the limits for a Class B digital device, pursuant
to Part 15 of FCC Rules. These limits are designed to provide reasonable protection against harmful
interference in a residential installation.
TOSHIBA Support
If you require any additional help using your computer or if you are having problems operating the
computer and suspect that it is hardware related, you may need to contact TOSHIBA for additional
technical assistance. Visit TOSHIBA technical support website:
www.toshiba-europe.com
18
User Information Guide