1
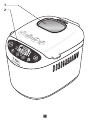
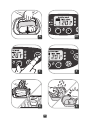
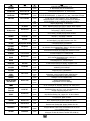
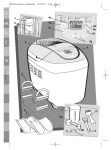
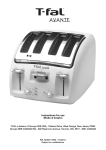
EN
FR
Actibread
www.t-falusa.com
1
2
2
5
3
4
6
7
2f
2a
2c
2g
2g
2g
2d
3
IMPORTANT SAFEGUARDS
When using electrical appliances, basic safety precautions should always be followed including the following:
1. Read all instructions.
2. Do not touch hot surfaces. Use handles or knobs.
3. To protect against electrical shock do not immerse cord, plugs, or this appliance in water or other liquid.
4. Not intended for use by children. Close supervision is necessary for any appliance being used near children.
5. Unplug from outlet when not in use and before cleaning. Allow to cool before putting on or taking off
parts.
6. Do not operate any appliance with a damaged cord or plug or after the appliance malfunctions, or has
been damaged in any manner. Return appliance to the nearest authorized service facility for examination,
repair or adjustment.
7. The use of accessory attachments not recommended by the appliance manufacturer may cause injuries.
8. Do not use outdoors.
9. Do not let cord hang over edge of table or counter, or touch hot surfaces.
10. Do not place on or near a hot gas or electric burner, or in a heated oven.
11. Extreme caution must be used when moving an appliance containing hot oil or other hot liquids.
12. Plug cord into the wall outlet. To disconnect, press and hold the START/STOP button for a second, remove
plug from wall outlet.
13. Do not use appliance for other than intended use.
SAVE THESE INSTRUCTIONS
1.
2.
3.
4.
For your safety, this appliance complies with applicable technical rules and norms.
Check that the main voltage corresponds to the voltage indicated on the appliance.
Use a stable work surface, away from any contact with water and never in a built-in kitchen alcove.
Do not move the appliance when working.
Polarization instructions
This appliance has a polarized plug (one blade is wider than the other). To reduce the risk of electric shock,
this plug is intended to fit into a polarized outlet only one way. If the plug does not fit fully into the outlet,
reverse the plug. If it still does not fit, contact a qualified electrician. Do not attempt to modify the plug in
any way.
Short Cord instructions
1. A short power cord is to be provided to reduce the risk resulting from becoming entangled in or tripping
over a longer cord.
2. Longer power cords or extension cords are available and may be used if care is exercised in their use.
3. If a long power cord or extension cord is used,
a) The marked electrical rating of the cord or extension cord should be at least as great as the electrical
rating of the appliance, and
b) The cord should be arranged so that it will not hang over the countertop or tabletop where it can be
pulled on by children or tripped over unintentionally.
4
FOR HOUSEHOLD USE ONLY
DO
• All interventions other than cleaning and everyday maintenance by the customer must be performed by an
authorized service center.
• For your safety, only use accessories and spare parts designed for your appliance.
• All appliances undergo strict quality control. Practical usage tests are performed on randomly selected
appliances, which would explain any slight traces of use.
• At the end of the program, always use oven mitt to handle the bread pan or hot parts of the appliance. The
appliance becomes very hot during use.
• Never obstruct the air vents.
• Be very careful, steam can be released when you open the lid at the end of or during the program.
• When using program No.14 (jam, stewed fruit, etc.) watch out for steam and hot spattering when
opening the lid.
• Caution, if the dough overflows and touches the heating element, it can catch fire, therefore:
- Never exceed the quantities indicated in the recipes.
- Never exceed 2lbs of dough.
- Never exceed 2 cups of flour and 1 teaspoon of yeast.
• Disconnect the appliance if it shows any working abnormalities.
DO NOT
•
•
•
•
•
•
•
•
•
Do not use an external timer or separate remote control system.
Do not touch the metal parts or hot surfaces of the appliance when it is working.
Do not use this appliance as source of heating or drying.
Do not unplug appliance by pulling on cord. Instead grasp plug and pull to disconnect.
Do not touch the viewing window during and just after operation. The window can reach a high
temperature.
Do not place the appliance on other appliances.
Do not place paper, cardboard or plastic in or on the appliance.
Should any part of the appliance catch fire, do not attempt to extinguish it with water. Unplug the appliance.
Smother flames with a damp cloth.
This product has been designed for household use only. Any professional use, inappropriate use or failure to
comply with the instructions will avoid the warranty.
5
DESCRIPTION
1 - lid with viewing window
2 - control panel
a - display screen
b - on/off button
c - loaf weight selection
d - buttons for setting delayed start
and adjusting the time for programs
EN
e - crust color selection
f - choice of programs
g - operating indicator light
3
4
5
6
7
-
bread pan
kneading paddle
measuring cup
teaspoon/tablespoon
hook accessory for lifting out kneading paddle
PRACTICAL ADVICE
Preparation
1 Please read these instructions carefully: the method for making bread with this appliance is not the same
as for hand-made bread.
2 All ingredients used must be at room temperature (unless otherwise indicated) and must be weighed exactly.
Measure liquids with the measuring cup supplied. Use the teaspoon/ tablespoon supplied to measure
teaspoons on one side and tablespoons on the other. Ensure all spoon measures are level and not
heaped. Incorrect measurements could result in a poor end product.
3 For successful bread making using the correct ingredients is critical. Use ingredients before their use-by date
and keep them in a cool, dry place.
4 It is important to measure the quantity of flour precisely. That is why you should weigh out flour using a
kitchen scale. Use pre-measured packets of dried yeast, sold in most US grocery stores. Unless otherwise
indicated in the recipe, do not use baking powder. Once a packet of yeast has been opened, it should be
sealed and stored in a cool place and used within 48 hours.
5 To avoid spoiling of the dough, we advise that all ingredients should be put in the bread pan at the start
and that you should avoid opening the lid during use (unless otherwise indicated). Carefully follow the order
of ingredients and quantities indicated in the recipes. First the liquids, then the solids. Yeast should not
come into contact with liquids, sugar or salt.
General order to be followed:
> Liquids (butter, oil, eggs, water, milk)
> Salt
> Sugar
> Flour, first half
> Powdered milk
> Specific solid ingredients
> Flour, second half
> Yeast
6
Using
• Bread preparation is very sensitive to temperature and humidity conditions. In case of high heat, use
liquids that are cooler than usual. Likewise, if it is cold, it may be necessary to warm up the water or milk
(never exceeding 95°F).
• It can also sometimes be useful to check the state of the dough during the second kneading: it should
form an even ball which comes away easily from the walls of the pan.
- If all the flour has not been blended into the dough, add a little more water,
- if the dough is too wet and sticks to the sides, you may need to add a little flour.
Such corrections should be undertaken very gradually (no more than 1 tablespoon at a time) and wait to
see if there is an improvement before continuing.
• A common error is to think that adding more yeast will make the bread rise more. Too much yeast makes
the structure of the bread more fragile and it will rise a lot and then fall while baking. You can determine the
state of the dough just before baking by touching it lightly with your fingertips: the dough should be slightly
resistant and the fingerprint should disappear little by little.
Precautions for using gluten-free programs
• The flour mixtures have to be sifted with the yeast to avoid clumps.
• The kneading needs some encouragement: to foster their incorporation, scrape down any unmixed
ingredients from the sides to the middle of the bowl using a spatula (made of wood or plastic to avoid
scratching the coating).
• You should also help with incorporation when adding ingredients.
• The nature of the ingredients used for gluten-free recipes does not allow the bread to brown as it normally
would. The top of the bread often remains rather light.
• Gluten-free bread cannot rise like traditional bread and often remains flat on top.
• Not all premix brands deliver the same results: the recipes may need to be adjusted. Therefore, we
recommend that you experiment (see example below).
Example: adjust the quantity of liquid according to the consistency of the dough. It should be relatively supple,
but not too moist.
Too much liquid
OK
Exception: cake dough should have more liquid.
7
Too dry
BEFORE YOU USE YOUR APPLIANCE FOR THE FIRST TIME
• Remove the accessories and any stickers either inside or on the outside of the appliance - A.
• Clean all of the parts and the appliance itself using a damp cloth.
QUICK-START
• Fully unwind the power cord and plug it into a grounded socket.
• A slight odor may be given off when used for the first time.
• Remove the bread pan by lifting the handle and turning the bread pan slightly counter-clockwise. Then insert
the kneading paddle - B - C.
• Put the ingredients in the pan in exactly the order recommended. Make sure that all ingredients are weighed
with precision - D - E.
• Place the bread pan in the breadmaker. Holding the bread pan by the handle, insert it in the breadmaker so
that it fits over the drive shaft (you will need to tilt it slightly to one side to do this). Turn it gently clockwise
and it will lock into place - F- G.
• Close the lid. Plug in the breadmaker and switch it on. After you hear the beep, program 1 will appear on
the display as the default setting, i.e. 2 lbs, medium browning - H.
• Select the desired program using the
button.
• Press the
button. The timer will flash and the operating indictor light will illuminate. The operating
indicator lights up - I - J.
• Unplug the breadmaker at the end of the cooking or warming cycle. Lift the bread pan out of the
breadmaker. Always use oven gloves as the pan handle is hot, as is the inside of the lid. Turn out the hot
bread and place it on a rack for at least 1 hour to cool - K.
To get to know your breadmaker, we suggest trying the FRENCH BREAD recipe for your first loaf.
FRENCH BREAD (program 9)
INGREDIENTS - tsp = teaspoon - tbsp = tablespoon
BROWNING = MEDIUM
POIDS = 1000 g
TIME = 3:10
1. Water = 1 ½ cups
2. Salt = 2 tsp
8
3. Flour = 1 ¼ lb
4. Yeast = 1 ½ tsp
USING YOUR BREADMAKER
A default setting is displayed for each program. You will therefore have to select the desired settings
manually.
Selecting a program
Choosing a program triggers a series of steps which are carried out automatically one after another.
The menu button allows you to choose a certain number of different programs. The time corresponding
to the program is displayed. Every time you press the
button, the number on the display panel
switches to the next program from 1 - 15.
Using gluten-free programs.
Programs 1, 2 and 3 should be used to bake gluten-free breads and cakes. Only one weight is available
for each of the programs (2 lbs for programs 1 and 2 and 1.5 lbs for program 3).
Gluten-free breads and cakes are suitable for people who are intolerant (celiac disease) of the gluten
found in several grains (wheat, barley, rye, oat, Khorasan wheat, spelt, etc).
It is important to avoid cross-contamination with flour containing gluten. Use extra care when cleaning
the bowl, paddle and all the utensils that will be used to prepare gluten-free breads and cakes. Also
check that the yeast you use is free of gluten.
The consistency of gluten-free flours does not favor traditional mixing: we recommend that you sift the
flour mixes together with the yeast to prevent it from forming clumps.
This is why the delayed start feature is not available for the gluten-free programs.
You must also use a flexible wooden or plastic spatula to scrape the dough down from the sides of the
bowl to the center, along with any unincorporated ingredients, until the dough is homogenous.
Gluten-free bread will have a denser consistency and be lighter in color than normal bread.
1. Gluten-free bread. We recommend using a ready-to-use mix. Only the 2 lbs setting is available for this
program. For this setting a premix that is low in sugar and fat is recommended.
2. Gluten-free sweet bread. We recommend using a ready-to-use mix. Only the 2 lbs setting is available for
this program. For this setting a premix that is low in sugar and fat is recommended.
3. Gluten-free cake. We recommend using a ready-to-use mix. Only the 1.5 lbs setting is available for this
program.
4. Rapid whole wheat bread. This program is similar to the Whole wheat bread program but is quicker. The
texture of the bread may be a little more compact.
5. Whole wheat bread. Whole wheat bread program is used to make bread containing whole wheat flour.
6. Salt-free bread. Bread is one of the foods that provide the largest daily contribution of salt. Reducing salt
consumption can help reduce the risks of cardiovascular problems.
9
7. Rapid bread. Program 7 is specific to the Rapid bread recipe. Bread made using fast programs is more
compact than that made with the other programs.
8. Rapid sweet bread. This program is similar to the Sweet bread program but is quicker. The texture of the
bread may be a little more compact.
9. French bread. The French bread program corresponds to a traditional french crusty white bread recipe.
10. Sweet bread. The Sweet bread program is for recipes containing more sugar and fat such as brioches and
milk breads. If you are using special flour blends for brioche or rolls, do not exceed 1.5 lbs of dough in total.
11. Cooking only. The Cooking only program allows you to bake for 10 to 70 minutes (adjustable in increments
of 10 min). It can be selected alone and used:
a) with the Bread dough program,
b) to reheat cooked and cooled breads or to make them crusty,
c) to finish cooking in case of a prolonged electricity cut during a bread baking cycle. The breadmaker
should not be left unattended when using program 11. To interrupt the cycle before it is finished, the
program can be stopped manually by holding down the
button.
12. Bread dough. The Bread dough program does not bake. It is a kneading and rising program for all leavened
doughs such as pizza dough, rolls, sweet buns.
13. Cake. Can be used to make pastries and cakes with baking powder. Only the 1.5 lbs setting is available for
this program.
14. Jam. The Jam program automatically cooks jams and compots (stewed fruits) in the pan.
15. Pasta. Program 15 only kneads. It is for pasta dough, like noodles and gluten-free pizza dough for example.
Selecting the weight of the bread
The bread weight is set by default at 2 lbs. This weight is shown for informational purposes. See the recipes for
more details. Programs 1, 2, 3, 11, 12, 13, 14, 15 do not have weight settings.
Press the
button to set the chosen product - 1 lb, 1.5 lbs. or 2 lbs. The indicator light against the selected
setting will come on.
Selecting the crust color
By default, the color of the crust is set at MEDIUM. Programs 12, 14, 15 do not have a color setting.
Three choices are possible: Light / Medium / Dark.
If you want to change the default setting, press the
button until the indicator light facing the desired
setting comes on.
Start /Stop
Press the
button to switch the appliance on. The countdown begins.
To stop the program or to cancel delayed programming, hold down on the
10
button for 3 seconds.
CYCLES
A table (see the end of these instructions) indicates the breakdown of the various cycles for the
programme chosen.
Kneading
For forming the dough’s structure so that it can rise better.
During this cycle, and for programs 1, 2, 3, 4, 5, 6, 7, 8, 9, 10, 12, 13, you can add ingredients: dried fruit or
nuts, olives, etc. A beep indicates when you can intervene. See the summary table for preparation times (see
the end of these instructions) and the “extra” column. This column indicates the time that will be displayed on
your appliance’s screen when the beep sounds. For more precise information on how long before the beep
sounds, subtract the “extra” column time from the total baking time.
For example: “extra” = 1:45 and “total time” = 2:01, the ingredients can be added after 16 min.
Rest
Allows the dough to rest to improve kneading quality.
Rising
Time during which the yeast works to let the bread rise and to develop its aroma.
Baking
Transforms the dough into bread and gives it a golden crust.
Warming
Keeps the bread warm after baking. It is recommended that the bread should be turned out promptly
after baking, however.
For programs 1, 2, 3, 4, 5, 6, 7, 8, 9, 10, 13, you can leave your preparation in the appliance. A one-hour warming
cycle automatically follows baking. During the hour for which the bread is kept warm, the display shows 0:00
and the dots on the timer flash. At the end of the cycle, the appliance stops automatically after several
sound signals.
11
DELAYED START PROGRAM
You can program the appliance to start up to 15 hours in advance to have your preparation ready at the
time you want. This function cannot be used on programs 1, 2, 3, 7, 11, 12, 13, 14, 15.
This step comes after selecting the program, browning level and weight. The program time is displayed.
Calculate the time difference between the moment when you start the program and the time at which you
want your preparation to be ready. The machine automatically includes the duration of the program cycles.
Using the
and
buttons, display the calculated time ( up and
down). Short presses change the
time in intervals of 10 min + a short beep. Holding the button down gives continuous scrolling in 10-min
intervals.
For example, it is 8 pm and you want your bread to be ready for 7 am the next morning. Program 11:00 using
the
and . Press the
button. A beep is emitted. The timer colon blinks. The countdown begins. The
operating indicator light comes on.
If you make a mistake or want to change the time setting, hold down the
The default time is displayed. Start the operation again.
button until it makes a beep.
With the delayed start program do not use recipes which contain fresh milk, eggs, sour cream, yogurt, cheese
or fresh fruit as they could spoil overnight.
Practical advice
If there is a power cut: if, during the cycle, the program is interrupted by a power cut or mishandling, the
machine has a 7-min protection time during which the settings are saved. The cycle starts again where it
stopped. Beyond that time, the settings are lost.
If you plan to run a second program to bake another loaf, open the lid and wait 1 hour before beginning
the second preparation.
To turn out your loaf of bread: it may happen that the kneading paddle remains
stuck in the loaf when it is turned out. In this case, use the hook accessory as follows:
> once the loaf is turned out, lay it on its side while still hot and hold it down with
one hand, wearing an oven mitt,
> with the other hand, insert the hook in the axis of the kneading paddle - M,
> pull gently to release the kneading paddle - M,
> turn the loaf upright and stand on a rack to cool.
12
M
INGREDIENTS
Gluten-free flour. There are a great number of so-called "non-bread" flours (which do not contain gluten).
The most widely known are buckwheat, rice (white and brown), quinoa, corn, chestnut and sorghum flours. To
attempt to recreate the elasticity of gluten, it is crucial to mix together several types of non-bread flours and
to add thickening agents.
Thickening agents. To obtain a proper consistency and to try to imitate the elasticity of gluten, you can
also add xanthan gum and/or guar gum to your dough. These ingredients are used as thickeners, stabilizers
and emulsifiers in the agri-food industry.
Ready-to-use gluten-free mixes. These make it easier to bake gluten-free bread because they contain
thickeners and have the advantage of being guaranteed to contain no gluten; some are also organic. Not all
brands of ready-to-use gluten-free mixtures deliver the same results.
Fats and oils. Fats make the bread softer and provide more favor. It also stores better and longer. Too much
fat slows down rising. If you use butter, cut it into tiny pieces so that it is distributed evenly throughout the
preparation, or soften it. You can substitute 1 tablespoon butter for 1 tablespoon of oil. Do not add hot butter.
Keep the fat from coming into contact with the yeast, as fat can prevent yeast from rehydrating. Do not use
low fat spreads or butter substitutes.
Eggs. Eggs make the dough richer, improves the color of the bread and encourages the development of the
soft, white part. If you use eggs, reduce the quantity of liquid you use proportionally. Break the egg then slowly
add the liquid until you reach the quantity of liquid indicated in the recipe. Recipes are designed for one 1.5
ounce size egg; if your eggs are bigger, add a little flour; if they are smaller, use less flour.
Milk. Recipes use either fresh or powdered milk. If using powdered milk, add the quantity of water stated in
the recipe. It enhances the flavor and improves the shelf-life of the bread. For recipes using fresh milk, you can
substitute some of it with water but the total volume must equal the quantity stated in the recipe. Low-fat or
fat-free milk is best to avoid bread from having too dry of a texture. Milk also has an emulsifying effect which
evens out its airiness, giving the soft, white part a better texture and appearance.
Water. Water rehydrates and activates the yeast. It also hydrates the starch in the flour and helps the soft,
white part form. Water can be totally or partially replaced with milk or other liquids. Use liquids at room
temperature, except for gluten-free breads that require the use of lukewarm water (approximately 95°F).
Flour. The weight of the flour varies significantly depending on the type of flour used. Depending on the
quality of the flour, baking results may also vary. Keep flour in a hermetically sealed container, as flour reacts
to fluctuations in atmospheric conditions, absorbing moisture or losing it. Use “strong flour”, “bread flour” or
“baker’s flour” rather than standard flour. Adding oats, bran, wheat germ, rye or whole grains to the bread
dough will give a smaller, heavier loaf of bread. If you are using special flour blends for bread, brioche or
rolls, do not exceed 1.5 lbs. of dough in total. Sifting the flour also affects the results: the more the flour is
whole (i.e. the more of the outer envelope of the wheat it contains), the less the dough will rise and the denser
the bread. You can also find ready-to-use bread premixes in the grocery store. Follow the manufacturer’s
instructions when using these preparations. Usually, the choice of the program will depend on the preparation
used. For example: Whole wheat - Program 5.
13
Sugar. Use white sugar, brown sugar or honey. Do not use sugar cubes. Sugar acts as food for the yeast,
provides a sweeter tasting bread and improves the browning of the crust. Artificial sweeteners cannot be
substituted for sugar as the yeast will not react with them.
Salt. Salt gives taste to food and regulates the yeast’s activity. It should not come into contact with the yeast.
Thanks to salt, the dough is firm, compact and does not rise too quickly. It also improves the structure of the
dough. Use ordinary table salt. Do not use coarse salt or salt substitutes.
Yeast. Baker’s yeast exists in several forms: fresh in small cubes, dried and active to be rehydrated or dried
and instant. Fresh yeast is sold in supermarkets (bakery or fresh produce departments), but you can also buy
fresh yeast from your local baker. In its fresh or instant dried form, yeast should be added directly to the baking
pan of your breadmaker with the other ingredients. Remember to crumble the fresh yeast with your fingers to
make it dissolve more easily. Only active dried yeast (in small granules) must be mixed with a little tepid water
before use. Choose a temperature close to 95°F, less and it will not rise as well, more will make it lose its rising
power. Keep to the stated amounts and remember to multiply the quantities if you use fresh yeast (see
equivalents chart below).
Equivalents in quantity/weight between dried yeast and fresh yeast:
Dried yeast (in tsp)
1 1½ 2 2½ 3 3½ 4 4½ 5
Fresh yeast (in tbsp)
½ 1 1¼ ½ 1¾ 2 2½ 2¾ 3
To make gluten-free breads, you must use a special gluten-free yeast.
Add-in's (dried fruit or nuts, olives.). Add a personal touch to your recipes by adding whatever
ingredients you want, taking care:
> to add following the beep for additional ingredients, especially those that are fragile such as dried fruit,
> to add the most solid grains (such as flax or sesame) at the start of the kneading process to facilitate use of
the machine (delayed starting, for example),
> to thoroughly drain moist ingredients (olives),
> to lightly flour fatty ingredients for better blending,
> not to add too large a quantity of additional ingredients, especially cheese, fresh fruit and fresh vegetables,
as they can affect the development of the dough, respect the quantities indicated in the recipes,
> that no ingredients fall outside the pan.
CLEANING AND MAINTENANCE
• Unplug the appliance.
• Clean all the parts, the appliance itself and the inside of the pan with a damp cloth. Dry thoroughly - L.
• Wash the pan and kneading paddle in hot soapy water. If the kneading paddle remains stuck in the pan, let
it soak for 5 to 10 min.
• When necessary the lid can be cleaned with warm water and a sponge.
• Do not wash any part in a dishwasher.
• Do not use household cleaning products, scouring pads or alcohol. Use a soft, damp cloth.
• Never immerse the body of the appliance or the lid in water.
14
RECIPES
For each recipe, add the ingredients in the exact order indicated. Depending on the recipe chosen and the
corresponding program, you can take a look at the summary table of preparation times (see the end of these
instructions) and follow the breakdown for the various cycles.
tsp = teaspoon - tbsp = tablespoon
PROG. 1 - GLUTEN-FREE BREAD
PROG. 2 - GLUTEN-FREE SWEET BREAD
PROG. 3 - GLUTEN-FREE CAKE
2 lbs
Warm milk*
Beaten eggs*
Salt*
Chestnut flour**
Corn flour**
Gluten-free dry yeast **
Melted butter
Vanilla extract
Icing sugar
We recommend using a ready-to-use mixture.
Follow the recommendations on the pre-mix packaging.
Do not exceed 2 lbs of dough.
Beat together all ingredients followed by (*) until they
become pale. Then add and mix the ingredients followed by
(**) previously sieved. Then place the remaining ingredients
in the tank in the order indicated.
PROG. 4 - RAPID WHOLE WHEAT BREAD
PROG. 5 - WHOLE WHEAT BREAD
Whole wheat bread 1 lb
1.5 lbs
Water
1 cup
1 ¼ cups
Sunflower oil
1 ½ tbsp 2 tbsp
Salt
1 tsp
1 ½ tsp
Sugar
1 ½ tsp
2 tsp
Bread flour
1 cup
1 ¹⁄³ cups
Wholewheat flour
1 cup
2 cups
Bread machine
dry yeast
1 tsp
1 tsp
PROG. 7 - RAPID BREAD
Super quick bread
1 lb
Warm water
1 cup
Sunflower oil
3 tsp
Salt
½ tsp
Sugar
2 tsp
Powdered milk
1 ½ tbsp
Bread Flour
2 ½ cups
Bread machine
dry yeast
1 ½ tsp
PROG. 6 - SALT FREE BREAD
1 lb
Water
1 cup
Bread Flour
2 ²⁄³ cups
Bread machine
dry yeast
½ tsp
When the machine beeps, add
Sesame seeds*
¹⁄³ cup
2lbs
1 ¾ cups
3 tbsp
2 tsp
3 tsp
2 cups
3 cups
1.5 lbs
1 tbsp + 1 tsp
3
1 pinch
1 ¼ cups
½ cup
2 tsp
1 stick
1 tsp
¾ cup
1.5 lbs
1 ¹⁄³ cup
3 ²⁄³ cups
2lbs
1 ²⁄³ cup
5 ¹⁄³ cups
1 tsp
1 tsp
½ cup
¾ cups
2 tsp
1.5 lbs
1 ¼ cup
1 tbsp
1 tsp
3 tsp
2 tbsp
3 ½ cups
2lbs3
1 ¾ cup
1 ½ tbsp
1 tsp
1 tbsp
3 tbsp
5 cups
2 ½tsp
3 tsp
PROG. 8 - RAPID SWEET BREAD
PROG. 10 - SWEET BREAD
Sandwich bread
1 lb
1.5 lbs
Cold milk
½ cup
1 cup
Eggs
1
1
Bread machine
dry yeast
²⁄³ tsp
1 tsp
Bread flour
2 ¹⁄8 cups 3 ¹⁄8 cups
Gluten
½ tsp
1 tsp
Sugar
1 ½ tbsp 2 tbsp
Salt
1 tsp
1 ½ tsp
When the machine beeps, add
Butter*
¹⁄³ stick
½ stick
1 medium egg = 0.1 lb
15
2lbs
1 cup
2
1 ¹⁄³ tsp
4 ¼ cups
1 tsp
3 tbsp
2 tsp
²⁄³ stick
PROG. 9 - FRENCH BREAD
Crusty french
garlic bread
1 lb
Water
²⁄³ cup
Salt
¾ tsp
Sugar
¼ tbsp
Bread flour
1 ¾ cups
Bread machine
dry yeast
¾ tsp
Chopped garlic cloves 1
PROG. 13 - CAKE
Lemon cake
Beaten eggs*
Sugar*
Salt*
Butter
Sifted white flour
Baking powder
Lemon juice
Zest of lemon
PROG. 12 - DOUGH
1.5 lbs
1 cup
1 tsp
½ tbsp
2 ²⁄³ cups
2lbs
1 ¹⁄³ cups
1½ tsp
½ tbsp
3 ½ cups
1 tsp
2
1 ½ tsp
2
1.5 lbs
3
¾ cups
pinch
¼ cup
1 ½ cups
2 1/4 tsp
3 tbsp
1 lemon
2lbs
3
1 cup
pinch
¹⁄³ cup
2 ¼ cups
3 tsp
4 tbsp
1 lemon
Pizza
Water
Olive oil
Salt
Bread Flour
Bread machine
dry yeast
1.5 lbs
1 cup
1 ½ tbsp
1 tsp
3 ²⁄³ cups
2lbs
1 ¹⁄³ cup
2 tbsp
1 ½ tsp
5 cups
½ tsp
1 tsp
1 ½ tsp
PROG. 14 - JAM
1 lb
2
½ cup
pinch
¹⁄8 cup
1 ¹⁄8 cup
1 ½ tsp
2 tbsp
½ lemon
Compotes and jams
2lbs
Strawberries, peaches,
rhubarb or apricots
1 lb
Sugar
1 ¾ cups
Lemon juice
juice of ¾ lemon
Pectin
2 tbsp
Cut and coarsely chop the fruit. Pour the ingredients
into the tank in the order indicated.
Beat together all ingredients followed by (*) until they
become pale. Pour mixture into the bread pan. Add the
other ingredients.
PROG. 15 - PASTA
Fresh pasta
Water
Beaten eggs
Salt
Bread Flour
1 lb
²⁄³ cup
1 tbsp
½ tsp
2 ½ cups
1 lb
3 tbsp
3
¼ tsp
2 ¾ cups
1.5 lbs
3 ½ tbsp
3
½ tsp
4 cups
2lbs
¹⁄³ cup
6
1 tsp
5 ¾ cups
1 medium egg = 0.1 lb
16
TROUBLESHOOTING GUIDE TO IMPROVE YOUR RECIPES
Not getting the expected
results? This table will
help you.
Bread Bread falls Bread does Crust not Sides brown but Top and
rises too after rising not rise
golden bread not fully sides
much
too much
enough enough
cooked
floury
The
button was pressed
during baking.
Not enough flour.
Too much flour.
Not enough yeast.
Too much yeast.
Not enough water.
Too much water.
Not enough sugar.
Poor quality flour.
Wrong proportions
of ingredients (too much).
Water too hot.
Water too cold.
Wrong program.
TECHNICAL TROUBLESHOOTING GUIDE
PROBLEMS
The kneading paddle is stuck
in the pan.
After pressing , nothing
happens.
CAUSES - SOLUTIONS
• Let it soak before removing it.
• EO1 is displayed and flashes on the screen, the appliance beeps: the
appliance is too hot. Wait 1 hour between 2 cycles.
• EOO is displayed and flashes on the screen, the appliance beeps: the
appliance is too cold. Wait for it to reach room temperature.
• HHH or EEE is displayed and flashes on the screen, the appliance beeps:
malfunction. The machine must be serviced by authorized personnel.
• A delayed start has been programmed.
After pressing , the motor • The pan has not been correctly inserted.
is on but no kneading takes • Kneading paddle missing or not installed properly.
place.
In the two cases cited above, stop the appliance manually with a long press on
the
button. Start the recipe again from the beginning.
After a delayed start, the
• You forgot to press
after programming the delayed start program.
bread has not risen enough • The yeast has come into contact with salt and/or water.
or nothing happens.
• Kneading paddle missing.
Burnt smell.
• Some of the ingredients have fallen outside the pan: unplug the appliance,
let it cool down, then clean the inside with a damp sponge and without any
cleaning product.
• The preparation has overflowed: the quantity of ingredients used is too great,
notably liquid. Follow the proportions given in the recipe.
17
TABLE OF CYCLES - TABLE DES CYCLES
PROG. WEIGHT BROWNING
(lbs)
POIDS
(lbs)
DORAGE
TOTAL
TIME
(h)
TEMPS
TOTAL
(h)
PREPARING THE DOUGH COOKING KEEP WARM EXTRA
(Kneading-Rest-Rising)
(h)
(h)
(h)
(h)
PRÉPARATION DE LA PÂTE CUISSON MAINTIEN AU
(Pétrissage-Repos-Levée)
(h)
CHAUD
(h)
(h)
1
2
1
2
3
2:01
1:06
0:55
1:00
1:45
2
2
1
2
3
2:15
1.15
1:00
1:00
2:05
3
1.5
1
2
3
1:45
0:15
1:30
1:00
1:35
4
5
6
7
8
9
10
1
1.5
2
1
1.5
2
1
1.5
2
1
1.5
2
1
1.5
2
1
1.5
2
1
1.5
2
1
2
3
1
2
3
1
2
3
1
2
3
1
2
3
1
2
3
1
2
3
2:00
2:05
2:10
2:40
2:45
2:50
2:50
2:55
3:05
1:25
1:30
1:35
2:20
2:25
2:30
2:55
3:00
3:10
3:20
3:25
3:30
1:05
1:45
2:00
0:40
1:40
2:05
2:40
18
0:55
1:00
1:05
0:55
1:00
1:05
0:50
0:55
1:05
0:45
0:50
0:55
0:40
0:45
0:50
0:50
0:55
1:05
0:40
0:45
0:50
1:00
1:00
1:00
1:00
1:00
1:00
1:00
1:45
1:50
1:55
2:21
2:26
2:31
2:22
2:27
2:37
1:15
1:20
1:25
1:52
1:57
2:02
2:31
2:36
2:46
2:39
2:44
2:49
PROG. WEIGHT BROWNING
(lbs)
POIDS
(lbs)
DORAGE
TOTAL
TIME
(h)
TEMPS
TOTAL
(h)
PREPARING THE DOUGH COOKING KEEP WARM EXTRA
(Kneading-Rest-Rising)
(h)
(h)
(h)
(h)
PRÉPARATION DE LA PÂTE CUISSON MAINTIEN AU
(Pétrissage-Repos-Levée)
(h)
CHAUD
(h)
(h)
1
2
3
0:10
---
---
1:20
1:20
13
2
1
2
3
2:10
14
---
---
---
---
11
12
15
1
2
3
0:10
---
---
---
---
---
0:56
0:25
1:45
1:00
1:50
1:05
0:15
0:50
---
---
0:15
0:15
---
---
---
1:10
1:10
LIGHT - LÉGER
MEDIUM - MOYEN
DARK - FORT
Comment: the total duration does not include warming time.
Remarque : la durée totale n’inclut pas le temps de maintien au chaud.
19
A
B
C
D
E
F
20
G
H
I
J
K
L
21
T-FAL INTERNATIONAL GUARANTEE: COUNTRY LIST
¸z« “§∞«
ALGERIA
ARGENTINA
ՀԱՅԱՍՏԱՆ
ARMENIA
AUSTRALIA
ÔSTERREICH
AUSTRIA
BELGIQUE BELGIE
BELGIUM
БЕЛАРУСЬ
BELARUS
BOSNA I
HERCEGOVINA
BRASIL
BRAZIL
БЪЛГАРИЯ
BULGARIA
CANADA
CHILE
COLOMBIA
HRVATSKA
CROATIA
ČESKÁ REPUBLIK
CZECH REPUBLIC
DANMARK
DENMARK
EESTI
ESTONIA
¸B±
EGYPT
SUOMI
FINLAND
FRANCE + Guadeloupe,
Martinique, Réunion,
Saint-Martin
DEUTSCHLAND
GERMANY
ΕΛΛΑΔΛ
GREECE
香港
HONG KONG
MAGYARORSZÁG
HUNGARY
INDONESIA
ITALIA
ITALY
日本
JAPAN
ҚАЗАҚСТАН
KAZAKHSTAN
한국어
KOREA
LATVJA
LATVIA
…b∫∞Ë W≤ß
1 year
2 años
2 years
2 տարի/
2 years
CIJA
9 rue Puvis de Chavannes - Saint Euquene - Oran
GROUPE
SEB
ARGENTINA S.A.
0800-122-2732
Billinghurst 1833 3° - C1425DTK - Capital Federal - Buenos Aires
ՓԲԸ
"Գրուպպա
ՍԵԲ",
(010) 55-76-07
125171 Մոսկվա, Լենինգրադյան - խծուղի, 16А, շին.3
GROUPE
SEB
AUSTRALIA
02 97487944
1 year
PO Box 7535, - Silverwater NSW 2128
2 Jahre
SEB ÖSTERREICH GmbH
01 866 70299 00
2 years Campus 21 - Businesspark Wien Süd - Liebermannstr. A02 702 - 2345 Brunn am Gebirge
2 ans
GROUPE SEB BELGIUM SA NV
070 23 31 59
2 years
25 avenue de l'Espérance - ZI - 6220 Fleurus
2 года
ЗАО «Группа СЕБ-Восток», 125171, Москва,
017 2239290
Ленинградское - шоссе, д. 16А, стр. 3
2 years
Info-linija za potrošače 2 godine
SEB Développement
033 551 220
2 years
Predstavništvo u BiH - Vrazova 8/II - 71000 Sarajevo
SEB COMERCIAL DE PRODUTOS DOMÉSTICOS LTDA
1
ano
11 2915-400
1 year
Rua Venâncio Aires, 433, Pompéia, São Paulo/SP
2 години
ГРУП СЕБ БЪЛГАРИЯ ЕООД
0700 10 330
2 years
бул. България 81 B, ет. 5 - 1404 София
1
an
GROUPE SEB CANADA
800-418-3325
1 year
345 Passmore Avenue - Toronto, ON M1V 3N8
GROUPE SEB CHILE Comercial Ltda Av. Providencia, 2331, piso 5,
2
años
12300 209207
2 years
Oficina 501 Santiago
2 años
GROUPE SEB COLOMBIA
18000919288
2 years
Apartado Aereo 172, Kilometro 1 - Via Zipaquira - Cajica Cundinamarca
2 godine
SEB Développement S.A.S.
01 30 15 294
2 years
Vodnjanska 26 - 10000 Zagreb
2
roky
GROUPE
SEB ČR spol. s r .o.
731 010 111
2 years
Futurama Business Park (budova A) Sokolovská 651/168a - 186 00 Prha 8
2 år
GROUPE SEB NORDIC AS
44 663 155
2 years
Tempovej 27 - 2750 Ballerup
GROUPE SEB POLSKA SP Z O.O.
2 aastat
668 1286
2 years
ul. Bukowińska 22b - 02-703 Warszawa
X§|S Vº Vuπ
16622: ʪ Uº∞« ◊î∞« 1 year
ãÅL - W¥ãbcJß ù« ë∫ 豧 - u¥U± 14 oO ãD
2
Vuotta
Groupe
SEB Finland
09 622 94 20
2 years
Kutojantie 7 - 02630 Espoo
(0)41 28 18 53
09 74 50 47 74
1 an
1 year
GROUPE SEB FRANCE
Service Consommateur Tefal - BP 15 - 69131 ECULLY CEDEX
0212 387 400
2106371251
2 Jahre
2 years
2 χρόνια
2 years
8130 8998
1 year
06 1 801 8434
2 év
2 years
+62 21 5793 6881
1 year
GROUPE SEB DEUTSCHLAND GmbH / KRUPS GmbH
Herrnrainweg 5 - 63067 Offenbach
SEB GROUPE ΕΛΛΑΔΟΣ Α.Ε.
Οδός Καβαλιεράτου 7 Τ.Κ. 145 64 Ν. Κηφισιά
SEB ASIA Ltd. Room 903, 9/F, South Block, Skyway House 3 Sham Mong Road, Tai Kok Tsui, Kowloon - Hong-Kong
GROUPE SEB CENTRAL EUROPE Kft.
Távíró köz 4 - 2040 Budaörs
Groupe SEB Indonesia (Representative office)
Sudirman Plaza, Plaza Marein 8th Floor
JL Jendral Sudirman Kav 76-78, Jakarta 12910, Indonesia
199207354
2 years
2 anni
GROUPE SEB ITALIA S.p.A.
Via Montefeltro, 4 - 20156 Milano
0570 077 772
1 year
株式会社グループセブジャパン
〒141-0022 東京都品川区東五反田3-14-13 高輪ミューズビル
727 378 39 39
2 жыл
2 years
ЖАҚ «Группа СЕБ- Восток»
125171, Мәскеу, Ленинградское шоссесі,16А, 3 үйі
1588-1588
1 year
(유)그룹 세브 코리아
서울시 종로구 서린동 88 서린빌딩 2층, 110-790
6 616 3403
2 gadi
2 years
GROUPE SEB POLSKA Sp. z o.o.
ul. Bukowińska 22b, 02-703 Warszawa
22
LIETUVA
LITHUANIA
5 214 0057
MAКЕДОНИЈА
MACEDONIA
(0)2 20 50 022
2 metai
2 years
2 ans
2 years
2 годин
2 years
LUXEMBOURG
0032 70 23 31 59
MALAYSIA
603-77100 8000
2 years
MEXICO
(01800) 112 8325
MOLDOVA
(22) 929249
NEDERLAND
The Netherlands
0318 58 24 24
1 año
1 year
2 ani
2 years
2 jaar
2 years
NEW ZEALAND
0800 700 711
1 year
815 09 567
NORGE
NORWAY
PERU
441 4455
POLSKA
POLAND
0 801 300 421 koszt jak
za połączenie lokalne
PORTUGAL
808 284 735
2 år
2 years
1 año
1 year
2 lata
2 years
2 anos
2 years
REPUBLIC
OF IRELAND
01 677 4003
1 year
ROMÂNIA
ROMANIA
РОССИЯ
RUSSIA
SRBIJA
SERBIA
0 21 316 87 84
2 ani
2 years
2 года
2 years
2 godine
2 years
495 213 32 30
060 0 732 000
SINGAPORE
6550 8900
1 year
SLOVENSKO
SLOVAKIA
SLOVENIJA
SLOVENIA
ESPAÑA
SPAIN
SVERIGE
SWEDEN
233 595 224
2 roky
2 years
2 leti
2 years
2 años
2 years
2 år
2 years
2 ans
2 Jahre
2 years
02 234 94 90
902 31 24 00
08 594 213 30
SUISSE / SCHWEIZ
SWITZERLAND
044 837 18 40
台灣
TAIWAN
02 28333716
1 year
ประเทศไทย
THAILAND
02 769 7477
2 years
TÜRKIYE
TURKEY
216 444 40 50
2 YIL
2 years
U.S.A.
800-395-8325
1 year
УKPAÏHA
UKRAINE
044 300 13 04
2 роки
2 years
UNITED KINGDOM
0845 602 1454
1 year
VENEZUELA
0800-7268724
2 años
2 years
VIETNAM
08 38645830
2 years
GROUPE SEB POLSKA Sp. z o.o.
ul. Bukowińska 22b, 02-703 Warszawa
GROUPE SEB BELGIUM SA NV
25 avenue de l'Espérance - ZI - 6220 Fleurus
Groupe SEB Bulgaria EOOD - Office 1, floor 1, 52G Borovo St., 1680 Sofia - Bulgaria
ГРУП СЕБ БЪЛГАРИЯ ДООЕЛ - Ул. Борово 52 Г, сп. 1, офис 1, 1680 София - България
GROUPE SEB MALAYSIA SDN. BHD
Unit No. 402-403, Level 4, Uptown 2, No. 2, Jalan SS21/37,
Damansara Uptown, 47400, Petaling Jaya, Selangor D.E Malaysia
G.S.E.B. MEXICANA, S.A. de C.V. Goldsmith 38 Desp. 401, Col. Polanco Delegacion Miguel Hildalgo - 11 560 Mexico D.F.
ТОВ «Груп СЕБ Україна»
02121, Харківське шосе, 201-203, 3 поверх, Київ, Україна
GROUPE SEB NEDERLAND B.V.
De Schutterij 27 - 3905 PK Veenendaal
GROUPE SEB NEW ZEALAND
Unit E, Building 3, 195 Main Highway, Ellerslie, Auckland
GROUPE SEB NORDIC AS
Tempovej 27 - 2750 Ballerup - DANMARK
GROUPE SEB Perú
Av. Camino Real N° 111 of. 805 B - San Isidro - Lima - Perú
GROUPE SEB POLSKA Sp. z o.o
ul. Bukowińska 22b 02-703 Warszawa
GROUPE SEB IBÉRICA SA
Urb. da Matinha - Rua Projectada à Rua 3 - Bloco1 - 3° B/D 1950 - 327 Lisboa
GROUPE SEB IRELAND
Unit B3 Aerodrome Business Park, College Road, Rathcoole, Co. Dublin
GROUPE SEB ROMÂNIA
Str. Daniel Constantin nr. 8 - 010632 Bucureşti
ЗАО «Группа СЕБ-Восток», 119180 Москва,
125171, Москва, Ленинградское шоссе, д. 16А, стр. 3
SEB Developpement
Đorđa Stanojevića 11b - 11070 Novi Beograd
GROUPE SEB SINGAPORE Pte Ltd.
59 Jalan Pemipin, #04-01/02 L&Y Building - Singapore 577218
.o.r.s OKSNEVOLS BES EPUORG
avalsitarB 70 138 - 04 ánčinbyR
SEB d.o.o
Gregorčičeva ulica 6 - 2000 MARIBOR
GROUPE SEB IBÉRICA S.A.
C/ Almogàvers, 119-123, Complejo Ecourban - 08018 Barcelona
TEFAL SVERIGE SUBSIDIARY OF GROUP SEB NORDIC
Truckvägen 14 A, 194 52 Upplands Väsby
GROUPE SEB SCHWEIZ GmbH
Thurgauerstrasse 105 - 8152 Glattbrugg
SEB ASIA Ltd. Taiwan Branch
4F., No. 37 Dexing W. Rd., Shilin Dist., Taipei City 11158, Taiwan (R.O.C.)
GROUPE SEB THAILAND
2034/66 Italthai Tower, 14th Floor, n° 14-02, - New Phetchburi Road,
Bangkapi, Huaykwang, Bangkok, 10320
GROUPE SEB ISTANBUL AS
Beybi Giz Plaza Dereboyu Cad. - Meydan Sok. - No: 28 K.12 Maslak
GROUPE SEB USA
2121 Eden Road - Millville, NJ 08332
ТОВ «Груп СЕБ Україна»
02121, Харківське шосе, 201-203, 3 поверх, Київ, Україна
GROUPE SEB UK LTD
Riverside House, Riverside Walk - Windsor, Berkshire, SL4 1NA
GROUPE SEB VENEZUELA
Av Eugenio Mendoza, Centro Letonia, Torre ING Bank, Piso 15, Ofc 155
Urb. La Castellana, Caracas
Vietnam Fan Joint Stock Company
25 Nguyen Thi Nho Str, Ward 9, Tan Binh Dist, HCM city
23
www.t-falusa.com
T E FA L / T- FA L I N T E R N AT I O N A L G U A R A N T E E
Date of purchase: . . . . . . . . . . . . . . . . . . . . . . . . . . . . . / Date d'achat / Fecha de compra /
Data da compra / Data d'acquisto / Kaufdatum / Aankoopdatum / Købsdato / Inköpsdatum /
Kjøpsdato / Ostopäivä / Data zakupu / Data vânzării / Įsigijimo data/ Ostukuupäev / Datum
nakupa / Sorozatszám / Dátum nákupu / Pirkuma datums / Datum Kupovine / Datum kupnje /
Data cumpărării / Datum nákupu / Tarikh pembelian / Tanggal pembelian / Ngày mua hàng/
Satın alma tarihi / Дата прпдажи / Дата на закупуване / Датум на купуваое / Сатылған мерзімі /
Ημερομηνία αγοράς/ Վաճառքի օրը / วันที่ซื้อ / 購買日期 /購入日 / 구입일자 / ¡«dA∞« a¥¸U¢ / a¥¸U¢ bO dª
Product reference: . . . . . . . . . . . . . . . . . . . . . . . . . . / Référence du produit / Referencia del
producto / Referência do produto / tipo de prodotto / Typnummer des Gerätes / Artikelnummer
van het apparaat / Referencenummer / Produktreferens / Artikkelnummer / Tuotenumero /
referencja produktu / Model / Gaminio numeris / Toote viitenumber / Tip aparata / Vásárlás
kelte / Typ výrobku / Produkta atsauces numurs / Model proizvoda / Oznaka proizvoda / Cod
produs / Produk rujukan / Referensi produk / Mã sản phẩm/ Ürün kodu / Мпдель / Мпдель /
Мпдел на уреда / Мпделi / Κωδικός προιόνηος / Մոդել / รุ่นผลิตภัณฑ์ / 產品模型 / 製品レファレ
ンス番 / 제품명 / qLUJ∞« Z∑ÓMLÔ∞« l§d± / ‰uB∫L qLUJ l§d±
Retailer name & address: . . . . . . . . . . . . . . . . . . . . . . . . . . . . . . . . . . . . . . . . . . . . . . . . . . /
Nom et adresse du vendeur / Nombre y dirección del minorista / Nome e endereço do revendedor /
Nome e indirizzo delnegozzio / Name und Anschrift des Händlers / Naam en adres van de retailer /
Forhandler navn & adresse / Återförsäljarens namn och adress / Forhandler navn og adresse /
Jälleenmyyjän nimi ja osoite / nazwa i adres sprzedawcy / Numele şi adresa vânzătorului /
Parduotuvės pavadinimas ir adresas / Müüja kauplus ja aadress / Naziv in naslov trgovine /
Tipusszám / Názov a adresa predajcu / Veikala nosaukums un adrese / Naziv i adresa maloprodaje /
Naziv i adresa prodavca / Naziv i adresa prodajnog mjesta / Nume şi adresă vânzător / Název a
adresa prodejce / Nama dan alamat peruncit / Nama Toko Penjual dan alamat / Tên và địa chỉ
cửa hàng bán/ Satıcı firmanın adı ve adresi / Название и адрес прпдавца / Назва і адреса
прпдавця / Търгпвки пбект / Назив и адреса на прпдавницата / Сатушының аты және
мекен-жайы / Επωνυμία και διεύθσνζη καηαζηήμαηος / Վաճառողի անվանումը և հասցեն /
ชื่อและที่อยู่ของห้าง/ร้านที่ซื้อ / 零售商的店名和地址/販売店の名前、住所/소매점 이름과 주소/
Wzeπ∑∞« lzU° Ê«uM´Ë rß« / ‘Ëd≠ Áœdî ”¸œ¬ Ë ÂU≤
Distributor stamp . . . . . . . . . . . . . . . . . . . . . . . Cachet distributeur /Sello del distribuidor /
Carimbo do revendedor / Timbro del negozzio / Händlerstempel / Stempel van de retailer /
Forhandler stempel / Återförsäljarens stämpel / Forhandler stempel / Jälleenmyyjän leima /
pieczęć sprzedawcy / Ştampila vânzătorului / Antsp audas / Tempel / Žig trgovine / Eladó
neve, címe/ Razítko predajcu / Zīmogs / Pečat maloprodaje/ Pečat prodavca / Pečat prodajnog
mjesta / Ştampila vânzătorului/ Razítko prodejce/ Cap peruncit / Cap dari Toko Penjual / Cửa
hàng bán đóng dấu/ Satıcı Firmanın Kaşesi / Печать прпдавца / Печатка прпдавця / Печат на
търгпвския пбект / Печат на прпдавницата / Сатушының мөрі / Σθραγίδα καηαζηήμαηος /
Վաճառողի կնիքը / ตราประทับของห้าง/ร้านที่ซื้อ / 零 售 商 的 蓋 印 / 販 売 店 印 / 소매점 직인 /
Wze§∑∞« lzU° Â∑ª / ˆb¸ª ¸NL gu¸≠
24
TEFAL/T-FAL* INTERNATIONAL LIMITED GUARANTEE
: www.t-falusa.com
This product is repairable by TEFAL/T-FAL*, during and after the guarantee period.
Accessories, consumables and end-user replaceable parts can be purchased, if locally available, as described on the
TEFAL/T-FAL internet site www.t-falusa.com
The Guarantee
TEFAL/T-FAL guarantees this product against any manufacturing defect in materials or workmanship during the
guarantee period within those countries*** as stated in the country list on the last page of the user manual, starting
from the initial date of purchase.
The international manufacturer’s guarantee covers all costs related to restoring the proven defective product so that
it conforms to its original specifications, through the repair or replacement of any defective part and the necessary
labor. At TEFAL/T-FAL’s choice, a replacement product may be provided instead of repairing a defective product.
TEFAL/T-FAL’s sole obligation and your exclusive resolution under this guarantee are limited to such repair or
replacement.
Conditions & Exclusions
TEFAL/T-FAL shall not be obliged to repair or replace any product which is not accompanied by a valid proof of
purchase. The product can be taken directly in person or must be adequately packaged and returned, by recorded
delivery (or equivalent method of postage), to a TEFAL/T-FAL authorized service centre. Full address details for each
country’s authorized service centers are listed on TEFAL/T-FAL website (www.tefal.com) or by calling the appropriate
consumer Service centre set out in the attached Country List.
This guarantee applies only for products purchased and used for domestic purposes and will not cover any damage
which could occur as a result of misuse, negligence, failure to follow TEFAL/T-FAL instructions, or a modification or
unauthorized repair of the product, faulty packaging by the owner or mishandling by any carrier. It also does not
cover normal wear and tear, maintenance or replacement of consumable parts, or the following:
- using the wrong type of water or consumable
- scaling (any de-scaling must be carried out according to
the instructions for use)
- ingress of water, dust or insects into the product
- damages or bad results specifically due to wrong voltage
or frequency as stamped on the product ID or specification
- accidents including fire, flood, thunderbolt etc
- damage to any glass or porcelain ware in the
product
- mechanical damages, overloading
- professional or commercial use
Consumer Statutory Rights
This international TEFAL/T-FAL guarantee does not affect the Statutory Rights a consumer may have or those rights
that cannot be excluded or limited, nor rights against the retailer from which the consumer purchased the product.
This guarantee gives a consumer specific legal rights, and the consumer may also have other legal rights which vary
from State to State or Country to Country. The consumer may assert any such rights at his sole discretion.
*** Where a product purchased in one listed country and then used in another listed country, the international
TEFAL/T-FAL guarantee duration is the one in the country of usage, even if the product was purchased in a listed
country with different guarantee duration. The repair process may require a longer time if the product is not locally
sold by TEFAL/T-FAL. If the product is not repairable in the new country, the international TEFAL/T-FAL guarantee
is limited to a replacement by a similar or alternative product at similar cost, where possible.
* TEFAL household appliances appear under the T-FAL brand in some territories like America and Japan. TEFAL/T-FAL
are registered trademarks of Groupe SEB.
EN
4 - 17
FR
18 - 00
Ref. NC00120741 - 02/2014
www.t-falusa.com