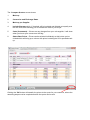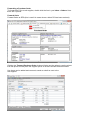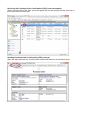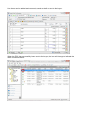
1
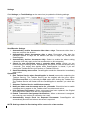
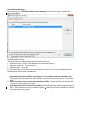
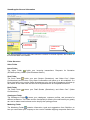
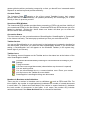
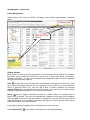
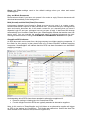
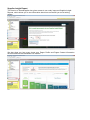
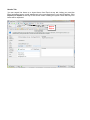
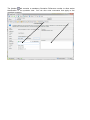
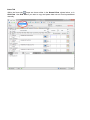
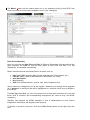
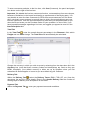
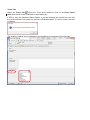
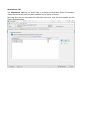
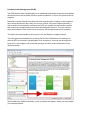
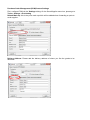
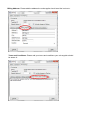
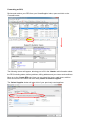
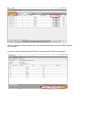
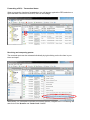
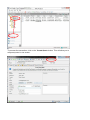
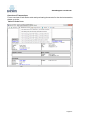
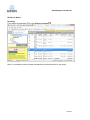
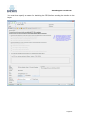
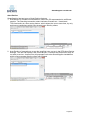
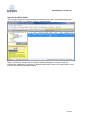
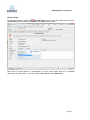
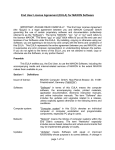
SmartSupplier Quick Start Guide October 2015 ................................................................................................................................. 1 Introduction .............................................................................................................. 4 ShipServ Customer Service Centre ......................................................................... 4 Installation Instructions ............................................................................................ 5 Preparation .......................................................................................................... 5 SmartSupplier Initial Setup .................................................................................. 6 Settings................................................................................................................ 7 NOTE: Settings related to Purchasing will be covered in a later section. ............ 7 Auto-Decline Settings .......................................................................................... 8 Upgrade to the Latest Version of SmartSupplier Standard Edition ...................... 9 Uninstall SmartSupplier Program ............................................................................. 9 SmartSupplier-General Information ....................................................................... 10 Folder Structure ................................................................................................. 10 Sales Folder.................................................................................................... 10 Catalogues Folder .......................................................................................... 10 Marketing Folder ............................................................................................. 10 Contacts Folder .............................................................................................. 11 Unactioned RFQ Window .................................................................................. 11 Connection Status ............................................................................................. 11 Taskbar Service ................................................................................................. 11 Taskbar Icons .................................................................................................... 11 Numbers in Brackets at the Subfolders ............................................................. 11 SmartSupplier - How to Use .................................................................................. 12 Folder Management .......................................................................................... 12 Display Options ............................................................................................... 12 Grey and Black Documents ............................................................................ 13 Bold (Unread) and Not Bold (Read) Documents ............................................. 13 Closed/Lost RFQ Indicator.............................................................................. 13 Supplier Insight Report ................................................................................... 14 Archive Function ............................................................................................. 15 Find a Document ............................................................................................ 15 Creating a Quotation ......................................................................................... 15 View and Print RFQ ........................................................................................ 15 Quoting ........................................................................................................... 15 Purchase Order Management (POM) .................................................................... 24 Forwarding an RFQ ........................................................................................ 27 Receiving and comparing quotes .................................................................... 29 Forwarding a Purchase Order ................................................................................ 32 Receiving the Purchase Order Confirmation (POC) from sub-supplier .................. 33 Sending Purchase Order Confirmation (POC) to buyer Open the order and click the ‘Confirm Order’ button and follow the confirmation steps: ...................................... 33 Overview of Transactions ...................................................................................... 35 For an overview of both Sales order and purchasing documents for the whole transaction, please go to the .................................................................................. 35 Actions upon Receipt of Purchase Orders ......................................................... 36 Accepting or Confirming an Order .................................................................. 36 View and Print Order....................................................................................... 36 Confirm Order ................................................................................................. 36 Tabs ................................................................................................................ 36 Save and Send ............................................................................................... 36 Header Tab ..................................................................................................... 36 Decline to Quote ................................................................................................ 37 Declining ......................................................................................................... 37 Decline Order.................................................................................................. 41 Introduction SmartSupplier is a tool for suppliers to transact with buyers on ShipServ TradeNet that lets you receive Requests for Quotations and Purchase Orders and to send Quotations, Order Acceptances and Order Confirmations. SmartSupplier also lets you manage catalogues, customer profile and contracts and lets you export and import documents to and from Excel. This manual is intended to be a QuickStart Guide for new users of SmartSupplier. For detail information regarding catalogue functionality with its inherent auto-pricing capability, please refer to our complete SmartSupplier user guide. ShipServ Customer Service Centre Should you experience any difficulties using SmartSupplier, the ShipServ Customer Service Centre is available 24 hours a day, 7 days a week as at [email protected] AsiaPacific [email protected] Phone: +852 2501 9210 Americas [email protected] Phone:+1 732 374 3863 Europe [email protected] Phone: + 44 203 051 0255 Support hours: 0900-1800 Hong Kong 0100-1000 GMT Support hours: 0830-1700 US East Coast 1230-2100 GMT Support hours: 0830-1700 CET(DK) 0730-1600 GMT Installation Instructions SmartSupplier can be accessed via the following link: http://www.shipserv.com/smartsupplier/download.html. The following instructions will guide you through the process. Preparation Before installing SmartSupplier, make sure you know your ShipServ Login ID and Password. You should have received this by e-mail from ShipServ. Note that SmartSupplier uses Microsoft .NET Framework. The SmartSupplier installation program will check if you already have this installed and, if not, it will download and install it for you. Note that this is a large download (25MB) which requires a broadband connection. If you do not have a broadband connection and the installer detects that you need .NET Framework, we recommend that you cancel the installation and ask ShipServ Customer Services to send you a SmartSupplier Installation CD and instructions for installing from that CD. Check that your computer meets the following minimum system requirements: Operating system: Windows XP, Windows 7, Windows 8, Windows 8.1 & Windows 10 Processor: at least Core 2 Duo Memory: 2G* (4G recommended) Microsoft Internet Explorer 9 or later Microsoft .NET Framework 3.5 Microsoft Data Access Components (MDAC) v2.6 or later. If you have an earlier version of MDAC then version 2.6 will be automatically installed when you install SmartSupplier. Free disk space: 1G (plus 96 MB (Minimum); 256 MB (Recommended) for Microsoft .NET Framework if not already installed). Or the minimum required by the operating system, whichever is higher Display: 1024 x 768 high color; 1280 x 768 (Recommended)Installation from a Hyperlink Follow steps 1 through 3 below, or if you do not have Administrator privileges on your computer, ask your IT department to login as a user with Administrator privileges to perform these steps: 1. Click Download Now. 2. When prompted to Open, Run or Save, select the Run or Open option. (You might also be asked to confirm running of an exe file from ShipServ which you should accept.) 3. Follow the on-screen instructions (InstallShield Wizard) until you see the message "Installation of SmartSupplier is complete". Note: If you plan to install SmartSupplier on a server and then use Citrix or MS Terminal Services to allow several users to run SmartSupplier simultaneously, choose the “Server” installation type instead of “Typical,” to allow SmartSupplier to store each user's transactions in a separate folder. SmartSupplier Initial Setup 1. If you logged in as Administrator when you installed SmartSupplier, please login now as the user that will be using SmartSupplier. 2. Start SmartSupplier from the Programs menu or by clicking the Desktop icon created during installation. 3. When using SmartSupplier for the first time, you must register SmartSupplier by entering your ShipServ Login ID and Password (as provided in the e-mail sent to you by ShipServ). 4. On successful registration, you will be asked to accept or confirm a new ShipServ Service Agreement. You must accept the Service Agreement before you can use SmartSupplier. Acceptance means that the new Service Agreement will replace any previous agreement between you and ShipServ but, unless otherwise agreed, your fees and payment terms remain unchanged. 5. Finally you will be asked to review your Settings, described below. If you are unsure about these, we suggest you leave them set to the recommended default settings which are suitable for most users. 6. SmartSupplier should now connect automatically and begin downloading your latest transactions. You may begin work on the transactions as soon as they appear in your Inbox folder. Settings Click Settings (or Tools\Settings on the menu bar) to update the following settings: Send/Receive Settings 1. Automatically archive documents older than x days. Documents older than x days are moved to the Archive. 2. Automatically delete documentes after x days. Documents older than the indicated number of days will be deleted and can no longer be viewed from SmartSupplier. 3. Automatically Archive documents daily. Select to enable the above setting (otherwise it will only apply to the first send/receive on this computer). 4. Check for new documents every t seconds when online. Unless you are disconnected or working offline, SmartSupplier will check for new documents every t seconds. This setting also applies when SmartSupplier is closed, if you are running the Taskbar Service (see section on Taskbar Service). 5. Send immediately when online. SmartSupplier sends the transaction immediately when online. Operations 6. Run Taskbar Service when SmartSupplier is closed (see section explaining the Taskbar Service). The Taskbar Service can be stopped with the menu option File\Close and Exit, or by choosing the Exit option after clicking the Taskbar icon. The Taskbar Service will restart next time SmartSupplier is started if you check this box. 7. Autostart Taskbar Service on Windows startup. 8. Notify me when new documents arrive for y seconds. Check this box to enable a desktop alert to appear on the Taskbar when new documents arrive. 9. Hide Replaced Documents. When a document has been replaced, the Original document will be hidden from the list of transactions. 10. Enable Transaction Assignment Notifications. When a document is assigned, the receiving user receives a notification via e-mail. 11. Automatically launch Excel for Exported Documents. SmartSupplier will automatically launch Excel when a document is exported. NOTE: Settings related to Purchasing will be covered in a later section. Auto-Decline Settings Click Settings (or Tools\RFQ Auto-Decline Settings on the menu bar) to update the following settings: Add Auto-Decline Rule: The Auto-Decline settings allows users to define rules for Specific buyers – Buyer Tab (Example in screenshot above) Specific countries – Country tab, or Specific ports – Port tab If a rule has been set up which covers a Buyer, Country or Port, then SmartSupplier will automatically decline such transactions. 1. Automatically Decline RFQs from buyers in accordance with the defined rules: Ticking this box will enable the Auto-Decline rules which have been set up in the three tabs. 2. Allow Creation of new rules when declining RFQs: Ticking this box will activate the “create rule during Decline” option. 3. Automatically Decline Closed-Lost RFQs. SmartSupplier will automatically decline a RFQ , which has been won by another supplier., ensuring no time is wasted on quoting for business won by others. Upgrade to the Latest Version of SmartSupplier Standard Edition The auto-upgrade feature of SmartSupplier will detect when a new version is available and download it automatically in the background. Once the download is complete, you will be prompted with a pop-up window to install the upgrade. If you do not upgrade when you are first prompted, you will see a green right arrow on the upper right hand side of screen at the tool bar; click this arrow to install the upgrade at your convenience. Once you see the message "Installation of SmartSupplier is complete" you can start SmartSupplier and log in as usual. Uninstall SmartSupplier Program To uninstall any previous versions of SmartSupplier Programs, from the Window Start Menu select Control Panel, Add or Remove Programs, and follow the usual procedures for uninstalling software. SmartSupplier-General Information Sales Folder Folder structure Unactioned transactions Connection Status The SmartSupplier home page looks similar to Outlook or Outlook Express, with folders on the left hand side of the screen. Folder Structure Sales Folder Inbox Folder The Inbox Folder holds your incoming transactions: Requests for Quotation (RFQs/Enquiries), Orders (POs/Purchase Orders.) Sent Folder The Sent Folder holds your sent Quotes (Quotations), and Order Conf. (Order Confirmations) and Invoices. Only Order Confirmations will show up in this subfolder. If a Buyer has been set to receive Order Acceptances only, the Order Acceptance will show up as a status of the order itself and will not be duplicated here as a separate document. Draft Folder The Draft Folder Confirmations). stores your Draft Quotes (Quotations), and Order Conf. (Order Catalogues Folder The Catalogues Folder stores your catalogues, customer profiles, and contracts for different customers. This folder and the functionality it affords you could benefit you greatly as a tool to attract new business and to simplify the quoting process. Marketing Folder The Marketing Folder contains information, tools and suggestions from ShipServ on how you can market your company to the current TradeNet shipping companies and to the greater global maritime purchasing community so that you benefit from increased market exposure as well as improved process efficiency. Contacts Folder The Contacts Folder contains a list of the current TradeNet buyers, their contact persons and their e-mail addresses, all updated periodically. We encourage you to write directly to them to promote yourself. Unactioned RFQ Window The Unactioned RFQ window provides faster processing of RFQs via real-time visibility of your unactioned RFQs for the last 30 days. Unactioned RFQs are RFQs that are yet to be quoted or declined. Clicking the ‘Action these now’ button will allow you to review the RFQs to action them accordingly. Connection Status This icon shows you the connection status of SmartSupplier. SmartSupplier is “Connected” to the Internet currently. The latest pop-up advised you that you received one RFQ. Taskbar Service You can set SmartSupplier to run continuously in the background, constantly checking for new documents, even when you close the main SmartSupplier window. If you choose this setting, a SmartSupplier icon will appear on the Windows Taskbar (in the system tray, bottom right of your screen.) Taskbar Icons The following icons will appear on the Taskbar and on the status bar at the bottom of the main SmartSupplier window. Connected and automatically checking for new documents according to your Settings Trying to connect You have new unread documents (cleared when any document is opened) You are working offline You are disconnected due to a communications error. Place your mouse over the icon on the Taskbar for more details. SmartSupplier is sending/receiving new documents Numbers in Brackets at the Subfolders There may be a number in brackets next to subfolders such as RFQs and POs. For Inbox folders, the number in round brackets (n) indicates the number of unread documents in each folder. For Outbox and Draft folders, the number in square brackets {n} indicates the total number of documents in that folder. In all cases, the number only includes archived documents if the Show Archived filter is selected for that folder. SmartSupplier - How to Use Folder Management Shown below is the inbox for RFQ’s. All folders have similar characteristics, described below. Collumn sorting Filter and Group Options Display Options Each column is used to provide information on the document being viewed, for example: the Status column within the RFQ inbox can be one of three main states, Unactioned, Quoted or Declined. You can sort the display and change the width of columns displayed using the filter and group options. Filter lets you hide or show certain documents based on the status of a document. Click on it to see a drop-down selection list. For example, you can select to only see unactioned RFQs or archived RFQs only. You can add a filter to column headings by choosing Column Filtering on the drop-down list, and then click on the funnel icon on each column heading to apply filtering based on the values in that column. Group lets you display transactions based on multiple criteria, for example first by Buyer, then by Vessel. The view will automatically collapse to show each group heading. Click the plus + next to the group heading to expand the view and show the documents under that heading. If you choose to group by more than one column, groups will be nested inside each other in the order selected. If grouping or filtering is applied, this is indicated at the top of the view. Click Remove Filter (red cross) to reset the view to the default settings. Group and Filter settings reset to the default settings when you close and restart SmartSupplier. Grey and Black Documents Documents are black if you have not opened it for review or reply. Recent documents will download automatically in the background. Bold (Unread) and Not Bold (Read) Documents A document changes from Unread to Read as soon as you open it or create a reply. Read/unread status is specific to each individual user. This means that your colleague may open and read a document but it will remain unread for you, assuming that you have a separate Login ID and your colleague has not yet sent a reply. A document will change automatically from Unread to Read when your SmartSupplier detects that another user has sent a reply. You can override the read/unread status of selected documents by rightclicking on the document or using the Edit\Mark as Read/Mark as Unread menu option. Closed/Lost RFQ Indicator An RFQ document can be sent from a buying company to multiple supplying companies. If the Order for this enquiry is then placed with one of these ShipServ enabled supplying companies, SmartSupplier will indicate that this RFQ has been awarded to an alternative supplying company . Understanding which RFQs have been awarded to alternative suppliers will: Remove quoting or chasing time for Closed/Lost RFQs Provide insight into which RFQs are typically awarded to alternative suppliers Note: in this version of SmartSupplier only full Orders to an alternative supplier will trigger an RFQ to be marked as Closed/Lost. Full Orders are defined as Orders that have the same number of line items as the Quote and original RFQ. Supplier Insight Report This version of SmartSupplier also gives access to our newly improved Supplier Insight Reports, which allows you to see information about how successful you are at wining quotes. We also show you how many views your Pages Profile and Pages Contact information received and how that translates into Quotes. Archive Function You can Archive documents by highlighting the document (or multiple documents) and using Archive\Archive Selected Documents on the tool bar at the top (or by right-clicking the selected document or documents). Archived documents are normally hidden from the folder views (except by choosing one of the “Show Archived” filter options). Since archive status is specific to each individual user, a colleague may archive a document but it will remain unarchived for you (assuming that you have a separate Login ID and Password). Therefore, you can use the archive function to “remove” any document from a folder when you have finished processing it. You cannot “delete” a transaction from SmartSupplier. Unactioned RFQs that are less than 12 months old should be actioned and as such cannot be archived. Note: Archive status is saved locally on your computer but is not sent to the TradeNet server. Therefore your archive settings will not be transferred if you use a different computer. Find a Document In the main folder view, click Find to open the search bar where you can enter the Reference of the document you want to find. The search occurs within the current folder only (including archived documents), checking for the specified text anywhere in the reference field (so do not use wildcard characters such as ‘*’). Creating a Quotation View and Print RFQ Double click on the row listing the RFQ to view the RFQ. If you wish, click on the printer icon on the upper left hand corner of the screen. Quoting From within the displayed RFQ, click Create Quote in the upper left hand corner. The drop-down list shows the choices of Auto Match or Blank Document. The default is Auto Match (see Catalogue information later in this document)if you have set up the appropriate Company Profile, Catalogue and/or Contract. Tabs You can either click on the tab itself to go from one to the other, or click on the Previous (Left) arrow or the Next (Right) arrow to go back and forth. Familiarize yourself with each of the tabs, but recognize that you need not view all tabs and that you need not enter information in tabs, other than in the pricing tab. Save and Send Click Save as Draft to save an unfinished quotation or Send to send it to your customer. You need not go through all the tabs before clicking these buttons. Header Tab You can export line items to or import them from Excel at any tab, letting you send the Excel worksheet as an e-mail attachment to the manufacturers or your sub-suppliers. Click Export and Import at the top of the screen when creating the quote. Note that only line items will be exported. Import Export The Header tab contains a mandatory Quotation Reference number to allow easier identification of the quotation later. You can also enter comments that apply to the complete quotation. Items Tab Within the Items tab , items are shown either in the Normal View, shown below, or in Grid View. Use Grid View if you want to copy and paste data onto an Excel spreadsheet manually. The Match button with the search glass icon is for automatic pricing of this RFQ if the items here have been previously mapped to one of your catalogues. Enter Prices Manually Here you can enter the Unit Price and Disc % (Discount Percentage for that particular line item) manually; the Total for that line item, which is (Unit Price less Disc %) x Qty (Quantities), is calculated automatically. Data in other boxes that are already filled in or blank, such as Part Type (IMPA number, ISSA number, Manufacturer’s Part Number, etc.) Part No. (IMPA, ISSA or Manufacturer’s Part Number, etc. itself) Item Description Qty (Quantity) Unit (Unit of Measurement – pieces, sets, pairs, kilograms, litre) can be entered or changed by you as the supplier. Whatever you change will be regarded as a “Variance” to the Buyer and will be highlighted in a variance notice sent by ShipServ to the Buyer. For Part Type and Unit, you can only choose from a drop-down selection list (note that these units of measure and corresponding descriptions are used as they are MTML compliant.) ShipServ has adopted the MTML standard of Unit of Measurement so that various integrations with Buyers and Suppliers work properly. To decline to quote for a line item, click the red Del (Delete) button on the right of the line item. To enter comments particular to the line item, click Cmt (Comment), the pencil and paper icon button on the right of the line item. Important: We disable the line item comments function, on transactions from some buyers, because of limitations in the import functionality or requirements of the Buying party. You may be able to enter line item comments for RFQs from some customers, but not others. Also, note that in some systems, buyers will have to click a few more buttons to see your line item comments. Your line item comments may most likely not be passed back to you when the Buyer issues you the Purchase Order for your quotation. In view of this, if you have important messages regarding a line item, we suggest you append or enter it in the Item Description box. Total Tab In the Total Tab , enter the overall discount percentage in the Discount: field, add in Freight and one Other charge. The Total Price will automatically be calculated. Change the currency in which you wish to quote by selecting from the drop-down list in the Currency box (note that these currency codes and descriptions are used as they are MTML compliant.) Your default currency is either set up by ShipServ when you first subscribed to SmartSupplier or is sent to you as a default by your Customer. Delivery Tab Within the Delivery Tab , select the Delivery Terms (EXW, FOB, CIF, etc.) from the drop-down list and fill in other details. Enter in the Quoted Delivery field the number of working days for delivery from acceptance of the Order. Payment Tab Within the Payment Tab , enter your payment terms and conditions. Terms Tab Within the Terms Tab , input your Terms and Conditions. Click on the Prices Good Until down-arrow to see a calendar to ease data entry. If RFQ is from the ShipServ Match Engine, a pop-up message will remind the user that they must indicate if the goods are Genuine or Branded spares. If not from match, the field is optional. The Quality of spares can be indicated in the DropDown in the Bottom Left hand side. Preview Tab The Preview Tab lets you preview the completed quotation. You can either Save as Draft to save the unfinished or to be reviewed quotation to the Draft subfolder, or Send it to your customer. if you click Send, a pop-up window will ask for confirmation to send the quotation. Attachments Tab The Attachment Tab lets you attach files to a Quote and Purchase Order Confirmation. These documents will then be made available to your buyer customer. Note that files with an executable file extension cannot be sent (for more details visit the FAQ in SmartSupplier). Purchase Order Management (POM) The POM feature within SmartSupplier is an additional functionality developed for suppliers who themselves need to obtain prices for goods requested i.e. source the goods from subsuppliers. Examples of these are ship chandlers and other suppliers with a network of sub-suppliers who receive requests for items they do not have in stock. Using the POM functionality, a ship chandler can forward the contents of an RFQ to a supplier via the ShipServ system and receive the corresponding quote in their SmartSupplier account. They can use this quote as the basis of their quote to their customer, with an appropriate mark-up added. This allows the ship chandler to source items via vast ShipServ supplier network. This user guide demonstrates how to setup and use the POM feature set, starting from when an RFQ is received in SmartSupplier from a customer, sourcing and buying those items from a sub-supplier and eventually issuing a purchase order confirmation to the original customer. After enabling the POM functionality, a pop up window will appear, where you may update your company details. Purchase Order Management (POM) feature Settings First, configure POM via the ‘Settings’ dialog. On the SmartSupplier menu bar, please go to: Tools > Settings > Purchasing Default Mark-up: this is the price mark-up which will be added when forwarding a quote to a sub-supplier: Delivery Address: Please add the delivery address of where you like the goods to be delivered: Billing Address: Please add the address the sub-supplier should send the invoice to: Terms and Conditions: Please add your terms and conditions your sub-supplier should be aware of: Forwarding an RFQ Review and retrieve your RFQ from your SmartSupplier Inbox, open and click on the ‘Forward’ button: The following screen will appear, allowing you to fill in the ‘Header’ tab information about the RFQ including dates, delivery address, billing address and your terms and conditions: Move on to the ‘Create RFQ’ tab. Here you can select line items, mark items, add line items and remove line items and then finally search or select a supplier. The ‘Select Supplier’ button will give a list of your previously used suppliers: When a supplier has been selected you will be taken back to the ‘Forward RFQ’ window, on a new tab. Line items can be edited and your RFQ can be previewed, saved or simply sent: Forwarding a RFQ – Transaction Status When a transaction has been forwarded an icon will appear against the RFQ and when a quote has been received for this RFQ, the icon will change: Receiving and comparing quotes The received quote can be reviewed individually by right-clicking on the line item in your inbox and open: Alternatively, for a complete overviews of incoming quotes, navigate to the ‘Purchasing’ tab and click on the ‘Quotes’ and ‘Order Conf.’ folders: To process the transaction, click on the ‘Create Quote’ button. This will allow you to compare quotes in one screen: The ‘Compare Quotes’ screen shows: 1. Mark-up 2. Currencies and Exchange Rates 3. Mark-up per Supplier 4. Include Charges which, if checked, will be included and divided out equally over the line items, thus allowing you to forward the costs to your buyer. 5. Cmts (Comments) – If there are any changes from your sub-supplier, it will show when you hover your mouse over the flag. 6. Select Best Prices – Prices can be selected individually or this button can be clicked which will bring up a column with prices including the 20% specified markup. 1 4 2 3 5 6 Clicking the ‘OK’ button will transfer the prices to the quote for your customer, where the remaining steps must be completed before the quote can be sent. Forwarding a Purchase Order To forward the PO to a sub-supplier, double click the line in your Inbox > Orders: Here there are 2 options: Forward Order Forward Order as RFQ (this is useful in cases where a direct PO has been received) Clicking the ‘Forward Purchase Order’ button will give you the option to use the prices from the quote and will place the supplier prices in to the Purchase Order document. Line items can be added and removed, saved as a draft or sent to the sub-supplier. Purchase Order Management User Guide v1.0 Receiving the Purchase Order Confirmation (POC) from sub-supplier When you receive the POC from your sub-supplier the icon will change and the order can in turn be confirmed to the buyer: Sending Purchase Order Confirmation (POC) to buyer Open the order and click the ‘Confirm Order’ button and follow the confirmation steps: Line items can be added and removed, saved as draft or sent to the buyer: When the POC has successfully been sent to the buyer, the icon will change to indicate the order confirmed status: SmartSupplier User Manual Overview of Transactions For an overview of both Sales order and purchasing documents for the whole transaction, please go to the Sales > Order folder: - Page 35 - SmartSupplier User Manual Actions upon Receipt of Purchase Orders Accepting or Confirming an Order View and Print Order Double click on the row listing the PO to view the PO. If you wish, click on the printer icon on the upper left hand corner of the screen. Confirm Order Click Confirm Order on the upper left hand corner. Enter an Order Ack Ref (order acknowledgement reference) number if you are accepting an order and a Confirmation Ref (confirmation reference) number on the Header Tab if you are confirming an order. Accept Only lets you indicate that you accept an order as is, but you cannot change the content (e.g., prices.) With Confirm (with prices), once you open the order, you can make changes to the documents, including prices and delivery time. If you choose to do an Order Acceptance, the rest of the tabs will be greyed off and you cannot make any changes other than to enter an Order Ack Ref and Supplier Comments on the Header Tab. Some buyers have chosen to block Order Confirmations and allow you to only create Order Acceptances. As with Quotations, documents can now be attached to Purchase Order Confirmations. Note that an Order Acceptance is considered to be an order status and not a separate document. For this reason you will not find order acceptances in the Sent folder. However, Order Confirmations are separate documents maintained in the Sent folder. Tabs Either click on the tab itself to go from one to the other, or click on the Previous (Left) arrow or the Next (Right) arrow to go to prior or subsequent screens. Save and Send You can click Save as Draft or Send anytime to save the unfinished PO confirmation or send it to your customer, without viewing all tabs. The rest of the procedure is similar to the section titled Creating a Quotation described above. Header Tab On the Header Tab , there is an Order Response box on the lower left hand side of the screen. To the right of the Order Response field, click on the down-arrow to choose from one of three options: Confirm (with prices), Accept Only, and Decline Order. - Page 36 - SmartSupplier User Manual Decline to Quote Declining From within the displayed RFQ, click Decline to Quote . Note: it is possible to select multiple transactions and decline them in one action. - Page 37 - SmartSupplier User Manual You must then specify a reason for declining the RFQ before sending the decline to the buyer. - Page 38 - SmartSupplier User Manual Auto-Decline SmartSupplier has two types of Auto-Decline features: 1. Auto-Decline of Closed-Lost transactions, where the PO was awarded to a different supplier. The Resulting transaction status indicates Closed/Lost – Unactioned. This functionality is a time-saving feature, which allows the user to save time, by only working on transactions which have already been filled by others. 2. Auto-Decline of transactions, as per the specified rules, set up in the RFQ Auto-Decline Settings. The user can specify rules for the Buyers, Countries and Ports which they do not wish to service. A saved rule will propagate onto other SmartSupplier installations within a few moments after the client was updated. - Page 39 - SmartSupplier User Manual Auto Decline RFQs folder The user can review the Auto-Declined transactions at any time, by accessing the AutoDecline RFQs folder. An “Unblock” button is available here. When “unblocking” a document, an options window will appear, where the user can Unblock the transaction in question or Unblock and Remove one of the Auto-Decline rules from the Auto-Decline Settings window. - Page 40 - SmartSupplier User Manual Decline Order To decline an Order, choose the Decline Order option on the drop-down menu; enter a Decline Ref (decline reference number) and Supplier Comments. Note that an Order Decline is considered to be an order status and not a separate document. For this reason, you will not find order declines in the Sent folder. - Page 41 -