1
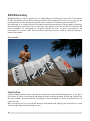
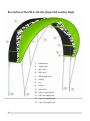
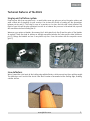
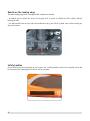
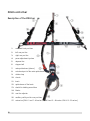
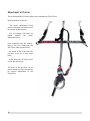
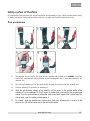
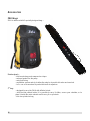
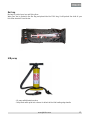
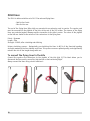
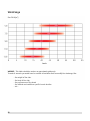
ZULU User manual - English
Please read this user manual carefully before you use the ZULU.
Welcome to GIN Kiteboarding …
Thank you for choosing a GIN kite.
Our R&D team has invested a lot of time, passion and experience into creating the ZULU.
We hope you will have as much fun with this kite as we have, and we wish you many wonderful sessions
with your new ZULU !
For more information and to keep in touch with the fantastic evolution of our sport, visit our website :
www.ginkites.com
Please pass on this manual to the new owner if you ever resell your kite.
Enjoy riding GIN,
The GIN Kiteboarding Team
Information about safety
Aimed at customers with a good knowledge of kiting, this manual principally provides technical
information about the ZULU. This manual cannot replace training from an approved kite school.
Kiting is a magnificent sport, but certain rules do apply and these must never be neglected. As an
“ambassador” of our sport, please respect these rules and always keep safety in mind.
Respect :
-
the other riders
the kite launch and landing zones
the riding locations
the rules of riding and of the air
the public and their safety
the natural elements
Familiarize yourself with :
your equipment
your safety equipment
Make sure that you have adequate personal and third party liability insurance for kiting.
The manufacturer as well as the distributors and agents of GIN Kiteboarding products cannot be held
liable for death, personal injury or material damage resulting from any use of this equipment.
2
Table of contents
WELCOME TO GIN K ITEBOARDING … ............................................................................................................... 2 I NFORMATION ABOUT SAFETY............................................................................................................................ 2 TABLE OF CONTENTS......................................................................................................................................... 3 GIN K ITEBOARDING........................................................................................................................................ 4 CONSTRUCTION ............................................................................................................................................4
HISTORY OF THE ZULU.................................................................................................................................... 5 FOR WHAT LEVEL OF RIDER… .......................................................................................................................5
ZULU’S CHARACTERISTICS.............................................................................................................................5
DESCRIPTION OF THE ZULU, SLE KITE (SUPPORTED LEADING EDGE).................................................................... 6 TECHNICAL FEATURES OF THE ZULU................................................................................................................... 7 SINGLE POINT INFLATION SYSTEM ....................................................................................................................7
LINE DEFLECTORS .........................................................................................................................................7
HANDLE ON THE LEADING EDGE......................................................................................................................8
SAFETY HANDLES..........................................................................................................................................8
SLE BRIDLES .................................................................................................................................................. 9 R EAR LINE BRIDLES......................................................................................................................................9
ZULU CONTROL BAR .....................................................................................................................................10 DESCRIPTION OF THE ZULU BAR ..................................................................................................................10
SWIVEL SYSTEM..........................................................................................................................................11
POWER ADJUSTMENT SYSTEM ........................................................................................................................11
R EAR LINE ADJUSTERS ................................................................................................................................11
STOPPER BALL ...........................................................................................................................................11
LEASH ......................................................................................................................................................11
A DJUSTMENT OF THE BAR ............................................................................................................................12
SAFETY SYSTEM OF THE ZULU.........................................................................................................................13 MAIN QUICKRELEASE...................................................................................................................................13
QUICKRELEASE OF THE LEASH.......................................................................................................................14
A UXILIARY SAFETY ON THE REAR PRE-LINES ...................................................................................................15
TO CONNECT A KITE LEASH ( FOR UN-HOOKED RIDING) ...................................................................................15
A CCESSORIES.................................................................................................................................................16 ZULU BAGS..............................................................................................................................................16
B AR BAG..................................................................................................................................................17
GIN PUMP.................................................................................................................................................17
ZULU LINES .................................................................................................................................................18 TO CONNECT THE FLYING LINES TO THE KITE....................................................................................................18
LOOKING AFTER YOUR KITE.............................................................................................................................19 CONTROL BAR SET-UP AND SAFETY SYSTEM.....................................................................................................19
WARNING.................................................................................................................................................19
WINDRANGE.................................................................................................................................................20 GIN K ITEBOARDING WARRANTY.....................................................................................................................21 A CKNOWLEDGEMENTS ....................................................................................................................................22 www.ginkites.com
3
GIN Kiteboarding
GIN Kiteboarding is a rider’s company. For us, kiteboarding is a priority and a way of life. The members
of GIN’s Development Team have worked and ridden hard throughout the year to ensure you get the
best experience possible through our products. We are stoked to introduce to you the new ZULU.
Our philosophy is to create products of the highest quality and performance that are able to provide us
with the maximum satisfaction; we are then more than happy to share these with YOU and other GIN
riders worldwide. Our development is straight forwards; we focus on what is essential to the
performance of our kites rather than investing in marketing features, which in reality do nothing to
enhance the product.
Marc Ramseier
Construction
A highly skilled workforce takes extreme care during the entire manufacturing process of our kites.
Every piece of fabric, reinforcement and detail has been carefully designed, refined and crafted from
the most suitable, selected materials. Everything is then assembled in a finely controlled process to
create this kite.
After several hours of use, you will still discover small details that simplify your kiting life as a result
of the thought GIN put into the design for you.
4
History of the ZULU
The ZULU are people from South Africa. The name ZULU comes from the expression ama zulou, which
means the people from the sky. Regarding the performance of our new kite, we wanted to call it ZULU
and to remember the expression ama zulou.
For what level of rider…
Thanks to :
- an easy relaunch
- a big depower range
- huge stability, even unhooked
- an instinctive turn
- formidable performance in the low end windrange
- a reasonable bar pressure
- a constant traction, even with low speed
- an incredibly powerful lift
The ZULU is the perfect kite for all kind of riders, from beginners to freestyle, wakestyle and speed
riders.
ZULU’s characteristics
The ZULU features a lower aspect ratio and deep profiles.
We have been committed to achieve real innovations with the actual flight characteristics of the kite
rather than trying to give this impression through an absolutely revolutionary new shape.
Thanks to its 4-line SLE bridle all this is combined with the comfort and safety of having a high depower
setup.
This means:
- Having the comfort of adjusting the entire range of power while riding or when coming in to
the beach.
- Having the safety of immediate depower when letting go of the bar in an emergency.
The ZULU offers incredible low-end performance
As a result you will be able to use a ZULU in one or two kite sizes smaller than riders with many other
SLE kites. This increases your fun, your safety and what you get for your money !
www.ginkites.com
5
Description of the ZULU, SLE kite (Supported Leading Edge)
1.
leading edge
2.
trailing edge
3.
BB1 (strut)
4.
BB2 (strut)
5.
BB3 (wingtip strut)
6.
wingtip
7.
top
8.
bottom
9.
SLE bridles
10. left rear pigtail (blue)
11. left front pigtail (red)
12. right rear pigtail (grey)
13. right front pigtail (red)
6
Technical features of the ZULU
Single point inflation system
Pump up your kite from one point only – a much better warm-up, gets you out on the water quicker and
adds a whole lot of simplicity to your session. You do have the choice of sealing off the connections
between struts and LE. This helps in case of a puncture or to store the kite with struts inflated. The
flight of your kite will be also optimised. In order to re-balance the pressure in the whole kite, open all
the connections before inflating the LE.
Whenever you replace a bladder, throw away the 3 white plastic zip ties (from the valve of the bladder
to replace). These ties help to achieve an airtight connection between the valve and the tube (visible on
pict 2). Change the bladder and use 3 new plastic zip ties. Cover the valves with the neoprene covers
(pict 1).
Line deflectors
We've framed the strut ends at the trailing edge with deflectors, which prevent any lines getting caught.
The deflectors won't restrict the struts from their freedom of movement at the trailing edge, enabling
a better airflow.
www.ginkites.com
7
Handle on the leading edge
The main leading edge tube is equipped with a double use handle :
- It enables you to attach the strap of the pump to it, in order to inflate the ZULU safely, without
holding the kite.
- You will benefit from an easy and safe handhold to carry your ZULU up-wind, inner surface facing up,
top surface down.
Safety handles
If you need to return to the beach in self-rescue, the 2 safety handles sewn to the wing tip struts will
be convenient for controlling the ZULU as well as possible.
8
SLE bridles
The GIN Kiteboarding team has designed the optimum set up for the SLE bridles of your ZULU. You only
need to connect the red pigtails of the SLE bridles to the front flying lines.
Rear line bridles
For the rear bridles, you have 2 options to set up :
1.
Attachment point A : original set up : for a reactive kite
2.
Attachment point B : set-up for a less reactive kite with slower turning
Then connect the rear pigtails of the bridles to the rear flying lines, respecting the colour code :
- grey = right
- blue = left
www.ginkites.com
9
ZULU control bar
Description of the ZULU bar
1.
combined front pre-lines
2.
left rear pre-line
3.
right rear pre-line
4.
power adjustment system
5.
depower line
6.
stopper ball
7.
main quickrelease (sleeve)
8.
swivel and part of the main quickrelease
9.
chicken-loop
10. stoosh
11. leash
12. quickrelease of the leash
13. elastic for holding wound lines
14. floater
15. rear line adjuster
16. auxiliary safety on the rear pre-lines
17. carbon bar (ZULU 5 and 7 : 44 cm bar / ZULU 9 and 11 : 48 cm bar / ZULU 13 : 52 cm bar)
10
Swivel system
The swivel of the chicken-loop (swivel system) allows you to cancel any twists on the front flying lines
and on the leash. To unwind the twists after a jump with one or more rotation(s), it is easy to turn the
bar first to cancel the twist on the rear flying lines, then to pull down the bar. The act of pulling down
the bar relieves pressure on the swivel and allows it to automatically rotate, cancelling any twists in
the front lines and the leash.
Power adjustment system
The power adjustment strap allows you to adjust the power of the kite. Strap released, the kite will
have the maximum of power. Strap pulled, the kite will have less power :
1.
Pull down the strap with the red marking (less power)
2.
Pull down the strap with the black marking (more power)
Rear line adjusters
The adjusters of the rear pre-lines allow a quick and precise adjustment to cancel any small differences
in line length.
Stopper ball
The red stopper ball lets you choose the position of your bar when you let it go. The position of the red
ball defines the maximum depower you will have when you release the bar. Simply move the red ball up
or down the depower line to define the best set up for you. The closer to the power adjustment strap
you set the ball, the more depower available, and the bigger your margin of safety
Leash
The leash is connected to one front flying line of the kite. When you release the main safety system,
you are only connected to your kite by one line from the leash. The kite will flag out.
www.ginkites.com
11
Adjustment of the bar
The neutral position of the bar allows easy adjustment of the 4 lines.
Neutral position of the bar :
- The power adjustment strap
must be released and the bar must
be pushed up (depowered)
- The red stopper ball must be
placed
against
the
power
adjustment strap
Have someone hold the chickenloop (or fix it to a hook) and hold
the 4 lines under equal tension
- the knots of the front and rear
pre-lines must be at the same
level.
- at the kite side, all 4 lines must
end at the same level.
The knots of the pre-lines can be
easily moved by a few centimetres
for perfect adjustment of the
flying lines.
12
Safety system of the ZULU
It is imperative that you know the correct operation and assembly of your safety system before using
it. Always check your safety system before each use to make sure that it functions correctly.
Main quickrelease
1.
The depower line is fixed to the quick release system with a black cord. WARNING : the black
cord of the sleeve must not be twisted around the depower line; it must be parallel to the
depower line.
2.
Pass the rigid webbing n°2 of the quickrelease through the metal rectangle, towards you.
3.
Fold the webbing n°2 up and on to webbing n°1.
4.
Slide the quickrelease sleeve in the direction of the arrow in the picture while rolling
webbing n°3 on to webbing n°2. The 3 layers of webbing are covered with the quickrelease
sleeve. Lock the quickrelease by pulling the solid sleeve down against the chicken loop. The
sleeve must cover the white printed number 3.
5.
To release : push the quickrelease sleeve away from you, following the 2 arrows on the
picture. You will still be connected to the kite by the leash.
www.ginkites.com
13
Quickrelease of the leash
14
1.
Hold the white and red loop at the end of the leash.
2.
Pass the pin through the leash loop. Place the pin parallel to the grey line.
3.
Slide the red plastic tube over the pin.
4.
To release : draw the red ball in the direction of the 2 arrows in the picture.
Auxiliary safety on the rear pre-lines
This is an auxiliary safety, only available after having released the main safety system or thrown away
the bar when not hooked in. Hold on to one of the red handles to loose all power in the kite. The kite will
flag out in the wind.
To connect a kite leash (for un-hooked riding)
1. Hold the connector of your harness leash.
2. Connect the harness leash to the metal D-ring of
the chicken-loop.
3. Ready to ride un-hooked. To optimise your safety
in this situation, place the red stopper ball as
close as possible to the power adjustment strap.
www.ginkites.com
15
Accessories
ZULU bags
ZULU is delivered with 2 specially designed bags :
Main backpack :
- kite board straps and compression straps
- external pocket for the pump
- waist belt strap
- ventilation system and zip to allow the wing to dry and to let water and sand out
- le 2ème sac se trouve dans la poche intérieure du capuchon
2nd bag :
- designed to carry the ZULU with inflated struts
- with the kite packed inside, it is possible to carry it either, across your shoulder, or to
place it inside the main rucksack and to carry it on your back
- kite size printed on bag
16
Bar bag
Bar bag to protect your bar and flying lines.
When your bar is packed in the bar bag and placed into the ZULU bag, it will protect the cloth of your
kite from abrasion from the bar.
GIN pump
- XL pump with Aluminium stem
- Pump leash with quick-lock release to attach to the kite leading edge handle
www.ginkites.com
17
ZULU lines
The ZULU is delivered with a set of 4 X 23 m coloured flying lines :
- Red fort he fronts
- Blue fort he rear
The end of the flying lines (kite side) are connected to an extension cord in spectra. The spectra cord
must be connected to the pigtails of the kite, at the end of the SLE bridles. The sleeves of the flying
lines are protected against damage and the connection to the kite is easier. The colour of the pigtails
on the kite are similar to the colours of the extensions to the flying lines.
Fabric : Dyneema
Length : 23m
Strength : 220 KG, after stretching and stitching
Unique stretching process : Mechanically pre-stretching the lines to 80 % of the theorical breaking
strength maximises the line stability over time. This process ensures optimal quality, and significantly
reduces the risk of line length change with use..
To connect the flying lines to the kite
Connect the spectra cord extensions to the pigtails of the kite (pict 3). This label allows you to
disconnect the lines easily, even after high tension on the knot during flight.
Always connect the lines using a lark's head knot :
18
Looking after your kite
- Do not pump your kite without having checked carefully that the Velcro is positioned correctly
at the end of the struts, and that all bladders are positioned correctly and without twists.
- Do not leave your kite out in the sun or flapping in the wind if you are not using it, the cloth
will prematurely age.
- Never store a wet kite for a long time. Make sure it is completely dry.
- Never use any sort of chemical cleaner on your kite. Only use clean fresh water.
- Store your kite in a dark and dry place leaving the bag open.
- Do not walk on the lines or on the kite.
- Put the control bar into the water before riding if the bar was in contact with the sand. The
water will clean the depower rope from the sand that could wear it out prematurely.
Control bar set-up and safety system
- Check your control bar set-up and safety system before each use to make sure that it works
correctly.
- Check for wear and tear on each part, also check all knots and lines, making sure that the
neoprene protectors are in place where appropriate.
- Take care to clean your control bar set-up, your safety system, bridles, pulleys and lines of
all sand, mud and dust.
Warning
- Your safety and the safety of others depend upon the correct use of this equipment. You are
solely responsible for ensuring that you only use this equipment in situations and conditions
suitable for your level of competence and in a way that will not endanger third parties.
- Safety does not only depend on the safety systems of the kite, it is also the result of
training and of the correct evaluation of the situation and all conditions; the location,
potential hazards, other people, the weather, etc
- Your kite and safety systems must be regularly checked and properly maintained.
- ZULU is a kite adapted for kitesurfing and snowkiting. Unlike a paraglider or a speedflying
wing, the ZULU is NOT designed for free flight and does NOT meet the specific safety
requirements of free flight.
www.ginkites.com
19
Windrange
Size ZULU (m")
knots
WARNING : This table should be used as an approximate guide only.
To make it accurate you would have to consider all variables that can modify the windrange, like :
-
20
the weight of the rider
the level of the rider
the performance of the board
the altitude and conditions specific to each location
etc...
GIN Kiteboarding warranty
GIN Kiteboarding warrants your ZULU to be free of major defects in material or workmanship to the
original purchaser for a period of ninety days from the date of purchase. We invite you to register your
ZULU on the website www.ginkites.com during the seven days after your purchase. We ask you to keep
your original receipt.
.
This warranty is available under the following conditions :
- The warranty is valid only when the product was registered by the owner at www.ginkites.com
within seven days of the date of purchase.
- The warranty is valid only when this product is used for normal recreational activities, and
does not cover products used in rental or teaching operations.
- GIN Kiteboarding will make the final warranty determination, which may require inspection
and/or photos of the product, which clearly shows the defects. This information must be sent
to the GIN Kiteboarding distributor in your country, postage prepaid. Products can be returned
only after having received the authorization of GIN Kiteboarding.
- If Gin Kiteboarding declares that warranty is valid, the warranty will cover only the repair or
replacement of the defective product. GIN Kiteboarding will not be responsible for any costs,
losses or damages incurred due to shipment.
- The warranty does not cover damages caused by misuse abuse, neglect or normal wear and
tear - including but not limited to – punctures and rigging with other than GIN Kiteboarding
components. All damages due to : excessive sun exposure / over inflation of the bladders /
improper handling and storage / use in waves or shore break will not be covered by the
warranty.
- The warranty is not valid where any unauthorized repair, change or modification has been
made to any part of the equipment.
- The warranty for any repair or replacement equipment is valid from the date of the original
purchase only.
- The original purchase receipt must accompany all warranty claims. The name of the retailer
and date of purchase must be clearly legible.
- There is no special, extra warranty except those laid out on this page.
www.ginkites.com
21
Acknowledgements
GIN Kiteboarding would like to thank the riders who contributed to the development of the ZULU. Their
effectiveness, their optimism and their ideas brought much to the result that is the ZULU.
Thank you also to all the impassioned people who have given their energy and time for the kite and for
GIN Kiteboarding.
Thank you to YOU !
22