1
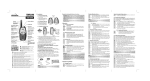
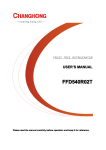
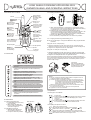
LONG RANGE COMMUNICATOR MODEL 2203
OWNER'S MANUAL AND OPERATING INSTRUCTIONS
Communicator Controls
2.3 Installing the Battery Pack
Indicator lighting RED when you're
transmitting. GREEN
when you're
receiving
Antenna
Enter/Key Lock/
Lamp Button
Ear/Mic/AC-DC
Charge Jack
PTT (PUSH to TALK)
button - Press and
hold to transmit.
LCD Screen - Displays
the current channel
selection and other
radio symbols.
MON (Monitor)
button - Press to
monitor the
current channel.
(Power) button
- Press and hold
to turn the PMR
unit ON or OFF.
(UP)/ (DOWN)
buttons - Press to
change channels,
volume, and to
select settings during
programming.
TX Power H/L (High/Low)
button - Press to select
the power H/L setting.
CALL button - Press
to send ringing tone
to other PMR units
Mosquito Repeller
Mic (Microphone)
Mode Button Press to program
the PMR settings.
Speaker
a
b
d
c
Figure 3
Charge
switch
Figure 4
Figure 5
a. Slide down the Battery Compartment Cover (Figure 3) latch
located on the bottom of the PMR, then slide down the Battery
Compartment Cover as shown in Figure 4.
b. Install the 4.8V, 700 mAH Ni-MH (Nickel Metal Hydride)
rechargeable battery pack (included) as shown in Figure 5. OR
Use 4 x 1.5V AAA/LR03 regular alkaline batteries paying
attention to the polarity marking in the battery compartment.
c. Replace the Battery Compartment Cover.
d. Lock the Battery Compartment Cover Latch into position.
2.4 Charging the Rechargeable Battery pack
Note: Do not attempt to charge the PMR when using regular alkaline
batteries.
Using the AC-DC Adaptor plug
Car Adaptor
charge jack
a. Insert the small plug on the end of the AC-DC adaptor into the
Ear/Mic/Charger jack located at the top side of the unit (Figure 6).
b. Plug the AC adaptor into the AC wall outlet.
Using the Car Adaptor charger plug
a. Insert the small plug on the end of the Car adaptor charger plug
into the Charger jack located at the bottom side of the unit (Fig. 7).
b. Plug the Car adaptor into the car cigarette socket.
1. LCD Screen
When charging, the Battery level indicator icon will start scrolling on
the LCD Screen. It takes about 10 hours to fully recharge the battery if
they've become completely run down, new battery takes up to 14
hours to fully charge.
Channel Number. Changes from 1 to 8 as selected by
the user.
CTCSS Code. Changes from 1 to 38 as selected by
the user.
Displays the current Battery charge level.
Displayed when the Vox feature is enabled.
Displayed when transmitting a signal.
Displayed when receiving a signal.
Displays the transmitting Power level (Hi
/Lo ).
Blinks during Channel scan mode.
Displayed when the Dual Watch function is turned
ON.
Displayed when the Key Lock feature is activated.
Displayed when sending Call-Ring tone to other PMR
units.
Displays when the Stopwatch feature is turned ON.
Displays during Monitor operation, and Speaker
volume selection.
Displays when the Mosquito Repeller function is
activated.
Displayed when the Scrambler function is turned ON.
2. Installation
2.1 Removing the Belt Clip
a. Pull the Belt Clip Latch away
from the PMR.
b. While pulling the Belt Clip
Latch, push up the Belt Clip
as shown in Figure 1.
2.2 Installing the Belt Clip
a. Slide the Belt Clip into the
slot as shown in Figure 2.
b. A Clip is locked into position.
Belt clip latch
Important:
Turn OFF the PMR unit
when charging. Charge
the Battery pack 10~14
hrs. prior to initial use.
Figure 6
Figure 7
Notes:
Do not charge the battery using both AC adaptor and Car
Charger adaptor at the same time.
Caution: Danger of explosion if battery is incorrectly placed.
For the regular batteries, replace only with AAA/LR03
or equivalent type. For the Rechargeable battery
pack, replace only with same type and make of the
battery pack that comes with the unit.
Remove the batteries/battery pack if the unit will not be used
for a long period of time.
To reduce the risk of electric shock, do not expose this
appliance to rain and moisture.
3. Operation
3.1 Turning the Unit ON/OFF
To Turn ON;
a. Press and hold the
(Power) button. A Dual tone will be
heard and the LCD Screen will display the current
channel.
To switch OFF;
b. Press and hold the
(Power) button. A Single tone will
be heard and the LCD Screen will turn blank.
3.2 Adjusting the Speaker volume
Figure 1
Figure 2
There are 8 volume levels.
To adjust the speaker volume level, press the
(UP)
button to increase, or press the
(DOWN) button to
decrease. During the adjustment, the LCD Screen will
display the speaker icon and the corresponding number of
the volume level at the lower right corner.
3.3 Receiving a Call
The unit is continuously in the Receive mode when the unit
is turned ON and not transmitting. When a signal is received
on the current channel, the RX icon
will be displayed
on the LCD Screen and the LED indicator will turn on.
3.4 Transmitting (sending)
a. Press and hold PTT (Push to Talk) button to transmit your
voice. The TX icon
will display on the LCD Screen.
b. Hold the unit in a vertical position with the Mic
(Microphone) 5 cm away from the mouth. While holding
the PTT button, speak into the mic (microphone) in a
normal tone of voice.
c. Release the PTT button when you have finished
transmitting.
Important:
Check the channel activity by pressing and holding the M
(Monitor) button. You will hear static if the channel is
unoccupied. Do not transmit if someone is talking on the current
channel.
In order for other people to receive your transmission, they must
also be on the same channel and have set the CTCSS code
that you are currently using. Refer to the "Changing Channel"
section for more information.
4. Functions and Settings
4.1 Changing Channels
The PMR has 8 available channels. To change channels, in
normal mode;
a. Press the
button once, the Channel number icon on
the LCD Screen will start blinking.
b. While the Channel number icon is blinking, press the (UP)
or
(DOWN) button to select the desired channel.
The channel changes from 1 to 8, or from 8 to 1.
c. Press the
(Enter) button to confirm your selection and
return to the normal mode.
Note: Refer to the "Channel Table" section of this Owner
detailed frequency listing.
4.1.1 Monitor
You can use the Monitor feature to check for weak signals
on the current channels.
a. Press the M button for 1 second to hear everything on
the current channel for 15 seconds.
b. Press the M button again to turn off the Monitor
operation.
4.2 Changing the CTCSS sub-channels
Each of the 1-8 channels has 38 sub channels (CTCSS subchannels). To change channels, in normal modes;
a. Press the
button twice, the CTCSS number icon on the
LCD Screen will start blinking.
b. While the CTCSS number icon is blinking, press the
(UP)
or
(DOWN) button to select one of the 38
CTCSS sub-channels. (Set this option to transmit and
receive a call using the main channels only.)
c. Press the
(Enter) button to confirm your selection and
return to the normal mode.
4.4 Setting the Scrambler Mode
The Scrambler mode makes your transmission voice sounds
garbled to anyone listening. It adds an extra layer of privacy
but it does not guarantee secrecy. Both of the Transmitting
and Receiving units must be set into the same Scrambler
mode. To activate the Scrambler mode;
a. In normal mode, press this
button 4 times, the
(Scrambler icon) will display and the OFF icon will start
blinking on the LCD Screen.
b. Press the
(UP) button or
(DOWN) button to select
the desired scrambler mode (off, 1, 2, 3, or 4).
c. Press the
(Enter) button to confirm your selection
and return to the normal mode.
4.5 Changing the Call-Ring tone
You can use the Call-Ring tones to alert the other user/s or
to identify yourself. The PMR is equipped with 10 different
types of Call-Ring tones. To change the Call-Ring tone
setting, in normal modes;
a. Press the
button 5 times, the
(Call-Ring tone
icon) will be displayed on the LCD Screen and the
current Call-Ring tone number will start blinking.
b. While the Call-Ring tone icon is blinking, press the
(UP)
or
(DOWN) button to change the setting. A
respective Call-Ring tone sound will be played when
changing from one tone to another.
c. Press the
(Enter) button to confirm your selection and
return to the normal mode.
4.51 Sending a Call-Ring tone
With the PMR in normal mode, press the C button. The
microphone will be muted and the unit will transmit the
current Call-Ring tone to other users set to the same
Channel and CTCSS code.
4.6 Setting the DW (Dual Watch)
This unit is capable of monitoring two channels (main
channel, and the DW channel) in the standby mode.
However, the unit can only transmit a call using main
channel. The DW channel can only monitor/receive a call
transmitted by other users with the same channel can
CTCSS code setting as the DW channel. To activate the
Dual watch mode;
a. In normal mode, press the
button 6 times, the
(DW) icon will start blinking on the LCD Screen.
b. Press the
(UP) or
(DOWN) button to select the
DW (dual watch) channel (1~8, execpt the main
channel). Otherwise, set this option to
c. Press the
(Enter) button to confirm your selection
and return to the normal mode.
In the normal mode, the LCD screen will alternately display
the Main and the DW channel numbers. Whereby the
CTCSS code is applicable, the user must set first the CTCSS
code number prior to setting the DW channel number.
Note: When the Dual Watch function is activated, the VOX
function will be temporarily disabled until the Dual Watch
mode is turned OFF.
4.3 Setting the Channel Scan
Channel scan performs searches for active signals in an
endless loop from channels 1 to 8. To turn ON;
a. Press the
button 3 times, the
(SCAN), Channel
number, and the CTCSS number icons will start flashing on
the LCD Screen.
b. Press the
(UP) or
(DOWN) button to activate the
channel scan mode.
c. The channel number on the LCD Screen changes rapidly
until an active signal is detected. (To deactivate the
channel scan mode, press the
(Enter) button. The LCD
Screen will immediately return to the normal mode with
the previous channel setting.)
d. When an active signal (one of the 8 channels) is
detected, channel scan pauses on the active channel.
e. Press the
(Enter) button to communicate with the
active signal channel, and the channel scan will be
deactivated.
Note: When the Channel Scan is activated, the VOX function
will be temporarily disabled until the Channel Scan
function is turned OFF.
4.7 Setting the VOX (Voice Activated) Sensitivity
In VOX mode, the PMR will transmit a signal only when it is
activated by your voice or other sounds around you. The
unit will transmit for a further for 1 second even if you stop
talking. To set the VOX sensitivity level;
a. Press the
button 7 times, the
blinking on the LCD Screen.
(VOX) icon will start
b. Press the
(UP) or
(DOWN) button to select the
VOX (off, 1, 2, 3, or 4) sensitivity.
c. Press the
(Enter) button to confirm your selection
and return to the normal mode.
While the VOX mode is on, pressing the
(Enter) button
for 1 second can suspend the VOX transmission for 4
seconds. VOX operation is not recommended if the PMR will
be used in a noisy or windy environment.
4.8 Setting the Mosquito Repeller Mode
5.6 Battery Meter Indicator
a. In normal mode, press the
button 8 times, the
(Mosquito Repeller icon) will display and the start
blinking on the LCD Screen.
b. Press the
(UP) or
(DOWN) button to select your
preferred mosquito repeller frequency (1~4) or set this
option to Repeller frequency chart setting.
The PMR can detect the battery charge in the following
levels;
Battery charge at high level.
Battery charge at medium level.
Battery charge at low level.
Item
1
2
3
4
Frequency
48Hz
6.5KHz
5.5KHz, 6.5KHz, 7.5KHz, 8.5KHz, 9.5KHz
6.5KHz - 9KHz
Cadence
Continued
Continued
6s for each frequency
Sweeping
Note:
To get the best performance, try to adjust to different
frequency.
The Mosquito Repeller signal cannot be activated during
Transmitting, Receiving, Monitoring, Channel Scan and Dual
Watch scan operation.
4.9 Setting the Stop-Watch
a. In normal mode, press the
button 9 times, the
(Stop-watch icon) will display and the Channel icon will
be blinking on the LCD Screen.
b. Press the
(UP) button the timer start counting on the
LCD Screen.
c. Press the
(DOWN) button to stop the timer from
counting. Pressing the
(DOWN) button again to reset
the timer display back to zero.
d. Press the
button to return to the normal mode.
At this level, the PMR will emit a 15 seconds in normal mode.
Important: Charge the unit for 10~14 hours.
Battery charge at very low level. At this level, the other icons
in the LCD Screen also turn OFF
Important: Charge the unit for 10~14 hours.
Specifications:
Channels Available
CTCSS Sub-channel
Output Power (TX)
5 Channels
38 for each Channel
0.5W ERP (High) / 0.2W ERP (Low)
Range
About to 8 Kms. (high) / 3 Kms. (Low)
Effective Range
The Transmission range of the product is dependent on the environment
terrain where it is being used, the following diagram attempts to guide
the user on the sort of performance to expect for everyday use.
Signal Strenght
Optimum (open area) (1)
Medium ground based
obstruction (2)
Note: The PMR transmit and Receive function will still operate
even if the Stop-watch function is in operation. However,
the Call-Ring tone function will be temporarily disabled.
Heavily built up area (3)
0
5. Auxiliary Features
5.1 Key Lock
The Key Lock feature allows the user to disable the
(UP),
(DOWN), Monitor, and the Menu
buttons so that the
PMR settings could not be changed accidentally.
a. To activate the Key Lock feature, press and hold the
button for 1 second. The
(Lock) icon will display on
the LCD Screen.
b. To deactivate the Key Lock feature, press and hold the
button again for 1 second. The
(Lock) icon will
disappear on the LCD Screen.
The PTT , H/L , Call C , and the
(POWER) button will
remain functional even if the Key Lock feature is activated.
5.2 TX Power H(High)/L(Low) feature
This feature permits the selection of the transmitting power
level to high or low. Before transmitting a speech to other
PMR units, press the H/L button to select the desired
power output. If High is selected, the PMR will transmit at
maximum power and at a longer transmission range.
Range (Km)
8
Range Slope
Range Check
The Transmission range will be affected as shown in the above diagram.
The transmitting range typical values for different environment
conditions will be (1) 8 km (2) 4 km (3) 2 km. It should be remembered
that these are only guide values as actual achieved distances will be
dependent on the environment and terrain.
Note: This radio cannot transmit or receive calls while the unit is charging.
CHANNEL TABLE
CHANNEL
1
2
3
4
FREQUENCY (MHz)
463.975
464.125
464.175
464.325
CHANNEL
5
FREQUENCY (MHz)
464.375
CTCSS ( Continuous Tone Coded Squelch System) Frequency Table.
5.3 Busy Indicator (RSSI Indicator)
Anytime when the PMR detects a valid signal on the current
channel, the
BUSY indicator will display on the LCD
Screen and the Indicator lighting will light green. However,
the speaker will only be enabled when the signal matches
the current CTCSS code.
5.4 LCD Screen Back Light
Every time a button is pressed (except PTT, Call, and Power
buttons), the LCD Screen back light will illuminate for 4
seconds.
5.5 Microphone/Earphone Jack
The PMR is equipped with an auxiliary microphone and
earphone jack (located at the upper side near the
antenna). The headset may or maynot be included with the
package.
NOTE: The maximum transmission range will vary depending on terrain
and environment.
WARNING: Using batteries
1. The PMR units operate with 4 1.5V AAA/LR03 regular Alkaline
or Ni-MH (nickel metal hydride) batteries.
2. Batteries and rechargeable battery pack should not be thrown
with domestic rubbish. You may hand them in at your nearest
collection point.
3. Do not leave batteries installed over a long period of time as
leakage may occur and this can destroy the radio.
Troubleshooting Guide
SYMPTOM
SOLUTION
No power.
= Check the battery pack is installed properly.
= The batteries may be weak.
= Replace the old battery pack with a new one.
Reception is
weak.
= Press the
(UP) button to increase the
receiver volume level.
= The receiving signal may be weak and/or out
of range.
= If this happens press the M (Monitor) button.
Cannot change
CTCSS subchannels.
= Key lock mode must be deactivated if the Key
lock icon
is displayed on the LCD Screen.
= To change CTCSS sub-channels, press the MENU
button twice, the CTCSS icon blinks on the LCD
Screen.
= Press the
(UP) or
(DOWN) buttons to
change the CTCSS sub-channels.
= Batteries may be weak.
Range is limited.
= Batteries may be weak.
= Replace with new batteries if the charge level
indicator gets low.
= Check the TX Power H/L setting. See the
"Effective Range" diagram.
= The maximum range will vary depending on
terrain and environment.
= Open fields provide the maximum range, while
steel/concrete structures, heavy foliage, and
use in buildings and in vehicles may limit the
range significantly.
= Wearing the radio close to the body, such as
in a pocket or on a belt, will decrease range;
change the location of the radio.
Sound distortion
problems.
= If you are transmitting, speak in a normal tone
of voice, 5 cm away from the Mic
(microphone).
= If you are receiving, lower the volume to a
comfortable level.
= Radios too close. Radios must be at least 2
meters apart; increase your distance.
= Radios too far apart. Obstacles interfere with
transmission. Talk range is up to 8Km (High
power), 3 Km (Low power) in clear unobstructed
conditions.
No communication = Check the Scrambler mode setting. Both the
Transmitting and Receiving PMR units should
have the same Scrambler mode setting.
= Check the CTCSS code setting. Both the
Transmitting and Receiving PMR units should
have the same CTCSS code setting.
Mosquito Repel not = Adjust the Mosquito Repeller Frequency and
check the most effective frequency to get the
effective.
best performance.