1
The Efika Book
Information About Using the Efika Motherboard
July 2007 edition - by Geoffrey CHARRA (V1.5)
Sponsored by
The Efika book
Contents
1 Introduction...........................................................................................................3
1.1 Objectives........................................................................................................3
1.2 License............................................................................................................ 3
1.3 Greetings.........................................................................................................3
2 Specifications of the Efika.........................................................................................4
2.1 Presentation.....................................................................................................4
2.2 Efika Motherboard Specifications..........................................................................5
2.3 Efika Versions................................................................................................... 5
2.4 Efika Open Client...............................................................................................6
3 Hardware Compatibility and Setup.............................................................................. 7
3.1 Supported Graphics Cards...................................................................................7
3.2 PSU................................................................................................................9
3.3 Case............................................................................................................... 9
3.4 Storage..........................................................................................................12
3.4.1 Devices Directly Connected to the On-board IDE 44 Pin Connector..................... 12
3.4.2 Other IDE Devices......................................................................................13
3.5 Hardware Setup..............................................................................................13
3.6 Known Hardware and/or Software Problems.........................................................17
4 Genesi Firmware ................................................................................................... 17
4.1 Presentation ..................................................................................................17
4.2 Firmware Version.............................................................................................17
5 Operating Systems................................................................................................17
5.1 Linux.............................................................................................................17
5.1.1 Global Information.....................................................................................17
5.1.2 Installing GNU/Linux Debian........................................................................23
5.1.3 Installing GNU/Linux Gentoo........................................................................29
5.1.4 Installing GNU/Linux OpenSuse....................................................................31
5.1.5 Installing GNU/Linux Ubuntu........................................................................31
5.1.6 Installing GNU/Linux EdUbuntu..................................................................... 32
5.1.7 Installing GNU/Linux Crux...........................................................................33
5.1.8 Use your Imagination with your Efika............................................................33
5.2 MorphOS........................................................................................................36
6 Additional Information............................................................................................36
6.1 Where to Buy an Efika......................................................................................36
6.2 Websites about the Efika ..................................................................................36
6.2.1 Official Websites .......................................................................................36
6.2.2 Community Websites .................................................................................37
July 2007 edition – Geoffrey CHARRA – http://www.efika.org
2
The Efika book
1 Introduction
1.1 Objectives
The Efika book is a free multi-language electronic book dedicated to the Efika motherboard
from Genesi. It contains information about the Efika hardware, it's setup and it's supported
operating systems (Linux distributions and MorphOS).
The information gathered herein was checked rigorously. However, the author does not
guarantee the accuracy and declines any responsibility for any damage or any loss that could
be caused, whether directly or indirectly, in all or partly, by the use of this documentation.
This information provided here is not intended to replace the official information provided by
Genesi or bplan.
1.2 License
Please respect the following license which applies to this document.
Free private use : this document can be downloaded and/or copied freely for free private use.
Free public use : this document can be downloaded and/or copied for free public use. A link to
the original site of the document (http://www.efika.org) or an associated note, is however
required on the page containing the document.
Commercial use : any commercial use of this document is strictly prohibited, except with prior
agreement of the respective authors.
In case of doubt, please contact me by email: lugduweb [ AT ] efika.org
1.3 Greetings
First, I would like to thank all the people having taken part directly or indirectly in this project,
in particular:
–
Thibaut Jeanson (Linux Debian install section additional information)
–
Karoly Balogh (Linux Debian 3D desktop install)
–
Johan Dams (Linux Ubuntu section)
–
Péter Czanik (Linux OpenSuse and EdUbuntu sections)
–
Nico Macrionitis and The Linux Crux PPC team (Linux Crux section)
–
Matt Sealey (Efika technical information verification)
I would also like to thank the following people who are helping or helped me to translate this
document in others languages :
-
French : David Brunet (V1.1) & the author (all versions)
-
Japanese : Akinori Tsuji (V1.4 R1 to R3)
-
Polish: Pawel Szczodry (V1.4 R3)
-
Italian : Loris Cuoghi (V0.4 and V1.4 R2)
-
Swedish : Daniel Lundh (V1.4 R1)
July 2007 edition – Geoffrey CHARRA – http://www.efika.org
3
The Efika book
-
Czech : Marek Klobaska (V1.1)
-
Russian : Vlad Vinogradov (V0.1 to V0.4)
And those who will help for future releases:
-
German : Heinrich Lehmann and Ulrich Beckers
-
Greek : Konstantinos Margaritis
-
Portuguese : Nuno Vasco Saltao Da Costa and Ricardo Rocha
-
Romanian : Alexandru Lazar
Spanish : Héctor Juan Lopez, Carlos Reinoso Espinoza and Jose Mari Rodriguez
Martinez
-
Turkish : Heinrich Lehmann
I would also like to thank Gerald J. Normandin Jr and Lyndon Hill for their assistance with
the English versions, respectively V1.1 and V1.4 R3 .
2 Specifications of the Efika
2.1 Presentation
The Efika is based on an ATX motherboard using a RISC PowerPC processor from Freescale
(MPC5200B). This tiny card targets mostly embedded applications. It also has a very low
power consumption and is completely silent.
It was created in 2005 by bplan GmbH, Genesi’s research and development centre,
located in Germany. It was first shown at the Freescale Technology Forum in 2005
The Efika is quite unique : it is neither a clone of a PC standard board nor a clone of a
Macintosh board. It can handle the Linux operating system (Debian, Gentoo, etc.) and will also
handle MorphOS and AROS Amiga-like systems soon.
In December 2006, Genesi sold it's first boards to customers and resellers and shipped some
of
them
to
the
members
of
the
Efika
developers
program
(see
http://www.powerdeveloper.org).
July 2007 edition – Geoffrey CHARRA – http://www.efika.org
4
The Efika book
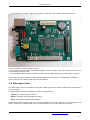
2.2 Efika Motherboard Specifications
-
ATX board (153x118x38 mm while using a 90° AGP adaptor)
Open Firmware (Genesi Firmware v1.3, IEEE 1275 compliant, handles x86 peripheral
BIOS)
Freescale MPC5200B PowerPC SoC up to 466 MHz (400 MHz, 32 bit PPC + FPU 603e or
e300 core, 760 MIPS)
128 MB DDR RAM @ 266 MHz
44 pin IDE connector (2 mm 90° connector for 2.5” HDD)
1 PCI (33/66 MHz PCI 2.2) or 1 AGP 90° riser slot (optional)
10/100 Mbit/s Ethernet (Realtek 8201 Phyceiver)
2x USB ports (1.1) OHCI
1x RS232 Serial port D-SUB9
Stereo audio out, microphone and line input S/PDIF (Sigmatel STAC 9766 AC97)
IRDA 2400 bps to 4 Mbps
RTC clock (power management on/off)
RoHS compliant
Note : Hi-Speed USB 2.0 support is not planned.
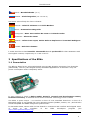
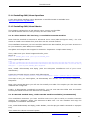
2.3 Efika Versions
Today, there are two versions of the Efika board:
–
The pre-production version “5200” (shown at the Freescale Technology Forum 2005) : in
this version, the Ethernet port is swapped and the CPU is an MPC5200.
July 2007 edition – Geoffrey CHARRA – http://www.efika.org
5
The Efika book
–
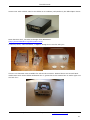
The production version “5200B” described in the previous chapter and shown below :
Future possible versions might include:
- A MPC512X processor with integrated graphics, SATA, USB2.0 and other improvements. See
the Freescale product page.
- A MPC5200B or MPC512X/no-display coupled with a higher performing XGI graphics chipset
There were also discussions in some threads about the possibility of integrating an FPGA on
future designs but nothing was announced officially.
2.4 Efika Open Client
The Efika Open Client is a network computer based around the Efika motherboard and directly
sold by Genesi.
The Efika Open Client is available in 3 basic configurations:
–
Node (for clustering and control)
–
Basic (network booting graphical client)
–
Plus (a full featured disk workstation).
Open Client configurations can be made with standard 2.5" hard disks or for lower power and
higher resilience, a flash based device (CompactFlash or discrete IDE flash module).
July 2007 edition – Geoffrey CHARRA – http://www.efika.org
6
The Efika book
Note that keyboard and monitor are not included in the configuration.
Specifications are as follows:
The prices given hereafter are the prices of May 2007 with the rate of corresponding exchange.
Open Client Node - headless network node ($275 or ~€205)
• Efika 5200B motherboard
• Industrial 18-gauge steel case
• Power Supply AC/DC adapter
Open Client Basic - network-booting thin terminal ($325 or ~€245)
• Efika 5200B motherboard
• Industrial 18-gauge steel case
• Power Supply AC/DC adapter
• XGI Volari V3XE graphics (DVI-I, HDTV)
• (optional) 64 MB Compact Flash and adapter for local storage (+$25 or ~+€15)
Open Client Plus - efficient standalone desktop solution ($375 or ~€280)
•
•
•
•
•
•
Efika 5200B motherboard
Industrial 18-gauge steel case
Power Supply AC/DC adapter
XGI Volari V3XE graphics (DVI-I, HDTV)
(optional) 64 MB Compact Flash and adapter for local storage (+$25 or ~+€15 ?)
40 GB hard disk
Note: the motherboard only can be bought for $99 (or ~€75) and the case only for ($150 or
~€110).
For more information see http://www.genesippc.com/openclient.php
3 Hardware Compatibility and Setup
3.1 Supported Graphics Cards
The MPC5200B PowerPC processor supplies a single PCI bus at 66 or 33 MHz. Off the shelf PCI
at 66 MHz are not available. Thus, the Efika uses the AGP slot in PCI mode and AGP is bridged
mechanically to PCI with the AGP 90° riser slot. The 66 MHz frequency is the smallest common
denominator providing AGPx1, which only runs at 3.3 V: be aware that other voltages will
result in damage to the board. The Hardware Layer/OpenFirmware provides x86 BIOS support,
so it is possible to use standard AGPx1 graphic cards such as an ATI 9200 series card.
Please also note that a sufficiently powerful graphics board is required to offload the CPU if you
want to use a graphic desktop such as GNOME (xfce or e17 is recommended). For this reason,
the ATI RADEON 9250 is probably the best choice (it is the most powerful graphic board at
AGPx1 and it is still quite easy to find).
July 2007 edition – Geoffrey CHARRA – http://www.efika.org
7
The Efika book
The graphic card must also be low profile to fit at 90° on the Efika like on the picture below:
The following list is a set of cards that worked properly on Pegasos systems. They are AGPx1
and 3.3 V. They should also work on this board (but this needs to be confirmed for each
board).
•
•
•
•
•
•
•
•
•
•
•
•
•
•
•
•
•
•
•
•
•
•
•
•
ATI Radeon 7000VE (RV100)
ATI Radeon 7200 (R100)
ATI Radeon 7500 (RV 200)
ATI Radeon 8500 LE (RV 200)
ATI Radeon 8500 (RV 200)
ATI Radeon 9000 SE (RV 250)
ATI Radeon 9000 (RV250)
ATI Radeon 9000 Pro (RV250)
ATI Radeon 9100 (RV200)
ATI Radeon 9200 SE (RV 280)
ATI Radeon 9200 (RV 280)
ATI Radeon 9200 Pro (RV 280)
ATI Radeon 9250 (RV 280)
3DFX Voodoo3 2000 (Avenger)
3DFX Voodoo3 3000 (Avenger)
3DFX Voodoo3 3500 (Avenger)
3DFX Voodoo4 4500 (Napalm)
3DFX Voodoo5 5500 (Napalm) (this card was recognised as a Voodoo4 on
Pegasos/MorphOS, only one GPU was used, thus it is not recommended)
SIS 305
SIS 300
SIS 6326
3D Labs / Texas Instruments Permedia2 (not recommended, because there might be no
3D support on MorphOS like on Pegasos)
3D Labs / Texas Instruments Permedia2v (not recommended, because there might be
no 3D support on MorphOS like on Pegasos)
XGI Volari V3XE AGP
Note : XGI has released the source code to Genesi for both 2D and 3D (thanks to HAL/OF).
This might be a good choice for future improvements.
July 2007 edition – Geoffrey CHARRA – http://www.efika.org
8
The Efika book
3.2 PSU
The power consumption of the Efika is very low :
0.8 to 1.2 W in operation with USB and Ethernet turned on
1 to 3 W for a hard disk
5 to 15 W for a graphics card
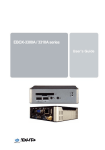
That gives something around 20 W, so it is then possible (and recommended) to use a Pico
ATX PSU (60-80 W or 120 W) such as this one :
Note: power consumption as low as 9 W has been recorded with hard disk, graphics card (ATI
9250) all running with a reasonable amount of usage but without heavy 3D running. Those
numbers have to be confirmed officially.
In European countries they can be difficult to find. Here are a few shops where they can be
bought around the globe :
UK : http://www.mini-itx.com
France : http://www.thinkitx.com
Nederlands : http://www.picco.nl or http://www.sallandautomatisering.nl/
USA: http://www.mini-box.com
A standard 400 W ATX PSU can also be used initially (this is what I’m currently using).
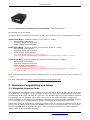
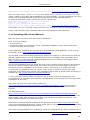
3.3 Case
It is quite hard to find a suitable case for the Efika, because the board does not have a
standard format. A miniITX case can be used but must be modified a little to make the Efika
fit. A 5.25” hard drive case could also be used (but this must be tried and confirmed).
July 2007 edition – Geoffrey CHARRA – http://www.efika.org
9
The Efika book
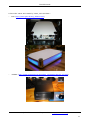
Genesi now sells a black case for the Efika on its website (with/without) the Efika Open Client:
Note that this case, can also be bought from Blastwave.
(http://www.blastwave.org/efika/index.html )
A second, silver, case thereafter, is bplan's design but is not for sale yet :
There is no alternate case available for sale at the moment. Instead there are several hand
made cases such as the Efika cardboard box. I guess this is the easiest box to make right now
and it’s free :
July 2007 edition – Geoffrey CHARRA – http://www.efika.org
10
The Efika book
A few other cases were made by users, such as these :
–
–
Geit (http://www.geit.de/eng_efikase.html)
DJBase (http://www.pegasosforum.de/album_showpage.php?pic_id=422).
July 2007 edition – Geoffrey CHARRA – http://www.efika.org
11
The Efika book
3.4 Storage
3.4.1 Devices Directly Connected to the On-board IDE 44 Pin Connector
For storage, a 2.5” hard drive can be used as explained in the official installation guide, but a
memory card or microdrive adaptor also works. A hard disk is better for its lower price and its
higher capacity, but Compact Flash or microdrive can be interesting because they are
completely noiseless and consume less power.
- IDE standard 2.5” ATA 5400 rpm disk
- Memory card with adaptor (Compact Flash)
- Memory card with adaptor (Microdrive)
July 2007 edition – Geoffrey CHARRA – http://www.efika.org
12
The Efika book
3.4.2 Other IDE Devices
Genesi does not approve whatsoever of plugging cables into the IDE connector ! The following
section might not work at all... So it is really not recommended !
The IDE 44 pin connector could be also be used for a 3.5” HD or an ATAPI CDROM. This would
need a 44 pin male/male gender changer and shorter than 10 cm IDE ribbon cable which
seems to be difficult to find. Thus such a card usage does not seem recommended for a start.
The on-board MPC5200B is compliant with ATA-4 specifications (so two HDD/CDROM drives
could theoretically be managed). However, Genesi says that the Efika's controller can't handle
devices that are too far away from the connector (10 cm seems to be the maximal value
however a value of less than 45 cm should also be possible as written in the Freescale's official
MPC5200B manual).
In addition, the on-board connector is female (as opposed to standard male connectors)
making it impossible to directly connect a 2.5” HDD. In consequence, a standard ribbon cable
can not be used alone and a 44 pin IDE male/male gender changer such as this one is required
:
But that might not work... and maybe break something...
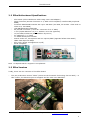
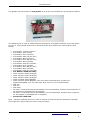
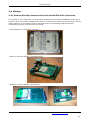
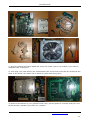
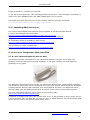
3.5 Hardware Setup
The pictures thereafter illustrates the hardware setup of the Efika described into the official
document provided with each motherboard. Note these pictures are intended to help you set
up your Efika, but they do not replace the official documents.
Hardware needed :
- An Efika board
- A 2.5” hard disk (here, a Samsung 40GB ATA 5400 rpm hard disk)
- A graphic board (here, a Gigabyte ATI RADEON 9250 AGP8x used as AGP1x)
- A Power switch and a Reset switch (mine were taken from an old Morex case)
- A Power Supply Unit (standard ATX or Pico ATX)
- 4 plastic stand offs to raise up the board
- A USB keyboard and a network cable (optional)
- A screwdriver and a pliers for the hardware setup
Important notice : Genesi also recommends to put something between the hard the disk and
the VGA adapter if you did not mount the board in a case, because the VGA board might touch
the hard disk and it could burn the VGA, and possibly the Efika and the hard disk too.
July 2007 edition – Geoffrey CHARRA – http://www.efika.org
13
The Efika book
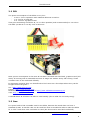
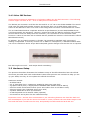
1) Start by putting the plastic stand-offs under the board. This is not needed if you have an
adequate case to plug it in.
2) Then plug your hard disk on the motherboard (the screw holes of the HD are located at the
back of the board). Be careful not to break any pins while doing this !
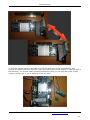
3) Remove the bracket of your graphic board if any (use the pliers to unscrew) and put a low
profile bracket instead if you have one (I didn't).
July 2007 edition – Geoffrey CHARRA – http://www.efika.org
14
The Efika book
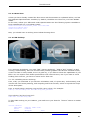
4) Plug the graphic board on the AGP riser and the AGP riser on the motherboard, then
connect the power and reset switches (“PW” and “RS” marks should appear on opposite side of
the AGP slot). You should obtain something like below. Now you can plug the power supply
(without switching it on yet or plugging it into the wall).
July 2007 edition – Geoffrey CHARRA – http://www.efika.org
15
The Efika book
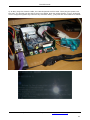
5) At last, plug the network cable, the USB keyboard and the VGA. Then plug the power into
the wall. You should now be able to boot your Efika. Push the power button. If your keyboard
is not recognised (bplan logo without any firmware boot), just push the reset switch to reboot.
July 2007 edition – Geoffrey CHARRA – http://www.efika.org
16
The Efika book
3.6 Known Hardware and/or Software Problems
Here is a list of current known problems that can be encountered on the Efika board :
USB Keyboards : some keyboards are not well recognised on boot. If that happens to
you, try to reset and reboot your Efika. If that still does not work, try to reset and
reboot while hitting some CTRL/ALT keys.
4 Genesi Firmware
4.1 Presentation
Genesi firmware (previously named “SmartFirmware”) is the command prompt shell which can
be first seen when the Efika starts like on the Pegasos. It looks like white text prompt on a
black background on your monitor.
The provided BIOS is an implementation of OpenFirmware (http://www.openfirmware.org/)
with a few differences. Genesi firmware is based on a Forth engine (http://www.forth.org/)
which is a command line interpreter, in which the instructions are executed immediately when
"Enter" key is pressed. Genesi firmware amongst other things makes it possible to list the
peripherals available and their properties, to modify their parameters and to initialise boot
commands on a peripheral or the network.
For a detailed guide of all the commands available, refer to the online handbook: Genesi
firmware User's manual: http://www.pegasosppc.com/files/SFUserManual.pdf .
This document is also available on the MorphOS CD, in the "Docs" directory.
4.2 Firmware Version
The current firmware version shipped with the Efika is Genesi firmware v1.3.
To obtain detailed information about firmware revision, type the following commands in the
OpenFirmware prompt :
cd /openprom
.properties
5 Operating Systems
5.1 Linux
5.1.1 Global Information
5.1.1.1 Linux Distributions Running on Efika
Linux is an OpenSource operating system of UNIX type created by Linus Torvalds
and continuing to evolve thanks to many developers in the world.
Linux became very popular because it has many interesting features :
- Free (OpenSource)
- Great range of software available for free.
- Very stable as based on the UNIX system.
- Very efficient for network applications.
- Multiuser.
- Multiplatform.
July 2007 edition – Geoffrey CHARRA – http://www.efika.org
17
The Efika book
It has nevertheless some weak points:
- Not very easy to use, nor to install.
- Quite heavy, mostly on boot.
- Not very efficient for graphic applications.
Several distributions of Linux are already available on Efika :
Distribution
Links
Debian
Gentoo
OpenSuse
EdUbuntu
Crux
Ubuntu
http://www.debian.org/
http://www.gentoo.org/
http://www.opensuse.org
http://www.edubuntu.org
http://cruxppc.sunsite.dk
http://www.ubuntu.com
Easy Install
(*)
8/10
5/10
tbd
tbd
tbd
tbd
Interest (*)
9/10
10/10
For additional information, see http://www.linux.org/.
PenguinPPC (Linux PPC port home page) www.penguinppc.org.
PegasosPPC the home of the Pegasos computer http://www.pegasosppc.com/.
Kernel.org (where you will find the latest Linux kernel) http://www.kernel.org/.
(*) This is a personal opinion and some people might not agree.
In this ebook, we will focus on the Debian and Gentoo Linux distributions.
5.1.1.2 Hard Disk Partitioning under Linux on Efika
5.1.1.2.1 Partitioning
Like on Pegasos, Genesi firmware on the Efika does not provide the RTAS methods which allow
Linux to modify NVRAM settings and make its own partitions bootable: you will have to do that
manually.
If your root is on a Logical Volume Managed (LVM) partition, then /boot should be on a
separate disk to be able to boot.
Genesi firmware on the Efika numbers its partitions incorrectly starting from 0 instead of 1
according to the CHRP specification. So /dev/sda1 is hd:0 and /dev/sdb1 is hd0:0 ; disk 0 is
named “hd” and disk 1 “hd0”.
/dev/sda -> first port (used for the 2.5” hard drive that can be plugged directly on the
motherboard, at least if ATA driver is loaded before USB module).
/dev/sdb -> second port
/dev/sda1 = first port, first partition.
/dev/sda2 = first port, second partition.
/dev/sdb1 = second port, first partition.
5.1.1.2.2 Using the “parted” Tool
Parted is a partitioning command line tool used in several distribution. Using it is really easy.
Here is list of the most important commands. Beware, that everything is executed
immediately, there is no undo function. This is just a short command summary, for a complete
list, visit http://www.gnu.org/software/parted/manual/
First, a little reminder about partition naming :
To get started, one needs parted /dev/hda to edit partitions on your primary master IDE
disk. Replace the device name, if another hard drive is to be edited. When started, parted will
drop you in some kind of command line. Anything you type there is executed immediately, so
be careful!
July 2007 edition – Geoffrey CHARRA – http://www.efika.org
18
The Efika book
Help will display brief help
print will list existing partitions, if there are any.
mklabel amiga creates an amiga partition table. All previous data is lost!
mklabel msdos creates an msdos partition table. All previous data is lost!
mkpart type fs start end creates a partition. It does not format the partition, but creates the
correct entry in the partition table.
type is always primary in the case of Amiga partition table, a p is enough
fs in any of the following: ext2, ext3, reiserfs, linux-swap, etc.
start and end represent the start and end point of a partition in mega or gigabyte. M is
appended to the number to represent a megabyte, G stands for gigabyte.
Example:
mkpart
mkpart
mkpart
mkpart
p
p
p
p
ext2 0M 100M
linux-swap 100M 612M
ext3 612M 10G
ext3 10G 40G
quit quits the program. There is no need to save, everything is saved as soon as you hit enter
after a command.
5.1.1.2.3 Mounting Partitions of other Operating Systems
How to mount a MorphOS FFS partition under Linux ?
Firstly, only FFS partitions are supported. The command is simple, in root mode, type: "mount
/dev/xxxx /mnt/myamigapartition -t affs -o user,rw" (to mount the partition "xxxx"). You
can also add a line in /etc/fstab to mount your Amiga partition at each start :
/dev/xxxx /mnt/myamigaparition affs user,noauto 0 0
How to mount a Linux partition under MorphOS ?
For that it is necessary to download the Ext2/Ext3 filesystem for MorphOS:
http://home.elka.pw.edu.pl/%7Emszyprow/programy/ext2filesystem/.
The file ext2fs_0.4_mos.lha contains the necessary files to manage the EXT2 and EXT3 Linux
filesystems. While following exactly the 'readme' file, it should not be a problem to install it
and to have access to the Linux partition in a transparent way.
5.1.1.3 Tricks and Hints
5.1.1.3.1 General Information on Linux Usage for Linux Rookies
User « root »
The « root » user is the administrator, which signifies that the root has all the privileges. In a
console, to go to root mode, type “su” and then the root’s password. Under Debian, you can't
login directly as root, but you can launch any root command by adding the “sudo” command at
the beginning of the command line.
Online Help
To obtain help about a command : in a console, type « man the_command_name ».
Copy a directory and its content to another filesystem preserving permissions, ownership and
links
Here is a trick using the “tar” command to perform a recursive copy without creating an
intermediate tar file.
tar cf - * | ( cd /target; tar xfp -)
July 2007 edition – Geoffrey CHARRA – http://www.efika.org
19
The Efika book
5.1.1.3.2 Keyboard shortcuts and commands in Xorg (graphic user interface of Linux)
To go from text mode (console) to Xorg/XFree, press on "CTRL+ALT Fx" (X = 1 to 6,
7=XFree). For easily mounting/unmounting a disk, use KwikDisk from KDE menu.
To kill XFree (in the event of a crash): press on "CTRL+ALT+BACKSPACE".
To kill a GUI program: launch "xkill" in a console and click on the troublesome program.
To kill a program in text mode, use "kill" command (“man kill” for more help).
5.1.1.3.3 Using a Linux System from Another Linux System by Changing root
If you want to use a Linux system from another one without using a boot kernel you can use
the chroot command.
For example if you are under Linux Debian and that your want to use your Linux Gentoo which
is installed in another partition, lets say in /dev/sda4, just do the following from a terminal:
The first time:
mkdir /mnt/gentoo
mount /dev/sda4 /mnt/gentoo
Then to change root into it :
mount -o bind /dev /mnt/gentoo/dev
mount -o bind /proc /mnt/gentoo/proc
chroot /mnt/gentoo
After having typed those commands you are logged as root under your other Linux system
which can be very convenient (for example if you have problems booting a fresh kernel).
5.1.1.3.4 NFS : Network File System and Remote Compiling
NFS makes it possible to mount directories from a server computer to a client computer as
local files/folders.
NFS can be used to directly transfer files from a computer to another, or to install a Linux
distribution, but combined with the “chroot” command explained above, it can also be used to
run your Efika applications and compilations from the client computer with a faster speed.
Personally I use a Pegasos as NFS client. This has the advantage to be PowerPC powered, so
no cross compilation is needed in this case.
Note that to “chroot”, on the Efika you must not use NFS on the target distribution on server
side or you won't have access to the /dev and /proc directories on the NFS client. Instead, the
NFS server must be run from another distribution under another partition. For example, I've
used the NFS server under a Linux Debian distribution on my Efika, and the NFS client under a
Linux Gentoo distribution on my Pegasos. The target distribution which I was doing “chroot” in,
was a Linux Gentoo distribution installed on the Efika. This was a way to optimise compilation
time. This is an example of what can be done with NFS. It's up to you to imagine other ways to
use it.
Also note that if you just want to export an NFS partition from one machine (without the need
to “chroot” on client side) then any client machine can import it without needing a second
distribution to run on the server side.
There are many tutorials about NFS available on Internet. Here are those which helped me the
most :
- Installation on Linux Gentoo :
http://gentoo-wiki.com/HOWTO_Share_Directories_via_NFS
- NFS Easy way (Ubuntu)
http://doc.gwos.org/index.php/NFS_Easy_Way
- Linux mechanics – NFS (French page – Use Google for translation)
July 2007 edition – Geoffrey CHARRA – http://www.efika.org
20
The Efika book
http://linuxmecanic.frlinux.net/fr/nfs.html
http://translate.google.com/translate?u=http%3A%2F%2Flinuxmecanic.frlinux.net%2Ffr%2Fn
fs.html&langpair=fr%7Cen&hl=fr&ie=UTF8
In fact, the installation steps are the same on each distribution.
On the server :
– Add NFS server support to your kernel
– Install the NFS server packages
– Edit the /etc/export file on the server to configure the directories that can be mounted and
the access rights. Then export it (“exportfs -a”).
– Configure “portmap”
– Run services and daemons. Check it with (“rpcinfo -p”)
– Configure host.deny and host.allow files
On client :
– Add NFS server support to your kernel
– Install the NFS server packages
– Mount the remote directory by hand via the /etc/fstab file
If it does not work on the first try, don't panic, check rights, ports and launched services.
5.1.1.3.5 Multiboot with bootcreator
This paragraph will be helpful after you will have installed more than one operating system on
your Efika, because in this case, you will need a multiboot tool. For that, you can use
“bootcreator” which is for example available in the Gentoo packages.
To install it from Linux Gentoo, just type “emerge bootcreator” from your Gentoo system.
To install it from another Linux distribution, get the sources and compile them (configure;
make; make install).
Once installation is done, you need a small but empty partition which will be your boot
partition with ext3 filesystem where you will put all your boot kernels. For that, you can use
“parted” or “gparted” if it's installed.
Then, in all your Linux systems, you must:
1) Edit the /etc/fstab file, and add an entry such as the following one:
/dev/sda1
/boot ext3
defaults 0 0
Note : replace “/dev/sda1” by the adequate partition on your system.
2) Rename your current /boot partition to boot_old (for example)
3) Mount the new /boot partition under each of them: “mount /boot”.
4) Copy all your boot kernels in this partition.
Then to create the possible boot entries, copy the example file from the bootcreator.example
file to /boot/bootmenu.txt and edit the file to your needs.
Then to create a boot menu file, type the following command:
bootcreator bootmenu.txt bootmenu
Finally, reset your Efika and press the “Esc” key when it boots.
Under OpenFirmware, set the following environment variables to automatically boot on your
bootcreator's bootmenu:
setenv boot-file /boot/bootmenu
setenv boot-device hd:0
setenv auto-boot? true
Now if you reset your Efika again (or just type boot), you should see your bootmenu.
July 2007 edition – Geoffrey CHARRA – http://www.efika.org
21
The Efika book
If you have input troubles, edit your menu again, set VERSION=0 and re-create the bootmenu
file.
5.1.1.3.6 Making Linux Boot Faster
Linux is not very fast at boot, so it might be very interesting to optimise it on a relative low
speed computer such as Efika. Even if that can't be as fast as an operating system such as
MorphOS (which does not initialise the hardware), the boot time can be reduced using a few
tricks explained thereafter (but don't expect much more than a 20% time optimisation).
First, here is an interesting article from IBM about the subject :
- IBM - Boot Linux Faster (http://www-128.ibm.com/developerworks/linux/library/lboot.html?ca=dgr-lnxw09BootFaster )
Now here is a list of ideas that will help you optimise your system to boot faster (most of those
are for advanced Linux users) :
- use the “initrg” tool (http://www.initng.org/) which is designed to significantly increase the
speed of booting a unix-compatible system by starting processes asynchronously
- tweak the kernel to use Efika specific hardware and services only.
- tweak the kernel to load most of the drivers (except hard disk) as module, so they can be
auto-loaded in parallel with the boot scripts. Examples: audio, serial ports, non-ext3
filesystems such as VFAT, AFFS...
- change boot sequence in inittab/fstab to load things in background
- set RC_STARTUP_PARALLEL to "yes" in /etc/conf.d/rc file for executing boot programs in
parallel when it is possible
- boot with the “quiet” option to avoid slow text displaying
- use uncompressed kernel (probably a minor impact because the time used for accessing the
disk in firmware for an uncompressed kernel, trades off the time of uncompressing a
compressed kernel)
- use a lightweight desktop manager like e17 instead of Gnome or KDE
- remove some useless scripts for your system if you don't need it (ex: disk checking...)
Note that any optimisation will have an impact on other system configurations. For example
you may not need the same thing if you launch a graphic desktop than if you only launch a
console system.
An alternate option is to put the 5200B into "deep sleep" mode. With a switch connected to the
IrDA connector you can "suspend" your Efika to a low power state instead of turning it off.
Then simply push the switch and your boot time is less than a few seconds...
5.1.1.3.7 Connecting to an Efika with a Null Modem Cable
It is possible to connect to the Efika with a null modem cable and then control it from a remote
computer with the “minicom” tool, so in this case, you don’t need a graphic card.
Here a working config file for minicom-2.2:
July 2007 edition – Geoffrey CHARRA – http://www.efika.org
22
The Efika book
acrux@psyke:~$ minicom -v
minicom version 2.2 (compiled Dec 12 2006)
Copyright (C) Miquel van Smoorenburg.
This program is free software; you can redistribute it and/or
modify it under the terms of the GNU General Public License
as published by the Free Software Foundation; either version
2 of the License, or (at your option) any later version.
acrux@psyke:~$ cat .minirc.dfl
# Machine-generated file - use setup menu in minicom to change parameters.
pu baudrate
115200
pu bits
8
pu parity
N
pu stopbits
1
pu minit
~^M~
pu rtscts
No
pu xonxoff
Yes
5.1.2 Installing GNU/Linux Debian
In this chapter, we will see how we can install Linux Debian on an Efika board with a USB key
(and no available system at all).
5.1.2.1 Hardware and Software Requirements
1.
2.
3.
4.
A USB key (with default FAT32 filesystem).
An Efika with an empty hard disk (However data will be lost !)
An RJ-45 standard Ethernet cable connected to Internet and DHCP.
A graphic board good enough to offload the CPU (I'm using an ATI RADEON 9250 with
128Mb).
This how to focuses on the installation. For more information see the official
http://www.efika.de/download/Efika.readme.pdf.
July 2007 edition – Geoffrey CHARRA – http://www.efika.org
23
The Efika book
5.1.2.2 Download and Install
First download the required files from http://www.efika.info and put them on your USB key.
- Debian installer : http://www.efika.de/download/di_efika
- Debian kernel : http://www.efika.de/download/kernel_efika
5.1.2.3 Installation
Before continuing, note that three of the steps described thereafter are displaying errors which
are not in our case. Those steps are written in italic.
5.1.2.3.1 First installation steps
First, boot the installer from the USB key:
boot hd0:0 DI_EFIKA
Then follow the installation instructions :
Choose language : "english", "french", whatever...
Choose country: "France", whatever...
Keymap to use: Select your keyboard layout (us, fr, whatever…)
Primary network interface : eth0: Ethernet or Fast Ethernet.
Hostname : "efika", or whatever...
Domain name : leave blank
Debian, archive country : ftp.fr.debian.org was not working for me, so I've selected the
German mirror. Proxy : leave blank.
Download installer components : "No kernel modules were found" : this error is OK because
Efika is not fully supported yet. Just answer "Yes" to continue.
Partition disks : The installer doesn't have information about the type of partition you are
using...". Continue with partitioning : "Yes". Then select your partition table type.
You can either do a manual partitioning if you know how it works, or a guided partitioning to
use the full disk.
If you chose the guided partitioning, the Debian installer will create a default DOS/MBR
partition type.
If you chose the manual partitioning you will be able to choose the partition table format. I
recommend manual partitioning (at least if you know what you are doing).
On first install, I had chosen "msdos" but it's recommended to use an "amiga" type instead to
be able to install MorphOS later when it will be available. If not, a type change will lose
everything which is on your disk !
Anyway, you need at least two partitions :
a “swap” : "swap"; Bootable flag : "off"
a “root” partition "/" using ext3 filesystem ; Uses as "Ext3" ; Mountpoint : "/" ; Options :
"defaults" ; Reserved blocks : "5%" ; Typical usage : "standard" ; Bootable flag : "on".
Click "Finish" to validate, then “yes” to continue and write changes to disk. The partitions are
then created and formatted.
Root password : type and confirm a password for your administrator account.
July 2007 edition – Geoffrey CHARRA – http://www.efika.org
24
The Efika book
User account : type a complete user name and a login name. Then, type and confirm a
password for this user.
The base system installation starts...
Install the base system : no installable kernel found. Again, that's OK, we will install the kernel
manually : just click "Yes".
Software selection : leave defaults ("Desktop environment" and "Standard system")
Continue without bootloader : Still OK. "Yes".
At the end of installation (which takes almost 2 hours), note the given information on a piece
of paper then reboot.
5.1.2.3.2 First Boot
For the first boot on the hard disk connected to the board, just type the following command
(we still need boot from the USB key). Adapt “/dev/sda1” to your root partition name :
boot hd0:0 kernel_efika root=/dev/sda1
Under the graphical login window (GDM) do not connect yet. You would be under the GNOME
desktop which is very slow and difficult to use on Efika. We are now going to install XFCE4, a
lighter window manager.
?
?
?
?
?
?
?
Open a console by typing on the “CONTROL” + “ALT” + “F1”. Login as root with the
password
selected before.
Once connected, stop GDM : /etc/init.d/gdm stop
To install XFCE4, type the following command : apt-get install xfce4 xfce4-goodies
Once the XFCE4 installation is finished, restart GDM : /etc/init.d/gdm start
Back to the connection window (GDM), click on “Sessions” and select “XFCE”.
Now, login under XFCE with the password selected during installation then launch an
internet browser such as Firefox or Epiphany.
Go to http://www.efika.info and grab the debian precompiled kernel file and save it at
the default location (~/Desktop/Downloads). Then, copy this file into the /boot
directory.
Example :
su root
cp ~/Desktop/Downloads/kernel_efika /boot/
Now, get the modules from the same internet page, save them at the default location
(~/Desktop/Downloads) and extract them :
su root
cd ~/Desktop/Downloads
tar zxvf modules_efika.tgz
mv ./lib/modules/2.6.19-* /lib/modules/
Note : check that the modules directory name is the same as the kernel name issuing a
"uname -r" command and comparing it with the modules directory.
July 2007 edition – Geoffrey CHARRA – http://www.efika.org
25
The Efika book
5.1.2.4 Auto-boot
Unless you have already created the boot menu with bootcreator as explained before, and set
the adequate OpenFirmware variables, by default, the Efika won’t boot on your fresh Debian
install.
In this case, reboot your Efika and under OpenFirmware set the following system variables to
boot automatically on your Debian install:
setenv boot-file /boot/kernel_efika root=/dev/sda1
setenv boot-device hd:0
setenv auto-boot? true
Now, you should have a working Linux Debian booting alone.
5.1.2.5 3D desktop
For a working 3D desktop, you need “DRI” (Direct rendering), “AIGLX” and “compiz” up and
running. Unfortunately, due to a bit older than possible graphics card drivers included in Etch,
it won't be fast or really usable, but it's a good toy, if you want to show the capabilities of your
Efika. You can expect much better performance with recent drivers, but if you want to avoid
building from sources, you have to wait a bit for that now.
5.1.2.5.1 Enabling Direct rendering
First, of all, you need DRI. If you have an ATI Radeon card, it's quite easy. Unfortunately, XGI
owners still need some patching, and compiling stuff from scratch, which is beyond the scope
of this description.
First, to avoid losing a working xorg.conf file, save it first ! For example:
sudo cp /etc/X11/xorg.conf /etc/X11/xorg.conf_whatever
Then edit the /etc/X11/xorg.conf:
sudo nano /etc/X11/xorg.conf
To have DRI working on your Radeon, just make sure your that the "Device" section is similar
to this:
Section "Device"
Identifier
Driver
Option
"Generic Video Card"
"radeon"
"BusType"
"PCI"
July 2007 edition – Geoffrey CHARRA – http://www.efika.org
26
The Efika book
Option
Option
Option
Option
EndSection
"AccelMethod" "XAA"
"XAANoOffscreenPixmaps" "true"
"EnablePageFlip"
"1"
"ColorTiling"
"1"
Also, make sure that you don't have UseFBDev option, or you have it disabled. If you have a
BusID option, make sure it's correct, or either disable it. You don't really need it, as auto
detection really should work.
Note that the “BusType” “PCI” option line is needed, even if your Radeon is an AGP
one. Because it doesn't work in AGP mode, but in PCI mode, in the Efika (like in the Pegasos
II). Practically the AGP riser of the Efika is just a PCI slot, with an AGP-compatible layout. But
you have to tell this to the XOrg driver, because it detects the AGP chip, and tries to use the
AGP extensions - which is impossible on Efika (and Pegasos).
Also note, that to have working DRI, you need to have a section like this (normally located at
the bottom of the file):
Section "DRI"
Mode
0666
EndSection
Debian installer normally makes this change automatically to /etc/x11/xorg.conf. Check it and
make the change yourself if needed.
After you made all the changes, save the file.
Then restart X11 (mandatory).
Quick & dirty way: press CTRL+ALT+BACKSPACE keys (that will kill current X11 session) and
then log as root and type “startx”. X11 should now restart.
Slow way: reboot your Efika.
Now check that you have DRI enabled by typing the following into a terminal:
glxinfo | grep direct
The answer should be:
direct rendering: Yes
If you don't have a glxinfo command, install mesa-utils package first, with the following
command (as root):
apt-get install mesa-utils
If you have a libGL warning while running glxinfo, just ignore it.
So, if you have the above "direct rendering: Yes" answer, you managed to have DRI enabled,
which is required to have 3D acceleration. If it doesn't work, you might not have a supported
card, or you mistyped something. You might need to dig yourself into /var/log/Xorg.0.log, to
see what went wrong.
5.1.2.5.2 Composite Extension, and AIGLX
To have composite extension enabled, be sure to have another section in xorg.conf, like this:
Section "Extensions"
Option "Composite" "Enable"
EndSection
You also need "dbe" module loaded. You find "Module" section in the earlier part of xorg.conf. I
have the following modules loaded:
July 2007 edition – Geoffrey CHARRA – http://www.efika.org
27
The Efika book
Section "Module"
Load
"dbe"
Load
"i2c"
Load
"bitmap"
Load
"ddc"
Load
"dri"
Load
"extmod"
Load
"freetype"
Load
"glx"
EndSection
Depending on your configuration, this list may vary. Just be sure "dbe" is included in it, before
"dri" and "glx". If “vbe” and “int10” modules are there, remove them because they are
irrelevant on a PowerPC computer.
Again, save the changes, and restart X. If everything is ok, you should have similar results of
the following tests:
user@efika:~$ cat /var/log/Xorg.0.log | grep "AIGLX enabled"
(==) AIGLX enabled
user@efika:~$ cat /var/log/Xorg.0.log | grep "Compo"
(**) Extension "Composite" is enabled
If you've done everything right, your system is now prepared to drive compiz window
manager, which is responsible for all the eyecandy and effects on your 3D desktop. We're also
done with the hardware configuration part, the followings are not Efika specific at all. But in
fact, if you have a Pegasos II or ODW, even the hardware configuration is the same! The very
same xorg.conf just works fine on my Pegasos II/G4 + ATI Radeon 9000 configuration as well.
5.1.2.5.3 Installing compiz and gnome-themes
First, you need to install compiz, of course. Log in as root, and use apt-get, or your favourite
package manager.
apt-get install compiz gnome-themes
Gnome-themes is required to let compiz use a bit better look&feel than it's default. You can
proceed without it as well.
5.1.2.5.4 Compiz with XFCE4
You really shouldn't be running anything more bloated on your Efika than XFCE4, so we don't
care about Gnome or KDE now. If you still run one of them, you will find gadzillions of howto's
on the net, because this part is not Efika specific at all. So, to force XFCE4 to use compiz
instead of xfwm4, you need to change it's default configuration.
Edit the file /usr/share/desktop-base/profiles/xdg-config/xfce4-session/xfce4-session.rc,
search for the "Failsafe Session" section, and change it to look like this:
[Failsafe Session]
Count=4
# Client0_Command=xfwm4
Client0_Command=compiz,--fast-filter
Save it. Please notice the comma in the compiz line. That is no typo, you need that there. After
this, log out, log in into a non-X console, and delete your .cache directory, where xfce4 keeps
some session-specific variables cached. If you don't delete this, the default settings you've just
changed, might not get applied. Don't worry, you only delete temporary files, your
configuration is not affected.
rm -r ./.cache
July 2007 edition – Geoffrey CHARRA – http://www.efika.org
28
The Efika book
That's it. If you've done everything right, after you log in to your X session you now should
have the rotating cube, bouncy windows, and other goodies.
If you want to disable compiz later, you only need to revert the changes in xfce4-session.rc
file, and empty .cache directory again, as described. The rest of the changes are not harmful
at all, and can safely remain untouched, however you might be able to free up some memory,
if you disable composite extension again in xorg.conf file.
5.1.3 Installing GNU/Linux Gentoo
5.1.3.1 New Install
5.1.3.1.1 First Way: NFS Install
To install Gentoo on your Efika by NFS install, you can follow the instructions given here :
http://gentoo-wiki.com/Efika.
5.1.3.1.2 Second Way: Install from a Debian Shell
Another way to install Gentoo, is to use your Debian install and “chroot” into it. Here is a way
to do it :
Open a shell and type the following commands (We suppose here that you have an empty
partition on /dev/sda2).
Mount a Gentoo root filesystem:
mkdir /mnt/gentoo/
mount /dev/sda2 /mnt/gentoo/
Download a “stage1” or “stage3” tar file from one of the Gentoo mirrors.
Example on : http://ftp.club-internet.fr/pub/mirrors/gentoo/releases/ppc
For a “stage1” or “stage3” install:
cd /mnt/gentoo
tar jxvpf /mnt/cdrom/stages/stage1-xxx (with <xxx> any string, press <TAB> for automatic
completion)
Mount /dev and /proc :
mount -o bind /dev /mnt/gentoo/dev
mount -o bind /proc /mnt/gentoo/proc
Copy resolv.conf file (contains resolved IP adress of the computer)
cp /etc/resolv.conf /mnt/gentoo/etc/resolv.conf
Change root to use your new system as if we would have booted on it:
chroot /mnt/gentoo
Now you are ready to build your Gentoo system.
You will need to “emerge –sync”, configure your /etc/make.conf file with the adequate flags
and bootstrap it. This is a very long process. Please refer to the official Gentoo documentation
for it.
5.1.3.1.3 Third Way: Cross-compiling
You can use your Pegasos or another computer (PPC or x86) to cross compile a Gentoo
distribution for your Efika. For that, please refer to the documentation provided on Gentoo’s
website.
July 2007 edition – Geoffrey CHARRA – http://www.efika.org
29
The Efika book
- http://www.sable.mcgill.ca/~dbelan2/crossdev/crossdev-powerpc-i686.html
- http://gentoo-wiki.com/HOWTO_Cross_Compile
- http://gentoo-wiki.com/Embedded_Gentoo
5.1.3.1.4 Fourth Way : Using a Pre-built Stage4
This is indeed, a variation of the second way install with a « stage4 » instead of a « stage1 »
or a « stage3 ». For that, just follow those instructions :
http://dev.gentoo.org/~humpback/efika/
This is the fastest way to install a new Gentoo system on your Efika computer. Thus, this the
one I recommend for that.
As an alternate pre-built stage4, “e17ka”, a LiveCD for the Efika 5K2 is available in download
as a torrent. It is a gentoo-linux liveimagesystem created to have an out-of-the-box system
with some useful applications. See included README file for install.
http://www.pegasos.org/downloads/torrents/e17ka.torrent
5.1.3.2 Converting a Pegasos Linux Gentoo System to an Efika Linux Gentoo System
If you are running Linux Gentoo on your Pegasos, you can convert it to an Efika distribution
just by changing the CFLAGS in /etc/make.conf and by recompiling it all on the Pegasos (which
is really much faster !).
To do that, follow those steps :
1) First, copy all the content of your favourite Pegasos Linux Gentoo system to another
partition. For that use the tar command which keeps the links.
For example, to copy the “/” content to the /mnt/gentoo_efika partition:
cd / ; tar cf - . | ( cd /mnt/gentoo_efika; tar xfp - )
2) Then change root to the new partition (see above)
mount -o bind /dev /mnt/gentoo_efika/dev
mount -o bind /proc /mnt/gentoo_efika/proc
chroot /mnt/gentoo_efika
3) Change your CFLAGS in /etc/make.conf
nano /etc/make.conf
Replace the CFLAGS line by :
CFLAGS=”-O2 -mcpu=603e -pipe”
4) For the kernel, the best is to get the last Efika kernel sources and configuration kernel
from http://dev.gentoo.org/~humpback/efika/
If needed, configure it to your needs:
cd /usr/src/linux
make menuconfig
Exit from the GUI, then compile your kernel:
make all modules_install
Now copy your kernel to your /boot partition
cp /usr/src/linux/arch/ppc/boot/images/zImage.chrp /boot/efika_gentoo_ker
5) Then you are ready to rebuild all your system (It took 5 days for my EZPegTV's Pegasos
system) :
“emerge -e system”.
6) Copy your entire partition to your Efika, for example by using an external USB drive
and the tar command (If the whole partition is too big for a single tar, make several tar
files of your system. Then extract these files to your Efika hard drive. Personally I made
three tar files : one for /usr/src, another one for /usr/portage and one with the all other
directories). You can also use your directory as a NFS source if installed.
7) Don't forget to update your /etc/fstab. Then, put the kernel to the right place if needed
(see previous Debian chapter) to be able to boot.
July 2007 edition – Geoffrey CHARRA – http://www.efika.org
30
The Efika book
5.1.4 Installing GNU/Linux OpenSuse
A wiki page about installing Linux OpenSuse on an Efika board is available here:
http://en.opensuse.org/Efika102
5.1.5 Installing GNU/Linux Ubuntu
This chapter explains how to get Ubuntu Linux running on the Efika.
The actual Ubuntu kernel is not yet used, this will come soon.
5.1.5.1 First method: The hard way, no available PowerPC machine
Note that this method is reserved to advanced Linux users (NFS and Qemu used) : it's a lot
easier to install Linux Debian first, and then use the second method.
This installation assumes you have an Efika without an OS installed, but you have access to a
PC (non PowerPC) with GNU/Linux installed.
Get QEmu and compile with support for PowerPC. Important: compile static binary !
Then, make sure your kernel supports binfmt_misc.
Mount it:
mount -t binfmt_misc none /proc/sys/fs/binfmt_misc
Then register QEmu with it:
echo
':ppc:M::\x7fELF\x01\x02\x01\x00\x00\x00\x00\x00\x00\x00\x00\x00\x00\x02\x00\x14:\xff\xff
\xff\xff\xff\xff\xff\xff\xff\xff\xff\xff\xff\xff\xff\xff\xff\xfe\xff\xff:/usr/local/bin/q
emu-ppc:' > /proc/sys/fs/binfmt_misc/register
Now, install debootstrap and dpkg (with the adequate installation tool of your Linux
distribution).
Create the minimal Ubuntu system with debootstrap:
debootstrap --arch powerpc feisty /nfsroot/home/ubuntu/ http://archive.ubuntu.com/ubuntu
This step is why you need QEmu, as debootstrap will “chroot” into the newly created root
filesystem.
Note: this tutorial assumes you will use this initially over NFS. This implies you also have NFS
installed and configured.
Finally, if debootstrap completed successfully, you can now start the Efika with a PowerPC
kernel (the Debian kernel from efika.info for instance).
5.1.5.2 Second method: Easy, with PowerPC machine available [recommended]
This installation assumes you have an Efika with Linux (HD or NFS) or another PowerPC
machine like a Pegasos. Again, this assumes an NFS root. You can initialise and copy the
filesystem to Harddrive afterwards.
First, install debootstrap and dpkg (under Debian, use the apt-get install command or Synaptic
tool)
Then create the Ubuntu minimal system:
July 2007 edition – Geoffrey CHARRA – http://www.efika.org
31
The Efika book
debootstrap --arch powerpc feisty /wherever/you/want http://archive.ubuntu.com/ubuntu
Note for NFS users: There is a bug with dpkg which results in an error like this:
"dpkg: unable to lock dpkg status database: No locks available". To get around this, you have
to mount a loop filesystem and create the Ubuntu system there with debootstrap.
To create a filesystem (1GB is more than enough, can be less):
dd if=/dev/zero of=./filesystem bs=1k count=1000k
mkfs.ext3 ./filesystem
mount -o loop ./filesystem /wherever/you/want
debootstrap --arch powerpc feisty /wherever/you/want http://archive.ubuntu.com/ubuntu
Afterwards, you can copy this root fs wherever you want and unmount the loop filesystem.
Finally, start the Efika with a PowerPC kernel like the Debian one from efika.info.
5.1.6 Installing GNU/Linux EdUbuntu
Efika can work very nicely as a thin client for EdUbuntu.
Here is what is needed:
* a local network
* a PowerPC machine as EdUbuntu server (preferably a Pegasos, which will be used here)
* at least one Efika, as thin client
If all hardware is available, the first step is to download and install EdUbuntu on the 'server'.
Download it from: http://www.edubuntu.org/Download
Use the DVD, which has all files necessary for booting on Pegasos, or use mkvmlinuz from an
already installed Ubuntu 6.10 to create a boot kernel (or mkzimage from openSUSE, like I
did). For that, you can follow the steps described in the Linux volume of the Pegasos book
(http://thepegasosbook.wikipeg.org).
The normal installation does not install the LTSP (Linux Terminal Server Project) environment.
There is a script to install it afterwards, but it does not seem to be working as it should be.
Restarting a broken installation does not work either. This leaves us to create the LTSP
environment on installation. Use the 'expert' menu point, or add the 'priority=low' boot
parameter to get some more control over installation and be able to install LTSP. Some help is
available at: http://www.edubuntu.org/GettingStarted
To save yourself a lot of trouble, it's better to use a network setup as suggested in the
documentation: a 192.168.0.0/24 network, with EdUbuntu server at 192.168.0.254 (see some
explanation at the end).
Xorg does not work on a fresh install. Please see
http://www.pegasos.org/index.php?name=News&file=article&sid=1229 how to get Xorg
running on the 'server'. This will take a while, as many packages are updated over the
Internet.
Use information from
https://help.ubuntu.com/community/HowToCookEdubuntu/Chapters/LTSPManagement to
upgrade software inside the LTSP directory. Look for the 'Updating your LTSP clients NFS root'
part. Replace 'i386' with 'powerpc' as needed. This will bring the LTSP environment up to
shape, and also makes sure, that Xorg works.
Next task is to download prebuilt Efika kernel and modules from http://www.efika.info/ and
copy to the appropriate directories. 'kernel_efika' goes to /var/lib/tftpboot , modules should be
extracted to /opt/ltsp/powerpc/lib/modules
Also check /etc/ltsp/dhcpd.conf , probably it needs to be adjusted from i386 to powerpc. Don't
July 2007 edition – Geoffrey CHARRA – http://www.efika.org
32
The Efika book
forget to restart it, if anything is changed.
To get rid of some warnings, edit /opt/ltsp/powerpc/etc/lts.conf . Kernel support is missing so,
make sure, that 'SOUND=False' and 'NBD_SWAP=false' are in the file.
Now Efika should be able to boot over the network with the following command:
boot kernel_efika kernel_efika ip=dhcp root=/dev/nfs
5.1.7 Installing GNU/Linux Crux
Linux CRUX ISO CDROM both supports Genesi Pegasos II and Genesi Efika boards.
It can be downloaded from those URLs :
http://cruxppc.sunsite.dk/downloads/crux-ppc-2.2.0.2-rc1.iso
http://cruxppc.sunsite.dk/downloads/crux-ppc-2.2.0.2-rc1.iso.md5sum
An installation howto is available in PDF format :
http://cruxppc.sunsite.dk/releases/2.2.0.2/efika-howto.pdf
And a handbook is also available here :
http://cruxppc.sunsite.dk/releases/2.2.0.2/handbook.html
5.1.8 Use your Imagination with your Efika
5.1.8.1 Use a Nintendo Wiimote with an Efika
This section provides information to use a Nintendo Wiimote controller on an Efika. The
Nintendo controller has motion sensing capability. It can give a totally new and attractive
gameplay to any game.
The Wiimote communicates with the Wii via a Bluetooth wireless link. The Bluetooth controller
is a Broadcom 2042 chip, which is designed to be used with devices which follow the Bluetooth
Human Interface Device (HID) standard, such as keyboards and mice. The Bluetooth HID is
directly based upon the USB HID standard, and much of the same documentation applies.
For more information about it, have a look at the following URL :
http://www.wiili.org/index.php/Wiimote
A Wiimote is shipped with every Wii console sold, but it is also possible to buy a single one for
a price between €40 and €60. We will also be using a Belkin/Sitecom CN-520 Bluetooth USB
device like the one on the picture below (about €15) :
July 2007 edition – Geoffrey CHARRA – http://www.efika.org
33
The Efika book
The whole will be running on a Linux Gentoo system with a kernel version higher or equal to
2.6.19. For more information about Linux Gentoo installation, see the Linux Gentoo chapter
before.
5.1.8.1.1 Cwiid Driver Installation
First of all, we need to get the “CWiid” drivers. CWiid is a collection of Linux open source tools
written in C for interfacing your Linux system with a Nintendo Wiimote.
Start by downloading the “Cwiid” driver sources from http://abstrakraft.org/cwiid/
Download the latest version (I personally did use the 0.5.02 version available at the following
URL : http://abstrakraft.org/cwiid/downloads/cwiid-0.5.02.tgz).
Now, we must enable the “User lever driver” support into the kernel (or “uinput”).
In /usr/src/linux ; do “make menuconfig” to setup your kernel.
Device Drivers -> Input Device support -> Miscellaneous devices -> <M> User level driver
support
Quit and save. Check that the “grep UINPUT .config” commands displays the following result :
"CONFIG_INPUT_UINPUT=m".
Copy your kernel at the right place and reboot (for more information about kernel
configuration, check the Linux Gentoo chapter or/and the Linux Gentoo wiki).
After
reboot,
launch
the
module
with
the
“modprobe
uinput”
command.
To have it launched on each boot, add the “uinput” line at t h e e n d o f t h e
/etc/modules.autoload.d/kernel-2.6 file. For that type the following command :
echo "uinput" >> /etc/modules.autoload.d/kernel-2.6
Now we are ready to compile the Cwiid programs. Go into the Cwiid source directory and type
the following commands :
./configure
make
make install
ldconfig
In case of any problem, see the associated README file.
Note : “configure” may fail if some packages are not installed on your system. For Bluetooth
files, if you use gnome, the simplest is to emerge "emerge gnome-bluetooth" which will install
all what is needed :
Mon
Mon
Mon
Mon
Mar
Mar
Mar
Mar
26
26
26
26
13:49:13
13:52:14
13:56:02
14:09:09
2007
2007
2007
2007
>>>
>>>
>>>
>>>
dev-libs/openobex-1.3
net-wireless/bluez-utils-2.25-r1
net-wireless/libbtctl-0.6.0-r1
net-wireless/gnome-bluetooth-0.7.0-r1
July 2007 edition – Geoffrey CHARRA – http://www.efika.org
34
The Efika book
5.1.8.1.2 Bluetooth Configuration
Now, it's time to install and configure Bluetooth. For that, follow the Linux Gentoo Bluetooth
tutorial available at http://www.gentoo.org/doc/en/bluetooth-guide.xml up to step 5
(“Detecting and Connecting to Remote Devices“).
The Belkin/Sitecom CN-502 Bluetooth USB key is not listed in the peripherals supported by
“bluez”, but it works. Here is the console output for this device :
efika linux # lsusb
Bus 002 Device 002: ID 0a12:0001 Cambridge Silicon Radio, Ltd Bluetooth Dongle (HCI mode)
Bus 002 Device 001: ID 0000:0000
Bus 001 Device 001: ID 0000:0000
efika linux # hciconfig -a
hci0: Type: USB
BD Address: 00:10:60:A7:B1:CF ACL MTU: 192:8 SCO MTU: 64:8
UP RUNNING PSCAN ISCAN
RX bytes:396684 acl:24160 sco:0 events:288 errors:0
TX bytes:3593 acl:150 sco:0 commands:71 errors:0
Features: 0xff 0xff 0x0f 0x00 0x00 0x00 0x00 0x00
Packet type: DM1 DM3 DM5 DH1 DH3 DH5 HV1 HV2 HV3
Link policy: RSWITCH HOLD SNIFF PARK
Link mode: SLAVE ACCEPT
Name: 'BlueZ at efika (0)'
Class: 0x3e0100
Service Classes: Networking, Rendering, Capturing
Device Class: Computer, Uncategorized
HCI Ver: 1.1 (0x1) HCI Rev: 0x20d LMP Ver: 1.1 (0x1) LMP Subver: 0x20d
Manufacturer: Cambridge Silicon Radio (10)
In case of a problem : if the “lsusb” command displays the Bluetooth key but the hciconfig
displays nothing, just unplug the USB key, check that the Bluetooth service is launched, then
replug the USB key. It should now be working.
Note that some peripherals may be recognised in HID mode instead of HCI. To change this,
just type the “hid2hci” command.
5.1.8.1.3 Recognising the Wiimote
Press the “1” and “2” buttons of your wiimote simultaneously. The Wiimote's LED should now
be blinking. Then type “hcitool scan” command to display the Wiimote's MAC address.
Example:
efika linux # hcitool scan
Scanning ...
00:17:AB:2B:CD:81 Nintendo RVL-CNT-01
5.1.8.1.4 wminput, wmgui and wmdemo
Now, it your time to play : wmgui and wmdemo will help you check that everything works. To
make a more interesting test it is possible to use wminput with the neverball configuration file.
So you will be able to control the game with the Wiimote's sensor. Great fun !
5.1.8.1.5 And now what can we do with it ?
Use your imagination! This motion sensitive controller can be used with any application thanks
to the configuration files. For example, you can set up UAE Amiga emulator and run your old
games using the wiimote.
5.1.8.2 Use your Efika as a Media Centre Client
July 2007 edition – Geoffrey CHARRA – http://www.efika.org
35
The Efika book
The idea here is to combine an Efika and a Pegasos into a client/server media centre. The
Linux distribution used here, is a Linux Gentoo distribution with the MythTV software. The
Pegasos contains a TV tuner card (with IR sensor) and is used as the “backend” server, the
Efika being used as the “frontend” client. The Pegasos can also work alone as a
frontend/backend (See EZPegTV).
This project is still in progress and more information can be found at the following URL :
http://empx.charra.fr
5.2 MorphOS
MorphOS support is planned, but has not yet been released. The latest information can be
found on the official MorphOS website : http://www.morphos-team.net .
6 Additional Information
6.1 Where to Buy an Efika
The Efika motherboard can be bought from Genesi’s website (http://www.genesippc.com). See
chapter two for prices.
You can also try to win a free Efika by submitting an interesting project at the Efika developers
projects page.
It is also possible to buy Efika computers from resellers such as these :
- Relec/Pegasos Suisse - Swiss - http://www.pegasos-suisse.com/
- Pegasos.cz : http://www.pegasos.cz
6.2 Websites about the Efika
6.2.1 Official Websites
Genesi, manufacturer of the Efika: http://www.genesippc.com/
Genesi – Efika pictures : http://www.pegasosppc.com/gallery.php?id=141 ;
Genesi – Efika videos : http://www.pegasosppc.com/movies/efika_de.mp4
Bplan (Genesi), Efika R&D: http://www.bplan-gmbh.de/
PegasosPPC (Genesi), official site of Pegasos computers: http://www.pegasosppc.com/
Power Developer (Genesi), site PPC : http://www.powerdeveloper.org
Efika info : official information, docs and downloads for the Efika motherboard :
http://www.efika.info
Freescale, PowerPC processors : http://www.freescale.com/
Power org, PowerPC architecture technology development: http://www.power.org
Efika developers projects : http://projects.powerdeveloper.org/program/efika
July 2007 edition – Geoffrey CHARRA – http://www.efika.org
36
The Efika book
6.2.2 Community Websites
Efika org : http://www.efika.org
Gentoo Efika wiki : http://gentoo-wiki.com/Efika
OpenSuse Efika wiki : http://en.opensuse.org/Efika102
Mupper : http://www.mupper.org
Geit: how to build an Efika case : http://www.geit.de/eng_efikase.html
DevRandom blog : http://www.devrandom.us/
Pegasos.org : http://www.pegasos.org
July 2007 edition – Geoffrey CHARRA – http://www.efika.org
37