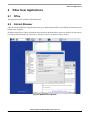
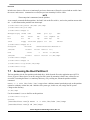
1
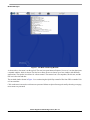
Freescale Semiconductor
Application Note
AN2751
Rev. 0.2, 10/2004
Genesi Pegasos II Yellow Dog Linux 3
by
Maurie Ommerman
CPD Applications
Freescale Semiconductor, Inc.
Austin, TX
This application note is the fifth in a series describing the Genesi
Pegasos II system, which contains a PowerPC™ microprocessor,
and the system’s various applications. This document describes
the implementation of Yellow Dog 3.0 Linux on this computer
system.
1
Introduction
This application note describes the Yellow Dog Linux (YDL)
operating system and many of the commands. Linux has a variety
of ways to accomplish most tasks. This document will show only
one way to perform the actions described here. There are other
ways. Also, there is usually a GUI way to accomplish most tasks,
however, this paper presents command line methods for most
tasks. GUI are nice, but they hide what is really happening. When
the network is set up with a GUI, how the files are actually
affected is not seen, but using the line commands allows feedback
on exactly what is happening. This is not a complete guide to
YDL, but is a collection of useful things to help both the
experienced and novice become quickly adept at using YDL.
© Freescale Semiconductor, Inc., 2004. All rights reserved.
1.
2.
3.
4.
5.
6.
7.
8.
9.
Contents
Introduction . . . . . . . . . . . . . . . . . . . . . . . . . . . . . . . . . 1
Terminology . . . . . . . . . . . . . . . . . . . . . . . . . . . . . . . . 2
Starting Yellow Dog Linux . . . . . . . . . . . . . . . . . . . . . 2
Logging in as a Normal User . . . . . . . . . . . . . . . . . . . 3
Window Managers . . . . . . . . . . . . . . . . . . . . . . . . . . . 7
Other User Applications . . . . . . . . . . . . . . . . . . . . . . . 9
Root User . . . . . . . . . . . . . . . . . . . . . . . . . . . . . . . . . 10
References . . . . . . . . . . . . . . . . . . . . . . . . . . . . . . . . . 25
Document Revision History . . . . . . . . . . . . . . . . . . . 26
Terminology
YDL is a fine implementation of Linux, however this version is not a complete distribution and is very limited. A
new implementation is being developed and when available will be distributed to Genesi Pegasos II owners and this
document will be updated at that time. This version does not work correctly and many deficiencies will be discussed
in this paper as well as some ways to work around the problems.
2
Terminology
The following terms are used in this document.
SCSI
IDE
Linux OS
Debian
Yellow Dog
USB
Shell
CUPS
YDL
3
Type of hard drive, which allows up to 8 drives on each channel
Type of hard drive, which allows up to 2 drives on each channel
Linux operating system
One of the distributions of Linux
One of the distributions of Linux
Universal serial bus
Software construct to allow separate users and jobs with in the same user to have a
separate environment to avoid interfering with each other
Common Unix Printing System Architecture
Yellow Dog Linux
Starting Yellow Dog Linux
Use the boot option 4 for the Yellow Dog kernel.
During boot up there are lots of messages. After boot is complete, read some of these messages with the dmesg
command and also in the /var/log directory. In fact, the /var/log directory contains many useful logs, including the
XF86 logs.
YDL starts in Default runlevel 3, Full multiuser mode, but with out X11 window manager. This can be seen from
the /etc/initab file.
To run in a full windowing environment, log in as a user and then perform the startx command. Note that the
XF86Config file may be misconfigured for the video monitor and the screen may be lost or it may become
unreadable and unusable, requiring a reboot. Virtual Terminals may or may not work. See Section 4.2, “Starting the
Graphics Display” for more details.
3.1
Boot Problems
The only known boot problem is that if YDL does not recognize the video display and blanks out during
initialization, the login prompt never displays. If this is the case, find another type of video display. The SONY
Multiscan E500 will not work, several NEC monitors do work. Other monitors have not been tested.
3.2
Log out Problems
Logging out of the graphical display may work fine or may cause the monitor to go blank. If it fails, then all the
virtual terminals will now fail. Reboot by pressing the restart button.
Genesi Pegasos II Yellow Dog Linux 3, Rev. 0.2
2
Freescale Semiconductor
Logging in as a Normal User
3.3
Types of Virtual Terminals
There are several virtual terminals available. They are accessed by the alt-ctrl-Fn combination. F7 is the graphics
window. F1, F2, F3, F4, F5, F6, F8 are text windows. One can switch between them by pressing the alt-ctrl-Fn
combination. These virtual terminals only become available when the graphics display has been started and may fail
after a graphics display logout.
3.4
Log in Screen Options
Since YDL does not start in a graphical display, a text login screen will be presented. If the monitor is disconnected
and then reconnected, the screen may be lost. If this happens, reboot.
.
4
Logging in as a Normal User
Since there is no graphics login window shown, just log in as a normal user from the text window. None of the virtual
windows are available at this time, only this one text window.
There is no user, guest, on this system, the only two users are maurie and root.
4.1
Users
The only users available on this system are root and maurie. Log in now as‘maurie,’ with password ‘maurie’
Yellow Dog Linux release 3.0 (Sirius)
Kernel 2.4.24-pegasos on an ppc
localhost login: maurie
Password: maurie
last login: Wed Aug 4 10:41:30 on tty1
[maurie@localhost maurie]$
4.2
Starting the Graphics Display
Once logged in as a user, ensure that the /etc/X11/XF86Config and /etc/sysconfig/network files are set up properly
for the monitor, or the screen may become unusable requiring a reboot. See Section 7.10, “Fixing the Network and
X Windows Configuration Files”
Once the two files above have been fixed, start the graphics display. Once started then the virtual terminals will also
be available.
startx
4.3
Graphics or Not Graphics
The rest of this section can be completed in a graphics display using a terminal window, or can be completed in a
text window, or in a telnet window. The rest of this section will assume a text window and we will discuss the
graphics display window in Section 5, “Window Managers”.
Genesi Pegasos II Yellow Dog Linux 3, Rev. 0.2
Freescale Semiconductor
3
Logging in as a Normal User
4.4
Changing Password
A user may change his/her password with the password command.
maurie@localhost:~$ passwd
Changing password for maurie
(current) UNIX password:
Enter new UNIX password:
Retype new UNIX password:
passwd: password updated successfully
4.5
Changing Users
The su (switch user) command allows one to change users. Both of these forms will create a new shell for the new
user. The previous shell will be preserved. There are two forms.
•
su <username>
— This form does not have the ‘-’ character. This will change to the new user name, however, it will keep
the environment of the current user. That means, that all permissions will be associated with this new
user, but the home directory and all the environment will remain with the old user. Typing su and no
user name will change to the root user.
— the system will ask for the password for this user before making the change to the new user.
The root user can change, su, to any other user without giving the password.
•
su - <username>
— This form has the ‘-’ character. This will change to the new user name, and it will change the
environment to the new user, that is, it will invoke the .login, .bashrc, and other login files. That means,
that all actions are now performed by the new user with the new users environment. Typing su - and
no user name will change to the root user.
— the system will ask for the password for this user before making the change to the new user.
The root user can change, su, to any other user without giving the password.
•
The exit command will return to the previous user, restoring the previous shell. The current shell is
destroyed.
An example is shown below.
User maurie wishes to switch to user fae, see 7.2, “Create New Users” to create a user called fae.
su fae, followed by fae password, will switch to the new user, fae. However, we will continue to stay in old user,
guest, home directory, specifically, cd will change to /home/guest, not /home/fae. Creating new files will give
ownership of those files to fae, but will write them to /home/guest, if fae has permission to write into /home/guest.
The user can do a cd /home/fae to get to the fae’s home directory.
su - fae, followed by fae password, switches to the new user, fae, and change the environment to the new user
fae, therefore, the cd command will move to /home/fae.
User guest wishes to switch to user root and gain root environment.
su -, followed by the root password changes to the root user. Note that no user name is given, root is the default
user name for the su command.
Genesi Pegasos II Yellow Dog Linux 3, Rev. 0.2
4
Freescale Semiconductor
Logging in as a Normal User
exit returns to user maurie.
4.6
Checking Disk Space
The command df will check disk space. The most useful forms are:
df -k will display all the mounted volumes
[maurie@localhost maurie]$ df -k
Filesystem
1K-blocks
/dev/hda6
none
Used Available Use% Mounted on
12654072
2173688
10480384
127120
0
127120
18% /
0% /dev/shm
[maurie@localhost maurie]$
df -k . ( note the space and then a dot character after the -k) displays just the mounted volumes associated with
this user.
[maurie@localhost X11]$ df -k .
Filesystem
/dev/hda6
1K-blocks
12654072
Used Available Use% Mounted on
2173688
10480384
18% /
[maurie@localhost maurie]$
4.7
Remote Access to Other Computers
telnet <remote> gives the user a window to a remote computer, <remote> can be the IP address, or the name
of the machine.
Normally, Linux will not allow access via telnet. The telnet daemon at /usr/sbin/in.telnetd has a configuration file at
/etc/xinet.d called telnet. Therefore, change this file to allow access to this machine. On this YDL release, the file is
not here, so telnet is not available from any Unix or Linux machine to this YDL. So telnet through a Windows telnet
window.
ssh <remote> is a secure shell, similar to telnet.
[appslab12.sps.mot.com:/maurie] ssh 10.82.124.139
The authenticity of host ’10.82.124.139 (10.82.124.139)’ can’t be established.
RSA key fingerprint is 43:03:f8:aa:8e:41:59:ee:72:5b:ff:9e:26:5b:66:dd.
Are you sure you want to continue connecting (yes/no)? yes
Warning: Permanently added ’10.82.124.139’ (RSA) to the list of known hosts.
[email protected]’s password:
[maurie@localhost maurie]$
ftp <remote> gives the user the capability of transferring files between the local computer and the remote
computer.
On this version of YDL, ftp is locked out.
Use the man command on each of these remote access commands
Genesi Pegasos II Yellow Dog Linux 3, Rev. 0.2
Freescale Semiconductor
5
Logging in as a Normal User
/sbin/ifconfig will display the IP address of the local machine.
4.8
Other Useful Commands
These are a few simple very useful commands, if not familiar with Linux, experiment with these commands. Also
do the command, ls /bin, this will display all the user commands in the system.
ls lists all the files in the current directory.
ls -l lists all the files in the current directory and gives the file size and other statistics.
pwd shows the current directory.
cd returns the system to the home directory.
cd <directory name> takes the system to the directory named.
whoami tells who is the current user.
grep <something> filename finds all the occurrences of ‘something’ in the filename, using the meta
character ‘*’ will search all files in the current directory. grep ‘something’ *.
find . | xargs grep <something> finds all the occurrences of ‘something’ in all files in all subdirectories
as well.
find . -name <name> finds all files in all subdirectories of <name>, find. -name newfile.
man <command name> will give a short tutorial on the <command name> and display it to the screen., man ls.
man <command name> | col -b > j sends the display to the file, j, which can then be printed or edited.
Use this command to get a tutorial for all the commands listed here and in the /bin directory.
info <command name> gives a short tutorial on the <command name> and displays it to the screen. It is another
type of man page with somewhat different descriptions. Sometimes, it helps to read both the man and the info
description of a command to learn how to use it.
cat <file name> displays the contents of the file on the screen.
cat -n <file name> displays the contents of the file on the screen and number each line.
mkdir <dir name> creates a directory of name <dir name> in the current directory.
rmdir <dir name> removes a directory.
rm <file name> deletes a file.
uname -a gives the name of the running Linux system. As in the example below:
[maurie@localhost etc]$ uname -a
Linux localhost 2.4.24-pegasos #1 mer fév 11 18:05:13 CET 2004 ppc ppc ppc GNU/Linux
[maurie@localhost etc]$
ps -ef displays all active processes and their IDs.
ps -ef | grep <something> displays all active processes that have <something> in their title.
For example, ps -ef | grep maurie displays all the active processes for the user maurie, as shown in this
example.
[maurie@localhost maurie]$ ps -ef | grep maurie
Genesi Pegasos II Yellow Dog Linux 3, Rev. 0.2
6
Freescale Semiconductor
Window Managers
root
741
1
0 19:42 ?
00:00:00 login -- maurie
maurie
745
741
0 19:56 tty1
00:00:00 -bash
maurie
781
779
0 19:58 ?
00:00:00 /usr/sbin/sshd
maurie
782
781
0 19:58 pts/0
00:00:00 -bash
maurie
846
782
0 20:30 pts/0
00:00:00 ps -ef
[maurie@localhost maurie]$
The commands less and more are useful as final pipe commands. Used either as stand alone or in pipe
commands, they allow only one page of data to scroll by at a time. There are several examples of less later in this
paper.
ls -l | less only lists the files one screenful at a time.
4.9
Using a USB Memory Stick
YDL will automatically detect a USB memory stick, however, it cannot be mounted and used. Unfortunately, there
is no way to use a USB memory stick at this time.
5
Window Managers
There is only one window manager available, YDL, which is a derivative of the Gnome window manager. The X11
window manager is GDM, it uses the /etc/X11/XF86Config file.
5.1
The YDL Window Manager
A snapshot program is available and the screen shots are from this program. To take snapshots, right click on the top
panel, choose add to panel then chose button, then choose screen saver. This will put a camera icon on the top bar.
Click this camera icon, to choose the name of the screen shot from the window that displays. Screen shots cannot
be taken of menus.
The YDL Window Manager is a facility that runs on top of the X window system.
Genesi Pegasos II Yellow Dog Linux 3, Rev. 0.2
Freescale Semiconductor
7
Window Managers
Figure 1. The Main Yellow Dog Window
As shown above, the menu is on the top left. The next icon opens Internet Explorer. Next over, is an icon that opens
a terminal window, which is shown. The four boxes allow the user to choose up to four windows with different
applications. The speaker icon allows for volume control. The camera icon is for snapshots, like this one, and the
last icon is the time and date.
The terminal window shown in Figure 1 is a session using the ftp facility to transfer files from YDL to another Unix
or Linux machine.
Click on the menu icon and a set of menus are presented. Menus are placed in categories and by choosing a category,
more menus are presented.
Genesi Pegasos II Yellow Dog Linux 3, Rev. 0.2
8
Freescale Semiconductor
Other User Applications
6
6.1
Other User Applications
Office
This application is not available in this distribution.
6.2
Internet Browser
Open the Mozilla application using the main menu, go to internet, then Mozilla or just clicking the internet browser
button on the top panel.
By default, Mozilla uses a direct connection to the internet. In locations where proxies are needed, set up the proxy
by using the Mozilla menu Edit | Preferences | Advanced | Proxies as shown in Figure 2 below.
Figure 2. Mozilla Proxies Window
Genesi Pegasos II Yellow Dog Linux 3, Rev. 0.2
Freescale Semiconductor
9
Root User
7
Root User
Change to root user. Do not log in as root user, root privilege grants unlimited access and unlimited opportunity to
mess up the root file system beyond repair. Log in as a normal user and change to root user with the command:
su The password is moto.
Exit from root user as soon as the tasks that require root privileges are done.
7.1
Changing the Root Password
The first thing to do on the Genesi Pegasos II system is change the root password. The command is passwd. As
shown below, a prompt will ask for the new password twice. Once accepted, this new password is needed to gain
access to root privileges again.
[email protected]’s password:
[maurie@localhost maurie]$ su Password:
[root@localhost root]# passwd
Changing password for user root.
New password:
Retype new password:
passwd: all authentication tokens updated successfully.
[root@localhost root]#
As root user, any users password can be changed by using the passwd command and the user name
root@debian:~# passwd maurie
Enter new UNIX password:
Retype new UNIX password:
passwd: password updated successfully
Genesi Pegasos II Yellow Dog Linux 3, Rev. 0.2
10
Freescale Semiconductor
Root User
7.2
Create New Users
Users exist in a running Linux, a running Linux has a root file system, in the case of Yellow Dog on Pegasos II, it is
/dev/hda6. Freescale application note AN2738, Genesi Pegasos II Firmware, discusses the firmware boot command,
which passes the argument, root=/dev/hda6. Thus the root file system for YDL Linux is partition 5 (since partitions
start at 0, but Linux designates them starting at 1), which is /dev/hda6. The root file system has all the directories
necessary for Linux.
/
Figure 3. Root File System
A user is a member of the club, that is, they can log in and use the Linux resources. The /etc/passwd file denotes all
users, encrypted passwords, and the initial shell, which is owned by the user, root, but available to read by any user.
One way to see who is able to log onto the system is to read this file, however, a shadow password file can be created
to blunt this possibility. Only root can create new users, each user owns their own home directory. Each user will
have their home directory in /home, however, root has the home directory of /root.
/
home
etc
root
Figure 4. home, root, and etc Directories.
As an example for the following users, with these passwd file entries:
user1:x:501:501::/home/user1:/bin/bash
guest:x:502:502::/home/guest:/bin/bash
user2:x:503:503::/home/user2:/bin/bash
user3:x:514:514::/home/user3:/bin/bash
Genesi Pegasos II Yellow Dog Linux 3, Rev. 0.2
Freescale Semiconductor
11
Root User
This is the arrangement of home directories.
bin
/
home
user1
guest
Files/
directories
etc
root
Other
users
Files/
directories
Files/
directories
Figure 5. Home Directories
Thus when we create a new user, we add an entry to the /etc/passwd file, we create a new directory in the /home,
and set up an environment, usually consisting of several hidden files, .bashrc and other files that begin with the ‘.’
character.
Every user has a user name, a password, an environment, a user ID, and a group ID. Looking at the example passwd
file above, user1 is ID 501 and group 501, guest is ID 502 and group 502. Normally, user IDs and group IDs will be
assigned sequentially. These IDs are used to indicate the permission of files. Permission values are denoted by 3
octal digits, uuu,ggg,aaa, where uuu is the user set, ggg is the group set, and aaa is the all other set. Each group of 3
octal digits, represents the permissions, write, read, execute. Thus a permission set of 640 indicates that the user
(owner of the file) has a permission set of 5, which is o110, indicating read and write, groups set is 4, o100 indicating
read only, and all other users have 0, indicating no access. Thus users can be grouped together to share certain files.
[maurie@localhost etc]$ groups
maurie
[maurie@localhost etc]$
As a normal user, these hidden files that begin with a ‘.’ can be seen with the ls -a command.
Now these commands can be used to create new users.
useradd <user name>, creates a /home directory, sets up the environment, and prompts for an initial password.
This command is just the opposite for Debian. adduser creates the environment and
useradd does not. For YDL, useradd creates the environment and adduser does not.
Keep these differences clear when moving between Debian and YDL.
Genesi Pegasos II Yellow Dog Linux 3, Rev. 0.2
12
Freescale Semiconductor
Root User
userdel <user name> removes all the information for this user.
Here is an example:
[root@localhost test1]# useradd fae
[root@localhost test1]# cd /home/fae
[root@localhost fae]# ls -a
.
..
.bash_logout
.bash_profile
.bashrc
.gtkrc
.kde
.gtkrc
.kde
[root@localhost root]# userdel fae
[root@localhost root]#
At this time add the two users, fae and guest.
[root@localhost root]# useradd fae
[root@localhost root]# useradd guest
[root@localhost root]# ls -a /home/guest
.
..
.bash_logout
.bash_profile
.bashrc
[root@localhost root]#
7.3
Using Sound
Sound does not work on this distribution.
7.4
Naming Conventions of Devices, /dev/sda1, /dev/hda1, etc.
Most devices on YDL Linux are accessed via a special facility know as the /dev facility. It is a directory in root,
which is the ‘/’ directory. There are many devices defined here. Use this command to see them:
ls /dev
[root@localhost dev]# ls /dev | less
MAKEDEV
X0R
adb
adbmouse
agpgart
amigamouse
amigamouse1
apm_bios
and many more.
The special MAKEDEV is a script that can recreate the /dev directory if it should become corrupted.
Genesi Pegasos II Yellow Dog Linux 3, Rev. 0.2
Freescale Semiconductor
13
Root User
All devices are a set of keywords and a number. For example, hard drives on the IDE channel are designated, hd<l>,
where l is a letter designating the channel. Thus hda is the hard drive on IDE channel zero master position, hdb is
IDE channel zero slave position, hdc is IDE channel one master position, etc. Each partition is then indicated by a
number. Thus hda1 is the first partition on this hard drive.
sda indicates an SCSI device. The USB devices are on the SCSI bus, therefore, they are designated as sda0, unused,
sda1, the bottom front connector, sda2 and sda3 the rear connectors.
7.5
The Partition Table Editor
The utility, parted, is the partition table editor for the Genesi Pegasos II system and is similar to the earlier utility,
fdisk, used on many MAC and X86 Linux systems. On this version of YDL, both parted and fdisk will run, but
neither can read the partition table. Thus, hard drives cannot be set up from this version of YDL.
[root@localhost dev]# parted /dev/hda
GNU Parted 1.4.24
Copyright (C) 1998, 1999, 2000, 2001, 2002 Free Software Foundation, Inc.
This program is free software, covered by the GNU General Public License.
This program is distributed in the hope that it will be useful, but WITHOUT ANY
WARRANTY; without even the implied warranty of MERCHANTABILITY or FITNESS FOR A
PARTICULAR PURPOSE.
See the GNU General Public License for more details.
Using /dev/hda
(parted) p
Error: Unable to open /dev/hda - unrecognised disk label.
(parted) q
[root@localhost dev]# fdisk /dev/hda
Device contains neither a valid DOS partition table, nor Sun, SGI or OSF disklabel
Building a new DOS disklabel. Changes will remain in memory only,
until you decide to write them. After that, of course, the previous
content won’t be recoverable.
The number of cylinders for this disk is set to 4865.
There is nothing wrong with that, but this is larger than 1024,
and could in certain setups cause problems with:
1) software that runs at boot time (e.g., old versions of LILO)
2) booting and partitioning software from other OSs
(e.g., DOS FDISK, OS/2 FDISK)
Genesi Pegasos II Yellow Dog Linux 3, Rev. 0.2
14
Freescale Semiconductor
Root User
Warning: invalid flag 0x0000 of partition table 4 will be corrected by w(rite)
Command (m for help): p
Disk /dev/hda: 40.0 GB, 40020664320 bytes
255 heads, 63 sectors/track, 4865 cylinders
Units = cylinders of 16065 * 512 = 8225280 bytes
Device Boot
Start
End
Blocks
Id
System
Command (m for help): q
[root@localhost dev]#
The q command quits and p command prints the partition info, which in this case is unknown.
7.6
Mounting Partitions
In order to use any partitions on a hard drive, they must be mounted. The df command shows which hard drives
are mounted. The mount command with no arguments will show all mounted devices.
The command, mount -r -t <type> /dev/<designator> <directory> will mount a partition or
other device onto an existing directory in the root file system. the -r parameter indicates read only, the -t indicates
the type of file system, and /dev/<designator> is the device, and <directory> is the mount point.
The beginning of the file system is the root, which is designated as ‘/’. Thus to move to the root of the top level
directory, cd /. All directories must start at ‘/’. Remember that there is also a /root directory, which is the home
directory for the root user, but the root of the directory is ‘/’. In order to mount any new partitions, they must start
in some directory in the existing root directory. The default directory /mnt is available for mounting partitions,
however, a partition may be mounted on any directory. Once a partition is mounted, then that mount point’s, i.e.
directory address, previous contents are no longer viewable, they still exist, but they have been covered up by the
mounted partition, also called a mounted volume.
Thus to mount the second partition, which is partition 1 (counting from 0) is the /dev/hda2 on linux.
mount -r -t asfs /dev/hda2 /mnt/temp2 will mount the second partition onto the mount point
/mnt/temp2 as a file system type asfs.
To mount the sixth partition (counting from zero) is the /dev/hda5 on linux, which is the Debian partition.
mount -r -t ext3 /dev/hda5 /mnt/temp5
or
mount -r /dev/hda5 /mnt/temp5
In this case, ext2 and ext3 are the native Linux partition types and one does not need to designate the type for either
of these.
Genesi Pegasos II Yellow Dog Linux 3, Rev. 0.2
Freescale Semiconductor
15
Root User
In both cases whatever files were on /mnt/temp5 previous to the mount, will now be covered and un-seeable. Once
the mount and umount command are reversed, the previous /mnt/temp5 will be visible.
NOTE
The mount point is unmounted, not the partition.
As an example, mount the Debian partition, /dev/hda5, look at the files with ls, and see the partition mounts with
df -k, then dismount the partition from /mnt/temp1.
[root@localhost mnt]# mount /dev/hda5 /mnt/temp1
[root@localhost mnt]# cd temp1
[root@localhost temp1]# ls
ZDLPegasos2.png
cdrom0
home
media
proc
sys
usb4
bin
dev
initrd
mnt
root
tftpboot
usr
boot
etc
lib
opt
sbin
tmp
var
cdrom
floppy
lost+found
pegasos
srv
usb
vmlinuz
[root@localhost temp1]# df -k
Filesystem
1K-blocks
/dev/hda6
Used Available Use% Mounted on
12654072
2176504
10477568
127120
0
127120
21170868
6508364
14662504
none
/dev/hda5
18% /
0% /dev/shm
31% /mnt/temp1
[root@localhost temp1]#
[root@localhost temp1]# cd
[root@localhost root]# umount /mnt/temp1
[root@localhost root]#
7.7
Accessing the Boot Partition 0
The boot partition 0 is the first partition on the hard drive, which from the Freescale application note AN2736,
Genesi Pegasos II Boot Options is an affs, amega fast file system. By mounting it from Linux, all the files are
accessible. Assuming that there is a /mnt/temp1 directory, or by creating one, mount the partition with this
command:
mount -r -t affs /dev/hda1 /mnt/temp1 where -r indicates mount in read only mode, so this partition
cannot be accidently written into, and -t indicates file system type, in this case, affs, amiga fast file system.
Change to that directory.
cd /mnt/temp1
Use the command ls to see the files on this partition
[root@localhost root]# su Password:
[root@localhost root]# mount -r -t affs /dev/hda1 /mnt/temp1
[root@localhost root]# cd /mnt/temp1
Genesi Pegasos II Yellow Dog Linux 3, Rev. 0.2
16
Freescale Semiconductor
Root User
[root@localhost temp1]# ls
boot.img
menu
vmlinuz-2.4.24-pegasos
bootpeg2.img
update-2004.04.05
vmlinuz-2.6.4-pegasos
vmlinuz-2.4.25-powerpc
[root@localhost temp1]#
Table 1 below shows the use for these files:
.
Name
Type
Source
Use
boot.img
bootpegasos2ram.img
Amiga
ROM Image
bootpeg2.img
bootpegasos2ram.img
Amiga
ROM image
menu
Forth type file
Open Firmware
Boot choice program
update-2004.04.05
PowerPC executable
Unknown
Unknown
vmlinuz-2.4.24-pegasos PowerPC executable
Linux
2.4.24 kernel for debian
vmlinuz-2.4.25-powerpc PowerPC executable
Linux
2.4.25 kernel for yellow dog
vmlinuz-2.6.4-pegasos
Linux
2.6.4 kernel for debian
PowerPC executable
Table 1. Description of Files in the /boot partition 0 (/dev/hda1)
The umount /mnt/temp1 command unmounts the partition.
7.8
Accessing the MorphOS Partitions
Create two directories on /mnt named temp2 and temp3.
Unlike the Debian kernels, both affs and asfs file system types are available on
YDL with this kernel.
mkdir /mnt/temp2
mkdir /mnt/temp3
Mount the two MorphOS partitions.
mount -r -t asfs /dev/hda2 /mnt/temp2, where asfs indicates amiga smart file system.
mount -r -t asfs /dev/hda3 /mnt/temp3
Use the ls command, to see the files on these partitions.
One can read and edit these files, and specifically, can read, edit and copy the pdf
files referenced in Freescale application note AN2738, Genesi Pegasos II
Firmware, and SmartFirmware User Manual available on the MorphOS partition.
To access the files now on these two partitions, cd /mnt/temp2 to see the /dev/hda2 partition files.
[root@localhost root]# mkdir /mnt/temp2
[root@localhost root]# mkdir /mnt/temp3
[root@localhost root]# mount -r -t asfs /dev/hda2 /mnt/temp2
[root@localhost root]# mount -r -t asfs /dev/hda3 /mnt/temp3
[root@localhost root]#
Genesi Pegasos II Yellow Dog Linux 3, Rev. 0.2
Freescale Semiconductor
17
Root User
Some of the files are listed below:
[root@localhost root]# ls /mnt/temp2 | less
Apps
Apps.info
Barfly
Barfly.info
C
Classes
Classes.info
Devs
Devs.info
Docs
Docs.info
Fonts
Only the first few files are shown above.
The pdf files in the Docs directory display with the command ls Docs as in the example below:
[root@localhost root]# ls /mnt/temp2/Docs | less
Audio.pdf
Audio.pdf.info
FrontPanel.pdf
FrontPanel.pdf.info
ModeEdit.pdf
ModeEdit.pdf.info
MorphOS-dev.pdf
MorphOS-dev.pdf.info
PegasosFirmware.txt
PegasosFirmware.txt.info
PegasosSpecs.pdf
PegasosSpecs.pdf.info
SFUserManual.pdf
SFUserManual.pdf.info
SmartFirmware.pdf
SmartFirmware.pdf.info
Genesi Pegasos II Yellow Dog Linux 3, Rev. 0.2
18
Freescale Semiconductor
Root User
Finally, we can list the files on /dev/hda3 with these commands:
[root@localhost root]# ls /mnt/temp3 | less
ls
AmiNetRadio
AmiNetRadio.info
AmiNetRadio.readme
Demos
Demos.info
Developer
Developer.info
Docs.info
Dopus5
Dopus5.info
Games
Games.info
Icons
Only the first few files are shown above.
7.9
Printers
The print server and client are CUPS, Common Unix Printing System Architecture.
7.9.1 Installing a Printer
Open the Mozilla browser. In the browse window, type, http://localhost:631, enter. The printer daemon
uses port 631. Follow these steps:
1.
2.
3.
4.
5.
6.
7.
8.
Choose manage printers.
Look at available printers.
Choose add a printer
Enter root user and password.
Enter the name, location, and description (for example, cannon400-bw in room b2455)
Enter device (such as AppSocket/HP jetDirect)
Choose the network protocol (for example, LaserJet Series cups v1.1)
Specify device URI (for example, socket:\\IP:6100, where IP is a valid IP address, or
socket://10.82.119.224:6100)
9. Specify the driver (for example, Cannon400, HP 4SI/4SI MX driver)
Genesi Pegasos II Yellow Dog Linux 3, Rev. 0.2
Freescale Semiconductor
19
Root User
7.9.2 Other Operations with a Printer
Once in the Manage a Printer display, the options available are choose to print a test page, delete a printer, and
execute other tasks associated with printers.
7.9.3 Using a Printer
The lp command sends a file to a printer.
The lpstat command displays the status of the printer.
enscript formats a file for fancy printing, options such as more than one page per physical page, rotated, and
other things.
Try the following commands with a printing example. Create a file using any editor and call the file test.prt .
lp test.prt sends it to the default printer.
ls -d <printer name> test.prt sends it to a specific printer instead of the default printer.
Creating and printing a post script file:
man enscript | col -b > j captures the man page for enscript and formats it for printing and stores the
results in the file j. Unfortunately, this version of YDL does not have enscript.
enscript -c -2r -o out.ps j formats the man page for a post script file printing 2 pages per physical
page, rotated.
gv out.ps is a utility to view post script files.
lp out.ps prints it to a post script file.
lpstat -a shows the status of the print job.
7.9.4 Problem with the Printer
Even though all indications are correct, printer pages may queue up and never print; they go into some infinite
processing loop.
7.9.5 Starting and Stopping the Printer Server CUPS
The printer server CUPS is part of the init.d system. It can be stopped, started, or used for several other options.
[root@localhost root]# /etc/init.d/cups stat
Usage: cupsd {start|stop|restart|condrestart|reload|status}
[root@localhost root]# /etc/init.d/cups status
cupsd (pid 548) is running...
[root@localhost root]#
Genesi Pegasos II Yellow Dog Linux 3, Rev. 0.2
20
Freescale Semiconductor
Root User
7.10 Fixing the Network and X Windows Configuration Files
7.10.1 /etc/sysconfig
This file is used for network, which will be discussed in Section 7.11, “Networking”. It is also used to define the
host name, and the current setting of ‘pegasos9’ will not work.
Edit the file.
[maurie@localhost sysconfig]$ cat network
NETWORKING=yes
HOSTNAME=pegasos9
NAMELINE, resulting in this file content.
[maurie@localhost sysconfig]$ cat network
NETWORKING=yes
[maurie@localhost sysconfig]$
Save the file.
7.10.2 /etc/X11/XF86Config
This file controls the video display characteristics for the graphic display monitor. It does not affect the monitor
display during bootup or while using the single text screen.
Debian Linux uses the XF86Config-4 file for monitor and mouse control, YDL
uses the XF86Config file for monitor and mouse control, do not confuse them.
Edit the XF86Config file.
Comment out all the lines beginning with ModeLine. The vi command is used below.
vi /etc/X11/XFF86Config
:1,$s/ModeLine/#Modeline/
:qw
This will save the file with the changes. It may also be necessary to change the HorizSync and VertRefresh.
7.10.3 Fixing the Video Resolution
Modify the XF86config file in the lines that start with Monitor, change these two lines
HorizSync <the correct frequency>
VertRefresh <the correct frequency>
An example with the NEC MultiSync XP21. Look it up on the www.monitorworld.com web site and find that the
Horizontal Sync is 31-89, and the vertical refresh is 55-160. Add these two lines to the monitor section of the
/etc/X11/XF86Config-4 file, HorizSync 31-89, VertRefresh 55-160guest
The monitor section of the file now looks like this:
SSection "Monitor"
Genesi Pegasos II Yellow Dog Linux 3, Rev. 0.2
Freescale Semiconductor
21
Root User
Identifier "monitor1"
VendorName "Generic"
ModelName "1024x768 @ 70 Hz"
HorizSync 31.0-89.0
VertRefresh 55-160
Many ModeLine lines which should be commented out as shown in Section 7.10.2,
“/etc/X11/XF86Config.”
EndSection
Save the file.
7.10.4 Fixing the Mouse
If the mouse does not track correctly, in fact, if it seems to just work in a small area of the screen, then the mouse
information in the /etc/X11/XF86Config file is wrong. Edit it again and search for PS2 mouse or USB mouse.
Unless a thumb roller mouse is being used, one of these should say Option “Protocol” “PS/2”.
If one mouse is set to ImPS/2 and the other set to PS/2, then either mouse should work with the system.
These should look like this.
Section "InputDevice"
Identifier "PS2 Mouse"
Driver "mouse"
#Option "Protocol" "IMPS/2"
Option "Protocol" "PS/2"
Option "Device" "/dev/psaux"
Option "ZAxisMapping" "4 5"
EndSection
Section "InputDevice"
Identifier "USB Mouse"
Driver "mouse"
Option "Protocol" "USB"
Option "Device" "/dev/input/mice"
Option "ZAxisMapping" "4 5"
EndSection
Genesi Pegasos II Yellow Dog Linux 3, Rev. 0.2
22
Freescale Semiconductor
Root User
7.10.5 Fixing the Keyboard
If the keyboard does not work correctly, that is, strange characters appear when the keys are pressed, the keyboard
may be configured for something other than a United States keyboard.
Edit /etc/X11/XF86Config again and search for Keyboard1d. Ensure that Option “XkbLayout” is set to “us”.
It should look like this:
Section "InputDevice"
Identifier "Keyboard1"
Driver "Keyboard"
Option "XkbModel" "pc104"
Option "XkbLayout" "us"
Option "XkbCompat" ""
Option "XkbOptions" ""
EndSection
7.11 Networking
Managing a network on YDL Linux consists of a few commands and defining two configuration files,
/etc/sysconfig/network and /etc/sysconfig/network-scripts/ifcfg-eth0.
ifcfg-eth<n> indicates what ethernet connections and associated IP addresses are assigned to this local
computer. Each ethernet connection has a name of eth<n>, where n is the ethernet number. eth0 is assigned to the
ethernet port physically located farthest from the mouse port and next to the video port. see Freescale Application
note AN2666, Genesi Pegasos II Setup.
lo is the loop back port. If no IP is assigned to any ethernet port, then ifconfig will only show the lo port.
Network information can be found from the ifconfig command. As a non-root user, use the absolute path for
the command, /sbin/ifconfig.
[root@localhost root]# ifconfig
eth0
Link encap:Ethernet
HWaddr 00:0B:2F:41:86:69
inet addr:10.82.124.139
Bcast:10.82.127.255
UP BROADCAST RUNNING MULTICAST
MTU:1500
Mask:255.255.252.0
Metric:1
RX packets:333704 errors:0 dropped:0 overruns:0 frame:0
TX packets:8293 errors:0 dropped:0 overruns:0 carrier:0
collisions:0 txqueuelen:1000
RX bytes:24810364 (23.6 Mb)
TX bytes:1560598 (1.4 Mb)
Interrupt:9 Base address:0x1300
lo
Link encap:Local Loopback
Genesi Pegasos II Yellow Dog Linux 3, Rev. 0.2
Freescale Semiconductor
23
Root User
inet addr:127.0.0.1
Mask:255.0.0.0
UP LOOPBACK RUNNING
MTU:16436
Metric:1
RX packets:404 errors:0 dropped:0 overruns:0 frame:0
TX packets:404 errors:0 dropped:0 overruns:0 carrier:0
collisions:0 txqueuelen:0
RX bytes:36498 (35.6 Kb)
TX bytes:36498 (35.6 Kb)
[root@localhost root]#
The file /etc/sysconfig/network is the file that specifies networking, either on, yes, or off, no.
[root@localhost sysconfig]# cat network
NETWORKING=yes
[root@localhost sysconfig]#
There are two types of ethernet methods of obtaining an IP address.
1. DHCP, dynamically attain an IP from a DHCP server.
2. static, statically assign an IP address.
The /etc/sysconfig/network-scripts/ifcfg-eth0 file can specify which method to use, the file shown below uses the
DHCP method.
[root@localhost network-scripts]# cat ifcfg-eth0
# Please read /usr/share/doc/initscripts-*/sysconfig.txt
# for the documentation of these parameters.
USERCTL=no
PEERDNS=yes
TYPE=Ethernet
DEVICE=eth0
BOOTPROTO=dhcp
ONBOOT=yes
[root@localhost network-scripts]#
This file can specify static IP address by changing the BOOTPROTO macro to none, and specifying a static IP.
DEVICE="eth0"
BOOTPROTO="none"
IPADDR="10.82.144.3"
NETMASK="255.255.255.0"
ONBOOT="yes"
The gateway command is specified in the /etc/sysconfig/network file.
Genesi Pegasos II Yellow Dog Linux 3, Rev. 0.2
24
Freescale Semiconductor
References
GATEWAY="10.82.144.254"
These are example IP addresses, remember to use valid IP addresses.
The command, ifup eth0, will start the eth0 network.
Corresponding, ifdown eth0, will shut the eth0 network down.
7.12 Managing Packages, RPM, Red Hat Package Manager
System programs managed by the kernel and invoked to perform services system wide are managed by the Red Hat
Package manager.
Packages can be obtained from the YDL web site, http://www.yellowdoglinux.com, YDL community web site,
http://www.yellowdoglinux.org/, or from the Yellow Dog distribution CD.
On some distributions, a subset of available packages are on the hard drive at /usr/src/rpm. On this system, these are
empty.
RPM is a powerful Package Manager, which can be used to build, install, query, verify, update, and erase individual
software packages. A package consists of an archive of files and meta-data used to install and erase the archive files.
The meta-data includes helper scripts, file attributes, and descriptive information about the package. Packages come
in two varieties: binary packages, used to encapsulate software to be installed, and source packages, containing the
source code and recipe necessary to produce binary packages.
More information is available through the man and info systems.
man rpm
info rpm
8
References
The following documents describe the various applications of the Genesi Pegasos II system.
Freescale application note AN2666, Genesi Pegasos II Setup
Freescale application note AN2736, Genesi Pegasos II Boot Options
Freescale application note AN2738, Genesi Pegasos II Firmware
Freescale application note AN2739, Genesi Pegasos II Debian Linux
Freescale application note AN2743, Software Analysis on Genesi Pegasos II Using PMON and AltiVec
Freescale application note AN2744, PMON Module—An Example of Writing Kernel Module Code for
Debian 2.6 on Genesi Pegasos II
7. Freescale application note AN2748, Genesi Pegasos II Kernel and NFS facility
1.
2.
3.
4.
5.
6.
For assistance or answers to any question on the information that is presented in this document, send an e-mail to
[email protected].
Genesi Pegasos II Yellow Dog Linux 3, Rev. 0.2
Freescale Semiconductor
25
Document Revision History
9
Document Revision History
Table 2 provides a revision history for this application note.
Table 2. Document Revision History
Revision
Date
Substantive Change(s)
0.2
10/19/04
Changed title to Genesi Pegasos II Yellow Dog Linux 3 to avoid confusion with AN2802, Genesi
Pegasos II Yellow Dog Linux 4
0.1
08/31/04
Minor editing.
0
08/13/04
Initial release.
Genesi Pegasos II Yellow Dog Linux 3, Rev. 0.2
26
Freescale Semiconductor
Document Revision History
THIS PAGE INTENTIONALLY LEFT BLANK
Genesi Pegasos II Yellow Dog Linux 3, Rev. 0.2
Freescale Semiconductor
27
How to Reach Us:
Information in this document is provided solely to enable system and software implementers to
Home Page:
www.freescale.com
use Freescale Semiconductor products. There are no express or implied copyright licenses
USA/Europe or Locations Not Listed:
Freescale Semiconductor
Technical Information Center, CH370
1300 N. Alma School Road
Chandler, Arizona 85224
(800) 521-6274
480-768-2130
information in this document.
Europe, Middle East, and Africa:
+44 1296 380 456 (English)
+46 8 52200080 (English)
+49 89 92103 559 (German)
+33 1 69 35 48 48 (French)
incidental damages. “Typical” parameters which may be provided in Freescale Semiconductor
Japan:
Freescale Semiconductor Japan Ltd.
Technical Information Center
3-20-1, Minami-Azabu, Minato-ku
Tokyo 106-0047 Japan
0120-191014
+81-3-3440-3569
any license under its patent rights nor the rights of others. Freescale Semiconductor products are
Asia/Pacific:
Freescale Semiconductor Hong Kong Ltd.
Technical Information Center
2 Dai King Street
Tai Po Industrial Estate,
Tai Po, N.T., Hong Kong
852-26668334
indemnify and hold Freescale Semiconductor and its officers, employees, subsidiaries, affiliates,
For Literature Requests Only:
Freescale Semiconductor
Literature Distribution Center
P.O. Box 5405
Denver, Colorado 80217
(800) 441-2447
303-675-2140
Fax: 303-675-2150
www.freescale.com
AN2751
Rev. 0.2
10/2004
granted hereunder to design or fabricate any integrated circuits or integrated circuits based on the
Freescale Semiconductor reserves the right to make changes without further notice to any
products herein. Freescale Semiconductor makes no warranty, representation or guarantee
regarding the suitability of its products for any particular purpose, nor does Freescale
Semiconductor assume any liability arising out of the application or use of any product or circuit,
and specifically disclaims any and all liability, including without limitation consequential or
data sheets and/or specifications can and do vary in different applications and actual performance
may vary over time. All operating parameters, including “Typicals” must be validated for each
customer application by customer’s technical experts. Freescale Semiconductor does not convey
not designed, intended, or authorized for use as components in systems intended for surgical
implant into the body, or other applications intended to support or sustain life, or for any other
application in which the failure of the Freescale Semiconductor product could create a situation
where personal injury or death may occur. Should Buyer purchase or use Freescale
Semiconductor products for any such unintended or unauthorized application, Buyer shall
and distributors harmless against all claims, costs, damages, and expenses, and reasonable
attorney fees arising out of, directly or indirectly, any claim of personal injury or death associated
with such unintended or unauthorized use, even if such claim alleges that Freescale
Semiconductor was negligent regarding the design or manufacture of the part.
Learn More: For more information about Freescale Semiconductor products, please visit
Freescale™ and the Freescale logo are trademarks of Freescale Semiconductor, Inc. The
PowerPC name is a trademark of IBM Corp. and is used under license. All other product or service
names are the property of their respective owners.
© Freescale Semiconductor, Inc. 2004.