1
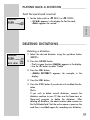
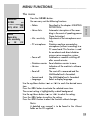
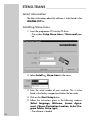
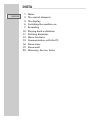
DIGTA ____________________________________________________
ENGLISH
1
3
5
6
7
10
11
13
14
16
19
20
Notes
The control elements
The display
Switching the machine on
Recording
Playing back a dictation
Deleting dictations
Menu functions
Communication with the PC
Steno.trans
Steno.mail
Warranty, Service, Sales
NOTES ___________________________________________________
ENGLISH
Digta is a digital portable dictation machine which has also been
developed as system component within the scope of the digital
dictation system of Grundig.
To simplify the revision editing of recordings, the machine has been
provided with new functions, such as the insertion or deletion of
text passages. Using a PC, dictations can be transmitted via a
network.
Scope of delivery
PC software Steno.mail and Steno.trans
USB cable
Batteries
MultiMediaCard (1MB corresponds up to 10 minutes
recording capacity)
– Pouch
ITALIANO
FRANÇAIS
–
–
–
–
SVENSKA
DANSK
– Power Supply/charging unit 472 (only for Europe; in the UK, use
a commercially availalbe adapter for Euro-plugs).
– Rechargeable battery 462 (2 NiMh-batteries, can be charged
inside the dictation machine with the power supply unit 472).
– Ever-ready case 812
– External microphone:
any commercial microphone with Ø 3.5 mm jack plug can be
used. The built-in microphone is automatically disconnected.
– External headphone:
any commercial mono or stereo earphone or headset with Ø
3.5 mm jack plug can be used.
Impedance: min. 32 Ω.
The volume level at the headphone connector is limited to 85
dB (A) (with 32 Ω headphone). The built-in loudspeaker is
automatically switched off.
The features indicated by Grundig apply only when using original
Grundig accessories.
Defects due to the use of accessories which are not original
Grundig accessoires or which do not comply with the legal regulations or the corresponding standards lead automatically to the
expiration of any guarantee rights.
NEDERLANDS
Accessories
1
NOTES _____________________________________________________
In order to assure that this digital portable dictation machine will
be able to provide you with good service and pleasure for a long
time to come, it is important that you observe the following points:
Digta
This digital portable dictation machine has been designed for the
recording and playback of voice.
Make absolutely sure that the machine is protected against dampness (rain, water splashes).
Do not place the dictation machine close to the heating or in direct
sunshine.
The manufacturer will offer no liability for damage resulting from
unauthorized tampering. Open only the cover of the battery compartment.
Use only a dry cloth for cleaning. Never use chemical cleaning
agents.
Environmental protection
The batteries – those free of heavy metals too – must not be disposed of in the domestic refuse. Used batteries must be taken to an
old battery collection point at the dealer’s and diposed of properly.
MultiMediaCard
Make absolutely sure that the electrical contacts at the bottom side
of the MultiMediaCard are not exposed to strong mechanical
stress.
The cards are insensitive to dirt and moisture but must nevertheless
be introduced into the machine in dry and proper condition.
Note:
Never remove the MultiMediaCard during recording or
the data transfer from a PC or to a PC. This could result in
the loss of data.
CE This product complies with the EC regulations »89/336/CEE,
73/23/CEE, 93/68/CEE«.
2
THE CONTROL ELEMENTS _______________________
Recording indicator
Display
Function buttons:
Lettering in bottom
display row
Up/down button
Card slot
On/off button
Socket for external
microphone
ENGLISH
Microphone
Recording button
Slide-switch for recording, playback, fast
forward and rewind
Safety lock
Menu/OK button
Button for new dictation
/ escape
USB interface
3
THE CONTROL ELEMENTS _____________________________
Power supply
socket:
3V–
- - - / 0.35 A
Headphone socket:
imped. 32 Ω min
Card ejection slideswitch
3V
0,35 A
EAR
HOLD
Battery compartment cover
Safety hints for the power supply/charging
unit 472 (accessory)
Before putting the machine into operation, make sure that the
mains voltage corresponds with the mains voltage indication on the
power supply unit. It is normal and harmles for the housing to
become warm. Ensure a good ventilation of the power supply unit
during operation and do not operate it in the direct vicinity of the
heating or in direct sunlight.
Maintenance: clean only with a dry cloth. Do not use solvents.
4
THE DISPLAY __________________________________________
Dictation name
Free:0h39
DICTOO1
VA C
O:O6
Current function
Record Stop
Button lettering
INS
ENGLISH
Free memory
Battery symbol for low
battery/rechargeable
battery.
Indication for voice
activation and microfone sensitivity
Dictation position,
total length
Slide-switch position
NEW
5
SWITCHING THE MACHINE ON
_____________
Note:
A detailed user manual is to be found in the »Docu«
folder on the CD supplied.
Switching on and off
Switching on the first time
1 Press the »ON/OFF« button until the display is activated.
– The software is loaded.
2 Select the desired display language.
3 Use the up or down button »ļ« »Ļ« to select the desired
language, e.g. »English«.
Ł
Deutsch
English
Francais
Ļļ
OK
4 Press the »OK« button.
– The dictation machine is ready for use.
ESC
Subsequent switching on
1 Press the »ON/OFF« button until the display is activated.
Switching off
1 Briefly press the »ON/OFF« button.
Safety lock
ļ « slide-switch up.
1 Push the » HOLD
Note:
If the safety lock is activated, the message »Keys locked«
appears in the display. If the machine is switched on inadvertently (e.g. when carrying it in a pocket), it is switched
off automatically.
6
RECORDING
__________________________________________
ENGLISH
Dictation
Speak over the dictation machine.
The figure shows the optimum position of the dictation machine.
The high-quality microphone allows also for recordings over greater distances.
New dictation
Free:0h38
no dictations
MENU
1 Press the »NEW« button. A new dictation with the next
higher index number is created.
– If the slide-switch is in the » STOP« position, the red
recording indicator will flash.
– The message »Record Stop« (recording-pause)
appears in the display.
̛
NEW
2 Set the slide-switch to »Ł START«.
– The recording indicator is lit permanently.
– The message »Record Start« appears
display..
– The dictation machine records the dictation.
in
the
7
RECORDING ______________________________________________
Recording-pause
Free:0h38h
DICTOO1
Record
INS
O:17
Stop
NEW
̛
1 Set the slide-switch to » STOP«.
– The recording indicator flashes.
–The message »Record Stop« appears in the display.
Ending the recording
Free:0h38h
DICTOO1
DICT -+ MENU
O:17
Stop
NEW
1 Set the slide-switch briefly to »ĵĵ REW.« or »ŁŁ F.FWD«,
or
2 press the red recording button »DICT
–
ļ «.
– »Stop« appears in the display.
Editing a dictation
When playing back a dictation, you may speak a new text
from the current dictation position, or add a recording to the
end of the dictation.
Free:0h38h
DICTOO1
Record
INS
O:05
Stop
NEW
1 Select the desired dictation using the up/down button
+ «.
»DICT_
̛ STOP« during playback.
2 Set the slide-switch to »
3 Press the red recording button »DICT
–
ļ «.
– »Record Stop« appears in the display.
4 Set the slide-switch to »Ł START« and speak the new text.
– »Record Start« appears in the display.
̛ STOP«.
5 Set the slide-switch to »
6 Press the red recording button »DICT
–
ļ « or set the slide-switch
to »ĵĵ REW.« or »ŁŁ F.FWD«.
– Recording is stopped.
8
RECORDING ______________________________________________
ENGLISH
Note:
If the dictation machine is switched off during a dictation
using the »ON/OFF« button, you will skip to the end of
the dictation when switching the machine on again with
the »ON/OFF« button and then pressing the recording
button »DICT
–
ļ «.
Inserting a recording
During playback you can insert a new recording at the
current dictation position.
Free:0h38h
O:14
DICTOO1
...........................................
Insert Stop
NEW
[
̛ STOP« during playback.
1 Set the slide-switch to »
2 Press the red recording button »DICT
–
ļ «.
– »Record Stop« appears in the display.
3 Press the »INS« button.
– »Insert Stop« appears in the display.
4 Set the slide-switch to »Ł START« and speak the text to be
inserted.
– »Insert Start« appears in the display.
̛ STOP«.
5 Set the slide switch to »
6 Press the red recording button »DICT
–
ļ « or set the slide-switch
to »ĵĵ REW.« or »ŁŁ F.FWD«.
– Recording is stopped.
9
PLAYING BACK A DICTATION ________________
Selecting a dictation and playing it
Free:0h38h
DICTOO1
DICT-+ MENU
O:26
Stop
NEW
1 Select the desired dictation using the up/down button
+ «.
»DICT_
2 Set the slide-switch to »Ł START«.
– »Start« appears in the display. The dictation is played
back from the beginning.
– At the end of the dictation, »End« appears in the
display.
Note:
If the dictation machine is switched off with the
»ON/OFF« button, you can resume playback at the
previous position after switching the machine on again
with the »ON/OFF« button.
Fast skip to the beginning or the end of the
dictation
1 Start playback by setting the slide-switch to » START«.
2 Briefly press the right function button to skip alternately to
the end or the beginning of the dictation.
Volume control
1
+ « during playback.
Press the up/down button »VOL _
Fast playback
Free:0h38h
DICTOO1
VOL-+
10
O:26
Start
1,5
ŁŁ
1 Press the » ŁŁ1.5 « button during playback.
– The dictation will be played back with about 1.5 times
the normal speed.
2
To return to the normal playback speed, press the
» Ł1.0 « button during fast playback.
PLAYING BACK A DICTATION ________________________
Fast forward and rewind
Free:0h38h
DICTOO1
O:26
ENGLISH
F.Fwd
1 Set the slide-switch to »ĵĵ REW.« or »ŁŁ F.FWD«.
– »F.Fwd« appears in the display for fast forward,
»Rew« appears for rewind.
DELETING DICTATIONS ___________________________
Deleting a dictation
Free:0h38h
DICTOO1
DICT-+ MENU
O:26
Stop
NEW
1 Select the desired dictation using the up/down button
+ «.
»DICT_
2 Press the »MENU« button.
– The first menu function »Delete« appears in the display.
– Use the »Ł« button to select “Delete”.
3 Press the »OK« button.
– »Delete DICT002?« appears, for example, in the
display.
4 Press the »OK« button.
5 Press the »ESC« button if you do not wish to delete the dictation.
Note:
If you wish to delete several dictations, connect the
dictation machine to your PC then use the Steno.trans or
Steno.mail program to delete the dictations. After
deleting all dictations, the administration data remains on
the MultiMediaCard. Not the entire memory space on the
card then is available again for recording new dictations.
11
DELETING DICTATIONS_________________________________
Deleting a part of a dictation
1 Select the desired dictation using the up/down button
+ «.
»DICT_
2 Press the »MENU« button.
– »Delete« appears at the top of the menu in the display.
3 Press the »OK« button.
4 Press the »PART« button.
Free:0h37h
O:14
DICTOO2
..........................................
Stop
MARK1 ESC
[
Free:0h37h
O:14
DICTOO2
...................... ....................
Stop
MARK2 ESC
[
]
5 Search the beginning of the passage to be deleted using
the playback functions.
6 Press the »MARK1 button.
7 Search the end of the passage to be deleted using the
playback functions.
8 Press the »MARK2« button.
9 Press the »DEL« button.
– »Delete [ ]?« appears in the display.
10 Press the »OK« button.
12
MENU FUNCTIONS ________________________________
The menu
DICT-+ MENU
Ł
O:O3
Stop
NEW
Delete
Voice Activ.
Mic. sensitivity
Ļļ
OK
ESC
Press the »MENU« button.
You can carry out the following functions:
– Delete
Described in the chapter »DELETING
DICTATIONS«.
– Voice Activ.
Automatic interruption of the recording in the event of speaking pauses
(Voice Activation).
– Mic. sensitivity
Adjustment of the microphone sensitivity.
– PC microphone
Dictation machine connected as
microphone (without recording) to a
PC sound card. This function is used
for enrolment and direct dictation
using a voice recognition system.
– Power off
Automatic or manual switching off
after several minutes.
– Dictation counter Reset dictation counter to zero.
– Version
Indication of the machine’s software
version.
– Reset all
The reset all is recovered and the
MultiMediaCard is formatted.
– Format card
The MultiMediaCard is formatted.
– Language
Select a display language.
ENGLISH
Free:0h39h
DICTOO1
Use the up/down button »ļ« or »Ļ« to mark the desired menu
item.
Press the »OK« button to activate the selected menu item.
The current setting is highlighted by a dark background.
Use the up/down button »ļ« or »Ļ« to select the setting.
Press the »OK« button to confirm the setting.
Press the »ESC« button to abort the function without changes.
Note:
A detailed user manual is to be found in the »Docu«
folder on the CD supplied.
13
COMMUNICATION WITH THE PC ___________
Steno.trans
The Steno.trans software is used to transfer your dictations to your
PC. You obtain an immediate overview of your work and can also
play back your dictations on a notebook. For example, transfer
your dictations to a voice recognition system which processes DSS
dictations, or send Voice Mails via your mail system.
Steno.mail
If you use the stationary digital dictation and transcriber system
GDV 4000 in your office management, the Digta in connection
with the Steno.mail software make you a mobile user in the
GDV4000 network. All addresses of your authors and typists are
available for sending your dictations. You mark your dictations, for
example, with the dictation type, deadline and priority, in order to
perfectly organize your transcription service. If all dictations have
the same priority, you simply plug the USB cable into the Digta.
With the simple pressure of a button all dictations are sent to the
preselected typist. Your Digta is immediately free for further
dictations.
A detailed user manual is to be found in the »Docu« folder on the
CD supplied.
System requirements for Steno.trans and
Steno.mail
With USB connector: Win 98/2000/ME
With MMC drive,
e.g. at the parallel port:also NT from 4.0 and WIN 95
For E-Mail connection: MAPI-compatible mailsystem
(e.g. Microsoft Outlook)
14
COMMUNICATION WITH THE PC____________________
1 Connect the dictation machine via the USB interface with
the PC.
2 Use the »ON/OFF« button to switch the dictation machine on and in PC mode.
– During data transfer the red recording indicator is
blinking.
Warning:
Disconnect the USB interface only via the task bar as
otherwise the data transfer may be incomplete.
You should not transfer dictations when the batteries
are low as low batteries distroy the dictation.
Note:
Steno.trans and Steno.mail can be connected only to
one dictation machine. If a 2nd dictation machine is
connected to the USB interface, this is not recognized by the PC, that is, only one removeable disk
drive appears under Windows
ENGLISH
Connecting the dictation machine with the PC
and disconnecting it
15
STENO.TRANS _______________________________________
Latest information
The latest information about the software is to be found in the
README.TXT file.
Installing Steno.trans
1 Insert the programme CD into the CD drive.
– The window Setup Steno.trans / Steno.mail pops
up.
2 Select Install => Steno.trans in the menu.
3 Enter the serial number of your machine. This is to be
found in the battery compartment below the bar code.
4 Click on the Start Setup button.
5 Follow the instructions given in the following windows
(Select language, Welcome, Licence Agreement, Choose Destination Location, Select Program Folder, Setup type).
– The software is loaded
16
STENO.TRANS ___________________________________________
7 Launch the Steno.trans program.
– The Steno.trans window opens up
ENGLISH
6 Click in the window InstallShied Wizard Complete,
on the button Finish.
Connect the dictation machine via the USB interface with
the PC and switch it on.
8 Click on the Dictation machine drive menu item in
the Setup menu.
– The Select directory window pops up
9 Click on the drive unit assigned to the dictation machine,
e.g. Removable disk (G:) and then on the OK button
10 In the View menu, click on the Refresh command, or
press the F5 key.
– The dictation machine directory is shown. If the
dictations stored on the card of the dictation machine
are shown, the installation was successful.
17
STENO.TRANS ___________________________________________
Filling basic data in the accompanying note
1 In the Setup menu, click on the Accompanying note
for dictation machines menu item.
– The Standard accompanying note for dictation machine menu pops up.
2 Fill in the text boxes Author, Transcriber and
Dictation group.
3 Click on the OK button.
– The accompanying note is transferred to the dictation
machine. This note is assigned to all new dictations.
Hearing a dictation
Double-click on the desired dictation in the Dictations on
dictation machine or the Own dictations window.
– You hear the dictation via the loudspeakers of the PC.
The playback and positioning functions can be carried out with the
buttons in the small window located between the dictation directories of Steno.trans.
Note:
A detailed user manual is to be found in the »Docu«
folder on the CD supplied.
18
STENO.MAIL
_____________________________________________
Filling basic data in the accompanying note
2
Click on the Configuration symbol.
– The Accompanying note window pops up.
ENGLISH
1 Launch the Steno.mail program, enter your identification, and switch the dictation machine on and in PC mode
using the »ON/OFF« button.
3 Select the author name by clicking on the list box. The first
4 characters of the author name form the dictation name
on the dictation machine.
4 In the list boxes Trancriber, Dictation type, Group,
select the settings required for your tranciption service.
5 Click on the Send to dictation machine button.
– The data of the accompanying note is saved in the dictation machine.
Hearing a dictation
Double-click on the desired dictation in one of the following
directories: Own dictations, Inbox, Sent dictations, or
Dictations in dictation machine.
– The DSS player is opened and you hear the dictation.
19
WARRANTY, SERVICE, SALES _________________
UK, IRELAND
Please contact your supplier if you wish to register the guarantee
of this product or make a claim
If there is no specialized dealer in your region, please contact one
of the following addresses.
Grundig Business Systems, Elstree Way
Boreham Wood, Hertfordshire, WD6 1RX
Tel.: 0208-324-9488
Fax: 0208-324-9493
Grundig Business Systems GmbH
Sales International, Kurgartenstraße 54
D-90762 Fürth, Germany
Tel.: 0049 911 47 58-223
Fax: 0049 911 47 58-229
20