1
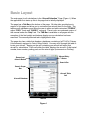
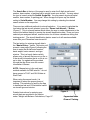
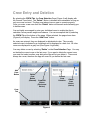
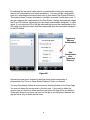
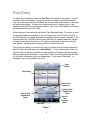
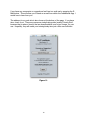
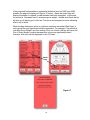
LoadMaster
User’s Guide
Copyright, P. Harp, 2010-2011
Table of Contents
Introduction!..............................................................................................................1
Basic Layout! ............................................................................................................2
Calculating Your Weight & Balance!.......................................................................4
Crew Entry and Deletion!..........................................................................................5
Editing a Crew!..........................................................................................................7
Fuel Entry!.................................................................................................................9
Cargo Entry!............................................................................................................10
Help Tab!..................................................................................................................11
Weight and Balance Calculations!........................................................................13
Aircraft Selection Using The Table!.................................................................14
Aircraft Selection Using The Search Bar!........................................................14
Calculate Using The “Manual Entry ...” Button!..............................................15
Aircraft Display Pages!...........................................................................................17
Limitations Checked!..............................................................................................20
Corrections or Suggestions!..................................................................................21
Introduction
The LoadMaster is an application specifically designed for U.S. Army Flight Students
and Instructor Pilots engaged in TH-67 Initial Entry Rotary Wing Flight Training. The
LoadMaster allows the user to calculate their weight and balance for any TH-67
assigned to Cairns AAF. BWS IP’s/students may also utilize this app by entering
their weight & balance info manually (TH-67s and OH-58s).
The LoadMaster provides a quick and easy solution for computing your weight and
balance for any given mission. Final calculation pages are color coded. If the load
calculation results in no limits being exceeded the display page color is Green. If
there are limitations resulting from the calculation (i.e. the aircraft is over 3200
pounds) the display page color is Yellow and the app will advise you of how long this
restriction will apply. If the calculation results in a limit being exceeded, such as
exceeding the aircraft’s allowable gross weight, the display page will display in Red
and alarms will go off. If any limits are exceeded for a given calculation, or
restrictions apply, the app will notify you with specifics and offer solutions (if any) to
fix the problem.
The application has a database loaded with all the TH-67’s assigned to Cairns
(Primary and Instruments). The user has the ability to build, save and edit multiple
custom crews, set takeoff and landing fuel levels and enter cargo on board (both for
the passenger compartment and baggage compartment (TH-67 only)). It also has a
feature to use the last aircraft calculated which means you only have to select the
aircraft once in the beginning of your flight planning and that setting remains current
for the rest of the flight, or until you change it, in case adjustments are needed in fuel
levels, crew, or cargo. The app will also allow manual entry of Aircraft ID, basic
weight, and basic moment for aircraft that are not on file or for BWS operations.
NOTE: All BWS aircraft must be entered manually. However, this only entails three
additional entries, aircraft ID, basic weight and basic moment.
1
Basic Layout
The main page for all calculations is the “Aircraft Selection” Page (Figure 1). When
the application first starts up this is the page that is initially displayed.
The page has a Tab Bar at the bottom of the page. All other tabs provided are in
support of this page and allow you to customize your aircraft load for the flight. The
tabs are self-explanatory and allow the user to enter and edit customized “CREWS”,
adjust “FUEL” loads and “CARGO” on board. There is also a condensed version of
this manual under the “Help” tab. The TAB Bar is available on all pages with the
exception of the final weight and balance display once a calculation has been
executed. The currently selected tab is highlighted in blue.
The page also has a table that displays a database consisting of all TH-67s (Primary
& Instruments) assigned to Cairn’s Army Airfield. You may scroll through the table to
locate your aircraft. Tapping on the cell containing your aircraft will select that
aircraft for calculations. Each cell within the table, displays the aircraft’s 5-digit serial
number, buzz number, parking pad, and the aircraft type (Instruments or Primary).
Manual Entry
Button
Reuse Last
Aircraft Button
Search Bar
Search Scope
Bar
Aircraft Table
Cell
Aircraft Database
Tab Bar
Figure 1
2
The Search Bar at the top of the page is used to enter the 5-digit aircraft serial
number, buzz number, or parking pad to quickly locate your aircraft. You may select
the type of search using the Search Scope Bar. You may search by aircraft serial
number, buzz number, or parking pad. When the app first opens up, the default
setting is Serial Number. You may change this setting by selecting the desired
search criteria on the scope bar.
There are two additional methods for aircraft selection. If you want to calculate the
load using the last aircraft selected, press the “Reuse Last Aircraft...” Button
(Figure 1). This is a handy feature which allows the user to make adjustments to the
current load without having to reenter the aircraft identification data. Once you have
selected your assigned aircraft, use this button for all future calculations during that
training period. The aircraft identification data is saved so it will remain available
even after your iPhone has been turned off.
The last option for entering aircraft data is
the “Manual Entry...” button. This button will
present a new page (Figure 2) allowing the
user to enter the aircraft serial number,
basic weight, basic moment, and type
mission. This is a handy feature which
allows entry of aircraft that are not on file, or
if the aircraft information that is on file is not
up to date. An update will be provided
through the App Store once the correct
information is known.
NOTE: Manual entry is the only input
method available for BWS aircraft. I do not
have access to TH-67 and OH-58 data at
Shell Field.
When using the manual mode, it is
important to select the proper phase of
training. This selection is used by the App
to determine fuel and CG limitations based
on aircraft type and mission.
Detailed instructions for entering your
aircraft data are provided in the section
under “Weight and Balance Calculations, Page 12”.
3
Figure 2
Segmented Index
Phase of Training
Calculating Your Weight & Balance
The first time you run the LoadMaster, there is only one crew assigned. This is a
three person Generic Crew based on 225 pounds per crewmember (this is the same
crew setup used for the 365-4s located in the aircraft logbook).
The initial aircraft scenario is set for TH-67 Primary (See Figure 3). Fuel is set for
82.6 gallons at takeoff and 20 gallons for landing. Cargo is set for 0 pounds in the
passenger compartment and 0 pounds in the baggage compartment. All of these
values may be changed by selecting the appropriate tab in the tab bar and entering
your own values based on your crew and mission.
The App is designed so that once you set the basic elements of your crew, fuel and
cargo load, you just have to select the aircraft and go. The crew, fuel and cargo
settings you select will remain as is until you the user change it.
The following pages describe in detail how to configure and tailor the App to meet
your specific mission requirements
Default Crew
(Generic)
Default Fuel
Settings
Default
Cargo
Settings
Figure 3
4
Crew Entry and Deletion
By selecting the CREW Tab, the Crew Selection Page (Figure 4) will display with
the Generic Crew listed. The “Delete” Button is dimmed and unavailable as long as
only one crew is stored. The App must always have a crew to operate properly.
Once you enter a new crew then the “Delete” button will become active allowing you
to delete crews.
You are highly encouraged to enter your individual crews to enable the App to
calculate a more precise weight and balance. You can accomplish this by selecting
the CREW Tab at the bottom of the page. When selected, the page shown here
(Figure 4) will display. Press the “Add Crew” button.
As crews are entered, they are displayed in alphabetical order. The currently
selected crew is indicated by a checkmark and is displayed in a dark font. All other
crews are displayed in a gray font (See Figure 4-right side).
You may delete a crew by selecting “Delete” on the Crew Selection Page. You may
not delete the current crew or the last crew. If you want to delete the current crew
you must first select another crew before the App will let you delete it. There must
always be a crew, therefore the App will never let you delete the last crew.
Add
Crew
Button
Delete
Crew
Button
(Dimmed)
Crew Edit
Button
(Disclosure
Button)
Crew
Tab
Figure 4
5
Current
Crew
Selection
Delete
Crew
Button
(Active)
Selecting the “Add Crew” Button will display the page shown in Figure 5-below. Tap
in the text field next to “Crew Name:” and a keyboard will display allowing you to
enter a name for the crew. You must enter a crew name and at least one
crewmember. If the crew has only one crewmember they must be entered as the
PIC. When finished entering the crew name, press Return on the keyboard and the
cursor will move to the next text field. You may also select any text field by tapping
in the text field and entering the data.
To allow for quick crew entries, crewmember names are optional. The crew name is
mandatory. The crew member’s name is not mandatory, but if a crewmember’s
name has been entered, the App will insist on a crew weight. If you elect not to
enter a name, you may always come back later and enter the name (see Editing a
Crew on the next page).
Once your crew has been entered, press the “Save” Button and your crew will be
saved and available for use in future calculations. This crew will always be available
until you delete it. If you change your mind, simply press “Cancel” and the App will
return to the crew selection page, without saving your entries.
You may enter as many crews as your device’s RAM can hold. Crews are displayed
in alphabetical order.
Text Fields
Text Fields
Save
Button
Cancel
Button
Figure 5
6
Editing a Crew
To edit a crew tap the “Disclosure Button” next to the crew name. A page will
display with the individual crew entries as shown below on the right (Figure 6A).
Simply select the field(s) you wish to edit, enter the new information and then press
Save. If you change your mind, press Cancel and the crew will remain as is and the
Crew Selection Page will reappear.
When the user presses Cancel, the App will proceed one of two ways depending on
what you were doing at the time you pressed Cancel. If you pressed the Cancel
button when you were actively editing a field, then Cancel will simply retract the
keyboard and leave the entry as is, allowing editing to continue. If you were not
actively editing a field when you pressed the Cancel button, then pressing Cancel
will cause the App to revert back to the Crew List page as shown below on the left.
If you wish to swap the PI and OR crewmembers (student swap) just press on the
red cell labeled “Press to Swap Student Stations” at the bottom of the page.
Swapping is disabled if you are currently editing a field. You may enable the swap
feature by selecting cancel and then pressing the red button. Select Save and the
crew details will be updated.
You may temporarily remove a crewmember from the crew by pressing the red
minus button next to the crewmember’s name. The name and weight of the
crewmember will be dimmed and shown in italics and a plus sign will appear next to
the name as shown in Figure 6B
Figure 6A
Temporary
Crew
Removal
Disclosure
Button
Swap
Crew
Stations
Button
7
By selecting the red minus button next to a crewmember’s name you temporarily
remove the crewmember from future calculations. You may add the crewmember
back in by selecting the blue plus button next to their name (See Figure 6B below).
This feature allows for easy calculations of multiple scenarios for any given crew. If
the user removes the crewmember at the Pilot Station, the App automatically swaps
the PI and OR stations (assuming there are three crewmembers assigned). In other
words, if you remove the Pilot, the App automatically moves the crewmember at the
OR station into the pilot station and the crewmember that was removed is assigned
to the OR Station.
Temporarily
Remove
Crewmember
Add
Crewmember
after
Temporary
Removal
Figure 6B
Anytime the crew size is reduced to less than three (either temporarily or
permanently) the “Press to Swap Student Stations” button is removed.
You may Permanently Delete an entire crew by selecting Delete on the Crew Page.
You may not delete the current crew or the last crew. If you want to delete the
current crew you must first select another crew before the App will let you delete it.
There must always be at least one crew for the App to work properly, therefore the
App will never let you delete the last crew.
8
Fuel Entry
To adjust your fuel status, select the Fuel Tab at the bottom of the screen. Figure 7,
as shown below, will display. A picker is shown with takeoff fuel initially selected.
Just roll in the amount of fuel for takeoff and the quantities at the bottom of the page
will adjust accordingly. To adjust your landing fuel select “Landing Fuel” on the
segment index and roll in the desired quantity. The current fuel selection will always
be displayed below the Fuel Picker.
Select the type of aircraft using the Aircraft Type Segment Index. This index is used
to calculate maximum quantities of fuel on board based on the TH-67 or OH-58. It
will still calculate your weight and balance regardless of the setting. However, if you
are calculating for a OH-58 and there are more than 70.3 gallons selected, the app
will adjust your takeoff fuel down to 70.3 gallons and alert you that this correction
was applied. Selecting your aircraft type here will avoid this alert.
The App will not allow you to enter more fuel for landing than you have selected for
takeoff. When finished, press the “Save Button”. If you forget to press “Save” an
Action Sheet will display and ask if you wish to Save or Disregard the last changes.
Make the appropriate selection. If you select “Save” these fuel settings will be used
for all further calculations until you change them. If you select “Disregard”, no
changes to your fuel quantities will occur.
Save
Button
Fuel Picker
Current Fuel
Selection
Landing Fuel
Segmented
Index
Takeoff Fuel
Segmented
Index
Aircraft
Type
Segment
Index
Fuel Tab
Figure 7
9
Cargo Entry
To adjust your cargo, select the Cargo Tab at the bottom of the screen. Figure 8, as
shown below, will display. A picker is shown with the “Pax Comp” cargo initially
selected. Just roll in the weight of the cargo you intend to store in the passenger
compartment (Station 104) and the quantities at the bottom of the page will adjust
accordingly. To enter the cargo you wish to store in the baggage compartment
(Station 148) select “Bag Comp” on the segment index and roll in the desired weight.
The current cargo weight selection will always be displayed below the Cargo Picker.
When finished, press the “Save Button”. If you forget to press “Save” an Action
Sheet will display and ask if you wish to Save or Disregard the last changes. Make
the appropriate selection. If you select “Save” the cargo weights will be adjusted for
all further calculations until you change them again. If you select “Disregard”, No
changes to your cargo load will occur.
Cargo Picker
Baggage
Compartment
Segmented
Index
Current Cargo
Weight Selection
Passenger
Compartment
Segmented
Index
Cargo Tab
Figure 8
10
Help Tab
if you select the “Help Tab”, Figure 9 as shown below, will display. Simply select the
item on the segmented index at the top of the page and a condensed version of this
manual will appear for that tab item in the text window. The segmented index
coincides with the items displayed on the Tab Bar, i.e., Aircraft, Crew, Fuel, and
Cargo.
Updates-Read Me! is important. You should check the App Store for updates often.
This is how the database (basic weights & moments) will remain current and up to
date. Weight and Balance data changes often and the accuracy of your calculations
depends on accurate Basic Weight & Moment Data.
Pressing on the Info Button will display a new page as shown in Figure 10. This
page displays the date of the last software update as well as the application version
number. Check the App Store often (at least once monthly) for software/database
updates.
Text
Window
Segmented
Index of
Help Topics
Updates
Button
Info
Button
Current
Version
Help Tab
Figure 9
11
If you have any comments or suggestions feel free to e-mail me by pressing the EMail button. This will allow you to send an e-mail from within the LoadMaster App. I
would love to hear from you.
The address for my web site is also shown at the bottom of the page. If you have
time, check it out. There are numerous study/training aids (mainly Primary Stuff,
because that is where I teach) that are downloadable, most at no charge, for your
use. Hopefully, they will make your training/study time just a little more efficient.
Figure 10
12
Weight and Balance Calculations
Once you have set up your crews, fuel, and cargo, it is simply a matter of selecting
your aircraft. This can be accomplished in several ways. Refer to Figure 11.
First, you may find your aircraft by scrolling through the Aircraft Table listing provided
and selecting your aircraft. Second, you may enter the 5-digit aircraft serial number,
aircraft buzz number, or aircraft parking pad in the search bar and the App will drill
down into the list until it finds your aircraft. Third, you may press the “Reuse Last
Aircraft...” Button and the App will compute your weight and balance using the last
aircraft chosen. This is a handy feature which allows you to adjust your load without
having to reenter the aircraft each time. Finally, you may choose the “Manual
Entry...” Button. This is provided for newly acquired aircraft that are not stored in the
database or aircraft who’s basic weight and moment have changed since the last
update. Changes can be noted by checking the Basic Weight & Moment as shown
on the 365-4s in the aircraft logbook.
Manual Entry... is also provided for the entry of BWS aircraft (TH-67 and OH-58). It
is the only method to enter BWS aircraft because they are not stored in the
application database.
Manual Entry
Button
Reuse Last
Aircraft Button
Search Bar
Search Scope
Bar
Aircraft Table
Cell
Aircraft Database
Tab Bar
Figure 11
13
Aircraft Selection Using The Table
To select an aircraft using the Table Listing, simply scroll through the list until you
find the aircraft you want and select it. The weight & balance calculation will be
calculated using this aircraft.
Aircraft Selection Using The Search Bar
An easier method is to tap on the search bar and a keypad will present itself as
shown below in Figure 12. Select the type of search by pressing Serial Number,
Buzz Number or Parking Pad on the Search Scope Bar. The aircraft database list
will reorganize itself based on the scope of the search chosen.
Type in the search criteria using the keypad and the table listing will begin to reduce
itself in size by eliminating all aircraft in the list that do not meet the search criteria
you have entered. You may enter the entire serial number, buzz number or parking
pad or select from the list at any given time. Either method will initiate a calculation
once the App has the final selection.
Manual
Entry...
Button
Search
Bar
Cancel
Button
Delete
Entry
Button
Search
Scope
Bar
Figure 12
The Cancel Button is only displayed when you are engaged in an active search
using the Search Bar. When pressed the App will clear the search bar, retract the
keyboard and revert back to the Aircraft Selection Page as shown in Figure 11. You
may also change the type of search (i.e., buzz number or parking pad, etc.) on the
scope bar at anytime before or during the search. If the scope is changed, the
14
search bar will clear itself of any entries and allow you to enter the new search
criteria. If a search is conducted with negative results, an alert will display
suggesting you reenter the data or make an entry manually. It will then clear the
search bar and allow you to try again. If you decide to enter the data manually,
simply press Cancel and then select the Manual Entry... Button. Pressing Cancel,
clears the search bar and removes the keyboard from view.
The Delete Entry Button (small gray X) simply clears the Search Bar of your entry
allowing you to reenter a new aircraft ID, buzz number or parking pad.
Aircraft Selection Using The “Reuse Last Aircraft...” Button
The App will always store the last aircraft you selected. This is a very handy feature
which allows you to enter the aircraft only once at the beginning of your flight
planning for any particular training day/mission. The button Displays “Reuse” along
with the aircraft serial number of the last aircraft selected (see figure 13). Changes
or adjustments in load may be quickly recalculated with minimal input from the user.
All future calculations will use this aircraft until a new aircraft is selected.
Manual
Entry...
Button
Reuse Last
Aircraft...
Button
Figure 13
Calculate Using The “Manual Entry ...” Button
Occasionally you will come across an aircraft that is not in the database or the
information that is in the database is not current. Additionally, BWS aircraft are not
included in the database. Selecting the “Manual Entry...” button (see figure 13)
allows you to do just that-enter the required data manually.
15
After selecting this button, the page below (figure 14) will display. The App prompts
you for the aircraft serial number (5 digits) and the aircraft basic weight and moment
(4 digits). When you tap on an entry field a keyboard will display which will allow you
to make the appropriate entries. When you are finished entering the data, select the
button from the segmented index which coincides with the mission type for your
aircraft. This selection is important because it determines the appropriate limitations
to apply, i.e, max gross weight, CG limits, etc...). When this page initially displays the
type of aircraft you last entered is initially selected. If it is the first time you have
used this entry method, VFR-67 is selected.
You may enter anything you wish as an aircraft ID. When entering Basic Weight &
moment, the app is looking for a four-digit entry. When entering this information,
round any tenths off (for example 2389.7 would round off to 2390). If the entry is not
correct, the App will present an Alert and prompt you to correct the entry.
Cancel
Button
Calculate
Button
Segmented
Index
Figure 14
When finished entering press the “Calculate” button and the App will compute your
weight & balance. If you decide not to calculate using this method, simply press the
“Cancel” button and the App will return to the Aircraft Selection Page.
16
Aircraft Display Pages
The color of the weight and balance display will vary based on the final results of
your calculations. If the load calculates with no restrictions or limitations exceeded,
the color of the page will be green as shown below-Figure 15.
Figure 15
Initially, the page on the left displays (Display Page). Data is organized in the same
format as the DA Form 5701-228-R (PPC). By selecting the “Details” button a
second page will display which shows a graphical representation of the current load.
This page is shown above (figure 15) on the right (Detailed Display Page).
Note: Double tapping anywhere on the screen other than on the “Details” or “Done”
button will also select the Detail display. When calculating for an OH-58, fuel is
shown in pounds on the Detailed Display Page. The Baggage Compartment Label
is dimmed and the weight is set to zero on the Detailed Display Page when
calculating for an OH-58, regardless of settings on the Cargo Selection Page.
Selecting the “Back” button or double tapping on the screen will take you back to the
original load display as depicted above on the left. After viewing the data, pressing
the “Done” button will take you back to the Aircraft Selection Page.
Note: The Initial Display Page also shows the aircraft buzz number, type aircraft
(Instruments, Primary, or BWS) and parking (if available) at the bottom of the page.
The crew name is displayed in bold next to Crew:
17
If there are restrictions to the aircraft based on the load (such as GWT over 3200
pounds) the color of the page will be Yellow. See Figure 16 below. Additionally, the
Limits Button will be displayed. Press the “Details” button for details about the load
or press the “Limits” button for detailed explanation of the limits in question and
possible solutions (if any) to deal with the problem.
Figure 16
Example: In this example, the
aircraft gross weight exceeds
3200 pounds (TH-67 Only).
Consequently, the aircraft is
flyable but there are airspeed and
auto limits as well as hovering
OGE limits. This restriction
applies till the aircraft fuel quantity
reaches 79 gallons at which time
the aircraft GWT will be below
3200 pounds.
18
If the proposed load exceeds an operational limitation (such as GWT over 3350
pounds) the page will display red (Figure 17 below). Again the Limits Page will
display information in regards to what limitation has been exceeded. In this case,
the aircraft is 18 pounds over it’s maximum gross weight. Audible and Visual alarms
will also go off alerting you to this fact. There are also triangle limit icons indicating
what is out of limits.
When the App determines a limit or restriction has been exceeded (Red Page), it
only reports the most significant limitation exceeded. For example, if the aircraft is
over Max Gross Weight, and the Landing CG is out of limits, the App will report the
Out of Gross Weight condition because this is the most significant problem.
However, limit icons will be displayed for the CG limits.
Limits
Icon
Figure 17
19
Limitations Checked
During each weight & balance calculation the LoadMaster checks the following
parameters and advises the user accordingly.
Limit/Restriction
Advisory
GWT over 3200 pounds
(TH-67 - Yellow Page)
TH-67: Issues advisory and provides the fuel
quantity in gallons at which point the aircraft
GWT will be less than 3200 lbs.
(OH-58 - Red Page)
OH-58: Flight Not Authorized Warning.
GWT over 3350 pounds
(TH-67 Only - Red Page)
Advises you of how much you are over 3350 and
a “Flight Not Authorized” Warning.
Minimum Crew Weight under
170 pounds. (TH-67 Only Red Page)
Flight Not Authorized Warning.
Takeoff CG is less than
Takeoff CG Forward Limit or
Takeoff CG is greater than
Takeoff CG Aft Limit.
(Red Page)
Flight Not Authorized Warning.
Landing CG is greater than
Landing CG Aft Limit.
(Red Page)
Flight Not Authorized Warning.
Landing CG is less than
Landing CG Forward Limit.
(Yellow Page)
Issues advisory and provides the fuel quantity in
gallons at which point the aircraft CG goes
forward of the Forward CG limit. NOTE: If the
aircraft is refueled prior to this gallon limit, the
aircraft will remain within CG.
Instrument aircraft CG is aft of
110 (instrument aircraft only).
(Yellow Page)
Advises user that Flight in IMC is not authorized.
A fuel quantity in gallons is displayed for the point
at which the aircraft CG moves forward of 110 (if
applicable).
When calculations are
performed for an OH-58 and
fuel quantity is greater than
70.3 gallons/471 pounds.
App will adjust takeoff and landing fuel (if
applicable) to 70.3 Gallons/471 pounds) and
advise the user. Alert can be avoided by
selecting OH-58 on the fuel selection page.
20
Corrections or Suggestions
Please let me know if there are any errors in this manual or if there are any sections
that are confusing or not clear. You may contact me at the following E-Mail Address:
[email protected].
21
22