1
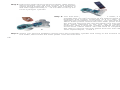
User Manual
Hydrocar
www.cebekit.es
The clean energy education kit
User Manual
Table of Contents:
Model No.: C-7110
Warning
To avoid the risk of property damage, serious injury or death:
This kit should only be used by persons 12 years old and up, and only under the supervision of adults who
have familiarized themselves with the safety measures described in the kit. Keep small children and animals away, as
it contains small parts that could be swallowed. The fuel cell generates gases that are very easily ignited. Read the
instructions before use and have them ready for reference.
1. About the Hydrocar
2. General safety instructions
3. List of components
4. Assembly of the car kit
5. Electrolysis: create Hydrogen from water
6. Hydrogen Fuel Cell Car operation
7. Advice for optimal operation
8. Troubleshooting
p1
p6
p7
p8
p11
p16
p17
p19
1. About the Hydrocar
a. Why Hydrogen?
The Hydrocar is a futuristic educational kit that contains one of the most exciting and advanced
technologies of the 21st century. This kit operates on 100% clean fuel produced by a reversible
fuel cell that converts water to hydrogen using energy captured from the sun. To help improve the
quality of our environment, reduce the impact of soaring energy costs, and decrease our
dependence on imported oil, the time is right to start introducing the world to the benefits of
hydrogen fuel cell technologies.
Our civilization consumes carbon-based fossil fuels 100,000 times faster than they are being
made available, raising many questions about global supplies and whether they are able to meet
the world's fast-growing global energy demand. With geopolitical uncertainties in oil producing
countries and insufficient oil refining capacity, our global economy is already under significant
pressure. Oil is critical to the well-being of entire nations, therefore new technologies that can
reduce the dependence on imported oil are becoming strategic. National security concerns are
now encouraging scientists from all over the world to develop new energy technology solutions
such as hydrogen fuel cells.
Around the world, scientists and researchers are looking to find new ways to meet our growing
energy needs without further damaging our environment or endangering our planet. One
alternative is hydrogen, which can be created using clean, renewable sources such as wind and
solar power. Using a device called an electrolyzer, water can be used to form hydrogen. Fuel cells
can then convert hydrogen to electrical energy to power anything from vehicles and homes to
electronic devices.
This Hydrocar kit is conveniently designed to bring the latest research out of the laboratories and
into your hands - so that you too can join the global scientific community in bringing the world into
the Hydrogen Age.
An even greater issue has to do with the consumption of oil itself. Fossil fuels contain carbon, and
burning gasoline in our vehicles creates toxic air pollution in our cities and contributes to massive
amounts of carbon dioxide being released into our atmosphere. Carbon dioxide accumulation is
the cause of greenhouse effects and global warming. For more than 100 years, humans have
burned tremendous amounts of carbon-based fuels, causing our atmosphere to heat up. Global
warming can now be witnessed by increasingly violent storms, desertification, shrinking mountain
glaciers, melting polar ice caps, changing ocean currents and rising sea water levels. We are just
starting to notice the effects.
Our society needs a new and renewable fuel and hydrogen is the best solution for the long term.
1
2
Indeed, hydrogen is the most abundant element in our universe and carries the most energy per
unit of weight. This carbon-free fuel can be produced either by using traditional or renewable
power sources such as solar or wind power. Once captured, hydrogen can be converted back to
usable energy in numerous applications, including vehicles. This means our every day fuel can be
produced locally, and in unlimited quantities. When it is consumed in the fuel cell, the result is
electricity and water. This water can then be used to produce hydrogen and oxygen, making the
cycle continuous and natural, with no toxic emissions. There are many challenges to making this a
reality, but it's only a matter of time... ...and human ingenuity!
b. What is a fuel cell and how does it work?
A fuel cell is a device that can convert hydrogen to usable electric power. The fuel cell is an
assembly of advanced material layers where hydrogen and oxygen react with each other to
generate electricity and water, without any combustion.
Electric Circuit
(40%-60% Efficiency)
e
e
e
e
e
e
Fuel H2 (Hydrogen)
O2 (Oxygen)
O
2H
e
e
O
2
2
Heat
O
Air + Water Vapor
Used Fuel Recirculates
Flow Field Plate
Flow Field Plate
Gas Diffusion Electrode (Anode)
Around the world, several "Hydrogen Highway" projects are being developed and over 200
hydrogen refueling stations have already been built to service the first fuel cell vehicles.
3
Gas Diffusion Electrode (Cathode)
Catalyst
Catalyst
Proton Exchange Membrane
4
Serious interest in fuel cells did not begin until the 1960's, when they were used as power for
mans first missions to the moon. Although fuel cells still provide electricity and water for today's
space missions, this unique technology is now aimed at promoting a global transition to
renewable energy sources. Fuel cell cars that use hydrogen as fuel are called "zero emission
vehicles." If fuel cell cars were to use hydrogen produced by renewable sources of energy such
as solar or wind power, our fuel supply would be unlimited - and consumption of hydrogen through
fuel cells would not create any waste nor air pollution.
The Hydrocar uses a reversible Proton Exchange Membrane (PEM) fuel cell (see section 3, List
of components - part C). It generates electrical energy by consuming hydrogen located in the
on-board hydrogen storage cylinder (see section 3, List of parts and components, part G) which
reacts with oxygen, which is also created and stored on-board the car.
The Hydrocar will independently find its way past any obstacles in its path. You will see it run
and reverse until it can find a forward direction clear of barries. When the car runs on its own
hydrogen, two bright blue LED lights will start to flash from the top of the car’s motor.
Now build your own hydrogen car to learn about this revolutionary energy technology!
2. General safety Instructions
To avoid the risk of property damage, serious injury or death:
1. Read carefully and fully understand the instructions before starting assembly of this kit.
2. This kit is intended only for use by persons 12 years old and up, and only under the supervision
of adults who have read and understood the instructions in this user manual.
3. When assembling this kit, tools may be used. Extra care should be taken to avoid personal
injury.
4. Some parts are small and fragile; please be careful when handling and connecting parts to avoid
breakage. Handle all parts and components with care.
5. Do not attempt to use any part, item, or component provided in this kit for any other purpose
than what is instructed in this manual. Do not attempt to disassemble any part, item or
component in this kit.
6. Turn off the battery pack when not in use. When the battery pack is turned on, do not allow the
metal leads to touch. Remove the batteries after use, and during storage.
7. Empty all water, hydrogen and oxygen from each component after use.
8. Clean your hands after working with the kit.
5
6
3. List of Components
A. Syringe
B. Short rubber tubes (see Chapter 4, Step 1)
C. Reversible Fuel Cell
D. Solar panel
E. Kit chassis with motor and LED lights
F. Battery pack
G. Inner cylinders
H. Outer cylinders
I. Long rubber tubes (see Chapter 4, Step 1)
4. Assembly of the kit
A
B
Step 1: Use the scissors (not included in this kit) to cut out two lengths of 4 cm (1.5 inches) of rubber
tubing from the long rubber tube provided in the kit. Place the red pin into one of the 4 cm
(1.5 inches) rubber tubes, and the black pin into the other 4 cm (1.5 inches) rubber tube.
These short rubber tubes become part (B) of the kit. Cut the remaining long rubber tube into
two equal pieces. These two longer pieces will be used to form part (I) of the kit.
C
Step 2: Attach the short rubber tube (B) with the black pin to the top nozzle on the hydrogen side of
the fuel cell (marked H2). Attach the other short rubber tube (B) with the red pin to the top
nozzle on the oxygen side of the fuel cell (marked O2).
D
E
Step 3: Insert the fuel cell (C) with the attached short rubber tubes (B) into the rectangular slot on
the chassis (E).
F
G
H
I
You will also need the following 3 items (not included in this kit):
- 2 AA batteries (alkaline batteries highly recommended)
- Scissors
- 100 ml of distilled water*
* Distilled water is highly recommended for optimal use.
7
8
Step 4: Insert the hydrogen and oxygen outer storage cylinders (H) into the round slots located on
the chassis (E). Fill the cylinders with distilled water upto the 20 mark on each of the outer
storage cylinders (H).
Insert the inner cylinders (G) into the outer cylinders (H) so that the inner cylinders (G) are
filled with water. There are two notches at the bottom of each of the inner cylinders (G).
These openings allow for gas to escape the inner cylinders (G) into the outer cylinders (H)
to limit the amount of gas stored. Make sure these openings are not blocked by the raised
plastic frame holding the inner cylinders (G). Push on the top of the inner cylinders (G) to
be sure they fit firmly onto the plastic rim located at the bottom of the outer storage cylinders (H).
Step 5: Attach the long tubes (I) to the top of the inner cylinders (G). Attach the long tube coming
from the hydrogen storage cylinder to the lower nozzle of the hydrogen side of the fuel cell.
Attach the long tube coming from the oxygen storage cylinder to the lower nozzle of the
oxygen side of the fuel cell.
Step 6: Good ion conductivity is critical to the performance of the fuel cell. In order to ensure
good conductivity, the fuel cell’s membrane
needs to be properly humidified.
In order to hydrate the fuel cell, complete the following
points:
Use the syringe (A) to suck distilled water (purchased
separately) into the syringe. Once the syringe is filled with
distilled water, place the syringe into the top nozzle on the
oxygen side of the fuel cell (C) and proceed to push water
into the oxygen side of the fuel cell (marked O2) until you
see water passing through the chamber in front of the
screen and out the lower nozzle. Leave the fuel cell for 5
to 10 minutes to fully hydrate.
9
water
10
5. Electrolysis: create Hydrogen from water
Electrolysis is the process of converting electrical energy to chemical energy. When an electrical
charge is applied to water, the charge breaks the chemical bond between hydrogen and oxygen
and creates charged particles called ions. In this case, positively charged hydrogen ions and
negatively charged ions are formed. An electrolyzer has 2 electrodes where the ions form. One
electrode, called the anode, is positively charged, and attracts negatively charged ions. The other
electrode is called the cathode and attracts the positively charged hydrogen ions.
Reversible fuel cells can be used to perform electrolysis. In a fuel cell, the electrolyte is part of the
membrane assembly. When a current is applied to a fuel cell, it will electrolyze water producing
hydrogen on the cathode side and oxygen on the anode side.
Note: Follow these next instructions only after you have completed all the steps in Chapter 4:
“Assembly of the car kit ”. Make sure the fuel cell has been hydrated by injecting water using the
syringe before proceeding to electrolysis.
!
Warning: Using non-distilled water damages the electrodes of the fuel cells. Fuel cells use
nano-scale or carbon supported platinum as a catalyst, and these particles are very sensitive to
impurities found in non-distilled water.
For the purposes of this hydrocar kit, high quality drinking water or tap water with low mineral
content can also be used - however usability of the kit will inevitably be shortened.
The Fuel Cell must ONLY be hydrated through the O2 side and NOT through the H2 side, failure
to do so will result in the blockage of hydrogen flow.
a. Using Solar Panel for electrolysis
The Hydrocar kit can use a small solar photovoltaic cell for the electrolysis process as a way to capture
renewable energy from the sun. Please follow the instructins below:
Step 1: Insert one end with the banana plug of the red cable into the red jack of the solar panel, the
other end with the banana plug into the fuel cell.
Step 2: Insert one end with the banana plug of the black cable into the black jack of the solar panel,
the other end with the banana plug into the fuel cell.
11
12
Step 3: Place the solar panel in direct sunlight. With strong,
direct sunlight, you will see oxygen and hydrogen
gases being produced in the inner gas cylinders. It
will take approximately 5 - 10 minutes to fill up the
inner hydrogen cylinder.
Step 4: The first time you operate electrolysis of water, it is
possible that you will not arrive at the optimal result of
hydrogen and oxygen production at a 2:1 ratio. To
optimize the production of hydrogen, you will need to
follow these points: Disconnect the solar panel from
the fuel cell. Remove the red and black pins from the
short tubes attached to the fuel cell to release
hydrogen. After 2 seconds, quickly re-attach the pins
to the short rubber tubes. You will need to complete
this step to remove all inner gases from the fuel cell.
Then repeat steps1, 2 and 3.
b. Or using Battery Pack for electrolysis
Step 1: Make sure the battery pack (F) is switched to “off”. Insert 2 new AA batteries into the battery
pack (F) provided in this kit. Do not use any other battery pack - this has been designed specifically for this reversible fuel cell.
Step 2: Be very careful to insert the red wire from the power jack into the red jack (oxygen side) of
the fuel cell, and the black wire from the power jack into the black jack (hydrogen side) of
the fuel cell. The fuel cell could be completely destroyed if the power supply is not connected properly.
Step 5: When you see the bubbles coming from the hydrogen cylinder and rising to the surface of
the water, disconnect the solar panel from the fuel cell.
13
14
Step 3: Switch the battery pack to the “on” position to start electrolysis. You will know oxygen and
hydrogen gases are being produced when water is displaced to the top of the water storage
cylinders. You can also measure the gas produced by measuring what looks like empty
space gradually increasing in the top of the inner cylinders (this takes approx 5 minutes).
When the hydrogen inner cylinder is full of hydrogen gas, you will begin to see bubbles
coming out of the inner cylinder into the outer cylinder. Electrolysis is completed when water
in the inner cylinders is completely displaced at a 2:1 ratio (2 parts hydrogen, 1 part
oxygen). The cylinder with more gas is the hydrogen cylinder.
Step 4: Switch the battery pack off. Follow the instructions in Part 5a, Step 4, in order to remove all
inner gases from the fuel cell and optimize the production of hydrogen. Then repeat steps
2 and 3.
Step 5: When you see the bubbles coming from the hydrogen cylinder and rising to the surface of
the water, switch off the battery pack and disconnect it from the fuel cell.
15
6. Hydrogen Fuel Cell Kit Operation
Once you have completed the assembly of the kit as described in “Chapter 4: Assembly of the kit”,
and completed electrolysis as described in “Chapter 5: Electrolysis Operation”, you can run your
fuel cell kit with hydrogen.
Step 1: Disconnect the solar panel from the fuel cell. If you used the battery pack, disconnect it from
the fuel cell.
Step 2: Hold up the front of the kit so the motor does not
touch the ground. Plug the red and black wires from
the kit motor into the red and black jacks on the fuel
cell. Place the kit on a smooth and flat surface and
watch it go! The two blue LED lights on the front of
the motor will also start to flash. The kit will independently find its way past any obstacles in its path,
and you will see it turn and reverse until it can find a
forward direction clear of barriers. The kit will continue to run on its own until all the hydrogen gas
stored in the inner cylinder is consumed.
16
7. Advice for Optimal Operation
7. The fuel cell left in the open air is very sensitive to volatile organic compounds, which will
affect the performance of the fuel cell. So when you are finished using the kit, it is highly
recommended to place the fuel cell inside an air-sealed plastic bag, such as a ziploc bag. This
will protect the fuel cell while you are not using your kit.
1. Make sure you use distilled water only. Any other water will contain substances and minerals that
can contaminate and destroy the fuel cell. If you notice the fuel cell rusting – it means the
appropriate water (distilled water) was not used for your experiments.
8. When using a solar panel, the current output of the solar panel should be no more than 0.7 A,
and normal voltage no higher than 2V. A solar panel creating higher output and voltage may
damage the fuel cell.
2. Only use the power pack provided and purchase 2 AA batteries, preferably alkaline batteries.
3. Make sure the fuel cell is well hydrated before any electrolysis operation by filling it with water
using the syringe.
9. The fuel cell could be completely destroyed if the red wire of the battery pack is connected to
the black jack of the fuel cell.
4. You will have maximum performance when the entire electrolysis process is repeated three to four
times. This is due to the increased hydration of the PEM membrane in the fuel cell after repeated
use. Optimal temperature: 20°C - 30°C. Make sure the reservoir is filled with distilled water to the
zero mark on the outer cylinders before proceeding with electrolysis.
10. Make sure the fuel cell has been hydrated by injecting water using the syringe before
proceeding to electrolysis. Leave the water inside the fuel cell for 5 to 10 minutes to fully
hydrate the fuel cell.
5. Ensure that the small outlets on the inner cylinders are not blocked by the plastic rim on the
bottom of the outer cylinder. Hydrogen and oxygen are lighter than water so they flow to the top of
the inner tube, displacing the water. If these small holes are blocked, too much pressure will build
up inside the fuel cell and this will cause damage.
6. When you run the fuel cell multiple times, water in the upper part of the outer cylinder might not
descend to the inner cylinder. This is because a vacuum has been created in the tubing.
Disconnect the tubing from the upper nozzle of the fuel cell and the water will descend into the
inner cylinder appropriately.
17
4
4
18
8. Troubleshooting
1. The water levels do not drop when the gas outlet tubes on both sides of the fuel
cell are unplugged.
Solution: Check whether the holes on the wall of the inner cylinder are blocked. If so, turn the
inner cylinder until water enters the holes and fills up the inner cylinder.
2. The electrolyzer does not produce hydrogen and/or oxygen.
Solution: a. Check whether the wires are appropriately connected, and whether there are any
loose connections. The fuel cell could be completely destroyed if the red wire of the battery
pack is connected to the black jack of the fuel cell.
b. Check whether the switch of the battery pack is in the “on” position.
3. The water electrolysis process slows down.
Solution: a. Add water to the oxygen side of the fuel cell and wait for about 5 minutes.
b. Replace old AA batteries with new AA batteries inside the battery pack.
4. The kit stops moving while there is still hydrogen left inside the tanks.
Solution: a. Purge the gases and perform water electrolysis for 4-5 minutes. Unplug the
hydrogen gas outlet tube and oxygen gas tubes to purge the gases. Perform water electrolysis
again until the hydrogen tank is filled, and connect the motor to the fuel cell. If the problem
persists, go to the next step.
b. Let the water electrolysis process last about 10 minutes to consume the residual water. To
push water out of the fuel cell, purge the gases. Perform water electrolysis once more until the
hydrogen tank is filled, then connect the motor to the fuel cell.
19
welcome to the Hydrogen Age!