1
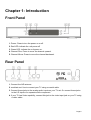
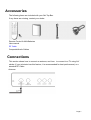
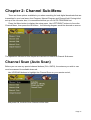
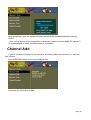
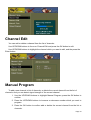
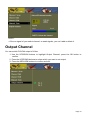
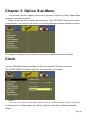
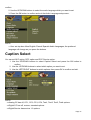
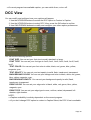
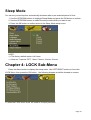
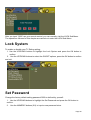
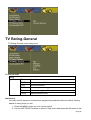
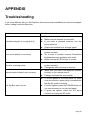
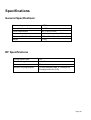
ATSC CECB Jiuzhou DTT6000 User’s Manual Attachment 1. User’s Manual Warning! Important Safety Instructions CAUTION: TO REDUCE THE RISK OF ELECTRIC SHOCK, DO NOT REMOVE COVER(OR BACK), NO USER SERVICEABLE PARTS INSIDE. REFER SERVICING TO QUALIFIED SERVICE PERSONNEL. This symbol indicates high voltage is present inside. It is dangerous to make any kind of contact with any inside part of this product. This symbol alerts you that important literature concerning operation and maintenance has been included with this product. Note to installer: This reminder is provided to call Set-Top Box installer’s attention to Article 820-40 of the National Electrical Code (Section 54 of Canadian Electrical Code, Part I), that provides guidelines for proper grounding and, in particular, specifies that the cable ground shall be connected to the grounding system of the building as close to the point of cable entry as practical. Caution: FCC regulations state that any unauthorized changes or modifications to this equipment may void the user’s authority to operate it. Caution: To prevent electric shock, match the wide blade of plug to the wide slot, and fully insert Page 1 the plug. Warnings to prevent damage, which may result in fire or electric chock hazard, do not expose this appliance to rain or moisture z Protect the power cord. Power supply cords should be routed so that they won't be walked on or pinched by objects placed on against them. Pay particular attention to cords at plugs, convenience receptacles, and the point where they exit from the unit. z Unplug the product from the wall outlet and disconnect the antenna or cable system during a lighting storm or when left unattended and unused for long periods of time. This will prevent damage to the unit due to lightning and power-line surges. z Avoid overhead power lines. An outside antenna system should not be placed in the vicinity of overhead power lines or other electric light or power circuits or where it can fall into such power lines or circuits. When installing an outside antenna system, be extremely careful to keep from touching the power lines or circuits. Contact with such lines can be fatal. z Do not overload the wall outlet or extension cords. Overloading can result in fire or electric shock. z Do not insert anything through the opening in the unit, where they can touch dangerous voltage points or damage parts. Never spill liquid of any kind on the product. z Do not attempt to service the product yourself. Refer all servicing to qualified service personnel. Unplug the unit from the wall outlet and refer servicing to qualified service personnel under the following conditions: When the power-supply cord or plug is damaged If liquid has been spilled on the unit or if objects have fallen into the unit If the product has been exposed to rain or water If the product does not operate normally by following the operating instructions If the product has been dropped or the cabinet has been damaged When the product exhibits a distinct change in performance z If you make adjustments yourself, adjust only those controls that are covered by the operating instructions. Adjusting other controls may result in damage and will often require extensive work by a qualified technician to restore the product to normal. z When replacement parts are required, be sure the service technician uses replacement Page 2 parts specified by the manufacturer or those that have the same characteristics as the original part. Unauthorized substitutions may result in additional damage to the unit. z Upon completion of any service or repairs to this product, ask the service technician to perform safety checks to determine that the product is in a safe operating condition. Page 3 CONTENTS ----------------------------------------------------------------------------------------------------------------------------Chapter 1: Introduction ...............................................................................................................................6 Front Panel ...................................................................................................................................... 6 Rear Panel ....................................................................................................................................... 6 Accessories...................................................................................................................................... 7 Connections..................................................................................................................................... 7 Remote Control Overview .............................................................................................................. 8 On-screen Menus .......................................................................................................................... 10 Chapter 2: Channel Sub-Menu.................................................................................................................. 11 Channel Scan (Auto Scan) ............................................................................................................ 11 Channel Add.................................................................................................................................. 12 Channel Edit.................................................................................................................................. 13 Manual Program............................................................................................................................ 13 Output Channel ............................................................................................................................. 14 Chapter 3: Option Sub-Menu ........................................................................................................ 15 Clock ............................................................................................................................................. 15 Language ....................................................................................................................................... 16 Audio Language ............................................................................................................................ 16 Caption Select ............................................................................................................................... 17 DCC View ..................................................................................................................................... 18 Sleep Mode.................................................................................................................................... 19 Chapter 4: LOCK Sub-Menu ....................................................................................................................19 Lock System.................................................................................................................................. 20 Set Password ................................................................................................................................. 20 Block Channel............................................................................................................................... 21 TV Rating-Children....................................................................................................................... 21 TV Rating-General........................................................................................................................ 22 Downloadable RRT ....................................................................................................................... 24 Chapter 6: Special Features ......................................................................................................................25 Electronic Program Guide............................................................................................................. 25 Signal Quality................................................................................................................................ 25 Adjusting the volume .................................................................................................................... 25 View the information..................................................................................................................... 26 Clock ............................................................................................................................................. 26 Changing Channels ....................................................................................................................... 27 Setting Your Favorite Channels..................................................................................................... 28 APPENDIX...............................................................................................................................................29 Troubleshooting ............................................................................................................................ 29 Page 4 Specifications ................................................................................................................................ 30 General Specifications:............................................................................................................. 30 RF Specifications...................................................................................................................... 30 Page 5 Chapter 1: Introduction Front Panel 1: Power: Press to turn the power on or off. 2: Red LED: indicate the unit power off 3: Green LED: indicate the unit power on. 4: Channel Plus: Press to move the channel upward. 5: Channel Minus: Press to move the channel backward. Rear Panel 1: Connect the AIR antenna 2: modulate out: Use to connect your TV using a coaxial cable. 3: Connect these jacks to the analog audio inputs on your TV set. Or connect these jacks to the L/R inputs of a separate audio component. 4: If your TV has Video capability, connect this jack to the video input jack on your TV using a video cable. Page 6 Accessories The following items are included with your Set-Top Box. If any items are missing, contact your dealer. Remote Control & AAA Batteries User manual RF Cable Composite/Audio Cables Connections This section shows how to connect an antenna, and how to connect to a TV using A/V cables (if your television has this feature, it is recommended for best performance) or a standard RF Cable. Antenna: Page 7 RF Cable to TV: A/V cables to TV: Remote Control Overview The remote control and on-screen menus work together to operate your Set-Top Box. Understanding the remote control buttons and menus allows you to operate Set-Top Box easy. If you need assistance while using the remote control and the menus, the feature that displays a help description upon selecting a menu item, will be useful. Page 8 POWER: Press to turn the power on or off. MUTE: Press to enable or restore audio. EXIT: Press to exit from the on-screen menu or a pop-up display. MENU: Press to display the on-screen menu or switch back to the previous menu screen. This button works only when unit jacks are properly connected. LAST: Press to view the previous channel. INFO: Press to display current channel information. UP/DOWN: Press to move the channel upward or downward. If on-screen menu is displayed, use to move the on-screen cursor up or down. Page 9 LEFT/RIGHT: Press to increase or decrease the volume. If on-screen menu is displayed, use to move the on-screen cursor left or right. NUMERIC Buttons: Press to directly input numbers or to go directly to a specific channel. Ie: to access channel 28-4, press “2” > “8” > “-“ > 4. Note: if a subset channel is desired, you must distinguish the channel with the hyphen button. GUIDE: Press to display the Electronic Program information. —: Press to show the number of current channel. AUDIO: Press to change sounds modes and cycle through the available sounds of current channel. FAV: Press to add current channel to favorite program or delete current channel from favorite program. FAV+/-: Press to move the favorite channel upward or downward. SIGNAL: Press to display signal strength. ASPECT: Press to display or change the current aspect ratio. This may reduce black bars found during certain programming. CLOCK: Press to display the clock information. CAPTION: Press to display or change the current caption setting. On-screen Menus To go to the on-screen menu, press the MENU button. Using the ARROW (OK/↑←↓→) buttons on the remote control, you can move between menus. To enter a specific menu, press the OK button. You can select a menu or confirm a selected option using this button. To go back to the previous menu form a sub-menu, press the MENU button. To exit form the on-screen menu, press the EXIT button. Example of Main Menu. NOTE: The on-screen menu is displayed only after the unit has been properly connected to your TV.. Page 10 Chapter 2: Channel Sub-Menu There are three options available to you when searching for local digital broadcasts that are transmitted in your local area: Auto Program, Manual Program and Channel Add. During initial set up of the converter box, it is recommended that you run AUTO PROGRAM first. Press the Menu button to display the setup menu. Use LEFT/RIGHT buttons to focus the Channel Menu, then press the OK button., the following diagram would be showed on screen: The operations followed of this chapter are carried out under the Channel Sub-menu. Channel Scan (Auto Scan) Before you can use any special channel buttons (CH+/-/INFO), the antenna you wish to use must be scanned for available channels. Use UP/DOWN buttons to highlight the Channel Scan on your remote control, and press OK, the Auto Scan Channel will be start. Page 11 Upon completion, your set-top box will have stored all the available scanned channels. NOTE: >Your set-top box must be connected to a antenna in order to receive digital TV signals. It is recommended to install a rooftop antenna, if possible. Channel Add If you do not want to search all the channels, but merely add new channels, you can use this function. Use UP/DOWN buttons to focus on Channel Add and press the OK button to start. Page 12 Channel Edit You can add or delete a channel from the list of channels. Use UP/DOWN buttons to focus on Channel Edit and press the OK button to edit. Use UP/DOWN buttons to highlight the channel which you want to edit, and the press the Enter button. Manual Program To add a new channel to list of channels, or delete the current channel from the list of channels. And you can detect signal strength of the current channel. 1. Use the UP/DOWN buttons to highlight Manual Program, press the OK button to confirm. 2. Press the UP/DOWN buttons to increase or decrease number which you want to program. 3. Press the OK button to confirm add or delete the current channel from the list or channels. Page 13 NOTE: >If the no signal of your select channel, or weak signals, you can’t add or delete it. Output Channel You can switch Ch3/Ch4 output of Video. 1. Use the UP/DOWN buttons to highlight Output Channel, press the OK button to confirm. 2. Press the UP/DOWN buttons to select which you want to set output. 3. Press the MENU/OK buttons to confirm and exit. Page 14 Chapter 3: Option Sub-Menu You can learn from this chapter, how to set up your own Time Zone (Clock), Aspect Ratio, Language, and other functions. Press the Menu button to display the setup menu. Use LEFT/RIGHT buttons to focus the Channel Menu, then press the OK button, the following diagram would be showed on screen: The operations followed of this chapter are carried out under the Channel Sub-menu. Clock Use the UP/DOWN buttons to highlight CLOCK and press the OK button to confirm. Use the LEFT/RIGHT buttons to select the time zone where you reside. NOTE: >The Time zone options include Alaska, Hawaii, Eastern, Central, Mountain, Pacific.Aspect Ratio To change your TV shows aspect ratio, Set by Program, Letter Box, Cropped, Squeezed models. Page 15 1. Use the UP/DOWN buttons to highlight Aspect Ratio and press the OK button to confirm. 2. Use the UP/DOWN buttons to select the model which you want to set. 3. Press the OK button to confirm and exit the Aspect Ratio setup menu. Language You can set the language for any On Screen Display (OSDs) 1. Use the UP/DOWN buttons to highlight Language and press the OK button to confirm. 2. Use the UP/DOWN buttons to select the option which you want to set. 3. Press the OK button to confirm and exit the Language setup menu. NOTE: >>Your set-top box offers English /French /Spanish languages; the preferred language will change as you press the buttons. Audio Language You can set the Audio Language for your set-top box: 1. Use the UP/DOWN buttons to highlight Audio Language and press the OK button to Page 16 confirm. 2. Use the UP/DOWN buttons to select the audio language which you want to set. 3. Press the OK button to confirm and exit the Audio Language setup menu. NOTE: >>Your set-top box offers English /French /Spanish Audio Languages; the preferred language will change as you press the buttons. Caption Select You can set ACC option, DCC option and DCC Service option. 1. Use the UP/DOWN buttons to select Caption Select and press the OK button to confirm. 2. Use the UP/DOWN buttons to select which option you want to set. 3. Use the LEFT/RIGHT buttons to switch options, then press OK to confirm and exit. NOTE: >>Analog CC has off, CC1, CC2, CC3, CC4, Text1, Text2, Text3, Text4 options. >>Digital CC has off, custom, standard options. >>Digital Service has service 1-6 options. Page 17 >>If current program has available caption, you can switch them, or turn off. DCC View You can modify and configure how your captions will appear. 1. Use the UP/DOWN buttons to switch the DCC option to Custom in Caption. 2. Use the UP/DOWN buttons to select DCC View, press the OK button to confirm. 3. Use OK/UP/DOWN buttons to modify and configure your other caption preferences. You can set the following options: FONT SIZE: You can set your font size to small, standard, or large. FONT TYPE: You can set your font type to font0, font1, font2, font3, font4, font5, font6, font7. TEXT COLOR: You can set your font color to white, black, red, green, blue, yellow, magenta, cyan TEXT OPACITY: You can set your text opacity to solid, flash, translucent, transparent. BACKGROUND COLOR: You can set your background color to black, white, red, green, blue, yellow, magenta, cyan. BACKGROUND OPACITY: You can set your background opacity to solid, flash, translucent, transparent. EDGE COLOR: You can set your edge color to black, white, red, green, blue, yellow, magenta, cyan. EDGE TYPE: You can set your edge type to none, uniform, raised, depressed, left shadow, right shadow. NOTE: >>Caption availability is entirely dependent on the current program. >>If you don’t change DCC option to custom in Caption Select, the DCC View is available. Page 18 Sleep Mode You can set your set-top box automatically shutdown after a pre-selected period of time. 1. Use the UP/DOWN buttons to highlight Sleep Mode and press the OK button to confirm. 2. Use the UP/DOWN buttons to select the sleep mode which you want to set. 3. Press the OK button to confirm and exit the Sleep Mode setup menu. NOTE: >> The factory-default option is 4 Hours. >> Here are 7 options: OFF, 1 hour, 2 hours, 4 hours, 8 hours. Chapter 4: LOCK Sub-Menu Press the Menu button to display the setup menu. Use LEFT/RIGHT buttons to focus the LOCK Menu, then press the OK button., the following diagram would be showed on screen: To enter the LOCK menu each, will need to be input password: Page 19 After you input “0000” use your remote control, you can normally visit the LOCK Sub-Menu. The operations followed of this chapter are carried out under the LOCK Sub-Menu. Lock System To enable or disable your TV Rating setting: 1. Use the UP/DOWN buttons to highlight the Lock System and press the OK button to confirm. 2. Use the UP/DOWN buttons to select the ON/OFF options, press the OK button to confirm and exit. Set Password Change the factory default setting password 0000 to defined by yourself: 1. Use the UP/DOWN buttons to highlight the Set Password and press the OK button to confirm. 2. Use the NUMERIC buttons (0-9) to input a new password twice. Page 20 Block Channel You can block channels like below: 1. Use the UP/DOWN buttons to highlight the Block Channel and press the OK button to confirm. 2. Use the UP/DOWN buttons to select a channel which you want to block. 3. Press the OK button to block or unblock the channel you highlighted. NOTE: >> There will a lock icon to indicate the channel blocked or not. TV Rating-Children TV Rating-Children movie rating level. Page 21 TV Rating-General TV Rating-General movie rating level. TV Parental Guide Rating Age Based TV-Y All children TV-Y7 Direct to older children TV-G General Audience TV-PG Parental guidance suggested TV-14 Parents strongly cautioned TV-MA Mature audience only MPAA Rating You may control access to channels and programs by password that can restrict viewing based on rating limits you set 1. Press the MENU button on your remote control 2. Use the LEFT/RIGHT buttons to select V-Chip menu and press the OK button to list Page 22 it. 3. Press the UP/DOWN buttons to highlight MPAA Rating menu, press the OK button and use UP/DOWN/LEFT/RIGHT buttons to select a preferred rating. Important Notes about Parental Locks: Explanation of the MPAA and TV(FCC) Rating Systems TV (FCC) Age-Based Ratings: TV-Y: All children. The themes and elements in this program are specifically designed for a very young audience, including children from ages two to six. TV-Y7: Directed to older children. The themes and elements in this program may include mild physical or comedic violence, or may frighten children under the age of seven. TV-G: General audience. It contains little or no violence, no strong language, and little or no sexual dialog or situations. TV-PG: Parental guidance suggested. This program may contain infrequent coarse language, limited violence, some suggestive sexual dialog, and situations. TV-14: Parents strongly cautioned. This program may contain sophisticated themes, sexual content, strong language, and more intense violence. TV-MA: Mature audiences only. This program may contain mature themes, profane language, graphic violence, and explicit sexual content. TV(FCC) Content Rating: FV Fantasy violence V Violence S Sexual language D Sexually suggestive dialog The viewer can also block the audio and video for such-rated programs. MPAA Rating System: G General audience (no restriction) PG Parental guidance suggested PG-13 Parents strongly cautioned R Restricted. Children under 17 should be accompanied by an adult NC-17 No children under age 17 X Adults only NR Not rated z z TV (FCC) ratings: The particular rating that you have selected will be locked (and indicated as a red “L” on a blue background). Additionally, all age-based ratings within a particular group will also be locked. For example, if the TV-G rating and all of its contents (V,S,L,and D) will automatically be locked as well. MPPA ratings: The particular rating that you have selected will be locked. In addition, more restrictive ratings will be locked as well. Page 23 z Neither TV (FCC) ratings nor MPAA ratings apply to news programs. Downloadable RRT This function is for broadcasting update. If the service is available, the function will be enabled. To set rating values from the downloaded table and check if block proceeds according to the program rating information which is attached. Page 24 Chapter 6: Special Features Electronic Program Guide You can view the electronic program guide (EPG), which includes information about available programs. The full guide will display programming information for all channels, which the mini guide will display programming information for your current channel. Press the GUIDE button on your remote control to view the following: The EPG shows: > Current date and time > Current program and next program and the times Signal Quality To graphical display the signal strength of the current channel. Press the SIGNAL button on your remote control. The Signal Quality indicate current program signal strength Adjusting the volume You can control the volume of you set-top box using the VOL buttons on your remote control. Page 25 MUTE button: This button is used to mute the sound of your set-top box .No audio will be heard once this button is pressed. LEFT/RIGHT buttons: Use these buttons you can increase or decrease the volume. NOTE: To cancel the MUTE action, you can press the MUTE button again or use the LEFT/RIGHT buttons. View the information You can view the information on the current channel by pressing the INFO button. The INFO shows: >The major channel number and the minor channel number.(e.g. Ch14-1,the major channel number is 14 and the minor channel number is 1) >Current date and time. >Program title >Current signal strength. To hide INFO: Press the INFO button again or press the EXIT button. After 5 seconds, the information will automatically disappear from your TV screen. Clock You can view the clock information of current time by pressing the CLOCK button Page 26 Press the CLOCK button once, the clock information will show on the right bottom side of the TV screen. To hide CLOCK: Press the CLOCK button again or press the EXIT button. Changing Channels You can change the currently displayed channel with the following methods. NUMERIC buttons: Press the NUMERIC buttons (0-9) to directly enter the channel number. UP/DOWN buttons: Press the UP/DOWN button to move up or down to the next available channel. Press and hold the UP/DOWN button to navigate quickly through the channels. LAST buttons: Press to return to the previous channel you have viewed. Fox example, if you were previous turned to Channel 55-1 and then changed to Channel 28-4, pressing the LAST button will change the current channel back to channel 55. FAV+/-: Press switch among your favorite channels. (see page xx) NOTE: You must first complete the Auto scan channels procedure before changing channels. (see page xx) Page 27 Setting Your Favorite Channels You can create a list to easily navigate your Favorite channels. Easily add a new channel to the Favorite Channels list or delete a channel from the Favorite Channels list. To add a new channel to the Favorite Channels: 1. Switch to the channel which you want to add. 2. Press the FAV button switch to Add Channel to Favorite list menu. 3. Press the OK button, and then the current channel will be added to the Favorite list. To delete a channel from Favorite list: 1. Switch to the channel which you want to delete. 2. Press the FAV button switch to Delete Channel from Favorite list menu. 3. Press the OK button, and then the current channel will be deleted from the Favorite list. NOTE: >You can use the Manual Channel Set method described above to operate. >Press the – button will show the current channel whether in Favorite list or not. Page 28 APPENDIX Troubleshooting If you have difficulty with you Set-Top Box, there are several possibilities you should investigate before calling a service technician. Problem Possible solution Intermittent signal, or no signal at all z z z z z Poor sound quality, or no sound z z z No color, or wrong colors z z Remote control doesn’t work correctly z z Set-Top Box won’t turn on z z Try to tune to another channel Make sure the antenna is connected If you have a powered antenna, turn the power boost on. Rotate the antenna for a stronger signal Make sure you have connected your audio system correctly Try to tune to another channel. Sometimes broadcasters have problems with audio Make sure the MUTE function is not set Make sure you have connect the video system correctly Change the video wire and re-connect. Make sure you have fresh batteries installed correctly in you remote control. Change new batteries and reinstall. If no led lighted in the front panel, to make sure the receiver’s power plug is installed and that the AC outlet is working. If red led lighted, press the POWER button on you remote control or on the front panel. If green led lighted, check the A/V wires connect or re-plug the AC outlet. Page 29 Specifications General Specifications: Broadcasting standard ATSC Demodulation method 8-VSB Power requirement AC 110V,50-60Hz Power consumption <8 Watts/In standby:<1Watt Dimension (W x D x H) 260 x 190 x 42 (mm) Weight 1.2kg RF Specifications Tuning system type F/S Band coverage Air 2~69 Antenna 75-ohm external antenna terminal Number of inputs/outputs 75-ohm Antenna/Cable in, Antenna out 2 Analog Audio Out (L/R) Page 30