1
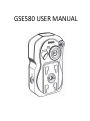
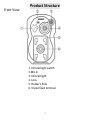
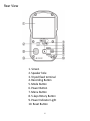
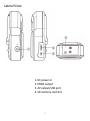
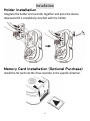
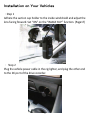
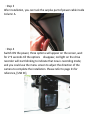
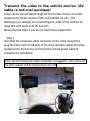
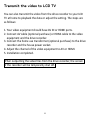
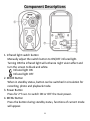
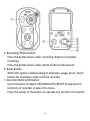
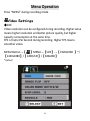
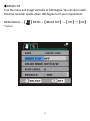
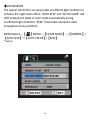
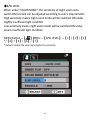
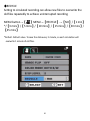
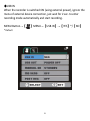
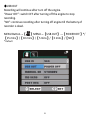
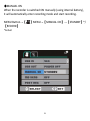
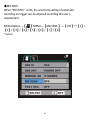
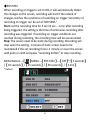
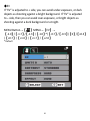
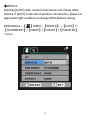
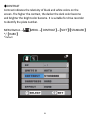
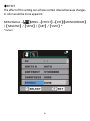
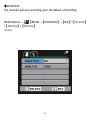
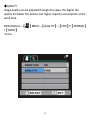
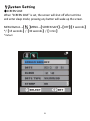
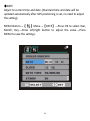
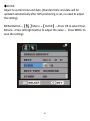
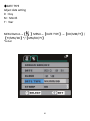
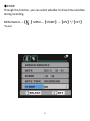
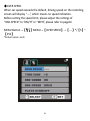
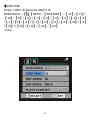
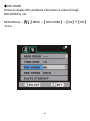
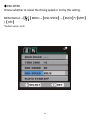
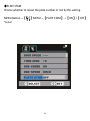
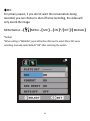
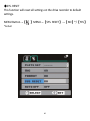
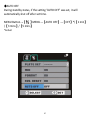
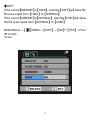
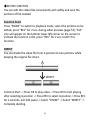
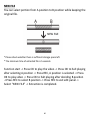
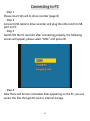
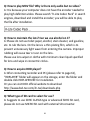
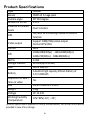
GSE580 USER MANUAL
Content
Instructions before use ................................................................................................... 4
Preface ................................................................................................................ 4
Product Guarantee .............................................................................................. 4
Copyright infringement Warning......................................................................... 4
Check Product Accessories .................................................................................. 4
Product Structure ........................................................................................................... 5
Front View .......................................................................................................... 5
Rear View ............................................................................................................ 6
Lateral view ......................................................................................................... 7
Installation ...................................................................................................................... 8
Holder Installation .............................................................................................. 8
Memory Card Installation (Optional Purchase) ................................................... 8
Installation on Your Vehicles ............................................................................... 9
Transmit the video to the vehicle monitor (AV cable is optional purchase) .......11
Transmit the video to LCD TV ...................................................................... 12
Component Descriptions .............................................................................................. 13
Recharging .................................................................................................................... 15
Menu Operation ........................................................................................................... 16
Video settings ................................................................................................... 16
System Setting .................................................................................................. 33
Video Playback.................................................................................................. 52
Additional functions .......................................................................................... 58
Connecting to PC .......................................................................................................... 61
Q&A .............................................................................................................................. 62
Related Parameters....................................................................................................... 64
Video Recording Time (For Reference) ............................................................. 64
Requirement of playing Full HD 1080P and 720P .............................................. 64
Product Specifications ....................................................................................... 65
2
Preface
Instructions before use
This user manual will describe the usage of this product in details and
at the same time provide comprehensive information including usage,
operation, installation instructions and specification, etc. Please read
the manual carefully and keep it properly. We hope our product will
satisfy your need and provide you with long-term services.
Product Guarantee
This product is approved by ISO 9001:2008 International Quality
Standard and certified with FCC and CE. Our customers can use this
product free of apprehension.
Copyright infringement Warning
Please note this product is for personal use only. The forms of usage
should not offend or infringe international or domestic copyright laws
and regulations. All recorded videos should only use for personal use..
Please note that using this product for recording of occasions like
shows, exhibitions or commercial activities will infringe others’
copyrights or legislation rights.
Check Product Accessories
Please check whether the following accessories are present before
use
1. Vehicle Power Cable (4M) x1
2. Holder x1
3. HDMI Video Cable x1
4. USB Cable x1
5. User Manual x1
4
Front View
Product Structure
1. Infrared light switch
2.Mic-in
3. Infrared light
4. Lens
5. Holder’s hole
6. Tripod fixed terminal
5
Rear View
1. Screen
2. Speaker hole
3. Tripod fixed terminal
4. Recording Button
5. Mode Button
6. Power Button
7. Menu Button
8. 5-keys Rotary Button
9. Power Indicator Light
10. Reset Button
6
Lateral View
1. DC power-in
2. HDMI output
3. AV output/USB port
4. SD memory card slot
7
Installation
Holder Installation
Integrate the holder and recorder together and press the device
downward till it completely clenched with the holder.
Memory Card Installation (Optional Purchase)
Install the SD card into the drive recorder in the specific direction.
8
Installation on Your Vehicles
.Step 1
Adhere the suction cup holder to the inside windshield and adjust the
lens facing forward. Set “ON” on the “IMAGE FLIP” function. (Page17)
. Step 2
Plug the vehicle power cable in the cig lighter, and plug the other end
to the DC port of the drive recorder.
9
.Step 3
After installation, you can tuck the surplus part of power cable inside
Column A.
.Step 4
Switch ON the power, three options will appear on the screen, wait
for 2~3 seconds till the options disappear, red light on the drive
recorder will start blinking to indicate that now is recording mode;
and you could use the menu screen to adjust the direction of the
camera to complete the installation. Please refer to page 21 for
reference, [USB IN],
10
Transmit the video to the vehicle monitor (AV
cable is optional purchase)
Video can be transmitted through AV IN interface if there are video
equipments (vehicle monitor, GPS, and Satellite TV, etc.). The
following is an example on transmitting the video to the monitor by
using GPS with build-in AV IN function
Please skip the steps if you do not have these equipments.
.Step 5
Insert the AV composite video connector to the video equipment,
plug the other end to USB port of the drive recorder, adjust the video
equipment to AV channel, and insert the vehicle power cable to
complete the installation.
When the AV Composite video connector is plugged in, the screen on
the main system will be temporarily shut off.
11
Transmit the video to LCD TV
You can also transmit the video from the drive recorder to your LCD
TV at home to playback the data or adjust the setting. The steps are
as follows:
1. Your video equipment should have AV IN or HDMI ports.
2. Connect AV cable (optional purchase) or HDMI cable to the video
equipment and the drive recorder.
3. Connect the home use transformer (optional purchase) to the drive
recorder and the house power socket.
4. Adjust the channel of the video equipment to AV or HDMI.
5. Installation completed.
When outputting the video files from the drive recorder, the screen
of the recorder will be temporarily shut off.
12
Component Descriptions
1. Infrared light switch button
Manually adjust the switch button to ON/OFF infrared light.
Turning ON the infrared light will enhance night vision effect and
turn the screen to black and white.
Infrared light ON
Infrared light OFF
2. MODE Button
When in standby status, button can be switched in circulation for
recording, photo and playback mode.
3. Power Button
Press for 2~3 sec. to switch ON or OFF the main power.
4. MENU Button
Press the button during standby status, functions of current mode
will appear.
13
5. Recording/Photo Button
Press the button when under recording mode to start/stop
recording.
Press the button when under photo mode to take picture.
6. Reset Button
When the system crashed owing to improper usage, press “reset”
button for shutdown action of drive recorder.
7. Direction Button/OK Button
Use this button to adjust UP/DOWN/LEFT/RIGHT to operate the
functions of recorder or select the menu.
Press the center of the button to operate any function of recorder.
14
Recharging
Step 1:
Please set “SCREEN SAVE” function to “5 seconds” (please refer to
page 33). sleep mode is set to avoid battery consumption during
recharging.
Step 2:
Vehicle use power cable or USB cable can be used for recharging.
Please connect the vehicle use power cable or USB cable provided
and connect to the cig lighter hole or computer.
Step 3:
The following screen will appear automatically when the connection
is made properly, please select “CHARGE” and press OK.
Step 4:
”Charging…” appeared on the screen indicates it is under recharging.
The screen will indicate “Battery Full” after completing recharging
and automatically turn off.
15
Menu Operation
Press “MENU” during recording mode.
Video Settings
◆SIZE
Video resolution can be configured during recording. Higher value
means higher resolution and better picture quality, but higher
capacity consumption at the same time.
FPS is Frame Per Second during recording. Higher FPS means
smoother video.
MENU Button→【
】MENU→【SIZE】→【1920x1080 】*/
【1440x1080】/【1280x720】/【848x480】
* Default
16
◆IMAGE FLIP
Turn the menu and image vertically to 180 degree. You can also install
the drive recorder upside down 180 degree to fit your requirement.
MENU Button→【
】MENU→【IMAGE FLIP】→【OFF】*/【ON】
* Default
17
◆COLOR MODE
The system will shift to set value under insufficient light condition to
enhance the night vision effect; “AUTO B/W” and “AUTO COLOR” will
shift to black and white or color mode automatically during
insufficient light condition; “B/W” mean black and white video
irrespective of any condition.
MENU Button→【
】MENU→【COLOR MODE】→【NORMAL】/
【AUTO B/W】*/【AUTO COLOR】/【B/W】
* Default
18
◆B/W LEVEL
When under “COLOR MODE”, the sensitivity of night vision auto
switch ON function can be adjusted according to user’s requirements.
High sensitivity means night vision mode will be switched ON under
slightly insufficient light condition
Low sensitivity means night vision mode will be switched ON under
severe insufficient light condition.
MENU button→【
】MENU→【B/W LEVEL】→【1】/【2】/【3】
*/【4】/【5】/【6】/【7】
* Default, Smaller the value mean higher the sensitivity
19
◆RECYCLE
Setting to circulated recording can allow new files to overwrite the
old files repeatedly to achieve uninterrupted recording
MENU button→【
】MENU→【RECYCLE】→【NO】/【1 min】
*/【3 mins】/【5 mins】/【10 mins】/【15 mins】/【30 mins】/
【45 mins】
*Default. Default value. To save the data every 1 minute, so each circulation will
overwrite 1 minute of old files.
20
◆USB IN
When the recorder is switched ON (using external power), ignore the
menu of external device connection, just wait for 2 sec. to enter
recording mode automatically and start recording.
MENU Button→【
】MENU→【USB IN】→【YES】*/【NO】
* Default
21
◆USB OUT
Recording will continue after turn off the engine.
“Power OFF”: switch OFF after turning off the engine to stop
recording.
”NO”: continue recording after turning off engine till the battery of
recorder is dead.
MENU Button→【
】MENU→【USB OUT】→【POWER OFF】*/
【15 mins】/【10 mins】/【5 mins】/【3 mins】/【NO】
* Default
22
◆MANUAL ON
When the recorder is switched ON manually (using internal battery),
it will automatically enter recording mode and start recording.
MENU Button→【
【RECORD】
】MENU→【MANUAL ON】→【STANDBY】*/
*Default
23
◆MD SENS.
When “POST REC” is ON, the sensitivity setting of automatic
recording on trigger can be adjusted according the user’s
requirement.
MENU Button→【
】MENU→【MD SENS.】→【OFF】*/【1】/
【2】/【3】/【4】/【5】/【6】/【7】/【8】
* Default
24
◆POST REC
When recording on trigger is set to ON, it will automatically detect
the changes on the screen, recording will start if the extend of
changes reaches the conditions of recording on trigger. Sensitivity of
recording on trigger can be set at “MD SENS.”.
Start: set the recording time for 5 sec,10 sec….1 min after recording
being triggered, the setting is the time of continuous recording after
recording was triggered. If recording on trigger conditions are
reached during recording, the recording time will be accumulated.
Stop: The screen need to be static during recording. Recording will
stop upon the setting, 1 minute of static screen need to be
maintained if the set recording time is 1 minute or cover the screen
with palm or cloth and press “recording button” to stop recording.
MENU Button→【
】MENU→【POST REC】→【OFF】*/【5 seconds】
/【10 seconds】/【15 seconds】/【30 seconds】/【1 min】
* Default
25
◆EV
If “EV” is adjusted to + side, you can avoid under-exposure, or dark
objects as shooting against a bright background. If “EV” is adjusted
to – side, then you can avoid over-exposure, or bright objects as
shooting against a dark background or at night.
MENU Button→【
】MENU→【EV】→
【-2.0】/【-1.7】/【-1.3】/【-1.0】*/【-0.7】/【-0.3】/【0】/【+0.3】
/【+0.7】/【+1.0】/【+1.7】/【+2.0】
* Default
26
◆WHITE B
Selecting [AUTO] under normal circumstances can choose white
balance. If [AUTO] mode cannot produce natural colors, please use
appropriate light conditions to change White Balance setting.
MENU Button→【
】MENU→【WHITE B】→【AUTO】*/
【FLUORESCENT】/【SUNNY】/【CLOUDY】/【TUNGSTEN】
* Default
27
◆CONTRAST
Contrast indicates the relativity of black and white colors on the
screen. The higher the contrast, the darker the dark color become
and brighter the bright color become. It is suitable for drive recorder
to identify the plate number.
MENU Button→【
*/【HARD】
】MENU→【CONTRAST】→【SOFT】
【
/ STANDARD】
* Default
28
◆SHARPNESS
Sharpness means the significant degree of contour image during
shooting. The higher the sharpness the more obvious the contour
image of characters and scene, it is very useful for face recognition
during drive recording.
MENU Button→【
】MENU→【SHARPNESS】→【SOFT】/
【STANDARD】/【HARD】*
*Default
29
◆EFFECT
The effect of this setting can achieve certain interest because changes
in color would be more apparent.
MENU Button→【
】MENU→【EFFECT】→【OFF】
【
/ MONOCHROME】
/【NEGATIVE】/【SEPIA】/【ART】/【VIVID】*
* Default
30
◆DURATION
The recorder will stop recording upon the default of recording.
MENU Button→【
】MENU→【DURATION】→【NO】*/【15 mins】
/【30 mins】/【45 mins】
*Default
31
◆QUALITY
Image quality can be adjusted through this value, the higher the
quality the better the picture, but higher capacity consumption at the
same time..
MENU Button→【
/【GOOD】
】MENU→【QUALITY】→【FINE】*/【NORMAL】
*Default
32
System Setting
◆SCREEN SAVE
When “SCREEN SAVE” is set, the screen will shut off after set time
and enter sleep mode; pressing any button will wake up the screen.
MENU Button→【
】MENU→【SCREEN SAVE】→【OFF】
【
/ 5 seconds】
*/【15 seconds】/【30 seconds】/【1 min】
* Default
33
◆DATE
Adjust to current time and date. (Standard time and date will be
updated automatically after GPS positioning is set, no need to adjust
the setting).
MENU Button→【
】Menu→【DATE】→Press OK to select Year,
Month, Day→Press left/right button to adjust the value→Press
MENU to save the settings.
34
◆CLOCK
Adjust to current time and date. (Standard time and date will be
updated automatically after GPS positioning is set, no need to adjust
the setting).
MENU Button→【
】Menu→【CLOCK】→Press OK to select Hour,
Minute→Press left/right button to adjust the value→ Press MENU to
save the settings.
35
◆DATE TYPE
Adjust date setting
D:Day
M:Month
Y:Year
MENU Button→【
】MENU→【DATE TYPE】→【DD/MM/YY】/
【YY/MM/DD】*/【MM/DD/YY】
*Default
36
◆STAMP
Through this function, you can select whether to show time and date
during recording.
MENU Button→【
】MENU→【STAMP】→【ON】*/【OFF】
*Default
37
◆OVER SPEED
When car speed exceeds the default, driving speed on the recording
screen will display “---”, which means no speed indication.
Before setting the speed limit, please adjust the settings of
“OSD-SPEED” to “KM/H” or “MPH”, please refer to page41
MENU Button→【
【250】
】MENU→【OVER SPEED】→【---】*/【5】~
*Default option: km/h
38
◆TIME ZONE
Taiwan is GMT +8, please set GMT to +8.
MENU Button→【
】MENU→【TIME ZONE】→【-12】/【-11】/
【-10】/【-9】/【-8】/【-7】/【-6】/【-5】/【-4】/【-3】/【-2】
/【-1】/【0】/【+1】/【+2】/【+3】/【+4】/【+5】/【+6】/【+7】
/【+8】*/【+9】/【+10】/【+11】/【+12】
*Default
39
◆OSD-COORD
Choose to display GPS coordinate information in videos through
OSD-COORD or not.
MENU Button→【
】MENU→【OSD-COORD】→【ON】*/【OFF】
*Default
40
◆OSD-SPEED
Choose whether to reveal the driving speed or not by this setting.
MENU Button→【
/【OFF】
】MENU→【OSD-SPEED】→【KM/H】*/【MPH】
*Default option: km/h
41
◆PLATE STAM
Choose whether to reveal the plate number or not by this setting.
MENU Button→【
】MENU→【PLATE STAM】→【ON】/【OFF】
*Default
42
◆PLATE SET
You can key in your plate number to the recorder. When “PLATE
STAM” is set to “ON”, your plate number will be displayed on the
screen.
MENU Botton→【
】MENU→【PLATE SET】→Press OK to enter
settings→Press direction button to select number and press OK→
Select “OK” on the top left corner to complete the setting.
43
◆MIC
For privacy reason, if you do not want the conversations being
recorded, you can choose to shut off voice recording, the video will
only record the image.
MENU Button→【
】MENU→【MIC】→【ON】*/【OFF】/【MANUAL】
*Default
*When setting is “MANUAL”, press left button after exit to select ON or OFF voice
recording; manually select default “ON” after restarting the system.
44
◆FORMAT
This function will delete all data in the memory card including
protected data.
When the memory card is used for a long period, too much data will
reduce the access efficiency. This function will optimize the access
speed of the memory card.
MENU Button→【
】MENU→【FORMAT】→【NO】*/【YES】
*Default
45
◆SYS. RESET
This function will reset all settings on the drive recorder to default
settings.
MENU Button→【
】MENU→【SYS. RESET】→【NO】*/【YES】
*Default
46
◆AUTO OFF
During standby status, if the setting “AUTO OFF” was set, it will
automatically shut off after set time.
MENU Button→【
】MENU→【AUTO OFF】→【OFF】*/【1 min】
/【3 mins】/【5 mins】
*Default
47
◆VOLUME
Volume of menu operating and video playback can be adjusted.
MENU Button→【
】MENU→【VOLUME】→【0】*/【1】/【2】
/【3】/【4】/【5】*/【6】/【7】/【8】
*Default is the direct proportion of number to volume
48
◆LIGHT FREQ
Select 50Hz if the power voltage of the country is 220V. Select 60Hz if
the power voltage is 50Hz.
MENU Button→【
】MENU→【LIGHT FREQ】→【60Hz】*/【50Hz】
*Default
49
◆LANGUAGE
Use this setting to adjust the menu to your preferred language.
MENU Button→【
】MENU→【LANGUAGE】→【English】/【简
体中文】/【繁體中文】*
*Default
50
◆VERSION
View the firmware version of the drive recorder.
MENU Button→【
】MENU→【VERSION】*
*The version number during factory shipment will be considered as
the original version.
51
Video Playback
Please press MODE button to enter video playback mode.
◆Preview
Up
Down
Left
Right
OK
N/A
Video Index
Previous Clip
Next Clip
Play Video
52
◆Play
Up
Down
Left
Right
OK
Volume Up
Volume Down
Reverse playing 2X, 4X 8X
Fast forward playing 2X, 4X, 8X
Hold (press REC button to take photo)
53
◆DELETE
Delete the single video clip being selected.
MENU Button→【
】MENU→【DELETE】→【NO】*/【YES】→
Operation starts after pressing the OK button
*Default
54
◆SLIDE SHOW
Video clips can be played continuously. Setting [1 second] means,
after the video is over, it will pause for 1 second before playing the
next video clip.
MENU Button→【
】MENU→【SLIDE SHOW】→【NO】*/【1 second】
/【3 seconds】/【5 seconds】
*Default
55
◆MEMORY
Select “CARD” or “INTERNAL” to save or read files, if SD card is not
installed, it will automatically select “INTERNAL” to access files.
56
◆COPY
If the current【MEMORY】is【CARD】
,selecting【COPY】will allow the
file to be coped from【CARD】to【INTERNAL】.
If the current【MEMORY】is【INTERNAL】
,selecting【COPY】will allow
the file to be copied from【INTERNAL】to【CARD】.
MENU Button→【
OK to start.
】MENU→【COPY】→【NO】*/【YES】→Press
*Default
57
Additional functions
◆File protection function
Set the recording file to protection mode, the file will not be
overwritten during circulated recording.
Set the file to Protection mode:
Recording->Press OK->
sign will appear on the top right corner of
the screen -> the file had been set to Protection mode.
Cancel file protection:
During setting file protection, in order to protect the current file
under recording, file protection will be cancelled automatically after
the file recording had been done.
sign appeared on the up right corner on the screen -> Press OK ->
Cancel file protection.
◆GPS Positioning
When the drive recorder is switched ON, it will start detecting GPS
signal, a
sign will appear on the up side of the screen to indicate
positioning completed.
After positioning, speed and coordinates will be displayed on the
recording video.
GPS signal stability will be affected by weather conditions, tunnel,
basement, etc,. The phenomenon will not affect drive recording
function, please wait patiently or restart your drive recorder or go to
open spaces to complete positioning.
58
◆DIVIDE FUNCTION
You can edit the video files conveniently and swiftly and save the
portions of file needed.
Function Start
Press “MODE” to switch to playback mode, select the portions to be
edited, press “REC” for 2 sec. during video preview (page 52), “A-B”
icon will appear on the bottom lower left corner on the screen to
indicate the function is ON, press “REC” for 2 sec. to OFF this
function.
DIRECT
You can divide the video file from A position to two portions while
keeping the original file intact.
DIRECT
Function Start -> Press OK to play video -> Press OK to halt playing
after selecting A position -> Press REC to select A position-> Press REC
for 2 seconds, exit Edit panel -> Select “DIVIDE” -> Select “DIRECT” ->
Complete dividing.
59
NEW FILE
You can select portion from A position to B position while keeping the
original file.
NEW FILE
* Please check whether there is sufficient storage space left.
* The minimum time of extracted file is 5 seconds.
Function start -> Press OK to play the video -> Press OK to halt playing
after selecting A position -> Press REC, A position is selected -> Press
OK to play video -> Press OK to halt playing after deciding B position
->Press REC to select B position -> Press REC to exit edit panel ->
Select “NEW FILE” -> Extraction is completed.
60
Connecting to PC
.Step 1
Please insert SD card to drive recorder (page 8)
.Step 2
Connect USB cable to drive recorder and plug the other end to USB
port on PC.
.Step 3
Switch ON the PC recorder after connecting properly, the following
screen will appear, please select “MSC” and press OK.
.Step 4
Now there will be two removable disks appearing on the PC, you can
access the files through SD card or internal storage.
61
Q&A
Q: Why GPS of the drive recorder is unable to complete positioning?
The screen without
means means GPS is still positioning. GPS
signal will be affected by the elements like, weather conditions,
tunnel, basement, etc and even the signal strength will be affted. This
phenomenon will not affect your drive recorder, please wait patiently
or you can restart the drive recorder or go to open spaces to
complete positioning.
Q: How to achieve the best quality resolution?
A:
1.Keep the windshield and the lens clean (Please refer page63).
2. Please adjust the following parameters in Image Param (Please
refer page16).
Video resolution
1920x1080
Digital effect
Vivid
EV
-1.0
Contrast
Hard
Sharpness
Hard
Q: Why drive recording did not start after switching ON drive
recorder?
A: Below conditions could be the cause: 1. Recording function is not
started (page 21). 2. All files inside the storage are protected files and
caused circulated recording to stop, please copy and save the files or
format the storage (page 45). If the methods mentioned above does
not work, please contact our dealer or original factory for repair.
62
Q: How to play MOV file? Why is there only audio but no video?
A: It is because your computer does not have the encoder needed to
play high definition video. Please search “K-Lite Codec Pack” in search
engines, download and install the encoder; you will be able to play
the file after installation.
Q: How to maintain the lens? Can we use alcohol on it?
A: Please do not use toilet paper, alcohol, stain cleaner, and gasoline,
etc. to rub the lens. On the lens is a thin plating film, which is to
prevent unnecessary light wave from entering the camera. Improper
rubbing will cause tear or scar on the lens.
Please use lens wiper or clothe with minimum clean liquid specified
for lens and wipe in concentric circles.
Q: How to acquire DOD player?
A: After connecting recorder and PC (please refer to page 61),
“HDPLAYER” folder will appear on the storage, enter the folder and
double click HDPLAYER.EXE for installation.
Or you can visit DOD official website to download
http://www.dod-tec.com/zh-tw/downloads.php
Q: What type of SD card to select for use?
A: Suggests to use SDHC CLASS6 type or advanced SDHC SD card,
please do not use MICRO SD card with external SD converter.
63
Related Parameters
Video Recording Time (For Reference)
1920x1080(30FPS)
1440x1080(30FPS)
1280x720(30FPS)
848x480(60FPS)
1G
17
mins
27
mins
34
mins
35
mins
2G
34
mins
54
mins
68
mins
70
mins
Memory card(GB)
4G
8G
68
136
mins
mins
108
216
mins
mins
136
272
mins
mins
140
280
mins
mins
※Recording time will be different based on different host devices,
memory card brands and other settings.
Requirement of playing Full HD 1080P and
720P
.Windows ® XP (Service Pack 2 at least)or Vista
.3.2GHz Pentium 4 at least
.Direct X 9.0c at least
.RAM with more than 1GB capacity
.VGA card with the RAM with at least 256MB
64
Product Specifications
Type
Sensor
Camera angle
Amount of IR LED
Distance of infrared
beam
GPS
Video output
Format
DPI
MEPG
Storage medium
USB
Battery
Imposition of date /
time on video
Size
Weight
Voltage
Working humidity
/Temperature
GSE580
CMOS of 5 mega-pixel
90~120 degree
4 PCS
Over 5 meters
Yes, with GPS receiving module as build-in
function
Support 1080i/720p video output
Formal: NTSC/PAL
MOV
1920x1080(30fps)、1440x1080(30fps)
1280x720(30fps)、848x480(60fps)
H.264
SD Card(up to 32GB)
Micro USB 2.0
A build-in high capacity lithium battery of
3.7V 1300mAh
Yes
95mm X 60mm X 37mm
138g
DC 12-24V
10%~80%/-10℃~70℃
※Actual specifications depend on factory announcement. No further notice will be
provided in case of any change.
65


![[1 ] Oracle® Enterprise Manager](http://vs1.manualzilla.com/store/data/005669073_1-0396df232df5e560fdd03210f5126330-150x150.png)