1
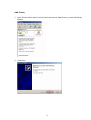
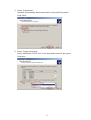
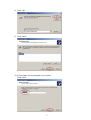
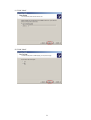
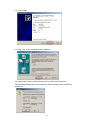
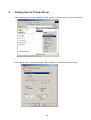
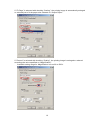
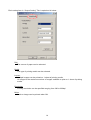
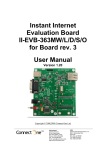
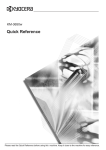
Printer Driver
User’s Manual
Regarding this manual
This manual explains how to install Windows Printer Driver and how to use it.
This Printer Driver can be used with Microsoft Windows 2000 and Windows XP.
1
Index
1.
INSTALLATION METHOD ......................................................................................3
2.
SETTING ITEM OF PRINTER DRIVER ..........................................................10
2
1.
Installation Method
Install TCP/IP Port
1. Insert Installation Disk in CD-ROM driver.
2. Open “(the optical drive)\Software\PrinterDriver\Port\” and run
“KM3650wTcpMon_100.exe”.
3. Click Start.
4. Click Finish.
3
Add Printer
1. Open Printer folder within Control Panel and launch “Add Printer” to start Add Printer
Wizard.
2. Click Next.
4
3. Select “Local printer”.
Uncheck “Automatically detect and install my Plug and Play printer”.
Click “Next”.
4. Select “Create a new port”.
Select “KM-3650w TCP/IP Port” in the drop-down menu for port types.
Click Next.
5
5. Enter the KM-3650w’s IP address or host name.
Click “OK”.
6. Click “Have Disk”.
7. Specify “KM36PR.inf” at “(the optical drive)\Software\PrinterDriver\”
Click Open.
6
8. Click “OK”.
9. Click “Next”.
10. Printer name can be changed at your option.
Click “Next”.
7
11. Click “Next”.
12. Click “Next”.
8
13. Click “Finish”.
14. Click “Yes” if the following window appears.
To reinstall the printer, delete the printer first, and install the printer.
The following dialog pops up automatically when updating the Port Monitor.
Select Yes.
9
2.
Setting item of Printer Driver
Select the printer you have installed by right clicking, and then open “Printing Preference”.
Each setting item in “General Setting” Tab is explained on and after the next page.
10
Paper Size
Specify the size of paper used for printing.
If “Custom Paper Size” is selected in the above setting, the following dialog is indicated.
A paper size can be specified at your option within the following range.
Width: 100 mm to 914.4 mm
Height: longer than 100 mm
11
If “Fit Page” is selected with checking “Scaling”, the printing image is automatically enlarged
or reduced just to fit the paper size selected on “Output Paper”.
If “Percent” is selected with checking “Scaling”, the printing image is enlarged or reduced
according the value specified on “Magnification”.
Available setting range for Magnification is from 20 to 500%.
12
Direction
Orientation of paper can be selected.
The printing image is rotated in a 180 degrees arc revolution against the paper.
Copies
Number of prints can be specified ranging from 1 to 999.
Checking “Collate” enables to print sets with collating.
13
Each setting item in “Output Setting” Tab is explained in below.
Roll
The source of paper can be selected.
Media
The type of printing media can be selected.
Layout:
Multiple images can be printed on 1 sheet of printing media.
16 images is the maximum number of images available to print on 1 sheet of printing
media.
Resolution
Printing resolution can be specified ranging from 300 to 600dpi.
Mirror
A mirror image can be printed when ON.
14
Printer Driver User’s Manual
2006.3 Rev. 1.0
The Copyright Act protects this manual.
It is prohibited to copy or duplicate all or a part of this manual without permission.
15