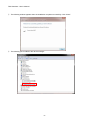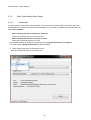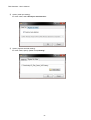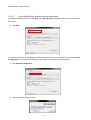
1
TSA−IC300/301 User’Manual
TSA-IC300/301
User’s Manual
Tessera Technology Inc.
Rev: 1.1
TS-TUM01755
2013/7/5
-1-
TSA-IC300/301 User’s Manual
Contents
1.
2.
Overview........................................................................................................................................................5
1.1
Document Overview ........................................................................................................................................... 5
1.2
Related Terminology .......................................................................................................................................... 5
1.3
TSA-IC300 and TSA-IC301 Features ................................................................................................................ 5
1.4
Product Overview ............................................................................................................................................... 6
Hardware .......................................................................................................................................................8
2.1
Hardware Specifications ..................................................................................................................................... 8
2.2
Block Diagram.................................................................................................................................................... 9
2.3
Description of Key Components....................................................................................................................... 10
2.4
Board Functions................................................................................................................................................ 12
2.4.1
Power Supply........................................................................................................................................... 12
2.4.2
Board Connection Mode and Switch Setting ........................................................................................... 14
2.4.3
Evaluation Circuit.................................................................................................................................... 16
2.4.3.1
Switches................................................................................................................................................... 16
2.4.3.2
Clock........................................................................................................................................................ 17
2.4.3.3
Current Consumption Measurement Terminals ....................................................................................... 18
2.4.3.4
Universal Area ......................................................................................................................................... 20
2.4.3.5
Smart Analog IC ...................................................................................................................................... 21
2.4.4
3.
Connectors ............................................................................................................................................... 23
2.4.4.1
External Power Supply Connector........................................................................................................... 23
2.4.4.2
USB I/F Connector .................................................................................................................................. 24
2.4.4.3
E1 Emulator I/F Connector...................................................................................................................... 25
2.4.4.4
EB-RL78/G1A-EB-IC30x Connectors .................................................................................................... 26
2.4.4.5
Sensor Extension I/F Connector .............................................................................................................. 28
2.4.4.6
MCU Extension I/F Connector ................................................................................................................ 31
Confirmation of On-board Hall Sensor Operations .....................................................................................33
3.1
Tutorial using Smart Analog Easy Starter ........................................................................................................ 33
3.1.1
Set Up Smart Analog Easy Starter........................................................................................................... 34
3.1.1.1
PC OS environment for Smart Analog Easy Starter................................................................................ 34
3.1.1.2
File structure of Smart Analog Easy Starter ............................................................................................ 34
3.1.1.3
Install the USB driver for Smart Analog Easy Starter ............................................................................. 35
3.1.2
Start Smart Analog Easy Starter .............................................................................................................. 38
3.1.2.1
Initialization............................................................................................................................................. 38
3.1.2.2
Registers and target device settings ......................................................................................................... 40
3.1.2.3
Smart Analog Easy Starter operating instructions ................................................................................... 41
3.1.2.4
How to save the register setup files ......................................................................................................... 42
-2-
TSA-IC300/301 User’s Manual
3.1.3
4.
Debugging with CubeSuite+........................................................................................................................50
4.1
Creating a project with CubeSuite+.................................................................................................................. 50
4.2
Debugging Setup .............................................................................................................................................. 59
4.2.1
When using the USB I/F connector ......................................................................................................... 59
4.2.2
When using the E1 I/F connector............................................................................................................. 60
4.3
5.
Debugging with CubeSuite+............................................................................................................................. 61
Programming the CPU with the Renesas Flash Programmer.....................................................................63
5.1
Creating a workspace in RFP............................................................................................................................ 63
5.2
CPU Programming Setup.................................................................................................................................. 70
5.2.1
When using the USB I/F connector ......................................................................................................... 70
5.2.2
When using the E1 I/F connector............................................................................................................. 71
5.3
6.
Confirm Smart Analog Easy Starter Operations on TSA-IC30x ............................................................. 44
Programming the CPU with RFP...................................................................................................................... 72
Hardware Documentation............................................................................................................................75
6.1
Circuit diagrams................................................................................................................................................ 75
6.2
Component List ................................................................................................................................................ 83
6.3
Board Dimensions ............................................................................................................................................ 86
6.4
Component Layout ........................................................................................................................................... 88
-3-
TSA-IC300/301 User’s Manual
Cautionary Notes
・
The contents of this document are subject to change without prior notice.
・
Reproduction of this document in any format is prohibited without written permission from Tessera Technology Inc.
(herein, “ the Company”)
・
The company shall not be liable for any mistakes contained in this document.
・
The company shall not be liable for the infringement of third party patent, copyrights, or other intellectual property
rights arising from the use of Tessera Technology products listed in this document. The company does grant any
rights concerning Tessera Technology or third party patents, copyrights, or other intellectual property rights based on
this material.
・
Circuitry, software or related information included in this document is provided as semiconductor product operation
examples and application examples. The user is responsible for the appropriate application of the circuitry, software
or related information when designing equipment. The company shall not be liable for loss or damage incurred by
the user or other third party based on the use of this circuitry, software or related information.
・
Please handle this product as you would a CMOS device. The user should be particularly careful to protect
him/herself from accumulated static electricity when using this product.
・
Make sure all test and measurement equipment, including the work station, is properly grounded.
・
The user should wear an ESD wrist strap to prevent any buildup of static electricity.
・
Do not touch the device pins with bare hands.
・
-4-
TSA-IC300/301 User’s Manual
1.
Overview
1.1
Document Overview
This document provides the hardware specifications, software configuration, and USB driver installation
instructions for Tessera Smart Analog evaluation boards TSA-IC300 and TSA-IC301. It also provides an
example analog front end (AFE) circuit design using an on-board Hall sensor. Unless otherwise stated, all
information here is applicable to both TSA-IC300 and TSA-IC301.
1.2
Related Terminology
This manual uses the following terms in explanations of hardware specifications and software descriptions.
Table 1.1 Terminology
Term
Smart Analog
Smart Analog IC
●
Product lineup with software configurable circuits and characteristics
supporting various types of sensors and drivers.
Smart Analog silicon molded in a plastic package.
Smart Analog IC300
Renesas Electronics Smart Analog IC300
- Circuit type: configurable
- Part number: RAA730300
Smart Analog IC301
Renesas Electronics Corp. Smart Analog IC301
- Circuit type: general-purpose instrumentation amplifier
- Part number: RAA730301
Smart Analog Easy Starter
Renesas Electronics Smart Analog evaluation tool, also called SA
Easy Starter
E1 Emulator
Renesas Electronics on-chip debugging emulator, also works as a
Flash programmer (sold separately)
CubeSuite+
Integrated development environment for developing and debugging
Renesas Electronic MCU software
Renesas Flash Programmer
(RFP)
1.3
Definition
Programming software tool for Renesas Electronics Flash MCUs
TSA-IC300 and TSA-IC301 Features
Dedicated for Renesas Electronics Smart Analog IC evaluation
(TSA-IC300 is for evaluating Smart Analog IC RAA730300; TSA-IC301 is for evaluating Smart Analog IC
RAA730301)
●
RL78/G1A (F5F1ELEAFB) MCU is employed for on-board Smart Analog IC control
●
Power supply: select power from USB, external supply, or E1
●
Comes mounted with Hall sensor (HW-300B manufactured by Asahi Kasai Microdevices)
●
Monitor sensor operations using Smart Analog Easy Starter software
●
Expandable for additional sensors
-5-
TSA-IC300/301 User’s Manual
1.4
Product Overview
This product is configured with the following.
・ TSA-IC30x board
・ User’s Manual
・ Related documentation
Includes download URL for Usage Notes and Smart Analog Easy Starter
Please read these documents before using the TSA board.
・ USB cable (Mini-B type)
The board’s external picture is shown in Figure 1.1.
Figure 1.1 TSA-IC30x External Picture
-6-
TSA-IC300/301 User’s Manual
Figure 1.2 shows an example of TSA board operations. Engineers can readily use Smart Analog Easy
Starter PC software to configure parameters and connections of the RAA730300/RAA730300 analog
blocks.
GUI(Smart Analog Easy Starter)
Circuit
design
Waveform
observation
PC
TSA-IC300
USB Cable
Figure 1.2 TSA Board User Operation Setup
-7-
TSA-IC300/301 User’s Manual
2.
Hardware
2.1
Hardware Specifications
Table 2.1 shows the hardware specifications for the TSA board.
Table 2.1 Hardware Specifications for TSA-IC300/TSA-IC301
Spec Item
Product
configuration
Mounted Smart
Analog IC
Description
TSA-IC300
Double-deck configuration:
CPU board (EB-RL78/G1A) + Smart Analog board (EB-IC300)
TSA-IC301
Double-deck configuration:
CPU board (EB-RL78/G1A) + Smart Analog board (EB-IC301)
TSA-IC300
Renesas Electronics Smart Analog IC300
- Part number: RAA730300
- Circuit type: configurable
TSA-IC301
Renesas Electronics Smart Analog IC301
-Part number: RAA730301
-Circuit type: general-purpose instrumentation amplifier
CPU
Mounted CPU
Renesas Electronics RL78/G1A MCU
-Part number: R5F10ELEAFB
- Memory size: Flash ROM 64KB / RAM 4KB / Data Flash 4KB
Mounted CPU
frequency
Main system clock: High-speed on-chip oscillator 1 to 32 MHz
Low-speed on-chip oscillator 15 kHz
Sub-system clock: oscillator 32.768 kHz
Interface
Sensor input pins
Supply Voltage
Display
Mounted sensor
Dimensions
USB Connector(Mini-B)
External power-supply connector
E1 emulator connector
Sensor extension I/F connector (50 pins)
MCU extension I/F connector (50 pins)
TSA-IC300
12 pins: MPXIN10/11/20/21/30/31/40/41/50/51/60/61
Input up to (AVDD1+0.1)V in rail-to-rail input mode
Input voltage when using P-ch single input mode: AVDD1 - 1.4 V
TSA-IC301
Three sets of differential input: AMPINP0/AMPINM0,
AMPINP1/AMPINM1, and AMPINP2/AMPINM2
Input voltage when using rail-to-rail input mode: AVDD1 + 0.1 V
Input voltage when using P-ch single input mode: AVDD1 - 1.4 V
+5.0V (USB bus power/external power supply) or +3.3V (from E1)
LED
Hall Sensor HW-300B (Asahi Kasai Microdevices)
Board dimensions
100 x 65 x15mm(W x D x H)
-8-
TSA-IC300/301 User’s Manual
2.2
Block Diagram
The TSA-IC300/301 block diagram is shown below.
XTAL2
(32.768KHz)
CPU other signals
SPI
USB I/F
MCU
(RL78/G1A)
UART
(78K0 USB)
Analog etc.
External Power
Supply Connector
Board Connection Mode
Circut
3.3V
5V
Power
(3.3V)
3.3V
E1 I/F
Connector
Reset
SW
EB-RL78/G1A EB-IC30x Connector
USB-CN
(MiniB)
USBVDD
Universal Area
SAIC
(SAIC300/301)
Sensor Extension I/F
Connector
(50pin)
XTAL1
(unmount)
EB-IC30x
MCU Extension I/F
Connector
(50pin)
EB-RL78/G1A
3.3V
Sensor
HW-300B
Analog power
connector
3.3V
Sensor power
connector
3.3V
Figure 2.1 TSA-IC300/301 Block Diagram
The TSA-IC30x is a double-decked board configuration. The bottom board, EB-RL78/G1A, employs the
RL78/G1A MCU for configuring Smart Analog ICs. The top board, EB-IC300/301, employs Smart Analog
IC300/IC301, respectively. Power supply can be selected from the USB bus power, external power supply or
E1 power. Connectors are provided for powering analog circuits and sensor devices externally.
-9-
TSA-IC300/301 User’s Manual
2.3
Description of Key Components
Key components comprising EB-RL78/G1A are described below.
①
⑪
②
⑫
③
④
⑤
⑬
⑩
⑥
⑧
⑨
⑦
Figure 2.2 EB-RL78/G1A Key Component Positions
No.
Ref.
Component
Function
①
SW4
Reset switch
②
CN10
E1 I/F connector
③
LED1
USB power supply LED
④
CN1
USB I/F connector
Connector for USB (Mini-B) cable connection
⑤
J1
External power jack
Power jack for connection to external power source
JP1
⑥
JP2
⑦
⑧
LED2
SW1
SW2
⑨
SW3
⑩
IC3
⑪
JP3
⑫
IC7
⑬
XTAL1
XTAL2
+5V/power supply select
jumper
Digital power supply select
jumper
External power supply LED
Mode switches
Board reset switch
Connector for connecting the E1 emulator
Turns on when USB power is supplied
Selects main power supply
Selects RL78/G1A digital power supply
Turns on when external power is supplied via power jack
Must be configured according to the debug application software used on
the PC.
Function switch
Switch connected to INTP0 pin on RL78/G1A
USB controller
USB controller (μPD78F0730MC-CAB-AX)
Analog power supply select
jumper
CPU
Clock
Selects RL78/G1A analog power supply
RL78/G1A
3-pin oscillator (not mounted) for main clock
32.768 kHz oscillator for sub-clock
-10-
TSA-IC300/301 User’s Manual
Key components comprising EB-IC30x are described below.
①
⑧
②
⑤
⑦
⑥
④
③
⑨
Figure 2.3 EB-IC30x Key Component Positions
No.
Ref.
Component
①
−
Universal area
②
CN2
Sensor power connector
③
④
Connector for supplying power to sensors (not mounted)
Connector for connecting an external analog power supply (not
CN1
Analog power connector
JP3
Sensor power supply selection jumper
Selects one of two power supplies for Hall sensor
JP4
Analog power supply selection jumper
Selects one of two power supplies for Smart Analog IC
JP5
⑤
Function
Area for mounting additional sensors
Analog power supply select jumper
RL78/G1A
LED1
Digital power-charged LED
LED2
Analog power-charged LED
⑥
IC1
Smart Analog IC
S1
Sensor
⑦
JP1
JP2
⑧
TH1
⑨
TH2
mounted)
Selects one from three power supply sources for the RL78/G1A
analog block.
Turns on when the digital power is supplied
Turns on when the analog power is supplied
Smart Analog IC300 or 301
Hall Sensor HW-300B
Sensor connection jumper
For connecting Smart Analog IC and the mounted sensor
MCU extension I/F connector
Connector for adding an external smart analog IC board.
Sensor extension I/F connector
Connector for adding an external sensor board
-11-
TSA-IC300/301 User’s Manual
2.4
Board Functions
2.4.1
Power Supply
Various power sources can be used for digital and analog powers of the SA-IC MCU and sensor on the TSA
board. Jumpers J1 to J5 define the power supply selection.
Table 2.2 Settings for Power Supply Selections
Board
JP
JP1
EB-RL78/G1A
JP2
JP3
JP3
Power supply
destination
Function
+5V Select
JP
Setting
Name of power
supply source
①-②
VBUS
②-③
DVDD_EXT
External power jack (J1)
①-②
Regulator Output
+3.3V Regulator Output.
OPEN
E1 Power
①-②
SHIELD_AVDD
Power that is selected in the JP5 of EBIC300/301.
②-③
DVDD
Power that is selected in the JP2 of EBRL78/G1A.
①-②
LDO_OUT
②-③
SVCC_EXT
Sensor power connector (CN2) ※3
①-②
AVDD_EXT
Analog power connector (CN1)
②-③
AVDD_F
Power that is selected in the JP2 of EBRL78/G1A.
①-③
AVDD_F
Power that is selected in the JP2 of EBRL78/G1A.
③-④
AVDD_EXT
③-⑤
LDO_OUT
+5V
DVDD Select
EB-IC30x
JP5
USB power supply.
DVDD
(RL78/G1A digital power)
AVDD2 Select
Power supplied from the E1 emulator.
(+3.3V※1)
AVDD2
(RL78/G1A analog power)
Sensor Power Select
SVCC
AVDD1 Select
JP4
Power supply source
AVDD1
(Smart Analog IC300/301 Analog
Power)
SHIELD_AVDD Select
( RL78/G1A Analog Power)
SHIELD_AVDD
LDO output supply of Smart Analog IC. ※2
Analog power connector (CN1)
LDO output supply of Smart Analog IC. ※2
■ Jumpers on the EB-RL78/G1A board
■ Jumpers on the EB-IC30x board
※1 When using E1 power feed: Use +3.3V from the E1 emulator. Do not use +5V output.
※2 Adjust the LDO output not to exceed +2V.
※3 Apply power not to exceed +2V.
5V
CN1
5V
External power
J1
3.3V
E1 I/F
CN10
EB-RL78/G1A
EB-IC30x
JP1
USB Suppy
1
5V→3.3V
2
Regulator
3
JP2
1
Digital
Analog Power CN
JP5
VDD
DVDD
JP3 ③ ② ①
AVDD2
3.3V
AVDD_F
Filter
2
1
2
3
4
5
6
CN1
AVDD_EXT
2V
SHIELD_AVDD
DVDD
Senser Power CN
JP4 ③ ② ①
CN2
AVDD1
SVCC
DVDD
LOGIC
AVDD
DVDD
AVDD
SPI
LDO
ADC
AVDD
JP3
① ② ③
LDO_OUT
2.8V
2V
JP1
Sensor(HW-
AFE
JP2
RL78/G1A
Smart Analog IC30x
Figure 2.4 Power Supply Source Selection Diagram
-12-
TSA-IC300/301 User’s Manual
The following table shows the jumper settings on the EB-RL78/G1A board corresponding to power sources
used for the TSA board.
Table 2.3 Digital Power Selection (on EB-RL78/G1A)
Digital power supply source
USB power supply
Power supply from external power jack.
Power supply from the E1 emulator.
JP Setting
JP1
JP2
①-② SHORT
①-② SHORT
②-③ SHORT
①-② SHORT
OPEN
①-② SHORT
OPEN
②-③ SHORT
The following table shows jumper settings on the EB-IC30x board corresponding to power sources used for
the on-board sensor.
Table 2.4 Power Supply Selection for On-board Sensor (on EB-IC30x)
JP Setting
JP3
Sensor power supply source
Power supply from the LDO regulator of Smart Analog IC.
①-② SHORT
Power supply from Sensor power connector (CN2)
②-③ SHORT
The following table shows jumper settings for power sources used for the analog block of the RL78/G1A
MCU.
Table 2.5 Analog Power Supply Selection for RL78G/G1A Analog Block (on both EB-RL78/G1A and
EB-IC30x)
RL78/G1A Analog Power supply source
Power supply from digital power that passes through the filter.
Power supply from Analog power connector (CN1)
Power supply from Sensor power connector (CN2)
Power supply from digital power.
JP Setting
JP5
JP3
①-③ SHORT
①-② SHORT
③-④ SHORT
③-⑤ SHORT
One of the above
①-② SHORT
①-② SHORT
②-③ SHORT
Specific LEDs turn on when the corresponding power is fed to the boards. The following table lists each board,
LEDs and respective power supply selection status.
Table 2.6 LED and Power Supply Status
Board
EB-RL78/G1A
EB-IC30x
LED
Power Source to Turn on respective LED
LED1
Connected to PC via USB cable (USB-bus power feed)
LED2
+5V applied via an external power jack (external power feed)
LED1
DVDD power applied
LED2
AVDD1 power applied
-13-
TSA-IC300/301 User’s Manual
2.4.2
Board Connection Mode and Switch Setting
The TSA evaluation board allows the user to switch the PC connection modes by setting SW1 and SW2 to
enable USB connection with various evaluation and development tools. Table 2.7 provides a description of
each connection mode and Table 2.8 shows the various settings. Default settings at shipping are indicated in
bold characters in Table 2.8.
Table 2.7 Board Connection Modes
Connection
Mode
Description of Operation
UART
This mode is used for connecting the PC and RL78/G1A in UART. It must be selected when
using the Smart Analog Easy Starter software and a user program.
OCD
This mode is used for connecting the PC and the board via USB when writing a program to the
CPU or debugging. This mode must be selected when using CubeSuite+ (EZ Emulator).
Table 2.8 モード設定 Connection Mode Settings
Connection
Mode
Applicable Board
UART
EB-RL78/G1A
OCD
Switch Setting
Applicable
Software Tools
SW1-2 = ON
SW1-1 = OFF
SW2 = UART
Smart Analog Easy
Starter
SW1-2 = OFF
SW1-1 = ON
SW2 = OCD
*Do not use switch combinations other than listed above.
*Use UART mode when using the E1 Emulator.
-14-
Functions
SA-IC default firmware is
pre-programmed before
shipment
CubeSuite+
(EZ Emulator)
Uses “78K0 USB” MCU
controller for simple
debugging and flash
programming
RFP (COMx)
Uses “78K0 USB” MCU
controller for flash
programming
TSA-IC300/301 User’s Manual
Figure 2.5 Mode Switch: UART Mode
Figure 2.6 Mode Switch: OCD Mode
-15-
TSA-IC300/301 User’s Manual
2.4.3
Evaluation Circuit
The following describes the evaluation circuit mounted on the TSA board.
2.4.3.1
Switches
Table 2.9 Switch Functions
Board
Ref.
EB-RL78/G1A
Function
SW1
OCD/UART mode selection switch 1
Refer to 2.4.2 Connection Mode and Switch Setting for more details
SW2
OCD/UART mode selection switch 2
Refer to 2.4.2 Connection Mode and Switch Setting for more details
SW3
Connected to INTP0 pin on RL78/G1A
When the switch is open, the INTP0 pin input level is high; when pushed, the INTP0
input level turns to low.
SW4
Switch connected to RESET pin on the RL78/G1A MCU
When the switch is open, the RESET pin is high. And when pushed, the RESET pin
turns low to enable the CPU reset.
*SW4 cannot be used when using EZ Emulator. Use the debugger reset instead.
SW4:Reset switch
SW1/SW2:Mode switches
Figure 2.7 Switch Positions
-16-
SW3:Function switch
TSA-IC300/301 User’s Manual
2.4.3.2
Clock
The on-board MCU (RL78/G1A) on the TSA board has a built-in high-speed on-chip oscillator that serves as
the system clock. As use of the built-in high-speed oscillator circuit is expected, the board does not offer a
mounted resonator as the default. However, the board includes patterns (XTAL1) for adding a resonator when
needed to meet higher frequency or frequency precision requirements. The patterns can accommodate a
lead-type 2- or 3-terminal resonator. The board also includes an XTAL2 (32.768 kHz) resonator as the
sub-clock.
XTAL1 :Main clock
XTAL2 :Sub clock
Figure 2.8 Clock Positions
-17-
TSA-IC300/301 User’s Manual
2.4.3.3
Current Consumption Measurement Terminals
The TSA board is designed with measurement terminals for measuring the current consumption of the
mounted device (CPU/Smart Analog IC). Before taking measurements, remove the 0Ω resistor.
TP1
TP2
DVDD
RL78/G1A
EF1
VDD
R16
EVDD0
0Ω
DVDD
Figure 2.9 EB-RL78/G1A CPU Current Measurement Terminals (DVDD)
TP3
RL78/G1A
TP4
AVDD2
EF2
AVDD
R22
0Ω
AVDD2
Figure 2.10 EB-RL78/G1A Current Measurement Terminals (AVDD2)
-18-
TSA-IC300/301 User’s Manual
DVDD
TP3
TP4
DVDD
RAA730300
EF2
DVDD
R2
0Ω
TP1
TP2
AVDD1
RAA730300
EF1
AVDD1
AVDD1
R1
AVDD2
0Ω
AVDD3
Figure 2.11 EB-IC300 Current Measurement Terminals (DVDD/AVDD1)
TP3
DVDD
TP4
DVDD
RAA730301
EF2
DVDD
R2
0Ω
TP1
TP2
AVDD1
RAA730301
EF1
AVDD1
AVDD1
R1
AVDD2
0Ω
Figure 2.12 EB-IC301 Current Measurement Terminals (DVDD/AVDD1)
-19-
TSA-IC300/301 User’s Manual
2.4.3.4
Universal Area
EB-IC30x includes a universal area for expansion use. The design includes analog power AVDD1 and GND
pin holes, making modifications quick and easy.
Figure 2.13 EB-IC30x Universal Area
Connector on the
bottom to interfere
GND
AVDD1
Through-hole are connected.
External power jack
on the bottom to
interfere.
Figure 2.14 Universal Area Expansion
-20-
TSA-IC300/301 User’s Manual
2.4.3.5
Smart Analog IC
The following table shows where SA-IC pins are connected.
Table 2.10 EB-IC300 Smart Analog IC300 Pin Connections
Smart Analog
IC300
Pin No.
Smart Analog IC300
Pin name
Singnal name
EB-IC300
Connection destination
1
2
3
4
5
6
7
8
9
10
11
12
13
14
15
16
17
18
19
20
21
22
23
24
25
26
27
28
29
30
31
32
33
34
35
36
37
38
39
40
41
42
43
44
45
46
47
48
AVDD3
SC_IN
TEST
AMP5_OUT
AGND2
AMP5_INN
AMP5_INP
MPXIN61
MPXIN51
MPXIN60
MPXIN50
AMP3_OUT
DAC3_OUT/VREFIN3
AMP2_OUT
AGND1
AMP1_OUT
AVDD1
DAC2_OUT/VREFIN2
DAC1_OUT/VREFIN1
MPXIN41
MPXIN31
MPXIN40
MPXIN30
MPXIN21
MPXIN11
MPXIN20
MPXIN10
AGND3
I.C
AVDD2
LDO_OUT
AMP4_OUT
AMP4_INN
AMP4_INP
TEMP_OUT
/RESET
DVDD
/SCLK
SDO
SDI
/CS
DGND
DAC4_OUT/VREFIN4
HPF_OUT
CLK_HPF
CLK_LPF
AGND4
LPF_OUT
AVDD1
SC_IN
AMP5_OUT
GND
AMP5_INN
AMP5_INP
MPXIN61
MPXIN51
MPXIN60
MPXIN50
AMP3_OUT
DAC3_OUT
AMP2_OUT
GND
AMP1_OUT
AVDD1
DAC2_OUT
DAC1_OUT
MPXIN41
MPXIN31
MPXIN40
MPXIN30
MPXIN21
MPXIN11
MPXIN20
MPXIN10
GND
AVDD1
LDO_OUT
AMP4_OUT
AMP4_INN
AMP4_INP
TEMP_OUT
RESET_B
DVDD
SCLK_B
SDO
SDI
CS_B
GND
DAC4_OUT
HPF_OUT
CLK_HPF
CLK_LPF
GND
LPF_OUT
Analog power
Sensor extension I/F connector(TH2)
GND
Sensor extension I/F connector(TH2)
GND
Sensor extension I/F connector(TH2)
Sensor extension I/F connector(TH2)
Sensor extension I/F connector(TH2)
Sensor extension I/F connector(TH2)
Sensor extension I/F connector(TH2)
Sensor extension I/F connector(TH2)
Sensor extension I/F connector(TH2)
Sensor extension I/F connector(TH2)
Sensor extension I/F connector(TH2)
GND
Sensor extension I/F connector(TH2)
Analog power
Sensor extension I/F connector(TH2)
Sensor extension I/F connector(TH2)
Sensor extension I/F connector(TH2)
Sensor extension I/F connector(TH2)
Sensor extension I/F connector(TH2)
Sensor extension I/F connector(TH2)
Sensor extension I/F connector(TH2)
Sensor extension I/F connector(TH2)
Sensor extension I/F connector(TH2)
Sensor extension I/F connector(TH2)
GND
GND
Analog power
Sensor extension I/F connector(TH2)
Sensor extension I/F connector(TH2)
Sensor extension I/F connector(TH2)
Sensor extension I/F connector(TH2)
Sensor extension I/F connector(TH2)
MCU extension I/F connector(TH1)
Digital power
MCU extension I/F connector(TH1)
MCU extension I/F connector(TH1)
MCU extension I/F connector(TH1)
MCU extension I/F connector(TH1)
GND
Sensor extension I/F connector(TH2)
Sensor extension I/F connector(TH2)
MCU extension I/F connector(TH1)
MCU extension I/F connector(TH1)
GND
Sensor extension I/F connector(TH2)
-21-
RL78/G1A
Pin No.
54
50
49
51
60
57
29
28
27
26
52
61
3
53
name
ANI2
ANI6
ANI7
ANI5
ANI17
P130
SCK21
SI21
SO21
P73
ANI4
P01
P42
ANI3
TSA-IC300/301 User’s Manual
Table 2.11 EB-IC301 Smart Analog IC301 Pin Connections
Smart Analog
IC301
Pin No.
Smart Analog IC301
Pin name
Singnal name
EB-IC301
Connection destination
1
2
3
4
5
6
7
8
9
10
11
12
13
14
15
16
17
18
19
20
21
22
23
24
25
26
27
28
29
30
31
32
33
34
35
36
37
38
39
40
41
42
43
44
45
46
47
48
DGND
DVDD
TEST2
TEST1
TEST1
DGND
/RESET
AGND2
AGND2
AGND2
AGND2
TEMP_OUT
I.C
AGND2
AGND2
LDO_OUT
AGND2
AVDD2
AGND1
AGND1
AMPINP0
AMPINM0
AMPINP1
AMPINM1
AMPINP2
AMPINM2
AGND1
AGND1
AGND1
AVDD1
AMP_OUT
DAC_OUT/VREFIN
TEST2
TEST2
TEST2
TEST2
AGND1
AGND1
AGND1
AGND1
AGND1
AGND1
DGND
DGND
/SCLK
SDO
SDI
/CS
GND
DVDD
GND
RESET_B
GND
GND
GND
GND
TEMP_OUT
GND
GND
LDO_OUT
GND
AVDD1
GND
GND
AMPINP0
AMPINM0
AMPINP1
AMPINM1
AMPINP2
AMPINM2
GND
GND
GND
AVDD1
AMP_OUT
DAC_OUT
GND
GND
GND
GND
GND
GND
GND
GND
SCLK_B
SDO
SDI
CS_B
GND
Digital power
OPEN
GND
GND
GND
MCU extension I/F connector(TH1)
GND
GND
GND
GND
Sensor extension I/F connector(TH2)
GND
GND
GND
Sensor extension I/F connector(TH2)
GND
Analog power
GND
GND
Sensor extension I/F connector(TH2)
Sensor extension I/F connector(TH2)
Sensor extension I/F connector(TH2)
Sensor extension I/F connector(TH2)
Sensor extension I/F connector(TH2)
Sensor extension I/F connector(TH2)
GND
GND
GND
Analog power
Sensor extension I/F connector(TH2)
Sensor extension I/F connector(TH2)
OPEN
OPEN
OPEN
OPEN
GND
GND
GND
GND
GND
GND
GND
GND
MCU extension I/F connector(TH1)
MCU extension I/F connector(TH1)
MCU extension I/F connector(TH1)
MCU extension I/F connector(TH1)
-22-
RL78/G1A
Pin No.
57
60
-
name
P130
ANI17
-
49
29
28
27
26
ANI7
SCK21
SI21
SO21
P73
TSA-IC300/301 User’s Manual
2.4.4
Connectors
The TSA board provides various types of connectors. Table 2.12 lists the connectors and the corresponding
functions (some connectors may not be mounted on the board).
Table 2.12 Connector Functions
Connector
Type
Reference
J1
Connector Product
Functions
Number
DC power jack
HEC0470-01-630
External power supply (+5.0V input) Center pin
(positive) is 5V and surrounding is GND.
Input voltage requirement: Min. 4.0V to Max.
5.5V
CN2
USB Mini-B connector
UX60SC-MB-5ST
USB I/F
CN10
2.54mm pitch 14-pin connector
7614-5002PL
E1 Emulator I/F
TH1
2.54mm pitch 10-pin connector
Not mounted
MCU extension I/F
TH2
2.54mm pitch 50-pin connector
Not mounted
Sensor extension I/F
2.4.4.1
External Power Supply Connector
Connector J1 is installed as an external power-supply connector. Please use a suitable AC adaptor. Refer to
“2.4.1 Power Supply” for details concerning external, USB and E1 power feeds.
Figure 2.15 External Power Supply Connector Position
-23-
TSA-IC300/301 User’s Manual
2.4.4.2
USB I/F Connector
Connector CN2 is provided as the USB I/F connector on the TSA board. RL78/G1A is connected to the PC
through the USB controller (78K0 µPD78F0730MC-CAB-AX). A USB cable is bundled with the board for
this purpose. This connection to the PC enables the developer to debug and flash-program the CPU
(RL78/G1A) firmware with CubeSuite+ and RFP, respectively. For more details on debugging with
CubeSuite+, see 4. Using CubeSuite+ to Debug. For details on using RFP to write to the CPU,
refer to 5. Using Renesas Flash Programmer to Program the CPU.
Figure 2.16 USB I/F Connector Position
-24-
TSA-IC300/301 User’s Manual
2.4.4.3
E1 Emulator I/F Connector
Connector CN10 serves as the E1 Emulator I/F connector for the TSA board. This E1 Emulation connection
enables the developer to debug with CubeSuite+ and flash-program the CPU (RL78/G1A) firmware with
CubeSuite+ and RFP, respectively. For more details on debugging with CubeSuite+, see 4. Using
CubeSuite+ to Debug. For details on using RFP to write to the CPU, refer to 5. Using Renesas Flash
Programmer to Program the CPU.
Figure 2.17 E1 Emulator I/F Connector Position
-25-
TSA-IC300/301 User’s Manual
2.4.4.4
EB-RL78/G1A-EB-IC30x Connectors
The TSA board provides connectors CN3-4 and CN6-CN9 for the connection between EB-RL78G1A and
EB-IC30x.
EB-Rl78/G1A-EB-IC30x
Connector
Figure 2.18 EB-IC30x Connector Positions on EB-RL78/G1A
-26-
TSA-IC300/301 User’s Manual
EB-Rl78/G1A Connector
Figure 2.19 RL78/G1A Connector Positions on EB-IC300
EB-Rl78/G1A Connector
Figure 2.20 RL78/G1A Connector Positions on EB-IC301
-27-
TSA-IC300/301 User’s Manual
2.4.4.5
Sensor Extension I/F Connector
Connector TH2 is designed on EB-IC30X for adding an external sensor board. Note that no components are
mounted at shipment. The through-holes are provided for the developer to use as needed.
Table 2.13 EB-IC300 Sensor Extension I/F Connector
TH2
Pin
No.
1
3
5
7
9
11
13
15
17
19
21
23
25
27
29
31
33
35
37
39
41
43
45
47
49
Smart Analog IC300
Pin
Pin name
No.
19
DAC1_OUT/VREFIN1
16
AMP1_OUT
27
MPXIN10
25
MPXIN11
26
MPXIN20
24
MPXIN21
18
DAC2_OUT/VREFIN2
14
AMP2_OUT
23
MPXIN30
21
MPXIN31
22
MPXIN40
20
MPXIN41
13
DAC3_OUT/VREFIN3
12
AMP3_OUT
11
MPXIN50
9
MPXIN51
10
MPXIN60
8
MPXIN61
33
AMP4_INN
34
AMP4_INP
43
DAC4_OUT/VREFIN4
32
AMP4_OUT
Signal name of
the schematic
DAC1_OUT
AMP1_OUT
GND
MPXIN10
MPXIN11
MPXIN20
MPXIN21
DAC2_OUT
AMP2_OUT
GND
MPXIN30
MPXIN31
MPXIN40
MPXIN41
DAC3_OUT
AMP3_OUT
GND
MPXIN50
MPXIN51
MPXIN60
MPXIN61
AMP4_INN
AMP4_INP
DAC4_OUT
AMP4_OUT
-28-
TH2
Pin
No.
2
4
6
8
10
12
14
16
18
20
22
24
26
28
30
32
34
36
38
40
42
44
46
48
50
Smart Analog IC300
Pin
Pin name
No.
35
TEMP_OUT
44
HPF_OUT
48
LPF_OUT
7
AMP5_INP
4
AMP5_OUT
2
SC_IN
6
AMP5_INN
31
LDO_OUT
-
Signal name of
the schematic
AVDD1
GND
GND
SHIELD_AVDD
RL78_AVREFP
RL78_AVREFM
RL78_ANI8
RL78_ANI9
RL78_ANI10
RL78_ANI11
RL78_ANI12
TEMP_OUT
HPF_OUT
LPF_OUT
AMP5_INP
AMP5_OUT
SC_IN
AMP5_INN
LDO_OUT
GND
GND
AVDD1
TSA-IC300/301 User’s Manual
Table 2.14 EB-IC301 Sensor Extension I/F Connector
TH2
Pin
No.
1
3
5
7
9
11
13
15
17
19
21
23
25
27
29
31
33
35
37
39
41
43
45
47
49
Smart Analog IC301
Pin
Pin name
No.
22
AMPINM0
24
AMPINM1
21
23
32
31
26
25
-
AMPINP0
AMPINP1
DAC_OUT/VREFIN
AMP_OUT
AMPINM2
AMPINP2
-
Signal name of
the schematic
GND
AMPINM0
AMPINM1
GND
AMPINP0
AMPINP1
DAC_OUT
AMP_OUT
GND
AMPINM2
AMPINP2
-
-29-
TH2
Pin
No.
2
4
6
8
10
12
14
16
18
20
22
24
26
28
30
32
34
36
38
40
42
44
46
48
50
Smart Analog IC301
Pin
Pin name
No.
12
TEMP_OUT
16
LDO_OUT
-
Signal name of
the schematic
AVDD1
GND
GND
SHIELD_AVDD
RL78_AVREFP
RL78_AVREFM
RL78_ANI8
RL78_ANI9
RL78_ANI10
RL78_ANI11
RL78_ANI12
TEMP_OUT
LDO_OUT
GND
GND
AVDD1
TSA-IC300/301 User’s Manual
Tessera also offers a sensor extension board (TSA-EXT Board) which can be connected to the sensor
extension I/F connector TH2. The TSA-EXT Board is equipped a 50-pin pin header so that (TSA-EXT Board
can be easily inserted. The pin header should be mounted to TH2, on the same side of the board as the Smart
Analog IC. As shown in Figure 2.12, combined use of TSA-IC30x and the extension board enables the
developer to add new sensors.
Figure 2.21 Sensor Extension Board TSA-EXT BOARD Connected to TSA-IC300
* TSA-EXT Board is sold separately and is not included with TSA-IC300 or TSA-IC301.
-30-
TSA-IC300/301 User’s Manual
2.4.4.6
MCU Extension I/F Connector
The EB-IC30x board is equipped with connector TH1, which serves as the MCU extension I/F connector.
Note that no components are mounted to TH1 at shipment. The through-holes are provided for the developer
to use as needed.
Table 2.15 EB-IC300 MCU Extension I/F Connector
TH1
Pin
No.
1
3
5
7
9
11
13
15
17
19
21
23
25
27
29
31
33
35
37
39
41
43
45
47
49
RL78/G1A
Pin
Pin name
No.
23
P76
28
P71
32
P30
58
P04
2
P43
35
P16
37
P14
41
P10
61
P01
63
P141
6
RESET
21
P31
25
P74
4
P41
31
P05
17
P60
19
P62
33
P50
-
Signal name of
the svhematic
GND
RL78_P76
SDO
RL78_P30
RL78_P04
RL78_P43
RL78_P16
RL78_P14
RL78_SCK00
CLK_HPF
RL78_P141
DVDD
RL78_/RESET
RL78_P31
RL78_P74
RL78_P41
RL78_P05
RL78_P60
RL78_P62
RL78_INTP1
GND
GND
GND
GND
TH1
Pin
No.
2
4
6
8
10
12
14
16
18
20
22
24
26
28
30
32
34
36
38
40
42
44
46
48
50
-31-
RL78/G1A
Pin
Pin name
No.
22
P77
27
P72
29
P70
3
P42
36
P15
38
P13
62
P00
64
P140
9
P137
24
P75
26
P73
30
P06
57
P130
18
P61
20
P63
34
P51
-
Signal name of
the svhematic
GND
RL78_P77
SDI
SCLK_B
CLK_LPF
RL78_P15
RL78_P13
RL78_P00
RL78_P140
DVDD
RL78_INTP0
RL78_P75
CS_B
RL78_P06
RESET_B
RL78_P61
RL78_P63
RL78_INTP2
GND
GND
GND
GND
TSA-IC300/301 User’s Manual
Table 2.16 EB-IC301 MCU Extension I/F Connector
TH1
Pin
No.
1
3
5
7
9
11
13
15
17
19
21
23
25
27
29
31
33
35
37
39
41
43
45
47
49
RL78/G1A
Pin
Pin name
No.
23
P76
28
P71
32
P30
58
P04
2
P43
35
P16
37
P14
41
P10
61
P01
63
P141
6
RESET
21
P31
25
P74
4
P41
31
P05
17
P60
19
P62
33
P50
-
Signal name of
the svhematic
GND
RL78_P76
SDO
RL78_P30
RL78_P04
RL78_P43
RL78_P16
RL78_P14
RL78_SCK00
RL78_P01
RL78_P141
DVDD
RL78_/RESET
RL78_P31
RL78_P74
RL78_P41
RL78_P05
RL78_P60
RL78_P62
RL78_INTP1
GND
GND
GND
GND
TH1
Pin
No.
2
4
6
8
10
12
14
16
18
20
22
24
26
28
30
32
34
36
38
40
42
44
46
48
50
-32-
RL78/G1A
Pin
Pin name
No.
22
P77
27
P72
29
P70
3
P42
36
P15
38
P13
62
P00
64
P140
9
P137
24
P75
26
P73
30
P06
57
P130
18
P61
20
P63
34
P51
-
Signal name of
the svhematic
GND
RL78_P77
SDI
SCLK_B
RL78_P42
RL78_P15
RL78_P13
RL78_P00
RL78_P140
DVDD
RL78_INTP0
RL78_P75
CS_B
RL78_P06
RESET_B
RL78_P61
RL78_P63
RL78_INTP2
GND
GND
GND
GND
TSA-IC300/301 User’s Manual
3.
Confirmation of On-board Hall Sensor Operations
This section offers a tutorial for purchasers of the TSA evaluation board, providing instructions on how to
easily evaluate an analog frontend circuit design. The mounted Hall sensor allows the developer to start the
SA-IC evaluation without any additional resources after purchase. The tutorial uses TSA-IC300 as an
example, but the same operations apply to TSA-IC301 evaluations as well.
3.1
Tutorial using Smart Analog Easy Starter
This tutorial is for using PC application software “Smart Analog Easy Starter.” The firmware for the board to
interface with the PC and the default firmware configuring SA-IC have already been written to TSA-IC300. The
explanation is based on the use of Windows 7 and Smart Analog Easy Starter version 2.0. Please refer to the
help section for more details on Smart Analog Easy Starter functions and operations.
Tutorial Flow
Set Up Smart Analog Easy Starter
・ PC OS environment for Smart Analog Easy Starter
・ File structure of Smart Analog Easy Starter
・ Install the USB driver for Smart Analog Easy Starter
Start Smart Analog Easy Starter
・ Initialization
・ Registers and target device settings
・ Smart Analog Easy Starter operating instructions
・ How to save the register setup files
Confirm operations on TSA-IC300
(Smart Analog Easy Starter)
・ Smart Analog circuit design for the mounted Hall sensor
→ Example of Smart Analog Easy Starter usage
-33-
TSA-IC300/301 User’s Manual
3.1.1
Set Up Smart Analog Easy Starter
3.1.1.1
PC OS environment for Smart Analog Easy Starter
Smart Analog Easy Starter software can be save in any folder on your PC. The following operating systems
are supported.
Supported OS
Windows 7
(32bit/64bit)
Windows Vista (32bit/64bit)
Windows XP
3.1.1.2
(32bit)
File structure of Smart Analog Easy Starter
Smart Analog Easy Starter software can be saved in any folder in your system. Download the zip file from the
URL indicated in the enclosed documents.
When you extract the downloaded Zip file, you should see the following files and directories (some files are
omitted).
Executable (start.exe)
is stored.
Register setting folder
The Smart Analog IC30x setup files are also located under the Smart Analog Easy Starter directory. Please
download this as well. After the setup file is download, store it in the register setting folder.
-34-
TSA-IC300/301 User’s Manual
3.1.1.3
Install the USB driver for Smart Analog Easy Starter
The following explains how to install the USB driver.
Cautionary notes concerning USB driver installation:
・Administrative privileges are required in order to install the USB driver.
・Connections via a USB hub may prevent your PC from recognizing the driver. If this
occurs, connect the TSA board directly through a USB port on the PC, without using a
USB hub.
The following steps describe how to install the USB driver:
① Select the USB power feed and connect TSA-IC30x to the PC with a USB cable.
② When the PC and evaluation board are connected, the following update window is displayed. Select
“Reference computer…”
Select this.
-35-
TSA-IC300/301 User’s Manual
③ Specify the information file of the driver to be installed. Click “Browse”, specify a folder to store
MQB2SALL.inf and other files, and then click “Next”.
④ The driver installation will start. When the following window appears; click “Install” and continue with the
installation process.
-36-
TSA-IC300/301 User’s Manual
⑤ The following window appears when the installation completes successfully. Click “Close”.
⑥ The following port is added to the device manager.
-37-
TSA-IC300/301 User’s Manual
3.1.2
3.1.2.1
Start Smart Analog Easy Starter
Initialization
To start the Smart Analog Easy Starter software, execute the “start.exe” file located in the folder where the
software file was unzipped. The Start Window will appear on your screen. Click File in the Start Window and
select GUI Trial Mode.
・ When initiating GUI after connecting to the board
Clear GUI Trial Mode (remove check from box).
・ When initiating GUI without connecting to board
Select GUI Trial Mode (add check to box).
Set the folder location for saving the register setup file in Register Set Folder under Options.
The ini file stored in Register Set Folder will then be loaded.
①
When initiating GUI after connecting the board
Clear GUI Trial Mode (remove check from box).
-38-
TSA-IC300/301 User’s Manual
②
Option (serial port setting):
For most cases, select Serial port auto detection.
③
Option (register set folder setting):
For most cases, specify “(folder name) ¥setting”.
-39-
TSA-IC300/301 User’s Manual
3.1.2.2
Registers and target device settings
In the Registers box, select Hall element on TSA-IC300. To use the same values as the previous startup,
select Use the last status of Registers. If the Register Setting File was saved during the previous startup,
the characters input to the Register when the file was saved will be displayed; select accordingly. See 3.2.1.4
How to Save the Register setup files for more details. In the Target Board box, select TSA-IC300
(RL78/G1A+Smart Analog IC 300).
① Initial execution only:
For TSA-IC301, select the following.
Register
Target board
Hall element on TSA-IC301
TSA-IC301(RL78/G1A + Smart Analog IC301)
② Second and subsequent executions (to continue with previously set values):
-40-
TSA-IC300/301 User’s Manual
3.1.2.3
Smart Analog Easy Starter operating instructions
For detailed operation instructions, click Help in the Start Window that appears after startup, and reference
the help file.
① Click Help.
To display the GUI version, click Help in the Start Window when you run the software, and then click About
this Application. The information pertaining to the version you are running will be displayed.
① Click About this Application.
② Version information window opens.
-41-
TSA-IC300/301 User’s Manual
3.1.2.4
How to save the register setup files
The user can save the changes made to the register settings to a file, as shown below.
① Click Register Set Export.
② Enter the author’s name in the “Author” box and, in “Description,” enter the characters to be displayed in
the Register box that appears in the Start Window during startup. Finally, click Export. The example
below shows “Sensor Test” input in the description box.
-42-
TSA-IC300/301 User’s Manual
③ When the Setting folder is displayed, enter the file name and click Save .
④ For subsequent startups, Sensor Test will be displayed in the Register box in the Start Window.
-43-
TSA-IC300/301 User’s Manual
3.1.3
Confirm Smart Analog Easy Starter Operations on TSA-IC30x
The following describes how to confirm the software operations on TSA-IC300. The same process can be
used for TSA-IC301 by changing the contents of the Register box to “Target Board.”
① Board Setup
Set the EB-RL78/G1A mode switch to UART mode and connect the board to the PC as shown in the
figure below. Refer to 2.4.1 Power Supply for details on power supply methods and to 2.4.2 Mode
Switching for instructions on how to switch modes.
PC
USB Cable
CN1
TSA-IC300/301
Figure 3.1 USB Board Connection
-44-
TSA-IC300/301 User’s Manual
② Start the Smart Analog Easy Starter software
In the Register box, select “Hall element on TSA-IC300,” the register setting file for the Hall sensor
mounted on the TSA board.
In the Target Board box, select “TSA-IC300 (RL78/G1A+Smart Analog IC300).”
After making both selections, click Select. The following is an example of the window when setting
TSA-IC301.
Register
Target Board
Hall element on TSA-IC301
TSA-IC301(RL78/G1A + Smart Analog IC301)
③ The program’s Main Window is then displayed.
-45-
TSA-IC300/301 User’s Manual
④ Click Chip Config to view the Chip Config window. This window shows the settings for the analog section
of the Smart Analog IC300. The user can change the gain, amp and other settings here. Refer to the help
file for more details.
Chip Config Window
-46-
TSA-IC300/301 User’s Manual
⑤ Click Graph to open the ADC Graph window. This window shows the A/D conversion results for the
analog output channel (CH) set in the Graph Display box. A/D conversion results are displayed in the
ADC Graph window because “ADC transfer” and “Graph” are both selected for AMP3OUT, as shown
below.
ADC Graph Window
-47-
TSA-IC300/301 User’s Manual
⑥ Next, click Run. This starts the A/D conversion, and displays the results in the ADC graph window.
Note that the A/D conversion value may be affected by the intensity of a magnet if placed too close to
the Hall sensor. The red outline in Figure 3.2 indicates the position of the Hall sensor.
Figure 3.2 EB-IC300 Position of Hall Sensor on EB-IC300
-48-
TSA-IC300/301 User’s Manual
⑦ Next, click Stop. This stops the A/D conversion and terminates the display of A/D conversion results in the
ADC Graph window.
-49-
TSA-IC300/301 User’s Manual
4.
Debugging with CubeSuite+
This section explains how to debug a program using CubeSuite+. There are two ways to debug: USB I/F or
E1 I/F. The commonalities between these two methods are presented first, followed by a detailed explanation
of each. The explanations here assume the use of Windows 7 as the OS, and CubeSuite+ version V2.00.00
[15 Mar 2013]. Refer to the help file for details on CubeSuite+ functions and operations.
・ Creating a project with CubeSuite+
・ When using a USB I/F connector
・ When using an E1 I/F connector (with power supply from the E1 emulator)
・ When using an E1 I/F connector (without power supply from the E1 emulator)
・ Debug using CubeSuite+
4.1
Creating a project with CubeSuite+
The following explains the process of creating a project with CubeSuite+.
①
Start CubeSuite+
The following window is displayed when CubeSuite+ is started.
-50-
TSA-IC300/301 User’s Manual
②
Start window display
If the display is different, click Start to display the Start window. Click Create New Project and then GO.
-51-
TSA-IC300/301 User’s Manual
③
Create Project window settings
Enter the settings (see list below) in the Create Project window. After all settings are complete, click
Create.
Microcontroller:
RL78
Using Microcontroller:
R5F10ELE(64pin)
Project name:
determined by user
Place:
determined by user
Make the project folder:
determined by user
-52-
TSA-IC300/301 User’s Manual
④
Debug tool settings
When using USB I/F: change the debug tool to RL78EZ Emulator.
When using E1 I/F: change the debug tool to RL78 E1 (serial).
-53-
TSA-IC300/301 User’s Manual
Modify the settings listed below to meet the debug tool connection requirements.
When supplying power from the emulator:
Supply power from emulator? (Max 200mA)
Yes
Supply voltage
3.3V
When not supplying power from the emulator:
Supply power from emulator? (Max 200mA)
-54-
No
TSA-IC300/301 User’s Manual
⑤
Build tool settings
Set the build tool link options as indicated below.
Set enable/disable on-chip debugging?
Yes (-go)
On-chip debug option control byte value
84
Set user option bytes?
Yes (-gb)
User option byte value
EFFE8
-55-
TSA-IC300/301 User’s Manual
⑥
Save project
Save the project by executing Save project under the File tab.
The following files are created.
-56-
TSA-IC300/301 User’s Manual
⑦
How to add a source
This section explains how to add a source. Select the project tree file, and right click to open the following
menu. Select Add, then Add file .
The File Selection window will come up. Select the files, then click to Open.
-57-
TSA-IC300/301 User’s Manual
Confirm that the file names were added to the project tree.
-58-
TSA-IC300/301 User’s Manual
4.2
Debugging Setup
This section describes the board settings for debugging with CubeSuite+.
4.2.1
When using the USB I/F connector
The following describes the board settings for debugging with CubeSuite+ using the USB I/F interface.
①
Board setup
Set the mode switch on EB-RL78/G1A to OCD mode, and connect as shown in the figure below. For
details concerning the power supply method, refer to 2.4.1 Power Supply. Refer to 2.4.2 Mode
Switching for more information concerning how to switch modes.
PC
USB Cable
CN1
TSA-IC300/301
Figure 4.1 Board Connection via USB Cable
②
USB Cable Connection & Communications
Connect the board to the PC using a USB cable. Confirm that the EB-RL78/G1A LED1 is on.
Figure 4.2 LED ON (for USB connection)
-59-
TSA-IC300/301 User’s Manual
4.2.2
When using the E1 I/F connector
The following describes the board settings for debugging with CubeSuite+ using E1 interface.
①
Board setup
Set the mode switch on EB-RL78/G1A to UART mode, and connect as shown in the figure below. Specify
Method Selected for Create a new project as the power supply method. For details, refer to 2.4.1
Power Supply. Refer to 2.4.2 Mode Switching for more information concerning how to switch modes.
PC
E1 Emulator
USB Cable
CN10
TSA-IC300/301
Figure 4.3 Board Connection via E1 Cable
②
E1 emulator connection
Connect the E1 emulator to connector CN10.
Figure 4.4 E1 Emulator I/F Connector Position
-60-
TSA-IC300/301 User’s Manual
4.3
Debugging with CubeSuite+
This section explains how to debug a program with CubeSuite+. The operations described here apply whether
you are using EZ Emulator or the E1 Emulator.
①
Start a project
Start the project you created using CubeSuite+ as described in section 4.1. Select the project according
to the tool you are using (if using E1, this includes the power supply method as well). Rebuild the C
source. Supply power to the board and run the download.
Rebuild
-61-
Download
TSA-IC300/301 User’s Manual
②
Execute project
When the tool is connected, the following window will open. Click the Execute icon and the program will
be executed. Refer to the help file for more details on CubeSuite+ functions and operations.
Execute
-62-
TSA-IC300/301 User’s Manual
5.
Programming the CPU with the Renesas Flash Programmer
This section explains how to program the CPU using the Renesas Flash Programmer (RFP). There are two
ways to program. The commonalities between these two methods are presented first, followed by a detailed
explanation of each. The explanations here assume the use of Windows 7 as the OS, and RFP version
V2.00.01 [26 Oct 2012]. Refer to the help file for details on RFP functions and operations.
・ Creating a workspace in RFP
・ When using a USB I/F connector
・ When using an E1 I/F connector (with power supply from the E1 emulator)
・ When using an E1 I/F connector (without power supply from the E1 emulator)
・ Programming the CPU with RFP
5.1
Creating a workspace in RFP
The following explains the process of creating a workspace in RFP.
①
Creating a workspace in RFP
The following window is displayed when RFP is started.
Select Create new workspace , specify Basic mode , and then click Next .
-63-
TSA-IC300/301 User’s Manual
②
Select the device
Microcontroller
RL78
Target to be used
RL78/G1A R5F10ELE
Workspace name
Determined by user
Project name
Determined by user
Location
Determined by user
After all settings are selected, click Next .
③
Set communication interface
Select the programming method.
When using USB I/F connector: COMx (x can be any value from 1 to 256)
*Board must be connected to PC beforehand.
When using E1 I/F connector: E1
-64-
TSA-IC300/301 User’s Manual
When using COMx:
When using E1:
Click Next (N).
④
Set supply clock
Clock supply is only set when using E1.
Confirm the interface speed setting, and then click Next .
-65-
TSA-IC300/301 User’s Manual
⑤
Set power supply
When using COMx:
Confirm that input supply voltage (V) is 3.30V, and then click Next .
When using E1:
When using power supply from the E1 emulator, select the settings shown in the window below.
If power supply is not from the E1 emulator, clear the Power target from the emulator box
Click Next .
-66-
TSA-IC300/301 User’s Manual
⑥
Project Settings
When using COMx:
Confirm the settings in the dialog box. The Tool Name under Using Tool should be COMx (x: any
number from 1 to 256). Once the information is confirmed, click Complete .
When using E1:
Confirm the settings in the dialog box. The Tool Name under Using Tool should be E1. Once the
information is confirmed, click Complete .
-67-
TSA-IC300/301 User’s Manual
⑦
Set HEX program file
Click Browse .
Select the desired program file and click Open .
-68-
TSA-IC300/301 User’s Manual
Confirm that the desired program file name is displayed in the dialog box.
-69-
TSA-IC300/301 User’s Manual
5.2
CPU Programming Setup
This section describes how to set the board to program the CPU with RFP.
5.2.1
When using the USB I/F connector
This section describes how to set the board to program the CPU with RFP when using USB interface.
①
Board setup
Set the EB-RL78/G1A mode switch to OCD mode and connect the board to the PC as shown in the
figure below. Refer to 2.4.1 Power Supply for details on power supply methods and to 2.4.2 Mode
Switching for instructions on how to switch modes.
PC
USB Cable
CN1
TSA-IC300/301
Figure 5.1 USB Board Connection
②
USB Cable Connection & Communications
Connect the board to the PC using a USB cable. Confirm that the EB-RL78/G1A LED1 is on.
Figure 5.2 LED ON (for USB connection)
-70-
TSA-IC300/301 User’s Manual
5.2.2
When using the E1 I/F connector
The following describes the board settings for programming the CPU with RFP using E1 interface.
①
Board setup
Set the mode switch on EB-RL78/G1A to UART mode, and connect as shown in the figure below. Specify
Method Selected for Create a new work space as the power supply method. For details, refer to 2.4.1
Power Supply. Refer to 2.4.2 Mode Switching for more information concerning how to switch modes.
PC
E1 Emulator
USB Cable
CN10
TSA-IC300/301
Figure 5.3 E1 Board Connection
②
E1 emulator connection
Connect the E1 emulator to connector CN10.
Figure 5.4 E1 Emulator I/F Connector Position
-71-
TSA-IC300/301 User’s Manual
5.3
Programming the CPU with RFP
This section explains how to program the CPU using the Renesas Flash Programmer (RFP). There are two
ways to program: using the EZ Emulator and using the E1 emulator
①
Start an RFP workspace
Start the workspace you created in RFP as described in section 5.1. Select the workspace according to
the tool you are using (if using E1, this includes the power supply method as well). Before programming
the CPU, confirm that the correct file appears in the dialog box.
-72-
TSA-IC300/301 User’s Manual
②
Execute the program
Click start to execute the program.
(1) The window will look similar to this when the command is in progress.
-73-
TSA-IC300/301 User’s Manual
③ Programming completed
「The window will look like this when the programming procedure is successfully completed.
-74-
TSA-IC300/301 User’s Manual
6.
Hardware Documentation
6.1
Circuit diagrams
Circuit diagrams are provided on the following pages.
-75-
RxD6
FLMODE0
GND
ID_NC
DD+
VBUS
UGND
1.6Kohm
LED1
SML-311UT
UGND
RED
VBUS
HEC0470-01-630
TP14
TP13
2
3
1
DVDD
C1
0.1uF
UGND
L1
VBUS
RED
1
1
JP1
3
+5V Select
1-2 VBUS
2-3 DVCC_EXT
OPEN E1 Power
2
2
1.5Kohm
2
3
4
4
UGND
4
IC5
C6
0.47uF
C3
0.47uF
UGND
VBUS
R8
R7
C14
1uF
+5V
GND
EN
VIN
IC6
<Shiled>
NC
4
5
1
R12
3.3V/200mA
C11
1uF
RxD6USB
JP2
2
FFC-2AMEP1B
1
1
2
4
5
6
8
C7
0.1uF
UGND
R37
1
DVDD Select
SHORT Regulator Output
OPEN E1 Power
7
3
USBPUC
USBM
USBP
USBREGC
Vdd
Vss
REGC
DVDD
2
0ohm
C12
1uF
P121/X1/OCD0A
P122/X2/EXCLK/OCD0B
FLMD0
RESET
P120/INTP0/EXLVI
P00/TI000
P01/TI010/TO00
P30/INTP1
IC3
VBUS
15
14
13
12
11
10
9
8
7
6
5
4
3
2
1
SW2
SSSS223600
UGND
2
27ohm
2
27ohm
UGND
TxD6USB
1
R11
UGND
78K0_RESETB <Shiled>
2
10Kohm
FLMODE0
<Shiled>
2
<Shiled>
10Kohm
CSTCE16M0VH3L99-R0
XTAL3
2
<Shiled>
VOUT
0.1uF
C9
2
1
1
RL78_/RESET_LS
RxD6
R1
1.5Kohm
ADP151AUJZ-3.3-R7
2
3
1
1
2
R4
1.5Kohm
UGND
SN74LVC1G125DCK
UGND
VBUS
SN74LVC1G125DCK
IC1
SN74LVC2G07DCK
IC2B
DVDD
FFC-3AMEP1B
3
DVDD_EXT
VBUS
R14
C5
4.7uF
<Shiled> RL78_/RESET
DVDD_EXT
BLM41PG750S
Digital Power 5V
J1
UGND
0.1uF
C10
5
4
2
3
FFC-6AMEP1B
2,3 RL78_/RESET
UGND
78K0_RESETB
TxD6
CN2
1
2
1
2
3
4
5
6
1
2
5
2
1
2
1
5
1
1
2
1
2
1
3
VBUS
1
Unmount
5
3
FG2
FG1
FG2
FG1
1
2
1
2
1
2
CN1
UX60SC-MB-5ST
1
VBUS
1
A 2
K
1
A 2
K
1
2
DVDD
16
17
18
19
20
21
22
23
24
25
26
27
28
29
30
C13
0.1uF
RL78_TOOL0
RL78_TXD0
UGND
2
2
2
SW2
OCD
UART
UART
RL78_RXD0
LEFT
RIGHT
OCD
UPD78F0730MC
P61
P60
P32/INTP3/OCD1B
P31/INTP2/OCD1A
EVdd
EVss
P33/TI51/TO51
P17/TI50/TO50
P16/TOH1
P15
P14/RxD6
P13/TxD6
P12/SO10
P11/SI10
P10/SCK10
1
2
C8
0.1uF
1
VBUS
UGND
2
2
10Kohm
RL78_/RESIN
2
VBUS
UGND
10Kohm
10Kohm
VBUS
2 FLMODE0
1.5Kohm
UGND
Unmount
VBUS
R10
UGND
1
1
2
C28
0.1uF
UGND
RxD6
RL78_/RESET_LS
TxD6
RL78_/RESIN
C27
0.1uF
1
6
DVDD
4
14
13
12
11
15
9
16
10
C2
0.1uF
1.6Kohm
Date:
Size
A3
Title
VOA
VOB
VIC
VID
GND2
GND2
3
4
5
6
2
8
1
7
1
2
4
3
Tuesday , May 28, 2013
Document Number
TS-TCS01677
DVDD
C29
0.1uF
Sheet
RxD6USB
RL78_/RESET
TxD6USB
RL78_/RESIN_LS
SW1-2/SW1-3
ON UART
OFF OCD
DVDD
<Shiled>
UGND
SW1-1/SW1-4
ON OCD
OFF UART
CHS-02TB
SW1
TxD6USB
EB-RL78/G1A Board
VIA
VIB
VOC
VOD
GND1
GND1
VDD2A VDD1A
VDD2B VDD1B
IC8
ADuM7442CRQZ
C4
0.1uF
RL78_/RESIN_LS
<Shiled>
DVDD
IC4
DVDD
SN74LVC2G07DCK
IC2A
DVDD
VBUS
<Shiled>
R9
SN74LVC1G125DCK
100Kohm
<Shiled>
R38
R6
1
VBUS
R3
100Kohm
UGND
TxD6
R5
1
2
1
2
VBUS
1
2
1
1
2
5
2
5
1
3
1
2
DVDD
1
1
1
2
78K0 Programing Connector
1
2
LED2
SML-311UT
2
1Kohm
2
Figure 6.1 EB-RL78/G1A Circuit Diagram 1/3
R15
2
R29
1
-76R2
2
10Kohm
2
R13
1
1
2
RxD6USB
of
C30
0.1uF
3
Rev
E1.00
RL78_/RESETIN 2
TSA-IC300/301 User’s Manual
SW3
1
DVDD
1
JP3
2
C23
4pF
<Shiled>
C25
1uF
C24
3pF
<Shiled>
2
0ohm
FFC-3AMEP1B
3
AVDD2 Select
1-2 Shield Power
2-3 DVDD
SHIELD_AVDD
1
RL78_XT2 <Shiled> R26
3
Unmount
XTAL1
<Shiled>
1
EF1
NFM18PC104R1C3
1
3
RL78_INTP0
1
RL78_P00
C26
0.1uF
AVDD2
32.768KHz
XTAL2
SSP-T7-FL_3.7pF
C22
Unmount
3 SAIC_CLK_HPF
3
RL78_P141
3
RL78_P140
3
C31
0.1uF
7
8
RL78_XT2 <Shiled>
RL78_XT1 <Shiled>
12
14
16
13
10
11
C18
100pF
C16
100pF
<Shiled>
<Shiled>
RL78_X2
RL78_X1
C17
0.1uF
C15
0.1uF
15
<Shiled>
63
64
62
61
48
47
RL78_/RESET <Shiled> 6
RL78_TOOL0 <Shiled> 5
RL78_INTP0
9
37
RL78_P14
36
RL78_P15
35
RL78_P16
20
RL78_P63
19
RL78_P62
18
RL78_P61
17
RL78_P60
C19
0.47uF
RL78_AVDD
3
3
3
3
3
3
3
RL78_X2
EF2
NFM18PC104R1C3
1
3
3
2
0ohm
RL78_XT1
C21
Unmount
<Shiled>
2
0ohm
1
RL78_X1
R22
1
TP4
TP3
1
3
2
4
SKRPABE010
DVDD
1
2
1
2
1
2
1
2
1
2
1
2
1
2
1
2
R16
1
2
AVDD2
1
2
1
2
2
1
2
1
2
1
2
3
4
5
6
7
8
9
10
11
12
13
14
7614-5002PL
CN10
R5F10ELEAFB
P141/PCLBUZ1/INTP7
P140/PCLBUZ0/INTP6
P00/TI00/(KR0)
P01/TO00/(KR1)
AVSS
AVDD
P120/ANI19
P77/INTP11/KR7
P04/SCK10/SCL10/(KR4)
P30/ANI27/SCK11/SCL11/INTP3/RTC1HZ
P70/ANI28/SCK21/SCL21/KR0
P71/SI21/SDA21/KR1
P72/SO21/KR2
P73/SO01/KR3
P06/TI06/TO06/KR9
P41/ANI30/TI07/TO07
P05/TI05/TO05/KR8
P130
P76/INTP10/KR6
P75/SCK01/SCL01/INTP9/KR5
P74/SI01/SDA01/INTP8/KR4
P31/ANI29/TI03/TO03/INTP4
P150/ANI8
P151/ANI9/(KR6)
P152/ANI10/(KR7)
P153/ANI11/(KR8)
P154/ANI12/(KR9)
P27/ANI7
P26/ANI6/(KR9)
P25/ANI5/(KR8)
P24/ANI4/(KR7)
P23/ANI3/(KR6)
P22/ANI2/(KR5)
P21/ANI1/AVREFM
P20/ANI0/AVREFP
P02/ANI17/SO10/TxD1/(KR2)
P03/ANI16/SI10/SDA10/RxD1/(KR3)
DVDD
AVDD2
TP7
TP8
TP5
TP6
2
3
41
40
39
38
33
34
22
58
32
29
28
27
26
30
4
31
57
23
24
25
21
46
45
44
43
42
49
50
51
52
53
54
55
56
60
59
1
RL78_/RESET <Shiled>
3
3
3
3
3
3
3
3
3
3
3
3
3
3
3
3
3
DVDD
SAIC_SDO
1Kohm
10Kohm
Date:
Size
A3
Title
3
2
10Kohm
SA-IC I/F
R20
1
SA-IC I/F
3
USB I/F
1
1
3
3
3
3
3
3
3
3
RL78_P43
3
SAIC_CLK_LPF 3
RL78_SCK00
RL78_RXD0
RL78_TXD0
RL78_P13
RL78_INTP1
RL78_INTP2
RL78_P77
RL78_P04
RL78_P30
SAIC_SDI
SAIC_CSB
SAIC_SCLKB 3
RL78_P06
RL78_P41
RL78_P05
SAIC_RESETB 3
RL78_P76
RL78_P75
RL78_P74
RL78_P31
RL78_ANI8
RL78_ANI9
RL78_ANI10
RL78_ANI11
RL78_ANI7
RL78_ANI6
RL78_ANI5
RL78_ANI4
RL78_ANI3
RL78_ANI2
RL78_ANI17 3
RL78_ANI16 3
RL78_TOOL0 1
RL78_/RESETIN 1
<Shiled>
<Shiled>
RL78_/RESET 1,3
1
3
2
4
SKRPABE010
SW4
RL78_TOOL0
<Shiled>
RL78_/RESETIN <Shiled>
TP9
TP10
TP11
TP12
TP15
P43
P42/TI04/TO04
P10/ANI18/SCK00/SCL00/(KR0)
P11/ANI20/SI00/SDA00/RxD0/TOOLRxD/(KR1)
P12/ANI21/SO00/TxD0/TOOLTxD/(KR2)
P13/ANI22/SO20/TxD2/(KR3)
P50/ANI26/SI11/SDA11/INTP1
P51/ANI25/SO11/INTP2
DVDD
RESET
P40/TOOL0
P137/INTP0
P14/ANI23/SI20/SDA20/RxD2/(KR4)
P15/ANI24/SCK20/SCL20/(KR5)
P16/TI01/TO01/INTP5
P63
P62
P61/SDAA0
P60/SCLA0
P124/XT2/EXCLKS
P123/XT1
P122/X2/EXCLK
P121/X1
REGC
EVSS0
EVDD0
VSS
VDD
IC7
1
2
TP2
1
1
4
1
2
TP1
R27
2
100ohm
1
1
Figure 6.2 EB-RL78/G1A Circuit Diagram 2/3
R28
2
1Kohm
2
R24
1
-77R25
2
Tuesday , May 28, 2013
Document Number
TS-TCS01677
EB-RL78/G1A Board
RL78_ANI12 3
RL78_AVREFM 3
RL78_AVREFP 3
Sheet
2
R23
Unmount
C20
10uF
R21
Unmount
AVDD2
R18
3Kohm
R17
13Kohm
AVDD2
1
2
1
2
1
2
1
2
10Kohm
1
R19
2
DVDD
of
3
Rev
E1.00
TSA-IC300/301 User’s Manual
-78-
2
2
2
2
SAIC_SCLKB
SAIC_SDO
SAIC_SDI
SAIC_CSB
<Shiled>
<Shiled>
SHIELD_AVDD
RL78_ANI17
RL78_ANI4
RL78_ANI3
RL78_ANI16
RL78_ANI5
RL78_ANI2
RL78_ANI6
RL78_ANI7
<Shiled>
<Shiled>
<Shiled>
CN8
8X1F-H8.5
2
2
2
2
2
2
2
2
2 SAIC_RESETB
2 SAIC_CLK_LPF
2 SAIC_CLK_HPF
2
2
2
2
2
2
2
RL78_AVREFP
RL78_AVREFM
RL78_ANI12
RL78_ANI11
RL78_ANI10
RL78_ANI9
RL78_ANI8
RL78_P76
RL78_P30
RL78_P04
RL78_P43
RL78_P16
RL78_P14
RL78_SCK00
RL78_P141
RL78_/RESET
RL78_P31
RL78_P74
RL78_P41
RL78_P05
RL78_P60
RL78_P62
2
2
2
2
2
2
2
2
1,2
2
2
2
2
2
2
Unmount
CN5
8X1F-H8.5
CN4
8X1F-H8.5
CN7
8X1F-H8.5
+5V DVDD
1
2
3
4
5
6
7
8
9
10
8
7
6
5
4
3
2
1
1
2
3
4
5
6
7
8
Figure 6.3 EB-RL78/G1A Circuit Diagram 3/3
1
2
3
4
5
6
7
8
8
7
6
5
4
3
2
1
CN9
8X1F-H8.5
1
2
3
4
5
6
7
8
CN3
10X1F-H8.5
+5V
1
3
5
7
9
11
13
15
17
19
21
23
25
27
29
31
33
35
2
4
6
8
10
12
14
16
18
20
22
24
26
28
30
32
34
36
18X2F-H8.5
CN6
Date:
Size
A3
Title
Tuesday , May 28, 2013
Document Number
TS-TCS01677
EB-RL78/G1A Board
RL78_INTP1 2
RL78_P77 2
RL78_P15 2
RL78_P13 2
RL78_P00 2
RL78_P140 2
RL78_INTP0 2
RL78_P75 2
RL78_P06 2
RL78_P61 2
RL78_P63 2
RL78_INTP2 2
Sheet
3
of
3
Rev
E1.00
TSA-IC300/301 User’s Manual
1
2
AVDD_EXT
DVDD
R1
1
DVDD
AVDD1
SHIELD_AVDD
C13
4.7uF
TP3
DVDD
TP9
DVDD
1
TP4
EF1
NFM18PC104R1C3
1
3
1
EF3
2
0ohm
AVDD_F
TP11
C16
0.1uF
LDO_OUT
NFM18PS105R0J3
3
EF2
NFM18PC104R1C3
1
3
SHIELD_AVDD
C15
10uF
C14
0.1uF
R2
1
2
0ohm
1
2
TP2
2
1
2
1
2
1
C5
10uF
C3
10uF
C1
10uF
JP4
2
C6
0.1uF
C4
0.1uF
C2
0.1uF
Shield AVDD Select
1-3 AVDD_F(DVCC)
3-4 AVDD_EXT
3-5 LDO_OUT
FFC-6BMEP1B
6
4
3
5
2
1
JP5
FFC-3AMEP1B
3
1
AVDD1 Power Select
1-2 AVDD_EXT
3-4 AVDD_F(DVDD)
C7
0.1uF
2
1
Analog Power 3.3V
PinHeader2.54mm
CN1
Unmount
1
2
A
K
1
2
1
2
1
2
1
2
1
2
AVDD1
1
2
1
2
R3
A
Figure 6.4 EB-IC300 EB-IC300 Circuit Diagram 1/2
R4
K
1
2
1
2
C11
10uF
AVDD1
TP10
C12
0.1uF
AMP5_OUT
AMP5_INP
AMP5_INN
AMP4_OUT
AMP4_INP
AMP4_INN
AMP1_OUT
AMP2_OUT
AMP3_OUT
MPXIN10
MPXIN11
MPXIN20
MPXIN21
MPXIN30
MPXIN31
MPXIN40
MPXIN41
MPXIN50
MPXIN51
MPXIN60
MPXIN61
MPXIN50
MPXIN51
MPXIN60
MPXIN61
AMP4_INN
AMP4_INP
DAC4_OUT
AMP4_OUT
MPXIN30
MPXIN31
MPXIN40
MPXIN41
DAC3_OUT
AMP3_OUT
MPXIN10
MPXIN11
MPXIN20
MPXIN21
DAC2_OUT
AMP2_OUT
DAC1_OUT
AMP1_OUT
LDO_OUT
SCLK
SDO
SDI
CS
RESET
LPF_OUT
HPF_OUT
TEMP_OUT
SC_IN
CLK_LPF
CLK_HPF
DAC1_OUT/VREFIN1
DAC2_OUT/VREFIN2
DAC3_OUT/VREFIN3
DAC4_OUT/VREFIN4
RAA730300DFP
TEST
DGND
I.C
DVDD
AGND3
AGND4
AVDD3
AGND2
AVDD2
AGND1
AVDD1
IC1
AVDD1
3
42
29
37
28
47
1
5
30
15
17
31
38
39
40
41
36
1
3
5
7
9
11
13
15
17
19
21
23
25
27
29
31
33
35
37
39
41
43
45
47
49
2
4
6
8
10
12
14
16
18
20
22
24
26
28
30
32
34
36
38
40
42
44
46
48
50
FFC-50BMEP1
Unmount
TH2
C9
1uF
LDO_OUT
SCLK_B
SDO
SDI
CS_B
RESET_B
LPF_OUT
SC_IN
CLK_LPF
CLK_HPF
2
46
45
48
44
35
DAC1_OUT
DAC2_OUT
DAC3_OUT
DAC4_OUT
AMP5_OUT
AMP5_INP
AMP5_INN
AMP4_OUT
AMP4_INP
AMP4_INN
AMP1_OUT
AMP2_OUT
AMP3_OUT
MPXIN10
MPXIN11
MPXIN20
MPXIN21
MPXIN30
MPXIN31
MPXIN40
MPXIN41
MPXIN50
MPXIN51
MPXIN60
MPXIN61
19
18
13
43
4
7
6
32
34
33
16
14
12
27
25
26
24
23
21
22
20
11
9
10
8
1
2
1
2
1
2
1
-792
1
2
2
AMP5_OUT
2
2
2
2
2
SCLK_B
SDO
SDI
CS_B
RESET_B
SHIELD_AVDD
TEMP_OUT
HPF_OUT
LPF_OUT
AMP5_INP
AMP5_OUT
SC_IN
AMP5_INN
LDO_OUT
AVDD1
RL78_AVREFP 2
RL78_AVREFM 2
RL78_ANI8 2
RL78_ANI9 2
RL78_ANI10 2
RL78_ANI11 2
RL78_ANI12 2
2
Sensor Power 2V
Unmount
1
2
PinHeader2.54mm
CN2
C10
470pF
2
2
CLK_LPF
CLK_HPF
2
10Kohm
Unmount
R9
1
LPF_OUT
SVCC_EXT
2
AMP4_OUT
<Shiled>
<Shiled>
2
2
2
AMP1_OUT
AMP2_OUT
AMP3_OUT
SDO
DVDD
JP3
2
RL78_P141
RL78_SCK00
RL78_P30
RL78_P04
RL78_P43
RL78_P16
RL78_P14
RL78_P76
2
RL78_/RESET
2
RL78_P31
2
RL78_P74
2
RL78_P41
2
RL78_P05
2
RL78_P60
2
RL78_P62
2 RL78_INTP1
2
2
2
2
2
2
2
2
Sensor Power Select
1-2 LDO_OUT
2-3 SVCC_EXT
FFC-3AMEP1B
3
1
FFC-2AMEP1B
2
FFC-2AMEP1B
2
CLK_HPF
SDO
SVCC
1
1
R7
R8
LED1
SML-311UT
1Kohm
LED2
SML-311UT
1Kohm
Date:
Size
A3
Title
DVDD
TP12
R6,R8 Unmount
1
1
R5
R6
Sensor Connect
JP2
1
JP1
1
2
4
6
8
10
12
14
16
18
20
22
24
26
28
30
32
34
36
38
40
42
44
46
48
50
Unmount
FFC-50BMEP1B
TH1
TP5
TP6
TP7
TP8
IN-
IN+
3
1
DVDD
Tuesday , May 28, 2013
Document Number
TS-TCS01678
EB-IC300 Board
1
3
5
7
9
11
13
15
17
19
21
23
25
27
29
31
33
35
37
39
41
43
45
47
49
HW-300B
OUT-
OUT+
S1
0ohm
HPF_OUT
2
S_HPF_OUT
2
0ohm
0ohm
TEMP_OUT
2
S_TEMP_OUT
2
0ohm
4
2
1
Sheet
RESET_B
CS_B
CLK_LPF
SDI
SCLK_B
TEMP_OUT 2
S_TEMP_OUT 2
1
0.1uF
C8
HPF_OUT
2
S_HPF_OUT 2
2
TP1
2
2
2
2
of
2
Rev
V1.00
RL78_P61 2
RL78_P63 2
RL78_INTP2 2
RL78_P06
RL78_INTP0 2
RL78_P75 2
RL78_P00 2
RL78_P140 2
RL78_P15
RL78_P13
RL78_P77
SVCC
TSA-IC300/301 User’s Manual
1
1
1
1
SCLK_B
SDO
SDI
CS_B
Unmount
8X1F-H8.5
CN10
<Shiled>
<Shiled>
SHIELD_AVDD
1
2
3
4
5
6
7
8
9
10
CN12
8X1F-H8.5
TEMP_OUT
HPF_OUT
LPF_OUT
AMP5_OUT
AMP4_OUT
AMP3_OUT
AMP2_OUT
AMP1_OUT
<Shiled>
<Shiled>
<Shiled>
8X1F-H8.5
CN11
CN14
6X1F-H8.5
CN8
8X1F-H8.5
1
1
1
1
1
1
1
1
S_TEMP_OUT
S_HPF_OUT
RESET_B
CLK_LPF
CLK_HPF
CN7
8X1F-H8.5
+5V DVDD
CN13
8X1F-H8.5
1
1
1
1
1
CN4
8X1F-H8.5
8
7
6
5
4
3
2
1
8
7
6
5
4
3
2
1
1
2
3
4
5
6
8
7
6
5
4
3
2
1
1
2
3
4
5
6
7
8
1
2
3
4
5
6
7
8
-80-
1
2
3
4
5
6
7
8
Figure 6.5 EB-IC300 Circuit Diagram 2/2
1
2
3
4
5
6
7
8
1
1
1
1
1
1
1
RL78_AVREFP
RL78_AVREFM
RL78_ANI12
RL78_ANI11
RL78_ANI10
RL78_ANI9
RL78_ANI8
Unmount
CN5
8X1F-H8.5
RL78_P76
RL78_P30
RL78_P04
RL78_P43
RL78_P16
RL78_P14
RL78_SCK00
RL78_P141
RL78_/RESET
RL78_P31
RL78_P74
RL78_P41
RL78_P05
RL78_P60
RL78_P62
1
1
1
1
1
1
1
1
1
1
1
1
1
1
1
8
7
6
5
4
3
2
1
CN9
8X1F-H8.5
1
2
3
4
5
6
7
8
CN3
10X1F-H8.5
+5V
1
3
5
7
9
11
13
15
17
19
21
23
25
27
29
31
33
35
2
4
6
8
10
12
14
16
18
20
22
24
26
28
30
32
34
36
18X2F-H8.5
CN6
Date:
Size
A3
Title
Tuesday , May 28, 2013
Document Number
TS-TCS01678
EB-IC300 Board
RL78_INTP1 1
RL78_P77 1
RL78_P15 1
RL78_P13 1
RL78_P00 1
RL78_P140 1
RL78_INTP0 1
RL78_P75 1
RL78_P06 1
RL78_P61 1
RL78_P63 1
RL78_INTP2 1
Sheet
2
of
2
Rev
E1.00
TSA-IC300/301 User’s Manual
1
R2
1
1
2
TP4
AVDD_EXT
2
0ohm
C4
10uF
C12
0.1uF
EF3
SHIELD_AVDD
C13
10uF
1
AVDD_F
C8
0.1uF
C5
0.1uF
C1
10uF
TP11
C14
0.1uF
LDO_OUT
NFM18PS105R0J3
3
EF2
NFM18PC104R1C3
1
3
SHIELD_AVDD
C11
4.7uF
AVDD1
TP9
DVDD
DVDD
DVDD
Analog Power 3.3V
PinHeader2.54mm
CN1
Unmount
DVDD
TP3
EF1
NFM18PC104R1C3
1
3
2
1
2
0ohm
1
2
R1
1
2
1
1
1
2
1
2
TP2
2
1
2
1
2
C2
0.1uF
3
Shield AVDD Select
1-3 AVDD_F(DVCC)
3-4 AVDD_EXT
3-5 LDO_OUT
FFC-6BMEP1B
6
4
3
5
2
1
JP5
FFC-3AMEP1B
2
AMP_OUT
TEMP_OUT
LDO_OUT
AMPINP2
AMPINM2
AMPINP1
AMPINM1
AMPINP0
AMPINM0
C9
10uF
DAC_OUT
32
3
33
34
35
36
45
46
47
48
7
LDO_OUT
31
12
16
25
26
23
24
21
22
C10
0.1uF
AVDD1
TEST2
TEST2
TEST2
TEST2
TEST2
SCLK
SDO
SDI
CS
RESET
DAC_OUT/VREFIN
RAA730301DFP
TEST1
TEST1
DGND
DGND
DGND
DGND
I.C
DVDD
AGND2
AGND2
AGND2
AGND2
AGND2
AGND2
AGND2
AVDD2
AGND1
AGND1
AGND1
AGND1
AGND1
AGND1
AGND1
AGND1
AGND1
AGND1
AGND1
AVDD1
IC1
AVDD1 Power Select
1-2 AVDD_EXT
2-3 AVDD_F(DVDD)
JP4
1
4
5
1
6
43
44
13
2
8
9
10
11
14
15
17
18
19
20
27
28
29
37
38
39
40
41
42
30
1
C6
470pF
<Shiled>
<Shiled>
<Shiled>
AMP_OUT
AMPINP2
AMPINM2
AMPINP1
AMPINM1
AMPINP0
AMPINM0
AVDD1
TP10
Unmount
2
AVDD1
1
2
A
K
1
2
1
2
1
R3
A
1
2
1
2
R4
K
1
2
Figure 6.6 EB-IC301 EB-IC301 Circuit Diagram 1/2
2
1
-812
1
2
AMPINM2
AMPINP2
AMPINP0
AMPINP1
DAC_OUT
AMP_OUT
AMPINM0
AMPINM1
2
10Kohm
CN2
1
2
SVCC_EXT
Unmount
R7
1
DVDD
1
3
5
7
9
11
13
15
17
19
21
23
25
27
29
31
33
35
37
39
41
43
45
47
49
1Kohm
LED2
SML-311UT
1Kohm
LED1
SML-311UT
2
4
6
8
10
12
14
16
18
20
22
24
26
28
30
32
34
36
38
40
42
44
46
48
50
3
1
JP3
1
1
2
0ohm
2
2
0ohm
RL78_P30
RL78_P04
RL78_P43
RL78_P16
RL78_P14
RL78_SCK00
RL78_P01
RL78_P141
2
2
2
2
2
2
2
2
SHIELD_AVDD
Unmount
LDO_OUT
RL78_AVREFP 2
RL78_AVREFM 2
RL78_ANI8 2
RL78_ANI9 2
RL78_ANI10 2
RL78_ANI11 2
RL78_ANI12 2
2
RL78_/RESET
2
RL78_P31
2
RL78_P74
2
RL78_P41
2
RL78_P05
2
RL78_P60
2
RL78_P62
2 RL78_INTP1
RL78_P76
SDO
SVCC
4
2
TP12
TEMP_OUT
S_TEMP_OUT
2
Sensor Power Select
1-2 LDO_OUT
2-3 SVCC_EXT
FFC-3AMEP1B
R5
R6
FFC-2AMEP1B
2
FFC-2AMEP1B
2
Sensor Connect
JP2
1
JP1
1
TEMP_OUT
AVDD1
R6 Unmount
FFC-50BMEP1B
TH2
Sensor Power 2V
Unmount
PinHeader2.54mm
2
2
2
2
2
SCLK_B
SDO
SDI
CS_B
RESET_B
C7
1uF
2
AMP_OUT
SDO
3
1
Date:
Size
A3
Title
DVDD
TP5
TP6
TP7
TP8
2
4
6
8
10
12
14
16
18
20
22
24
26
28
30
32
34
36
38
40
42
44
46
48
50
FFC-50BMEP1B
TH1
0.1uF
C3
DVDD
SVCC
Tuesday , May 28, 2013
Document Number
TS-TCS01679
EB-IC301 Board
1
3
5
7
9
11
13
15
17
19
21
23
25
27
29
31
33
35
37
39
41
43
45
47
49
TEMP_OUT 2
S_TEMP_OUT 2
IN-
IN+
HW-300B
OUT-
OUT+
S1
1
2
TP1
Sheet
Unmount
RESET_B
CS_B
SDI
SCLK_B
1
of
2
Rev
V1.00
RL78_P61 2
RL78_P63 2
RL78_INTP2 2
RL78_P06 2
RL78_INTP0 2
RL78_P75 2
RL78_P00 2
RL78_P140 2
RL78_P42 2
RL78_P15 2
RL78_P13 2
RL78_P77 2
TSA-IC300/301 User’s Manual
-82-
1
1
1
1
SCLK_B
SDO
SDI
CS_B
8X1F-H8.5
CN10
Unmount
<Shiled>
<Shiled>
SHIELD_AVDD
1
2
3
4
5
6
7
8
9
10
8
7
6
5
4
3
2
1
CN12
8X1F-H8.5
1
2
3
4
5
6
7
8
1
1
S_TEMP_OUT
RESET_B
RL78_P42
RL78_P01
TEMP_OUT
AMP_OUT
<Shiled>
<Shiled>
<Shiled>
8X1F-H8.5
CN11
CN14
6X1F-H8.5
CN8
8X1F-H8.5
1
1
1
1
CN4
8X1F-H8.5
CN7
8X1F-H8.5
+5V DVDD
CN13
8X1F-H8.5
1
2
3
4
5
6
7
8
8
7
6
5
4
3
2
1
8
7
6
5
4
3
2
1
1
2
3
4
5
6
1
2
3
4
5
6
7
8
Figure 6.7 EB-IC301 Circuit Diagram 2/2
1
2
3
4
5
6
7
8
1
1
1
1
1
1
1
RL78_AVREFP
RL78_AVREFM
RL78_ANI12
RL78_ANI11
RL78_ANI10
RL78_ANI9
RL78_ANI8
Unmount
CN5
8X1F-H8.5
1
1
1
1
1
1
1
1
1
1
1
1
1
1
1
CN9
8X1F-H8.5
RL78_P31
RL78_P74
RL78_P41
RL78_P05
RL78_P60
RL78_P62
RL78_P76
RL78_P30
RL78_P04
RL78_P43
RL78_P16
RL78_P14
RL78_SCK00
RL78_P141
RL78_/RESET
8
7
6
5
4
3
2
1
1
2
3
4
5
6
7
8
CN3
10X1F-H8.5
+5V
1
3
5
7
9
11
13
15
17
19
21
23
25
27
29
31
33
35
2
4
6
8
10
12
14
16
18
20
22
24
26
28
30
32
34
36
Date:
Size
A3
Title
18X2F-H8.5
CN6
Tuesday , May 28, 2013
Document Number
TS-TCS01679
EB-IC301 Board
RL78_INTP1 1
RL78_P77 1
RL78_P15 1
RL78_P13 1
RL78_P00 1
RL78_P140 1
RL78_INTP0 1
RL78_P75 1
RL78_P06 1
RL78_P61 1
RL78_P63 1
RL78_INTP2 1
Sheet
2
of
2
Rev
E1.00
TSA-IC300/301 User’s Manual
TSA-IC300/301 User’s Manual
6.2
Component List
Component lists are provided on the following pages.
-83-
TSA-IC300/301 User’s Manual
EB-RL78/G1A BOARD Parts List
Item
1
2
3
4
5
6
7
Quantity
1
1
1
1
4
1
12
8
9
10
11
12
13
14
15
16
17
18
19
20
21
22
23
24
25
26
27
28
29
30
31
3
1
4
2
1
0
1
1
2
3
1
1
1
1
0
2
1
1
2
1
4
3
2
9
32
33
34
35
36
37
38
39
40
41
42
43
44
45
46
47
48
2
2
3
1
1
0
1
1
1
1
2
0
0
1
1
5
6
Reference(Mount parts)
Reference(Unmount parts)
CN1
CN2
CN10
CN3
CN4,CN7,CN8,CN9
CN6
C1,C2,C4,C7,C8,C9,C10,
C13,C15,C17,C26,C31
CN5
Parts kind
Connector
Connector
Connector
Connector
Connector
Connector
Capacitor
Pats model number
UX60SC-MB-5ST
FFC-6AMEP1B
7614-5002PL
FSS-41085-10
FSS-41085-08
FSS-42085-18
GRM188R71H104KA93#
Maker
HIROSE
HONDA TSUSHIN
3M
HIROSUGI
HIROSUGI
HIROSUGI
Murata
0.47uF
4.7uF
1uF
100pF
10uF
Unmount_C1608
4pF
3pF
NFM18PC104R1C3
SN74LVC1G125DCK
SN74LVC2G07DCK
UPD78F0730MC
ADP151AUJZ-3.3-R7
R5F10ELEAFB
ADuM7442CRQZ
FFC-3AMEP1B
FFC-2AMEP1B
HEC0470-01-630
SML-311UT
BLM41PG750S
1.5Kohm
1Kohm
100Kohm
10Kohm
Capacitor
Capacitor
Capacitor
Capacitor
Capacitor
Capacitor
Capacitor
Capacitor
Filter
IC
IC
IC
Regulator
MCU
IC
Pin header
Pin header
DC-JACK
LED
Filter
Resistor
Resistor
Resistor
Resistor
GRM188B31E474KA75#
GRM21BB31E475KA75#
GRM21BB11C105KA01#
GRM1882C1H101JA01#
GRM21BR61C106KE15#
GRM1882C1H4R0CZ01#
GRM1883C1H3R0CZ01#
NFM18PC104R1C3
SN74LVC1G125DCK
SN74LVC2G07DCK
uPD78F0730MC-CAB-AX
ADP151AUJZ-3.3-R7
R5F10ELEAFB
ADuM7442CRQZ
FFC-3AMEP1B
FFC-2AMEP1B
HEC0470-01-630
SML-311UT
BLM41PG750SN1L
RK73B1JTTD152J
RK73B1JTTD102J
RK73B1JTTD104J
RK73B1JTTD103J
Murata
Murata
Murata
Murata
Murata
Murata
Murata
Murata
TI
TI
RENESAS
AnalogDevices
Renesas
AnalogDevices
HONDA TSUSHIN
HONDA TSUSHIN
HOSHIDEN
ROHM
Murata
KOA
KOA
KOA
KOA
27ohm
1.6Kohm
0ohm_R2125
13Kohm
3Kohm
Unmount_R2125
0ohm
100ohm
CHS-02TB
SSSS223600
SKRPABE010
TPD10
Unmount_X
SSP-T7-FL_3.7pF
CSTCE16M0VH3L99-R0
HK-5-G
HK-5-G
Resistor
Resistor
Resistor
Resistor
Resistor
Resistor
Resistor
Resistor
Switch
Switch
Switch
Test point
Crystals
Crystals
Crystals
Test point
Test point
RK73B1JTTD270J
RK73B1JTTD162J
RK73Z2ATTD
RK73B1JTTD133J
RK73B1JTTD302J
RK73Z1JTTD
RK73B1JTTD101J
CHS-02TB
SSSS223600
SKRPABE010
TPD10
SSP-T7-FL_3.7pF
CSTCE16M0VH3L99-R0
HK-5-G RED
HK-5-G BLACK
KOA
KOA
KOA
KOA
KOA
KOA
KOA
C27,C28,
C29,C30
C3,C6,C19
C5
C11,C12,C14,C25
C16,C18
C20
C22,C21
C23
C24
EF1,EF2
IC1,IC4,IC5
IC2
IC3
IC6
IC7
IC8
JP3,JP1
JP2
J1
LED1,LED2
L1
R1,R4,R10,R14
R2,R24,R25
R9,R3
R5,R6,R7,R8,R13,R19,R20,
R27,R38
R12,R11
R15,R29
R22,R16,R37
R17
R18
R21,R23
R26
R28
SW1
SW2
SW3,SW4
TP1,TP2,TP3,TP4
XTAL1
XTAL2
XTAL3
TP5,TP6,TP7,TP8,TP13
TP9,TP10,TP11,TP12,TP14,TP15
Parts name
UX60SC-MB-5ST
FFC-6AMEP1B
7614-5002PL
10X1F-H8.5
8X1F-H8.5
18X2F-H8.5
0.1uF
-84-
ALPS
ALPS
SII
MURATA
MAC8
MAC8
TSA-IC300/301 User’s Manual
EB-IC300 BOARD Parts List
Item
1
2
3
4
5
6
7
Quantity
0
1
4
0
1
5
8
Reference(Mount parts)
8
9
10
11
12
13
14
15
16
17
18
19
21
22
23
24
25
26
1
1
1
2
1
1
2
2
1
2
1
0
0
4
4
2
2
0
27
28
2 R5,R7
0
CN3
CN4,CN7,CN8,CN9
CN6
C1,C3,C5,C11,C15
C2,C4,C6,C7,C8,C12,C14,
C16
C9
C10
C13
EF2,EF1
EF3
IC1
JP1,JP2
JP3,JP4
JP5
R2,R1
S1
Reference(Unmount parts)
Parts name
CN1,CN2
PinHeader2.54mm
10X1F-H8.5
CN5,CN10,CN11,CN12,CN13 8X1F-H8.5
CN14
6X1F-H8.5
18X2F-H8.5
10uF
0.1uF
Parts kind
Connector
Connector
Connector
Connector
Connector
Capacitor
Capacitor
Pats model number
FFC-2AMEP1B
FFC-10AMEP1B
FFC-8AMEP1B
FFC-6AMEP1B
FFC-36BMEP1B
GRM21BR61C106KE15#
GRM188R71H104KA93#
Maker
HONDA TSUSHIN
HONDA TSUSHIN
HONDA TSUSHIN
HONDA TSUSHIN
HONDA TSUSHIN
Murata
Murata
1uF
470pF
4.7uF
NFM18PC104R1C3
NFM18PS105R0J3
RAA730300DFP
FFC-2AMEP1B
FFC-3AMEP1B
FFC-6BMEP1B
0ohm
HW-300B
FFC-50BMEP1B
TPD10
HK-5-G
HK-5-G
SML-311UT
1Kohm
-
Capacitor
Capacitor
Capacitor
Filter
Filter
SAIC
Pin header
Pin header
Pin header
Resistor
Hall sensor
Pin header
Test point
Test point
Test point
LED
Resistor
-
GRM21BB11C105KA01#
GRM188B11H471KA01#
GRM21BB31E475KA75#
NFM18PC104R1C3
NFM18PS105R0J3
RAA730300DFP
FFC-2AMEP1B
FFC-3AMEP1B
FFC-6BMEP1B
RK73Z2ATTD
HW-300B
FFC-50BMEP1B
HK-5-G B
HK-5-G R
SML-311UT
RK73B1JTTD102J
-
Murata
Murata
Murata
Murata
Murata
RENESAS
HONDA TSUSHIN
HONDA TSUSHIN
HONDA TSUSHIN
KOA
ASAHIKASEI
HONDA TSUSHIN
MAC8
MAC8
Rohm
KOA
-
Resistor
Resistor
RK73Z1JTTD
RK73B1JTTD103J
KOA
KOA
Parts kind
Connector
Connector
Connector
Connector
Connector
Capacitor
Capacitor
Capacitor
Capacitor
Capacitor
Filter
Filter
SAIC
Pin header
Pin header
Pin header
Resistor
Hall sensor
Pin header
Test point
Test point
Test point
LED
Resistor
-
Pats model number
FFC-2AMEP1B
FFC-10AMEP1B
FFC-8AMEP1B
FFC-6AMEP1B
FFC-36BMEP1B
GRM21BR61C106KE15#
GRM188R71H104KA93#
GRM188B11H471KA01#
GRM21BB11C105KA01#
GRM21BB31E475KA75#
NFM18PC104R1C3
NFM18PS105R0J3
RAA730301DFP
FFC-2AMEP1B
FFC-3AMEP1B
FFC-6BMEP1B
RK73Z2ATTD
HW-300B
FFC-50BMEP1B
HK-5-G B
HK-5-G R
SML-311UT
RK73B1JTTD102J
-
Maker
HONDA TSUSHIN
HONDA TSUSHIN
HONDA TSUSHIN
HONDA TSUSHIN
HONDA TSUSHIN
Murata
Murata
Murata
Murata
Murata
Murata
Murata
RENESAS
HONDA TSUSHIN
HONDA TSUSHIN
HONDA TSUSHIN
KOA
ASAHIKASEI
HONDA TSUSHIN
MAC8
MAC8
Rohm
KOA
-
Resistor
Resistor
RK73Z1JTTD
RK73B1JTTD103J
KOA
KOA
TH1,TH2
TP1,TP2,TP3,TP4
TP5,TP6,TP7,TP8
TP9,TP10,TP11,TP12
LED1,LED2
R3,R4
T1,T2,T3,
T7,T8,T9,T10,T11,
T12,T13,T14,T15,
T16,T17,T18,T19,
T20
R6,R8
R9
0ohm
10Kohm
EB-IC301 BOARD Parts List
Item
1
2
3
4
5
6
7
8
9
10
11
12
13
14
15
16
17
18
19
20
21
22
23
24
25
26
27
Quantity
0
1
4
0
1
4
7
0
1
1
2
1
1
2
2
1
2
1
0
0
4
4
2
2
0
Reference(Mount parts)
CN3
CN4,CN7,CN8,CN9
CN6
C1,C4,C9,C13
C2,C3,C5,C8,C10,C12,C14
C7
C11
EF2,EF1
EF3
IC1
JP1,JP2
JP4,JP3
JP5
R2,R1
S1
TP5,TP6,TP7,TP8
TP9,TP10,TP11,TP12
LED1,LED2
R3,R4
1 R5
0
Reference(Unmount parts)
Parts name
CN1,CN2
PinHeader2.54mm
10X1F-H8.5
CN5,CN10,CN11,CN12,CN13 8X1F-H8.5
CN14
6X1F-H8.5
18X2F-H8.5
10uF
0.1uF
C6
470pF
1uF
4.7uF
NFM18PC104R1C3
NFM18PS105R0J3
RAA730301DFP
FFC-2AMEP1B
FFC-3AMEP1B
FFC-6BMEP1B
0ohm
HW-300B
TH2,TH1
FFC-50BMEP1B
TP1,TP2,TP3,TP4
TPD10
HK-5-G
HK-5-G
SML-311UT
1Kohm
T1,T2,T3,
T7,T8,T9,T10,T11,
T12,T13,T14,T15,
T16,T17,T18,T19,
T20
R6
1Kohm(1608)
R7
10Kohm
-85-
TSA-IC300/301 User’s Manual
6.3
Board Dimensions
Figure 6.8 shows the board dimensions and connector positions. The pitch for all extension connector
through-holes is 2.54mm. These dimensions and positions are the same for both EB-IC300 and EB-IC301.
Figure 6.8 EB-RL78/G1A Board Dimensions
-86-
TSA-IC300/301 User’s Manual
Figure 6.9 EB-IC30x Board Dimensions
-87-
TSA-IC300/301 User’s Manual
6.4
Component Layout
The following figures show the component layout for each board surface. Refer to circuit diagrams and
component lists for component references and part numbers.
Figure 6.10 EB-RL78/G1A Component Layout (Front)
Figure 6.11 EB-RL78/G1A Component Layout (Back)
-88-
TSA-IC300/301 User’s Manual
Figure 6.12 EB-IC300 Component Layout (Front)
Figure 6.13 EB-IC300 Component Layout (Back)
-89-
TSA-IC300/301 User’s Manual
Figure 6.14 EB-IC301 Component Layout (Front)
Figure 6.15 EB-IC301 Component Layout (Back)
-90-