1
NovoLAB User's Manual (Novo
Tech Software Ltd)
NovoLAB User's Manual (Novo Tech Software Ltd)
Table of Contents
1. Contents .............................................................................................................................................................3
1.1 Starting to use NovoLAB ...............................................................................................................................3
1.1.1 License Agreement ................................................................................................................................3
1.1.2 Getting Started ... ..................................................................................................................................5
1.1.3 Units System ..........................................................................................................................................6
1.1.4 Work Flow .............................................................................................................................................6
1.1.5 NovoLAB Main Screen ...........................................................................................................................7
1.1.6 License Manager....................................................................................................................................9
1.1.7 Updating NovoLAB ................................................................................................................................9
1.1.8 Backup & Restore ................................................................................................................................10
1.2 Projects List ................................................................................................................................................11
1.3 Boreholes List .............................................................................................................................................11
1.4 Entering Soil Layers ....................................................................................................................................13
1.5 Drilling Methods .........................................................................................................................................14
1.6 Sample Types..............................................................................................................................................15
1.7 Working with Tables ...................................................................................................................................15
1.8 Laboratory Tests .........................................................................................................................................17
1.8.1 General ................................................................................................................................................17
1.8.2 Sieve Analysis Test ...............................................................................................................................19
1.8.3 Moisture and Density Test...................................................................................................................23
1.8.4 Atterberg Limits Test ...........................................................................................................................24
1.8.5 Field Density Test ................................................................................................................................25
1.8.6 Chemical Test ......................................................................................................................................26
1.8.7 Hydraulic Conductivity Test .................................................................................................................27
1.8.8 Unconfined Compression Test.............................................................................................................28
1.8.9 Triaxial Compression Test ....................................................................................................................29
1.8.10 Consolidation Test .............................................................................................................................31
1.8.11 Direct Shear Test ...............................................................................................................................31
1.8.12 Compaction Test ................................................................................................................................33
1.9 Reporting ....................................................................................................................................................34
1.9.1 Boring Log............................................................................................................................................34
1
NovoLAB User's Manual (Novo Tech Software Ltd)
1.9.2 SPT Plot................................................................................................................................................35
1.9.3 Google Earth Model ............................................................................................................................36
1.9.4 Export to MS Excel ...............................................................................................................................38
1.9.5 Projects List .........................................................................................................................................39
1.9.6 Boreholes List ......................................................................................................................................40
1.9.7 Samples List .........................................................................................................................................41
1.9.8 Tests Summary ....................................................................................................................................41
1.9.9 Tests Invoice ........................................................................................................................................42
1.9.10 Smart Print ........................................................................................................................................43
1.9.11 Sample Identification.........................................................................................................................44
1.10 Tools and Options.....................................................................................................................................44
1.10.1 Preferences .......................................................................................................................................44
1.10.2 Lab. Tests Default Settings ................................................................................................................47
1.10.3 Log Template Designer ......................................................................................................................48
1.10.4 Database Settings ..............................................................................................................................49
1.10.5 Active Sieves ......................................................................................................................................50
1.10.6 Windows Calculator...........................................................................................................................52
1.10.7 Online Backup....................................................................................................................................52
2. Online Resources ..............................................................................................................................................54
2.1 Novo Tech Website ....................................................................................................................................54
2.2 NovoLAB Updates .......................................................................................................................................54
2.3 Other Novo Tech Solutions .........................................................................................................................54
2.4 Contact Us ..................................................................................................................................................54
3. Annex ...............................................................................................................................................................55
3.1 Contact Us ..................................................................................................................................................55
2
NovoLAB User's Manual (Novo Tech Software Ltd)
1. Contents
NovoLAB 2.3 User's Manual
(Lab. Test Processing and Log Drafting Software)
Last update: January 2014
Designed and Developed By:
Novo Tech Software Ltd.
4188 Hoskins Road,
North Vancouver, BC, Canada
www.NovotechSoftware.com
Programmed by : Alireza Afkhami, M.A.Sc, M.C.P, P.Eng
1.1 Starting to use NovoLAB
1.1.1 License Agreement
NovoLAB End User License Agreement
PLEASE READ THIS END USER LICENSE AGREEMENT ("EULA") CAREFULLY BEFORE
DOWNLOADING OR USING THE SOFTWARE. BY DOWNLOADING THE SOFTWARE, OR USING THE
SOFTWARE, YOU ARE CONSENTING TO BE BOUND BY THIS AGREEMENT. IF YOU DO NOT AGREE
TO ALL OF THE TERMS OF THIS AGREEMENT DO NOT DOWNLOAD AND/OR USE THE SOFTWARE.
3
NovoLAB User's Manual (Novo Tech Software Ltd)
The Product is Copyright © 2002-2014 “NOVO TECH SOFTWARE”. You may use it and distribute it
according to this following License Agreement. If you do not agree with these terms, please
remove the Product from your system. By incorporating the Product in your work or distributing
the Product to others you implicitly agree to these license terms.
1. DEFINITIONS
1.1. "NovoLAB" or "Software" refers to “NOVO TECH SOFTWARE”’s program, in each case,
supplied by “NOVO TECH SOFTWARE” herewith, and corresponding documentation, associated
media, and online or electronic documentation.
1.2. "Trial Version” means a free version of the Software for personal use only, so identified, to be
used in one computer only and for a period of 14 days. The Trial Version is fully functional with no
restrictions compared to the registered version.
1.3. "Registered Version" means a version which has been bought from “NOVO TECH SOFTWARE”.
2. LIMITATION OF LIABILITY
In no event shall "NOVO TECH SOFTWARE" be liable for any damages (including, without
limitation, lost profits, business interruption, or lost information) rising out of 'Authorized Users'
use of or inability to use the NovoLAB, even if "NOVO TECH SOFTWARE" has been advised of the
possibility of such damages. In no event will "NOVO TECH SOFTWARE" be liable for loss of data or
for indirect, special, incidental, consequential (including lost profit), or other damages based in
contract, tort or otherwise. "NOVO TECH SOFTWARE" shall have no liability with respect to the
content of the NovoLAB or any part thereof, including but not limited to errors or omissions
contained therein, libel, infringements of rights of publicity, privacy, trademark rights, business
interruption, personal injury, loss of privacy, moral rights or the disclosure of confidential
information.
3. FOR NovoLAB TRIAL VERSION
(a) The NovoLAB Trial version may be freely distributed, with exceptions noted below, provided
the distribution package is not modified in ANY WAY.
(b) The NovoLAB Trial version may not be distributed inside of any other software package
without written permission of “NOVO TECH SOFTWARE”.
(c) The NovoLAB Trial version allows the user to publish its work according to the license
agreement, but nor “NOVO TECH SOFTWARE” nor any member of the company can be held liable
for the content or accuracy of the publication.
(d) You may use the accompanying Product free of charge for a period of 14 days for the sole
purpose of evaluating the Product. If, after this period, you wish to continue using this Product,
you are required to purchase it. In other case, you are required to remove this Product, in its
entirety, from all computers on which it is installed.
(e) You shall not use, copy, rent, lease, sell, modify, decompile, disassemble, otherwise reverse
engineer, or transfer the Product except as provided in this Agreement. Any such unauthorized
use shall result in immediate and automatic termination of this Agreement.
4. FOR NovoLAB REGISTERED VERSION
(a) You may install and use the Software on a single computer; OR install and store the Software
on a storage device, such as a network server, used only to install the Software on your other
computers over an internal network, provided you have a license for each separate computer on
4
NovoLAB User's Manual (Novo Tech Software Ltd)
which the Software is installed and run. A license for the Software may not be shared, installed or
used concurrently on different computers.
(b) The NovoLAB Registered version allows the registered user to publish its work according to the
license agreement, but nor “NOVO TECH SOFTWARE” nor any member of the company can be
held liable for the content or accuracy of the publication.
(c) The NovoLAB Registered version guaranties to the registered user free updates for a whole
version cycle and for 12 (twelve) months.
(d) You shall not use, copy, rent, lease, sell, modify, decompile, disassemble, otherwise reverse
engineer, or transfer the Product except as provided in this Agreement. Any such unauthorized
use shall result in immediate and automatic termination of this Agreement.
(e) Once purchased, the Software may not be return to "NOVO TECH SOFTWARE". The price paid
for the Software is not refundable.
(f) The NovoLAB license is issued for one computer based on the Hardware ID provided by user.
Each transfer of license to another computer, if approved by NOVO TECH SOFTWARE, will be
subject to 20 percent charge based on latest NovoLAB price.
5. TERMS
This license is effective until terminated. You may terminate it by destroying the program, the
documentation and copies thereof. This license will also terminate if you fail to comply with any
terms or conditions of this agreement. You agree upon such termination to destroy all copies of
the program and of the documentation, or return them to the author.
6. OTHER RIGHTS AND RESTRICTIONS
All other rights and restrictions not specifically granted in this license are reserved by "NOVO
TECH SOFTWARE". If you have any questions regarding this agreement, please write to
[email protected]
YOU ACKNOWLEDGE THAT YOU HAVE READ THIS AGREEMENT, UNDERSTAND IT AND AGREE TO
BE BOUND BY ITS TERMS AND CONDITIONS.
1.1.2 Getting Started ...
Getting Started
We recommend minimum 1024*768 screen resolution for using NovoLAB.
If you are using the dongle key version, please make sure that it is plugged to your computer
before you run the program.
To invoke the help page associated with each page of software, click on the
button on top-
right corner of each page in NovoLAB.
Make sure you prepare backup from your data periodically. Your database file is the
NovoLAB.MDB file (see more).
After the first installation on each computer, please open the general preferences(See 1.10.1)
pages and set the preferences. Next, open the laboratory tests default settings(See 1.10.2) page
and set default values. These are very important steps in NovoLAB installation and setup,
otherwise you may end up with incorrect results.
5
NovoLAB User's Manual (Novo Tech Software Ltd)
Review the data entry and reporting steps(See 1.1.4) recommended for using NovoLAB.
Please contact us at [email protected] with any questions or suggestions.
1.1.3 Units System
Units System
This version of NovoLAB supports Metric units (kg, cm).
1.1.4 Work Flow
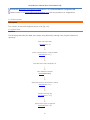
Workflow
The following describes the data entry steps using NovoLAB, starting from project initiation to
reporting:
Enter new project data
(see how(See 1.2))
↓
Enter new borehole / test pit data
(see how(See 1.3))
↓
Enter SPT blow counts, sample list, etc
↓
Enter laboratory test data
(see how(See 1.8.1))
↓
Specify soil layers for each borehole / test pit
(see how(See 1.4))
↓
Prepare boring log
(see how(See 1.9.1))
↓
Prepare other reports, as required
(see how)(See 1.9)
6
NovoLAB User's Manual (Novo Tech Software Ltd)
↓
Prepare database backup
(see how(See 1.1.8))
1.1.5 NovoLAB Main Screen
NovoLAB Main Screen
The main screen of NovoLAB provides access to the main toolbar and shows additional information
on the status-bar below the screen. The current project name is shown on the top-right corner of
the screen. You can minimize the screen by clicking on the
icon beside the project name. The
following describes the function of different tabs on the main toolbar:
File tab: this tab provides access to list of projects(See 1.2) and boreholes(See 1.3).
Soil Mechanics Lab. tab: this tab provides access to data entry pages for laboratory test(See
1.8.1) pages, such as sieve analysis, Atterberg limits, etc. (see more(See 1.8.1))
Reporting tab: this tab provides access to boring log(See 1.9.1), tests summary report(See
1.9.8), etc. (see more(See 1.9))
Tools & Options tab: this tab allows you to configure general preferences(See 1.10.1) and
default test settings(See 1.10.2).
Tables tab: provides features for working with data entry tables(See 1.7), such as deleting a
row, exporting table to Excel and importing data from text file into the table.
Help tab: this tab provides access to this help file, license manager(See 1.1.6) page and more.
7
NovoLAB User's Manual (Novo Tech Software Ltd)
Status-bar: this is located at the bottom of the screen and provides information on versioning
and type of NovoLAB license you currently use. If an update is available you will see a notification
on the status bar. For more information on how to update NovoLAB, read this article(See 1.1.7).
8
NovoLAB User's Manual (Novo Tech Software Ltd)
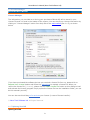
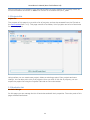
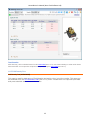
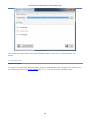
1.1.6 License Manager
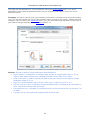
NovoLAB User's Manual
License Manager
The information you provided to us during your purchase of NovoLAB, will be stored in your
License File and it is used in the header of the reports. You can check your License information by
clicking on "License Manager" button from Help tab of the main toolbar(See 1.1.5), as shown
below:
If you have purchased the software but not yet received a license file from us, please click on
Request Your License! button and follow the instructions to request a license file. When you
receive the license file (*.license), please click on Install License File button on this dialog to load
and activate the license (program simply copies the license file into the installation folder, you can
do this manually as well).
You can also use this dialog to De-activate your license (in case of license transfer).
© Novo Tech Software Ltd. All Rights Reserved
1.1.7 Updating NovoLAB
Updating NovoLAB
9
NovoLAB User's Manual (Novo Tech Software Ltd)
If an update of NovoLAB is available, the following notification will be shown on the statusbar at
the bottom of your screen:
In order to update NovoLAB please follow these steps:
1. Click on the red Update is available! link from the statusbar. If you have a valid update
subscription this will take you to Novo Tech website to download new version (you can
renew your subscription here)
2. Prepare a backup (See 1.1.8)from your database and save it in a safe place
3. Uninstall NovoLAB from Windows control panel > Add or Remove Programs page
4. Install new version
5. Restore your database (see how(See 1.1.8))
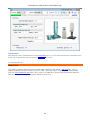
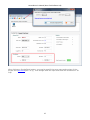
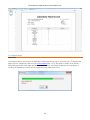
1.1.8 Backup & Restore
Database Configuration
It is necessary to regularly backup the database and be prepared in case of hard disk failure or infection by a computer
virus. By having a backup of your database you will be able to use the database by reinstalling NovoLAB. For this purpose
click on "Database Configuration" from the "Tools and Options" menu on the main toolbar(See 1.1.5). The following page
will appear:
NovoLAB comes with Microsoft Access database, so please do not change the database type without consulting Novo Tech
technical team.
Preparing a Backup
Click on the link Backup my database in the bottom left of your screen. Save the back up file in location of you choice. All
your project data is stored in this database file. We recommend you save the backup file on a CD or flash drive, it is
recommended to save the backup file in a folder with a name that indicates the backup date.
The second method is to click on the path shown below the "Current database path" (see the above screenshot). This will
open the folder; now you can easily copy the database file to your desired location.
Database Restore
If you want to restore your data, click on the link Replace / restore database in the upper right of your screen and locate
10
NovoLAB User's Manual (Novo Tech Software Ltd)
where the backup file of your database is saved. NovoLAB will replace the existing database with your backup. Please note
that the actual database file extension is .mdb and the extension of the database backup file is _mdb.
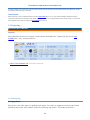
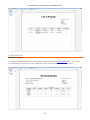
1.2 Projects List
Projects List
The purpose of this page is to provide a list of projects, and can be accessed from the File tab on
the main toolbar(See 1.1.5). This page consists of a toolbar, list of projects and a list of test holes
for selected project.
Using toolbar you can create new project, delete an existing project, filter projects and save
change. You can also print a list of all projects. Once you click on the list of projects, you can
export the project list using the Projects Table tab on the main toolbar.
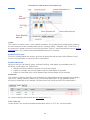
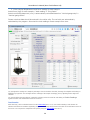
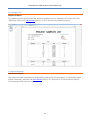
1.3 Boreholes List
Boreholes Manager
On this page you can manage the list of boreholes and edit their properties. The main parts of this
page are described below:
11
NovoLAB User's Manual (Novo Tech Software Ltd)
Toolbar
This toolbar is used to insert / save /delete boreholes. The toolbar also provides quick access to
the main sections of the borehole data such as "Borehole Data", "Samples" and "Field Tests". If
the borehole is actually a test pit, the drilling method "Test Pit" should be selected (see all drilling
methods(See 1.5)). Please note the deleted data cannot be restored.
Borehole List Panel
This list is located below the toolbar, and lists all boreholes and test pits (with different icons).
Click on any boreholes to view and edit its information.
Borehole Data tab
Using this tab you can specify name, method of drilling, total depth, groundwater level, fill
thickness, coordinates, etc. Please note:
Name of borehole should be unique in the current project
Depth of a sample may not be greater than the total depth of borehole
Depth of a test field may not be greater than the total depth of the borehole
Samples tab
This section is used for entering a list of samples for selected borehole by specifying their depth,
type, color, sample number (Code or ID), and a visual description. If the gradation tests is
previously conducted on this sample, the last column will show the USCS soil classification.
For various sample types please see this article(See 1.6).
Field Tests tab
In this section, the results of standard penetration tests, or CPT, etc. can be entered.
12
NovoLAB User's Manual (Novo Tech Software Ltd)
The other field tests could consist of CPT, Vane shear, Down-hole / Cross-hole shear wave velocity
and similar tests. For ease of data entry, you can also import the test result from a Text file. To
do this, click on the table, then select "From Text File" menu from the main toolbar(See 1.1.5).
The following described the format of the text file to be prepared for importing field test data.
Locating Boreholes on Google Earth
To use this feature, you need the UTM coordinates of the boreholes. Click on Google Earth icon,
then specify the zone name and number to open Google Earth 3D model (more(See 1.9.3)).
1.4 Entering Soil Layers
Soil Layering
This page is accessed from Reporting tab of the main toolbar(See 1.1.5) and is used for defining
subsurface soil layers. These layers will be shown on the boring log(See 1.9.1). You need to
specify the bottom depth of each layer, as well as its dominant soil class, layer title and layer
description. The divider line between the subsequent layers can be of type solid, dashed and
dotted.
13
NovoLAB User's Manual (Novo Tech Software Ltd)
You can also use Comments tab to enter comments at certain depth. Comments will be shown on
the boring log if they are selected as part of the log (see log designer(See 1.10.3)).
1.5 Drilling Methods
Drilling Methods
The following drilling methods are supported in NovoLAB; if you don't see the boring method you
are looking for, just contact us(See 3.1) and we will send you a customized database with
additional drilling methods:
Mud Rotary
Test Pit
Solid Stem Auger (STA)
Hollow Stem Auger (HSA)
Hand Auger
Sonic (vibratory)
Direct Push (DP)
Air Rotary
14
NovoLAB User's Manual (Novo Tech Software Ltd)
Percussion
Cable Tool
Reverse Circulation
Diamond Core
Hydraulic Rotary
1.6 Sample Types
NovoLAB User's Manual
Sample Types
The following sample types are supported in NovoLAB; if you don't see the one you are looking
for, just contact us(See 3.1) and we will send you a customized database with additional drilling
methods:
Disturbed
Undisturbed
Shelby / U4
Core Cutter (for test pits)
SPT Split Spoon
Percolation Test (see more(See 1.8.7))
Field Density
Water
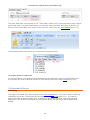
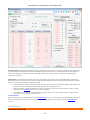
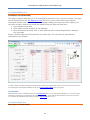
1.7 Working with Tables
Working with Tables
Most of the data entry and on-screen results in NovoLAB use tables. The following is an example
of a table. Please note that data should be entered in the white cells. The red cells are
automatically calculated by the program.
15
NovoLAB User's Manual (Novo Tech Software Ltd)
You can add / delete rows to most of tables (if they are used for data entry). All tables can be
exported to Excel, XML and Text formats. Tables such as SPT blow counts or other field tests can
import data from a tabular text file. In order to work with a table, click on it. The following menu
on the main toolbar allows you to perform several functions:
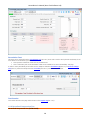
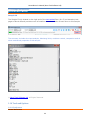
Importing from Text File: When importing from a text file to a table (such as SPT blow counts), the text file needs to be
comma or tab separated and each line should contain the same numbers as in the table. The following screenshot shows
importing Depth and SPT Blows data from a text file when on the boreholes manager(See 1.3) page:
16
NovoLAB User's Manual (Novo Tech Software Ltd)
1.8 Laboratory Tests
1.8.1 General
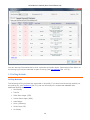
Soil Mechanics Lab. Menu
In order to access to soil mechanics tests data entry pages, please use "Soil Mechanics Lab."
menu from the main toolbar(See 1.1.5).
The numbers in bracket show the total number of tests for each test. For example the above
screenshot indicates data for 3 direct shear tests are entered into this project.
17
NovoLAB User's Manual (Novo Tech Software Ltd)
1.8.1.1 Test Data Entry
Soil Mechanics Lab. Menu
In order to access to soil mechanics tests data entry pages, please use "Soil Mechanics Lab."
menu from the main toolbar(See 1.1.5).
The numbers in bracket show the total number of tests for each test. For example the above
screenshot indicates data for 3 direct shear tests are entered into this project.
1.8.1.2 Tests Toolbar
Tests Toolbar
This toolbar is shown at the top of all test pages and allows you to navigate through the tests,
save, delete, copy(See 1.8.1.3) and print the test results.
In order to enter new test data select the borehole and sample from the lists on the left side of the test toolbar; this will
clear all fields and you can start data entry for this new test.
Please note deleted test data cannot be recovered.
18
NovoLAB User's Manual (Novo Tech Software Ltd)
1.8.1.3 Copying a Test
NovoLAB User's Manual
Copy Test
This feature is used to copy all test data from one sample to another sample (even in a different
project), and can be accessed through the test toolbar(See 1.8.1.2).
© Novo Tech Software Ltd. All Rights Reserved
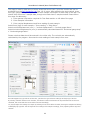
1.8.2 Sieve Analysis Test
Sieve Analysis Test (C136)
This page is used for data entry of sieve analysis test and to view / print the test results. This
page can be accessed from the Soil Mechanics Lab.(See 1.8.1) menu. The main input data
consists of sample weight, Atterberg limits and hydrometer data.
Weights: In most cases one sample is used for sieve analysis. However, if the sample is divided to
two parts (i.e. retained above the sieve #4 (4.75 mm opening) and below sieve #4) select the "2Part Sieve Test (#4)" checkbox and enter the weight of the second sample as well. In addition,
please enter the weight of the retained soil on each sieve in the table. Please note that data
should be entered in the white cells. The red cells are automatically calculated by the program.
19
NovoLAB User's Manual (Novo Tech Software Ltd)
Atterberg Limits: If Atterberg limits test is done on this sample you can click on "Read From Atterberg Test" button, and
LL and PL will be automatically retrieved from database and will be placed in the corresponding fields. If Atterberg limits
data for this sample has not been entered in NovoLAB, simply enter LL and PL values or select from the appropriate
checkboxes on the left.
Hydrometer: If hydrometer test (below sieve #200) is conducted, enter data in the corresponding tables. Please note
depending on type of hydrometer used (151H or 152H) data with different formats should be entered (follow the example
shown on screen when selecting the hydrometer type).
Only Used Sieves: select this checkbox to see only those sieves with non-zero retained weights. This allows you to
quickly check your input data with the laboratory sheets for any data entry error.
Only Active Sieves: select this checkbox to only show the sieves mostly used in your laboratory (hence, a faster
data entry). See this article(See 1.8.2.2) for more information.
Show Filters: if this checkbox is selected, filter curves are shown on the sieve analysis report. To edit the filter
curves data click on "Edit Filter Curves" button.
Test Results
After data entry, click on calculate button from the tests toolbar(See 1.8.1.2). Test results will be shown in the table on the
bottom-right corner of the screen. You can print the unconfined compression test report by using the tests toolbar(See
1.8.1.2).
1.8.2.1 Sieve Test
Sieve Analysis Test (C136)
20
NovoLAB User's Manual (Novo Tech Software Ltd)
This page is used for data entry of sieve analysis test and to view / print the test results. This
page can be accessed from the Soil Mechanics Lab.(See 1.8.1) menu. The main input data
consists of sample weight, Atterberg limits and hydrometer data.
Weights: In most cases one sample is used for sieve analysis. However, if the sample is divided to
two parts (i.e. retained above the sieve #4 (4.75 mm opening) and below sieve #4) select the "2Part Sieve Test (#4)" checkbox and enter the weight of the second sample as well. In addition,
please enter the weight of the retained soil on each sieve in the table. Please note that data
should be entered in the white cells. The red cells are automatically calculated by the program.
Atterberg Limits: If Atterberg limits test is done on this sample you can click on "Read From Atterberg Test" button, and
LL and PL will be automatically retrieved from database and will be placed in the corresponding fields. If Atterberg limits
data for this sample has not been entered in NovoLAB, simply enter LL and PL values or select from the appropriate
checkboxes on the left.
Hydrometer: If hydrometer test (below sieve #200) is conducted, enter data in the corresponding tables. Please note
depending on type of hydrometer used (151H or 152H) data with different formats should be entered (follow the example
shown on screen when selecting the hydrometer type).
Only Used Sieves: select this checkbox to see only those sieves with non-zero retained weights. This allows you to
quickly check your input data with the laboratory sheets for any data entry error.
Only Active Sieves: select this checkbox to only show the sieves mostly used in your laboratory (hence, a faster
data entry). See this article(See 1.8.2.2) for more information.
21
NovoLAB User's Manual (Novo Tech Software Ltd)
Show Filters: if this checkbox is selected, filter curves are shown on the sieve analysis report. To edit the filter
curves data click on "Edit Filter Curves" button.
Test Results
After data entry, click on calculate button from the tests toolbar(See 1.8.1.2). Test results will be shown in the table on the
bottom-right corner of the screen. You can print the unconfined compression test report by using the tests toolbar(See
1.8.1.2).
1.8.2.2 My Sieves
Active Sieves
This page is used to specify the sieves you use in your laboratory. To access this page click on
"My Sieves" buttons from the "Tools and Options" menu on the main toolbar(See 1.1.5).
Although NovoLAB database includes a complete list of all standard sieves, if you don't use all
these sieves in your laboratory you can deselect them from this list. The advantage is that on
sieve analysis page, you can select to show the "active sieves" only; this will ease data entry.
1.8.2.3 Filter Zones
Filter Zones
This feature is used to plot filter zones on sieve analysis curve in order to determine if the
material being tested conforms with certain particle size distribution criteria. This feature can be
accessed from sieve analysis(See 1.8.2) page.
22
NovoLAB User's Manual (Novo Tech Software Ltd)
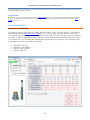
1.8.3 Moisture and Density Test
Moisture / Density Test (ASTM D4643, D2216)
This page is used for data entry of moisture / density determination test and to view / print the
results. This page can be accessed from the Soil Mechanics Lab.(See 1.8.1) menu. Please enter
the required input data and press calculate button to see the results. If the actual input data is
not available (e.g. test is conducted by another laboratory) click on "Input data not available"
checkbox and enter the test results manually.
23
NovoLAB User's Manual (Novo Tech Software Ltd)
Test Results
After data entry, click on calculate button from the tests toolbar(See 1.8.1.2). Test results will be shown on the right side of
the screen. You can print the test report by using the tests toolbar(See 1.8.1.2).
1.8.4 Atterberg Limits Test
Atterberg Limits Test (ASTM D4318)
This page is used for data entry of Atterberg limits test and to view / print the results. This page
can be accessed from the Soil Mechanics Lab.(See 1.8.1) menu.
Data entry should be done in separate tables for liquid limit and plastic limit tests. Input data
simply consists of container weight as well as dry and wet weight of soil samples. Enter minimum
3 samples to obtain a reasonable test results. Please note that data should be entered in the
white cells. The red cells are automatically calculated by the program.
24
NovoLAB User's Manual (Novo Tech Software Ltd)
Test Results
After data entry, click on calculate button from the tests toolbar(See 1.8.1.2). Test results including LL and PL will be shown
below each table. You can print the compaction test report by using the tests toolbar(See 1.8.1.2).
1.8.5 Field Density Test
Field Density Test (ASTM D6938)
This page is used for data entry of field density test and to view / print the results. This page can
be accessed from the Soil Mechanics Lab.(See 1.8.1) menu. Please enter the required input data
and press calculate button to see the results.
25
NovoLAB User's Manual (Novo Tech Software Ltd)
Test Results
After data entry, click on calculate button from the tests toolbar(See 1.8.1.2). Test results will be shown at the bottom of the
screen. You can print the test report by using the tests toolbar(See 1.8.1.2).
1.8.6 Chemical Test
Chemical Tests
This page is used for data entry of soil and water chemical test results (see how(See 1.6) to
specify a sample as type of 'water'), and to view / print the report. This page can be accessed
from the Soil Mechanics Lab.(See 1.8.1) menu. For data entry simply find the desired chemical
test and enter the corresponding test results in front of it.
26
NovoLAB User's Manual (Novo Tech Software Ltd)
Test Results
You can print the compaction test report by using the tests toolbar(See 1.8.1.2).
1.8.7 Hydraulic Conductivity Test
Permeability Test (ASTM D2434)
This page is used for data entry of falling head and constant head permeability test, and to view /
print the test results. This page can be accessed from the Soil Mechanics Lab.(See 1.8.1) menu.
After entering the sample and apparatus information, please enter water head and time readings
in the table. Please note that data should be entered in the white cells. The red cells are
automatically calculated by the program.
27
NovoLAB User's Manual (Novo Tech Software Ltd)
Percolation Test
This page can be accessed from the Soil Mechanics Lab.(See 1.8.1) menu and is used to enter hydraulic conductivity of soil
to be shown on the borehole logs when:
This represents a field test results such as percolation test
This is a laboratory test results but details of data is not available to be used in Permeability Test page
In order to enter permeability of soil make sure the sample is defined as Percolation type(See 1.6) on borehole manager
page(See 1.3). Select the sample from the test toolbar(See 1.8.1.2) and enter the test results.
Test Results
Test results entered on this page will be shown on the borehole log(See 1.9.1).
1.8.8 Unconfined Compression Test
Unconfined Compression Test (ASTM D2166)
28
NovoLAB User's Manual (Novo Tech Software Ltd)
This page is used for data entry of Unconfined Compression Test and to view / print the test
results. This page can be accessed from the Soil Mechanics Lab.(See 1.8.1) menu. After entering
the sample information and moisture data, please enter data for force reading and axial
displacement. Please note that data should be entered in the white cells. The red cells are
automatically calculated by the program. You can also specify a picture of the sample (typically
taken after the test).
Please enter zero for both force reading and axial displacement for the first reading.
In order to insert a new row in between existing rows, press Shift+Insert.
In order to delete a row of data, select the row and press Shift+Delete buttons. Please note deleted data cannot be
recovered.
Test Results
After data entry, click on calculate button from the tests toolbar(See 1.8.1.2). Test results including unconfined shear
strength (Qu) will be shown in the table on the bottom of the screen. You can print the unconfined compression test report
by using the tests toolbar(See 1.8.1.2).
1.8.9 Triaxial Compression Test
Triaxial Shear Test (ASTM D4767)
This page is used for data entry of Triaxial shear test and to view / print the results and can be
accessed from the Soil Mechanics Lab.(See 1.8.1) menu. After selecting the test type and entering
gauge settings you need to enter sample information for each step of the test. You should enter
minimum 2 sample data; though most tests have 3 samples tested. Please follow this steps for
data entry:
1. Enter general information required for Test Data section on left side of the page
2. Enter samples information
29
NovoLAB User's Manual (Novo Tech Software Ltd)
3. Enter vertical displacement and force reading for each sample
Actual force (kgf) for each sample= "load reading" x "Ring factor"
Actual vertical displacement (mm) is automatically calculated based on "Vertical gauge step" x
"Vertical gauge factor"
Please note that data should be entered in the white cells. The red cells are automatically
calculated by the program. Also start the test readings of each sample from zero.
You can adjust the readings of a sample by selecting it from the list below the table, choosing the multiplier and clicking on
Multiply by hyperlink. This will adjust all force readings of the sample accordingly, hence, adjusting friction angle and
cohesion.
You can also delete the entire data of a sample by selecting it from the same list and clicking on Delete Readings
hyperlink. Please note deleted data cannot be recovered.
Test Results
After data entry, click on calculate button from the tests toolbar(See 1.8.1.2). Test results including F and cohesion for
effective and total stress condition (depending of type of Triaxial test) will be shown in the table on the left-bottom corner of
the screen. You can print the compaction test report by using the tests toolbar(See 1.8.1.2).
30
NovoLAB User's Manual (Novo Tech Software Ltd)
1.8.10 Consolidation Test
Consolidation Test (ASTM D2435)
This page is used for data entry of 1-D consolidation test and to view / print the results. This page
can be accessed from the Soil Mechanics Lab.(See 1.8.1) menu. After entering the sample
information please enter vertical displacement gauge readings for each step of the loading. You
can enter as many loads as you want but please follow this steps for data entry:
1. Enter sample information
2. Enter loads (normal stresses) in the left table
3. After all loads are entered, click on each load and enter vertical displacement reading in
the right table
Please note that data should be entered in the white cells. The red cells are automatically
calculated by the program.
In order to delete a reading, simply press Delete button. Please note deleted data cannot be recovered. The time intervals
for recording the vertical gauge readings can be set in Tests Default Settings(See 1.10.2) page.
Test Results
After data entry, click on calculate button from the tests toolbar(See 1.8.1.2). Test results including Cc, Cs, Pc, dry density,
void ratio (e) and degree of saturation of this sample will be shown in the table on the right-bottom corner of the screen.
You can print the compaction test report by using the tests toolbar(See 1.8.1.2).
1.8.11 Direct Shear Test
Direct Shear Test (ASTM D3080)
31
NovoLAB User's Manual (Novo Tech Software Ltd)
This page is used for data entry of direct shear test and to view / print the results and can be
accessed from the Soil Mechanics Lab.(See 1.8.1) menu. After selecting the test method, shear
box type, gauge factors, etc. you need to enter sample information for each step of the test. You
should enter minimum 2 sample data; though most tests have 3 samples tested. Please follow
this steps for data entry:
1. Enter general information required for Test Data section on left side of the page
2. Enter samples information
3. Enter vertical displacement and force reading for each sample
Actual force (kgf) for each sample= "force reading" x "Ring factor"
Actual vertical displacement (mm) = "vertical displacement" x "Vertical gauge factor"
Actual horizontal displacement (mm) is automatically calculated based on "Horizontal gauge step"
x "Horizontal gauge factor"
Please note that data should be entered in the white cells. The red cells are automatically
calculated by the program. Also start the test readings of each sample from zero.
NovoLAB supports any type and size of shear box, just select the type and enter width (B) and height (H) of the box.
By selecting "Calculate effective area" checkbox, the effective contact area between the top and bottom half of the box is
calculated, and normal and shear stress will be corrected accordingly.
You can also adjust the readings of a sample by selecting it from the list below the table, choosing the multiplier and clicking
on Multiply by hyperlink. This will adjust all force readings of the sample accordingly, hence, adjusting friction angle and
cohesion.
32
NovoLAB User's Manual (Novo Tech Software Ltd)
You can also delete the entire data of a sample by selecting it from the same list and clicking on Delete hyperlink. Please
note deleted data cannot be recovered.
Test Results
After data entry, click on calculate button from the tests toolbar(See 1.8.1.2). Test results including F and cohesion will be
shown in the table on the left-bottom corner of the screen. You can print the compaction test report by using the tests
toolbar(See 1.8.1.2).
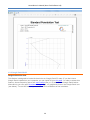
1.8.12 Compaction Test
Compaction Test (ASTM D698)
This page is used for data entry of compaction test and to view / print the results. This page can
be accessed from the Soil Mechanics Lab.(See 1.8.1) menu. After entering the test type, mold
volume and specific gravity, please enter data for each test. This page accepts up to 5 tests while
minimum 3 tests are required to obtain the test results. Please note that data should be entered
in the white cells. The red cells are automatically calculated by the program. The following types
of compaction tests are covered in NovoLAB:
AASHTO T-99 (ST.)
AASHTO T-180 (MOD.)
ASTM D-1557 (MOD.)
ASTM D-698 (ST.)
33
NovoLAB User's Manual (Novo Tech Software Ltd)
In order to delete one of the tests, select the test number from the list below the main table and click on X button. Please
note deleted data cannot be recovered.
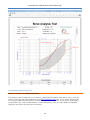
Test Results
After data entry, click on calculate button from the tests toolbar(See 1.8.1.2). Test results including optimum moisture
content and maximum dry density of soil will be shown in the table on the right-bottom corner of the screen. You can print
the compaction test report by using the tests toolbar(See 1.8.1.2).
1.9 Reporting
NovoLAB User's Manual
Reports
NovoLAB offers a variety of reports. These can be accessed from "Reporting" tab of the main
toolbar(See 1.1.5), as shown below:
© Novo Tech Software Ltd. All Rights Reserved
1.9.1 Boring Log
Boring Log Report
Boring log is the main part of a geotechnical report. Inn order to prepare the boring log choose
Reporting tab of the main toolbar, and click on Boring Log button. This make some time
34
NovoLAB User's Manual (Novo Tech Software Ltd)
depending on number of boreholes and tests in current project. In the meanwhile you will notice
the progress report on the bottom of your screen:
Prior to preparing the boring log make sure you have defined the subsurface soil layers for each
borehole / test pit using the Soil Layering(See 1.4) page. The following is a sample screenshot of
boring log:
You can specify the columns presented on the boring log using the log designer(See 1.10.3)
feature.
1.9.2 SPT Plot
SPT Plot
To prepare a report consisting a plot of SPT blow counts versus depth for all boreholes of the
current project, from the main toolbar(See 1.1.5), click on "SPT Plot" button from the "Reporting"
tab. This will show the following report:
35
NovoLAB User's Manual (Novo Tech Software Ltd)
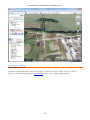
1.9.3 Google Earth Model
Google Earth 3D Plan View
This feature is designed to locate the boreholes on Google Earth 3D map. If you don't have
Google Earth installed on your computer you can install it from this page. In order to access this
feature, choose Reporting tab of the main toolbar(See 1.1.5) and click on Google Earth button.
Alternatively you can open Boreholes Manager(See 1.3) page and click on the Google Earth icon
(see below). To use this feature, you need the UTM coordinates of the boreholes.
36
NovoLAB User's Manual (Novo Tech Software Ltd)
After clicking on Google Earth button, you need to specify the zone name and number of the
project site (see more(See 1.9.3)). Then Google Earth will open and show the boreholes on 3D
map.
37
NovoLAB User's Manual (Novo Tech Software Ltd)
1.9.4 Export to MS Excel
Export to Microsoft Excel
All tables in NovoLAB can be exported to Excel. In order to export a table, click on "Export to
Excel" on the Reporting tab of the main toolbar(See 1.1.5). Another page pops up:
38
NovoLAB User's Manual (Novo Tech Software Ltd)
Now select the output folder and choose tables to export, then click on "Save as Excel File"
button.
1.9.5 Projects List
Projects List Report
To prepare a report listing all the projects saved in the database select "Projects List" button from
the "Reporting" tab on the main toolbar(See 1.1.5). This will show the following report:
39
NovoLAB User's Manual (Novo Tech Software Ltd)
1.9.6 Boreholes List
Boreholes List Report
To prepare a report listing the current project boreholes from the main toolbar(See 1.1.5), click
on "Boreholes List" button from the "Reporting" tab. This will show the following report:
40
NovoLAB User's Manual (Novo Tech Software Ltd)
1.9.7 Samples List
Samples List Report
To prepare a report listing the current project's samples click on "Samples List" button from the
"Reporting" tab on the main toolbar(See 1.1.5). This will show the following report:
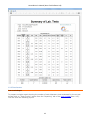
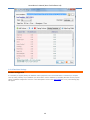
1.9.8 Tests Summary
Tests Summary Report
This report provides a summary of all laboratory tests in the current project. To access this report
choose "Reporting" tab from the main toolbar(See 1.1.5), and click on "Tests Summary Report".
The following shows a similar report:
41
NovoLAB User's Manual (Novo Tech Software Ltd)
1.9.9 Tests Invoice
Tests Invoice Report
To prepare a simple report showing the number of each laboratory test conducted for the current
project click on "Tests Invoice" button from the "Reporting" tab on the main toolbar(See 1.1.5).
This will show the following report:
42
NovoLAB User's Manual (Novo Tech Software Ltd)
1.9.10 Smart Print
Smart Print
This feature allows you to print all laboratory tests and boring logs in just one click. To access this
page click on "Reporting" tab from the main toolbar(See 1.1.5) and click on Smart Print button.
NovoLAB opens each test page and prepares the reports, so please be patient while program is
working as depending on size of the project this may take some time.
43
NovoLAB User's Manual (Novo Tech Software Ltd)
1.9.11 Sample Identification
NovoLAB User's Manual
Sample ID
The Sample ID link located on the right end of the test toolbar(See 1.8.1.2) on laboratory test
pages of NovoLAB and provides more information about the results of tests done on this sample:
The summary includes sieve test analysis, Atterberg limits, moisture content, compaction and all
other mechanical properties of this sample:
© Novo Tech Software Ltd. All Rights Reserved
1.10 Tools and Options
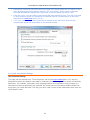
1.10.1 Preferences
General Preferences
44
NovoLAB User's Manual (Novo Tech Software Ltd)
This page can be reached from "Tools & Options" tab on the main toolbar(See 1.1.5) and is
designed to set the general preferences such as your company information, fonts, etc. and is
described below:
Company: this tab is used to enter your company information including a brief text and company
logo. You can also specify the size of your company name printed on the reports. Please note that
company name is fixed in the license file(See 1.1.6) you received during activation of NovoLAB. If
you want to change company name, contact us(See 3.1).
Reports: this tab is used for report settings as described below:
Page numbering: if 'Automatic' is selected, page number in a report starts from 1. If you
want to start page numbers from a different number, select 'Start From' option.
Graph curve width: is used to set the line width of the plots shown on the reports. Choose
between a range of 1 to 4.
Paper size: choose between A4 (210 mm x 297 mm) or Letter size (8.5" x 11").
Soil type symbols in color: if selected, soil type shading column in boring log will be shown in
color, otherwise it will be black and white.
Print depth grid lines: if selected, a horizontal grid line will be printed on the log for each 2 m
of depth.
Log page interval: this specifies the page length of boring logs.
45
NovoLAB User's Manual (Novo Tech Software Ltd)
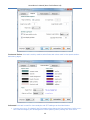
Fonts and Colors: this tab is mainly used to select fonts and colors used in the reports and on
data entry pages.
Advanced: this tab is used for sieve analysis and SPT settings as described below:
Connect sieve curve: if selected, the first empty sieve above the first used sieve (with a nonzero retained weight) will be assigned to 100% passing when plotting the sieve curve
46
NovoLAB User's Manual (Novo Tech Software Ltd)
Automatically connecting hydrometer and sieve : these two curves usually do not match on the
sieve analysis graph at the particle size of 0.075 mm (#200). If this option is selected,
NovoLAB automatically adjusts the hydrometer to percent passing at sieve #200.
Show filter zones: you can define upper bound and lower bound for filter. This will be printed
on sieve analysis report for comparison of material particle size distribution to the sieve
requirements (read more(See 1.8.2.3)).
# of curves / page: up to 5 sieve tests can be plotted on the same plot. NovoLAB will
automatically group the tests based on the desired number.
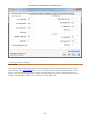
1.10.2 Lab. Tests Default Settings
Lab. Test Default Settings
This page can be reached from "Tools & Options" tab on the main toolbar(See 1.1.5) and it is
designed to specify the default input data for laboratory tests. Setting default values will facilitate
data entry. For example, parameters such as gauge factors and ring factors rarely change in a
laboratory unless the equipment are replaced. We recommend you set these default values first
thing after you install NovoLAB. This way you don't need to enter these parameters each time you
input data for tests.
47
NovoLAB User's Manual (Novo Tech Software Ltd)
1.10.3 Log Template Designer
Log Template
This page is used for designing the boring log template and can be accessed from the Tools &
Options tab on the main toolbar(See 1.1.5). To add a column to the log template click on the
green + icon and select the column to add. You can specify the column order and remove a
column from the log template. We recommend specifying one column as 'Spring column' so the
program can adjust the width of this column to fit the paper size.
48
NovoLAB User's Manual (Novo Tech Software Ltd)
1.10.4 Database Settings
Database Configuration
It is necessary to regularly backup the database and be prepared in case of hard disk failure or infection by a computer
virus. By having a backup of your database you will be able to use the database by reinstalling NovoLAB. For this purpose
click on "Database Configuration" from the "Tools and Options" menu on the main toolbar(See 1.1.5). The following page
will appear:
49
NovoLAB User's Manual (Novo Tech Software Ltd)
NovoLAB comes with Microsoft Access database, so please do not change the database type without consulting Novo Tech
technical team.
Preparing a Backup
Click on the link Backup my database in the bottom left of your screen. Save the back up file in location of you choice. All
your project data is stored in this database file. We recommend you save the backup file on a CD or flash drive, it is
recommended to save the backup file in a folder with a name that indicates the backup date.
The second method is to click on the path shown below the "Current database path" (see the above screenshot). This will
open the folder; now you can easily copy the database file to your desired location.
Database Restore
If you want to restore your data, click on the link Replace / restore database in the upper right of your screen and locate
where the backup file of your database is saved. NovoLAB will replace the existing database with your backup. Please note
that the actual database file extension is .mdb and the extension of the database backup file is _mdb.
1.10.5 Active Sieves
Active Sieves
This page is used to specify the sieves you use in your laboratory. To access this page click on
"My Sieves" buttons from the "Tools and Options" menu on the main toolbar(See 1.1.5).
Although NovoLAB database includes a complete list of all standard sieves, if you don't use all
these sieves in your laboratory you can deselect them from this list. The advantage is that on
sieve analysis page, you can select to show the "active sieves" only; this will ease data entry.
50
NovoLAB User's Manual (Novo Tech Software Ltd)
51
NovoLAB User's Manual (Novo Tech Software Ltd)
1.10.6 Windows Calculator
NovoLAB User's Manual
Calculator
In order to open Windows calculator click on Settings and Tools menu from the main toolbar, and
click on Calculator button.
© Novo Tech Software Ltd. All Rights Reserved
1.10.7 Online Backup
Online Backup
Users can backup a copy of their data on Novo Tech web server. In case you loose your data you
can ask us for a copy of the file; you can then restore(See 1.1.8) your database.
Disclaimer: You are not charged separately by Novo Tech for the Online Backup feature. We do
not guarantee your data file will be available upon request (in case of server failure, etc.),
however, we consider this as an additional factor of safety that helps our users to restore their
data if they choose to leave a copy of their database on our server. This feature is currently free,
and optional.
52
NovoLAB User's Manual (Novo Tech Software Ltd)
53
NovoLAB User's Manual (Novo Tech Software Ltd)
2. Online Resources
2.1 Novo Tech Website
http://www.novotechsoftware.com
2.2 NovoLAB Updates
http://www.novotechsoftware.com/updatelogs/novolab.txt
2.3 Other Novo Tech Solutions
http://www.novotechsoftware.com/products/
2.4 Contact Us
http://www.novotechsoftware.com/contact-us/
54
NovoLAB User's Manual (Novo Tech Software Ltd)
3. Annex
3.1 Contact Us
NovoLAB User's Manual
Contact Us
Should you have any questions or comments please email us at [email protected]
or leave us a message online.
© Novo Tech Software Ltd. All Rights Reserved
55