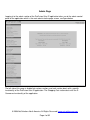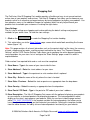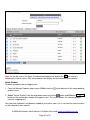
1
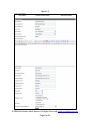
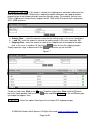
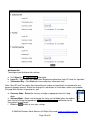
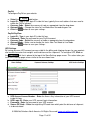
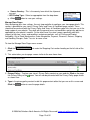
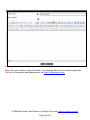
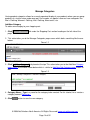
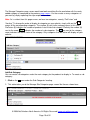
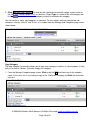
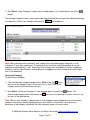
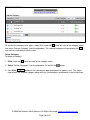
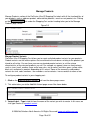
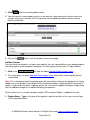
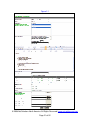
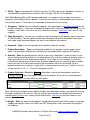
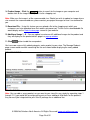
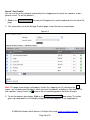
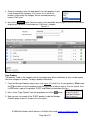
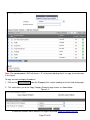
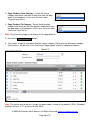
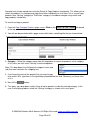
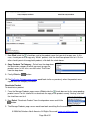
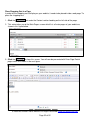
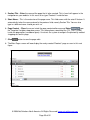
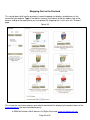
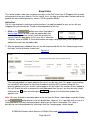
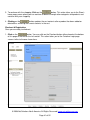
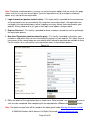
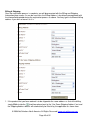
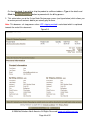
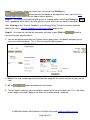
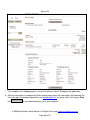
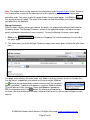
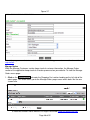
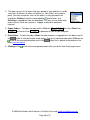
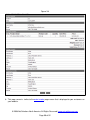
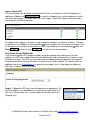
ProFusion Ultra IS Shopping Cart
User Manual
© 2008 Net Solutions North America. All Rights Reserved | www.netsolutionsna.com
Page 1 of 52
Table of Contents
Shopping Cart Cover Page…………………………...………………………………………………………..1
Table of Contents……………………………………………………………………………………………….2
Main Admin Page……………………………………………………………………………………………….4
Store Settings……………………………………………………..………………………………………….....5
Payment Gateway………………………………………………………………………………………9
Manage Store Pages……………………………………………………………………………………….…12
Manage Categories……………………………..………………………………………………………….....14
Add New Category………………………………………………………………………….........…...14
Add Sub Category……………………………………………………………………………………..15
Copy Category…………………………………………………………………………………………16
Deactivate Category…………………………………………... ……………………………………..17
Delete Category………………………………………………………………………………………..18
Manage Products…………………………………………………………………...…………………………19
Product Variants……………………………………………………………………………………….19
Add New Product……..……………………………………………………………………………….20
Search Product….…………………………………………………………………………………..…25
Copy Product…...……………………………………………………………………………………...26
Deactivate Product…………………………………………………………………………………….30
Delete Product…………………………………………………………………………………………31
Place Shopping Cart in Web Page……………………………………………………………...…………...32
Store Front………………………………………………………………………...………………...…34
E-mail Product…………………………………………………………………………………….……38
© 2008 Net Solutions North America. All Rights Reserved | www.netsolutionsna.com
Page 2 of 52
Related Products……………………………………………………………………………………....38
Shop Online…………………………………………………………………………………………………….40
Add to Cart……………………………………………………………………………………………..40
Checkout & Registration………………………………………………………………………………41
Billing & Shipping……………………………………………………………………………………...43
Manage Customers…………………………………………………………………………………………....47
Manage Orders…………………………………………………………………………………………..........48
Export & Import CSV…………………………………………………………………………………………..51
UPS Real-Time Shipping……………………………………………………………………………………..51
© 2008 Net Solutions North America. All Rights Reserved | www.netsolutionsna.com
Page 3 of 52
Admin Page
Logging in to the admin section of the ProFusion Ultra IS application takes you to the admin control
panel of the application which is the main administrative page screen, see figure below.
The left side of this page is divided into various sections and each section deals with a specific
functionality of the ProFusion Ultra IS application. The Shopping Cart section deals with the ECommerce functionality of the application.
© 2008 Net Solutions North America. All Rights Reserved | www.netsolutionsna.com
Page 4 of 52
Shopping Cart
The ProFusion Ultra IS Shopping Cart module provides a flexible and easy to set up and maintain
online store of your products and services. The Ultra IS Shopping Cart allows you to showcase your
products online in an attractive and organized way by having categories to display your products. You
can upload as many as five additional images for a product which not only help enhance your
products but also enable your customers in making the right choice.
Store Settings
The first step in setting up a shopping cart involves defining the default settings and payment
methods for your online store. To view the store settings:
1. Click on the
link under the Shopping Cart section heading.
2. This action takes you to the Store Settings page screen which would look something like the one
below (figure 1.0).
Note: This page contains all relevant information such as the contact details of the store, the currency
of trade, shipping and tax codes, and the payment method for the store. The ”Payment Gateway
Settings” and the “UPS Service Settings” tabs allows you to configure the online payment gateway
service providers for your store. Let us configure the “Store Settings” page screen first which is
explained below.
Fields marked *are required fields and as such must be completed.
3. Store Name – Type in the name of your store inside this box.
4. Store Address1 – Enter the street address for your store.
5. Store Address2 – Type in the apartment or suite number which is optional.
6. Store City – Enter the name of the city where the store is located.
7. Store State / Province – Select the state or province as appropriate from the drop down.
8. Store Country – Select the country as appropriate from the drop down.
9. Store Postal / ZIP Code – Type in the postal or ZIP code of your store’s address.
10. Store Description - The Ultra IS Shopping Cart comes with the option of displaying your products
on your website as featured products for promotional purposes. The featured products would
display on the store’s main page on your website. What you see here inside the page content
editor [TPL_CART_FEATPROD] is the template variable for featured products that allows you to
have a featured product display on the frontend of your website. Deleting this template variable
from the editor removes the ability to have featured products functionality on your website.
© 2008 Net Solutions North America. All Rights Reserved | www.netsolutionsna.com
Page 5 of 52
Figure 1.0
© 2008 Net Solutions North America. All Rights Reserved | www.netsolutionsna.com
Page 6 of 52
11. Store Phone – Enter your store’s phone number in this field which is optional.
12. Store Fax – Enter your store’s fax number in this field which is optional.
13. Store Admin Name – Enter the name of the admin person for the store.
14. Admin E-mail – Type in the e-mail address of the admin person.
15. Outbound E-mail – Any e-mails sent out from the store using this application would use the email address entered here.
16. Category Alias – Type in an alternative name for category should you wish to call it something
else, for example, Class, Type, Group, etc.
17. Categories Alias - Type in an alternative name for categories (plural) should you wish to call
them something else, for example, Classes, Types, Groups, etc.
18. Product Alias – Type in an alternative name for product should you wish to call it something else,
for example, item, goods, produce, merchandise, etc.
19. Products Alias - Type in an alternative name for products (plural) should you wish to call them
something else, for example, items, goods, produce, merchandise, etc.
20. Store Open – Select as appropriate from the drop down. Selecting “Yes” would enable the
customer to add the product in to the cart. If “No” is selected the customer would not be able to
add the product in to the cart.
21. Currency Sign – Select the currency as appropriate from the drop
down.
22. Shipping Code – Select the appropriate shipping code for the
products from this drop down. This field determines the shipping and handling costs (if any) that
are to be added to the total price.
Note: If you wish to charge your customers for shipping and handling,
make sure to select the shipping cost as appropriate at the time of
adding the product on the Add Product page screen which is explained
later in this document.
price.
– Select this option if no additional shipping costs are to be added to the total
– If this mode is selected, then shipping costs would be determined
individually for the products.
© 2008 Net Solutions North America. All Rights Reserved | www.netsolutionsna.com
Page 7 of 52
– If this mode is selected, the shipping costs would be set based on the
total of the purchase order. Selecting this radio button option would open up a pop-up window
prompting you to add shipping charges based on the price ranges. For example, you can have
$10 as shipping costs for purchases ranging from $0 - $100 and $15 for purchases ranging from
$101 - $500 and so on.
a. Greater Than… – enter the amount in value for the starting range, in this case it would be 0.
b. … and Till – enter the amount in value for the ending range, in this case it would be 100.
c. Shipping Price – enter the amount in value for the shipping cost to be added to the order
total. In this case, it would be 10. Next hit the
button to save the shipping charges.
Simply repeat the steps as below and hit the
button once you are finished.
Figure 1.1
To edit any field value, Click on the arrow. To delete a field value, Click inside the
check
box of the corresponding field and hit the
button and Click
on the confirmation popup window that appears next.
– Select this option should you wish to include UPS shipping charges.
© 2008 Net Solutions North America. All Rights Reserved | www.netsolutionsna.com
Page 8 of 52
23. Tax Code – Select the appropriate tax code for the products from this
drop down.
– Select this option if no sales taxes are to be added to the total price.
– Select this option if you wish to have sales taxes based on the states to
which the products are to be shipped, or in other words
destination-based sales tax. Selecting this radio button
would open up a pop-up window prompting you to select
the state and enter the tax value as a percentage as
shown here. For this tutorial, let us select Washington
from the drop down value and enter 5 as the percentage
of tax to be added to the total. Next click the
button to finish adding the state-based tax. Simply repeat this to configure the sales tax
percentages for the rest of the destination states that you wish to operate in.
Note: For example, if a customer residing in the state of Washington were to make an order for $300
worth of your products, his total cost would be calculated as under:
(a) Sub Total
(b) Tax
(c) Shipping Cost
Order Total
: $300.00
: $15.00 (5% of a)
: $15.00 (see figure 1.1)
: $330.00 (a+b+c)
If you wish to charge your customers sales tax, make sure to select the appropriate radio button
option under Tax field at the time of adding the product on the Add Product page screen which is
explained later in this document.
24. Click
button after entering all the relevant details.
Payment Gateway Settings
To configure payment gateway settings for your store, Click the
link that
you see at the top of the Store Settings page screen. This action takes you to a page screen that is
similar to the one shown next.
© 2008 Net Solutions North America. All Rights Reserved | www.netsolutionsna.com
Page 9 of 52
Authorize.Net
To configure your Authorize.Net settings:
radio button.
a. First Select the
b. Login ID – Type in your API (Application Programming Interface) login ID inside this input box.
c. Transaction Key – Next Enter your transaction key information here.
Note: Your API and Transaction Key information are unique and specifically associated with your
payment gateway account. Should you change this information at a later date, make sure to update
this page with the latest information as well.
d. Currency Code – Select the currency of trade as appropriate from this drop
down.
e. Gateway Mode – Make sure to change the status to Live Mode (when the website
goes live) by clicking the appropriate
radio button for the
transactions to go through.
f. Click the
button to save your settings.
© 2008 Net Solutions North America. All Rights Reserved | www.netsolutionsna.com
Page 10 of 52
PayPal
To configure PayPal on your website:
a. Select the
radio button.
b. Login ID – Type in your login ID inside this box, typically the e-mail address that was used to
create the PayPal account.
c. Currency Code - Select the currency of trade as appropriate from the drop down.
d. Gateway Mode – Change the status to Live Mode when the website goes live.
e. Click the
button to save your settings.
PayPal PayFlow
a. Login ID – Type in your login ID inside this box.
b. Password – Enter the password for your PayPal account.
c. Currency Code – Select the currency of trade as appropriate from the drop down.
d. Gateway Mode – Make sure to change the status from Test Mode to Live Mode.
e. Click the
button to save your settings.
UPS Settings
By having your own UPS account you can establish the billing and shipping charges for your products
and services based on their weights and the distance of the shipments. To configure UPS, Click on
the
link that is placed at the top of the Store Settings page screen. This action takes you
to the UPS Settings page screen similar to the one shown here.
a. UPS Access License Number – Enter the Access Key information of your UPS account
inside this box.
b. UPS Login ID – Enter your UPS account Login information.
c. Password – Enter the password of your UPS account.
d. Source ZIP Code – Enter the originating ZIP code from which point the distance of shipment
is to be calculated.
© 2008 Net Solutions North America. All Rights Reserved | www.netsolutionsna.com
Page 11 of 52
e. Source Country – This is the country from which the shipments
are sent.
f. UPS Pickup Type – Select as appropriate from the drop down.
g. Click
button to save your settings.
Manage Store Pages
After configuring your store settings, the next step would be to configure your store page details. This
section is provided for your store’s Privacy Policy and Terms & Conditions page content. These
should not be confused with the Privacy Policy and Terms & Conditions page links that you see in the
footer region of your website. They deal with the general terms and conditions and privacy policies as
applicable to your website’s content. On the other hand, the store’s pages specifically deal with
respect to the store’s terms and conditions and privacy policies such as Pricing and Product
Availability, Out of Stock Merchandise, Order Acceptance, Payment, Discounts, Returns, Shipping
and Handling Charges, Sales Tax, etc. to name a few.
To view the Manage Store Pages menu screen:
1. Click the
page.
link under the Shopping Cart section heading on the left side of the
2. This action takes you to a page screen similar to the one shown here.
3. Privacy Policy – To place your store’s Privacy Policy content on your website, Click on the page
title Privacy Policy or the arrow. You will now be presented with the Privacy Policy page screen
as shown here.
4. Type in the privacy policy content inside this page content editor that you see on this screen and
Click the
button to save the page details.
© 2008 Net Solutions North America. All Rights Reserved | www.netsolutionsna.com
Page 12 of 52
5. Terms and Conditions – Repeat the same for placing the Terms & Conditions page content.
Note: Once your customers place their orders, they would be able to view the content typed here.
The links to these pages would be placed on the Order Review page screen.
© 2008 Net Solutions North America. All Rights Reserved | www.netsolutionsna.com
Page 13 of 52
Manage Categories
Having product categories allows for a much organized display of your products where you can group
products of a similar nature under one roof. For example, an apparel store can have categories like
Men’s Clothing, Women’s Clothing, Kids’ Clothing, Accessories, etc.
Add New Category
To add a new category to your shopping cart:
1. Click
page.
link under the Shopping Cart section heading on the left side of the
2. This action takes you to the Manage Categories page screen which looks something like the one
below.
Figure 1.2
3. Click
link placed at the top. This action takes you to the Add New Category
page screen like the one shown below which is similar to Add New Sub Category page screen as
well.
Figure 1.3
4. Category Name – Type in a name for the category to be created. For this tutorial, let us create a
category named “ProFusion.”
5. Click
button to save the new category.
© 2008 Net Solutions North America. All Rights Reserved | www.netsolutionsna.com
Page 14 of 52
The Manage Categories page screen would now look something like the one below with the newly
added category as compared to the previous page screen. You can create as many categories as
you want by simply repeating the steps explained as above.
Note: As is evident from this page screen, we have two categories, namely “ProFusion” and
“Hosting.” To change the order of display of categories on your website, simply click on the
arrows of the corresponding categories. The number (0) next to the category name, in this case,
ProFusion (0) indicates the number of products listed inside that category. Similarly the number (0)
indicates the number of sub categories. The
icon next to the category
next to the arrow
name indicates the active status of the category. Only categories that are active will display on your
website.
Add Sub Category
You can create sub categories under the main category for the products to display in. To create a sub
category:
1. Click on the
arrow under the Sub Categories heading.
2. This action takes you to the Manage Sub Categories page screen like the one shown here.
© 2008 Net Solutions North America. All Rights Reserved | www.netsolutionsna.com
Page 15 of 52
3. Click
link and you will now be presented with a page screen similar to
the Add New Category page screen as previous. Simply Type in a name of the sub category and
button to create a sub category inside the selected main category.
hit the
You can create as many sub categories as you want. For this tutorial, we have created two sub
categories, namely “Ultra IS” and “ECart” as is evident from the Manage Sub Categories page screen
shown below.
Copy Category
The copy category functionality allows you to copy main category as well as its sub categories (if any)
with just a click of a button. To create a copy of a category:
check box next to the category
1. From the Manage Categories page screen, Click inside the
name. In this case, let us try creating a copy of the “ProFusion” category and Click the check box
next to it.
© 2008 Net Solutions North America. All Rights Reserved | www.netsolutionsna.com
Page 16 of 52
2. Next Select “Copy Categories” option from the drop down list (as shown above) and hit the
button.
The Manage Categories page screen would now look something like the one shown below displaying
the copy of the “ProFusion” category along with its
sub categories.
Note: When you copy over a category, only a copy of the selected category along with its sub
categories (if any) gets copied over. The products listed inside the selected category do not get
copied over automatically as well. Should you wish to copy over the products from one category to
the other, use the Copy Products functionality of the shopping cart which will be discussed in detail
later in the document.
Deactivate Category
To deactivate a category:
1. From the Manage Categories page screen, Click inside the
check
box next to the category name. In this case, let us select “ProFusion”
category and click the check box next to it.
2. Next Select “Deactivate Categories” from the drop down list and hit the
button. The
deactivated category would now display the
icon next to it indicating its inactive status as can
be seen in the figure below.
Note: When a main category is deactivated, its sub categories too would become inactive and the
products listed therein would stop displaying on your website. On the other hand, when you
deactivate a sub category individually the main category would still remain active.
© 2008 Net Solutions North America. All Rights Reserved | www.netsolutionsna.com
Page 17 of 52
To activate the category once again, simply click inside the
check box next to the category name
and select “Activate Category” from the drop down. The selected category will now display the
icon next to it indicating its active status.
Delete Category
To delete a category:
1. Click inside the
check box next to the category name.
2. Select “Delete Categories” from the drop down list and hit the
button.
3. Next Click
button on the confirmation pop-up window that appears next. This action
now deletes the selected category along with any sub categories and products listed inside them.
© 2008 Net Solutions North America. All Rights Reserved | www.netsolutionsna.com
Page 18 of 52
Manage Products
Manage Products section of the ProFusion Ultra IS Shopping Cart deals with all the functionalities of
your products such as add new product, edit or delete products, search or sort product, etc. Clicking
on the
Products page screen.
link under the Shopping Cart section heading takes you to the Manage
Figure 2.0
Manage Product Variants
ProFusion Ultra IS Shopping Cart allows you to create unlimited product variants for your products.
Product variants are the various options that are offered to the customers relating to the products you
intend to sell online. You can have your own customized product variants to suit the unique
characteristics of the nature of products you sell. For example, an apparel store can have variants
such as sizes (small, medium, large, extra large, plus, etc) or colors (red, blue, green, yellow, white,
black, etc) and price its products depending on its variant. Some of the commonly used product
variants are size, color, members / non-members, and associates / non-associates to name a few.
To configure product variants in your shopping cart:
1. Click on the
link from the above page screen.
2. This action takes you to the Add/Edit Variant page screen like shown below.
3. Variant Label – Type inside this box the name of the variant you wish to create. In this case, we
shall type Dealer as a product variant.
© 2008 Net Solutions North America. All Rights Reserved | www.netsolutionsna.com
Page 19 of 52
4. Click
button to save the product variant.
5. You can create as many product variants as you want by simply entering the variant name and
saving it until you are finished. For this tutorial we have created two product variants, namely
Dealer and Reseller.
6. Click on the
button to exit the product variant menu page.
Add New Product
Once you have the categories set up on your website, the next step would be to start adding products
into the categories which completes the process of setting up your online store. To add a product:
1. Click on the
link from the above Manage Products page screen.
2. This action takes you to the Add New Product page screen which looks something like the one
shown below.
Note: This is the product details page where you will enter details relating to the product that is being
added such as the product name, product SKU, product description, and pricing details like quantity,
weight, list price and sales price, shipping, and tax etc. You can also upload the product image along
with five additional images as an option to display your products.
For this tutorial, let us see how a product named “UIS Association Edition” is added to the store.
3. Product Name – Type in the name of the product inside the text box. In this case, we shall type
“UIS Association Edition.”
© 2008 Net Solutions North America. All Rights Reserved | www.netsolutionsna.com
Page 20 of 52
Figure 2.1
© 2008 Net Solutions North America. All Rights Reserved | www.netsolutionsna.com
Page 21 of 52
3. SKU # – Type in the product ID inside this text box. The SKU can contain alphabetic, numeric, or
a combination of alphanumeric characters. We shall type “UIS-AE” for this product.
Note: Stock Keeping Unit or SKU (pronounced skew) is a number or string of alpha and numeric
characters that uniquely identify a product. It helps the user identify a unique product when there are
many similar options. It also helps the storekeeper to keep track of the inventory.
4. Categories – Select from the available categories and sub categories (previously created) for the
product to display in. If you want the product to display both in the main category as well as its sub
category, select both, in this case, we shall select main category “ProFusion” and “Ultra IS” sub
category.
5. Short Description – You can have an optional short description for the product (up to a maximum
of 100 characters). The description entered here will display along with the product name, price,
and image inside the product box on the store’s main page on your website.
6. Keywords – Type in search keywords for the product inside this text box.
7. Product Description – Type in a detailed description for this product using the page content
editor. The description entered here will display on the product details page on your website.
8. Quantity – Enter the product quantity (which in most cases would be 1) inside this box. In case
you are selling multiple quantities as a single product entity, enter the number of quantity sold as a
single unit and the system automatically converts it to a single unit. For example, a florist may
have different pricing levels for purchases of flowers depending on the number of flowers bought,
namely the cost of a single red rose can be $5 and a dozen red roses can be $50. So for a
bouquet of dozen roses (sold as a single unit), he would enter the quantity as 12 which in turn the
system converts to 12 x 1 = 12 for the selling price of $50.
9. Product Variations - Select the
radio button if you do not have product variants or
if you have product variants for the product. Since we have created product
variants previously, we shall select the latter option.
Note: Selecting the multiple variants option will open up a drop down section (see above) for entering
the weight and price for the variants. You can see the variant section now displaying the previously
created product variants here, namely Dealer and Reseller. Click here to see how it looks on your
website.
10. Weight – Enter the weight for the product. The pound and ounce input fields are given since most
shipping and logistics chains like FedEx and UPS among others take into account the weight of
the shipment.
© 2008 Net Solutions North America. All Rights Reserved | www.netsolutionsna.com
Page 22 of 52
Note: If you do not enter any weight for the product, the system automatically assumes it to be as 0
pound 1 ounce.
11. List Price – This is the price at which your product is listed on
the shopping cart. Let us Type $6500 as the price for this
product.
12. Sale Price – This is the price at which your product is offered for sale. We shall Type $5000 as
the sale price for this product. Generally, the sale price of a product is of a lesser value than its list
price.
Note: If only the list price is entered (in cases where you do not have variants) it will display on your
website as simply “Price.” On the other hand if both the list price and sale price are entered, they both
will display on your website but the “List Price” will have a strikethrough effect (in case it is of a higher
value than the sale price) like shown in this figure. The option of having both a list price and a sale
price is very helpful when you want to run a promotion for the product. You may also price your
product based on its variant like in this example and the price will display by selecting the appropriate
variant drop down.
13. Shipping – Select the appropriate shipping and handling method from this radio button.
Note: Make sure the shipping method chosen here is reflected on your Store Settings page screen as
well.
14. Shipping Cost – If you had selected the
as your shipping option for the
previous entry, then you would enter here how much you wish to charge your customers for
shipping and handling for this particular product.
15. Tax – Select the appropriate
radio button. If you select “Yes” and wish to add sales
tax, make sure to configure the Tax Code on the store settings page.
16. Featured Product – Select the
radio button as appropriate. Selecting “Yes” would
display the product on the store’s main page as a featured product (for product promotions) on
your website whereas selecting “No” would not display the product on the store’s main page on
your website. It would however display inside the category pages.
Note: Make sure the template variable for featured products is enabled on the store settings page for
the product to display as featured product on your website.
17. Status – Select the
radio button as appropriate which determines whether
the product should display on your website or not.
© 2008 Net Solutions North America. All Rights Reserved | www.netsolutionsna.com
Page 23 of 52
18. Product Image – Click the
button to search for the image on your computer and
double-click on the image file to upload it to the shopping cart.
Note: Make sure the image is of the recommended size. Should you wish to upload an image whose
size exceeds the recommended one, please contact your project manager to have it customized for
you.
19. Download File – Using this feature you can upload a file to the shopping cart which your
customers can later download once their orders get processed. The link to this downloadable file
would display on the Order Invoice page screen on your website.
20. Additional Image 1 - 5 – You can upload a maximum of 5 additional images for the product and
they will display on the product details page in a pop-up window.
21. Click
button to add the new product.
You have now successfully added categories and a product to your store. The Manage Products
page screen would now look something like the one shown below displaying the newly added
product.
Note: You can add as many products as you want to your store this way simply by repeating steps 1
through 21. If you would like to configure discounts or have additional field labels for the products,
they can easily be integrated into your Ultra IS package for an additional fee.
© 2008 Net Solutions North America. All Rights Reserved | www.netsolutionsna.com
Page 24 of 52
Search / Sort Product
You can use the sort by category functionality of the shopping cart to search for a product, or do a
general search. To sort the products:
1. Click on the
page.
link under the Shopping Cart section heading on the left side of the
2. This action takes you to the Manage Products page screen like the one shown below.
Figure 2.2
Note: This page screen displays all products listed in the shopping cart. By clicking on the
arrows, you can determine the order in which you want the products to display on your website. To
edit a product, simply click on the arrow of the corresponding product and make changes.
3. To sort the products by category, Click on the
down arrow. This action
opens up a drop down list of available categories and sub categories in the shopping cart.
© 2008 Net Solutions North America. All Rights Reserved | www.netsolutionsna.com
Page 25 of 52
4. Select the category from this drop down list to view products listed
inside that particular category. In this case, let us search for
products listed under the category that we created previously,
namely “ProFusion.”
5. Next hit the
button. Now the search result would be something like the one shown below
displaying the products listed under the “ProFusion” category.
Figure 2.3
Copy Product
The products listed in the shopping cart can be copied over either individually or they can be copied
from one category to another. To copy a product individually:
1. From the Manage Products page screen (see figure 2.2) which lists all your products, Click inside
the
check box next to the product name that you want to make a copy of. For this tutorial, let us
try and make a copy of the product “PURE” and Click the check box next to it.
2. Next, select “Copy Product” from the drop down and hit the
button.
3. Now you can see a copy of the “PURE” product inside the Manage
Products page screen as shown in this next figure.
© 2008 Net Solutions North America. All Rights Reserved | www.netsolutionsna.com
Page 26 of 52
Note: The copied product’s SKU will have a “-C” at the end indicating that it is a copy as can be seen
in this figure.
To copy an entire category of products:
1. Click on the
under the Shopping Cart section heading on the left side of the page.
2. This action takes you to the Copy Category Products page screen as shown below.
Figure 2.4
© 2008 Net Solutions North America. All Rights Reserved | www.netsolutionsna.com
Page 27 of 52
3. Copy Products From Category – Select the source
category from which you want to copy over from the drop
down list of categories. In this case, we shall select
“Hosting” from the list.
4. Copy Products To Category – Select the destination
category into which you want the products copied over from
the drop down list of categories. In this case, we shall select
“ProFusion” from the list.
Note: Only the main categories will display on this drop down list.
5. Next hit the
button.
6. This creates a copy of all products from the source category (Hosting) to the destination category
(ProFusion) as can be seen in this ProFusion Category page screen as compared to before.
Figure 2.5
Note: The easiest way to find out if a copy has been made is to look at the products’ SKUs. All copied
products will have a “-C” at the end of their SKUs.
© 2008 Net Solutions North America. All Rights Reserved | www.netsolutionsna.com
Page 28 of 52
A product can also be copied over using the Search & Copy Products functionality. This allows you to
search for products in a category and copy them either individually or all of them. Let us try and copy
products from “Hosting” category to “ProFusion” category in the above example using search and
copy products functionality.
To search and copy a product:
1. From the Copy Category Products page screen, Click on the
at the top.
link placed
2. You will now be presented with a page screen which looks something like the one shown below.
3. Category – Select the category name from this drop down to search for products in that category.
In this case, we shall select “Hosting” from the drop down.
Note: This drop down list will display all categories (main and
sub) that were created in the shopping cart.
4. If you know the name of the product that you want to copy
over and its SKU, type them in the input boxes placed below this field. Otherwise, just leave them
as it is.
5. Next hit the
button.
6. This opens up a drop down section listing all active products inside the selected category. In this
case it will display products inside the “Hosting” category as shown in this next figure.
© 2008 Net Solutions North America. All Rights Reserved | www.netsolutionsna.com
Page 29 of 52
7. Now Click inside the
check box next to the product name that you wish to copy over. In this
case, should you wish to copy only “Mailer” product, click the check box placed next to it. On the
other should you wish to copy both products, click both the check boxes.
8. Copy Products To Category – Select from the drop down
the destination category to which you want to copy the
products over. In this case, we shall select “ProFusion”
from the drop down.
9. Finally Click the
button.
10. The ProFusion Category page screen would look similar as previously when the products were
copied from one category to another.
Deactivate Product
To deactivate a product:
1. From the Manage Products page screen, Click inside the
check box next to the corresponding
product name. For this tutorial let us deactivate the copy of the product namely “Hosting” and click
the check box next to it.
2. Next Select “Deactivate Product” from the drop down menu and hit the
button.
3. The Manage Products page screen would now look something like the one below.
© 2008 Net Solutions North America. All Rights Reserved | www.netsolutionsna.com
Page 30 of 52
Note: As can be seen in this figure, the deactivated product will display the
icon next to it
indicating its inactive status. Only active products will display on the frontend of your website.
Delete Product
To delete a product from a shopping cart:
1. From the Manage Products page screen, Click inside the
product name.
check box next to the corresponding
2. Select “Delete Product” from the drop down menu and hit the
button and Click the
button on the confirmation window that appears next. This action deletes the selected product
from the shopping cart.
You now have categories and products added to your online store. Let us see how the store functions
on the frontend of your website.
© 2008 Net Solutions North America. All Rights Reserved | www.netsolutionsna.com
Page 31 of 52
Place Shopping Cart in a Page
In order for the shopping cart to display on your website, it needs to be placed inside a web page. To
place the shopping cart:
1. Click the
link under the Content section heading on the left side of the page.
2. This action takes you to the Main Pages screen which lists all main pages of your website as
shown in this figure below.
3. Click the
link from this screen. You will now be presented with Enter Page Details
page screen like shown in the next figure.
© 2008 Net Solutions North America. All Rights Reserved | www.netsolutionsna.com
Page 32 of 52
4. Section Title – Enter the name of the page that is to be created. This is how it will appear in the
navigation on your website. In this case, let us type “Products” inside the box.
5. Short Name – This is the extension of the page name. This field comes with the auto-fill feature. It
automatically takes the name entered in the previous field, namely Section Title. You can also
type in a different name should you wish so.
6. Page Content – Place the cursor inside the page content editor area and Select
from
the Template Variables drop down menu. This action places something like [TPL_CART_HOME]
inside the page editor (see above figure). It instructs the system to merge in the previously created
shopping cart on this page.
7. Click
button to save the page edits.
8. The Main Pages screen will now display the newly created “Products” page as seen in this next
figure.
© 2008 Net Solutions North America. All Rights Reserved | www.netsolutionsna.com
Page 33 of 52
Shopping Cart on the Frontend
This section deals with how the previously created shopping cart displays and behaves on the
frontend of your website. Type in the domain name of your website inside the address bar of the
browser and go to the page where you have placed the shopping cart, in this case, the “Products”
page.
Figure 3.0
This is how the store home page on your website would look like displaying the product boxes of the
featured products that were created previously.
© 2008 Net Solutions North America. All Rights Reserved | www.netsolutionsna.com
Page 34 of 52
The product’s name, sale price, variants drop down (if any), and image along with its short description
for the featured products will display on this page screen as is evident for the product that was
created previously, namely “UIS Association Edition.” By default the price shown inside the product
box when the page first loads would be that of the first variant (in this case, dealer).
Figure 3.1.1
Clicking on the variant drop down you can see the change in the product price
previously set on the admin section as can be seen in this figure. The price
shown here is the sale price of the product.
Note: The Type field drop down that you see inside the product box here (Dealer, Reseller) is the
product variant that was created previously.
The content displayed to the left of the screen is the store section page content which displays the
main and sub categories along with the (n) number of products listed
inside each category and the cart contents.
The “Search” functionality allows you to search for products listed
inside the shopping cart. Type in the search keyword inside the
input box and hit the
button.
Product Details
To see the product details, Click on the product name or on the
product image, or simply click the
button. This opens up the
detail page screen for the selected product. For example, Clicking
on the “UIS Association Edition” product name would open up the
detail page for that product as can be seen in this next figure.
© 2008 Net Solutions North America. All Rights Reserved | www.netsolutionsna.com
Page 35 of 52
Figure 3.1
© 2008 Net Solutions North America. All Rights Reserved | www.netsolutionsna.com
Page 36 of 52
This page screen displays the detailed information for the product entered previously at the time of
creating the product. Clicking on the product image will open up a pop-up window of additional
images, if any, as shown here in this figure.
While the product box displays only the sale price of the product, the product details page screen
would display both the list price and the sale price of a product as can be seen in this case.
Product Variants with List & Sale Prices
This is how the different price levels (previously set by the admin) would display depending on the
variants chosen using the drop down list.
© 2008 Net Solutions North America. All Rights Reserved | www.netsolutionsna.com
Page 37 of 52
E-Mail Product
The ProFusion Ultra IS Shopping Cart allows your website users to forward the product details as an
e-mail link which in turn enables your products to reach out to a much larger customer base. To
forward this web page:
1. Click on the
link found at the top of the product details page screen. This
opens up a pop-up window prompting you to enter details such as your name and e-mail address,
recipient’s name and e-mail address, etc. Fields that is marked * are required and as such must
be completed.
2. After filling in all the relevant details, hit the
as an e-mail link.
button to forward this details page screen
3. The e-mail forwarded to the recipient mentioned herein will contain product name, price, short
description, and the product image along with the product details page link.
Related Products
The related products feature allows you to view other similar products listed inside the selected
category. To view similar products:
1. Click on the
link found at the bottom of the product details page screen.
© 2008 Net Solutions North America. All Rights Reserved | www.netsolutionsna.com
Page 38 of 52
2. This action takes you to the Category page screen (see figure below), in this case “ProFusion”
since the product “UIS Association Edition” is listed inside the ProFusion category.
Figure 3.2
3. Clicking on the product name or the image or the
selected product’s details page screen.
button as before will take you to the
4. To sort the products by category, Click on the sub category on the
navigation inside the section page to the left. To sort the products by
name or price, Select as appropriate from the drop down menu placed
above the product boxes.
a. Product Name – sorts the products in an alphabetical manner.
b. Product Price – sorts the products ranging from the lowest to highest in price.
By default the products will display in the order they were added to the shopping cart.
© 2008 Net Solutions North America. All Rights Reserved | www.netsolutionsna.com
Page 39 of 52
Shop Online
This section explains how your customers actually use the ProFusion Ultra IS Shopping Cart to make
online purchases on your website. For this tutorial, let us see how an online order is processed for the
product that was created previously, namely “UIS Association Edition.”
Add to Cart
The first step involved in making an online purchase is to add the product to your cart as with any
shopping that you normally do. To add a selected product to the cart:
1. Click on the
button from either the product’s
details page screen or from inside the product box after
selecting the appropriate variant (since this product has
variants) from the drop down. In this case, let us select the
“Reseller” value of $5,000. A Flash confirmation message is displayed every time a product gets
added to the cart from the product box.
2. After the product gets added to the cart, you will be presented with the Cart Content page screen
that looks similar to the one shown here.
Figure 3.3
The selected product has been added to the cart as can be seen here. This page screen displays
the cart details with respect to the name of products and their SKU numbers along with the
quantity ordered, price, etc. and the section page on the left reflects the number of items added to
the cart. Should you wish to remove the selected product from the cart, you may do so by simply
clicking on the
button and clicking the
button on the confirmation window that
appears next.
Note: You may also add a selected product to the cart from the Store’s home page screen by clicking
button placed inside the product box. However, this is possible only in case of a
on the
featured product since only featured products display on the Store’s home page. The same is
possible for non-featured product by selecting it from the Category page screen though.
© 2008 Net Solutions North America. All Rights Reserved | www.netsolutionsna.com
Page 40 of 52
3. To continue with the shopping, Click on the
button. This action takes you to the Store’s
home page screen where you can continue to browse through other categories and products and
continue with your shopping.
4. Clicking on the
button updates the cart contents after a product has been added or
deleted thus reflecting the current contents in the cart.
Checkout & Registration
Once you are ready to checkout:
1. Click on the
button. You may click on the Checkout button either placed at the bottom
of this page or the one on the left section. This action takes you to the Customer Login page
screen similar to the one shown here.
© 2008 Net Solutions North America. All Rights Reserved | www.netsolutionsna.com
Page 41 of 52
Note: During the checkout process, you may use any of the given options that you see on this page
screen such as (a) use your secure login if you are a registered user, (b) use express checkout
option, or (c) sign up for new registration.
2. Login Information (portion shaded in blue) – This login facility is provided for the convenience
of the registered users on your website. By using their secure login details, the registered users
can bypass the registration process while shopping since they already have registered on your
website. All they need to do is just type in their login e-mail address and password.
3. Express Checkout – This facility is provided for those customers who do not want to go through
the registration process.
4. New User Registration (portion shaded in gray) – This facility is provided so that when your
customers shop online they can also simultaneously register on your website. This allows them to
have access to the secure pages on your website which otherwise would not be available to them.
For this tutorial, let us see how this new registration works in the checkout process.
Figure 3.4
5. Fill in the details of the registration form as shown here. Fields marked * are required fields and as
such must be completed. After completing all the required fields, Click on the
button.
Note: The details entered here will be stored on the admin panel under Manage Customers section.
© 2008 Net Solutions North America. All Rights Reserved | www.netsolutionsna.com
Page 42 of 52
Billing & Shipping
Once the registration process is complete, you will be presented with the Billing and Shipping
Information page screen. As can be seen here, the Billing Address is by default pre-populated with
the information provided during the registration process as above. You may type in a different billing
address if you wish or leave it as it is.
1. If the product that you have ordered is to be shipped to the same address as that of the billing,
simply Click inside the
check box placed next to the “Use Same Shipping Address” text and
the Shipping Address details will automatically be filled in by the application as shown here.
© 2008 Net Solutions North America. All Rights Reserved | www.netsolutionsna.com
Page 43 of 52
On the other hand, if you wish to ship the product to a different address, Type in the details and
Click the
button to proceed with the billing process.
2. This action takes you to the 3-step Order Review page screen (see figure below) which allows you
to review your cart contents before you actually pay for them.
Note: This becomes a 4-step process when UPS shipping method is calculated which is explained
towards the end of this document.
Figure 3.5
© 2008 Net Solutions North America. All Rights Reserved | www.netsolutionsna.com
Page 44 of 52
Step #1 – This process allows you to edit your cart contents by Clicking the
button placed at the bottom of the page which takes you to the Cart
Content page screen where you can add or remove products.
Step #2 – This allows you to edit your billing and / or shipping address details by Clicking the
link as appropriate which takes you to the previous screen where you can edit the information.
Note: Clicking on the “Terms & Conditions” or the Privacy Policy” link your customers would be
taken to the store’s Terms & Conditions or the Privacy Policy page screen.
Step #3 – Once you are satisfied with your order and ready to pay, Click the
start entering your payment details.
button to
3. You will now be presented with the Payment Details page screen (see below) prompting you to
enter your credit card details. This is the final step of the billing process.
4. Enter in the card number and the verification code along with the month and year of expiry for the
card.
5. Hit the
button to complete the transaction.
6. The next page screen that you see would be something like the one shown here. This is the Order
Invoice page screen and it displays the details of the order placed, see below.
© 2008 Net Solutions North America. All Rights Reserved | www.netsolutionsna.com
Page 45 of 52
Figure 3.6
7. This completes the shopping process using the ProFusion Ultra IS Shopping Cart application.
8. After the transaction is complete the Order Invoice page screen will now display the Download File
link at the top if the product ordered has any downloadable file as can be seen in this figure. Click
the
to start downloading the file to your computer.
© 2008 Net Solutions North America. All Rights Reserved | www.netsolutionsna.com
Page 46 of 52
Note: The invoice details will be stored on the admin panel under Manage Orders section. A copy of
this invoice will be e-mailed to the admin person of this website as well as to the customer who
placed the order. You may also print this page screen using the print option. Just Click the
icon to start printing this page. The details of this order will now be available on the admin section of
your website on the backend.
Manage Customers
When an order is processed on your website, the details are automatically collected and stored on
the admin section. The Manage Customers section of the application keeps a record of the login
details and contact information of your customers. To view the Manage Customers menu page:
1. Click on the
the admin page.
link under the Shopping Cart section heading on the left side of
2. This action takes you to the Manage Customers page screen which looks similar to the one shown
here.
This page screen displays the name and e-mail address of your customers as well as the date they
first registered / shopped on your website as the case may be. Click on
the arrow of the corresponding customer to view or edit that customer’s
profile (see below). To delete or disapprove a customer, Click inside the
check box next to the customer’s name and Select as appropriate
from the drop down and hit the
button. By deleting or disapproving a
customer, you also disallow that customer the permission to use his secure login privileges on your
website.
© 2008 Net Solutions North America. All Rights Reserved | www.netsolutionsna.com
Page 47 of 52
Figure 3.7
This is the page screen that stores all the details as entered by your customers at the time of their
registration.
Manage Orders
While the Manage Customers section keeps track of customer information, the Manage Orders
section of the application keeps track of all orders processed on your website. To view the Manage
Orders menu page:
1. Click on the
link under the Shopping Cart section heading on the left side of the
admin page. This action takes you to the Manage Orders page screen which looks like the one
shown here.
© 2008 Net Solutions North America. All Rights Reserved | www.netsolutionsna.com
Page 48 of 52
2. This page screen lists all orders that were placed on your website as can be
seen here. By default, all orders will display as “New Order” on the admin
panel. You may change the status of the orders as they get processed
through by Clicking inside their corresponding
check boxes and
Selecting as appropriate from the drop down. This way you can know what
orders came in, what are in process, shipped, or otherwise deleted or
rejected.
3. Export Orders – To export the order details, Click the
to view the file or
link. Next Click either
to download the file on your computer.
4. Print Orders – To print the orders, Enter the order numbers as appropriate in the boxes and hit
button to start printing the order details. To print an individual order detail, Click on the
the
arrow of the corresponding order and hit the
button that is placed at the bottom of the
page (see next figure).
5. Clicking on the
arrow of the corresponding order takes you to the View Order page screen.
© 2008 Net Solutions North America. All Rights Reserved | www.netsolutionsna.com
Page 49 of 52
Figure 3.8
6. This page screen is similar to the order invoice page screen that is displayed to your customers on
your website.
© 2008 Net Solutions North America. All Rights Reserved | www.netsolutionsna.com
Page 50 of 52
Import / Export CSV
This feature allows you to upload and download CSV files to and from the Ultra IS Shopping Cart
application. Click on the
link under the Shopping Cart section heading on the left
side of the admin page. This action takes you to the Import / Export CSV page screen which looks
something like the one shown here.
This page screen allows you to import / export categories, products, customers, or orders. To import
or upload a csv file, Click on the corresponding arrow and follow the instructions that displays next.
On the other hand, to export or download a csv file, simply Click on the corresponding arrow and
to view the file or
Click
to save the file on your computer.
Shop Online Using UPS Methods
If you have configured UPS shipping methods to charge shipping and handling costs for your
products, the UPS rates would automatically be added to the order total once the customer is ready
to checkout and pay. The UPS rates are calculated and added dynamically based on the weight of
the orders placed and the physical address to which they are to be shipped. This would involve an
additional step to the 3-step process (as previously described), the first step being the addition of
UPS rates as can be seen in this figure.
Shipment
Select UPS Shipping Service
Step #1 – Select the UPS rates from the drop down as appropriate. The
rates that appear in this drop down list are dynamically generated. The
rate that is selected from this list will be added to the order total as the
Shipping Cost.
© 2008 Net Solutions North America. All Rights Reserved | www.netsolutionsna.com
Page 51 of 52
Step #2 – The Review Payment step will be dynamically generated based on the shipping method
opted in the previous step. For example, if a customer chooses the
option for an
order or $100, his Order Review page would show the order total as shown in this figure below.
© 2008 Net Solutions North America. All Rights Reserved | www.netsolutionsna.com
Page 52 of 52