1
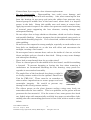
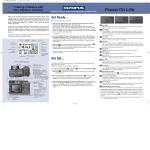
INON Underwater Wide Conversion Attachment Lens UWL-100 Achromat Type 1 / Type 2 User Manual Thank you for purchasing Inon products. Simply screwing on the Inon UWL-100 attachment lens to the 67mm threaded front lens port of popular digital camera housings makes extreme wide-angle photography possible. The lens can be installed or removed underwater giving the photographer even greater flexibility. Type 1 and Type 2 lenses are the same except for the position of the threaded mounting ring on the lens base. The Type 1 threads are placed farther “up” the lens barrel, towards the outer, larger lens element. This allows the smaller lens element facing the camera to be placed closer to the camera lens. The Type 2 threads simply place the rear lens element a little farther away from the camera. Choosing between a Type 1 or Type 2 lens depends on your camera/housing system, whether it has a 67M threaded mount on its outer port, or if an adapter ring is necessary or not. Refer to the “UWL-100 View Angle and Focus Range when used with various housings & cameras” chart later in this Manual. It is possible to change your lens from Type 1 to Type 2, and vice versa, by simply changing the “Type 1 / Type 2 Threaded Mounting Ring” which is screwed onto the back of the lens. Contact Inon or your local dealer if you require this service. Main Features - - The UWL-100 is designed to perform equally well both underwater and above. Underwater it is an extreme wide-angle converter, in air it is a fisheye converter. (Underwater view angle 100.5°, above water view angle 158.35°, when used with C-3030 Zoom + PT-005) With the optional “Dome Lens Unit for UWL-100”, an attachment dome to fit over the UWL-100, it is possible to achieve even wider underwater angle of view, close to that currently possible on land. In addition to enabling extreme wide angle of view, the optical design of the UWL-100 allows closer focusing distances so better “wide-macro” (close focus wide angle) photography is possible. (When used with the C-3030 Zoom, in Standard Mode the focus range is ∞~0.233m compared to camera only focus Inon UWL-100 Manual 1 Ver. 1.21 July 11,, 2003 Translation Copyright 2002, 2003 by Mark Rupert. All rights reserved. - range of ∞~0.8m. In Macro Mode the focus range is 0.233m~0.0383m, compared to the camera only range of 0.8m~0.2m) The lens is constructed of high quality optical glass with multi-layer anti reflective coating on both sides. Five lens elements are arranged in four groups with achromatic doublets to correct for chromatic and spherical aberration. By design, the UWL-100 minimizes aberration to achieve master lens performance. Compatible Camera Housings, supported by Inon (as of March 2003) Manufacturer Olympus Canon Inon Housing Model(s) PT-005, PT-007, PT-010, PT-015 Necessary 67mm Mount Base (Not necessary, attach directly) PT-012 Inon “M67 Mount Base PT-012” PT-014 Inon “M67 Mount Base PT-014” WP-DC300 Inon “M67 Mount Base DC300” WP-DC200, WP-DC200s Inon “M67 Mount Base DC200/200s” WP-DC100, WP-DC500 Inon “M67 Mount Base DC100/500” DN-800, DN-880 (discontinued) (Not necessary, attach directly) Other known Camera/Housings that support Inon UWL-100 lenses* Manufacturer Fisheye Zillion Housing Model(s) Necessary Mounting Parts FIX 4040 (Olympus C-xxx series) (direct) FpBlitz (FinePix 4800/6800Z) Zillion “FpBlitz Inon Adapter” FpLude (FinePix F601) Zillion “FpLude Arm Base/Lens Adapter” FpJake (FinePix F401) Zillion “FpJake 67mm Arm Base/Lens Adapter” Gates Ikelite PC7/10/1/3/100/110/120 Gates TRV900/950, DJ100 bayonet adapter ring necessary. Various (contact manufacturer) “Multi-Port” compatible. Gates * Note: Compatibility, performance and warranty of these housings when used with Inon attachment lenses is only provided by the respective housing manufacturer. Inon does not provide technical support or warranty for these products, and provides above information for reference purposes only. Contact respective housing manufacturer for details. Installation Method - Always apply a thin film of grease (the grease used for the housing’s o-ring is fine) to the metal threads that will be screwed onto 67M the housing port Inon UWL-100 Manual 2 Ver. 1.21 July 11,, 2003 Translation Copyright 2002, 2003 by Mark Rupert. All rights reserved. - - ring. This is to prevent electrolytic and salt corrosion between the lens and housing port, which in extreme cases could cause the lens and port to permanently fuse together. Align the threads carefully and screw lens onto the 67M housing port ring. The UWL is a “water-contact” lens, meaning the water between the lens and the port acts as an optical element. Therefore, it is necessary to let water completely enter the space between the rear of the UWL-100 lens and the housing port. So that air does not get trapped between the lens and the housing port, either install the lens underwater; or, when underwater, partially unscrew the lens allowing any air to escape, and then retighten. It may also help to lightly tap the lens/housing with your hand to dislodge air bubbles attached to the lens or port. When using the lens in air, to prevent vignetting of the two protruding ridges on the rim of the rubber lens protector, carefully rotate the lens protector on the lens, so that when the lens if screwed onto the housing the protruding ridges are at the 12:00 o’clock and 6:00 o’clock positions. Use Suggestions and Precautions - - - Depending on camera and housing used, the subject distance and angle of view, the camera’s internal strobe may not illuminate the entire image; or, unwanted light from the internal strobe may intrude on the image or cause backscatter. In such cases we recommend using an external strobe, such as the Inon D-180 or Z-220 together with the Inon “Inon Optical D Cable” and “Clear Photo System” products. (sold separately) The UWL-100 is designed for optimum performance with a variety of camera/housing combinations. To achieve optimum images with your equipment, start with the camera zoom set at the full Wide position. Depending on the camera/housing used, there may be slight vignetting of the image. In that case slightly zoom forward little by little until there is no more vignetting. After using, never put the lens caps on or place the lens in the carry pouch with any water (salt or fresh) remaining on the lens surfaces. Doing so may degrade the glass coatings or the glass itself, or cause spotting or discoloration. Slight spotting or discoloration will have minimal adverse effect on the image, but it is a matter of degree, and heavy surface degradation would necessitate replacing the damaged lens element(s). Inon UWL-100 Manual 3 Ver. 1.21 July 11,, 2003 Translation Copyright 2002, 2003 by Mark Rupert. All rights reserved. - - - - - - - Contact Inon if you require a lens element replacement. Do not disassemble. Disassembling lens could cause damage and subsequent flooding, and will void warranty. Also, when removing the lens from the housing do not grasp and twist the rubber lens protector ring. Instead grasp the middle area of the lens barrel, where there is a lanyard groove in the body. Grasp this middle area and rotate to remove lens. Applying excessive torque to the rubber lens protector could cause loosening of internal parts supporting the lens elements, causing damage and subsequent flooding. Do not subject lens to large shocks or vibrations, which can lead to damage and possible flooding. Always transport lens in the optional carry pouch, or other shock-absorbing bag/case. If on a boat deck, cushion with neoprene or other padding. Do not leave lens exposed to strong sunlight, especially on such surfaces as a boat deck, car dashboard etc. as the lens will collect and concentrate the sunlight, creating a fire hazard. Do not expose lens to extreme heat, such as the inside of a hot car, or in hot direct sunlight, such as a beach or boat deck. Doing so may cause damage and subsequent flooding. Never look at sun through lens (or any other time!) There is a lateral groove in the middle of the lens barrel, useful for attaching a lanyard. To prevent dropping or loosing the lens when removing it underwater we recommend attaching the lens, housing, carry pouch etc. together in one attached assembly. The angled face of the lens barrel (see photo at right) is an O-ring contact surface for the optional “Dome Lens Unit for UWL-100.” There must be no scratches or other surface imperfections to ensure proper seal and Dome Lens Unit O-ring watertight integrity. Be careful to prevent any Contact Surface damage to this O-ring contact surface. The silicon grease on the glass element sealing o-rings may leach out somewhat onto the lens surface. This is no problem, as the grease will not penetrate the lens material. If in the course of use, some grease does leach out, lightly wipe with commercially available lens paper or microfiber cloth, making sure the surrounding glass area is first clean, with no sand or other debris. Inon UWL-100 Manual 4 Ver. 1.21 July 11,, 2003 Translation Copyright 2002, 2003 by Mark Rupert. All rights reserved. Maintenance - - - - After use, remove lens from housing and soak in fresh water (less than 30C / 86F degrees) for several hours to dissolve any accumulated salt. Then wipe lens with soft cloth or towel. Be sure to remove any sand, dirt or other matter from the lens surface before wiping. And then, only gently wipe or dab any remaining water off so as not so scratch glass surface. To completely dry, do not leave lens exposed to direct sunlight. Instead, place it in a dry area with good ventilation. (It may take several days to completely dry, depending on relative humidity and air conditions.) Do not allow any water to dry on lens surfaces, as water spots or discoloration may result. When the lens is completely dry, store out of direct sunlight, in a well ventilated area. Do not store lens in following environments: - with solvent or other chemical fumes - with high humidity, or high ozone - with extreme temperature fluctuations Storage in such conditions may lead to water leakage, or other damage such as lens surface degradation, discoloration or mold. The lens is constructed with highly weather resistant black o-rings to secure the lens elements. However, if the lens is stored in an area of high ozone, or is exposed to excessive UV light, these o-rings may degrade, developing cracks. If this happens return lens to dealer for maintenance service. Lens Coating The UWL-100 lens coating is very delicate. After use, wash with fresh water and lightly wipe dry with clean, soft, dry cloth, such as a micro-fiber cloth. Then attach lens cap when dry. Do not attach lens cap and store when lens is still wet as permanent water spots may remain, or moisture will streak or discolor the coating. Preventative Maintenance Always apply a thin film of grease to all camera to lens contact surfaces, such as mounting threads. We highly recommend removing lens from housing after use to prevent salt build-up and corrosion. The lens may become difficult or impossible to remove if there is excessive corrosion. Inon UWL-100 Manual 5 Ver. 1.21 July 11,, 2003 Translation Copyright 2002, 2003 by Mark Rupert. All rights reserved. Removing Lens with Corroded Mounting Threads If salt build-up or corrosion makes lens difficult to remove, do not apply strong pressure or torque to rubber protective ring area. Doing so may compromise an internal O-ring seal. Instead, grasp and rotate the lens from the middle of the lens, at the lanyard groove area. PT-005 Adapter Ring (sold separately) Attention Olympus PT-005, PT-005s, PT-007, PT-010 housing users. Some Olympus Housing / Camera model combinations require use of “PT-005 Adapter Ring” for optimum performance when using UWL-100 Type 1 lens. 1. To determine if you need to use the Ring, first refer to the “UWL-100 View Angle and Focus Range when used with various housings & cameras” chart in this Manual. 2. Then, find your housing/camera combination. In the right column, find your “Useable Type” of UWL-100 lens, Type 1 or Type 2. Some housing/camera combinations work best with a Type 2 lens and no PT-005 Adapter Ring. If this is your case, read no farther and start enjoying your equipment. In other cases you will need to install the Adapter Ring on your housing, and then mount a Type 1 lens to the Adapter Ring. Caution: Before installing the Adapter Ring, be sure you have read and understand these instructions thoroughly. supplier. Also, please confirm any warranties provided by your housing The installation is a fairly simple matter, but by partially disassembling your housing’s port, you may also be voiding a warranty. Caution: Improper installation could result in water leakage, and damage to your housing and camera. By agreeing to undertake the installation you become responsible for any subsequent damages. Inon, the housing manufacturer and your housing supplier are not responsible for any damage resulting from improper installation of the Adapter Ring. If you have any doubts or questions about your ability to successfully perform the installation, stop, and do not attempt it. Please contact Inon or your supplier for further guidance in this case. Inon UWL-100 Manual 6 Ver. 1.21 July 11,, 2003 Translation Copyright 2002, 2003 by Mark Rupert. All rights reserved. PT-005 Adapter Ring Installation method 1. First, remove the existing threaded ring on your housing port, using the “Lens Ring Tool” provided with the PT-005 Adapter Ring. (see photo) Insert the tool into the grooves of the ring and rotate counterclockwise. Unscrew the ring. When removing the ring there may be a round rubber gasket. Be careful to remember the position of this gasket to help in reassembly. If the ring cannot be easily removed, do not attempt to force it off. Doing so could damage the housing itself. Instead, contact Inon or your supplier for further assistance. 2. Next, attach the PT-005 Adapter Ring to your housing port. If there was a rubber gasket ring when you first removed the port ring, make sure you replace it in the proper position before attaching the Adapter Ring. (see photo) Then, using the Lens Ring Tool, screw the ring down clockwise until it is snug. Do not over tighten as this could damage the housing. 3. Before installing your camera into the housing, take it in the water without the camera, preferably to the same depth you intend to dive, and inspect it for any leaks. Only install camera and take camera/housing assembly into the water after you have fully confirmed its watertight integrity. UWL-100 Optional Accessories 1) “Dome Lens Unit” Dome lens specifically designed for UWL-100. Fits on top of UWL-100 front lens element. Increases underwater angle of view close to that of above water angle of view. Enables closer focusing. Includes dome lens protector to protect dome and reduce flare. Inon UWL-100 Manual 7 Ver. 1.21 July 11,, 2003 Translation Copyright 2002, 2003 by Mark Rupert. All rights reserved. 2) “Carry Pouch for UWL-100” Neoprene carry pouch. Can be used underwater. Protect lens while carrying ing underwater, take lens out and install on housing when needed. 3) “PT-005 Adapter Ring” Adapter ring necessary to install UWL-100 Type 1 on Olympus PT-005, PT-005s, PT-007, PT-010. 4) “67mm Lens Holder” (single or double mount). Attaches to Inon Arm System. Holds one or two UWL-100 or UCL-330 lenses. 5) “Port Arm D” Attach strobe or light to Olympus housing port. (Requires Port Arm D Spacer, or PT-005 Adapter Ring.) 6) “Port Arm D Spacer” Spacer ring fits gap between Olympus housing port and Port Arm D. Port D Spacer Port Arm D 7) “Direct Arm Z Set” (not pictured) Arm set extension for mounting Inon D-180 or Z-220 Strobes to Port Arm D. 8) “M67 Mount Bases” For fitting UWL-100 to certain Olympus and Canon housings. M67 Mount Base – DC300 M67 Mount Base – DC200/200s M67 Mount Base – DC100/500 M67 Mount Base – PT-012 M67 Mount Base – PT-014 Inon UWL-100 Manual 8 Ver. 1.21 July 11,, 2003 Translation Copyright 2002, 2003 by Mark Rupert. All rights reserved. INON Underwater Close-up Lens UWL-100 Achromat Specifications Type 1 / Type 2 [1] Diameter [1] Ø100mm Length [2] 58.5mm Threading / Pitch M67 / 0.75 Weight (above/below water) 625g / approx. 370g [2] Depth Rating 60m (200 feet) Body Material / Finish Corrosion resistant aluminum alloy Black hard anodized Lens Material / Coating Optical Glass / Two-side anti-reflection coated Construction 4 groups, 5 elements Magnification [3] UWL-100 Product Set - 0.57077 Includes: UWL-100 Lens, Lens Protector (rubber, factory installed on lens), Two Lens Caps (one for lens front, one for lens rear), User Manual For inquiries, comments or suggestions regarding this manual, or periodic revisions, contact Mark Rupert by email: [email protected] or go to www.**TBD*** Inon Dealer Contact Information: * For overhaul, maintenance and repair please contact your Inon dealer before returning any products for service. Inon UWL-100 Manual 9 Ver. 1.21 July 11,, 2003 Translation Copyright 2002, 2003 by Mark Rupert. All rights reserved. UWL-100 View Angle and Focus Range when used with various housings & cameras (W ith camera zoom control at maximum wide position.) Housing PT-005 [9] (PT-005s) PT-007 [9] PT-010 [9] PT-015 [9] PT-012 [9] DC100 [9] DC200s [9] DC200 [9] DC300 [9] DC500 [9] DN-800 DN-880 Camera Attach Method Useable Type [10] Type 1 Type 2 C-3030Z C-3000Z C-2020Z C-3040Z C-2040Z C-3030Z C-3000Z C-2020Z C-4000Z C-4100Z C-4040Z C-3040Z C-2040Z C-3030Z C-3000Z C-2020Z C-5050Z C-40Z IXY D300 A40 A30 A20 A10 S40 S30 IXY D300a E 800 E 880 Direct Direct Direct Direct Direct Direct Direct Direct Direct Direct Direct Direct Direct Direct Direct Direct Direct M67 M.B. M67 M.B. M67 M.B. M67 M.B. M67 M.B. M67 M.B. M67 M.B. M67 M.B. M67 M.B. Direct Direct O O O O O O O O O O O O O O O O O 67T 67T 67 67 67 67 67T 67T 67T × × × × × x x × × 67 67 67T 67T 67T 67T 67 67 67 × × Focus Range (parentheses indicate range without UWL-100) [8 Angle of View In W ater On Land Normal Mode Macro Mode 100.5° 100.5° 90.6° 91.4° 82.9° 100.5°[4] 100.5°[4] 90.6° 100.5° 100.5° 91.4° 91.4° 82.9° 100.5°[4] 100.5°[4] 90.6° 91.4° 89.3° 90.1° 90.1° 90.1° 90.1° 90.1° 91.4° 91.4° 90.1° 82.1° 73.6° 158.35°[4] 158.35°[4] 142.82° 144.98°[4] 123.75° 158.35°[4] 158.35°[5] 142.82°[6] 158.40°[4] 158.40°[4] 144.98°[4] 144.98°[4] 123.75° 158.35°[5] 158.35°[5] 142.82°[6] 144.9°[4] 139.13°[6] 141.15°[6] 141.15°[6] 141.15°[6] 141.15°[6] 141.15°[6] 144.98°[6] 144.98°[6] 141.15°[6] 126.32° 105.87° inf. - 23.3cm (inf. -80cm) inf. - 23.3cm (inf. -80cm) inf. - 23.3cm (inf. -80cm) inf. - 23.3cm (inf. -80cm) inf. - 23.3cm (inf. -80cm) inf. - 23.3cm (inf. -80cm) inf. - 23.3cm (inf. -80cm) inf. - 23.3cm (inf. -80cm) inf. - 23.3cm (inf. -80cm) inf. - 23.3cm (inf. -80cm) inf. - 23.3cm (inf. -80cm) inf. - 23.3cm (inf. -80cm) inf. - 23.3cm (inf. -80cm) inf. - 23.3cm (inf. -80cm) inf. - 23.3cm (inf. -80cm) inf. - 23.3cm (inf. -80cm) inf. - 23.3cm (inf. -80cm) inf. - 23.3cm (inf. -80cm) inf. -22.0cm (inf. -76cm) inf. -22.0cm (inf. -76cm) inf. -22.0cm (inf. -76cm) inf. -22.0cm (inf. -76cm) inf. -22.0cm (inf. -76cm) inf. -22.0cm (inf. -76cm) inf. -22.0cm (inf. -76cm) inf. -22.0cm (inf. -76cm) inf. -7.1cm (inf. -30cm) inf. -10.3cm (inf. -40m) 23.3cm-3.8cm (80cm-20cm) 23.3cm-3.8cm (80cm-20cm) 23.3cm-3.8cm (80cm-20cm) 23.3cm-3.8cm (80cm-20cm) 23.3cm-3.8cm (80cm-20cm) 23.3cm-3.8cm (80cm-20cm) 23.3cm-3.8cm (80cm-20cm) 23.3cm-3.8cm (80cm-20cm) 23.3cm-3.8cm (80cm-20cm) 23.3cm-3.8cm (80cm-20cm) 23.3cm-3.8cm (80cm-20cm) 23.3cm-3.8cm (80cm-20cm) 23.3cm-3.8cm (80cm-20cm) 23.3cm-3.8cm (80cm-20cm) 23.3cm-3.8cm (80cm-20cm) 23.3cm-3.8cm (80cm-20cm) 23.3cm-3.8cm (80cm-20cm) 23.3cm-0.6cm (80cm-10cm) 22.0cm-2.5cm (76cm-16cm) 22.0cm-2.5cm (76cm-16cm) 22.0cm-2.5cm (76cm-16cm) 22.0cm-2.5cm (76cm-16cm) 22.0cm-2.5cm (76cm-16cm) 22.0cm-2.5cm (76cm-16cm) 22.0cm-2.5cm (76cm-16cm) 22.0cm-2.5cm (76cm-16cm) (Cannot use at widest setting) (Cannot use at widest setting) =Attach directly to housing port. O =Requires “PT-005Adapter Ring”. X =Not useable due to excessive vignetting; change to other Type. 67 = Requires “M67 Mount Base”. 67T =Possible with M67 Mount Base, but not optimal image quality; recommend change to other Type. 1) Specifications subject to change without notice. 2) Including factory installed rubber Lens Protector In “Useable Type” column in above chart, choose Type over O Type if possible. X not recommended 3) UWL-100 performance itself, not in combination with camera lens. 4) Slight vignetting in image corners, zoom forward slightly. 5) Definite vignetting in image corners, zoom forward slightly. 6) Not tested for vignetting. Zoom forward as necessary. 7) “PT-005 Adapter Ring” (sold separately) is necessary to install UWL-100 Type 1 on PT-005, PT-005s, PT-007 and PT-010 housings. Refer to this Manual, or PT-005 Adapter Ring User Manual. Type 2 lens not recommended on these housings. 8) Measurement in air. For in water measurement value, multiply by 1.33. 9) There may be slight differences in view angle and vignetting between different cameras of same model even if used in same housing. 10) “M67 Mount Base” (sold separately) is necessary to install UWL-100 Type 1 and Type 2 on some housings. Refer to above chart and M67 Mount Base User Manual. Symbol Legend: Inon UWL-100 Manual Ver. 1.21 July 11,, 2003 Translation Copyright 2002, 2003 by Mark Rupert. All rights reserved. 10