1
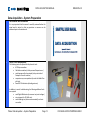
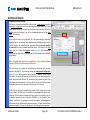
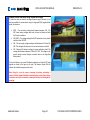
DATA ACQUISITION MANUAL REVISION 4.0 This manual is property of Smart Structures, Inc. It must be promptly returned to them at any time they may so request. It is loaned to the holder for his personal information and use only, and its content shall not be disclosed by the holder to any third party. The holder shall take every precaution to prevent third parties from perusing, reproducing or copying the same either wholly or in part. © 2012 Smart Structures Inc. All rights reserved. Neither the whole nor any part of this manual may be reproduced, stored in any retrieval system or transmitted in any form or by any means (electronic, mechanical, reprographic, recording or otherwise) without the prior written consent of the copyright owner. SmartPile® is a registered trademark of Smart Structures Inc. The SmartPile® system is protected under U.S. Patents No. 6,533,502 and 7,637,166, with additional patents pending. Smart Structures aims to ensure that all information in this document is correct and fairly stated, but Smart Structures is not liable for errors or omissions. Specifications are subject to change without notice. This device complies with Part 15 of the FCC Rules. Operation is subject to the following two conditions: (1) this device may not cause harmful interference, and (2) this device must accept any interference received, including interference that may cause undesired operation. FCC ID: V9CSP-X01D2 Changes or modifications not expressly approved by the party responsible for compliance could void the user’s authority to operate the equipment. Page 2 FOR EVALUATION PURPOSES ONLY DATA ACQUISITION MANUAL REVISION 4.0 Introduction Through sensors embedded in the pile, the SmartPIle® system obtains accurate information on stress levels in a concrete pile from the moment it is cast. This provides the system with the unique ability to measure residual stresses during installation and provide an accurate assessment of the true conditions in the pile. Multiple embedded sensors also collect accurate wave speed measurements, allowing a higher level of pile integrity monitoring. Consequently, accurate dynamic data on the shaft friction and tip resistance is available, so that an estimate of the ultimate static resistance (i.e. capacity of the pile) can be made. To enhance safety and ease of use, its patented design allows monitoring and recording of data from up to 500 feet from the pile, with no wires to connect. Powerful PC-based software generates DOT-formatted reports, provides multi-user access with password control, and allows data review from both current as well as past projects. The system provides the user with the following benefits: It provides for a high level of confidence in achieving the required driving resistance It eliminates PDA installation pile preparation time at jobsite It eliminates climbing leads at the job site for gauge installation It provides constant monitoring of pile driving energy It records pile driving data history Instrumentation is calibrated before every installation It measures pile pre-stress and driving stresses (i.e, tip stresses, residual stresses, total stresses) and pile tip resistance It provides for high levels of pile integrity monitoring It provides for an efficient means for monitoring pile re-strikes Instrumented piles require no special handling by the contractor It provides additional features for pile manufacturing and installation quality control Following a short system introduction, this manual describes in 31 steps, the data acquisition process with the SmartPile® system. It is important that these steps are followed strictly, and it is therefore suggested that this manual be carefully reviewed before the actual work is started, so that any questions or concerns can be addressed prior to the actual work. In case you require additional support or clarifications from Smart Structures, Inc., don’t hesitate to do this. The best way to contact Smart Structures is by calling (866) 640-2993 and then entering 1 for support. Introduction Page 3 FOR EVALUATION PURPOSES ONLY DATA ACQUISITION MANUAL REVISION 4.0 Contents Introduction ................................................................................................................................................................................................................... 3 System Overview ........................................................................................................................................................................................................... 8 Off-site Preparation of Installation Kit ....................................................................................................................................................................... 8 Activate System.......................................................................................................................................................................................................... 8 On-site Installation of Items included in the Installation Kit ..................................................................................................................................... 8 Check System Prior to Pile Casting............................................................................................................................................................................. 9 Pour Concrete ............................................................................................................................................................................................................ 9 Check System after Pile Casting ................................................................................................................................................................................. 9 Transport finished SmartPiles® to the Job Site ........................................................................................................................................................ 10 Data Acquisition ....................................................................................................................................................................................................... 10 Data Review ............................................................................................................................................................................................................. 10 Data Acquisition ........................................................................................................................................................................................................... 12 Data Acquisition - System Preparation ........................................................................................................................................................................ 13 Get Familiar with the Manual .................................................................................................................................................................................. 13 Check Tools & Equipment ........................................................................................................................................................................................ 13 Remove Dataport Cover .......................................................................................................................................................................................... 14 Inspect Dataport and Replace Battery ..................................................................................................................................................................... 14 Replace Dataport Cover ........................................................................................................................................................................................... 15 Check SmartPile® Workstation ................................................................................................................................................................................ 15 Data Acquisition – Connect to SmartPile® System ...................................................................................................................................................... 17 Start SmartPile® Suite and the Acquisition Software .............................................................................................................................................. 17 Table of Contents Page 4 FOR EVALUATION PURPOSES ONLY DATA ACQUISITION MANUAL REVISION 4.0 Search for SmartPile® System .................................................................................................................................................................................. 17 Select the Target Dataport from the Discovery List................................................................................................................................................. 18 Optional: Specify the Target Dataport Address Directly.......................................................................................................................................... 19 Connect to the Selected Dataport ........................................................................................................................................................................... 20 Turn on the Sensors ................................................................................................................................................................................................. 21 Data Acquisition – Session Configuration .................................................................................................................................................................... 22 Prepare to Configure a Session ................................................................................................................................................................................ 22 Configuration Step 1: Select User ............................................................................................................................................................................ 22 Configuration Step 2: Select Project and Location .................................................................................................................................................. 23 Configuration Step 3: Enter Pile Data ...................................................................................................................................................................... 24 Configuration Step 3a: Enter Driving Criteria .......................................................................................................................................................... 25 Recalculating Pile Parameters.................................................................................................................................................................................. 25 Session Configuration – Complete ........................................................................................................................................................................... 26 Fast Configuration - Load a previously created Session .......................................................................................................................................... 27 Data Acquisition – Final Preparations for Monitoring ................................................................................................................................................. 28 Final Preparations – Trigger Level / Depth Below Reference (Elevation))............................................................................................................... 28 Trigger Definition: Step 1 - Location and Source ..................................................................................................................................................... 28 Trigger Definition: Step 2 – Threshold Value ........................................................................................................................................................... 29 Set the Initial Depth Below Reference (DBR) of the Pile ......................................................................................................................................... 30 Data Acquisition – Monitoring ..................................................................................................................................................................................... 31 Capture Data ............................................................................................................................................................................................................ 31 Register DBR Increments ......................................................................................................................................................................................... 32 Additional Points of Interest .................................................................................................................................................................................... 33 Table of Contents Page 5 FOR EVALUATION PURPOSES ONLY DATA ACQUISITION MANUAL REVISION 4.0 Interrupt Data Acquisition ....................................................................................................................................................................................... 34 Resume Data Acquisition ......................................................................................................................................................................................... 34 Disconnect the Dataport .......................................................................................................................................................................................... 35 End Data Acquisition ............................................................................................................................................................................................... 36 Pack the Created Session ......................................................................................................................................................................................... 37 Review SmartPile® Documentation ......................................................................................................................................................................... 37 Additional Details ......................................................................................................................................................................................................... 39 Acquiring a State Stamp ........................................................................................................................................................................................... 39 Resetting/Updating Trigger Level ............................................................................................................................................................................ 41 Continuation of Monitoring using Separate Workstations ...................................................................................................................................... 42 Adjusting Data Capture Window Length ................................................................................................................................................................. 42 Dataport Status Indication using measured Voltages.............................................................................................................................................. 43 Dataport Status Indication using Blink Codes .......................................................................................................................................................... 44 System Troubleshooting .............................................................................................................................................................................................. 45 Addressing Target Dataport not Reporting during Discovery.................................................................................................................................. 45 Addressing Dataport Radio Link Timeout ................................................................................................................................................................ 46 Addressing Sensor Pack Data not Reporting............................................................................................................................................................ 47 Correcting Out of Range or Faulty Sensor Data Errors ............................................................................................................................................ 47 Correcting Radio ID mismatch (Target Device vs. Pile Configuration) ..................................................................................................................... 49 Corrective Procedure for Apparent Dead Radio ...................................................................................................................................................... 50 Staggering Radio Broadcast Intervals to avoid connection conflicts ....................................................................................................................... 52 Table of Contents Page 6 FOR EVALUATION PURPOSES ONLY DATA ACQUISITION MANUAL System Overview Page 7 REVISION 4.0 FOR EVALUATION PURPOSES ONLY DATA ACQUISITION MANUAL REVISION 4.0 System Overview Off-site Preparation of Installation Kit In most cases an Installation Kit will be prepared before the installation technician arrives at the casting yard (“off-site”) to speed up the installation of the system onsite. If for whatever reason an Installation Kit has not been prepared, and instead loose components have been shipped to the casting yard, additional preparation work will be required prior to the physical installation of the system. Activate System If pile casting is expected within the 3 days from the preparation of the Installation Kit, the preparation of the Installation Kit includes system activation by connecting the State Stamp Battery properly to initialize the Dataport. After the Dataport access cover has been put back into place, colored tape is placed over the screw heads to clearly mark that the Dataport has been activated. The tape also ensures that concrete is kept out of the screw head slots when the piles are poured. On-site Installation of Items included in the Installation Kit In the casting yard, the items included in the Installation Kit are installed. This includes installation of the Suspension and Dataport Assemblies as well as connecting all these items using the Tip Extension Cable. The work also includes proper dressing of all exposed cables. System Overview Page 8 FOR EVALUATION PURPOSES ONLY DATA ACQUISITION MANUAL REVISION 4.0 Check System Prior to Pile Casting Prior to casting, the installation of all items is inspected and checked. Once verified, the SmartPile® Workstation is connected to the system to verify its functionality and performance. If the system operates correctly, a Pre-cast State Stamp is issued. If applicable, epoxy can be applied to the Dataport housing before pile casting. Pour Concrete While pouring the concrete, special attention must be given to ensure that the SmartPile® system is not damaged either by having concrete dropped right on top of the sensing elements, or by careless vibrator use. Check System after Pile Casting After the pour has been completed, the SmartPile® Workstation is once again connected to the system to verify system functionality and performance. If the system operates correctly, a Post-cast State Stamp is issued. A copy of this State Stamp can be given to the appropriate yard personnel for quality and integrity tracking purposes. System Overview Page 9 FOR EVALUATION PURPOSES ONLY DATA ACQUISITION MANUAL REVISION 4.0 Transport finished SmartPiles® to the Job Site Data Acquisition The data acquisition using the SmartPile® Workstation is described in the Data Acquisition Manual. It is essential that the system is properly configured prior to the start of the data collection to ensure that the data is recorded correctly. This configuration as well as the actual data recording is done with the Data Acquisition software within the SmartPile® Suite. Data Review The analysis of the recorded data, either during data acquisition on site or at a later date in the office, is described in the Data Review Manual. This review is done using the Data Review software, running either stand alone or within the SmartPile® Suite. This software also allows you to perform installation monitoring analysis (including pile capacity calculations) and pile integrity analysis, as well as generate summary report. Additional capabilities of the system beyond driven pile installation are covered at the end of this manual. System Overview Page 10 FOR EVALUATION PURPOSES ONLY DATA ACQUISITION MANUAL Phase: Data Acquisition Page 11 REVISION 4.0 FOR EVALUATION PURPOSES ONLY DATA ACQUISITION MANUAL REVISION 4.0 Data Acquisition Part 2 of this manual – Data Acquisition, covers all SmartPile® activities associated with data monitoring that are conducted at the job site. Users are expected to be aware and compliant with all requisite safety requirements and training associated with working in a heavy construction site environment. SAFETY FIRST! Phase: Data Acquisition Page 12 FOR EVALUATION PURPOSES ONLY DATA ACQUISITION MANUAL REVISION 4.0 Data Acquisition - System Preparation 1 Get Familiar with the Manual It is very important that this manual is carefully reviewed before the actual work is started, so that any questions or concerns can be addressed prior to the actual work. 2 Check Tools & Equipment The following tools are required for this phase of work: #2 Philips screwdriver flat blade screwdriver (to help remove Dataport cover) small sponge and/or shop towels (to dry out inside of Dataport in case of moisture) carpenters crayon or equivalent (to mark the Radio ID on pile face) SmartPile® Workstation (including antenna) In addition, in case of troubleshooting, the following additional tools are required: small Digital Multimeter (to measure test point voltages) wire strippers (for 22 AWG wire) small soldering iron (butane recommended), and rosin core solder Phase: Data Acquisition – System Preparation Page 13 FOR EVALUATION PURPOSES ONLY DATA ACQUISITION MANUAL REVISION 4.0 Finally, the following part is required for each pile to be monitored: new SmartPile Battery Pack (p/n 101302) 3 Remove Dataport Cover For each pile to be monitored, remove the cover of the Dataport located near the pile top as follows: Remove the 6 screws securing the Dataport cover after first removing any remaining tape still covering them. Remove the Dataport cover by getting into the foam spacer between the lid and concrete using a flat blade screwdriver, and gently prying the cover up; Once the cover has been removed, peel away and discard the foam spacer material around the lid’s outside perimeter. 4 State Stamp Battery Inspect Dataport and Replace Battery After the lid has been removed, exposing the inside of the Dataport: Inspect the inside of the Dataport for signs of possible corrosion (metallic surfaces with a green color) in and around the battery compartment. If corrosion is detected, please follow Troubleshooting Item L at the end of this manual. Dry up any moisture found on the inside surfaces of the Dataport using the small sponge and/or shop towels. Depress the connector tab (red box) and pull it back to remove the State Stamp Battery. Properly discard the battery. Plug the remaining battery clip connector into the Dataport (white box). Install the driving battery with the exposed tabs oriented towards the spring clips, and the battery label facing up (green box). Insert the battery in one fast and clean sweeping motion by compressing the spring clips using the battery tabs, and dropping the battery back end into the compartment. Immediately after the new battery pack has been snapped into place, the red and green LED’s should begin blinking in an alternating pattern (red arrow) signifying proper system Phase: Data Acquisition – System Preparation Page 14 Note: For clarity, the pictures shown in step 3 and 4 were taken in an office environment FOR EVALUATION PURPOSES ONLY DATA ACQUISITION MANUAL REVISION 4.0 initialization. If no LED activity is detected, please remove the battery and allow two minutes before repeating the step above. If unsuccessful, please follow Troubleshooting Item L at the end of this manual. 5 Replace Dataport Cover Once proper system initialization has been confirmed, boldly mark the Radio ID of the system on the face of the pile next to the Dataport. In addition to the Radio ID being located on the face of the cover, the last 4 digits of the ID can also be found written in permanent marker on the metallic reflector in the (upper corner of the) Dataport antenna cavity. Make sure there are no physical obstructions between both the underside of the outer lip on the cover and the foam spacer around the base enclosure, and the lid seal gasket contact area with the base enclosure top rim. In order to provide a proper water tight seal, make sure the cover is tightly secured by replacing the 6 cover screws. Be careful not to over tighten the cover screws, potentially damaging the o-ring seal gasket under each screw head. 6 Check SmartPile® Workstation For Data Acquisition, a SmartPile® Workstation with an Antenna System/Stand is required (see adjacent figure). Before data acquisition is initiated, the following items should be checked: The Antenna System is plugged into a USB port on the Workstation. The configuration of the Workstation is such that it will not go into a Power Save Mode (needs to be set to “Always On”). The wireless network connection is disabled. No other applications are running on the Workstation. The Workstation battery power life is adequate (minimum 3 Hours), unless an available AC power source is available for Phase: Data Acquisition – System Preparation Page 15 Antenna Workstation FOR EVALUATION PURPOSES ONLY DATA ACQUISITION MANUAL REVISION 4.0 the computer. The Radio ID (address) of the target Dataport is known. And finally, if the system is being compared with a Pile Driving Analysis (PDA) system, the clocks of both systems are synchronized. Phase: Data Acquisition – System Preparation Page 16 FOR EVALUATION PURPOSES ONLY DATA ACQUISITION MANUAL REVISION 4.0 Data Acquisition – Connect to SmartPile® System 7 Start SmartPile® Suite and the Acquisition Software The SmartPile® Data Acquisition software can be accessed as follows: a. Log into the Laptop as a SmartPile® User b. From the Windows Start menu: StartProgramsSmartPile® SuiteSmartPile® Suite c. From the Review Application, use the Windows pull down Menu (top row): Acquire Data Open SmartPile® Acquisition Before the SmartPile® Data Acquisition software can be used, the user is asked to acknowledge some of the items described in the previous step. 8 Search for SmartPile® System To acquire data from a SmartPile® system, the SmartPile® Workstation needs to first be connected with that system. This connection is initiated as follows: a. Select the Connect Tab on the Display, if not done automatically. b. Point the Workstation Antenna at the orange Dataport cover of the target SmartPile® system. c. Click on the green PRESS to Initiate Connection Button (red box). d. If the USB Antenna is properly connected, the software should begin to identify all Bluetooth devices in range (green box). However, if the Connect Retries field (red box) begins incrementing rapidly (while no Bluetooth devices are identified), ensure that the Antenna is plugged into the USB port properly. Phase: Data Acquisition – Session Configuration Page 17 FOR EVALUATION PURPOSES ONLY DATA ACQUISITION MANUAL 9 REVISION 4.0 Select the Target Dataport from the Discovery List The Bluetooth Manager will continue to identify Bluetooth devices in range (red box) until the process is cancelled, or a Dataport Radio ID is selected as follows: a. Review the responding Dataport Radio ID’s from the list b. Select the target radio from the list, but clicking on it … there can be up to two target radios. c. Target radios will be displayed on the Target Radio List … clear that list by clicking on the clear Button d. Click on Connect The selected Dataport Radio IDs will be displayed in the connection window (green box in the adjacent figure). Since the device is coming out of sleep mode, this may take several cycles/seconds. The two rectangular lights in the connection window (green box) below “Device Connect Attempts” will turn green in succession when a successful connection to the selected device has been made. A red light Configuration Error signifies a connection attempt failure, and will subsequently send the system back around for another try. If this occurs, select the Direct Connect option (see step 10) to speed things up. Sometimes other wireless devices can interfere with the connection process as indicated by the Radio Connect Retries count on the connections screen. When this occurs and becomes problematic, cancel the connection, close and re-start the acquisition application, and try to connect again. If a correctly specified Dataport does not respond to the connection attempt, please follow Troubleshooting Item G and/or Troubleshooting Item M at the end of this manual. Note: Any Bluetooth Devices in range of the Antenna system will be identified in the Bluetooth Devices Responding window. If you select a device that is not a Dataport, the attempt to connect will fail. Phase: Data Acquisition – Session Configuration Page 18 FOR EVALUATION PURPOSES ONLY DATA ACQUISITION MANUAL 10 REVISION 4.0 Optional: Specify the Target Dataport Address Directly To speed up device connection/re-connection, and bypass the device discovery process described above; it is possible to directly connect to the target Dataport. This ability is helpful when encountering situations involving heavy Bluetooth traffic and longer device discovery delays. To directly connect to the target Dataport (using the Direct Connect part of the screen (red box)), enter the full target Dataport Radio ID in the fields provided. The full Dataport address consists of 6 digitpairs (ranges 0-9, A-F). You may also update the Direct Connect Radio IDs by Loading a Previous Session. The selected Dataport Radio ID will be displayed in the connection window (green box), and the process will continue as described in step 9. Phase: Data Acquisition – Session Configuration Page 19 FOR EVALUATION PURPOSES ONLY DATA ACQUISITION MANUAL 11 REVISION 4.0 Connect to the Selected Dataport Once the connection has been established, the screen will transition to the Raw Data Tab, and a saw wave Test Pattern from the Dataport will be received and displayed. The Test Pattern confirms Dataport connectivity, and is used to test the Bluetooth link speed and quality. The quality of the wireless link is shown in the Link Quality indicator (red box) as either Good, Fair or Poor, while the Link Speed is shown on the Link Speed dial (blue box). If necessary, adjust the antenna placement and/or orientation to improve the reception link speed and quality. If there are any problems detected with the connection to the Dataport, you may see the Radio Link Timeout LED (just below the Link Quality indicator) go to solid red. If this occurs, the software will automatically reconnect to, and reconfigure the Dataport. For additional information please refer to Troubleshooting Item H at the end of this manual. Phase: Data Acquisition – Session Configuration Page 20 FOR EVALUATION PURPOSES ONLY DATA ACQUISITION MANUAL 12 REVISION 4.0 Turn on the Sensors The next step is to activate the SmartPile® Sensor Packs by moving the slider switch from Radio Test to Gage Data (red box). The saw wave Test Pattern will transition to internal sensor readings. An SP_401 configuration will display 4 active traces, while an SP_601 configuration will display 6. At this time, the system is acting as a virtual Oscilloscope (with wireless probes), displaying sensor data received from within the SmartPile® core. When the sensors are initially activated after an extended period of dormancy, the data channels will settle into static position after about one minute of operation. The strain channels (red, blue, and grey traces) will settle in more quickly than the accelerometer channels (black, green, and purple traces). The latter channels will also experience an ocean wave effect before settling from the top down into zero. It is extremely important to note the way in which the sensors come into position. After one minute of operation, all data channels should be flat straight lines. In this mode of operation, the Dataport is continuously streaming 1600 data samples per active channel into the SmartPile® application software. If this is not the case, please consult Troubleshooting Item I and/or Item J at the end of this manual. Notes: It is highly recommended that all steps up to and including this step are completed with the pile horizontal on the ground to provide access. Any potential corrective actions required subsequent to this point become very difficult once the pile is in the upright position. If the Dataport Radio Link Timeout indicator (blue box) lights up when the slider switch is moved from Radio Test to Gage Data, move the slider back to Radio Test. If the system recovers, there is most likely a problem with battery power. For additional information please refer to Troubleshooting Item H and/or Additional Details Item E at the end of this manual. Phase: Data Acquisition – Session Configuration Page 21 FOR EVALUATION PURPOSES ONLY DATA ACQUISITION MANUAL REVISION 4.0 Data Acquisition – Session Configuration 13 Prepare to Configure a Session With streaming data visible on the screen confirming that the system is connected, you are now ready to load the Session Configuration Data, either a complete set to allow monitoring (see Step 14) or a partial set to allow collection of a State Stamp. The State Stamp provides a digital record of the SmartPile® system at the time an inquiry is made, and is mainly provided to verify system installation connectivity, confirm static sensor reading levels within pre-defined ranges, and collect system configuration information when the piles are being manufactured. The State Stamp can also be useful at the job site as a quick and easy way to quickly capture critical pile health detail information. For information on how to acquire a State Stamp, please refer to Additional Details Item A at the end of this manual. 14 Configuration Step 1: Select User Under the Session Configuration Tab there are 5 Sub Tabs, including the Select User Sub Tab. Here you can select a User from the pull down list (red box), or enter the data for a new User. The default entry is the last User of the system. To confirm the User data, you should click (in the blue box) either: New User Button if data on a new User was entered; or, Save/Update User Button if a User was selected from the pull down list (whether or not the data was updated). And then use the Next Button to move to the next step in the configuration process: Select Project and Location. Note that for these Configuration Steps as a minimum the item(s) marked with an * must be completed, that first time users need to accept the EULA before proceeding (purple box) and that as each Session Configuration Sub Tab is completed, the corresponding indicator light at the top comes on, signaling system acceptance. Phase: Data Acquisition – Session Configuration Page 22 FOR EVALUATION PURPOSES ONLY DATA ACQUISITION MANUAL 15 REVISION 4.0 Configuration Step 2: Select Project and Location In the Select Project and Location Sub Tab, the following data can be entered (note that the items marked with an *must be completed) : a. Project Details (blue box) In this box various Project Details can be entered, but in all cases the Project Name must be entered. Previously used Projects are available using the Existing Projects pull down menu to the right (red box). Upon entering the Project Details (or selecting/modifying an existing Project from the list), select/click (dark red box): New Project Button if data on a new Project was entered; or, Save/Update Button if a Project was selected from the pull down list (whether or not the data was updated). At that time, the Project Loaded light will turn on. b. Project Location (purple box) In this box various Project Location Details can be entered, but in all cases the Structure name, type and ID must be entered. Upon completing the Project Location information (or selecting an existing Location from the list in the red box), select/click (dark red box): New Location Button if data on a new Location was entered; or, Save/Update Button if a Location was selected from the pull down list (whether or not the data was updated). At that time the Location Loaded light will turn on. Use the Next Button to move to the next step in the configuration process: Configure Pile. Phase: Data Acquisition – Session Configuration Page 23 FOR EVALUATION PURPOSES ONLY DATA ACQUISITION MANUAL 16 REVISION 4.0 Configuration Step 3: Enter Pile Data Clicking the Next Button at the end of the previous step will bring up the Configure Pile Sub Tab. Move to the bottom and click on the Setup/New Button (red box). This event will open up a separate SmartPile® Pile Configuration Manager window (see the figure below). Click on the Load Prior/Edit Button (orange box) after selecting an existing target configuration from the pull down menu, or to recall (and edit where necessary) an existing pile library entry. Once the pile data have been entered or edited, click on the Load Dataport Configuration Button (blue box). In addition to loading the Radio ID and calibration parameters, this action will also retrieve Pile Data entered for the State Stamp (see Additional Details Item A at the end of this manual), and overwrite the appropriate fields in the Pile Physical Dimensions section of the Pile Configuration Manager window. If you don’t want to use an existing target configuration or recall an existing pile library entry, but instead want to start with a clean blank screen, click on the Create New Button (green box). Next, click on the Load Dataport Configuration Button (blue box). In addition to loading the Radio ID and calibration parameters, this action will also retrieve Pile Data entered for the State Stamp (see Additional Details Item A at the end of this manual), and complete the appropriate fields in the Pile Physical Dimensions section. This approach will save time, and reduces the possibility of a data entry error. After that any outstanding data must be entered. Note: If no data appear in the Pile Physical Dimensions fields after clicking the Load Dataport Configuration Button, the required information must be loaded manually. Upon completion, click the Save/Update Pile and then the Close Buttons (black box). This action will save your work (in pile library form) and close the Pile Configuration Manager window. Phase: Data Acquisition – Session Configuration Page 24 FOR EVALUATION PURPOSES ONLY DATA ACQUISITION MANUAL 16a REVISION 4.0 Configuration Step 3a: Enter Driving Criteria Along with the Pile Parameters and Properties, each pile can be configured to monitor and report on different: Nominal Bearing Resistance Tension Resistance Minimum Tip Elevation (with Respect to Reference Elevation) Maximum Top and Tip Compressive Stresses Maximum Tension Stresses % to Max to Warn (e.g. Warn (flash yellow), when at 75% of the Maximum Allowable Stress Level) The definition of Pile Refusal These values are used in Review to indicate Pile Health, Capacity and Minimum penetration (see Review Manual). 16b Recalculating Pile Parameters Instead of manually completing all data fields in the Pile Physical Dimensions section, clicking the Calculate Button (purple box) will automatically populate certain fields after having input only the pile diameter and void details (if applicable). Note: Be careful with special pile configurations, as the Calculate function assumes a 1D-tip, 2D-top placement of the sensors. Phase: Data Acquisition – Session Configuration Page 25 FOR EVALUATION PURPOSES ONLY DATA ACQUISITION MANUAL 17 REVISION 4.0 Session Configuration – Complete Once the Pile Configuration Manager window is closed, the data entries will be copied into the Configure Pile Tab, which completes the Session Configuration as indicated by all indicator lights across the top now being green. At this point, click on the Save Session Button (red box) to save the configuration. The system is now ready to collect data and begin monitoring. Use the Next Button on the Driving Criteria Tab to move to the next step in the configuration process: Trigger Config. Note: A configuration can be saved and reloaded multiple times, but only the most recently loaded configuration will be used during data acquisition. Phase: Data Acquisition – Session Configuration Page 26 FOR EVALUATION PURPOSES ONLY DATA ACQUISITION MANUAL 18 REVISION 4.0 Fast Configuration - Load a previously created Session It is possible to rapidly configure the system by loading a previously generated Session Configuration through the Load Recent Session Sub Tab within the Session Configuration Tab. Selecting a previously loaded session will (outside of connecting to the target Dataport) load all of what is required to begin collecting data for monitoring (as indicated by the top row of ready indicators in the window). To load a prior session, move to the Load Recent Session Tab, select a session from the Recent Saved Sessions drop down list, and then click on the Load Prior Session Button (red box). Notes: If an identical Session Configuration directory structure is detected on the SmartPile® Workstation, you will be notified that all new Blow Data Files will be appended beyond the current recorded blow count (blue box). Loading a previous session will not cause the system to over-write any previously recorded data. If by accident a Session is terminated without saving, the last loaded session can be recovered by clicking on the Recover Session Button (purple box). This action will also load that Session for continuation if desired. After doing so, you must click the Save Session Button before exiting. Phase: Data Acquisition – Session Configuration Page 27 FOR EVALUATION PURPOSES ONLY DATA ACQUISITION MANUAL REVISION 4.0 Data Acquisition – Final Preparations for Monitoring 19 Final Preparations – Trigger Level / Depth Below Reference (Elevation)) Before monitoring can begin, the system requires two final user inputs: Trigger level and initial pile Depth Below Reference (DBR): The Trigger level Threshold setting defines the dynamic change in signal level relative to the steady state value for one or more sensors anywhere in the pile that will initiate data collection by the system. The user will need to define a (relative) Reference Elevation, and record the initial pile Depth Below Reference (DBR). 20 Trigger Definition: Step 1 - Location and Source The Trigger level is set in the Trigger Config Tab, beginning with defining the Location and Source of the trigger (red box). The system provides 3 options for the Trigger Location: 1. Pile Top Position – default option 2. Pile Tip Position 3. Other, application dependent position (Please consult the Session Configuration for 3rd Sensor Pack location, if applicable). Normally, Sensor Pack 1 at the pile Top is selected (default). Locations 2 and 3 are reserved for use when Sensor Pack 1 is having difficulty. The available options for the Trigger Source are Strain, Accelerometer, or Auto (default option). If Auto is selected (which is normally the case), the system will trigger on whichever signal movement (either Strain or Accelerometer) first exceeds the entered Trigger Threshold. The Trigger Source is applied at the Trigger Location specified. Leave the Edge slider in the Rising position (default). This selection provides advanced options for accelerometer based triggering modes. Phase: Data Acquisition – Final Preparations for MonitoringPage 28 FOR EVALUATION PURPOSES ONLY DATA ACQUISITION MANUAL 21 REVISION 4.0 Trigger Definition: Step 2 – Threshold Value Once the Trigger Location and Source are defined, the next step is to enter a Trigger Threshold value (in quantization tics, out of 4095 full scale). The goal is to make the number as small (sensitive) as possible without generating spurious triggers (not related to hammer blows). Typical entered values are between 15 and 20 quantization tics. Once a Trigger Level is entered, the corresponding value for the strain (in microStrain) and acceleration (in Gs) are displayed on the screen for reference (purple box). To load the entered value, click on the Load Trigger Level Button, after which the Trigger Loaded indicator light will turn on (red box). At this point, whenever the selected Source at the corresponding Location exceeds the Threshold level (Trigger event), the system will record 160 milliseconds (or 1600 samples) of data per channel for all active channel pairs. If a different Trigger Threshold value is desired; first click on the Reset Trigger Level Button (blue box), and then enter a new value followed by clicking the Load Trigger Level Button (red box). If there are problems with setting or using the Trigger level, please consult Additional Details Item B at the end of this manual. Phase: Data Acquisition – Final Preparations for MonitoringPage 29 FOR EVALUATION PURPOSES ONLY DATA ACQUISITION MANUAL 22 REVISION 4.0 Set the Initial Depth Below Reference (DBR) of the Pile During monitoring, you will need to track and record the penetration of the pile to a user defined (relative) reference elevation, and user selected penetration resolution (Drive/Set Check). Use the Up-Arrow and Down-Arrow buttons to select the initial Depth Below Reference (DBR) of the pile relative to the markings on the pile, or enter the initial displacement directly into the field. Use either the Space Bar on the Workstation’s keyboard, or click on the Pile Marker Button (red box) to save this initial DBR value. You can select to use either the Drive or Set Check penetration resolution as indicated in the Top Banner of Acquisition. A selection of Set Check will turn the selector field yellow as an indicator. a. Once the session begins, the Space Bar on the Workstation’s keyboard will be used to increase the DBR value by the configured displacement amount. DBR data are captured as part of the Blow Data File, and are used in key displacement tracking calculations. It is therefore essential that this is done accurately! b. You can also enter the current DBR directly. Note that the DBR increment has a built in debounce of 1.5 seconds to avoid accidentally double-triggering on a DBR increment entry. Phase: Data Acquisition – Final Preparations for MonitoringPage 30 FOR EVALUATION PURPOSES ONLY DATA ACQUISITION MANUAL REVISION 4.0 Data Acquisition – Monitoring 23 Capture Data The system is now ready to begin capturing and recording Blow Data Files. Clicking on the Click to Begin Session Button (red box), or pressing the F1 button, will set the system up to begin recording Blow Data Files, and incrementing the Blow Count field for every captured blow. Once this button is clicked, it will turn green. To view the system calculations in SmartPile® Review during data acquisition, the Acquisition window can be minimized by pressing the F10 button. After doing this, only the top Banner of Acquisition will be visible at the bottom of Review (purple box). Pressing F10 again will restore the Acquisition window to full size. Alternatively, the full size Acquisition window can be placed behind the Review window by pressing the Alt-Tab keys. Pressing the Alt-Tab keys again will restore the full size Acquisition window in front of Review. Phase: Data Acquisition – Monitoring Page 31 FOR EVALUATION PURPOSES ONLY DATA ACQUISITION MANUAL 24 REVISION 4.0 Register DBR Increments During monitoring, remember to capture each Pile Marker increment as it passes the Reference Elevation reference point by pressing either the Space Bar on the keyboard, or clicking on the Pile Marker Button on the screen. DBR data are used in key displacement tracking calculations, and it is therefore essential that this is done accurately! Note that the DBR increment has a built in debounce of 0.4 seconds to avoid accidentally double-triggering on a DBR increment entry. If you miss a Pile Marker, use the up and down arrows to adjust and set the correct DBR value. Alternatively, you can also enter the actual DBR directly into the field. Clicking the Pile Marker Button (red box) will cause it to go BOLD until the next blow is received, after which the DBR value will be registered/committed. Phase: Data Acquisition – Monitoring Page 32 FOR EVALUATION PURPOSES ONLY DATA ACQUISITION MANUAL 25 REVISION 4.0 Additional Points of Interest There are several system features that users should be aware of and pay attention to during the course of monitoring, including: Using the Idle mode to conserve battery power, while maintaining an active radio connection Moving the slider set to Collect Data over to Idle (red box) causes the system to go into an increased connectivity heartbeat update, which can be viewed as a more rapid Event Count pulse rate (orange box). Use this mode during situations of extended monitoring delay (i.e. hammer and template issues, and pile cushion changes). Monitoring system health with top-level indicator lights (purple box) The System Fault indicator light signals the system has detected a hardware condition with one or more of the internal Sensor Packs. Click on the Accel / Strain Data Tab for additional diagnostics information. The Low Battery indicator light signals the system has detected deteriorating battery voltage levels under loading conditions. The user should take steps to conserve battery power where appropriate, or change the battery. The system will stop recording data if the level gets too low. Entering Monitoring Log activity in the Blow Note window (blue box) The Blow Note window is provided to allow the user to enter drive log activity information of potential future interest. Once text entering is complete, click on the Submit Button. The text information entered will be saved in the drive log upon the next Trigger event. To save a Blow Note entered at the end of drive; load a Trigger level of 0 to increment the Blow Count and capture an additional blow, before then going out of session. Phase: Data Acquisition – Monitoring Page 33 FOR EVALUATION PURPOSES ONLY DATA ACQUISITION MANUAL 26 REVISION 4.0 Interrupt Data Acquisition Blow capture can be disabled (which effectively interrupts recording of data) by clicking the green In Session Button (red box), or pressing the F1 button on the computer. Events or blows will still be triggered, but the data will not be saved, and the Blow Count will not increase. This option is useful in situations where pile driving is being held up for a variety of reasons. Taking the system out of session temporarily has the added benefit of moving all blow data stored in Workstation memory buffers to the hard drive. This provides an additional measure of data recording safety. However, if a considerable delay is anticipated, it is recommended that the session is stopped, the Session Configuration is saved, the Dataport is disconnected, and the Workstation shut down. This will help to avoid problems with low battery power when the drive/monitoring is resumed. 27 Resume Data Acquisition Ending the session automatically resets the Blow Counter. However, if the session is re-enabled, the Blow Data Files will be captured into the same session directory, beginning with the next available Blow Count number. Obviously, when data acquisition is resumed, the original Session Configuration will be loaded and used during data acquisition. If the data acquisition is to be resumed with the session still loaded, click on the Click to Begin Session Button (or press the F1 button), and the system will again begin recording Blow Data Files and incrementing the Blow Count field for every captured blow, starting where it left off (red box). If you have a situation where you need to continue monitoring on a project started by another user on another Workstation, you can share the configuration and provide monitoring continuity. For details see Additional Details Item C at the end of this manual. Phase: Data Acquisition – Monitoring Page 34 FOR EVALUATION PURPOSES ONLY DATA ACQUISITION MANUAL 28 REVISION 4.0 Disconnect the Dataport It is very important that the Dataport is turned off (properly disconnected) at the close of monitoring activities. This puts the Dataport into a low power mode that extends the life of the battery. If no immediate monitoring activities are foreseen (such as in the case of longer set checks), another option is to put the SmartPile® system into an extended sleep interval before disconnecting from the Dataport to conserve even more power. This is done by going to the Radio Config Tab, and entering a value between 20 and 30 in the Hibernate Time field (purple box). This puts the Smartpile® system in a very low power mode that will extend the battery life approximately 2 – 3 times. It should be noted that in this condition it may take longer than usual to re-connect to the Dataport. Disconnecting the Dataport is done as follows (red box): a. Exit the current Session by clicking on the green IN SESSION Button or pressing F1; as a result the button should turn red. b. Click on the Exit Button, and wait for the Disconnected indicator light below to turn on. This should also coincide with an audible beep. Phase: Data Acquisition – Monitoring Page 35 FOR EVALUATION PURPOSES ONLY DATA ACQUISITION MANUAL 29 REVISION 4.0 End Data Acquisition Data acquisition is completed, and SmartPile® Acquisition is closed by clicking the Exit Button. At that time you will be asked to enter the final tip elevation and any residual DBR to record the exact position of the pile at the end of driving (purple box). After this information has been entered (by clicking the Update Button), the user may be asked in which file format the data should be saved. It is suggested that all data collected is saved in the most up-to-date file format (i.e. version 3.75). Next, it is important that the Session is saved (by clicking the OK Button) as this information is required during any subsequent Session reviews using SmartPile® Review. Moreover, saved Session Configurations help expedite the future configuration and review of data using SmartPile® Review. Once the Session has been saved, the SmartPile® Data Acquisition software can be closed by hitting the Exit button once more. Phase: Data Acquisition – Monitoring Page 36 FOR EVALUATION PURPOSES ONLY DATA ACQUISITION MANUAL 30 REVISION 4.0 Pack the Created Session SmartPile® Review provides a means for creating a compressed Session Data file to allow the data to be shared with other users, or transferred to other computers. This is done by selecting File -> Pack Drive Session menu option (red box). When selecting this option, the resulting packed file is loaded into a *.zip file in the local SmartPile Project directory. It is suggested that at the end of each session this compressed Session Data file is created. 31 Review SmartPile® Documentation The SmartPile® Software Suite provides user access to SmartPile® Review, Acquisition and Installation documentation, which can be viewed when running the respective application. Adobe Acrobat Reader must be installed in order to use this feature. All SmartPile® User Manuals are available through the drop down Help Menu (red box). Phase: Data Acquisition – Monitoring Page 37 FOR EVALUATION PURPOSES ONLY DATA ACQUISITION MANUAL REVISION 4.0 * Additional Details Page 38 FOR EVALUATION PURPOSES ONLY DATA ACQUISITION MANUAL REVISION 4.0 Additional Details A Acquiring a State Stamp The process of acquiring a State Stamp starts in the Project Location section of the Session Configuration Tab. When specifying the Project Location for a State Stamp, select Cast in the Structure Type drop down menu next to ID. When the Next button is then selected, you will be automatically directed to the State Stamp Tab (red box). Before a State Stamp can be acquired, all of the manufacturing information regarding the pile internal and external geometries (including casting yard pile number) needs to be entered into the appropriate fields in the units specified for each field if this has not already been done for you. This is done in the State Stamp Sub Tab. Clicking the Calculate Button (blue box) will automatically populate certain fields after having input only the pile diameter and void details (if applicable). Note: Be careful with special pile configurations, as the Calculate function assumes a 1D-tip, 2D-top placement of the sensors. The next step is to associate this manufacturing information with a unique identifier: the Radio ID. This is done by clicking the Load Dataport Configuration Button (blue box) while connected to the SmartPile® Dataport. When clicking this button, the system will automatically obtain the stored radio configuration details associated with the Radio ID, and make all this information part of the State Stamp information details. This step will also ensure that the State Stamp details are entered into the cast piles internal memory for future use. Finally, and only during pile manufacturing; before a State Stamp can be issued for the system, the User must first provide an acknowledgement (purple box) indicating that the system installation has been verified as complete using the Installation Inspection Check List found in APPENDIX 4 of the SmartPile® User Manual - Installation. A permanent record of the installers’ acknowledgement will be kept with the pile records for archival purposes. If the pile manufacturing has been completed, the user should indicate so by checking the alternate box. Additional Details Page 39 FOR EVALUATION PURPOSES ONLY DATA ACQUISITION MANUAL REVISION 4.0 State Stamps include four health indicators (red box) for all active channels (shown as rectangular lights for each channel): Range – comparing the static sensor readings with pre-defined limits. Calibration – comparing the sensor calibration values with pre-defined limits. Temp – comparing the reporting Sensor Pack temperature readings with a pre-defined operating range. Voltage – comparing the reporting Sensor Pack monitoring voltage with a pre-defined range. A green indicator light reflects healthy sensor status (all’s well), a yellow light indicates values approaching/close to the limits, while a red indicator light signals reported values out of range. Ideally, all active channels should have all green indicators at the time a State Stamp is acquired. If this is not the case, please consult Troubleshooting Item I and/or Item J at the end of this manual. Clicking the Save State Stamp Button (blue box) after completing the steps above will capture the system state information. Saved State Stamps are typically stored in the Project Directory, and have a .tsp extension (with the Radio ID and date/time stamp part of the file name), making each State Stamp unique. A captured State Stamp can then be reviewed in SmartPile® Review. Clicking the Camera Icon (purple box) will take a screen shot of the State Stamp Tab; and store the resulting *.jpg image in the SnapShots folder in the SmartPile® directory. However, unlike a State Stamp; using this approach will only capture a screen of details in an image file format. Many programs are available to view and distribute *.jpg file formats. It should be noted that importing saved Dataport State Stamp information details during a full Session Configuration saves time, and reduces the possibility of a data entry error when entering key pile geometric information originally comprehended during pile manufacture (see also step 16). Additional Details Page 40 FOR EVALUATION PURPOSES ONLY DATA ACQUISITION MANUAL B REVISION 4.0 Resetting/Updating Trigger Level There are a couple of ways to reset or update the current Trigger Level during the course of monitoring. The goal is to set the Trigger Level as low as possible, without getting spurious Triggers. Basically, this means putting the Trigger Level just above the sensor noise floor. To do this while remaining in Session, go to the Trigger Config Tab, enter a new Trigger value (1), and click on the Load Trigger Level Button (2). The next hammer blow will latch this new value, and the Trigger Loaded indicator light (3) will become active as an acknowledgement. You can experiment with different levels until the desired result is achieved. Another option is to click on the Reset Trigger Level Button (4). This will take you out of session, and allow different settings to be tried including different Sources and Locations (5) without data being saved. Sometimes more stable results can be achieved by selecting a specific sensor Source, and optimizing the Trigger Level value using that source. Resetting the Trigger Level will stream sensor data, and give the user a better indication of what each sensors noise floor looks like. The dotted horizontal lines will move with the different Trigger Level settings, providing for a better user visual. 5 1 2 3 4 Once the proper settings are determined, click on the Load Trigger Level Button (2) as described above, and put the system back into session to resume monitoring. Additional Details Page 41 FOR EVALUATION PURPOSES ONLY DATA ACQUISITION MANUAL C REVISION 4.0 Continuation of Monitoring using Separate Workstations If you have a situation where you need to continue monitoring on a project started by another user on another Workstation, you can share the Session Configuration and monitoring data, and provide monitoring continuity as follows: 1. Start by packing the captured monitoring data on the initial acquisition system (see SmartPile® Review User Manual). 2. Provide the packed data file to the user who will be continuing on with the monitoring activities. 3. Unpack the data file on the next system to be used in acquisition (see SmartPile® Review User Manual) Using the content from the unpacked data file, load the previous session, and monitoring will continue at the next identified blow count increment. Note: The Radio IDs must match, otherwise a warning message will be displayed. D Adjusting Data Capture Window Length If during the course of monitoring not all data is captured and displayed before the beginning of the next blow (because of poor signal quality issues as indicated by the Radio Link Quality and Link Speed indicators in the red boxes), the user can consider reducing the length or duration of the Capture Window. However, addressing the source of the connection speed issues would be the preferred initial approach. To adjust the Capture Window size, go over to the Radio Config Tab. The default value for the Capture Window field (purple box) is 160 mSec, with an upper limit of 200 mSec. It is not recommended for users to make casual adjustments to this field, and if changes are required, not to reduce the value in this field below 120 mSec. To commit the change, click on the Update Dataport Config Button (orange box), after which the Update Successful indicator light will come on. Additional Details Page 42 FOR EVALUATION PURPOSES ONLY DATA ACQUISITION MANUAL E REVISION 4.0 Dataport Status Indication using measured Voltages To check the status or health of the target Dataport using a voltmeter, 4 test pads are available for measurement using the large pad (BLK) (negative/black probe) for reference: (RED) – The raw battery voltage should measure between 3.00 - 3.25 VDC. Lower battery voltages could result in lower Link Speeds or Radio Link Timeout conditions. 2V9 (VBAT) – The voltage reading after OV/RP protection circuitry should not be less than 2.90 VDC. 3V4 - The main supply voltage reading should be between 3.30 and 3.45 VDC. This voltage should be present as soon as the battery is installed. 2V5 - Dataport A/D reference voltage for system calibration check. This reading should measure between 2.49 and 2.51 VDC. This voltage is only present during an active Dataport connection when in the Gage Data slider position. To reset the Dataport, use a small flat blade screwdriver and short the RST pads together as shown in the figure to the right. The Dataport Status LEDs will indicate the initialization sequence after reset. Note: Doing this is not the same as removing the battery and waiting 2 minutes. A faulty system initialization caused by battery contact chatter during installation can only be corrected by removing the battery and waiting before repeating. Additional Details Page 43 FOR EVALUATION PURPOSES ONLY DATA ACQUISITION MANUAL F REVISION 4.0 Dataport Status Indication using Blink Codes In the lower section of the Dataport behind the 4 test pads, are two Status LEDS; one red and one green. The LED’s steady state or Blink Codes will indicate the current Dataport status as shown using the state table on the right. Additional Details Page 44 FOR EVALUATION PURPOSES ONLY DATA ACQUISITION MANUAL REVISION 4.0 System Troubleshooting G Addressing Target Dataport not Reporting during Discovery If while attempting to connect to a target Dataport, the device specifically is not reporting during the discovery broadcast of available SmartPile® Dataport Radio ID’s, follow these steps: 1. Load the Prior Session, this will load the Target Direct Address or 1. Enter the Direct Connect Address(es) of the target Dataport(s), and then click on the Direct Button (red box). If this proves unsuccessful: 2. Identify which SmartPile® Dataports consistently show up first in the Discovery list. Connect to these devices individually, and extend/stagger their Hibernate Times accordingly. If this also proves unsuccessful: 3. Open the cover of the target Dataport, and remove the battery for 2 minutes. Replace the battery, and verify proper system initialization using Blink Codes. 4. If all above proves unsuccessful, contact Smart Structures technical support. System Troubleshooting Page 45 FOR EVALUATION PURPOSES ONLY DATA ACQUISITION MANUAL H REVISION 4.0 Addressing Dataport Radio Link Timeout Radio Link Timeout indicator light activity signals that a radio connection timeout has occurred between the Dataport and the Workstation. Persistent timeouts are often indicative of a less than optimal antenna positioning (which can be confirmed by adjusting the antenna orientation, while noting changes in the Link Speed and Radio Link Quality in the red boxes), or a weak battery in the Dataport. To determine whether a weak battery is the possible cause, check the system Low Battery indicator light for activity (purple box). Next, move the Gage Data slider to the Radio Test position (blue box), and note any performance changes. Doing this reduces battery loading by the system, and may result in a reception/connectivity improvement. If Radio Link Timeouts are synchronous with moving the Radio Test slider over to Gage Data, replace the battery in the Dataport, and/or check the Dataport battery connections for signs of corrosion. The SmartPile® Acquisition software will automatically attempt to re-establish and configure the Dataport whenever the connection is lost. Note: To determine the status of the Dataport connection, keep an eye on the Event Count field (green box). If the Event Count is going up every 1-3 seconds, the connection remains live. System Troubleshooting Page 46 FOR EVALUATION PURPOSES ONLY DATA ACQUISITION MANUAL I REVISION 4.0 Addressing Sensor Pack Data not Reporting In some instances, after switching from Radio Test to Gage Data (red box), not all configured data channels report on the display. If an entire Sensor Pack is not reporting, sometimes the solution is to reset the protection fuses on the Dataport. To do so, switch the Gage Data slider to Radio Test, and then back again to Gage Data. No other parts of the configuration are altered during this process. J Correcting Out of Range or Faulty Sensor Data Errors SmartPile® Acquisition will activate the System Fault indicator light if it detects a problem with any signal levels reported by the active Sensor Packs. The specifics of the global error are viewable by going to the State Stamp Sub Tab, or the Accel / Strain Data Tab. In the State Stamp Sub Tab, a series of diagnostic indicator lights have been provided (red box) to identify the possible source of the error message. The channels are organized such that CH0, CH2, and CH4 are accelerometers, and CH1, CH3, and CH5 are strain gauges. CH0/CH1 are for the 1st Sensor Pack (Top), CH2/CH3 are for the 2nd Sensor Pack (Tip), and CH4/CH5 are for the 3rd Sensor Pack (application dependent). In general, each sensor has 4 indicator lights for diagnostics: Range – comparing the static sensor readings with pre-defined limits. Calibration – comparing the sensor calibration values with pre-defined limits. Temp – comparing the reporting Sensor Pack temperature readings with a pre-defined operating range. Voltage – comparing the reporting Sensor Pack monitoring voltage with System Troubleshooting Page 47 FOR EVALUATION PURPOSES ONLY DATA ACQUISITION MANUAL REVISION 4.0 a pre-defined range. A green indicator light reflects healthy sensor status (all’s well), a yellow light indicates values approaching/close to the limits, while a red indicator light signals reported values out of range. In addition, each active Sensor Pack has global diagnostic indicators shown along the right side of the Accel / Strain Data Tab (purple box): Power Fault – An active light indicates the system has detected that the over-current protection limiter for the Sensor Pack has tripped. Moving the Gage Data slider to Radio Test, and back again should reset and clear the condition unless something terminal has occurred. Rail Fault – An active light indicates the system has detected the operating supply voltage at the Sensor Pack is below a pre-defined limit. This situation is terminal, and the system will not run calculations on the data from this Sensor Pack. Accel Fault – An active light indicates the system has detected a problem with the either the static reporting levels (range) or calibration values for the respective accelerometer. Strain Fault - An active light indicates the system has detected a problem with the either the static reporting levels (range) or calibration values for the respective strain gauge. In order to better understand the source of any reported range errors, the following list may provide better insight: A random floating signal level is typical of completely open interface signal connections (more than one connection wire). A signal level fixed at either data limit extreme (railing) typically indicates a bad sensor input (pre-conditioning). A static strain reading in the +1400 to +1700 microStrain range indicates an open strain drive signal connection (one wire). An accelerometer reaching zero quickly, and without going through the ocean wave and fall to zero waveform, indicates an open or broken accelerometer drive signal connection (one wire). System Troubleshooting Page 48 FOR EVALUATION PURPOSES ONLY DATA ACQUISITION MANUAL REVISION 4.0 If a Sensor Pack is damaged or otherwise not reporting properly, the Dataport will still transmit data for those channels to the SmartPile® Acquisition application. A faulty reporting sensor range reading will result in a pop-up Error Message. To disable this Error pop-up, click Mask Error (rather than OK) in the message box. Note: To re-enable Range Error checks; move the Gage Data slider to Radio Test, and then back again to Gage Data. If the fault condition remains, it will be necessary to base the calculations in SmartPile® Review on a subset of the sensor data, and the faulty data channels will need to be disabled in the Raw Data Tab of SmartPile® Review before running calculations can be continued. All incoming data for all active channels, regardless of state, will appear in Acquisition, and will also be saved to disk should further review at some point in the future be desired. K Correcting Radio ID mismatch (Target Device vs. Pile Configuration) If you choose to create a Pile Configuration before arriving at the job site to save time, you may encounter a situation where the Radio IDs between the connected device and newly created Pile Configuration do not match. When connecting to the target device, the program will issue an Error Message (red box), and the User should re-visit the Pile Configuration Manager and click on the Load Dataport Configuration Button to correct the error. System Troubleshooting Page 49 FOR EVALUATION PURPOSES ONLY DATA ACQUISITION MANUAL L REVISION 4.0 Corrective Procedure for Apparent Dead Radio A non-responsive SmartPile® system can manifest itself in several ways: The system will not initialize upon battery installation (no Dataport LED activity). The system initializes, but later may not show up in device discovery. The system connects, but later disconnects when sensors are turned on, or randomly during monitoring. All three are related in that the potential root cause is an unwanted series resistance (up to an open circuit) between the battery and the interface circuit board within the Dataport. The components involved in this pathway are the battery harness and interface board mating connector. The predominant cause of this high series resistance is corrosion (typically green) within the Dataport at any one (or more) of the key points shown in the adjacent figure: 1. Corrosion and cracking on the battery spring clip: When looking at the battery clip, check if the corrosion has caused weakening or cracking of the clip. If so, the entire harness should be replaced. If it appears minor, scrape off the corrosive buildup on the clip surface in the area contacting the battery terminal. 2. Corrosion compromising wire solder connections: Check the integrity of the soldered wire to the battery clip by gently pulling on it. Corrosive action may have eaten away most but not all of the stranded wire. Even though 3V may be measured on the interface board test pads, the current surge from the Dataport and Sensor Pack turn on (up to 2A momentarily) can result in a momentary voltage sag that cause Dataport lock-up or re-initialization. If the wire breaks, restrip and re-solder the wire to the clip, and if necessary, replace the entire harness. 3. Corrosion of the mating pins inside interface board connector: Unplug the battery harness from the interface board, and look into the board mating connector (this may require a flashlight). If any signs of green corrosion appear, it is recommended that this electrical path be bypassed using the procedure below. If slight or minor, an electrical contact cleaner may be used. a. Remove the battery. System Troubleshooting Page 50 1 3 2 battery harness interface board mating connector Connector pins should be shiny gold FOR EVALUATION PURPOSES ONLY DATA ACQUISITION MANUAL REVISION 4.0 b. Cut the leads of the battery harness close to the connector. c. Strip 1/8” of jacketing from both wires, and tin them with solder. d. Tin the pads of the interface board as shown (both primary and alternate pad locations shown; alternate pad locations have been provided in case of corrosion of primaries). e. Solder the wires to the pads. Red wire to the lower pad, black wire to the upper pad (or to alternate pad locations shown as dashed lines). f. Install the battery, and confirm proper system initialization. If the Dataport compartment appears corrosion free, yet the system will not initialize (blinking LED’s) after battery installation, remove and measure the battery voltage. If under 2.9V, replace the battery. Otherwise, wait 3-5 minutes before re-installing. Sometimes a slow and haphazard battery installation can create an electrical make/break (contact chatter) condition, putting the system in an unknown state. Waiting 3-5 minutes allows the internal circuitry to slowly bleed off any stored charge. Try inserting the battery again, quick and cleanly: Position the battery, angled with terminals to clips (but not touching) Push in the spring clips using the battery contacts, Then drop the back end of the battery into the compartment. Verify proper system initialization. System Troubleshooting Page 51 FOR EVALUATION PURPOSES ONLY DATA ACQUISITION MANUAL M REVISION 4.0 Staggering Radio Broadcast Intervals to avoid connection conflicts When multiple active SmartPile® systems are in the discoverable vicinity of a Workstation, it may sometimes become difficult to establish a connection with the target device. Staggering the Dataport Hibernate Times among the localized Dataports helps to ensure the best opportunity for establishing a connection. To do so, follow these steps: 1. Launch SmartPile® Acquisition; click OK to the warning message, then turn on the Bluetooth device discovery by clicking the Press to Initiate Connection Button. 2. Record the order that the SmartPile® devices get discovered, starting with the device at the top of the list. This determines what Hibernate Times to set each device to. The first device on the list will be set to 23 sec, the next 20 sec, and the one reporting after that to 17 sec. The approach will be to individually connect to and adjust the first 3, and then determine if connecting to the target device remains problematic. 3. Connect to the first reporting SmartPIle® device on the list. 4. Once connected, go to the Radio Config Tab and change the Hibernate Time specified in lower left as described above; in the first case, it will be set from “10” to “23”. 5. Click on the Update Dataport Config Button, and note that the Update Successful indicator light turns on. 6. Disconnect from this device, close (END), and then restart the Acquisition application. Now select the 2nd noted device (which may now show up first on the list), and set to 20 sec. Continue with the 3 rd device. 7. Now try establishing a connection with the original target device. If still unsuccessful, continue to modify the Hibernate Times of additional SmartPile® devices using the basic approach described above. System Troubleshooting Page 52 FOR EVALUATION PURPOSES ONLY