1
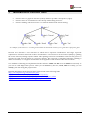
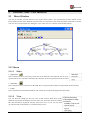
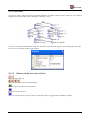
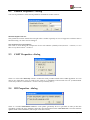
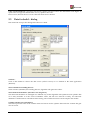
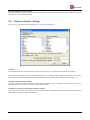
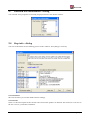
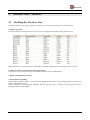
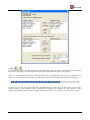
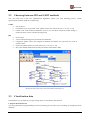
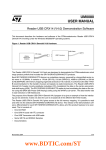
KNOCKER
Decision Trees
User Manual
Author: Jiří Vitinger
Library: DecisionTree.dll
Runnable class: DecTreeMain
Document – DecisionTree
Page 1/15
KNOCKER
Content:
1
2
INTRODUCTION TO DECISION TREES ................................................................................................... 3
DECISION TREES - USER INTERFACE ..................................................................................................... 4
2.1
MAIN WINDOW ................................................................................................................................................ 4
2.1.1 Menu ................................................................................................................................................................ 4
2.1.2 Tree view ......................................................................................................................................................... 6
2.2
GENERAL PROPERTIES - DIALOG ...................................................................................................................... 7
2.3
CART PROPERTIES - DIALOG ........................................................................................................................... 7
2.4
ID3 PROPERTIES - DIALOG ................................................................................................................................ 7
2.5
DATA FOR BUILD - DIALOG ............................................................................................................................... 8
2.6
DATA FOR CLASSIFY - DIALOG .......................................................................................................................... 9
2.7
DECISION TREE INFORMATION - DIALOG ....................................................................................................... 10
2.8
STEP INFO - DIALOG ........................................................................................................................................ 10
3
DECISION TREES - TUTORIALS ............................................................................................................ 12
3.1
3.2
3.3
4
5
BUILDING THE DECISION TREE....................................................................................................................... 12
CHOOSING BETWEEN ID3 AND CART METHODS .......................................................................................... 14
CLASSIFICATION DATA ................................................................................................................................... 14
REQUIREMENTS ..................................................................................................................................... 15
SAMPLES ................................................................................................................................................. 15
Document – DecisionTree
Page 2/15
KNOCKER
1
Introduction to Decision Trees
•
•
•
Decision tree is a graph of decisions (nodes) and their possible consequences (edges).
Decision trees are constructed in order to help with making decisions.
Decision making with decision tree is a common method used in data mining.
An example of a decision tree - according to the weather we would like to know, if it is good time to play some game.
Decision tree describes a tree structure in which leaves represent classifications and edges represent
conjunctions of features that lead to these classifications. A decision tree can be learned (built) by splitting
the source data set (training set) into subsets. This splitting is based on an attribute value test. This process is
repeated on each derived subset in a recursive manner. The recursion is completed when the splitting is
either non-feasible, or a singular classification can be applied to each element of the derived subset.
Two methods of learning are implemented in this software: CART and ID3. You can build a tree directly or
you can see each step of this process. Then you can browse by the tree, zoom, shift etc. Finally you can
classify your data using the prepared tree.
Detailed information about decision trees can be found at the following links:
http://en.wikipedia.org/wiki/Decision_tree
http://www.cs.ubc.ca/labs/lci/CIspace/Version4/dTree/
http://www.cise.ufl.edu/~ddd/cap6635/Fall-97/Short-papers/2.htm
http://www.doc.ic.ac.uk/~sgc/teaching/v231/lecture11.html
Document – DecisionTree
Page 3/15
KNOCKER
2
Decision Trees - User Interface
2.1
Main Window
You can see a menu, tool bar, and tree view in the main window. You can manage all tasks (details can be
found bellow) in the menu. Buttons of the tool bar are connected to the most important commands of menu.
You may use several buttons for setting the view in the tree view (details can be found bellow).
2.1.1 Menu
2.1.1.1
Main
Open tree...
This command loads a previously saved tree from XML file. The XML file has to be in a
special format. Use only files created by this software. (It has an equivalent on the tool bar.)
•
Save tree ...
This command saves current tree to the XML file in a special format. (It has an equivalent on the tool bar.)
•
Close
This command closes the Main Window and returns user to the main application (Knocker).
•
2.1.1.2
View
You can find all settings for the tree view in this section. Each item in this
submenu represents an attribute of a tree node. You can make decision whether
this item should be displayed directly in the tree view or not. You can turn
on/off each item individually or switch all items at once.
Document – DecisionTree
Page 4/15
KNOCKER
2.1.1.3
Settings
Each item in this sub menu opens a special dialog for specification of some settings.
These items are described bellow in more detail.
(Item Tree information has an equivalent on the tool bar.
2.1.1.4
•
)
Command
Set active method
You can choose one of the implemented methods for tree building in this submenu.
Currently CART and ID3 methods are available.
• Build tree
This command builds a decision tree with respect to the actual settings. Selected method will be used. (This
command has an equivalent on the tool bar.)
Step building tree
This command makes a first step of building tree process. Then you may explore details of all algorithm
possibilities. You can also watch the way in which the best possibility is chosen. See the "Step Info Window"
section for details. (It has an equivalent on the tool bar.)
•
• Classify
This command classifies your data using the current decision tree. The result is stored in a new table.
Document – DecisionTree
Page 5/15
KNOCKER
2.1.2 Tree view
You can see nodes, edges and some important attributes associated with the nodes in the tree view. Which
attributes should be visible can be changed in submenu “View”.
A window containing all attributes which are associated with the node appears after clicking at some node.
You can see an example of this window below.
2.1.1.5
Buttons in the tree view tool bar
Zoom in and zoom out.
Zoom in and zoom out axis independently.
Set exact space of each node in the pixels.
Fit the tree to the window.
Fit the tree to the window always when resizing the window. Toggle button, default is pushed.
Document – DecisionTree
Page 6/15
KNOCKER
2.2
General Properties - dialog
You can set parameters which are important for all methods in this window.
Maximal depth of the tree
This parameter restricts maximal tree depth. This is useful especially in case of large trees. Default value is
20 and usually you don't need to change it.
Zero (tolerance for real numbers)
This value is used during the comparison of two real numbers (double). If abs(number1 - number2) <= Zero
then we say that number1 = number2.
2.3
CART Properties - dialog
There is a value called Diversity which is counted for each possible branch in the CART algorithm. You can
choose one of the three ways to count it. The value p1 is probability of first result class etc. (CART method
works only with two result classes - its tree is always a binary tree.)
2.4
ID3 Properties - dialog
There is a counted Information Gain for each splitter (possibility how to split data in node) in the ID3
algorithm. Usually the more attribute values the more Information Gain. First check box is used for defense
against multi-valued attributes (like unique id of each record).
Document – DecisionTree
Page 7/15
KNOCKER
If the second check box is checked, each chosen splitter will have to have the Information Gain higher or
equal as the average Gain Information of every splitter in the node.
In most cases, the best choice is to have the both check boxes checked.
2.5
Data for build - dialog
Data should be set up in this dialog before the tree is built.
Get data...
Click on this button to choose the data source (called version) as it is defined in the main application
(Knocker).
Select columns for building the tree.
Select columns (attributes) for building the tree, algorithm will ignore the others.
Select numerical attributes. (The others are categorical.)
The numerical attributes are managed in a different way in ID3 algorithm. The splitter doesn't split the data
in so many branches as is the count of attribute values, but into two intervals. Usually, for numerical
attributes is much better to select them in this dialog. The result decision tree will be simpler and smaller.
Column with the class information
This field represents name of the column which will not be used to split the data and whic contains the goal
class of record.
Document – DecisionTree
Page 8/15
KNOCKER
Working column (will be created)
It is the column for temporary information. It should have a name different from all other attribute names in
the table. It is created automatically.
2.6
Data for classify - dialog
You have to set up data in this dialog before every data classification.
Get data...
Click on this button to choose the data source (called version) as it is defined in the main application.
The columns in the decision tree classification have to be a subset of the columns in the data source table.
The big colored label in the middle part of the dialog tells you whether this condition is met (OK) or not.
Working column (will be created)
It is the column for some temporary information. It should have a different name from the all other
attributes names in the table. It will be created automatically.
Column for result class information (will be created)
The result class will be stored to this column. It should have a different name from all other attribute names
in the table. It will be created automatically.
Document – DecisionTree
Page 9/15
KNOCKER
2.7
Decision tree information - dialog
You will find some properties of currently displayed decision tree in this window.
2.8
Step info - dialog
You can see the details of tree building process in this window. Everything is read-only.
Current method
This text describes you current method and its settings.
Current node
There is a short description of the current node whereas the splitters are defined. This node has a red color in
the tree view for your better orientation.
Document – DecisionTree
Page 10/15
KNOCKER
Best splitter
Name of the best splitter - splitter was chosen by the current method.
Splitters
You can browse all the splitters (all possibilities for splitting the data) in the current node. You can see
detailed information about selected splitter on the right panel.
Find the best splitter
Click on this button if you lost the best splitter and you would like to select it to display its detail. (Clicking
on the blue name of the best splitter causes the same action.)
Document – DecisionTree
Page 11/15
KNOCKER
3
3.1
Decision Trees - Tutorials
Building the Decision Tree
This tutorial shows you step by step, how to build your own decision tree from your training set.
1. Prepare your data
You need a table of classified records. You can see an example of such table on the picture below.
In the table there are several categorical attributes (columns) and the last one is the goal class of record.
2. Add your table as version into the main application
This process is very simple and it is described in another part of documentation.
3. Run the module Decision Trees
4. Set the data for building
Click Settings - Data for build... You will see the dialog described above. For example set it to the state as is
shown in the picture below.
Notice, that there is no numerical attribute. The last column “play” is chosen as the goal-class column.
Working column is still default.
Document – DecisionTree
Page 12/15
KNOCKER
5. Click
or
Pressing the first button invokes running the whole building process at once, the second one means stepping
this process. Stepping is described in more detail in the section about Step info - dialog above.
When you are building the tree from some big training set, (more than 1000 records) be very patient! It may
last for several minutes! For this reason, you can set the smaller tree depth limit in the General properties.
Progress bar increases its value just when the algorithm reaches some node and places there some records.
Then according to the number of these placed records progress bar changes its value. Because of this
progress bar updating there can be a situation when the value rises very slowly or stops rising for a while.
Document – DecisionTree
Page 13/15
KNOCKER
3.2
Choosing between ID3 and CART methods
You can select one of the two implemented algorithms before you start building process. Detail
specifications of these methods are following:
CART
•
•
•
only 2 classes
only binary trees are possible, each splitter creates two sub nodes (attr = val, attr != val)
cannot work with numerical attributes (even if you set them in Data for build dialog as
numerical, they will be considered categorical)
ID3
•
•
•
•
•
more classes
works with both categorical and numerical attributes
categorical splitter select one categorical attribute and makes one sub node for each its
present value
numerical splitter makes two sub nodes (attr < val, attr >= val)
this is the default method and usually has better results than CART
The picture shows you how to select the method of building tree.
3.3
Classification data
Classification of your data has a couple simple steps as described in this tutorial.
1. Prepare the decision tree
You can perform this step by building a tree from training set (see above) or by loading an existing tree from
XML file.
Document – DecisionTree
Page 14/15
KNOCKER
2. Set data for classification
Click Settings - Data for classify... The dialog described above is shown.
3. Click Command - Classify
Now, you have to choose a name for your new table (new version) which will contain your classified data.
Classification will start after the name confirmation. It is usually a very quick process.
4. Enjoy your classified data
You can see the classified data in the main application under the name you chose before. The new table
(version) will be descendant of starting data table.
4
Requirements
Necessary components for correct running of this module:
all common components of main application Knocker
•
•
DecisionTree.dll
•
DMTransformStruct.dll
•
PtreeViewer.dll
•
GuiExt.dll
•
Gui.dll
The main runnable class is DecTreeMain in DecisionTree.dll.
5
Samples
You will find some interesting sample data in CSV (Knocker friendly) format as a part of the distribution.
•
•
•
•
iris – 4 numerical attributes, 3 classes, 150 records, suitable for ID3
mushroom – 22 categorical attributes, 2 classes, 8124 records, suitable for ID3 and CART –
it can take a lot of time!
weather – 4 categorical attributes, 2 classes, 14 records, suitable for ID3 and CART
zoo – 16 categorical attributes, 1 numerical attribute, 7 classes, 101 records, suitable for ID3
– the first column is unique (name of the animal), so it should not be used in a building
process (but you can try it and you will see the problem)
Document – DecisionTree
Page 15/15