1
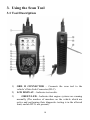
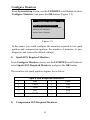
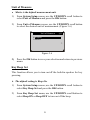
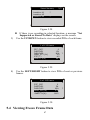
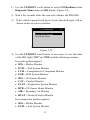
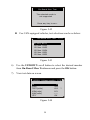
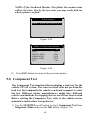
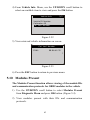
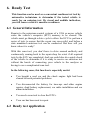
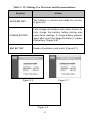
www.obd2express.co.uk Table of Contents 1. SAFETY PRECAUTIONS AND WARNINGS .............................................. 1 2. GENERAL INFORMATION .......................................................................... 2 2.1 ON-BOARD DIAGNOSTICS (OBD) II ............................................................. 2 2.2 DIAGNOSTIC TROUBLE CODES (DTCS) ........................................................ 2 2.3 LOCATION OF THE DATA LINK CONNECTOR (DLC) .................................... 3 2.4 OBD II READINESS MONITORS .................................................................... 4 2.5 OBD II MONITOR READINESS STATUS ......................................................... 5 2.6 OBD II DEFINITIONS .................................................................................... 6 2.7 OBD II MODES OF OPERATION .................................................................... 7 3. USING THE SCAN TOOL ............................................................................ 10 3.1 TOOL DESCRIPTION .................................................................................... 10 3.2 SPECIFICATIONS .......................................................................................... 12 3.3 ACCESSORIES INCLUDED............................................................................. 12 3.4 NAVIGATION CHARACTERS ........................................................................ 13 3.5 KEYBOARD .................................................................................................. 13 3.6 POWER AND CHARGE................................................................................... 13 3.7 DTC LOOKUP ............................................................................................. 16 3.8 SYSTEM SETUP ............................................................................................ 17 3.9 VEHICLE COVERAGE .................................................................................. 27 3.10 PRODUCT TROUBLESHOOTING.................................................................... 27 4. REVIEW DATA ............................................................................................. 29 5. OBDII DIAGNOSTICS ................................................................................. 30 5.1 READING CODES ......................................................................................... 32 5.2 ERASING CODES .......................................................................................... 34 5.3 LIVE DATA .................................................................................................. 36 5.4 VIEWING FREEZE FRAME DATA ................................................................. 47 5.5 RETRIEVING I/M READINESS STATUS......................................................... 49 5.6 O2 MONITOR TEST ..................................................................................... 55 2.3 Location of the Data Link Connector (DLC) The DLC (Data Link Connector or Diagnostic Link Connector) is the standardized 16-cavity connector where diagnostic scan tools interface with the vehicle's on-board computer. The DLC is usually located 12 inches from the center of the instrument panel (dash), under or around the driver‟s side for most vehicles. If Data Link Connector is not located under dashboard, a label should be there telling location. For some Asian and European vehicles, the DLC is located behind the ashtray and the ashtray must be removed to access the connector. If the DLC cannot be found, refer to the vehicle‟s service manual for the location. 3 to “Not Ready”. Since the three continuous monitors are constantly evaluating, they will be reported as “Ready” all of the time. If testing of a particular supported non-continuous monitor has not been completed, the monitor status will be reported as “Not Complete” or “Not Ready.” In order for the OBD monitor system to become ready, the vehicle should be driven under a variety of normal operating conditions. These operating conditions may include a mix of highway driving and stop and go, city type driving, and at least one overnight-off period. For specific information on getting your vehicle‟s OBD monitor system ready, please consult your vehicle owner‟s manual. 2.6 OBD II Definitions Power-train Control Module (PCM) -- OBD II terminology for the on-board computer that controls engine and drive train. Malfunction Indicator Light (MIL) -- Malfunction Indicator Light (Service Engine Soon, Check Engine) is a term used for the light on the instrument panel. It is to alert the driver and/or the repair technician that there is a problem with one or more of vehicle's systems and may cause emissions to exceed federal standards. If the MIL illuminates with a steady light, it indicates that a problem has been detected and the vehicle should be serviced as soon as possible. Under certain conditions, the dashboard light will blink or flash. This indicates a severe problem and flashing is intended to discourage vehicle operation. The vehicle onboard diagnostic system can not turn the MIL off until necessary repairs are completed or the condition no longer exists. DTC -- Diagnostic Trouble Codes (DTC) that identify which section of the emission control system has malfunctioned. Enabling Criteria -- Also termed Enabling Conditions. They are the vehicle-specific events or conditions that must occur within the engine before the various monitors will set, or run. Some monitors require the vehicle to follow a prescribed “drive cycle” routine as part of the enabling criteria. Drive cycles vary among vehicles and for each monitor in any particular vehicle. 6 OBD II Drive Cycle -- A specific mode of vehicle operation that provides conditions required to set all the readiness monitors applicable to the vehicle to the “ready” condition. The purpose of completing an OBD II drive cycle is to force the vehicle to run its onboard diagnostics. Some form of a drive cycle needs to be performed after DTCs have been erased from the PCM‟s memory or after the battery has been disconnected. Running through a vehicle‟s complete drive cycle will “set” the readiness monitors so that future faults can be detected. Drive cycles vary depending on the vehicle and the monitor that needs to be reset. For vehicle specific drive cycle, consult the vehicle‟s Owner‟s Manual. Freeze Frame Data -- When an emissions related fault occurs, the OBD II system not only sets a code but also records a snapshot of the vehicle operating parameters to help in identifying the problem. This set of values is referred to as Freeze Frame Data and may include important engine parameters such as engine RPM, vehicle speed, air flow, engine load, fuel pressure, fuel trim value, engine coolant temperature, ignition timing advance, or closed loop status. 2.7 OBD II Modes of Operation Here is a basic introduction to the OBD II communication protocol. Mode byte: The first byte in the stream is the mode number. There are 10 modes for diagnostic requests. The first byte in the response data bytes is this same number plus 64. For example, a mode 1 request would have the first data byte = 1, and the response would have the first data byte = 65. Here is a brief description of the modes: Mode $01 – Identifies the Powertrain information and shows current data available to the scan tool. This data includes: DTC set, status of on-board tests, and vehicle data such as engine RPM, temperatures, ignition advance, speed, air flow rates, and closed loop status for fuel system. Mode $02 – Displays Freeze Frame data. Same data as in mode 1, but it was captured and stored when a malfunction occurred and a DTC was set. Some of the PIDs for mode one are not implemented in this mode. 7 3. Using the Scan Tool 3.1 Tool Description 1) 2) 3) OBD II CONNECTOR – Connects the scan tool to the vehicle‟s Data Link Connector (DLC). LCD DISPLAY – Indicates test results. GREEN LED – Indicates that engine systems are running normally (The number of monitors on the vehicle which are active and performing their diagnostic testing is in the allowed limit, and no DTCs are present). 10 4) YELLOW LED – Indicates there is a possible problem. A “Pending” DTC is present and/or some of the vehicle‟s emission monitors have not run their diagnostic testing. 5) RED LED – Indicates there is a problem in one or more of the vehicle‟s systems. The red LED is also used to show that DTCs are present. DTCs are shown on the Scan Tool‟s display. In this case, the MIL lamp on the vehicle‟s instrument panel will light steady on. 6) One-Click I/M Readiness Key – Quick-checks State Emissions readiness and drive cycle verification. 7) ESC BUTTON – Cancels a selection (or action) from a menu or returns to the previous screen. 8) LEFT SCROLL BUTTON – When look up DTC definitions, moves to previous character and views additional information on previous screens if DTC definition covers more than one screen; deselect all marked PID data when viewing or recording customized live data list; views previous frames of recorded data when playing back live data. It is also used to update DTC library when pressed. 9) POWER BUTTON – Press and hold for 2 seconds to turn the scan tool on and off. Press and then release to view ? help information. 10) UP SCROLL BUTTON – Moves up through menu and submenu items in menu mode. When more than one screen of data is retrieved, moves up through the current screen to the previous screens for additional data. 11) OK BUTTON – Confirms a selection (or action) from a menu. 12) RIGHT SCROLL BUTTON – When look up DTC definitions, moves to next character and view additional information on next screens if DTC definition covers more than one screen; selects/deselects PID data when viewing or 11 recording customized live data list, and views next frames of data when playing back live data. DOWN SCROLL BUTTON – Moves down through menu and submenu items in menu mode. When more than one screen of data is retrieved, moves down through the current screen to next screens for additional data. 14) VΩ TERMINAL – Assists voltage and/or resistance test as a lead. 13) 15) COM TERMINAL – Assists test as a ground lead. 16) mA TERMINAL – Assists current (0~200mA) test as a lead. 17) A TERMINAL – Assists current (0~20A) test as a lead. 18) USB CONNECTOR – Connects the scan tool to the PC for printing and upgrading. 19) EXTERNAL DC POWER PORT – Connects the 5 volt power adapter to power the tool when disconnected from the vehicle or charge the battery. 20) STAND – Flips out for supporting the scan tool. 3.2 Specifications 1) 2) 3) 4) 5) Display: TFT color display (320 x 240 dpi) Operating Temperature: 0 to 60°C (32 to 140 F°) Storage Temperature: -20 to 70°C (-4 to 158 F°) Dimensions: Length Width Height 175 mm (6.91”) 96.6 mm (3.80”) 37 mm (1.46”) Weight: 0.3kg(without wire) 0.68kg(with wire) 3.3 Accessories Included 1) User’s Manual -- Instructions on tool operations. 12 Using your computer If you want to charge the tool using your computer, make sure that your computer is turned on, it isn't sleeping (refer to the computer's manual to find out how to turn sleep off), and that the USB you connect the tool to provides power. Also, make sure to use the high-powered USB ports which are typically found on the computer itself ----- not on your keyboard, which is low-powered. NOTE: If using a portable computer, make sure it is plugged into power and that the lid or display is open because if the lid is closed the computer may go into either standby, sleep, or hibernation mode and the tool will not charge. Using vehicle DLC If you want to charge the tool with vehicle DLC, the detailed instructions are described as above (refer to the Power on instructions). Using vehicle battery If you want to charge the tool with vehicle battery, use the battery test cable to connect the tool to the battery. Once connected, the Li-ion battery will be fully charged in about 2.5 hours. You can disconnect and use the tool before the battery is fully charged. You don't have to wait until the battery is completely empty before charging it again. The battery stops charging when it's full, so you don't have to worry if you leave it plugged in overnight (leaving the tool connected to an electrical source all the time doesn't continuously charge it). Once the battery is charged, disconnect the tool. If you're using your computer to charge it, make sure that you disconnect your tool correctly when it's finished charging. 15 Configure Monitors From System Setup screen, use the UP/DOWN scroll button to select Configure Monitors, and press the OK button. (Figure 3.5) Configure Monitors 1/4 Spark IGN Required Monitors Compression IGN Required Monitors Allowed INC Monitors ? Reset Factory Default Figure 3.5 In this menu, you could configure the monitors required to test spark ignition and compression ignition, the number of monitors to pass diagnosis, and restore the default settings. 1) Spark IGN Required Monitors From Configure Monitors screen, use the UP/DOWN scroll button to select Spark IGN Required Monitors, and press the OK button. The monitors for spark ignition engines list as below: Spark IGN Required Monitors √ √ √ √ √ 2) √ √ √ √ √ MIS FUEL CCM CAT HCAT Compression IGN Required Monitors 19 EVAP AIR O2S HTR EGR Unit of Measure Metric is the default measurement unit. 1) From System Setup screen, use the UP/DOWN scroll button to select Unit of Measure and press the OK button. 2) From Unit of Measure screen, use the UP/DOWN scroll button to select the desired unit of measurement. (Figure 3.6 ) Unit of Measure 1/2 English Metric ? Figure 3.6 3) Press the OK button to save your selection and return to previous menu. Key Beep Set This function allows you to turn on/off the build-in speaker for key pressing. The default setting is Beep On. 1) From System Setup screen, use the UP/DOWN scroll button to select Key Beep Set and press the OK button. 2) From Key Beep Set menu, use the UP/DOWN scroll button to select Beep ON or Beep OFF to turn on/off the beep. 21 Key Beep Set 1/2 Beep ON Beep OFF ? Figure 3.7 3) Press the OK button to save your selection and return to previous menu. Status Beep Set The default setting is Beep On. This function allows you to turn on/off the build-in speaker for the LEDs in diagnostic testing. Different audio tone corresponds to different LED lamp. This function is invaluable when performing diagnostics alone, or working in bright areas where LED illumination alone is not sufficient. 1) From System Setup screen, use the UP/DOWN scroll button to select Status Beep Set and press the OK button. 2) From Status Beep Set menu, use the UP/DOWN scroll button to select Beep ON or Beep OFF to turn on/off the beep. (Figure 3.8) Status Beep Set 1/2 Beep ON Beep OFF ? Figure 3.8 22 Tool Information The Tool Information function allows viewing of some important information such as serial number and software version number of the scanner. 1) From System Setup screen, use the UP/DOWN scroll button to select Tool Information, and press the OK button; wait for the Tool Information screen to appear. 2) View tool information on screen. (Figure 3.12) . Figure 3.12 Update Mode This function allows you to update the scan tool software and DTC library through a computer. To update your scan tool, you need the following items. AutoLink AL539/AL539b A PC or laptop with USB ports A USB cable 1) Download the programs in our website, www. auteltech.com, to be updated to your computer. 2) Run the Maxi Link II Tool Kit in your computer. (Figure 3.13) 25 3.9 Vehicle Coverage The AutoLink AL539/AL539b OBDII/EOBD Scanner is specially designed to work with all OBD II compliant vehicles, including those equipped with universal protocol -- Control Area Network (CAN). It is required by EPA that all 1996 and newer vehicles (cars and light trucks) sold in the United States must be OBD II compliant and this includes all Domestic, Asian and European vehicles. A small number of 1994 and 1995 model year gasoline vehicles are OBD II compliant. To verify if a 1994 or 1995 vehicle is OBD II compliant, check the Vehicle Emissions Control Information (VECI) Label which is located under the hood or by the radiator of most vehicles. If the vehicle is OBD II compliant, the label will designate “OBD II Certified”. Additionally, Government regulations mandate that all OBD II compliant vehicles must have a “common” sixteen-pin Data Link Connector (DLC). For your vehicle to be OBD II compliant it must have a 16-pin DLC (Data Link Connector) under the dash and the Vehicle Emission Control Information Label must state that the vehicle is OBD II compliant. 3.10 Product Troubleshooting This part describes problems that you may encounter while using the scan tool. Vehicle Linking Error A communication error occurs if the scan tool fails to communicate with the vehicle‟s ECU (Engine Control Unit). You need to do the following to check up: Verify that the ignition is ON. Check if the scan tool‟s connector is securely connected to the vehicle‟s DLC. Verify that the vehicle is OBD2 compliant. Turn the ignition off and wait for about 10 seconds. Turn the ignition back to on and continue the testing. 27 Control Module 1/2 Engine Module $A4 Figure 5.3 Use the UP/DOWN scroll button to select a module and press the OK button. 5.1 Reading Codes Reading Codes can be done with the key on engine off (KOEO) or with the key on engine running (KOER). Stored Codes are also known as “hard codes”, which are fault codes, or trouble codes that have been stored in the vehicle computer memory because the faults have reoccurred for more than a specified amount of key-cycles. These codes will cause the control module to illuminate the malfunction indicator light (MIL) when emission-related fault occurs. Pending Codes are also referred to as “maturing codes” or “continuous monitor codes”. They indicate problems that the control module has detected during the current or last driving cycle but are not considered serious yet. Pending Codes will not turn on the malfunction indicator lamp (MIL). If the fault does not occur within a certain number of warm-up cycles, the code clears from memory. Permanent Codes are DTCs that are "confirmed" and are retained in the non-volatile memory of the computer until the appropriate monitor for each DTC has determined that the malfunction is no longer present and is not commanding the MIL on. Permanent DTC shall be stored in non-volatile memory and may not be erased by any diagnostic services or by disconnecting power to ECU. 32 1) Use UP/DOWN scroll button to select Read Codes from Diagnostic Menu and press OK button. Diagnostic Menu 1/11 Read Codes Erase Codes Live Data View Freeze Frame I/M Readiness O2 Monitor Test ? Figure 5.4 2) Use the UP/DOWN scroll button to select Stored Codes or Pending Codes from the Read Codes menu and press the OK button. Read Codes 1/3 Stored Codes Pending Codes Permanent Codes ? Figure 5.5 If there is not any Diagnostic Trouble Code, the display indicates “No (pending) codes are stored in the module!” Wait a few seconds or press any key to return to previous screen. NOTE: Permanent Codes function is available for merely vehicles supporting the CAN protocols. 3) View DTCs and their definitions on screen. 33 Erase Codes Erase Done! Press any key to con. Figure 5.9 If the codes are not cleared, then an “Erase Failure. Turn Key on with Engine off!‖ message appears. Erase Codes Erase Failure. Turn Key on with Engine Off! Press any key to con. Figure 5.10 4) Press any button to return to Diagnostic Menu. 5.3 Live Data In this function, you can not only read the live data but also record data for later review. Viewing Data The View Data function allows viewing of live or real time PID data of vehicle’s computer module(s). 1) To view live data, use the UP/DOWN scroll button to select Live Data from Diagnostic Menu and press the OK button. (Figure 5.4) 36 If you want to deselect all marked items or select all items, press the LEFT button. A message comes up to ask for your confirmation. ………………Deselect All…………………. Deselect all selected PID’s? YES NO Figure 5.18 4) If you decide to deselect these items, press OK; if you decide not to, press ESC or use the LEFT/RIGHT scroll button to select NO to continue PID selections. Press the OK button to view selected PIDs on screen. ………………….Live Data DTC_CNT FUELSYS2 ETC(℃) SHRTFT1 (%) 4. 0 0L -40 99.2 Figure 5.19 5) Use the ESC button to return to previous menu. Recording Data The Record Data function allows recording vehicle modules’ Parameter Identification (PID) data to help diagnose intermittent vehicle problems. A recording includes 5 frames of live data before trigger event and several frames after trigger event. 40 There are two trigger modes used to record data: A. Manual Trigger - allows user to press the OK button to start recording. B. DTC Trigger - automatically records PID data when a fault that causes a DTC to set is detected by vehicle. CAUTION: DO NOT try to drive and operate the scan tool at the same time! Always have another person operate the scan tool while driving. To record live data, use the UP/DOWN scroll button to select Record Data from Live Data menu and press the OK button. (Figure 5.12) Recording Complete Data Set 1) To record complete set of live data, use the UP/DOWN scroll button to select Complete Data Set from Record Data menu and press the OK button. ………………..Record Data Complete Data Set Custom Data Set Unit of Measure 1/3.. ? Figure 5.20 2) Use the UP/DOWN scroll button to select a trigger mode and press the OK button. 41 …….Recording…. 5/46 ….. DTC_CNT FUELSYS1 FUELSYS2 LOAD_PCT(%) ETC(℃) SHRTFT1(%) 0 0L -- ? 0.0 -40 99.2 Figure 5.26 6) The number “x/x...” to the upper right corner of the screen indicates the maximum frames that can be recorded and the number of recorded frames. The scan tool keeps recording PID data until user presses the ESC button, selected memory location is full, or it completes recording. A message prompting to playback data shows on the screen. Record Data Recording Done! Playback data? YES NO Figure 5.27 If you wish to playback recorded data, press the OK button; if you do not wish to playback, press the ESC button, or use LEFT/RIGHT button to select NO and press the OK button to return to Record Data menu. Recording Custom Data Set 1) To record customized data, use the UP/DOWN scroll button to select Custom Data Set from Record Data menu and press the OK button. (Figure 5.20) 44 Select Memory Location #1 Location #2 Location #3 3/3 * * ? Figure 5.28 3) If there is no recording in selected location, a message “Not Supported or Stored No Data” displays on the screen. Use the UP/DOWN button to view recorded PIDs of each frame. 1 of 135 frame DTC_CNT FUELSYS1 FUELSYS2 LOAD_PCT (%) ETC(℃) SHRTFT1(%) … 6 0 OL N/A ? 0.0 -40 99.2 Figure 5.29 4) Use the LEFT/RIGHT button to view PIDs of next or previous frames. 6 of 135 frame DTC_CNT FUELSYS1 FUELSYS2 LOAD_PCT(%) ETC(℃) SHRTFT1(%) Figure 5.30 5.4 Viewing Freeze Frame Data 47 0 OL N/A 0.0 -40 99.2 4 ? Freeze Frame Data allows the technician to view the vehicle‟s operating parameters at the moment a DTC (Diagnostic Trouble Code) is detected. For example, the parameters may include engine speed (RPM), engine coolant temperature (ECT), or vehicle speed sensor (VSS) etc. This information will aid the technician by allowing the parameters to be duplicated for diagnostic and repair purposes. 1) To view freeze frame data, use the UP/DOWN scroll button to select View Freeze Frame from Diagnostic Menu and press the OK button. (Figure 5.4) 2) Wait a few seconds while the scan tool validates the PID MAP. 3) If retrieved information covers more than one screen, use the DOWN scroll button, as necessary, until all the data have been shown up. …………View Freeze Frame DTCFRZF FUELSYS1 FUELSYS2 LOAD_PCT (%) ECT(℃) SHRTFT1 (%) P1633 OL -0.0 -40 99.2 2. ? Figure 5.31 4) If there is no freeze frame data available, an advisory message “No freeze frame data stored!” shows on the display. If you want to view full name of a PID, use the UP/DOWN scroll button to select the PID, and press the ? HELP button. 48 Emissions Test can be performed. It is also suggested that the vehicle be inspected/repaired before driving the vehicle further. If the RED LED was obtained, there is a definite problem present in the system(s). In these cases, you have the following options: Repair the vehicle yourself. If you are going to perform the repairs yourself, proceed by reading the vehicle service manual and following all its procedures and recommendations. Take the vehicle to a professional to have it serviced. The problem(s) causing the red LED to light must be repaired before the vehicle is ready for an Emissions Test. Audio Tone Interpretation The audio tone is configured according to the I/M Readiness Status. This function is invaluable when performing diagnostics and driving at the same time , or working in bright areas where LED illumination alone is not sufficient. Different audio tone with different LED light indicates different I/M Readiness Status. LED Light Audio Tone Beep Interval Green LED Two long beeps 5 seconds Yellow LED short, long, short beep 5 seconds Four short beeps 5 seconds Red LED After you have read the information, press ESC to exit. The other buttons are disabled to prevent misoperation. B. Retrieve I/M Readiness status in typical way 52 1) Use the UP/DOWN scroll button to select I/M Readiness from Diagnostic Menu and press OK button. (Figure 5.4) 2) Wait a few seconds while the scan tool validates the PID MAP. 3) If the vehicle supports both types of tests, then both types will be shown on the screen for selection. ……………I/M Readiness 1/2. Since DTCs Cleared This Drive Cycle Figure 5.34 4) Use the UP/DOWN scroll button, as necessary, to view the status of the MIL light (―ON‖ or ―OFF) and the following monitors. For spark ignition engines: MIS -- Misfire Monitor FUEL -- Fuel System Monitor CCM -- Comprehensive Component Monitor EGR – EGR System Monitor O2S -- O2 Sensors Monitor CAT -- Catalyst Monitor EVAP -- Evaporative System Monitor HTR -- O2 Sensor Heater Monitor AIR -- Secondary Air Monitor HCAT -- Heated Catalyst Monitor For compression ignition engines: MIS -- Misfire Monitor FUEL -- Fuel System Monitor 53 ............O2 Monitor Test O2 Bank1 Sensor1 O2 Bank1 Sensor2 O2 Bank1 Sensor3 2/8… ? Figure 5.37 If the vehicle does not support the mode, an advisory message will be displayed on the screen. …………….O2 Monitor Test………….. The selected mode is not supported! Figure 5.38 4) View test results of selected O2 sensor. … ……….O2 Bank1 Sensor2 1/31. Rich-Lean Threshd V Lean-Rich Threshd V $70(counts) $71(counts) $83 $84 Figure 5.39 5) Use the UP/DOWN scroll button to view more screens of data if additional information is available in more than one page. 56 On-Board Mon. Test The selected mode is not supported Press any key to con.. Figure 5.42 For CAN-equipped vehicles, test selections can be as below: On-Board Mon. Test 1/31.. O2 Mon. B1S1 O2 Mon. B1S2 O2 Mon. B1S3 O2 Mon. B1S4 O2 Mon. B2S1 O2 Mon. B2S2 Figure 5.43 6) Use the UP/DOWN scroll button to select the desired monitor from On-Board Mon. Test menu and press the OK button. 7) View test data on screen. HO2S11 Voltage amplitu 1/36 ID MOD TEST(volts) MIN(volts) MAX(volts) STS 11 $10 400 1E1 ----OK Figure 5.44 59 ? NOTE: If the On-Board Monitor Test failed, this monitor item will be red color. Just by the text color you may easily find out which system is at fault. EVAP monitor Phase 0 Initial tank vacuum an.. Figure 5.45 Phase 0 Initial tank vacuum ID MOD TEST(in H2O) MIN(in H2O) MAX(in H2O) STS 00 $10 0000 7000 7200 Fail 1 ? Figure 5.46 8) Press ESC button to return to the previous menus. 5.8 Component Test The Component Test function allows initiating a leak test for the vehicle's EVAP system. The scan tool itself does not perform the leak test, but commands the vehicle's on-board computer to start the test. Different vehicle manufacturers might have different criteria and methods for stopping the test once it has been started. Before starting the Component Test, refer to the vehicle service manual for instructions to stop the test. 1) Use the UP/DOWN scroll button to select Component Test from Diagnostic Menu and press the OK button. (Figure 5.4) 60 4) From Vehicle Info. Menu, use the UP/DOWN scroll button to select an available item to view and press the OK button. Vehicle Info. 3/3 Vehicle ID Number Calibration ID Cal. Verf. Number ? Figure 5.52 5) View retrieved vehicle information on screen. Cal. Verf. Number CVN1: BB BA A0 78 ? Figure 5.53 6) Press the ESC button to return to previous menu. 5.10 Modules Present The Modules Present function allows viewing of the module IDs and communication protocols for OBD2 modules in the vehicle. 1) Use the UP/DOWN scroll button to select Modules Present from Diagnostic Menu and press OK button. (Figure 5.4) 2) View modules present with their IDs and communication protocols. 63 6. Ready Test This function can be used as a convenient readiness test tool by automotive technicians to determine if the tested vehicle is ready for an emission test. By visual and audible indication, you will learn a vehicle’s monitors readiness. 6.1 General Information Repairs to the emissions-control systems of a 1996 or newer vehicle cause the vehicle‟s computer (ECU) memory to be cleared. The vehicle must go through a drive cycle to allow the ECU to perform a series of tests to ensure that the repair was successful, and before a state mandated emissions test can be conducted. But how will you know when it is ready? With this scan tool, you don‟t have to drive around endlessly and continuously coming back to the repair shop for retest if all required tests by the ECU are completed. And you could also do a quick check of the vehicle to determine if it is ready to receive an emission test without the hassle of connecting your vehicle to the analyzer or having to use a complicated scan tool. In the following cases, this function is especially useful. You bought a used car and the check engine light had been cleared to mask potential problems. You disconnected the battery for tune-ups and other engine repairs, dead battery replacement, car radio installation and car alarm installation. You used a scan tool to clear the DTCs. Your car has been sent to repair. 6.2 Ready test application 65 NOTE: This function reads off the real time data of emission-related monitoring systems readiness status. Once the scan tool has finished other operations, for example, clearing trouble codes, the I/M Readiness Monitor Status program resets status of all the monitors to “INC” condition. In order to set these monitors to a Ready status, the vehicle must be driven through a complete drive cycle. Times for reset vary depending on vehicle. Please refer to your vehicle’s service manual for drive cycle information. NOTE: In this function, only ESC button is available. The other buttons are disabled to prevent misoperation. 6.3 LED and Tone Interpretation Select Ready Test from the Main Screen and the screen shows as below, including applicable monitors status, MIL state, Ignition type, DTCs (stored one and pending one). Figure 6.2 If the scan tool is idle, it will show the result immediately. If it is busy, it will wait till the current procedure finished. After viewing the status, press ESC button to exit. “OK” -- Indicates that a particular monitor being checked has completed its diagnostic testing. 68 Figure 7.1 7.3 AC Voltage While the tool in this mode, contact the probes to a circuit, then the LCD display will read the AC voltage with a resolution of 0.02 volt. Figure 7.2 NOTE: If the voltage is less than 3Volt, the result will display with a resolution of 0.01volt. 7.4 Continuity While the tool in this mode, contact the probes to a circuit, then the tool will check the continuity of this circuit. NOTE: If the resistance of circuit is less than 50 ohm, the scan tool would display actual value and a beep would be heard. 71 Figure 7.3 NOTE: If the resistance of circuit is more than 50 ohm, the scan tool would display 0L as below. Figure 7.4 7.5 Diodes While the tool in this mode, contact the probes to a diode in the correct polarity: red to the positive (+) terminal and black to the negative (-) terminal, then the LCD display will read forward voltage drop of this diode. 72 8. Start Test 8.1 Starter Test The function of a vehicle's starting system is to rotate the engine's crankshaft fast enough so that combustion can take place, and the engine can begin to run under its own power. This system is commonly referred to as the "cranking system". Providing the cranking power needed for reliable engine starts requires all starting system components to be in good working order. Testing the starting system can confirm that it is functioning properly, or provide valuable diagnostic information to isolate a problem in the system. The STARTER TEST measures the cranking voltage. If the engine cranking speed is good, and the cranking voltage reading is within specifications, you can generally conclude that the starting system is functioning properly. But, if the starter does not crank, cranks too slowly, or the volts reading is not within specifications, further testing will be required. To get more accurate results, this scan tool incorporates a temperature compensation feature to aid in tests. Before performing the STARTER TEST, the starting system should be visually inspected for physical defects, and some preliminary checks should be performed that will aid you in diagnosing a starting system problem. These are taken care of during the pretest. PRETEST 1. To prevent possible personal injury and protest the vehicle from damage, inspect the starting system for defects. Check for the following; then repair and/or replace any defective components. Battery defects. Frayed or broken electrical wiring. Corroded or loose connections. Loosely mounted starter motor, series-parallel switch, magnetic switch, solenoid, starter relay, etc. 75 Figure 8.2 7. Start engine and begin the test. There may be five test results. Table 1: Starter System Decisions and Recommendations Decision Action CRANKING NORMAL The starter voltage is normal and the starting system is OK. (Figure 8.3) CRANKING ABNORMAL The vehicle can’t start and there is a problem with the starting system. Check the battery, connection, wiring and starter. (Figure 8.4) CRANKING LOW The starter voltage is low and you’d better check the starter system before a problem happens. (Figure 8.5) CHARGE BATTERY The starter voltage is low and the battery is discharged. Fully charge the battery and retest the starter system. (Figure 8.6) 77 8. Press OK button to do the test again. The scan tool will prompt you to shutdown the engine. Figure 8.8 9. Follow the steps above to do the test again. If the scan tool doesn‟t connect to vehicle or battery, it will display a message as below. Check that OBDII connector is securely connected to the DLC, or battery contact is clean and well connected, then continue the test procedure. Figure 8.9 8.2 Charging System Test All late-model vehicles need a constant supply of power to run their electronic components, such as computers, daytime running lights and stereo systems. Most 12-volt charging systems produce more than 12 volts, some as high as 14.5 volts of DC power. Many 79 5. Start the engine and keep it running at 2000 rpm for over 15 seconds. Then press OK button and the scan tool will show as below. Figure 8.11 6. Follow the instructions to hold the engine rpm and turn on high beams and blower motor. Then press OK button. 7. The scan tool starts to record the charging voltage with loads on. There may be four test results. Table 2: Charging System Decisions and Recommendations Decision NORMAL Action The charging system is showing normal output. No problem detected. (Figure 8.12) 81 Table 3: CCA Rating Test Decisions and Recommendations Decision Action GOOD BATTERY The battery is normal and ready for service. (Figure 9.5) CHARGE BATTERY Fully charge the battery and retest. Failure to fully charge the battery before testing may cause false readings. If charge battery appears again after you fully charge the battery, replace the battery. (Figure 9.6) BAD BATTERY Replace the battery and retest. (Figure 9.7) Figure 9.6 Figure 9.7 Figure 9.8 87 Print Data Stored Codes Pending Codes Live Data Freeze Frame I/M Readiness O2 Sensor Test Print All Data 1/9 ? Figure 10.2 To print all retrieved data, use the UP/DOWN scroll button to select Print All Data from Print Data menu. 6) Press the OK button to upload data to the computer. 7) In the Maxi-Link Tool Kit, you could edit, delete, copy and print the data in the textbox by selecting the icons on the upper right of window. Print data. Delete data. Copy data. Edit data. NOTE: Data stored in a language different from current system settings of the scan tool will not be printable. Please adjust language settings before printing. A reminder would pop up under such circumstances. 89 11. Warranty and Service 11.1 Limited One Year Warranty Autel warrants to its customers that this product will be free from all defects in materials and workmanship for a period of one (1) year from the date of the original purchase, subject to the following terms and conditions: 1) The sole responsibility of Autel under the Warranty is limited to either the repair or, at the option of Autel, replacement of the scan tool at no charge with Proof of Purchase. The sales receipt may be used for this purpose. 2) This warranty does not apply to damages caused by improper use, accident, flood, lightning, or if the product was altered or repaired by anyone other than the Manufacturer‟s Service Center. 3) Autel shall not be liable for any incidental or consequential damages arising from the use, misuse, or mounting of the scan tool. Some states do not allow limitations on how long an implied warranty lasts, so the above limitations may not apply to you. 4) All information in this manual is based on the latest information available at the time of publication and no warranty can be made for its accuracy or completeness. Autel reserves the right to make changes at any time without notice. 90