1
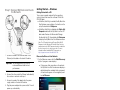
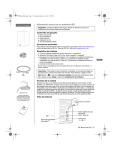
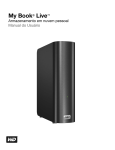
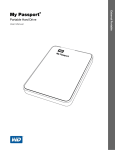
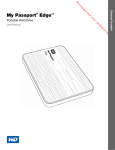
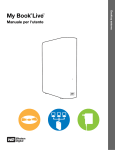
My Book Live Duo ® Quick Install Guide ™ Kit Contents About Your WD Product Important: See the user manual located on the My Book Live Duo under \\MyBookLiveDuo\Public\Software\User Manuals. Kit Contents Network hard drive Installation CD Ethernet cable AC adapter Quick Install Guide Optional Accessories For more information on optional accessories for this product, visit www.shopwd.com (U.S. only). Outside the U.S., visit http://support.wdc.com. System Requirements Ethernet connection (network adapter, router, or switch) Windows® XP/Vista/7; Mac OS® X Lion, Snow Leopard®, or Leopard® Web browser (Internet Explorer 7.0 and later on Windows platforms supported by this product, Safari 4.0 and later on Mac platforms supported by this product, Firefox 3.6 and later on supported Windows and Mac platforms, Google Chrome 14.0 and later on supported Windows and Mac platforms) Broadband internet connection Note: Compatibility may vary depending on your hardware configuration and operating system. Important: For best performance and reliability, it is recommended that you install the latest updates and service pack (SP). For Windows, go to the Start or menu and select Windows Update. For Mac, go to the Apple menu and select Software Update. Drive Format AC Adapter* *See the full user manual on the My Book Live Duo for more information about global AC adapter configurations My Book Live Duo is a dual-drive system that is pre-configured as a spanned drive. Spanning combines all the drives in a system into one big volume so they act like one giant drive. My Book Live Duo also supports RAID 1 (Mirrored) mode for data protection. Half of the capacity is used to store your data and half is used for a duplicate copy. If one drive fails in RAID 1, the system will still run, and your data will be preserved. You can replace the failed drive and restore the system. See the full user manual on your My Book Live Duo for more information on how to manage RAID. System View Reset button USB port (for expansion only) LED Ethernet port Kensington® Security Slot My Book Live Duo | 1 Step 1: Connect My Book Live Duo to the Network 3 1 4 2 1. Connect one end of the Ethernet cable to the Ethernet port located on the back of the drive. Important: We recommend that you use the enclosed Ethernet cable for best performance. 2. Connect the other end of the Ethernet cable directly into a router or network switch port. Getting Started — Windows Getting Started with a CD Turn on your computer and wait for the operating system to load, then insert the software CD into the CD-ROM drive. If AutoRun (AutoPlay) is enabled, the My Book Live Duo Welcome screen displays. If asked to run the setup file, double-click Setup.exe. If AutoRun (AutoPlay) is disabled, click Start > My Computer and locate the My Book Live Duo CD drive under Devices with Removable Storage. Double-click the CD, then double-click Setup.exe to display the My Book Live Duo Welcome screen. Note: The CD enables Universal Plug and Play (UPnP) Framework in the Windows XP firewall if it has not been enabled previously. UPnP Framework must be enabled for the discovery process to detect your drive. For more information about enabling UPnP Framework, see http://support.microsoft.com/kb/886257#8. Discover the Drive on Your Network 1. On the Welcome screen, click the Start Discovery button. A progress screen displays. If the process finds your drive on the network, the My Book Live Duo Found screen displays a default description and drive letter assignment. A check mark appears in the navigation panel beside Discover. 3. Connect one end of the adapter into the power supply socket on the back of the drive. 4. Plug the power adapter into a power outlet. The unit powers up automatically. Important: Wait for the My Book Live Duo drive to finish powering up (approximately three minutes) before configuring the drive. You will know it is ready when the LED turns green. Step 2: Access My Book Live Duo on the Network Use the following steps to easily find the My Book Live Duo device on the local area network (LAN). The CD contains software that makes it easier for you to locate, connect to, and monitor the My Book Live Duo device. Note: The My Book Live Duo application on the included CD should be installed on every PC connected to the LAN from which you intend to access your My Book Live Duo device. Note: For Windows Vista/Windows 7, the enclosed CD is only required to install WD Quick View and WD SmartWare software. 2 | My Book Live Duo Note: If the My Book Live Duo software does not discover your drive, the Connecting your Drive screen appears. Follow the on-screen instructions then click Find Drive. 2. If more than one drive is discovered, select your My Book Live Duo from the Drive Name list. The screen displays a default description in Drive Description. 3. Click Map network drive to mount the share to your desktop so that you can drag and drop files into the network drive folders using (My) Computer or Windows Explorer. Note: The mount will remain on your desktop until you delete it. Click the Change link to change the default drive letter. 4. Click Create a desktop shortcut to your drive to create a desktop shortcut. 5. Click the Details link to view the drive's model name, IP address, and MAC address. 6. Click the Continue button. The Install WD Quick View screen displays. Note: To continue without installing WD Quick View, click the Skip to Next Steps link and continue with “Perform Next Steps” below. You may install WD Quick View later by clicking Install in the navigation panel. Install WD Quick View WD Quick View installs the WD Quick View icon in the Windows system tray so that you can perform important functions such as launching WD SmartWare or checking drive status quickly. 1. Click the License Agreement link, and after reading the agreement, click I Accept. 2. Click the Start Install button. A progress bar displays until the Installation Complete screen appears. The system tray now displays the Getting Started Without a CD — Windows Vista/ Windows 7 The first time you connect the device to your network and open Windows Vista/Windows 7, your system will locate and install the WD Rally driver. When properly installed, Rally puts a large My Book Live Duo icon under Computer>Network, which allows you to share media. Once connected, open the drive as follows: 1. Click > Computer > Network > Storage > My Book Live Duo, and locate the drive’s Public folder. 2. Right-click the My Book Live Duo icon and select Open. 3. Double-click the Public folder to display the Shared Music, Shared Pictures, Shared Videos, and Software subfolders. You can now drag and drop files into the shared media folders using Windows Explorer. 4. Map the My Book Live Duo Public folder for quick access in the future: icon. In Windows Explorer, under Network, click MyBookLiveDuo. Right-click the Public folder and select Map Network Drive from the Right-click menu. Select the desired letter from the Drive dropdown list. Select the Reconnect at login check box. Click Finish. Your Public drive is now mapped. Getting Started — Mac Perform Next Steps Click the Next Steps button on the Install Complete screen, or the Next Steps link in the navigation panel at any time to display the Next Steps screen. Note: Discovery must take place before Next Steps is available. IF you want to .. . THEN . . . Open your My Book Live Duo drive and view the contents of its Public shares, Click the Open button. Back up the files, Click the Backup Options button. Set up (configure) your My Book Live Duo drive, Click the Start Setup button. Getting Started with a CD Turn on your computer and wait for the operating system to load, then insert the software CD into the CD-ROM drive. Double-click the My Book Live Duo CD, and then double-click Software>Setup for Mac>My Book Live Duo Setup.dmg to display the Welcome screen. Discover the Drive on Your Network 1. On the Welcome screen, click the Start Discovery button. A progress screen displays. If the process finds your drive on the network, the My Book Live Duo Found screen displays a default description and drive letter assignment. A check mark appears in the navigation panel beside Discover. Note: If the My Book Live Duo software does not discover your drive, the How to Connect screen appears. Follow the on-screen instructions then click Find Drive. My Book Live Duo | 3 2. Click Create an alias to MyBookLive to create a desktop shortcut. 3. Click the Details link to view the drive's model name, IP address, and MAC address. 4. Click the Continue button. The Install WD Quick View screen displays. Getting Started Without a CD 1. In a Finder window, click MyBookLiveDuo under the shared items in the side bar. 2. If presented with an authorization screen, select Guest, and then click Connect to display the Public share: Note: To continue without installing WD Quick View, click the Skip to Next Steps link and continue with “Perform Next Steps.” You may install WD Quick View later by clicking Install in the navigation panel. Install WD Quick View WD Quick View installs the WD Quick View icon in the menu bar, so that you can perform important functions such as quickly checking drive status. 1. Click the License Agreement link, and after reading the agreement, click I Accept. 2. Click the Start Install button. A progress bar displays until the Installation Complete screen appears. The menu bar now displays the icon. Perform Next Steps 1. Click the Next Steps button on the Install Complete screen, or the Next Steps link in the navigation panel at any time to display the Next Steps screen. Note: Discovery must take place before Next Steps is available. 3. Double-click the Public folder to display the media subfolders: Shared Music, Shared Pictures, and Shared Videos. You can now drag and drop files into the shared folders using Finder: Note: The Public folder icon automatically displays on the desktop. 4. If you want to make a shared drive icon permanent on your desktop, create an alias. Following are two ways to do that: Note: Before creating an alias, click Finder > Preferences > General and make sure Connected Servers is checked. Click the item you wish to alias (e.g., Shared Music), hold down the mouse button, hold down the Cmd and Option keys simultaneously, and drag the item to where you want the alias to appear. Instead of moving the original item, this creates an alias at the new location. -ORRight-click the item you want to alias (e.g., Shared Music), and then click File > Make Alias. See the complete user manual under \\MyBookLiveDuo\Public\Software for further instructions on the functions above, and all other basic and advanced device management functions. IF you want to .. . THEN . . . Open your My Book Live Duo drive and view the contents of its Public shares, Click the Open button. Back up the files, Click the Learn More button beside the Time Machine option, Set up (configure) your My Book Live Duo device, Click the Start Setup button. Western Digital 3355 Michelson Drive, Suite 100 Irvine, California 92612 U.S.A. Western Digital, WD, the WD logo, and My Book are registered trademarks; and My Book Live is a trademark of Western Digital Technologies, Inc. Other marks may be mentioned herein that belong to other companies. Specifications subject to change without notice. © 2012 Western Digital Technologies, Inc. All rights reserved. 4079-705085-A02 Jan 2012 4 | My Book Live Duo