1
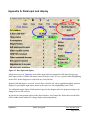
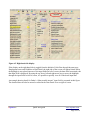
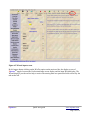
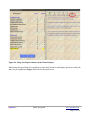
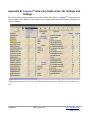
Xspouse
TM
Quick Start Guide
Tolapa Inc
e-mail: [email protected]
XspouseTM
Quick start guide
www.xspouse.com
Page 1 of 14
XspouseTM Data Entry
Note: If you are completely new to Xspouse you may find it helpful to first briefly look at Appendix A
at the end of this document to assist with understanding the mechanics of operation of Xspouse
screens.
Help and Documentation.
The extreme right icon in the XspouseTM main screen is labeled Wiz/Pro. This stands for
Wizard/Professional. The Wizard is the data entry wizard. The Professional screen is the regular
XspouseTM main screen. Clicking this icon repeatedly switches between the two screens.
You may enter data in either the Professional screen or the Wizard.
Overview of Data Entry.
The overall scheme of XspouseTM is very simple.
Enter the information about children (lines 1 and 2).
Enter FC 4058 (guideline) income (the five lines between Wages and Other Nontaxable Income). This
is the guideline gross income.
Enter FC 4059 (guideline) deductions (the four lines near the bottom of the screen, from Required
Union Dues to Other GDL Deductions; the lines half-way down the screen, child and spousal support
paid for prior relationships; and health insurance).
The guideline net is the difference between guideline gross income and guideline deductions. This is
the income which figures in the guideline child support formula (FC 4055).
NOTE: In XspouseTM , you will often see the words adjusted or unadjusted next to the word net. These
adjectives refer to whether the net has been adjusted for the tax consequences of spousal support. This
topic is discussed fully in Appendix D of the XspouseTM manual.
XspouseTM will then calculate child and spousal support.
Taxes.
FC 4059(a) lists federal and state income taxes as guideline deductions. Thus, we need to enter
information which will allow XspouseTM to calculate these taxes.
You have probably already entered all taxable income when entering guideline income. The categories
of taxable income and guideline income largely overlap.
Next, enter Adjustments to Income (line half-way down the screen ). These are defined in IRS Form
1040.
XspouseTM
Quick start guide
www.xspouse.com
Page 2 of 14
Finally, enter Tax Deductions (lines labeled Health Insurance through Miscellaneous Deductions).
These are defined in IRS Schedule A.
Guideline Gross Income and Taxable Gross Income are Distinct Entities.
These are often equal numerically, but much confusion can arise from failing to distinguish between the
two.
Adjustments to Income, Tax Deductions and Guideline Deductions.
Adjustments to Income (ATIs) and Tax Deductions are both “deductions” in the sense that they are
deducted from Taxable Gross Income. The difference is that ATIs are subtracted dollar-for-dollar
whereas Tax Deductions are subject to a variety of restrictions ( XspouseTM handles these restrictions
for you; you do not have to be concerned with them.)
Guideline deductions are subtracted from Guideline Gross Income. The guideline deductions
are subtracted dollar-for-dollar from Guideline Gross Income.
Filing Status
Special rules apply if the filing status is MFJOUT (remarried and filing jointly). Please read the
help pages in the Wizard concerning this.
Detail Windows
1
Child detail.
Use for split custody.
Contains buttons to help select or compute timeshare. In particular, there is a button to access the
Timeshare Worksheet. (The Timeshare Worksheet is a very useful feature. It is fully explained in the
XspouseTM User Manual.)
2
Non-Custodial Time detail.
This is the same detail as on the # of children line.
3
# of Exemptions detail.
This is not just for exemptions, but also for the number of children qualifying for the various federal
credits. The age limits are less that 19 for the EIC (Earned Income Credit), less than 17 for the CTC
(Child Tax Credit), less than 13 for the CCC (Child Care Credit). Use this detail Window when
releasing exemptions via IRS Form 8332 in the Guideline settlement. Qualifying children for the CTC
can be transferred along with released exemptions. Qualifying children for the EIC and CCC cannot be
transferred.
4
Wage detail.
Helps to convert income to monthly figures.
XspouseTM
Quick start guide
www.xspouse.com
Page 3 of 14
5
Other Taxable Income detail.
The most common types of taxable income (wages and self-employed income) can be entered directly
into the main screen. This detail allows the entry of other types of income listed in IRS Form 1040.
Do not enter spousal support of this relationship. XspouseTM will include it.
6
TANF + CS Received detail.
Temporary Assistance for Needy Families
7
Non-taxable Income detail.
Enter various categories of non-taxable income.
When the filing status is MFJOUT, this detail allows you to include a portion of new spouse
income in the calculation of child support.
8
New Spouse Income detail.
When the status is MFJOUT, use this detail window to enter taxable income of the new spouse. This
information is used only to calculate the joint taxes. It is not used for the calculation of child support
(unless you have chosen to include a portion of this income) and is never used for the calculation of
spousal support.
The information in this window is ignored if the filing status is not MFJOUT.
9
Adjustments to Income detail.
Use this detail if you would like XspouseTM to calculate the Tuition and Fees deduction on IRS Form
1040. Otherwise, you can enter ATIs directly into the main screen. Do not enter the Self-Employed
Health Insurance deduction. XspouseTM will calculate it. Do not enter spousal support of this
relationship. XspouseTM will include it.
10
Spousal Support Paid for Previous Relationships detail.
Spousal support paid by this spouse and/or new spouse. Any new spouse information will be used only
for calculating taxes and only if the filing status is MFJOUT.
11
Miscellaneous Deductions detail.
Allows the entry of miscellaneous tax deductions and state sales taxes paid.
12
Hardship deduction detail.
This is for FC 4071 information.
If the asterisk (*) is on next to this cell in the main screen, XspouseTM is calculating the maximum
hardship allowed under FC 4071(b).
You can also award partial hardships in this detail window.
XspouseTM
Quick start guide
www.xspouse.com
Page 4 of 14
13
Other GDL Deductions detail.
Job-related expenses and discretionary guideline deductions.
14
Child Care Expenses detail.
Used to calculate Child Care Credit (CCC).
Used to calculate mandatory add-ons. The allocation method (either 50/50 or FC 4061(b) should be
specified in the Settings screen.
Used in the Findings and Rebuttals report.
Settings
Most settings can be manipulated directly in the main screen through short-cut keys. Please refer to the
XspouseTM manual for a list of these keys.
Tax Settings
When the cursor is in one of the Father's or Mother's data input fields tax settings can be changed for
that parent via the Taxes>Tax Settings menu option (see Appendix B for details).
The Tax Settings enable you to include or exclude various taxes. All the fields are dual-entry fields:
You can include or exclude the highlighted tax by clicking the right mouse button or pressing the space
bar when highlighting the field or you can type in a decimal number between 0 and 10 in place of the
include/exclude label. The tax in question will be multiplied by that number. The include/exclude
toggle is equivalent to a numerical value of one and zero respectively being entered. To reset a
numerical value to the include/exclude setting press the space bar or right mouse button when in the
field.
Using numerical values in the state taxes in put fields can be used to estimate out-of-state taxes.
Preferences
Used to adjust the appearance of XspouseTM , such as window size . Some of the preferences only take
effect after XspouseTM is restarted. The help line in this window will advise you whether XspouseTM
should be restarted.
Findings and Rebuttals.
Displays a per-child breakdown of guideline child support. If you have entered child care expenses in
the main screen, then you can designate a per child allocation here, or you can choose to let XspouseTM
allocate these expenses equally between the children. For most calculations, only a knowledge of the
total child care expenses is necessary. The one exception is the calculation of per child add-ons in the
Findings and Rebuttals report.
The child care expenses can be either equally or unequally divided between the children. In the top
XspouseTM
Quick start guide
www.xspouse.com
Page 5 of 14
right corner of the Findings screen, there is a toggle that specifies how the total expenses are divided
between the children. The default is "Equally". However, this can be changed to "allocated by User".
When this is done, a button labeled "Allocate" pops up.
Clicking this button opens a dialog in which per child expenses can be entered for each child and each
parent.
XspouseTM keeps track of events that make it necessary to allocate the expenses de nuovo
and posts a warning when appropriate.
When the Low Income Adjustment (FC 4055(b)(7)) is switched on in the Settings screen, the lower
half of the Findings and Rebuttals report changes in appearance. The father/mother timeshare columns
are condensed into one. Three new columns are displayed under the heading "Family Information". The
numbers in these columns are NOT per child information--they refer to the child support payable when
the child in question is the oldest supported child.
The Basic CS may be manually changed to any amount in the range permitted by FC 4055(b)(7). This
can be done by typing in the desired amount in any cell; or by pressing [Ctrl+R] to toggle the amounts
between the high and low ends of the ranges.
There is a calculation aide attached to each of the Basic CS cells. To access it, press the ‘D’ key while
the yellow cursor is positioned on any of the Basic CS cells.
Example. Use the Child detail window to enter 3 children with mother.
Name the children Huey, Dewey and Louie.
In the main screen, enter 1000 monthly wages for father.
In the main screen, press 'R' to switch on the Low Income Adjustment.
Open the Findings screen (Reports > Findings).
The Basic CS opposite Huey (the oldest child) is the child support
for all 3 children.
The Basic CS opposite Dewey is the child support when only Dewey and
Louie are being supported.
The Basic CS opposite Louie is the child support when only Louie is
being supported.
In cases where the court decides that child support should be modified in accordance with FC 4057, the
automatic checking for FC 4055 compliance in XspouseTM can be switched off.
Judicial officers have full control over the data in the Findings and Rebuttals report.
XspouseTM
Quick start guide
www.xspouse.com
Page 6 of 14
Summary of Findings Screen modes.
When Display FC 4055(b)(7) low-income CS adjustment range is toggled to NO in the Settings
screen.
All child support amounts and payors comply with FC 4055. No range checking is necessary.
No message concerning range checking is printed because it is unnecessary.
When Display FC 4055(b)(7) low-income CS adjustment range has been toggled to YES in the
Settings screen.
In this case, there is a toggle in the Findings screen (just above the per-child information, on
the right) that allows the user to specify whether basic child support amounts should be
checked for compliance with FC 4055.
When FC 4055 checking is ON, the amount in each Basic CS field is checked for FC 4055
compliance. The payor of each of the basic child support figures is automatically calculated and cannot
be changed manually.
In contrast, when FC 4055 checking has been toggled to OFF, any amount may be typed into any of the
basic child support fields. In addition, the Payor fields (next to the Basic CS fields) are now toggle
fields (right-click on them to change them).
In the printout of the main screen, an informational message indicating whether FC 4055 checking is
ON or OFF is printed.
Remarks.
(1) When FC 4055 checking is toggled back to ON in the Findings screen, all user entered Basic
CS amounts and payors revert to guideline. The fields in the Payor column cease to be toggle
fields and become simple labels.
(2) An informational message concerning FC 4055 checking is printed if Display FC 4055(b)(7)
low-income CS adjustment range has been toggled to YES in the Settings screen. Conversely,
the absence of such a message indicates that Display FC 4055(b)(7) low-income CS adjustment
range is toggled to NO in the Settings screen.
(3) When Display FC 4055(b)(7) low-income CS adjustment range has been toggled to YES in the
Settings screen, the Findings screen must be opened at least once before printing the main
screen. Otherwise, XspouseTM will print a range-error message instead of the per-child
information.
XspouseTM
Quick start guide
www.xspouse.com
Page 7 of 14
Appendix A: Data input and display
Figure A1 Data input and display.
On the main screen of XspouseTM most of the input fields are button-like fields that will open up a
detail input window if double left mouse button clicked or if the “D” key is pressed when highlighting
such a field. In this diagram two such fields are circled in blue.
Display fields that appear “recessed” such as those circled in red can be toggled through the optional
displays by pressing the right-mouse button or the space bar when highlighting such a field.
Two additional toggle display fields marked in green in the diagram allow the program settings to be
changed, but are not recessed.
In general, the same pattern applies to the detail windows. Any button-like fields and recessed fields
lead to further detail windows or change display and setting options.
XspouseTM
Quick start guide
www.xspouse.com
Page 8 of 14
Figure A2 Right hand side display.
If the display on the right hand side is toggled from the default of Cash flow through Income taxes,
Employment taxes and Guideline to Data Detail, the right side of the screen will appear blank. When
the highlight is next placed into one of the input fields on left of screen, the data detail associated with
that input field is displayed. By using the up, down, left and right arrow keys to move the highlight
through the input fields on left of screen, it is possible to quickly view all of the detail input data.
An example showing detail for Father's “Other taxable income” input field is presented in this figure.
The detailed data can also be entered or edited in the Data Detail view on right of screen.
XspouseTM
Quick start guide
www.xspouse.com
Page 9 of 14
Figure A3 Wizard input screen.
By left mouse button clicking on the Wiz/Pro option on the main tool bar, the display screen of
XspouseTM toggles between the Professional input screen display and the input Wizard display. The
Wizard displays provide on-line help to assist with entering data in to particular fields selected by the
tabs on the left.
XspouseTM
Quick start guide
www.xspouse.com
Page 10 of 14
Figure A4 Using detail input windows in the Wizard display.
When using the input Wizard, it is possible to select detail windows and display options in exactly the
same way as explained in Figure A1 for the Professional screen.
XspouseTM
Quick start guide
www.xspouse.com
Page 11 of 14
Appendix B: XspouseTM dual entry fields under Tax Settings and
Settings
The following three figures outline the operation of dual-entry fields in XspouseTM. Using numerical
values in place of the include/exclude toggle in these fields permits greater flexibility in dealing with
various scenarios.
Figure B1 When the cursor is in one of the Father's or Mother's data input fields tax settings can be
changed for that parent via the Taxes>Tax Settings menu option or via the Tax Set on the main tool
bar.
XspouseTM
Quick start guide
www.xspouse.com
Page 12 of 14
Figure B2 The Tax Settings enable you to include or exclude various taxes. All the fields are
dual-entry fields: You can include or exclude the highlighted tax by clicking the right mouse button or
pressing the space bar when highlighting the field or you can type in a decimal number between 0 and
10 in place of the include/exclude label. The tax in question will be multiplied by that number. The
include/exclude toggle is equivalent to a numerical value of one and zero respectively being entered.
To reset a numerical value to the include/exclude setting press the space bar or right mouse button
when in the field.
Using numerical values in the state tax input fields can be used to estimate out-of-state taxes.
XspouseTM
Quick start guide
www.xspouse.com
Page 13 of 14
Figure B3 The guideline child support and spousal support fields are dual entry just like the tax
settings shown in Figure B2.
XspouseTM
Quick start guide
www.xspouse.com
Page 14 of 14


![Scheduler User Guide © Ecion.ca [ 1 ] Scheduler is a Windows](http://vs1.manualzilla.com/store/data/006858477_1-4414dd3fdf4d49d63a4f9c4ddcd871a4-150x150.png)