1
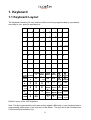
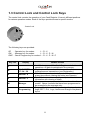
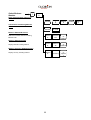
User Manual
Electronic Cash Register
CR 1200 series
...designed to Succeed
Dear valued customer!
On behalf of our proud company we wish to welcome you to the QUORION family of fine
business machines. We sincerely hope you will appreciate the many benefits of being
associated with a distinguished product name that represents both quality and
commitment to customer satisfaction.
The QUORION cash register is fully customizable and yet simple to operate. Users can
easily adapt it to any type of retail or scanning system. Moreover, our dynamic software
generates a compatible environment for a wide array of peripheral devices. It is exactly
this versatility and quality that has made us successful among our multinational customers.
It is therefore with great pride that we look forward to continuing our close collaboration
with our customers.
Sincerely,
Your QUORION Team
2
Index
Introduction ........................................................................................................................ 6
Specifications .................................................................................................................... 7
1. Keyboard ........................................................................................................................ 8
1.1 Keyboard Layout ...................................................................................................... 8
1.2 Names of Keys and their Function ......................................................................... 9
1.3 Control Lock and Control Lock Keys ................................................................... 11
2. Basic Sales Functions ................................................................................................. 12
2.1 Signing on a Clerk .................................................................................................. 12
2.2 Making a Sale Using an Open Department .......................................................... 13
2.3 Making a Sale Using a Preset Dept./PLU.............................................................. 13
2.3.1 Creating a PLU during a Sale.......................................................................... 14
2.4 Ringing up Multiple items in a Sale ...................................................................... 15
2.5 Tendering a Sale..................................................................................................... 16
3. Voiding and Negative Transactions ........................................................................... 16
3.1 Clearing a Numeric Entry ...................................................................................... 16
3.2 Correcting the Last Entry ...................................................................................... 17
3.3 Voiding Items during a Sale .................................................................................. 17
3.4 Refunding Items outside of a Sale ........................................................................ 18
3.5 Giving Discounts during a Sale ............................................................................ 19
3.6 Cancellation of a Sale ............................................................................................ 21
3.7 Voiding a Complete Sale ....................................................................................... 21
4. Advanced Sales Functions ......................................................................................... 21
4.1 Department Shifts .................................................................................................. 21
4.2 PLU Price Shifts ..................................................................................................... 21
4.3 Foreign Currency Function ................................................................................... 22
4.4 Holding a cash Sale ............................................................................................... 23
4.5 Receipt On/Off & Duplicate Receipt...................................................................... 23
4.6 Time and Date Functions ....................................................................................... 23
4.7 No Sale Function .................................................................................................... 23
4.8 Pay-Out and Received on Account ....................................................................... 24
4.9 Split Tendering Function ....................................................................................... 24
4.10 Preset Price Override Function ........................................................................... 25
5. Hospitality Functions .................................................................................................. 25
5.1 Assigning a Waiter ................................................................................................. 25
3
5.2 Opening a New/Existing Table .............................................................................. 25
5.3 Printing the Bill and Closing off the Table ........................................................... 26
6. Advanced Table Functions ......................................................................................... 27
6.1 Voiding an Item in a Table ..................................................................................... 27
6.2 Transferring Tables ................................................................................................ 28
6.3 Splitting a Table...................................................................................................... 28
6.4 Using Condiments.................................................................................................. 29
6.5 Additional Balance Functions ............................................................................... 31
7. Programming the Cash Register ................................................................................ 33
7.1 Programming the Date and Time .......................................................................... 33
7.2 Easy Programming................................................................................................. 33
7.3 Programming Files ................................................................................................. 34
7.4 Scanning ................................................................................................................. 36
7.5 Programming Network Features ........................................................................... 38
7.5.1 Activating the Network .................................................................................... 38
7.6 Training Mode ......................................................................................................... 38
8. System Reports ........................................................................................................... 38
8.1 User Report ............................................................................................................. 39
8.2 Types of System Reports ...................................................................................... 40
8.3 Printing the Electronic Journal ............................................................................. 40
9. Installing the Cash Register ........................................................................................ 41
9.1 Dot Matrix Printer ................................................................................................... 41
9.1.1 Installing of Paper Rolls .................................................................................. 41
9.1.2 Installing and Replacing of Ribbon Cassette ................................................ 42
9.2 Thermal printer ....................................................................................................... 42
9.2.1 Paper Insertion................................................................................................. 43
10. Accessories and Options .......................................................................................... 44
10.1 Ribbon Cassettes ................................................................................................. 44
10.2 Option PC Interface .............................................................................................. 44
11. Maintenance ............................................................................................................... 44
11.1 Information on the Electromagnetic Compatibility and Safety ........................ 44
12. Character Code Charts .............................................................................................. 45
13. Peripheral Devices ..................................................................................................... 46
13.1 Activation of a Serial Interface RS 232 ............................................................... 46
13.2 Cables ................................................................................................................... 46
13.2.1 PC-Cable ......................................................................................................... 46
4
13.2.2 Printer-Cable .................................................................................................. 47
14. Error Messages .......................................................................................................... 47
15. Test Routines ............................................................................................................. 48
16. Battery operated system CR1200 ............................................................................. 50
5
Introduction
This electronic Cash Register is designed to help your business function smoothly by
providing efficient register operations and accurate management reports. Start-up is quick
and easy, yet there are many options that can be added and revised so that you can
customize your operations for optimum productivity. Here are just a few of the Register’s
many valuable features:
•
Up to 100 default departments allow you to categorize merchandise to be sold.
•
Up to 20,000 PLU settings allow for fast, accurate entry of an item and record the items
to be sold.
•
Up to 16 clerks.
•
Large front and rear display for easy operator and customer viewing.
•
Automatic tax computation available for 8 different tax rates, including add-on and VAT.
•
Periodic management reports provide up-to-date sales analysis, including mid-day, endof-day, weekly or monthly totals.
•
Memory protection maintains financial records during power outage.
•
Cash Register displays time and automatically prints date and time on the receipt and
transaction records.
•
Training mode available for new users.
•
Programmable keyboard - CUSTOMIZATION to meet your requirements.
•
Up top 6 interfaces and fiscal memory expand the usage of your Cash Register.
In general, the functions of the CR 1200 series are the same. There are model-typical
differences concerning printers, displays, and keyboards used.
6
Specifications
- 8 lines a 16 characters
- 57mm Thermo
- Cutter
7
1. Keyboard
1.1 Keyboard Layout
The keyboard consists 128 key locations which are freely programmable by your dealer
according to your specific requirements.
1
2
A
9
I
17
Q
25
Y
33
3
B
10
J
18
R
26
Z
34
4
C
11
K
19
S
27
+
35
5
D
12
L
20
T
28
-
36
6
13
21
29
37
E
M
U
*
7
14
22
30
F
N
V
8
G
15
O
23
31
38
39
W
SP
40
43
44
45
46
47
48
49
50
51
52
53
54
55
56
57
58
59
60
61
62
63
64
65
66
67
68
69
70
71
72
73
74
75
76
77
78
79
80
RECPT MODI
ON/OF
#
F
REFUN
D
X
PLU
7
8
9
4
5
6
1
2
3
PRINT
INVOIC
E
TABLE
SPLIT
0
00
.
TABLE TABLE
#
#
PRINT
VOID
DATE
EC
TIME
CLEAR
R/A
P/O
TYPE
+%
–%
PAGE
X
32
41
RECEIPT JOURNA
P
24
41
CLERK PLU PRICE TAX
#
SHIFT SHIFT SHIFT
H
16
CAPS
CURSOR
PAGE
CURSOR
(–)
FCE
SYS
GUEST
#
CARD
INVOIC NS
E
TABLE SUB
CHECK
TRANS TOTAL
CASH CASH
ENTER
ENTER
Default Layout of the 128’ Keyboard
Note: The keys represented in this manual may appear differently on your keyboard due to
programming preferences of the end user or the dealer. The keys are to be considered as
a functional representation only.
8
1.2 Names of Keys and their Function
Key Label
Key Name
Function
Numeric Keys
- used for entering numbers
RECEIPT
Receipt Feed Key
- advances the receipt paper
Journal Feed Key
- advances the journal paper
Clear Key
- clears incorrect entries before registration and stops
the error alarm
Error Correct Key
- deletes the last registration immediately after
registration
Void Key
- voids a previously entered transaction before
finalization
X
Multiplication/Time
Key
- used for multiplication and displaying of the time
Clerk
Clerk Sign-On Key
- used to enter a preset clerk ID numeric code no.
PLU
Enter
PLU Price Entry Key
- used to manually change a preset PLU price
PLU
Price-Look-Up Key
- used to access preset PLU items
Department Keys
- used to enter single or multiple items into the
respective departments
RA
Received-OnAccount
- records payments received by cash, check or credit
cards
PO
Paid-Out Key
- used to record all cash paid out from the drawer
+%
Percent Plus-Key
- used to add preset or manually entered percentage
to an item or sub total
-%
Percent Minus-Key
- used to deduct a preset or manually entered
percentage from an item or sub total
(-)
Minus or Coupon
Key
- used to deduct a preset or manually entered
amount
#
NS
No Sale Key
- used to print a reference code number or to open
the cash drawer
Sub Total Key
- displays the sub total during operations & prints 2nd
receipt
0
9
...
JOURNAL
Clear
EC
EC
Void
1
Sub
Total
9
Cash
Cash Key
- used for finalization of all registrations and
transactions in cash
Check
Check Key
- used to tender payments made by check
Card
Card Key
- used to tender payments made by card
Dept
Shift
Department Shift Key
- used to shift the levels of direct keys
(e.g. 1st level: dep. 1...25, 2nd level: dep. 26...50)
FCE
Foreign Currency
Exchange
- calculate amounts in foreign currency
Hold
Hold Key
- temporarily holds a sale, can be recalled later on
Recpt
On/Off
Receipt On/Off Key
- receipt printer can be switched on or off
Scroll Keys
- used for scrolling on the display to make a selection
Page Up/Down Keys
- used for paging up or down on the display
Table
#
Table # Key
- used to open or close a table / tab
Table
Split
Table Split
- separate single articles of a table to the invoice
Table
Trans
Table Transfer
- transfers an existing table to another table
Print
Invoice
Print Invoice
- close table and print invoice
Guest
Invoice
Guest Invoice
- close table and print invoice including endorsement
message
Modifier Key
- preparation instructions for a particular article
CURSOR
CURSOR
PAGE
PAGE
Modi
#
Note: The keys above represent the default configuration. Actual keys may vary
depending upon your customized keyboard layout (See Programming Manual).
10
1.3 Control Lock and Control Lock Keys
The control lock controls the operation of your Cash Register. It has six different positions
for various operation modes. Each of the keys provide access to specific modes.
Control Lock
The following keys are provided:
OP
- Operator key for modes:
L-R-X
OW - Manager key for modes:
L-R-X-Z-M
OWP - Owner Program key for modes: L - R - X - Z - M - P
Key Pos.
Display
L
R
SALE MODE
17 - 04 - 36
X
REPORT X
Z
REPORT Z
M
Manager
P
Programming
Mode/Function
- Lock Mode – turns off the Cash Register and disables all
operations. All data is maintained in the memory.
- Registration – Transaction Mode - used for all
registrations and transactions (see Registration).
- Read Mode – used to print daily sales information reports
at any time without clearing the totals (see Reports).
- Reset Mode – used to read daily and periodic sales
information with clearing of totals.
- Manager options are opened, which are closed in other
modes. Opens functions that have been programmed to
be accessed by the manager only.
- Program Mode - used for programming of system function
flags, DEPT, PLU, Logo, names and change of keyboard
layout.
11
2. Basic Sales Functions
2.1 Signing on a Clerk
A clerk can be described in cash register terminology as the person who is assigned to the
cash register. Every transaction made by that person is recorded and a report can be
printed out at the end of a shift. The report will then show the total sales amount that each
clerk registered.
The default factory setting is Clerk number 1. The user can change the Clerk in 4 distinct
ways, depending upon how the cash register has been programmed.
Option 1:
If a general Clerk Key exists on the keyboard, enter first the clerk number and then press
the Clerk Key.
Example: Activate Clerk 5, press 5 followed by the Clerk Key.
5
Clerk
The programmed clerk name will appear on the display.
Option2:
Press the general Clerk Key on the keyboard. Depending on how many character lines
the display has, the clerk names will be listed. Scroll down until the appropriate name has
been found and press the Clerk Key again to confirm the selection.
Option3:
You can also program the specific Clerk Key on the keyboard. Simply press the correct
Clerk Key to activate that person.
Option4: A Clerk can also sign on by inserting the specific clerk key in the control lock.
Note: It is possible to enforce a compulsory clerk for each transaction. This simply means
that the users have to identify themselves before every transaction.
12
2.2 Making a Sale Using an Open Department
An open department refers to a department with an undetermined selling price. Items
which have not been programmed are categorized into such departments. The
salesperson determines the price during registration.
Example: To enter a price of $2 for department 3, press
the unit price including the cents, followed by the
department key.
2
0
1 Department 3
3
0
2,00
---------------------------------
1 Total
2,00
Cash
2,00
2.3 Making a Sale Using a Preset Dept./PLU
If a price has already been programmed in the cash
register for a specific department or PLU, simply press
the key. To ring up PLU’s which do not appear on the
keyboard, press the PLU number followed by the PLU
Key. If a PLU has a barcode programmed to it, then the
Barcode number becomes the PLU Number.
1 PLU 241
5,00
----------------------------------
1 Total
Example: To ring up PLU 241, press the PLU number
followed by the PLU Key.
2
4
Cash
1
13
5,00
5,00
PLU
2.3.1 Creating a PLU during a Sale
Occasionally, a salesperson may have to enter a new item, which has not been
programmed into the cash register. In such a case, your cash register will automatically
prompt you to create this item. Press the Subtotal Key to confirm or the Cancel Key to exit
the prompt. Once confirmed the cash register will ask you for the price. Upon entry of the
price, press the Subtotal Key again to confirm. Then, enter the department that the PLU is
linked to, press Subtotal to confirm. If the cash register has been programmed to allow for
new PLU name programming during registration, you will be presented with the chance to
enter a name for the PLU you are creating. Alternatively, the PLU will inherit the name of
the department that it is linked to.
Subtotal again once you are finished. The cash register will thereafter store the new PLU
for future transactions.
Example: Creation of PLU 123, Cola, with a price of $1.50, linked to Department 3 with
PLU programming active.
1
3
2
PLU
…then the display will prompt you to create, if PLU is not programmed.
Sub
Total
1
5
0
Enter the price...
Sub
Total
Sub
Total
3
Enter the Department to be linked to...
C
O
L
A
Sub
Total
And finally the PLU name
Note: The name of the PLU has to be entered using the Letter Keys on your Keyboard
14
2.4 Ringing up Multiple items in a Sale
Instead of pressing the same item repeatedly, the salesperson can make use of the
Multiplication Key. Enter the quantity first to be rung up, followed then by the Multiplication
Key and then the item.
Example: To ring up an open department of $3.50 five times.
5
X
3
5
0
1
Example: To ring up a preset PLU 25 not programmed on the keyboard 3 times.
3
X
2
5
PLU
Example: To ring up a PLU with a barcode 60050779 three times.
3
X
60050779
PLU
Note: the bar code digits must be entered individually with the Number Keys.
15
2.5 Tendering a Sale
A sale has to be tendered for it to be valid. Several
tendering keys may exist on the keyboard. The most
common are CASH, CARD, and CHECK. Other
tendering keys may be added to the keyboard. See
Programming Tender Keys in the Programming Manual.
Example: To complete a cash sale, first press the
Subtotal Key. Then enter the amount received, such as
$10 from the customer, and press CASH. The display
will then show the change that the customer will receive
Sub
Total
1
0
0
2 Cola
2,20
4,40
----------------------------------
2 Total
4,40
Cash
Change
10,00
5,60
0
Cash
To complete a credit card transaction, simply press the Tender Key CARD. The cash
register will assume the Subtotal amount as the amount being tendered
3. Voiding and Negative Transactions
3.1 Clearing a Numeric Entry
To erase an incorrect entry not yet registered, press the Clear key, normally located on the
bottom left of the keyboard
Clear
16
3.2 Correcting the Last Entry
The Error Correct Key (EC) is responsible for voiding the
last item that the user rang up in a sale. This is normally
the item that appears on the display. An error correct
can only be used in a sale and can only void the last
item. To void other items, refer to Voiding Items during
a Sale.
2 Cola
2,20
Error Correction
2 Cola
-2,20
4,40
-4,40
---------------------------------
Total
0,00
EC
3.3 Voiding Items during a Sale
Voiding refers to the removal of certain items from a
sale, usually because of an incorrect entry. The majority
of users have their cash registers programmed in such a
way that only the managers are able to correct such
entries. Managers have to physically enter a key into
the control lock and turn it to the (M)anager position
before any voids can be done (See Chapter 1.3). This
also includes any other negative transactions, such as
discounts and pay-outs.
To void an item in the R position of the lock while under
manager supervision, press the Void Key first and then
the item to be voided.
2 Dept1
Void Item
1 Dept1
2,50
5,00
-2,50
-2,50
----------------------------------
1 Total
2,50
Cash
2,50
Your Receipt Thank You
Example: To void department 1 with an amount of $2.50.
Void
2
5
1
0
Example: To void a PLU with a barcode 60050779.
Void
60050779
PLU
To void an item under the managers supervision first turn the key lock to the (M)anager
position. Then proceed with the void as explained above.
17
Example: To void a scanned PLU.
Void
Scanning Device;
Scan PLU
Once the item has been voided, turn the key back to the (R)egister position and proceed
with the sale.
3.4 Refunding Items outside of a Sale
When items are being returned, a refund must be done
on the cash register to record the item back into stock
and refund the customer with some form of payment.
To refund an item, press the Refund Key/Return Key
and then the item to be returned. Remember to press
the Refund Key before each item, if more than one item
is being returned.
Refund
1 PLU 5
Refund
1 PLU 8
2,50
-2,50
4,00
-4,00
--------------------------------
2 Total
Cash
-6,50
-6,50
Example: To cash refund PLU 5 and PLU 8.
Refund
5
PLU
PLU
18
Refund
8
Example: To refund a scanned item where manager supervision is required.
Refund
Scan PLU
If an item is being swapped out or exchanged,
refund the returned item first, then register the new
item. Press Subtotal to view the outstanding
amount due.
Example: The customer is exchanging PLU 1 with
PLU 2.
Refund
1
Refund
1 PLU 1
1 PLU 2
2,50
4,00
-2,50
4,00
----------------------------------
Total
1,50
Cash
1,50
2
PLU
PLU
3.5 Giving Discounts during a Sale
Two forms of discount exist, namely percentage discount and amount discount. This can
be further divided into net discount per item and gross discount per total sale. You can
also preset or determine how much discount to give for
any given sale.
To give a discount for a single item, enter the item first,
then enter the discount amount or percentage and press
the Discount Key.
If a discount has already been pre-programmed on the
cash register, you only need to press the Discount Key.
To give a discount for the entire sale, press the Subtotal
Key first. Next, enter the discount percentage or amount,
followed by the Discount Key. Press Subtotal again to
view the new Subtotal amount.
19
5 PLU 1
Disc 10%
2,00
10,00
1,00
----------------------------------
5 Total
Cash
9,00
9,00
Example: Percentage Discount on PLU 7 where the discount is pre-programmed.
7
PLU
-%
Example: Percentage Discount on the entire sale, where the user must determine the
percentage to be given (10%).
Sub
Total
1
0
Sub
Total
-%
Discounts...
Example: Pre-programmed Amount Discount on a scanned PLU, where the manager
supervision is required.
Note: Surcharges (+%) are carried out in the same sequence as above
20
3.6 Cancellation of a Sale
To cancel an entire sale, simply press the Cancel Key. The cash
register will cancel all items that were rung up for that particular
sale. Under manager supervision, turn the control lock to the
(M)anager position and press the Cancel Key.
CANCEL
3.7 Voiding a Complete Sale
Voiding a complete sale performs the same function as a refund,
in that items are being returned back in stock. The only difference
between a transaction void and a refund is that in a refund, the
Refund key must be pressed before each item. With transaction
void, you need only press the key once, then the cash register
remains in a negative mode until the transaction has been
tendered.
TRANS
VOID
To carry out a transaction void, press the Transaction Void key
first, then enter all the articles to be voided out, and complete the
sale with a payment key.
4. Advanced Sales Functions
4.1 Department Shifts
It is possible to have more than one department on the same key. This procedure, known
as department shifts, allows the user to fit more departments onto the keyboard. The
default shift is always Shift 1. To access Shift 2, simply press the Dept. Shift Key. The
cash register will automatically return to Shift 1, or will remain on Shift 2 until the user
changes the shift, depending on the flag set-up of the cash register (See programming
manual).
4.2 PLU Price Shifts
The cash register allows for more than one selling price for each PLU. This is a useful
function for special occasions, such as Happy Hour or item promotions. An automatic
price shift can be programmed into the cash register or the user can manually change the
price shift. The way in which the cash register is programmed will determine whether the
price shift changes after:
a) each PLU
b) each Sale
c) remains on the same price level until manually changed
21
Example: To register PLU 5 with Price Level 2.
Price
Shift
5
PLU
To return to Price Level 1, simply press the Price Shift Key again.
4.3 Foreign Currency Function
Foreign currency conversion is important for those countries that deal with more than one
currency.
Example: If a sale was to be paid with a foreign currency that was programmed in the cash
register, the user would first press the Subtotal Key followed by the appropriate Foreign
Currency Key. The display will show the amount due in the foreign currency. After the
amount has been tendered, the display will show the change due in the local currency.
Sub
Total
5.50
FCE
Display
6
0
0
Cash
Foreign currency
Amount due
.21
Change due in
Local currency
Tender in
Foreign currency
22
4.4 Holding a cash Sale
The hold function allows the user to temporarily hold a sale, proceed to
the next sale, and later call up and complete the original sale. This is
useful in situations, where there are complications experienced by the
purchaser, such as an article with no price, or where the purchaser
does not have enough money, and holding the sale helps reduce time
wasted at the counter. To hold a sale, simply press the Hold Key. To
recall the sale, press the Hold Key again. Complete the sale and
proceed with the next customer.
HOLD
Note: make sure there are sales on hold before attempting to take Z-Reports. In such
situations an error will occur. Tender all sales on hold before taking the report.
4.5 Receipt On/Off & Duplicate Receipt
If a receipt does not have to be produced, you can switch off the receipt
printer by pressing the Receipt On/OFF Key. To reactivate the printer,
simply press the Receipt On/OFF Key again.
In cases where a receipt is required and the receipt printer has been
switched off, the user can print a 2nd receipt. By pressing the Subtotal
Key after a sale, the printer will produce a copy of the sale. Receipts
can only be reprinted for the last sale.
Receipt
On/Off
4.6 Time and Date Functions
You can view the current time on the cash register by pressing the
Multiplication Key while the control lock is in the (R)egister position.
To reset the time and date, refer to the Programming Time and Date
Functions in the Programming Manual.
X
4.7 No Sale Function
The No Sale function allows the user to open the cash drawer without registering a sale.
You can view the number of times a No Sale function has been carried out in the X/Z
reports. The No Sale Key can also be used as a reference key. To print a specific
reference number on a receipt, enter the reference number and press the No Sale Key.
Example: To print a reference number 123 on the receipt.
1
2
No
Sale
3
23
4.8 Pay-Out and Received on Account
Money can be paid out of the cash drawer for special
purposes, such as petty cash, etc. This is referred to
as a Pay-Out (PO). To perform a pay-out, firstly enter
the amount to be paid out, then press the Pay-Out
Key (PO) and finally a Tender Key, i.e. CASH, CARD
or Check. The accumulated PO total will appear in
the financial reports.
Pay Out
25,00
----------------------------------
Total
PO-Cash
25,00
25,00
Example: To make a $25 cash pay-out.
2
5
0
0
PO
Cash
Conversely, money can also be received into the cash drawer. This transaction is known
as Received on Account (RA). Adding more float to the cash drawer would be one
example of Received on Account. To perform a RA transaction, first enter the amount
received, then press the RA Key, and finally a Tender Key (CASH, CARD, or CHECK,
etc). The accumulated RA total will appear in the financial report.
Example: To receive an amount of $50 cash.
5
0
0
0
RA
Cash
4.9 Split Tendering Function
Depending upon whether the cash register allows for it, Split Tendering allows the operator
to use more than one tender to close off a sale. This function is used when, for instance,
half a sale is closed off in cash and the other half to a card.
24
Example: A subtotal of $10, of which $6 is paid in Cash and $4 is paid by Card.
Sub
Total
6
0
0
Cash
Sub
Total
4
0
0
Card 1
Note: make sure that the entire total has been tendered before proceeding with the next
sale.
4.10 Preset Price Override Function
In certain situations the user is required to override a preset price during a sales
transaction. For this option to function, a PLU Ent Key must be programmed on the
keyboard (See Programming Manual).
Example: To override the price for PLU 5 with a new price of 50c.
5
0
PLU
ENT
5
PLU
5. Hospitality Functions
5.1 Assigning a Waiter
See Chapter 2.1 Signing on a Clerk.
5.2 Opening a New/Existing Table
In order for the cash register to store a client’s order, the waiter must assign a table
number. The cash register will store all articles entered for that specific person until the
table has been paid. There are 2 ways to open a table.
Option1: Entering the table number and pressing Table #
25
Example: To open Table 5
5
Table
#
Option2: By pressing Table #, scrolling down until the table has been found, and pressing
Table # again to make the selection.
Example:
Table
#
CURSOR
Table
#
Once a table has been opened, the user can begin entering the
articles. Modifiers may also be programmed on the keyboard and
Modi
can also be entered at this time. A modifier is an instruction to the
#
kitchen as to how the food is to be prepared. Medium rare and
sunny-side-up are 2 examples of modifiers. Since modifiers are
registered by number, there are 2 methods of entering. Enter the number of the modifier
and press the Modifier key, or press the Modifier Key and scroll down until the modifier has
been found, and then repress the Modifier Key to make the selection from the display.
When the order has been entered, press the Table # Key. The order will now be printed
out at any available kitchen printers, and the client’s balance will be updated. Follow this
procedure for all orders that need to be entered in the cash register.
5.3 Printing the Bill and Closing off the Table
The default setting of the cash register is such that 2 bills need to be printed out for each
client. If your set-up is otherwise, please consult your dealer for assistance.
The first bill that is printed out is referred to as the Statement. This can be printed at any
time during the table transaction and produces a consolidated summary of all the items for
the table. This printout is performed when the client requests the bill. To print this
Statement, open the table, press the Print Table Key, followed by the Table# Key. The bill
is clearly marked “NO INVOICE”, since this is just a Statement. You can still enter
additional orders thereafter.
Example: To print the bill for Table 2 (Statement).
2
Table
#
Print
Invoice
26
Table
#
Once the bill has been paid by the client, the waiter
can close-off the table and print a valid invoice for the
client. To achieve this, enter the table number followed
by the Print Table Key. The waiter is now required to
choose a form of payment, i.e. CASH, CARD, CHECK.
When a Payment Key has been pressed, the bill will be
printed.
The printed bill includes the “INVOICE”
header as well as all the articles ordered and the
payment form.
INVOICE
Table #7
4 Cola
3 Burger
2,00
7,00
8,00
21,00
----------------------------------
Example: To close-off and print a valid invoice for
Table 7.
7
Print
Invoice
7 Total
Cash
29,00
29,00
Cash
6. Advanced Table Functions
6.1 Voiding an Item in a Table
Voiding items in a table can be achieved as explained in Chapter 3.3 Voiding items
during a Sale. Another way to void an item is by accessing the table , scrolling until the
article has been found, and then pressing the Void key.
Example: To void an item from table 1 using the scrolling keys
1
Table
#
CURSOR
Scroll until article
has been found
27
Void
Table
#
6.2 Transferring Tables
Transferring tables allows the user to transfer all items registered on one table to another.
However, the table being transferred to must have a balance of zero.
To transfer a table, open the existing table, press the Table Transfer Key, enter the table
to be transferred to, and then press the Table # Key.
Example: Transferring table 1 to table 3.
1
Table
#
Table
Trans
3
Table
#
6.3 Splitting a Table
On certain occasions it may become necessary to split a table bill into separate portions.
In such a case, the user must simply open the table balance and then press the Split Table
key. The cash register will now show the items on the table. Select an item and press the
Split Key again to confirm your choice. Upon completion close the transaction with a print
table or tender key.
Example: To split table 2
2
Table
#
CURSOR
Table
Split
Scroll until article
has been found
CURSOR
Table
Split
...ETC
Scroll until article
has been found
28
Cash
6.4 Using Condiments
CONFIGURING THE SYSTEM USING QPROG
Before you can use condiment selection you must activate the condiment table file and
condiment selection option in the configuration of the application program. As an example
the system will be setup for maximum 16 condiment tables selection on PLU level. PLU #
1 will be programmed as STEAK and for compulsory selection of Condiment Table# 1 and
2. Table# 1 will be used for prompting RAW, MEDIUM, WELL DONE and Table# 2 will be
used for FRENCH FRIES, BOILED POTATOES, BAKED POTATOES. This example can
be used on a 2 line or 8 line display the only difference is the number of condiments shown
on the display. Note that on the 2 line display the Condiment Table name is not shown.
1 – CONFIGURE CONDIMENT TABLES FILE
• Open: QPROG->CONFIG->CONDIMENT TABLE
• Set number of condiment tables to 16. (The maximum number which can be used
for prompting is 32).
• Set the name length to 16 (This name is shown on the display when the table is
displayed).
• Set number of condiments in a table to 7 (On the multiline display maximum 7
condiments are displayed in one screen but it is possible to use more then 1
screen).
• Confirm by pressing OK
2 – CONFIGURE PLU FILE FOR CONDIMENT PROMPTING
• Open: QPROG->CONFIG->PLU FILE
• Set Condiment Selection to 16. (The max. number of tables for prompting is 32).
• Confirm by pressing OK
3 – CONFIGURE MODIFIER FILE
• Open: QPROG->CONFIG->MODIFIER FILE
• Set the number of Modifiers to 50.
• Set the name length to 16.
• Confirm by pressing OK
4 – PROGAM MODIFIERS USED IN CONDIMENT TABLES
• Open: QPROG->FILES->MODIFIERS
• Program Modifier# 1: RAW
• Program Modifier# 2: MEDIUM
• Program Modifier# 3: WELL DONE
• Program Modifier# 11: FRENCH FRIES
• Program Modifier# 12: BOILED POTATOES
• Program Modifier# 13: BAKED POTATOES
5 – PROGRAM CONDIMENT TABLE# 1 and 2
• Open: QPROG->FILES->CONDIMENT TABLES
• Select Condiment Table# 1
• Enter Name PREPARATION
• Set OPTION 1-1, Compulsory Selection
• Click on LIST Column
• Enter Key code 4001, 4002 and 4003 for Modifier 1, 2 and 3.
• Select Condiment Table# 2
• Enter Name POTATOES
29
• Set OPTION 1-1, Compulsory Selection
• Click on LIST Column
• Enter Key code 4011, 4012 and 4013 for Modifier 11, 12 and 13.
• Confirm by pressing OK
6 – PROGRAM PLU# 1
• Open: QPROG->FILES->PLU
• Select PLU# 1
• Enter Name STEAK
• Enter Department 1
• Enter Price 100
• Click on Column CONDI 1-8
• Select 1 and 2
7 – INSTALL PROGRAM IN CASH REGISTER
• For testing you could use Kitchen Printer# 1 programmed on the Internal Printer.
• Activate KP selection in the Department Configuration.
• Select Kitchen Printer 1 for Department# 1
• Program SYSTEM PARAMETER 21 to 2 and PARAMETER 22 to 0.
MAKING A SALE OF PLU# 1 (STEAK) WITHOUT QUANTITY ENTRY
1.
2.
3.
4.
5.
6.
7.
Enter 1 on the PLU# key or press DIRECT PLU# 1
The register will display CONDIMENT TABLE# 1
Make a selection (2 for MEDIUM)
The register will display CONDIMENT TABLE# 2
Make a selection (1 for FRENCH FRIES)
Press CASH
The register will now finish the ticket and print the KP ticket with the selected
condiments
MAKING A SALE OF 3 x PLU# 1 (STEAK)
1. Enter 3 on the MULTIPLY key
2. Enter 1 on the PLU# key or press DIRECT PLU# 1
3. The register will now show CONDIMENT TABLE# 1
4. Make a selection (2 for MEDIUM)
5. The register will show the selection on the operator display and ask for the quantity.
6. Press the MULTIPLY key without Entry to Confirm 3 times MEDIUM
7. The register will display CONDIMENT TABLE# 2
8. Make a selection (1 for FRENCH FRIES)
9. The register will show the selection on the operator display and ask for the quantity.
10. Enter 1 on the MULTIPLY key to select ONE FRENCH FRIES
11. The register will now re-display CONDIMENT TABLE# 2
12. Repeat steps 8 – 10 to select the other condiments.
13. Press CASH
14. The register will now finish the ticket and print the KP ticket with the selected
condiments
Notes When a condiment table is set for no compulsory selection you can abort by
pressing the CLEAR key and the register will continue with the next condiment table.
30
6.5 Additional Balance Functions
Select Balance
Number
1
Balance
#
Balance Sales with Balance# key
Sell Item
Balance#
Sell Item
Remove
Clerk Key
Receipt
Invoice
Balance#
Sell Item
Receipt
Invoice
INVOICE
CASH
Sell Item
INVOICE
CASH
INVOICE
CURREN
CY
CASH
TRANSF
ER
5
Balance
#.
SPLIT
Select
Item
SPLIT
CASH
SPLIT
Select
Item
SPLIT
5
Balance
#
SPLIT
Select
Item
6
SPLIT
CASH
Balance Sales with Clerk Lock
Subtotal Invoice (when allowed)
Subtotal Invoice directly after
Sales
Balance
#
Invoice and Payment
Receipt or Slip, with or without
Endorsement message as programmed
Invoice and Payment directly
after Sales
Receipt or Slip, with or without
Endorsement message as programmed
Invoice and Payment in Currency
Receipt or Slip, with or without
Endorsement message as programmed
Transfer to Other Balance
To balance 5
Split Items
1 Item is split
Split Items to other Balance
1 Item is split
Split Items with quantity entry
6 out of 10 beer should be split
31
Select Balance
Number
1
Balance
#
Sales with automatic Closing of
Balance
Balance
#
Sell Item
2
Sell Item
Transacti
on Void
INVOIC
E
DISCOU
NT
CLEAR
or
continue
INVOIC
E
SUBTOT
AL
CLEAR
or
continue
Currency
CLEAR
or
Paymen
t
Transaction Void during Balance
Sales
Balance Subtotal Discount
Subtotal or Itemizer Discount including
Balance total
Balance Subtotal Inquiry
Display subtotal including balance
Balance Currency Subtotal Inquiry
Display currency including balance
INVOIC
E
32
Sell Item
Balance
#.
7. Programming the Cash Register
7.1 Programming the Date and Time
Programming the Date and Time can be easy achieved in the
programming position. First, turn the to the (P)rogramming
position.
EC
TIME
To enter the date, enter the following format :
DayDayMonthMonthYearYearYearYear (standard) or
MonthMonthDayDayYearYearYearYear
Then press the Date key. This key is normally two keys above the
Clear key ie. EC or Void
To enter the time, enter the following format :
HourHourMinuteMinute (military time)
Then press the Time key.
This key is normally above the Clear key ie. EC or Void
VOID
DATE
7.2 Easy Programming
The register has a special program mode which can used by a clerk with Manager
authority or when the Central Lock is in the MANAGER ( M ) position. The mode is started
by entering the mode number on the SUBTOTAL key. When the mode is not active
ERROR#1 (Invalid Entry) is shown otherwise the register will print the mode on the receipt,
journal and electronic journal.
When the register is in Easy Programming Mode you can only exit this mode by either
turning the Central Lock, remove the Clerk Key or by pressing the SUBTOTAL key without
entry.
In mode 1, 2, 3 or 4 you must:
1 - Enter the new data
2 - Press SUBTOTAL
3 - Press a direct PLU key or enter the number on the PLU# key.
4 - Continue with next entry or exit by pressing SUBTOTAL without entry.
MODE 1
In this mode you can program the Plu Prices. The price of the active level is
programmed. When you want the program a price of another level (when active)
you must select the level first.
MODE 2
In this mode you can program the Plu Cost Prices.
MODE 3
In this mode you can program the first Plu Descriptor.
33
MODE 4
In this mode you can program the second Plu Descriptor.
MODE 5
In this mode you can program the Plu Department Selection.
MODE 6
In this mode you can add inventory to the PLU Inventory total when active.
MODE 7
In this mode you can subtract inventory from the PLU Inventory total when active.
MODE 8
In this mode you can change the Minimum PLU Inventory Level when active.
MODE 100, 101, 102 and 103
These modes are used for PLU file maintenance when Scanning Codes are used.
7.3 Programming Files
Programming the individual files using the keyboard is done by using the UP, DOWN,
PGUP, PGDN, TYPE (program type), X and CR (User Report) key.
You can only program when the Central Lock is in X, Z or T position. You start
programming by either entering the FILE# directly on the TYPE key or by pressing the
TYPE key without entry which will open the programming window and you can select the
file you want to program. Files which are not active in the configuration of the application
will not be shown. At the end of the line the File# number is also shown for reference.
When the file has been selected the first record will automatically be displayed. You can
select another record by entering the record number on the X key or by pressing the X
without entry which will select the next record. The field you want to program can be
selected by using the UP, DOWN, PGUP or PGDN keys. When the field is selected you
can enter the new data and then press the CR (also User Report) key. When a field is
modified it is printed on the Receipt, Journal and Electronic Journal.
When the register is in Programming Mode you can only exit this mode by either turning
the Central Lock, remove the Clerk Key or by pressing the TYPE key without entry.
Please refer to the WQPROG.DOC manual for further explanation of the fields in the
individual files.
Programming Mode 100, 101, 102, 103 and 255 are used for PLU file maintenance when
scanning is used.
File
Number
1
2
3
4
5
6
File
Type
Parameters
Options
Time zone
Day of Week zone
Day of Month zone
Date Zone
KeyCode
Not Available
Not Available
Not Available
Not Available
Not Available
Not Available
34
QPROG.DOC
Chapter
Chapter 6 (SYSTEM)
Chapter 6 (SYSTEM)
Chapter 6 (SYSTEM)
Chapter 6 (SYSTEM)
Chapter 6 (SYSTEM)
Chapter 6 (SYSTEM)
QPROG.DOC
Paragraph
System Parameters
System Options
Time Zones
Day of the Week Zones
Day of the MonthZones
Date to Date Zones
File
Number
7
8
9
10
11
12
13
14
15
16
17
18
19
20
21
22
23
24
25
26
27
28
29
30
31
32
33
34
35
36
38
39
40
41
42
43
44
45
46
47
File
Type
Receipt Header
Receipt Trailer
Slip Header
Slip Trailer
General Texts
Error Messages
General Messages
Day Descriptors
Month Descriptors
Counters (X, Z,
Invoice# Receipt#)
Total Sales
Group
Departments
PLU
Tax
Clerk
Salesperson
Tenders
Drawers
PORA
Discounts
Corrections
Foreign Currencies
User Reports
Balance Functions
Tables
Rooms
Accounts
NOT USED!!
Modifiers
Endorsement
Messages
Keyboards
Macro’s
(Menu’s
(not yet implemented)
Price Levels
Transaction Types
(not yet implemented)
Special Itemizers
Window Lookups
Condiments
Action tables
KeyCode
QPROG.DOC
Chapter
Chapter 6 (SYSTEM)
Chapter 6 (SYSTEM)
Chapter 6 (SYSTEM)
Chapter 6 (SYSTEM)
Chapter 6 (SYSTEM)
Chapter 6 (SYSTEM)
Chapter 6 (SYSTEM)
Chapter 6 (SYSTEM)
Chapter 6 (SYSTEM)
QPROG.DOC
Paragraph
Receipt Header
Receipt Trailer
Slip Header
Slip Trailer
Fixed Texts
Fixed Texts
Fixed Texts
Fixed Texts
Fixed Texts
Not Available
2XXX
3XXX
7XX
8XX
9XX
10XX
11XX
12XX
Not Available
13XX
Not Available
Not Available
Not Available
Chapter 5 (FILES)
Chapter 5 (FILES)
Chapter 5 (FILES)
Chapter 5 (FILES)
Chapter 5 (FILES)
Chapter 5 (FILES)
Chapter 5 (FILES)
Chapter 5 (FILES)
Chapter 5 (FILES)
Chapter 5 (FILES)
Chapter 5 (FILES)
Chapter 5 (FILES)
Chapter 5 (FILES)
Chapter 5 (FILES)
Chapter 5 (FILES)
Chapter 5 (FILES)
Chapter 5 (FILES)
Chapter 5 (FILES)
Total Sales File
Group File
Department File
PLU File
Tax File
Clerk File
Salesperson File
Tender File
Drawer File
P.O. and R.A. File
Discount File
Correction File
Foreign Currency File
User Report File
Balance Function File
Table Total File
Room Total File
Account Total File
4XXX
Not Available
Chapter 5 (FILES)
Chapter 5 (FILES)
Not Available
15XX
6XX
Chapter 5 (FILES)
Chapter 5 (FILES)
Chapter 5 (FILES)
Modifier File
Endorsement Message
File
Keyboard Level File
Macro File
Menu File
3XX
4XX
Chapter 5 (FILES)
Chapter 5 (FILES)
Price Level File
Transaction Type File
Not Available
16XX
14XX
Not Available
Chapter 5 (FILES)
Chapter 5 (FILES)
Chapter 5 (FILES)
Chapter 5 (FILES)
Special Itemizer File
Window Lookup File
Condiment Table File
Action Table File
Not Available
Not Available
Not Available
Not Available
Not Available
Not Available
Not Available
Not Available
Not Available
Not Available
Not Available
Not Available
5XXX
1XXXX – 5XXXX
35
7.4 Scanning
When scanning codes are activated in the configuration of the application it is possible to
create and/or delete items on the cash-register either in Program Mode or during
transaction when an item is not found. Furthermore there are some special maintenance
procedures which are can be activated in Manager or programming mode.
It is possible to connect two scanners to the register. You can activate them by
programming parameter 56 & 57 also check option# 78 for check digit verification when
scanning.
CREATING ITEMS in Transaction Mode
When Option#79 is set the register will prompt for creation of an article when not
found. If you want to create it you must confirm by pressing the SUBTOTAL key or
abort by pressing CLEAR (Note that you can press the CLEAR key at any stage to
abort!!). The register will now prompt for:
1 - The PRICE which you must enter on the SUBTOTAL key
2 - The Department which you must enter on the SUBTOTAL key
3 - The Descriptor when Option# 80 is set which you must enter on the
SUBTOTAL key
4 – Now the article is registered.
Note: From Release XX030605 on it is also possible to enter the PRICE directly on a fixed
DEPARTMENT key instead of entering the price and department on the subtotal key.
CREATING ITEMS in Program Mode
When you are in Program Mode# 20 (PLU programming) you can scan the code or
enter the code on the X key. When not found the register will ask you for creation which
must be confirmed by pressing the CR (User Report) key.
DELETING ITEMS in Program Mode
When you are in Program Mode# 20 (PLU programming) can also delete codes.
When you enter ZERO on the X key the register will ask you if you want to delete the
current code which must be confirmed by pressing the CR (User Report) key. Note that the
records are only marked for deletion so they will only free up their space after PLU FILE
MAINTENANCE.
PLU FILE MAINTENANCE
When using scan codes the register uses internally an INDEX file which is sorted so
the register can find a code very fast. Because the PLU file can grow very large (max
50000) when using scan codes the register will store the newly created articles in a
separate UPDATE file which is located at the end of the PLU file. The maximum size of the
UPDATE file is HALF of the FREE SPACE in the PLU file. When for example the free
space is 100 you can create 50 new items before the register will give the message to reindex the file. After re-indexing the file the remaining free space is 50 so you can again
create 25 new articles. You can continue until the free space is only 1 record.
Note that is important that the UPDATE file doesn’t grow to large (over 1000
articles) because this will have effect on the speed of creating new articles.
36
For maintenance of the PLU file there are the following commands:
100 – MERGE and DELETE
This command will MERGE the UPDATE and the BASE FILE and DELETE
the articles marked for deletion. This command can be used when new item
are created and items were deleted.
101 – MERGE
This command will MERGE the UPDATE and the BASE FILE. This command
can be used when only new item are created.
102 – DELETE
This command will DELETE the articles marked for deletion. This command
can be used items were only deleted.
103 – CHECK STATUS
This command will print and display the number of articles in the BASE and
UPDATE file.
255 – CLEAR COMPLETE PLU FILE
This command will clear the complete PLU file. Note that PLU sales and
inventory information is also cleared.
The command can be issued in programming mode on the TYPE key and in MANAGER
mode on the SUBTOTAL key. Note that COMMAND 255 to clear to complete PLU file is
only available in PROGRAM MODE.
PLU’S WITH SCANCODES ON KEYBOARD
When using scan codes it is also possible to put a PLU directly on the keyboard of
the register. Because the key code as programmed in the key table contains the record
number in the PLU Index file and not the scan code there are a few points you must keep
in mind.
1 – PLU File Maintenance
Maintenance of the PLU file like creating and/or deleting PLU’s should be
done either on the computer OR on the register but NOT ON BOTH because this
will result in different Index files for the computer and register.
2 – Programming PLU keys in WQPROG
When programming PLU keys in WQPROG you must enter the scan code in
the code field.
3 – Programming PLU keys on the Register
When programming PLU keys on the register you must enter the scan code
in the key-programming mode. The register will automatically insert the correct
index record number in the key table. The register will recognize the entry as a scan
code when MORE then 5 digits are entered. Normal key codes have a value of
maximal 5 digits. This means that when you want the program a PLU with scan
code “123” you MUST enter “000123”. Suppose this PLU is located at record
number 5 the register will put 10005 as key code which is also shown on the
display. When you enter “123” the register will program key code “123”.
USING PLU’S WITH SCANCODES IN COMBINATION WITH BALANCES
On the Balance the Index Number of the PLU is stored so at the moment it is NOT
ALLOWED to create or delete PLU when there are still balances open because the
sequence of the index file will be changed which will result in wrong PLU on invoices.
37
7.5 Programming Network Features
7.5.1 Activating the Network
The network is activated by programming the REGISTER# in PARAMETER 53 and the
NETWORK PORT in PARAMETER 89. There are two types of network possible:
RS-232 NETWORK
When you want to connect only 2 registers in a network you can also use a RS-232
network using the standard RS-232 ports in your register. The NETWORK PORT for RS232 can be any port except PORT# 4 which is fixed for the RS-485 network. The
maximum BAUDRATE for PORT# 1, 3 & 4 is 57600 (PARAMETER 2, 4 or 5, value 6) and
the maximum BAUDRATE for PORT# 2 is 9600 (PARAMETER 3 value 3 o. It is advised to
use the highest possible baud rate.
RS-485 NETWORK
When you want to connect more then 2 registers in a network you MUST use a RS-485
network which means you also need an RS-485 card installed in your register. The
NETWORK PORT for RS-485 is fixed to PORT# 4 and the maximum BAUDRATE is
57600 (PARAMETER 5, value 6). Other possible baud rates are 38400 (value 5), 19200
(value 4). It is advised to use the highest possible baud rate.
The network can be used only for communication with the PC.
7.6 Training Mode
Training mode allows for training on the cash register without registering what has been
rung up. No reports will be affected by whatever has been rung up in Training Mode, and
every receipt that is produced in training will be printed with a training message. A hash (#)
will also appear on the left hand side of the display.
In order to access Training Mode, a pre-programmed training clerk must be activated.
Training mode will remain activated until a new clerk is assigned. Training clerks can either
be assigned in the ( R )egister or the ( P )rogramming position. Certain clerk flags permit
the changing of training clerks in the P position only.
8. System Reports
All reports, whether x, z, or any financial, report are freely customizable and programmable
by the user. Therefore, you will be able to include any information you consider essential.
You can call up reports by turning the control lock key into the appropriate lock position,
either X or Z. Upon positioning the key in the right location, the display will show a report
type. You can now use the up/down keys to parse the list of reports on the display.
Selection occurs when you enter the number of the report (shown to its right) followed by
the Subtotal Key to confirm your choice.
38
Example: Printing Report #5 after having moved the control lock to the X or Z position.
Use the Down Key to move down the list on the display until the report (5) is shown.
Option1: Scrolling
Display Text
1>Report (5)
CURSOR
(-)
SYS
Option2: Entering the Report Number Directly
5
(-)
SYS
Note: The X or Z position merely determines, if the information will remain in storage after
print out. The Z-Report erases the printed data from memory, while the X-Report retains
the data. By pressing the CASH Key instead of the SUBTOTAL Key one can also call up
corresponding User Reports.
8.1 User Report
As a user one can also compose specific reports that include several of the predefined
reports. The type of reports that will appear can be set when programming the cash
register (See Programming Manual). The user can then select this specific report by
entering the User Report Number (also set when programming) followed by the Cash Key
(CR).
Example: Assume the User Report is Report #5. CR usually corresponds with CASH.
5
Cash
CR
39
8.2 Types of System Reports
Key lock position X or P
Key lock position Z
: Print without clearing data
: Print and clear data
xx + SYS (-) : Print system report type xx :
Report Type
Total Sales
Groups
Departments
Articles
Tax Totals
Tendering
Drawer Total
P.O. & R.A.
Discounts
Correction
Foreign Currency
Balance Function
Table Total
Special Item
PLU Inventory
ID
1
2
3
4
5
6
7
8
9
10
11
12
13
18
20
Please note the programming of the system keys. Default: SYS = COUPON
8.3 Printing the Electronic Journal
Key position X, Z or P :
• 101 + ENTER (CASH) : Print out last receipt
• xx + Multiplication (X) + 101 + ENTER : Print out last xx receipts
• 0 + Multiplication (X) + 101 + ENTER : Print out complete journal
Key position Z :
• 102 + ENTER (CASH) : Clear the Electronic Journal
• 0 + Multiplication (X) + 101 + ENTER : Print out and clear the complete journal
Please note the programming of the system keys! Default: ENTER = CASH
40
9. Installing the Cash Register
9.1 Dot Matrix Printer
9.1.1 Installing of Paper Rolls
Cut the edge
to be feed straight
like this
Do not try to feed
the paper if it is
like this
1. Lift up and remove the printer
cover.
2. Load the paper rolls into their
respective receptacles. The end of
the paper roll must feed from
below.
this way
3. Feed the end of the paper roll into
the paper entrance of the printer.
Press and hold the “Journal Feed“
key and feed enough paper so it
can be inserted into the slot of the
take-up reel. Wind two or three
turns of paper around the reel.
not this way
4. Now feed the end of the receipt
paper roll into the printer. Press
and hold the “Receipt Feed“ Key to
pass
the paper through the
printer.
5. Feed the paper from below
through the paper slot of the
printer cover and reinstall the not
this way printer cover.
41
To remove a paper roll, cut as shown
and feed out the off-cut with the
respective “PAPER FEED“ Key.
Warning: Do not under any
circumstance pull the paper while
still printing.
Printer may be
damaged.
Repeat these steps for the second
printer station when applicable.
cut the paper here
9.1.2 Installing and Replacing of Ribbon Cassette
1. Lift up and remove the printer cover.
2. Fit the left side clip of the ribbon cassette into
its receptacle of the cassette holder and
press down on the cassette for a proper fit.
To remove a used ribbon cassette push it to
the left and lift it out.
3. Reinstall the printer cover.
9.2 Thermal printer
Cutter
Printer
42
9.2.1 Paper Insertion
1. Turn the Cash Register on.
2. Using scissors cut the edge of the paper roll as shown below.
3. Open the printer cover.
4. Insert the paper roll with the correct direction.
5.
6. Hold both edges of the paper and insert it straight into the paper funnel. The printer
feeds and cuts the paper off automatically.
7. Close the printer cover.
To remove the paper roll, follow the steps below:
1.
2.
3.
4.
Turn on the Cash Register and open the printer cover.
Cut the paper off between printer and paper roll.
Remove the paper roll from the bottom housing.
Press the “FEED“key to remove the remaining paper.
Note: Do not pull out the remaining paper in the opposite direction of the paper feed!
43
10. Accessories and Options
10.1 Ribbon Cassettes
Ribbon cassettes are available from your dealer. Please only use your original supplier.
10.2 Option PC Interface
A separate PC communication manual is provided if your Cash Register is equipped with a
PC interface. 1 x RS232 is the standard configuration.
11. Maintenance
•
•
Do not disassemble your Cash Register for cleaning purposes. For cleaning use a dry
or slightly damp soft cloth. Never use water or volatile chemicals such as thinner,
benzene or alcohol.
Do not drop any metal objects such as paper clips into the Cash Register or printer as
this may lead to shorts, damages or electrical shocks.
11.1 Information on the Electromagnetic
Compatibility and Safety
CE Conformance
This QUORiON cash register conforms to the European Community’s EMV 2004/108
directive.
The cash register fulfills the following technical European requirements:
•
•
•
EN 55022 – „Norm values and measuring procedures for radio interference
properties – characteristics of information technology devices“
EN 55024 – „Norm values and measuring procedures for the interference
resistance properties– characteristics of information technology
devices“
EN 60950 – „Security measurements for the installation of IT“
A "conformance explanation" in accordance with the directives and standards cited on top
has been delivered and can be reviewed with
QUORiON Data Systems GmbH
An der Klinge 6
99195 Erfurt
(E-mail: [email protected]; web: www.quorion.de)
44
REMARK: If the cash register is installed in a system with other devices and components,
all other devices and components must each show EMV conformance to the norm.
According to the EMV 2004/108 directive as well as EC and national laws, the system
integrator is responsible to ensure that the built system complies with regulations
Power Cord Exchange
The power cord can only be exchanged by a certified technician. The same type of cord
has to be used.
12. Character Code Charts
2
3
4
5
6
7
8
9
A
B
C
D
E
F
0
1
2
3
4
5
6
7
8
9
A
B
C
D
E
F
Spac
e
!
"
#
$
%
&
‘
(
)
*
+
,
-
.
/
0
1
2
3
4
5
6
7
8
9
:
;
<
=
>
?
@
A
B
C
D
E
F
G
H
I
J
K
L
M
N
O
P
Q
R
S
T
U
V
W
X
Y
Z
[
\
]
^
_
`
a
b
c
d
e
f
g
h
i
j
k
l
m
n
o
p
q
r
s
t
u
v
w
x
y
z
{
|
}
~
?
„
…
†
‡
‰
Š
‹
Ś
Ť
Ž
Ź
€
,
‘
’
“
”
•
–
—
˜
™
š
›
ś
ť
ž
ź
ˇ
˘
Ł
¤
Ą
¦
§
¨
©
Ş
«
¬
-
®
Ż
°
±
˛
ł
´
µ
¶
·
¸
ą
ş
»
Ľ
˝
ľ
ż
Ŕ
Á
Â
Ă
Ä
Ĺ
Ć
Ç
Č
É
Ę
Ë
Ě
Í
Î
Ď
Đ
Ń
Ň
Ó
Ô
Ő
Ö
×
Ř
Ů
Ú
Ű
Ü
Ý
Ţ
ß
ŕ
á
â
ă
ä
ĺ
ć
ç
č
é
ę
ë
ě
í
î
ď
đ
ń
ň
ó
ô
ő
ö
÷
ř
ů
ú
ű
ü
ý
ţ
˙
Windows CE
45
13. Peripheral Devices
13.1 Activation of a Serial Interface RS 232
Your Cash Register can be equipped with up to 6 interfaces.
Location of interfaces (rear view)
RS
485
in
RS 232
RS 232
RS 232
RS 232
RS 232
RS 232
RS
485
out
RS 232
RS
485
in
RS
485
out
RS 232
RS 232
RS 232
RS
232
RS
232
RS 232
Each of the interfaces can be used after the activation. However, you may choose any interface for a peripheral device once it has been activated. You may program the Identification Number of the peripheral devices to be used. Note that the interface RS 485 is reserved for a Cash Register network. For the Scanner use only the interface named
SCANNER because this connector is equipped with the separate power supply (5 +) for
the Scanner.
13.2 Cables
The pin-layout of the serial ports of the QUORION cash registers is the same as the pinlayout of a serial port of a computer.
13.2.1 PC-Cable
For the connection between a Cash Register and a PC (QProg) you need a standard 9pin cross wired computer cable which has all signals connected.
CR-12xx
9-PIN male
COMPUTER
9-PIN male
2 - RXD
3 – TXD
3 – TXD
2 – RXD
4 - DTR
6 – DSR
5 – GND
5 – GND
6 - DSR
4 – DTR
7 – RTS
8 – CTS
8 - CTS
7 – RTS
46
13.2.2 Printer-Cable
For the connection between Cash Register and an external printer you need a standard 9
to 25-pin cross wired printer cable.
CR-1xxx
9-PIN male
PRINTER
25-PIN male
2 - RXD
2 – TXD
3 – TXD
3 – RXD
4 - DTR
6 – DSR
5 – GND
7 – GND
6 - DSR
20 – DTR
7 – RTS
4 – RTS
8 - CTS
5 – CTS
14. Error Messages
ID
Error Description
1
2
3
4
5
6
7
8
9
10
11
12
13
14
15
16
17
18
19
20
Invalid Entry
Invalid Time
Invalid Date
Invalid Article
Unknown Report
Invalid Function
Transbuf. Full
Still in Transaction
User Break
No Under/Tender
Still in Tender
Scanning Error
Select Clerk
Select Salesperson
Item not Sold
No Price Entered
No Zero Price
Closed Drawer
Manager Required
Entry to High
21
22
23
24
25
26
27
28
29
30
31
32
33
34
35
36
37
38
39
40
47
Discount not Allowed
Correct not Allowed
Already Discounted
Enter Quantity
Journal Full
Wrong Clerk
Print Invoice
Receipt Paper End
Journal Paper End
Slip No Paper
Logging Error
KP Error
Invoice Buffer Full
PLU File Full
Reindex PLU File
15. Test Routines
There are a number of procedures available in the register which can be used to test the
hardware, reset the reports and test the transaction load by simulating transactions. The
tests are started by entering a number on the TYPE key. The following are available:
301 – PRINTER FONT TEST PROCEDURE
1. Turn Lock to P (also X or Z when allowed)
2. Enter 301 on the TYPE key
3. The register will print the version information on the receipt printer.
Flash ROM version
P: D0040429
C: CR1200
Standard-Configuration
D: 00-LT1322-WE Printer driver version
RAM: 256K
Total Memory
Serial #
5065562
4. Printout of complete font table
5. Finished
302 (or 303) – ALL DISPLAY TEST PROCEDURE
1. Turn Lock to P (also X or Z when allowed)
2. Enter 302 (or 303) on the TYPE key
3. Display Test Start and all characters (0x20 to 0xFF) in all available modes are
displayed.
4. Finished
305 – VERSION PRINT PROCEDURE
1. Turn Lock to P (also X or Z when allowed)
2. Enter 305 on the TYPE key
3. The register will print the version information on the receipt printer.
Flash ROM version
P: D0040429
C: CR1200
Standard-Configuration
D: 00-LT1322-WE Printer driver version
RAM: 256K
Total Memory
Serial #
5065562
306 – RE-INIT PRINTER LOGO’S
1. Turn Lock to P (also X or Z when allowed)
2. Enter 306 on the TYPE key
3. The Printer logo(‘s) will be sent to the printer controller. all available modes are
displayed.
4. Finished
400 – DIRECT TRANSACTION TEST
1. Turn Lock to P (also X or Z when allowed)
2. Enter the number of transaction on the X key if not entered then 10 transactions is
default
3. Enter 400 on the TYPE key
4. The register will use the REGISTER number as CLERK and SALESPERSON
number when programmed else it will use CLERK 1 and SALESPERSON 1.
48
5. The register will now make a sale of 10 articles. The articles used depend on the
register number. It will use article 1 to 10 and add the REGISTER x 10. So on
register 1 it will use article 11 to 20.
6. The transaction is closed on TENDER 1.
7. Finished
401 – TABLE TRANSACTION TEST
1. Turn Lock to P (also X or Z when allowed)
2. Enter the number of transactions on the X key if not entered then 10 transactions is
default
3. Enter 401 on the TYPE key
4. The register will use the REGISTER number as CLERK and SALESPERSON
number when programmed else it will use CLERK 1 and SALESPERSON 1.
5. The register will use the REGISTER number as TABLE number when programmed
else TABLE 1 is used.
6. The register will now make a sale of 10 articles. The articles used depend on the
register number. It will use article 1 to 10 and add the REGISTER x 10. So on
register 1 it will use article 11 to 20.
7. The transaction is closed on PB FUNCTION 1 (Close Balance)
8. Finished
402 – DIRECT TRANSACTION TEST
1. Turn Lock to P (also X or Z when allowed)
2. Enter the number of transaction on the X key if not entered then 10 transactions is
default
3. Enter 402 on the TYPE key
4. The register will use CLERK 1 and SALESPERSON 1.
5. The register will now make a sale of 10 articles. It will use article 1 to 10.
6. The transaction is closed on TENDER 1.
7. Finished
403 – TABLE TRANSACTION TEST
1. Turn Lock to P (also X or Z when allowed)
2. Enter the number of transactions on the X key if not entered then 10 transactions is
default
3. Enter 403 on the TYPE key
4. The register will use CLERK 1 and SALESPERSON 1.
5. The register will use TABLE 1.
6. The register will now make a sale of 10 articles. It will use article 1 to 10
7. The transaction is closed on PB FUNCTION 1 (Close Balance)
8. Finished
4444 – RESET REPORTS AND COUNTERS
1. Turn Lock to P
2. Enter 4444 on the TYPE key
3. The register will use now clear all reports, tables and reset the receipt and invoice
counters.
4. It will print on the journal MESSAGE# 68 (SYSTEM CLEAR)
5. Finished
49
16. Battery operated system CR1200
As an option the Cash Register can be equipped with internal battery.
Attention: You must recharge the Accumulator, before the first working of machine.
1. The maximum battery charge is reached after 8 hours of recharging time (7,2 Ah)
2. The capacity is sufficient for normal operation anywhere from 6 to 10 hours,
depending upon quantity and size of printed receipts (Standard: 4h with 60
receipts, 15 lines each in turn with 16 characters).
3. The red blinking warning light is located below the operator lock and activates,
when the end of the normal operating time is reached, while printing is in progress.
Only once the user has reached the end of normal operating time does the red light
blink permanently.
4. At the end of the reserve operating time (roughly 1 hours) it is possible to turn the
cash register back on after it has been turned off and recharged for 10 to 20
minutes.
5. Forced shut down due to low battery power protects the battery from being
completely discharged. There is no warning before forced shut down takes place.
6. Cash register operation is permitted during recharging. Although the recharge time
will of course be longer. A green LED light indicates the recharge process.
7. Cash register operation can also take place via external power from outlets via an
adapter or car battery.
8. Recharge adapter:
a. AC/DC-Adapter > 15W; Output 12-28VDC (or Car-Battery),
or AC/AC-Adapter > 15W; Output 12-18VAC (Transformer);
b. Connection: Hollow plug 5,5 mm x 2,5 mm; not polarized
_______________________________________________________________________
1.50.417247 BA-englisch CR1200 series QUORION (Stand: 15.01.09)
50