Transcript
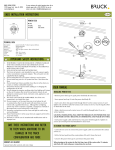
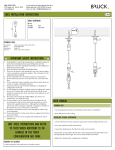
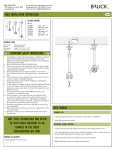
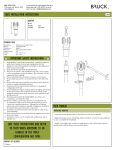
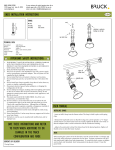
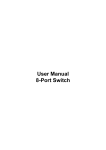
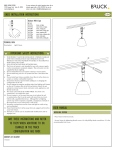
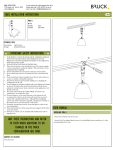
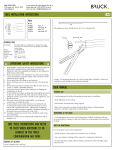
BRUCK LIGHTING SYSTEMS
15774 Gateway Circle Tustin, CA. 92780
www.brucklighting.com
For more assistance with technical questions please call our
technical support staff at (714) 259-9959. You can also
contact us by email at [email protected].
ENZIS INSTALLATION INSTRUCTIONS
STRAIGHT TRACK
11/16"
ART. NO.
140 008bz
140 008mc
bronze, 96”
matte chrome, 96”
3 ft
The supports are to be mounted every 36” or 3 ft. along the rail
5/16"
end cap
aluminum rod
TECHNICAL DATA
Description:
Design:
Dimensions:
Material:
Supply voltage:
Current:
Load:
The lightweight Enzis straight track is designed for straight
track runs. Two aluminum rods in the flexible track hold the
desired shape.
Jorg Westerheide
length: 96”
PVC-braided UGA
12 V
max. 25 A / circuit
max. 300 W / circuit
The straigh track is designed
for straight runs. Curves and
bends can be made but any
modifications are permanent.
IMPORTANT SAFETY INSTRUCTIONS
1.
THIS PRODUCT MUST BE INSTALLED BY A PERSON FAMILIAR
WITH THE CONSTRUCTION AND OPERATION OF THE
PRODUCT AND THE HAZARDS INVOLVED, IN ACCORDANCE
WITH LOCAL NEC CODE.
2. The Enzis rail system is not intended for use with a power supply
cord or convenience receptacle adaptor. This rail system is to be
supplied by Bruck Lighting.
3. Do not install this rail in damp or wet locations.
4. Do not install any part of a rail system less than 5 feet above the
floor.
5. Do not install any fixture assembly closer than 6 inches from any
curtain, or similar combustible material.
6. Disconnect electrical power before adding to or changing the
configuration of the rail.
7. Do not attempt to energize anything other than lighting rail fixtures on the rail. To reduce the risk of fire and electric shock, do not
attempt to connect power tools, extension cords, appliances, and
the like to the rail.
8. This track system MUST BE HARD WIRED. For all the wire
connections, use Listed Wire Nuts.
9. Do not connect a rail to more than one circuit unless the rail
is constructed so that it can be used with more than on circuit.
Check with a qualified electrician. Although the rail lighting
system may seem to operate acceptably, a dangerous overload of
the neutral may occur and result in a risk of fire.
10. Secondary connections must be clean and tight to avoid arcing
and overheating!
11. Warranty is void in case of unauthorized modifications and/ or
improper use.
SAVE THESE INSTRUCTIONS AND REFER
TO THEM WHEN ADDITIONS TO OR
CHANGES IN THE TRACK
CONFIGURATION ARE MADE
CONTENTS OF DELIVERY
1 track complete with 2 end caps
Caution - For shortening the track, use a Track Cutting Shear (230990). Cut the track
carefully to avoid damage to the conductive braiding.
USER MANUAL
PLANNING AID
- Use planning grid to decide all mounting locations prior to installation.
- Mark drill points on the ceiling.
- Drill all holes and mount the ceiling supports.
- Refer to the instructions included with the different types of ceiling supports,
connectors, and other components for further details.
SHORTENING OF THE TRACK
- For shortening the track, use a Track Cutting Shear (230990). Aluminum rods must
be removed prior to cutting. Cut the track carefully to avoid damage to the conductive
braiding.
HINTS ON MAINTENANCE
For cleaning the system and its components:
- Switch off power to the system! Let it cool down for 30 minutes.
- Use a non-abrasive cleaning cloth to wipe track, components and fixtures.
- Do not touch fixture lamps with bare hands! contaminants reduce the light output
and service life.