1
Electronic Approval System
User Manual
University-wide Computing Services
Data Base Administration Group
102 Andy Holt Tower
Knoxville, Tennessee
May 14, 1997
Table of Contents
I. Introduction . . . . . . . . . . . . . . . . . . . . . . . . . . . . . . . . . . . . . . . . . . . . . . . . . . . . . . . . 3
1.1 Terms and Definitions . . . . . . . . . . . . . . . . . . . . . . . . . . . . . . . . . . . . . . . . . 4
1.2 Electronic Approval System Main Menu . . . . . . . . . . . . . . . . . . . . . . . . . . . 6
II. Using the Electronic Approval System . . . . . . . . . . . . . . . . . . . . . . . . . . . . . . . . . . . 7
2.1 Electronic Document Summary Screen . . . . . . . . . . . . . . . . . . . . . . . . . . . . 7
2.2 Electronic Approval In-Box . . . . . . . . . . . . . . . . . . . . . . . . . . . . . . . . . . . . . 8
2.2.1 Approve Documents . . . . . . . . . . . . . . . . . . . . . . . . . . . . . . . . . . . . 9
2.2.2 Add "Cover Me" Person to Approval Path . . . . . . . . . . . . . . . . . . 10
2.2.3 Display Document Detail . . . . . . . . . . . . . . . . . . . . . . . . . . . . . . . 11
2.2.4 Deny Documents . . . . . . . . . . . . . . . . . . . . . . . . . . . . . . . . . . . . . 11
2.2.5 Send FYIs . . . . . . . . . . . . . . . . . . . . . . . . . . . . . . . . . . . . . . . . . . 12
2.2.6 Purge an FYI . . . . . . . . . . . . . . . . . . . . . . . . . . . . . . . . . . . . . . . . 13
2.2.7 Review Approval Path for Document . . . . . . . . . . . . . . . . . . . . . . 14
2.2.8 Mark Document as Urgent . . . . . . . . . . . . . . . . . . . . . . . . . . . . . . 15
2.2.9 Withdraw a Document from Electronic Approval . . . . . . . . . . . . . 16
2.3 Exercise 1: Working with documents in your In-Box . . . . . . . . . . . . . . . . . 17
III. Browsing Electronic Documents . . . . . . . . . . . . . . . . . . . . . . . . . . . . . . . . . . . . . . 20
3.1 Browse All of My Documents . . . . . . . . . . . . . . . . . . . . . . . . . . . . . . . . . . . 20
3.2 Exercise 2: Browse All My Documents . . . . . . . . . . . . . . . . . . . . . . . . . . . 22
IV. Work with Designees . . . . . . . . . . . . . . . . . . . . . . . . . . . . . . . . . . . . . . . . . . . . . .
4.1 Maintain Your Designees . . . . . . . . . . . . . . . . . . . . . . . . . . . . . . . . . . . . . .
4.2 Browse Your Designees . . . . . . . . . . . . . . . . . . . . . . . . . . . . . . . . . . . . . .
4.3 Maintain Designees . . . . . . . . . . . . . . . . . . . . . . . . . . . . . . . . . . . . . . . . . .
4.4 Exercise 3: Work with My Designees . . . . . . . . . . . . . . . . . . . . . . . . . . . .
24
24
25
27
29
V. Work with User Profile . . . . . . . . . . . . . . . . . . . . . . . . . . . . . . . . . . . . . . . . . . . . . . 31
5.1 Maintain Your User Profile . . . . . . . . . . . . . . . . . . . . . . . . . . . . . . . . . . . . . 31
5.2 Exercise 4: Work With My Profile . . . . . . . . . . . . . . . . . . . . . . . . . . . . . . . 33
VI. Designee Request for Third Party . . . . . . . . . . . . . . . . . . . . . . . . . . . . . . . . . . . . .
6.1 Maintain Designee Request for a Third Party . . . . . . . . . . . . . . . . . . . . . .
6.2 Browse Designee Requests . . . . . . . . . . . . . . . . . . . . . . . . . . . . . . . . . . . .
6.3 Add a Designee Request . . . . . . . . . . . . . . . . . . . . . . . . . . . . . . . . . . . . . .
6.4 Exercise 5: Designee Request for Third Party . . . . . . . . . . . . . . . . . . . . . .
May 22, 1997
Page
34
34
35
36
37
2
The University of Tennessee Electronic Approval System
I. Introduction
The Electronic Approval System (EAS) provides a mechanism for obtaining approvals for
all documents created electronically. It is designed to replace the manual processing of
paper and obtaining signatures. By using the EAS, an approver (or their designee) ‘signs’
a document in their In-Box just as if it were a piece of paper. Electronic documents follow
a predetermined path, as defined by each campus/unit, from one approver to the next until
all necessary approvals have been obtained. If an approver rejects a document, the
document reverts back to the originator. When a document has been approved by every
person in the approval path, it is forwarded to the appropriate campus/unit business office
for final processing.
The Electronic Approval System prevents users from accessing documents which are
intended for others. You can only access YOUR In-Box, YOUR User Profile, YOUR
Designees, and you can only browse documents of whose approval path you are a
member. Also, documents are only sent to you for approval if you are the person to whom
the document should be routed (or that person's Designee) based on the attributes of the
document and the level of approval you have been assigned within the Electronic Approval
System.
There are three main functions within the Electronic Approval System: Approval, Browse,
and Maintenance. The IDs for each of the functions is listed in bold letters to the left of the
title (e.g., UT EAS INBOX). These IDs are provided to allow you to fastpath from other
systems directly into the Electronic Approval System function you want without having to
negotiate through menus.
By providing your e-mail address in your User Profile, the Electronic Approval System will
send e-mail notification when you have documents that need your attention. This keeps
you from having to access the Electronic Approval System just to check if you have
documents. The notifications are sent each night and will tell you what type of documents
and how many have been sent to your In-Box.
May 22, 1997
Page
3
The University of Tennessee Electronic Approval System
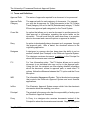
1.1 Terms and Definitions
Approval Path
The series of approvals required for a document to be processed.
Approval Path
Category
The approval path for each category of documents. For example,
you may be an approver for Travel documents in the FA (Foreign
Travel) category, but not for the EN (Entertainment) category. FA and
EN are two approval path categories for the Travel System.
Cover Me
An option that allows you to send a document to another person for
their approval or information regarding the action taken on the
document. This will most likely be used when there is a question
about a document and a second opinion or approval is desired.
Deny
An option to electronically deny a document as it progresses through
the approval path. After a denial, the document returns to the
originating application.
Designee
A designee is a person who has been given the ability to act on
another's behalf (see Principal) in the Electronic Approval System.
The designee receives documents in addition to the Principal for
whom the documents were intended.
FYI
For Your Information notice. The FYI feature allows you to send a
document to an individual who may not be in the approval path.
Using this link, the recipient can then display detailed information
about the document, review its approval path, or send other FYI
notices. Notice the difference between the FYI option and the Cover
Me option.
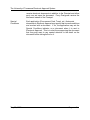
IMS
The Information Management System. This is the electronic manager
that controls the Electronic Approval System and most financial
applications.
In-Box
The Electronic Approval System screen which lists the electronic
documents which are awaiting your action.
Principal
The principal is the person who has the responsibility of acting upon
an Electronic Approval Document.
Proxy
A Proxy is a designee who receives documents instead of the
Principal for whom the documents were intended. Regular Designees
May 22, 1997
Page
4
The University of Tennessee Electronic Approval System
receive electronic documents in addition to the Principal and either
party can act upon the document. Proxy Designees receive the
document instead of the Principal.
Special
Conditions
May 22, 1997
Each application (Procurement Card, Travel, etc.) that sends
documents to Electronic Approval may specify that unusual conditions
are involved with a document. If so, the application may set the
Special Conditions indicator on a document when it is sent to
Electronic Approval. This is to alert those approving the document
that they may want to pay special attention to the detail on the
document before taking action on it.
Page
5
The University of Tennessee Electronic Approval System
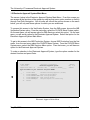
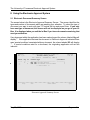
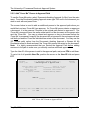
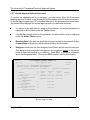
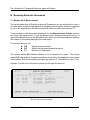
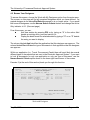
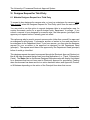
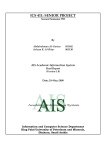
1.2 Electronic Approval System Main Menu
The screen below is the Electronic Approval System Main Menu. From this screen you
can access all the functions of the system by entering that menu option number or directly
through Fast Path Navigation. Not all users will see all the options shown on the menu
below; you will only see those options for which you are authorized.
To access this screen in the Verification System, from the IMS screen, choose the IMS
Verification System option. From the next menu, select the CHOICE Menu System option.
On the next menu, you will see an option for DBA Services, select this option. On the next
menu, you will see an option for the Electronic Approval System. Select that option for the
Electronic Approval System Main Menu.
To get to this screen in the IMS Production System, choose IMS Production from the first
menu, from the next menu select the CHOICE Menu System. From the CHOICE Menu
System menu, select the DBA Services Menu option. From that menu, you will have an
option for the Electronic Approval System.
To make a selection in the Electronic Approval System, type the option number for the
desired function and press Enter.
UT EAS EASMNU
9:00:56 AM
*Application Area: UT
University of Tennessee
Electronic Approval System
*Sub Area: EAS
*Function: EASMNU______
SNODGPJ
May 5,97
SNODGPJ
Type the number of your selection and press ENTER:
__
º
1
2
3
4
5
90
UT EAS
UT EAS
UT EAS
UT EAS
UT EAS
LOGOFF
INBOX
BRWALLMY
WRKDESIGNEES
WRKPROFILE
WRKDRQDOC
Documents Awaiting Approval (In-Box)
Browse All My Documents
Work with My Designees
Work with My Profile
Designee Request for Third Party
Electronic Approval Main Menu
May 22, 1997
Page
6
The University of Tennessee Electronic Approval System
II. Using the Electronic Approval System
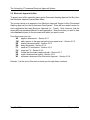
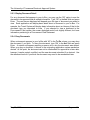
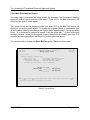
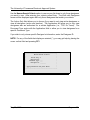
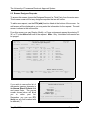
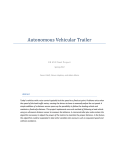
2.1 Electronic Document Summary Screen
The screen below is the Electronic Approval Summary Screen. The screen identifies the
types and number of documents which are awaiting your attention. To select the type of
document you want to work with type "S" beside the line and press Enter. If you only
have one type of document, this screen will not be displayed as you go to your InBox. It is displayed when you exit the In-Box if you have documents remaining that
need your attention.
If any document within the application has been marked urgent the column labeled Urg will
display ‘*’. If the application that sent the document to Electronic Approval indicated there
were ‘special conditions’ associated with any document, the column labeled SC will display
‘*’. If special conditions exist for a document, the originating application will set this
indicator.
EAS100P1
Mar 6,97
º
Select
-----__
__
Urg
--*
***** ELECTRONIC APPROVAL SYSTEM *****
- Document Summary Screen For: SAUCEJE
SAUCEMAN JR, JAMES E
SC
-*
EAS100M1
9:04 AM
Document Type
# Documents
----------------------------------- ----------EAS DRQ Designee Request
2
PCM PRC Procurement Card Statement
6
*** End of Data ***
Enter-PF1---PF2---PF3---PF4---PF5---PF6---PF7---PF8---PF9---PF10--PF11--PF12--help
exit
bkwrd frwrd
goto
Electronic Approval Summary Screen
May 22, 1997
Page
7
The University of Tennessee Electronic Approval System
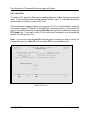
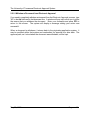
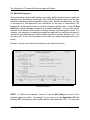
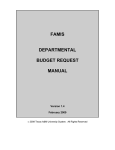
2.2 Electronic Approval In-Box
To access your In-Box, select the menu option Documents Awaiting Approval (In-Box) from
the Electronic Approval System Main Menu.
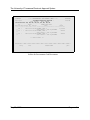
The screen below is an example of an Electronic Approval System In-Box (Documents
Awaiting Approval) for the Procurement Card System. There will be a similar screen for
each application that uses Electronic Approval (i.e., Travel). Note, however, that the
screen will look somewhat different for each application. Enter the action you wish to take
in the Action field next to the document with which you want to work.
From this screen you can :
AP
approve documents - Section 2.2.1
CM add a person to the approval path at your same level - Section 2.2.2
DE
display document detail - Section 2.2.3
DN
deny documents - Section 2.2.4
FY
send an FYI notification - Section 2.2.5
PU
purge an FYI - Section 2.2.6
RP
review the document's approval path - Section 2.2.7
UR
mark a document as Urgent - Section 2.2.8
WI
withdraw a document from Electronic Approval - Section 2.2.9.
Exercise 1 (at the end of this section) leads you through these functions.
May 22, 1997
Page
8
The University of Tennessee Electronic Approval System
PCM120P1
Apr 29,97
***** DEPARTMENTAL PROCUREMENT CARDS *****
PCM120M1
- Documents Awaiting Approval 2:02 PM
For: BOSSID
BOSS, IMA D
Valid Actions: AP, CM, DE, DN, FY, PU, RP, UR, WI
To
Need
Cardholder Name
$
Act Do Urg SC Typ By
Rec'd
Desc
Value
--- -- --- -- --- ----- ----- ------------------------- -------------__ AP *
PRC 05/15 04/28 BUSTER, PHIL I
1,579.48
__
Stmt 199702 - sent by BUSTEPI
__ FY * * PRC 05/15 04/28 BUSTER, PHIL I
889.48
__
Stmt 199703 - sent by BUSTEPI
__ FY *
PRC 05/15 04/28 BUSTER, PHIL I
999.48
Stmt 199704 - sent by BUSTEPI
*** End of Data ***
Enter-PF1---PF2---PF3---PF4---PF5---PF6---PF7---PF8---PF9---PF10--PF11--PF12-help
exit
bkwrd frwrd
goto
In-Box for Procurement Card Documents
May 22, 1997
Page
9
The University of Tennessee Electronic Approval System
2.2.1 Approve Documents
If a document requires your approval the To Do field will display ‘AP’. To mark a
document as approved, type ‘AP’ in the Act field and press Enter. A message will be
displayed at the bottom of the screen stating your action was successful. NOTE: If you
have specified that you want a Confirmation Prompt in your Profile (See Work With My
Profile menu option), you will be prompted to confirm the approval each time you Approve
a document.
When a document displays ‘AP’ in the To Do field, you may perform any of the functions
listed in the Valid Actions at the top of the screen. If the To Do field displays FY, the
document was sent to you only for your information. You do not have to take any action
on an FY document. You may use the ‘PU’ functions to purge an FY document from your
In-Box. Note: FYI documents are the only ones for which the purge option is allowed.
May 22, 1997
Page
10
The University of Tennessee Electronic Approval System
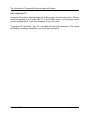
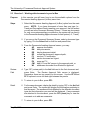
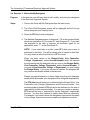
2.2.2 Add "Cover Me" Person to Approval Path
To use the Cover Me option, select Documents Awaiting Approval (In-Box) from the main
menu. From the Documents Awaiting Approval screen type ‘CM’ next to the document you
wish to work with and press Enter.
The screen below is used to add an additional person to the approval path whom you
would like to act as a ‘Cover Me’ type approver. If a ‘Cover Me’ person denies or approves
a document, it is the same as if anyone in the original path denied or approved it. The
‘Cover Me’ person will have the same authorization on the document as the person who
sent the ‘Cover Me’. You may go ahead and approve or deny a document before the
‘Cover Me’ is processed, however, the document will not proceed to the next approval level
until both you and the ‘Cover Me’ individual has acted on the document. You may use the
‘RP’ (review path) option from the Documents Awaiting Approval or Browse All My
Documents screen to check and see if the ‘Cover Me’ person has acted on the document.
Note: It is highly recommended that you Review the Approval Path before adding
someone to the path to make sure you actually need an additional approval.
Type the User ID of the person to add to the approval path, and press PF4 to add them.
To get a list of all possible User IDs, position the cursor on the User ID field and press
PF1.
EAS455P1
March 6,1997
***** ELECTRONIC APPROVAL SYSTEM *****
- Add New Approver to Approval Path -
Approval Number:
Application:
Document Type:
Need By:
Document Originator:
EAS455M1
9:14 AM
1997000000003
Urgent: N By User:
PCM
Departmental Procurement Cards
PRC
Procurement Card Statement
REINHOM
REINHOLD-LARSSON, MARTA G
*User ID: ________
Enter-PF1---PF2---PF3---PF4---PF5---PF6---PF7---PF8---PF9---PF10--PF11--PF12--help
exit add
goto
Add "Cover Me" Person to Approval Path
May 22, 1997
Page
11
The University of Tennessee Electronic Approval System
2.2.3 Display Document Detail
For any document that appears in your In-Box, you may use the ‘DE’ option to see the
document to be approved and all related information. Type ‘DE’ in the Act field and press
Enter. The next screen displayed will depend upon the type of document you asked to
view. Each application will display basic detail about a document in your In-Box. For
example, the Travel System will display basic information about an itinerary if that is the
document type you requested to view. If you selected to view a document in the
Procurement Card system, the screen displayed would look slightly different, but have
information pertaining to a Procurement Card Statement.
2.2.4 Deny Documents
When a document appears in your In-Box with ‘AP’ in the To Do column, you may deny
the document if you wish. To deny the document, type ‘DN’ in the Act field and press
Enter. A window will appear requiring a reason as to why the document was denied.
When you deny a document, it returns to the originating application system marked as
denied. At this point, the document can not be resubmitted for approval at a later date;
however, it can be copied, modified, and the new document submitted if so desired. Use
the withdraw function if you think the document may need to be resubmitted later.
May 22, 1997
Page
12
The University of Tennessee Electronic Approval System
2.2.5 Send FYIs
To send an FYI, select the Documents Awaiting Approval (In-Box) option from the main
menu. From the Documents Awaiting Approval Screen, type ‘FY’ in the Act field next to
the document for which you want an FYI sent.
The screen below is displayed when you request an FYI (For Your Information) notice for
a document by typing 'FY' beside it in the Act field. From this screen, you can send FYIs
to up to five users at a time by listing their User IDs in the fields provided and pressing the
PF5 (send) key. If you want to send FYIs to more than five people, you can repeat the
process for each group of five.
Note: If you do not know the User ID of the person(s) to whom you wish to send FYIs,
position the cursor to a User ID field and press PF1 for an alphabetical list.
EAS450P1
Apr 28,97
***** ELECTRONIC APPROVAL SYSTEM *****
- Send FYI Notice -
Approval Number:
Application:
Document Type:
Need By:
Document Originator:
EAS450M1
9:52 AM
1997000000083
Urgent: N By User:
PCM
Departmental Procurement Cards
PRC
Procurement Card Statement
REINHOM
REINHOLD-LARSSON, MARTA G
*Enter User ID(s) ________
________
________
________
________
Enter-PF1---PF2---PF3---PF4---PF5---PF6---PF7---PF8---PF9---PF10--PF11--PF12--help
exit
send
goto
Send FYIs Screen
May 22, 1997
Page
13
The University of Tennessee Electronic Approval System
2.2.6 Purge an FYI
Access the Documents Awaiting Approval (In-Box) screen from the main menu. When a
document appears in your In-Box with ‘FY’ in the To Do column, you may purge it when
you are finished with it. It will then disappear from your In-Box.
To purge an FYI document, type ‘PU’ in the Act field next to the document. The system
will display a message stating that your action was successful.
May 22, 1997
Page
14
The University of Tennessee Electronic Approval System
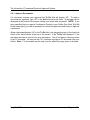
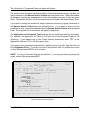
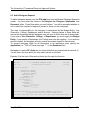
2.2.7 Review Approval Path for Document
To review the approval path for a document, you may select either the Documents
Awaiting Approval (In-Box) or the Browse All My Documents option from the main menu.
To see the approval path, type ‘RP’ in the Act field next to the document and press Enter.
The screen below displays the current approval path of a particular document.
C
If a person in the path has not acted on the document, the action that he/she is
expected to take is listed under the To Do column.
C
If he/she has already acted on the document, the action he/she took is displayed
under the Action Taken column.
C
Received Date is the date on which the document arrived in the person's In-Box.
Forward Date is the date on which he/she acted on the document.
C
Designee column lists the first designee found (there may be more) for the user.
The designee is a person who can approve this document instead of the person
listed (in case the principal is on vacation). Press PF11 to get more information
about the designees listed. (Then press PF10 to return back to this screen).
EAS200P1
May 5,97
***** ELECTRONIC APPROVAL SYSTEM *****
- Review Approval Path -
11:50 AM
1 More >
Application: PCM
DEPARTMENTAL PROCUREMENT CARDS
Document ID: PRC
PROCUREMENT CARD STATEMENT
Title: Stmt 199701 - sent by BUSTEPI
Approval #: 1997000000012
1
2
3
4
5
Approver
------------------------BUSTER, PHIL I
EXECUTIVE PRODUCER
BOSS, IMA D
DEAN EMERITUS
BOSS, IMA D
SYS ANALYST
BUSTER, PHIL I
EXECUTIVE PRODUCER
BUSTER, PHIL I
EXECUTIVE PRODUCER
To
Do
--
Action
Taken
-------WITHDRAW
Received
Date
---------04/25/1997
Forward
Date
---------04/25/1997
APPROVED
04/28/1997
04/30/1997
FY
04/29/1997
FY
04/30/1997
FY
04/30/1997
Designee
--------
Review Approval Path
May 22, 1997
Page
15
The University of Tennessee Electronic Approval System
May 22, 1997
Page
16
The University of Tennessee Electronic Approval System
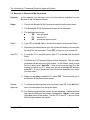
2.2.8 Mark Document as Urgent
You may mark a document as being urgent by accessing the Documents Awaiting
Approval (In-Box) option from the main menu. Type ‘UR’ in the Act field next to the
document you wish to mark urgent.
The screen below will be displayed when you enter ‘UR’ in the Act field next to the
document you wish to mark urgent. To change the Urgency Status of a document, type
'M' as the action (Modify) and change the Urgent Status appropriately (Y or N) and press
Enter. If a document is marked as urgent, it will be listed with ‘*’ on the In-Box and
Summary screens. When you change the Urgency Status of a document, your User ID is
recorded as having performed that function (in case questions arise).
You can also add or change the Need By Date and/or Time from this screen.
EAS350P1
Apr 28,97
***** ELECTRONIC APPROVAL SYSTEM *****
- Modify Urgent Status -
*Action (D,M):
_
Approval Number:
Application:
Document Type:
Originator:
Description:
EAS350M1
9:55 AM
1997000000091
PCM
Departmental Procurement Cards
PRC
Procurement Card Statement
REINHOM
REINHOLD-LARSSON, MARTA G
Stmt 199611 - sent by REINHOM
Urgent: N (Y/N)
Need By Date: __________
Time: ________
(MM/DD/CCYY)
(HH.MM A/PM)
Enter-PF1---PF2---PF3---PF4---PF5---PF6---PF7---PF8---PF9---PF10--PF11--PF12--help
exit
goto
Document 1997000000091 displayed successfully
Modify Urgent Status
May 22, 1997
Page
17
The University of Tennessee Electronic Approval System
2.2.9 Withdraw a Document from Electronic Approval
If you need to completely withdraw a document from the Electronic Approval process, type
‘WI’ in the Act field next to that document line. A window will pop-up to allow you to enter
the reason that you withdrew the document. Enter your comments and press PF3 to
return to this screen. The system will display a message stating your action was
successful.
When a document is withdrawn, it returns back to the originating application system. It
may be modified within that system and resubmitted for approval at a later date. The
approval path, as it stood when the document was withdrawn, will be kept.
May 22, 1997
Page
18
The University of Tennessee Electronic Approval System
2.3 Exercise 1: Working with documents in your In-Box
Purpose:
In this exercise you will learn how to use the available options from the
Documents Awaiting Approval (In-Box) menu item.
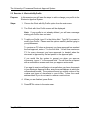
Steps
1. Select the Documents Awaiting Approval (In-Box) option from the main
menu. NOTE: If you have documents of more than one type (i.e.,
Travel and Procurement Cards) awaiting your approval, the first screen
you will see is the Document Summary Screen. If there are documents
for only one system awaiting your attention, the system will go directly
to the Documents Awaiting Approval screen for that system (i.e., Travel).
2. If you are on the Document Summary Screen, select a document type
by typing ‘S’ in the Select field on that line and press Enter.
3. From the Documents Awaiting Approval screen, you may:
C
AP
approve documents,
C
DN
deny documents,
C
DE
display document detail,
C
RP
review the document's approval path,
C
FY
send an FYI notification,
C
UR
mark a document as Urgent,
C
PU
purge an FYI,
C
CM add a "Cover Me" person to the approval path, or
C
WI
withdraw a document from Electronic Approval.
Review
Path
4. Type ‘RP’ (review path) in the Act field next to the first document and
press Enter. The Review Approval Path screen is displayed.
Remember there are two panels on this screen. Use the PF10 and
PF11 options to move left and right between the panels.
5. To return to your In-Box, press PF3.
Detail
6. For the same document, display the detail by typing ‘DE’ in the Act field
and press Enter. The system will display the information pertaining to
that document. The screens will look different for the different document
types but the information you need will be displayed. If any comments
are attached to the document, press the PF9 (cmnt) key to view the
comments or to add new comments.
7. To return to your In-Box, press PF3.
May 22, 1997
Page
19
The University of Tennessee Electronic Approval System
Urgent
8. Mark the same document Urgent by typing ‘UR’ in the Act field and
pressing Enter.
9. The Modify Urgent Status screen will be displayed with the document
information.
10. Type an ‘M’ (modify) in the Action field. Type a ‘Y’ in the Urgent Status
field and enter a Need By Date of one week from today. (You may also
enter a time.) Press Enter.
11. A message stating your action was successfully completed will be
displayed. Press PF3 to return to the Documents Awaiting Approval
screen. NOTE: Check the Urg column for your urgent status.
Send FYI
12. To send an FYI on a document, type ‘FY’ in the Act field and press
Enter.
13. The Send FYI Notice screen will be displayed with the document
information and fields for you to enter User ID(s). If you do not know the
User ID of the person to whom you want to send the FYI, press the PF1
key after placing your cursor in one of the User ID fields. You will get
a list of names and User IDs from which to select.
14. Select at least one User ID and press PF5 to send the FYIs and return
to the Document Awaiting Approval screen.
Purge FYI
15. To purge an FYI from a document, simply type ‘PU’ in the Act field next
to a document which has ‘FY’ displayed in the To Do field and press
Enter. The system will display a message at the bottom of the screen
stating that the FYI was purged successfully. Note: The purge function
is only allowed on FYI documents.
Cover Me
16. To use the ‘Cover Me’ option, type ‘CM’ next to a document on the
Documents Awaiting Approval screen and press Enter.
17. The Add New Approver to Approval Path screen will be displayed.
Similar to the FYI screen, you must enter the User ID for the person who
you want to add the approval path. Press PF1 on the User ID field to
get a list of names and User IDs. Press Enter to make your change and
see the name associated with the User ID.
May 22, 1997
Page
20
The University of Tennessee Electronic Approval System
18. Press PF4 (send) to send the ‘Cover Me’ and return to the Documents
Awaiting Approval screen.
19. Type ‘RP’ in the Act column next to the document on which you just
performed a ‘CM’ function. You will be shown the approval path
information so you may see the new approver you just added.
20. Press PF3 to return to the Documents Awaiting Approval screen.
Approve
21. To approve a document, type ‘AP’ in the Act field next to a document on
your list that has AP in the To Do column and press Enter.
22. A message will be displayed at the bottom of the screen stating the
document has been approved.
Deny
23. To deny a document from being approved, type ‘DN’ in the Act field next
to the document you wish to deny and press Enter.
24. A confirmation window will pop-up on the screen. Press Enter to deny
the document.
25. The pop-up window for entering comments will appear next. Comments
are required when you deny a document. Note that the fact that you
denied the document is already recorded. Supply a reason for the
denial.
26. Press PF3 to return to the Documents Awaiting Approval screen.
27. A message will be displayed at the bottom of the screen stating the
document had been denied.
Withdraw
28. To withdraw a document (and send it back to the originating application)
type ‘WI’ in the Act field next to the document you wish to withdraw.
29. The pop-up window for entering comments will appear next. Comments
are required when withdrawing a document. Note that the fact that you
withdrew the document is already recorded. Supply a reason for the
withdrawal.
30. Press PF3 to return to the Documents Awaiting Approval screen.
May 22, 1997
Page
21
The University of Tennessee Electronic Approval System
31. When you are finished, or wish to return to the main menu, press PF3.
If you have more documents still awaiting your attention, the Document
Summary Screen will be displayed so you may continue working with
your documents.
May 22, 1997
Page
22
The University of Tennessee Electronic Approval System
III. Browsing Electronic Documents
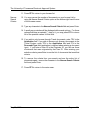
3.1 Browse All of My Documents
The screen below lists all Electronic Approval Documents you are authorized to view or
act upon (either as the principal approver or designee), all documents that were originated
by you in the applications, and all documents for which you have been sent an FYI.
To narrow the list of the documents displayed, use the Narrow Search Criteria option in
the lower right hand corner. A pop-up window will be displayed which allows you to
specify the characteristics of the document(s) for which you are searching thus reducing
the number of documents displayed (see next page).
From this screen you can:
DE
C
Display document detail,
RP
C
Review the document's approval path or
FY
C
Send an FYI notification.
The column marked UR indicates whether or not the document is urgent. The column
marked SC is the indicator for special conditions and is set by the application that creates
the document. Both these columns will display an asterisk (*) if the indicator is set to Yes.
Exercise 2 (at the end of this section) leads you through this function.
EAS150P1
Mar 6,97
Act
--__
__
__
__
***** ELECTRONIC APPROVAL SYSTEM *****
EAS150M1
- Browse All of My Documents 9:19 AM
For: SAUCEJE
SAUCEMAN JR, JAMES E
To U S
Need
Originated
Do R C App Type By
Rec'd
By
Title
-- - - --- ---- ----- ----- ---------- -----------------------------AP *
EAS DRQ
02/25 SAUCEJE
FLY, EMERSON H
AP
* EAS DRQ
02/28 SAUCEJE
JARRARD, JOHN D
AP *
TRV ITN
02/25 SAUCEJE
FLY, EMERSON H
AP
* TRV ITN
02/28 SAUCEJE
JARRARD, JOHN D
*** End of Data ***
DE=Detail FY=FYI RP=Review Path
Narrow Search Criteria _
Enter-PF1---PF2---PF3---PF4---PF5---PF6---PF7---PF8---PF9---PF10--PF11--PF12---
Browse All of My Documents
May 22, 1997
Page
23
The University of Tennessee Electronic Approval System
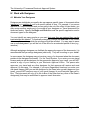
The screen below illustrates the Narrow Search Criteria window which pops up after you
type a character in the Narrow Search Criteria field and press Enter. When the window
is displayed, specify the characteristics of the document(s) you want to see and press
Enter. The system will filter out all documents that meet those criteria and display them.
If you want to change the conditions, simply repeat the process by typing a character in
the Narrow Search Criteria field and pressing Enter. If you want to remove all the
conditions at once, remove the character from the Narrow Search Criteria field and press
Enter. The complete list of documents will again be displayed.
The Application and Document Type fields are the two fields that identify a document.
For example, the application for Travel is TRV and one of the Document Types is ITN
(itinerary). If you wanted only to see Travel Itinerary documents, enter ‘TRV’ in the
Application field and ‘ITN’ in the Document Type.
If you want to see documents originated by a certain person (User ID), type that User ID
in the Originator ID field. If you are not sure of the person’s User ID, position the cursor
on that field and press PF1 for a list of users.
NOTE: For any of the fields that has an asterisk (*), you may get Help by placing the
cursor on that field and pressing PF1.
EAS150P1
Mar 6,97
***** ELECTRONIC APPROVAL SYSTEM *****
EAS150M1
- Browse All of My Documents 9:19 AM
For: SAUCEJE
SAUCEMAN JR, JAMES E
To U S
Need
Originated
Act Do R C App Type By
Rec'd
By
Title
--- -- - - --- ---- ----- ----- ---------- -----------------------------__ AP
EAS DRQ
02/25 SAUCEJE
FLY, EMERSON H
+-------------------------------------------+ RD, JOHN D
|
Narrow Search Criteria
|
|
|
|
*Application: ___
|
|
*Document Type: ___
|
|
Title: ____________________
|
|
Received Date: __________
|
|
*Originator ID: ________
|
|
Urgent: _
|
|
To Do: _
|
|
|
| Type preferences and press Enter.
|
+-------------------------------------------+
DE=Detail
FY=FYI
RP=Review Path
Narrow Search Criteria x
Enter-PF1---PF2---PF3---PF4---PF5---PF6---PF7---PF8---PF9---PF10--PF11--PF12---
Narrow Search Criteria Feature
May 22, 1997
Page
24
The University of Tennessee Electronic Approval System
3.2 Exercise 2: Browse All My Documents
Purpose:
In this exercise you will learn how to use the options available from the
Browse All My Documents Screen.
Steps:
1. Choose the Browse All My Documents option from the main menu.
2. The Browse All Of My Documents Screen will be displayed.
3. The available options are:
C
DE
view the detail
C
FY
send an FYI
C
RP
review the approval path.
Detail
4. Type ‘DE’ in the Act field on the first document line and press Enter.
5. Depending on the document type, the system will display a screen with
the detail for the document. Press PF3 to return to your browse list.
Send FYI
6. To send an ‘FYI’ to another person, type ‘FY’ in the Act field and press
Enter.
7. The Send an FYI Document Screen will be displayed. The document
information will be at the top of the screen. At the bottom, there is room
for you to enter up to 5 User IDs. If you do not know the User ID of the
person to receive the FYI, place your cursor in the User ID field and
press PF1. A list of names and User IDs will be displayed from which
you may select.
8. When you are ready to send the FYI, press PF5. This will return you to
the Browse All My Documents screen.
Review
Approval
9. To review the approval path for a document, type ‘RP’ in the Act field
next to the document line and press Enter.
10. The Review Approval Path screen will be displayed. Please note that
there are 2 panels with this screen (indicated by 1 More> in the upper
right hand corner of the screen). Use the PF10 and PF11 keys to move
left and right between the panels.
May 22, 1997
Page
25
The University of Tennessee Electronic Approval System
11. Press PF3 to return to your browse list.
Narrow
Search
Criteria
12. You may narrow the number of documents on your browse list by
using the Narrow Search Criteria option at the bottom right hand corner
of the browse screen.
13. Type any character in the Narrow Search Criteria field and press Enter.
14. A small pop-up window will be displayed with several options. For those
options that have an asterisk (*) next to it, you may press PF1 to view a
list of the possible values for that field.
15. If you wish to only browse through Travel documents, enter TRV in the
Application field. If you wish to browse only itinerary documents in the
Travel System, enter TRV in the Application field and ITN in the
Document Type field (application is required when entering a document
type). If you enter a User ID in the Originator ID, you will see those
documents that were originated by that User ID. After entering your
selection criteria, press Enter to see the list of documents that meet that
criteria.
16. To remove the criteria from your search and see the entire list of
documents again, remove the character in the Narrow Search Criteria
field and press Enter.
17. Press PF3 to return to the main menu.
May 22, 1997
Page
26
The University of Tennessee Electronic Approval System
IV. Work with Designees
4.1 Maintain Your Designees
Designees are individuals you specify who can approve specific types of documents either
instead of or in addition to you for a specific period of time. For example, if you are an
approver for Travel documents and you are going to be out of the office for two weeks, you
may assign another employee in your area as your designee on Travel documents for
those two weeks. Specify the Begin and End dates and the specific application and/or
document types for the designee.
You can identify as many people as you want, but once they are entered they can be
inactivated but not deleted. To inactivate a designee, change the End Date to the current
date or any future date on which the privilege should be revoked. You may want to name
one or more designees if you will be out of the office for an extended period of time (e.g.,
vacation).
Although assigning a designee can facilitate the approval process of the documents, it is
recommended that you assign designees judiciously. They will be acting on your behalf.
In some cases, the designee may not receive a copy of a document when the document
pertains to the designee him/herself. For the Travel System, if you enter your own travel
itinerary and you are the designee for the person who approves your travel, you will NOT
receive a copy of your itinerary in your Electronic Approval In-Box. The person who
approves your travel and any other designee for that approver will receive and must
approve it in this case. For example, if you are a Department Head and you enter your
own travel itinerary AND you are the designee for the Dean (who normally approves your
travel), you will NOT receive a copy of your travel itinerary in your Electronic Approval InBox. That document will only go to the In-Box of the Dean and any other of the Dean’s
designee(s) that may be authorized to approve travel itineraries.
May 22, 1997
Page
27
The University of Tennessee Electronic Approval System
4.2 Browse Your Designees
To access this screen, choose the Work with My Designees option from the main menu.
The screen on this page will list all unexpired designees which you have defined. An
expired designee is one whose End Date has passed so is no longer active. If you would
like to see all designees, use the Narrow Search Criteria feature and change the Active
Only indicator to ‘N’. (See next page.)
From this screen, you can:
C
Add new entries by pressing PF4 or by typing an "A" in the action field
beside an existing entry (see next section) or
C
Display the detail screen for selected entries by typing a "D" or an "S" beside
the entry you want to display.
The column labeled Appl identifies the application that this designee can approve. The
column labeled Doc indicates the type of documents in that application that the designee
can approve.
Within an application (i.e., Travel, Procurement Cards) there will most likely be several
different types of documents that are sent to the Electronic Approval System. If you want
to look at documents for only one application or only one type of document, use the
Narrow Search Criteria option shown in the lower right-hand corner of the screen.
Exercise 3 (at the end of this section) leads you through this function.
EAS540P1
***** ELECTRONIC APPROVAL SYSTEM *****
Jun 7,96
- Work with Designees Designees for: SAUCEJE
SAUCEMAN JR, JAMES E
Action
-----__
__
Designee
-------MATHELK
MCNEIMD
Name
Appl
------------------------ ---MATHEWS, LESTER K
TRV
MCNEIL, MICHAEL D
TRV
*** End of Data ***
Doc
--***
INV
Begin Date
---------05/15/1996
05/31/1996
EAS540M1
2:24 PM
End Date
----------
Narrow Search Criteria _
Enter-PF1---PF2---PF3---PF4---PF5---PF6---PF7---PF8---PF9---PF10--PF11--PF12--help
exit add
bkwrd frwrd
goto
Work with Designees
May 22, 1997
Page
28
The University of Tennessee Electronic Approval System
Use the Narrow Search Criteria option to narrow your list down to only those designees
you want to see. After entering your criteria, press Enter. The Work with Designees
screen will be displayed again with only those designees that match your criteria.
The Active Only field allows you to choose if you want to only view active designees or
view all designees (active and inactive). The Application will allow you to only view
designees who are authorized for a certain Application (i.e., ‘TRV’ for Travel). The
Document Type works with the Application field to allow you to view designees for a
specific Document Type.
If you wish to only view a specific Designee’s information, enter the Designee ID.
NOTE: For any of the fields that display an asterisk (*), you may get help by placing the
cursor on that field and pressing PF1.
+-------------------------------------------+
|
Narrow Search Criteria
|
|
|
|
Active Only: Y
|
|
*Application: ___
|
|
*Document Type: ___
|
|
*Designee ID: ________
|
|
|
|
|
| Type preferences and press Enter.
|
+-------------------------------------------+
May 22, 1997
Page
29
The University of Tennessee Electronic Approval System
4.3 Maintain Designees
The screen below is used to add, display, and modify detail information about a particular
designee and is accessed by choosing the Work with My Designees option from the main
menu then selecting a specific designee on that screen. Specify the application, the type
of documents in that application, any restrictions on the area of responsibility, the
Designee ID, and the period of time for which the designee will be active. Leave the End
Date blank to allow a designee to approve in your place indefinitely. You can also use the
features at the bottom of the screen to change the way each designation works. For
example, you may want to completely delegate the approval of a particular document to
someone in your office and have that document type sent to him/her instead of you. You
can ask for an FYI (For Your Information) notice sent to you when a designee acts on your
behalf.
Exercise 3 (at the end of this section) leads you through this function.
EAS550P1
Apr 2,97
***** ELECTRONIC APPROVAL SYSTEM *****
- Maintain Designees (A,C,D,M):
A
SNODGPJ_
TRV
Travel System
***
All Documents
17
UNIVERSITY-WIDE ADMINISTRATION
10
BUSINESS AND FINANCE
__
040
DIRECTOR OF BUSINESS & FINANCE
E170146______
REINHOM_
REINHOLD-LARSSON, MARTA G
EAS550M1
11:23 AM
*Action
*Designee For:
*Application ID:
*Document ID:
*Budget Entity:
*Vice Chancellor:
*College:
*Department:
Account:
*Designee ID:
Title:
Category:
Employee Status:
Designation:
Resp. Account:
Begin Date: 04/02/1997
End Date: __________ (Blank means 'Open-ended')
Designee should get the specified documents INSTEAD of me: N
(Y/N)
Send me an FYI when this designee acts on my behalf: N
(Y/N)
Enter-PF1---PF2---PF3---PF4---PF5---PF6---PF7---PF8---PF9---PF10--PF11--PF12-help
exit
user
info
goto
Maintain Designees
NOTE: If a field has an asterisk (*) next to it, use the PF1 (help) key to see a list of
possible values for a field. For example, if your cursor is on the Application ID field,
pressing PF1 will display a small window with the valid Application IDs. You may then
May 22, 1997
Page
30
The University of Tennessee Electronic Approval System
choose one from the list, press Enter and the Application ID field will be filled in with the
value you selected.
The area of responsibility for the designee is determined by the Budget Entity, Vice
Chancellor, College, Department, and/or Account. Entering values in these fields will
narrow the documents that the designee may act upon to those that are in those areas.
If you enter a Vice Chancellor, College, or Department, you must supply the Budget
Entity; if you specify a Department, the College must also be supplied. If you enter an
account number, the designee will only receive documents related to that account.
Please pay special attention to these fields since they will determine exactly which
documents your designee will be assigned responsibility.
The PF9 (info) key will assist you in determining the Budget Entity, Vice Chancellor code,
College, Department, and/or Account number. If an account number is present, PF9 will
return the attributes for the area of responsibility for that account number. If no account
number is present, PF9 returns the area of responsibility for the Designee’s responsible
account. You may then remove or modify these fields as necessary. For example, if you
want to allow the designee to approve all document in the college, remove the account
number and department entries.
You cannot Purge a designee. This is action is prevented so a historical record of your
designees can be maintained for auditing purposes. To end the designee’s ability to act
for you, provide an End Date on this screen.
May 22, 1997
Page
31
The University of Tennessee Electronic Approval System
4.4 Exercise 3: Work with My Designees
Purpose:
In this exercise you will learn how to add, modify, and view your designees
in the Electronic Approval System
Steps:
1. Choose the Work with My Designees from the main menu.
2. The Work With Designees screen will be displayed and will list any
active designees you currently have.
3. Press the PF4 key to add a designee.
4. The Maintain Designees screen is displayed. Fill in the required fields,
which are Application ID, Document ID, and Designee ID. If you want
the designee to be able to approve all document types for an
application, enter ‘***’ as the Document ID.
NOTE: If you need help on a field, press PF1 while your cursor is
positioned in that field. You will be shown a list of values for that field.
You may select a value from that list or PF3 to return.
When you enter values in the Budget Entity, Vice Chancellor,
College, Department , and/or Account Number fields, this narrows
the documents that the designee may act upon to that Budget Entity,
Vice Chancellor, College, Department, and/or Account Number. If
you enter a Vice Chancellor, College, or Department, you must supply
the Budget Entity. If you enter an account number, the designee will
only receive documents related to that account.
Please pay special attention to these fields since they will determine
exactly which documents your designee will be assigned responsibility.
The PF9 (info) key will assist you in determining the Budget Entity, Vice
Chancellor code, College, Department, and/or Account number. If an
account number is present, PF9 will return the attributes for the area of
responsibility for that account number. If no account number is present,
PF9 returns the area of responsibility for the Designee’s responsible
account. You may then remove or modify these fields as necessary.
For example, if you want to allow the designee to approve all document
in the college, remove the account number and department entries.
May 22, 1997
Page
32
The University of Tennessee Electronic Approval System
You cannot Purge a designee, however, one may be inactivated. This
action is prevented so an historical record can be maintained for
auditing purposes.
5. Press PF3 to return to the Work with My Designees screen.
6. From this screen, press PF4 (add) to add another designee, PF3 to
return to the main menu, or Enter an ‘M’ in the Act field to modify an
existing designee’s information.
May 22, 1997
Page
33
The University of Tennessee Electronic Approval System
V. Work with User Profile
5.1 Maintain Your User Profile
The screen on the next page is used to maintain your Electronic Approval User Profile.
This profile allows you to customize the way certain features of the system behave and
to specify an e-mail address to which you want electronic approval notices sent.
To access this screen, choose the Work with My Profile option from the main menu. If
when you access this screen a message is displayed stating “User Profile was not found”
you must follow the steps to add your User Profile. You will only add your User Profile
once.
To Add your User Profile:
C
C
C
Type "A" in the Action field.
Fill in all screen fields necessary for your profile and press Enter.
The system will respond with a message "User Profile added successfully.".
To receive an FYI when a document you have approved has reached the final approval,
enter a ‘Y’ in the first field. You will then receive an FYI for every document you have
approved when the document is approved, denied, or withdrawn by the last person in the
approval path.
If you would like the system to prompt you for confirmation when you approve documents,
type a ‘Y’ in the second field. You will then be prompted with a confirmation screen each
time you approve a document.
If you want to receive notification via e-mail when you have documents in your Electronic
Approval In-Box, enter the e-mail address to which the notices should be sent. The system
will send you nightly notices of the number and types of documents in your In-Box. Leave
the e-mail address blank if you do not want to receive e-mail notices.
To make changes to your profile, use the Modify ("M") action, type your changes and press
Enter.
Exercise 4, in the next section, leads you through this function.
May 22, 1997
Page
34
The University of Tennessee Electronic Approval System
EAS500P1
Jun 7,96
***** ELECTRONIC APPROVAL SYSTEM *****
- Work with User Profile -
*Action (A,C,D,M):
Profile for: SAUCEJE
º
EAS500M1
2:39 PM
_
SAUCEMAN JR, JAMES E
Y Send me an FYI when a document I have approved reaches Final Approval.
Y I would like a Confirmation Prompt when I approve documents.
Physically delete FYIs which I have purged after 7__ days.
(Leave blank to keep indefinitely)
Send my E-mail notices to the following address:
[email protected]____________________________________________
(Leave blank if you do not want E-mail notices)
Enter-PF1---PF2---PF3---PF4---PF5---PF6---PF7---PF8---PF9---PF10--PF11--PF12---
Work with User Profile
May 22, 1997
Page
35
The University of Tennessee Electronic Approval System
5.2 Exercise 4: Work with My Profile
Purpose:
In this exercise you will learn the steps to add or change your profile in the
Electronic Approval System.
Steps:
1. Choose the Work with My Profile option from the main menu.
2. The Work with User Profile screen will be displayed.
Note: If your profile is not already defined, you will see a message
stating your Profile does not exist.
3. To add your Profile, type ‘A’ in the Action field. Type ‘M’ if you want to
modify your Profile. Please read the options carefully before typing in
your preferences.
To receive an FYI when a document you have approved has reached
the final approval, enter a ‘Y’ in the first field. You will then receive an
FYI for every document you have approved (or denied) when the
document is approved by the last person in the approval path.
If you would like the system to prompt you when you approve
documents, type a ‘Y’ in the second field. You will then be prompted
with a confirmation screen each time you approve a document.
If you want to receive notification via e-mail when you have documents
in your Electronic Approval In-Box, enter the e-mail address to which the
notices should be sent. The system will send you nightly notices of the
number and types of documents in your In-Box. Leave the e-mail
address blank if you do not want to receive e-mail notices.
4. When you are finished, press Enter.
5. Press PF3 to return to the main menu.
May 22, 1997
Page
36
The University of Tennessee Electronic Approval System
VI. Designee Request for Third Party
6.1 Maintain Designee Request for a Third Party
To request to be a designee for someone else, or to set up a designee for someone other
than yourself, select the Designee Request for Third Party option from the main menu.
You may wish to use this option to request designee rights in an application area, for
certain documents, and/or for a specific budget entity, department, or college. If you
submit a request to be a designee for someone else, the other person (principal) must
approve your request before it actually goes into effect.
This option may also be used to request someone else (other than yourself) be approved
as a designee for a third party. For example, another co-worker in your area may need to
be a designee for the Department Head. If you have access, you may enter the designee
request for your co-worker to be approved as designee for the Department Head
(principal). The request would have to be approved by the Department Head (principal)
before it would go into effect.
This designee request document is processed through the Electronic Approval System just
like all the other documents that are sent from other applications (i.e., Travel, Procurement
Cards). The Status field on the Browse Designee Requests screen will display Uninitiated
for a document that has not been sent to Electronic Approval for processing; Pending
when the document has been sent but no action has been taken; and Approved, Denied,
or Withdrawn depending on the action of the Principal User when that occurs.
May 22, 1997
Page
37
The University of Tennessee Electronic Approval System
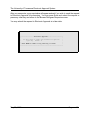
6.2 Browse Designee Requests
To access this screen, choose the Designee Request for Third Party from the main menu.
This browse screen will list any designee requests that are still active.
To add a new request, use the PF4 (add) function listed at the bottom of the screen. An
add screen will be displayed so you may enter the information for the request. The add
screen is shown in the next section.
From this screen you may Display, Modify, or Purge a document request by entering ‘D’
‘M’, or ‘P’ in the Action field next to the request. Note: Only ‘Uninitiated’ documents can
be purged.
EAS703P1
***** ELECTRONIC APPROVAL SYSTEM *****
May 5,97
- Browse Designee Requests Documents for:BOSSID
BOSS, IMA D.
Action
-----__
__
__
__
__
__
Document
Number
---------10
11
12
13
14
15
Designee Principal Appl Doc
Send
ID
ID
ID Type Proxy FYI
-------- --------- ---- ---- ----- ---TOWNSSS MCNEIMD
TRV ITN
N
N
TOWNSSS MONROLF
PCM PRC
N
N
MONROLF TOWNSSS
TRV ***
N
N
SNODGPJ MCNEIMD
TRV ITN
N
N
THOMPMR MONROLF
PCM PRC
N
N
SNODGPJ TOWNSSS
TRV ***
N
N
*** End of Data ***
EAS703M1
3:08 PM
Status
-----PENDING
APPROVED
UNINITIATED
PENDING
APPROVED
PENDING
Narrow Search Criteria _
Enter-PF1---PF2---PF3---PF4---PF5---PF6---PF7---PF8---PF9---PF10--PF11--PF12--help
exit add
bkwrd frwrd
goto
If you wish to narrow the list of
documents, type any character in
the Narrow Search Criteria field
and press Enter. The pop-up
screen shown below will allow
you
to refine your list.
Remember you can use PF1
(help) on any field marked with
an asterisk (*).
May 22, 1997
+-------------------------------------------+
|
Narrow Search Criteria
|
|
|
|
Status: _
|
|
*Principal: ________
|
|
*Designee: ________
|
|
*Application: ___
|
|
*Document Type: ___
|
|
|
| Type preferences and press ENTER.
|
+-------------------------------------------+
Page
38
The University of Tennessee Electronic Approval System
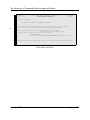
6.3 Add a Designee Request
To add a designee request, use the PF4 (add) key from the Browse Designee Requests
screen. You must enter the values in the Designee for, Designee, Application, and
Document fields. Press Enter when you are finished. You will be prompted whether or
not to submit the request for approval (screen is shown on the next page).
The area of responsibility for the designee is determined by the Budget Entity, Vice
Chancellor, College, Department, and/or Account. Entering values in these fields will
narrow the documents that the designee may act upon to those that are in those areas.
If you enter a Vice Chancellor, College, or Department, you must supply the Budget
Entity; if you specify a Department, the College must also be supplied. If you enter an
account number, the designee will only receive documents related to that account.
To request designee rights for all documents in an application area, specify the
Application (i.e., TRV for Travel) and type ‘***’ in the Document field.
Remember to use the PF1 (help) key for those fields that are marked with an asterisk (*).
You will see a list from which you may select values for the field.
Exercise 5 (at the end of this section) leads you through this function.
EAS705P1
May 6,97
***** ELECTRONIC APPROVAL SYSTEM *****
- Designee Request Document -
*Action (A,C,D,M,P):
Requested by:
*Designee for:
*Designee:
*Application:
*Document:
*Budget Entity:
*Vice Chancellor:
*College:
*Department:
Account:
Begin Date:
End Date:
EAS705M1
9:55 AM
A
BOSSID
DEANID__
YOURID__
TRV
ITN
__
__
__
___
_____________
05/06/1997
__________
Designee should get the specified documents INSTEAD of Principal: N
Principal should receive FYI when designee acts: N
Enter-PF1---PF2---PF3---PF4---PF5---PF6---PF7---PF8---PF9---PF10--PF11--PF12---
May 22, 1997
Page
39
The University of Tennessee Electronic Approval System
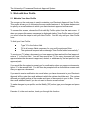
After you press enter, a pop-up window will appear and ask if you wish to send the request
to Electronic Approval for processing. You may press Enter and submit the request or
press any other key and return to the Browse Designee Requests screen.
You may submit the request to Electronic Approval at a later date.
+-------------------Electronic Approval--------------------+
|
|
|
You have asked to submit this document for approval:
|
|
Type: DRQ
Number: 14
|
|
|
| Press ENTER to submit or any other key to return.
|
+----------------------------------------------------------+
May 22, 1997
Page
40
The University of Tennessee Electronic Approval System
6.4 Exercise 5: Designee Request for Third Party
Purpose:
In this exercise you will learn the steps necessary to process a designee
request for someone other than yourself or request that you be a designee
for someone else.
Steps:
1. Select the Designee Request for Third Party option from the main menu.
2. If you have outstanding requests, they will be listed on the screen
shown.
3. From the Browse Designee Requests screen, press PF4 (add) to add
a new designee request.
4. The Designee Request Document screen is displayed.
5. Enter another student user ID (other than yours) in the Designee for
field.
6. Enter your student user ID in the Designee field.
7. Enter ‘TRV’ in the Application field and ‘ITN’ in the Document field.
8. The remaining fields are not required, however, you may enter values
in them. Use the PF1 (help) key to assist you in entering values in
these fields.
9. Press Enter when you are finished.
10. When the Electronic Approval pop-up screen is displayed, press Enter
to submit it to be processed. If you do not wish to submit the request to
Electronic Approval, press any other key.
11. Press PF3 to return to the Browse Designee Requests screen.
12. Press PF3 again to return to the main menu.
Back to Top
May 22, 1997
Index
Page
41