1
Users Guide
Version 5.1.12
October 22, 2008
Deepnines Security Edge Platform
©2008 Deepnines, Inc. All rights reserved. Deepnines Technologies, Security Edge Platform, Security Edge
System, Sleuth9 Security System, Sleuth9, ForensiX Capture System, Holistic Management Console, and
Zero Footprint Technology are trademarks and/or registered trademarks of Deep Nines Inc. All other brands
and products are trademarks and/or registered trademarks of their respective owners. Protected by US
Patents 6,930,978 and 7,058,976
Users Guide v5.1.12
ii
Deepnines Security Edge Platform
End User License Agreement
Warranty Policy
WP
This End-user License Agreement (the "Agreement") is an agreement between you (both the
individual installing the Product and any legal entity on whose behalf such individual is acting)
(hereinafter "You" or "Your") and Deep Nines, Inc. (hereinafter “Deepnines”).
Taking any action to setup or install the product constitutes your acceptance of this end user
license agreement. Written approval is not a prerequisite to the validity of enforceability of this
agreement and no solicitation of any such written approval by or on behalf of you shall be
construed as an inference to the contrary.
If you have ordered this product and such order is considered an offer by you, Deepnines‟
acceptance of your offer is expressly conditional on your assent to the terms of this agreement, to
the exclusion of all other terms. If these terms are considered an offer by Deepnines, your
acceptance is expressly limited to the terms of this agreement. If you do not agree with all the
terms of this agreement, you must return this licensed product with the original package and the
proof of payment to the place you obtained it for a full refund.
1. Definitions
“Annual Maintenance and Support” means the maintenance and support services provided by
Deepnines to you that are further defined in Section 3 below.
“Bandwidth” means the inline network connection rate or throughput rate.
“Documentation” means the user manuals provided to you along with the licensed product.
“Licensed Configuration" means to the extent applicable, as indicated on the license key, the
choice of features and bandwidth, as declared by you in your purchase order, or request for
License key, and upon which the licensing fee was based. The licensed configuration may
technically limit the functionality, performance or throughput of the licensed product as defined by
the applicable license key.
“License key" means the code provided to you by Deepnines that enables the licensed product to
operate on the Licensed-Server for the specified licensed configuration.
"Licensed product” means the object code copy of the software program provided to you in
association with this agreement, together with the associated original electronic media and all
accompanying manuals and other documentation, and together with all enhancements, upgrades,
and extensions thereto that may be provided by Deepnines to you from time to time.
"Licensed-Server" means the server, provided by you and defined by the host ID identified by you
to Deepnines when obtaining the license key or the appliance provided by Deepnines to you and
defined by the serial number, which enables the licensed product to operate in accordance with
the licensed configuration.
Users Guide v5.1.12
iii
Deepnines Security Edge Platform
“Managed Service Provider” if (a) you are in the regular business of providing firewall, VPN, IDS,
IPS, IDS, Anti-Virus, Anti-Spam, or Content Filtering addressing management for a fee to entities
that are not your affiliates (each a “service customer”); and (b) you indicated in your purchase
order or in requesting the license key that You intend to use the licensed products on behalf of
service customers.
“Standard User” means that if you indicated in your purchase order or in requesting the license
key that you intend to use the licensed products on Your own behalf, or you obtained the licensed
products from a managed service provider.
“Third Party Software” means any software programs provided by third parties contained in the
licensed product as detailed in the third party software addendum attached to this agreement.
“Third Party Software Provider” means the third party that has the right to provide and grant
licenses for the use of third party software.
2. License and Restrictions
License: Subject to the terms and conditions of this Agreement, Deepnines hereby grants only to
you, a non-exclusive, non-transferable license to use the copy of the licensed product in
accordance with the relevant end user documentation provided by Deepnines only on the
licensed-server and only for the licensed configuration. You have no right to receive, use or
examine any source code or design documentation relating to the licensed product.
Standard User Restrictions: If you are a standard user, you license the licensed products solely
for use by you to provide security management for your own operations. No licensed product, nor
any portion thereof, may be used by or on behalf of, accessed by, re-sold to, rented to, or
distributed to any other party.
Managed Service Provider Restrictions: If you are a managed service provider, you license the
licensed products for use by yourself to provide security management for only the operations of
your service customers. No licensed product or any portion thereof, except for the management
of your service customers, may be used by or on behalf of, accessed by, re-sold to, rented to, or
distributed to any other party.
General Restrictions: Except for one copy solely for back-up purposes and as required by
statute, you may not copy the licensed product, in whole or in part. You must reproduce and
include the copyright notice and any other notices that appear on the original licensed product
copy on any copy and in any media therefore. The licensed product is licensed to You solely for
your internal use by You and for you and the licensed product or any portion thereof may not be
used or accessed by, sub-licensed to, re-sold to, rented to, or distributed to any other party. You
agree not to allow others to use the licensed product and you will not use the licensed product for
the benefit of third parties. You acknowledge that the source code of the licensed product, and
the underlying ideas or concepts, are valuable intellectual property of Deepnines and You agree
not to, except as expressly authorized and only to the extent established by applicable statutory
law, attempt to (or permit others to) decipher, reverse translate, de-compile, disassemble or
otherwise reverse engineer or attempt to reconstruct or discover any source code or underlying
ideas or algorithms or file formats or programming or interoperability interfaces of the Licensed
products by any means whatsoever. You will not develop methods to enable unauthorized parties
to use the licensed product, or to develop any other product containing any of the concepts and
ideas contained in the licensed product. You will not (and will not allow any third party to) modify
licensed product or incorporate any portion of licensed product into any other software or create a
derivative work of any portion of the licensed product. You will not (and will not allow any third
party to) remove any copyright or other proprietary notices from the licensed product.
Users Guide v5.1.12
iv
Deepnines Security Edge Platform
Specific Restrictions: The licensed product is licensed to you based on the applicable licensed
configuration purchased. The licensed product is licensed as a single product; it may not be used
on more than one licensed server at a time, except as set forth in this Section 2. The licensed
product is “in use” on a computer when it is loaded into the temporary memory (i.e., randomaccess memory or RAM) or installed into the permanent memory (e.g., hard disk, CD-ROM, or
other storage device) of that licensed server. This license authorizes you to make one copy of the
Software solely for backup or archival purposes, provided that the copy you make contains all of
the Software‟s proprietary notices.
Evaluation License: This section shall only apply if you are evaluating the licensed product for an
initial thirty (30) day evaluation period. The license is valid only for a period of thirty (30) days
from the delivery of the licensed product, and is designed to allow you to evaluate the licensed
product during such period. In the event that you wish to enter into a longer-term license
agreement with Deepnines, you may request a license key from Deepnines that if provided to you
will allow you to use the licensed product after such evaluation period, but only subject to all of
the terms and conditions of this agreement. In the event that you determine not to enter into a
licensing transaction with Deepnines at the end of such thirty day evaluation period, or in the
event that Deepnines advises you that discussions with respect to a licensing transaction have
terminated, then your rights under this agreement shall terminate and you shall promptly return to
Deepnines or destroy all copies of the licensed product, and so certify to Deepnines.
Disabled License-Server: The license key you obtain from Deepnines enables the licensed-server
that enables you to use the licensed configuration of the licensed product. If your licensed-server
is disabled for any reason, Deepnines may, at its sole discretion, issue you another license key
that will enable you to operate this licensed product on a substitute licensed-server. In this event,
you agree not to use the licensed product on the original licensed-server nor its license key.
3. Maintenance and Support
Annual Maintenance and Support: For the time period specified in purchase order, applicable
price list or product packaging for the licensed product, and if not specified, then for a period of
thirty (30) days from the date of original purchase of the licensed product, you are entitled to
download revisions, upgrades, or updates to the licensed product, “when and if” Deepnines
publishes them via its electronic bulletin board system, website or through other online services.
After the specified time period, you have no further rights to receive any revisions, upgrades or
updates without the purchase of annual maintenance and support for the licensed product
pursuant to the terms and conditions of the Deepnines then-current maintenance and support
policies that are available at www.Deepnines.com/support.
“Product Updates and Product Upgrades” means any modification or addition to the licensed
product that fixes minor defects and does not change the overall utility, functional capability or
application of the licensed product and only to the extent that any such product updates are
actually provided by Deepnines to you hereunder. Product updates do not include, and the
licenses and Deepnines‟ obligations hereunder do not extend to, (a) “product upgrades,” that are
software or product releases that contain additional functionality or enhancements to the
functionality or performance of the Licensed product or (b) any product that is marketed by
Deepnines as a new or distinct product, unless mutually agreed to by the parties and specifically
noted in the purchase order or other contractual agreement.
“Subscription Updates” means that if you purchased a licensed configuration requiring
subscription updates, meaning periodic updates to signatures, databases, or lists pertaining to
third party software. Subscription updates shall be provided on a “when and if” commercially
available basis and only to you (a) for the time period specified in your purchase order (b) as long
as you pay the applicable annual maintenance and support fee.
Users Guide v5.1.12
v
Deepnines Security Edge Platform
Renewal Rate: You may renew annual maintenance and support at any time based on the value
identified and declared by you in your purchase order and pursuant to the then-current Deepnines
annual maintenance and support terms and conditions, which are available at
www.Deepnines.com. Deepnines reserves the right to cancel any subscription based service at
the end of the agreed upon term.
Renewal Escalation: Deepnines reserves the right to increase, but in no event decrease, the
renewal rate for the annual maintenance and support at the end of the agreed upon term. This
price increase shall be by no more than a percentage equal to the percentage set by the United
States Department of Labor Consumer Price Index (CPI) for the given time period or term of the
agreement.
4. Title and Intellectual Property
All rights, title, and interest in and to the licensed product shall remain with Deepnines and its
licensors. The licensed product is protected under international copyright, trademark and trade
secret and patent laws. The license granted herein does not constitute a sale of the licensed
product or any portion or copy of it.
5. Term and Termination
The license granted under Section 2 of this agreement is a perpetual license and will terminate
only if such termination results from your material breach of your obligations under this
agreement. The subscription based third party licenses, identified in the third party software
addendum, granted under Section 2 of this agreement will terminate contemporaneously with the
termination (a) specified in your purchase order (b) your failure to pay the applicable annual
maintenance and support fees or if such termination results from Your material breach of your
obligations under this agreement. Deepnines may terminate this agreement at any time upon
your breach of any of the provisions hereof. Upon termination of this agreement, you agree to
cease all use of the licensed product and to return to Deepnines or destroy the licensed product
and all documentation and related materials in your possession, and so certify to Deepnines.
Except for the license granted herein and as expressly provided herein, the terms of this
agreement shall survive termination.
6. Indemnification
Deepnines shall have the right, but not the obligation, to defend or settle, at its option, any action
at law against you arising from a claim that your permitted use of the licensed product under this
agreement infringes any patent, copyright, or other ownership rights of a third party. You agree to
provide Deepnines with written notice of any such claim within ten (10) days of your notice thereof
and provide reasonable assistance in its defense. Deepnines has sole discretion and control
over such defense and all negotiations for a settlement or compromise, unless it declines to
defend or settle, in which case you are free to pursue any alternative you may have.
7. Limited Warranty, Warranty Disclaimers and Limitation of Liability
Limited Warranty: Deepnines warrants to you that the encoding of the software program on the
media on that the licensed product is furnished will be free from defects in material and
workmanship, and that the licensed product shall substantially conform to its user manual, as it
exists at the date of delivery, for a period of ninety (90) days from the date You receive the
original license key. Deepnines‟ entire liability and your exclusive remedy shall be, at Deepnines‟
option, either: (i) return of the price paid to Deepnines for the licensed product, resulting in the
termination of this agreement, or (ii) repair or replacement of the licensed product or media that
does not meet this limited warranty or (iii) any hardware provided by Deepnines to you has a one
year limited warranty for repair or replacement.
Users Guide v5.1.12
vi
Deepnines Security Edge Platform
Except for the limited warranties set forth in this section, the licensed product and any services
are provided “as is” without warranty of any kind, either expressed or implied. Deepnines does
not warrant that the licensed product will meet your requirements or that its operation will be
uninterrupted or error-free. Deepnines disclaims any warranties of merchantability, fitness for a
particular purpose, and non-infringement. Some jurisdictions do not allow the exclusion of implied
warranties or limitations on how long an implied warranty may last, so the above limitations may
not apply to you. This warranty gives you specific legal rights. You may have other rights that vary
from state to state.
Limitation on Liability: Exception for bodily injury of a person, in no event will Deepnines be liable
to you or any third party for any damages arising out of the subject matter of this agreement, the
licensed product or any services under any contract, negligence, strict liability or other theory, for
any indirect, special incidental, or consequential damages (including lost profits), or for loss of or
corruption of data), or for cost of procurement of substitute goods or technology, irrespective of
whether Deepnines has been advised of the possibility of such damages. Deepnines‟ maximum
liability for damages shall be limited to the license fees received by Deepnines under this license
for the particular licensed product(s) that caused the damages.
Some jurisdictions do not allow the exclusion or limitation of incidental or consequential damages,
so the above limitation or exclusion may not apply to you.
8. Government Regulation and Export Control
Government Regulations: You agree that the licensed product will not be shipped, transferred, or
exported into any country or used in any manner prohibited by law.
Export: The Licensed product is subject to U. S. export control laws, including the U. S. Export
Administration Act and its associated regulations, and may be subject to export or import
regulations in other countries. Customer agrees to comply strictly with all such laws and
regulations and acknowledges that it has the responsibility to obtain licenses to export, re-export
or import the licensed system or any portion thereof.
Any and all of your obligations with respect to the licensed product shall be subject in all respects
to such United States laws and regulations as shall from time to time govern the license and
delivery of technology and products abroad by persons subject to the jurisdiction of the United
States, including the Export Administration Act of 1979, as amended, any successor legislation,
and the Export Administration Regulations ("EAR") issued by the Department of Commerce,
International Trade Administration, and Bureau of Export Administration. You warrant that you
will comply in all respects with the export and re-export restrictions applicable to the Licensed
product and will otherwise comply with the EAR or other United States laws and regulations in
effect from time to time.
You warrant and agree that you are not: (i) located in, under the control of, or a national or
resident of Cuba, Iraq, Libya, North Korea, Iran, Syria, Sudan or Yugoslavia, or (ii) on the U.S
Treasury Department list of Specially Designated Nationals or the U.S. Commerce Department's
Table of Deny Orders.
9. General
Miscellaneous: You may not assign your rights or obligations under this Agreement without the
prior written consent of Deepnines. If any provision of this Agreement is held to be invalid or
unenforceable by a court of competent jurisdiction, that provision of the Agreement will be
enforced to the maximum extent permissible so as to affect the intent of the Agreement, and the
remainder of the provisions of this Agreement shall remain in full force and effect. This
Agreement is governed by the laws of the United States and the State of Texas, without
reference to conflict of laws principles.
Users Guide v5.1.12
vii
Deepnines Security Edge Platform
The United Nations Convention on Contracts will not govern this Agreement for the International
Sales of Goods, the application of which is expressly excluded. This Agreement sets forth the
entire understanding and agreement between you and Deepnines and may be amended only in
writing signed by both parties.
Third Party Software: The provisions of this Agreement shall apply to all Third Party Software
Providers and to Third Party Software as if they were the Licensed product and Deepnines,
respectively.
Government Restricted Rights: This provision applies to licensed product acquired directly or
indirectly by or on behalf of any Government. The licensed product is a commercial product,
licensed on the open market at market prices, and was developed entirely at private expense and
without the use of any government funds. Any use modification, reproduction, release,
performance, display, or disclosure of the licensed product by any government shall be governed
solely by the terms of this agreement and shall be prohibited except to the extent expressly
permitted by the terms of this agreement, and no license to the licensed product is granted to any
government requiring different terms.
High Risk Activities: The software is not fault-tolerant and is not designed or intended for use in
hazardous environments requiring fail-safe performance, including without limitation, in the
operation of nuclear facilities, aircraft navigation or communication systems, air traffic control,
weapons systems, direct life-support machines, or any other application in which the failure of the
Software could lead directly to death, personal injury, or severe physical or property damage
(collectively, “High Risk Activities”). Deepnines expressly disclaims any express or implied
warranty of fitness for high risk activities.
Taxes: You will pay all sales, property, excise, use, value added and other similar taxes and
charges that become due and payable by reason of your actions under this agreement, the
license of the licensed product or the use or possession of the Licensed product by you,
excluding taxes directly imposed on Deepnines‟ income. If a certificate of exemption or similar
document is to be used in order to exempt you from such liability, you will furnish a copy of such
certificate or document to Deepnines.
Payment Terms: All fees, prices and other monetary amounts stated in this agreement are in
United States Dollars and are exclusive of taxes unless expressly specified otherwise. Unless
otherwise specified, all amounts payable under this agreement will be due within thirty (30) days
after the date of an invoice in respect thereof. You will pay a fee equal to the lower of one and
one-half percent (1.5%) per month or the highest legal rate allowed on all past due balances
owed by you under this Agreement. You also agree to pay Deepnines all reasonable costs and
expenses of collection, including attorneys‟ fees. If you fail to remit any amount payable to
Deepnines within thirty (30) days after the date of due payment, Deepnines may, in addition to all
other rights and remedies under this agreement and at law or equity, terminate this agreement,
under the provisions of Section 5.1 of this agreement. Amounts that are due and payable will
survive the termination of this agreement.
Questions? Should you have any questions concerning this Agreement, contact the
manufacturer at Deepnines, Inc., 14643 Dallas Parkway, Ste 150, Dallas Texas 75254 or our
website www.Deepnines.com.
Users Guide v5.1.12
viii
Deepnines Security Edge Platform
ADDENDUM
Third Party Software
For SEP 4.4.1 and higher:
Perpetual; Postgresql, Hunny XStream MIME toolkit, Performance Technologies, Inc. HDLC
Frame Transfer drivers, ImageStream, The OpenSSL Project; Xerces-C++ XML parser; Free
Software Foundation, Inc.:gnu (libgetopt, libregex); Java:Borland, Genlogic, SunMicrosystems,
Java4less, Incors, Jfree, Hypercronix Subscription
SEP - Subscription Based Software
Kaspersky -- KAV_Engine-5.5.4.34
For EFX 2.0 and higher:
junit, jfree, apache commons (beanutils, lang, logging, net, poi, collections, codec), jfreereport,
monarch date, trove4j, jgoodies, mindprod, postgresql
For EIQ 2.0 and higher:
Apache License, apache tomcat, http://www.apache.org/licenses/; perl
(http://dev.perl.org/licenses/); dom4j (http://www.dom4j.org/license.html); hibernate
(http://www.hibernate.org/356.html); postgresql (http://www.postgresql.org/about/licence); log4j
(http://logging.apache.org/ and http://www.apache.org/foundation/licence-FAQ.html); c3p0
(http://www.mchange.com/projects/c3p0/index.html - LGPL); nessus (licensed pursuant to the
Tenable Network Security, Inc., Registered Plugin Feed Subscription License Agreement) ;netsnmp; tcl used by expect; perl scripts - (http://dev.perl.org/licenses/); Net-Nessus-ScanLite;
Config-IniFiles; IO-Socket-SSL; Net-Telnet; TermReadKey; Net_SSLeay; nessus-parse
General Third Party Licenses to use the following software:
Apache License, Version 2.0, January 2004, http://www.apache.org/licenses/; GNU General
Public License, v. 2, June 1991, http://www.gnu.org/copyleft/gpl.html; Tenable Network Security,
Inc. Registered Plugin Feed Subscription License Agreement; Tenable Network Security, Inc
Registered Plugin Feed Subscription License Agreement v.3 2.11.05; CMU/UCD Copyright
Notice (which contains license/redistribution provisions); Kaspersky Labs. Copyright Notice
(which contains license/redistribution provisions); Cambridge Broadband Ltd. Copyright Notice
(which contains license/redistribution provisions); Sun Microsystems, Inc. Copyright Notice (which
contains license/redistribution provisions); Sparta, Inc. Copyright Notice (which contains
license/redistribution provisions); Cisco/BUPTNIC Copyright Notice (which contains
license/redistribution provisions); Fabasoft R&D Software GmbH & Co KG Copyright Notice
(which contains license/redistribution provisions)
Users Guide v5.1.12
ix
Deepnines Security Edge Platform
P
Preface
This manual provides installation, administration and operation information for the Deepnines
Security Edge Platform (SEP). This is a technical document intended for use by technical
support, technicians and operators responsible for the operation and maintenance of the SEP.
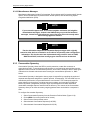
Note
NOTE
A note icon identifies information for the proper operation of SEP, including helpful hints, shortcuts,
or important reminders.
Caution
!
CAUTION !!
A caution icon indicates a hazardous situation that if not avoided, may result in minor or moderate
injury. Caution may also be used to indicate other unsafe practices or risks of property damage.
Trademarks
GHGH
GHJ
Product names mentioned in this manual may be trademarks or registered trademarks of their
respective companies and are hereby acknowledged.
Copyright
2008 Deepnines Inc. This manual is proprietary to Deepnines Inc. and is intended for the
exclusive use of Deepnines Inc‟s customers. No part of this document may in whole or in part be
copied, reproduced, distributed, translatedGHGH
or reduced to any electronic or magnetic storage
medium without the express written consentGHJ
of a duly authorized officer of Deepnines Inc.
Users Guide v5.1.12
x
Deepnines Security Edge Platform
Disclaimer
This manual has been thoroughly reviewed for accuracy. All statements, technical information,
and recommendations contained herein and in any guides or related documents are believed
reliable, but the accuracy and completeness thereof are not guaranteed or warranted, and they
are not intended to be, nor should they be understood to be, representations of warranties
concerning the products described.
Record of Revisions
Revision
Level
Date
Reason for Change
5.1
11-17-07
Preliminary Release
5.1.0 - b469
1/25/08
Revision 1
5.1.2 - 505
4/10/08
Revision 1
Comments or Suggestions Concerning this Manual
Comments or suggestions regarding the content and design of this manual are appreciated. To
submit comments, please contact the Deepnines Inc., Technical Publications or Technical
Support Department via email at [email protected]. See Chapter 7, “Technical
Support/Additional Resources “
Users Guide v5.1.12
xi
Deepnines Security Edge Platform
Table of Contents
ToC
Preface ................................................................................................................. x
Chapter 1 - Introduction ..................................................................................1-1
1.1
Overview of the Security Edge Platform (SEP) .................................................................. 1-1
Chapter 2 - Installation Requirements ...........................................................2-1
2.1
Installing the Security Edge Platform (SEP) Operating System ........................................ 2-1
Chapter 3 - Edge Management Console (EMC) .............................................3-1
3.1
3.2
3.3
3.3.1
3.4
3.5
3.6
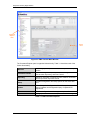
Overview of the Edge Management Console (EMC) ......................................................... 3-1
Installing the EMC .............................................................................................................. 3-1
Launching the EMC ............................................................................................................ 3-1
Logging in to EMC ................................................................................................ 3-2
EMC Console Main Window .............................................................................................. 3-4
Navigating the Command Explorer Pane ........................................................................... 3-6
EMC Version Number ........................................................................................................ 3-7
Chapter 4 - License Setup ...............................................................................4-1
4.1
4.2
Overview ............................................................................................................................ 4-1
Obtaining Your License ...................................................................................................... 4-1
Chapter 5 - Configuring SEP ...........................................................................5-1
5.1
5.2
5.3
5.4
5.4.1
5.4.2
Overview ............................................................................................................................ 5-1
How to Setup Email Anti-Virus Scanning ........................................................................... 5-1
How to Create a Flow Spec for IPS and IPS/IDS .............................................................. 5-6
How to Setup URL Filtering ................................................................................................ 5-9
Flow Spec Schedules ......................................................................................... 5-10
Putting It All Together For Custom URL Filtering .............................................. 5-12
Users Guide v5.1.12
xii
Deepnines Security Edge Platform
Chapter 6 - SEP Resources .............................................................................6-1
6.1
Overview ............................................................................................................................ 6-1
6.2
Monitors .............................................................................................................................. 6-1
6.2.1
Virus Scanner Activity .......................................................................................... 6-2
6.2.2
SMTP Activity ....................................................................................................... 6-3
6.2.3
POP3 Activity ....................................................................................................... 6-5
6.2.2
System Resources ............................................................................................... 6-7
6.2.2
Network Traffic ..................................................................................................... 6-7
6.2.3
Flow Statistics .................................................................................................... 6-10
6.2.4
Top Talkers ........................................................................................................ 6-11
6.2.5
Edge ForensiX ................................................................................................... 6-13
6.2.6
Users .................................................................................................................. 6-14
6.2.7
Alarm Viewer ...................................................................................................... 6-14
6.2.8
Log File Viewer .................................................................................................. 6-16
6.3
Protection Policies ............................................................................................................ 6-17
6.3.1
Deep Packet Inspection ..................................................................................... 6-18
6.3.2
Static Blocking .................................................................................................... 6-24
6.3.3
Conversation Symmetry ..................................................................................... 6-26
6.3.4
Flow Control ....................................................................................................... 6-28
6.3.5
URL Filter Rules ................................................................................................. 6-41
6.4
Reporting .......................................................................................................................... 6-43
6.4.1
Generating Reports ............................................................................................ 6-44
6.4.2
Anti-Virus Report ................................................................................................ 6-45
6.4.3
Network Anomalies Report ................................................................................ 6-47
6.4.4
Signature Violations Report ............................................................................... 6-51
6.4.5
URL Filters ......................................................................................................... 6-53
6.4.6
Saving and Printing Reports .............................................................................. 6-56
6.5
Setup ................................................................................................................................ 6-57
6.5.1
Logging............................................................................................................... 6-57
6.5.2
Virus Scanning ................................................................................................... 6-63
6.5.3
Alarm Delivery .................................................................................................... 6-66
6.5.4
Bridges ............................................................................................................... 6-69
6.5.5
EdgeForensiX (EFX) .......................................................................................... 6-70
6.5.6
Flow Tags ........................................................................................................... 6-73
6.5.7
Hosts List............................................................................................................ 6-74
6.5.8
Interfaces............................................................................................................ 6-75
6.5.9
Licenses ............................................................................................................. 6-77
6.5.10
Mirror Control ..................................................................................................... 6-77
6.5.11
Mirror Host.......................................................................................................... 6-78
6.5.12
Reporting Configuration ..................................................................................... 6-81
6.5.13
Save Configuration ............................................................................................. 6-82
6.5.14
System Identification .......................................................................................... 6-83
6.5.15
Traffic Manager .................................................................................................. 6-84
Users Guide v5.1.12
xiii
Deepnines Security Edge Platform
6.5.16
URL Filters ......................................................................................................... 6-87
6.5.17
Users .................................................................................................................. 6-88
6.6
Update .............................................................................................................................. 6-88
6.6.1
DPI Signature Updates ...................................................................................... 6-88
6.6.2
URL Server Updates .......................................................................................... 6-88
6.7
Users ................................................................................................................................ 6-89
6.7.1
Creating/Maintaining User Accounts .................................................................. 6-89
6.7.1
Modifying User Accounts ................................................................................... 6-93
6.7.2
Deleting User Accounts ...................................................................................... 6-93
6.7.3
Viewing Current Users ....................................................................................... 6-94
6.7.4
Exporting & Importing User Accounts ................................................................ 6-95
6.7.5
Configuring User Audit Information .................................................................... 6-97
6.7.6
Viewing SEP Users Audit Information ................................................................ 6-98
6.7.7
Operations .......................................................................................................... 6-98
Chapter 7 - Technical Support/Additional Resources ..................................7-1
7.1
7.2
7.3
Support Numbers ............................................................................................................... 7-1
Online Support ................................................................................................................... 7-1
Training Classes ................................................................................................................ 7-1
Appendix A ...................................................................................................... A-1
A.0 DPI Rules ........................................................................................................................... A-1
A.1 DPI Rule Writing ................................................................................................................. A-1
A.1.1
Rule Headers ....................................................................................................... A-1
A.1.1.2
Matching Simple Strings ...................................................................................... A-2
A.2 Update Methods ................................................................................................................. A-2
A.2.1
Oink Code ............................................................................................................ A-2
A.2.2
VRT ...................................................................................................................... A-2
A.2.3
Deepnines Website .............................................................................................. A-2
A.2.4
DPI Actions........................................................................................................... A-2
A.3 DPI Rules Selection ........................................................................................................... A-3
A.4 DPI Custom Rules (User Defined Rules) ........................................................................... A-3
Glossary .......................................................................................................... G-1
Users Guide v5.1.12
xiv
Deepnines Security Edge Platform
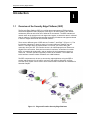
Introduction
1.1
1
Overview of the Security Edge Platform (SEP)
The Security Edge Platform (SEP) is a unified threat management (UTM) and policy
enforcement appliance that is deployed at the edge or at critical points in the network
architecture and acts as the first line of defense for the network. The SEP evaluates all
network traffic at the packet level, both ingress and egress, to determine what is valid and
what is malicious. The SEPs patent-pending technology is behavior and signature-based
in order to mitigate both known and unknown attacks.
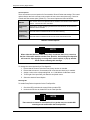
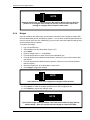
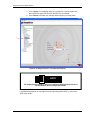
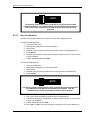
There are two different types of SEP devices; Frontline™ and Edge™ (Figure 1-1). The
functionality is identical on both, but there is one major difference between the two
devices. The Edge device is placed outside or in front of your router, taking the
connection from your ISP. The Frontline device is for LAN deployments on Ethernet or
Gigabit Fiber connections. Both devices contain 3 interfaces; an interface for outside
traffic, an interface for inside traffic, and an interface for the management console to
connect to. The SEP operates completely invisible to the network. The outside and
inside interface contains neither IP address nor a MAC address.
The SEP components can be one or two security edge appliances using the SEP to
monitor and control the flow of traffic in and out of the network. Optionally, an Edge
ForensiX (EFX) system can be used to store network traffic information in a database for
historical analysis.
Figure 1-1. Edge and Frontline Security Edge Platforms
Users Guide v5.2.1
1-1
Deepnines Security Edge Platform
2
Installation Requirements
2.1
Installing the Security Edge Platform (SEP) Operating
System
Prior to installing the Security Edge Platform (SEP) Operating System (OS), ensure that
the following minimum configuration on your computer system includes:
Dual Processor CPU (2 Dual-Core CPUs recommended)
2 GB RAM minimum, 4 GB RAM recommended (over 4 GB not currently used)
36 GB disk storage minimum, 72 GB recommended
Perform the following steps to install a new Security Edge Platform (SEP) Operating
System (OS):
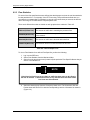
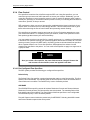
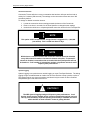
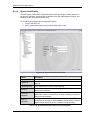
1. Insert the D9BaseOS CD in the CDROM drive and reboot your system. The box
will boot from the CD. A boot prompt appears (Figure 2-1).
NOTE
Ensure your computer system is configured to boot from CD.
GHGH
GHJ
Figure 2-1. SEP Warning Screen
Users Guide v5.2.1
2-1
Deepnines Security Edge Platform
2. Select one of the following options. For standard installation of the D9BaseOS in
SEP kickstart mode, press <ENTER>.
The installation process begins and will take approximately 2-4 minutes to complete. The
license agreement appears and you are prompted with the following:
Do you accept license term? (Y/N):
Enter Hostname: (Enter your host name)
Enter Domain Name: (Enter your domain name)
Enter Admin NIC IP Address: (Enter the IP address of the
admin port of the SEP)
Enter Admin NIC IP Netmask:
Enter the Gateway Routers IP Address:
Enter the DNS Server IP Address:
Enter the Secondary DNS IP Address:
Save Above Configuration (Y/N)?
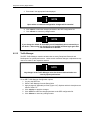
Once you verify and save the configuration, the Root Password screen appears as shown
in Figure 2-2.
Fig 2-2. Root Password Screen
3. Enter password twice for Linux root account and click <OK>.
Users Guide v5.2.1
2-2
Deepnines Security Edge Platform
The reformatting of the disk drive and package installation occurs and will take several
minutes to complete. Once installation is complete, the system will reboot. You will need to
verify that system is complete and can accomplish this by performing the following:
4. At the command prompt, type the following:
>Login: root
>Password: xxxxxxxx
>Ping xx.x.xxx.xx (IP address of primary DNS server)
A ping is a computer network tool to test whether your host is reachable across the IP
network. It will send echo requests to your host (your primary DNS server) and listen for an
echo response (replies). If successful, you will receive bytes of data back from the DNS
server. When complete, a statistical summary is printed. This process will ensure that your
system is responding.
There are several components that can be utilized that perform various functions within
SEP. A key component is the Edge Management Console (EMC) and you will need to
launch this application when the Security Edge Platform (SEP) Operating System (OS) is
installed on your server. Chapter 3, “Edge Management Console (EMC)” describes the
procedures for launching the EMC Console.
NOTE
When upgrading your SEP, ensure that you are not connected to or running the
SEP. Your system monitor may show incorrect version number when attempting
to upgrade your SEP while connected.
GHGH
GHJ
Users Guide v5.2.1
2-3
Deepnines Security Edge Platform
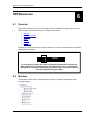
Edge Management Console (EMC)
3.1
3
Overview of the Edge Management Console (EMC)
The EMC provides graphical views of the network traffic and the operating condition of he
SEP and is used to configure and control Security Edge Platforms. You can monitor and
configure multiple Security Edge Platforms from a single EMC installation, as long as the
workstation on which the EMC is installed shares the SEP private network. Up to 32
EMCs can log into and monitor a single SEP.
3.2
Installing the EMC
The Enterprise Management Console (EMC) used to manage any single or multiple
SEPs should be from the latest version of the SEP. This is because the messaging
system used to communicate between the SEP and EMC must be compatible. All new
versions of EMC should be compatible with older supported SEPs but not the other way
around. The new EMC will work on older versions of the SEP but older versions of the
EMC will not work on newer versions of the SEP. Perform the following steps to
download and install the latest revision (highest build number) of SEP:
1. scp root@<ip-of-sep>:/opt/s9_post_install/pkg/HMC_FCSUI_v5.0.3.zip
2. unzip HMC_FCSUI_v5.0.3.zip
3. /hmc &
Note: The latest HMC_FCSUI_*.zip file will only be available from the SEP from
the last BaseOS install.
3.3
Launching the EMC
Dependent on your operating system, perform the following procedures for launching
EMC:
For Windows Operating System:
1. Open Windows Explorer and navigate to the directory where EMC is installed.
2. Double-click on emc.bat
For Unix or Linux Operating System:
1. Navigate to the directory in which the EMC is installed.
2. Execute ./emc
For MAC OS X Operating System:
1.
Double click on the jar file or run the EMC shell file by double clicking it in the
Finder.
Users Guide v5.2.1
3-1
Deepnines Security Edge Platform
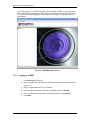
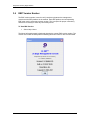
If you were logged in to any SEP hosts when you last exited the EMC, you are prompted to
log in to those same hosts when the EMC launches. If you have not been prompted to log
in, or this is your first time logging in, the following screen (Figure 3-1) appears once you
execute EMC.
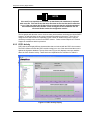
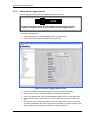
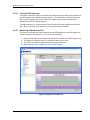
Figure 3-1. EMC Main Menu Screen
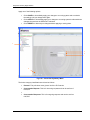
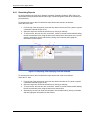
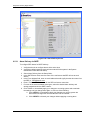
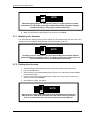
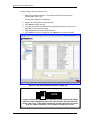
3.3.1 Logging in to EMC
1. Click File>Login (Figure 3-2)
2. Enter Hostname or the IP address of the SEP administrative interface to access
(Figure 3-3).
3. Enter your administrative TCP port of 9099.
4. Enter your SEP administrator user ID. (The default User ID is Sleuth9
5. Enter your administrator password. (The default password is godeep9s)
6.
Click <OK>.
Users Guide v5.2.1
3-2
Deepnines Security Edge Platform
1
Figure 3-2. EMC Main Menu Screen
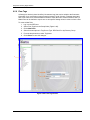
Once you log in, the Connect Host dialog opens as shown in Figure 3-3. Enter your Host,
Port, Username and Password and click <OK>. The password should be at least 8
characters long and contain at least 2 alphanumeric and 1 numeric characters.
2
3
4
5
6
Figure 3-3. EMC Main Menu Logon Screen
Users Guide v5.2.1
3-3
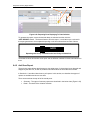
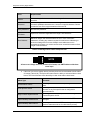
Deepnines Security Edge Platform
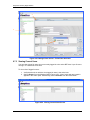
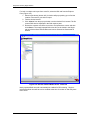
The first time you log in to EMC, the following screen appears (Figure 3-4). You will need
to obtain a license before you can access or configure any of the available options for the
SEP. Refer to Chapter 4, “License Setup” that describes the license setup for the SEP
platform.
Figure 3-4. License Details Screen
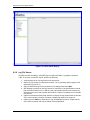
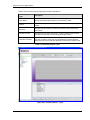
3.4
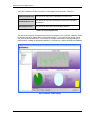
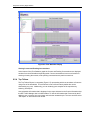
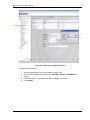
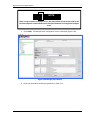
EMC Console Main Window
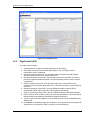
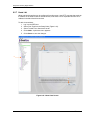
The EMC Console Main window contains 2 panes. The Command Explorer pane (tree
window) on the left allows you to expand folder icons to select informational and
configurable settings that are displayed on the Action Pane on the right. You can expand
the folder icons to reveal other folders and commands by clicking the
symbol next to
the connected platform (Figure 3-5).
Users Guide v5.2.1
3-4
Deepnines Security Edge Platform
Command
Explorer
Pane
Action
Pane
Figure 3-5. EMC Console Main Window
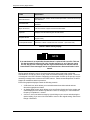
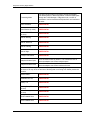
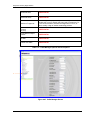
The Command Explorer pane is organized hierarchically. Table 3-1 describes each of the
folders functionality.
Monitors
Provides graphical representations of SEP operations for your
review.
Protection Policies
Provides configuration options for Static Blocking,
Conversation Symmetry, and Flow Control.
Reporting
Allows for generation of reports from AV, Network Anomalies
and Deep Packet Inspection events.
Setup
Provides configuration and setup options for the active SEP
unit.
Update
Allows for special configuration of Anti Virus update sites, Surf
Control updates and configuration/query of updated DPI
Signatures.
Users
Provides configuration and management options for users.
Operations
A single panel from which SEP operations can be managed.
Table 3-1. EMC Command Explorer
Users Guide v5.2.1
3-5
Deepnines Security Edge Platform
3.5
Navigating the Command Explorer Pane
You can navigate the Command Explorer using the mouse or the keyboard.
To navigate the Command Explorer using the mouse:
To open a folder, double-click the folder name, or click the handle or plus
(depending on which look and feel you have selected) next to the folder icon.
To execute a command, click the command name
To view the health condition of a SEP host, hover the mouse pointer over the
host name
To navigate the Command Explorer using the keyboard:
To move the focus up or down the list, press the Up or Down arrow keys
To open a folder, press the Right arrow key; to close a folder, press the Left
arrow key
To execute a command, press Enter or Return
Executing a command in the Command Explorer pane displays information or provides
input fields related to the current selection in the Action pane.
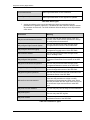
Table 3-2 describes each of the options available within the EMC Console.
Menu
Option
File
Login
Allows you to log in to a SEP server.
Logout
Allows you to log out of a SEP server.
Exit
Closes the SEP EMC and logs out of hosts
Clear Host History
Clears the host history list from the File
menu
Save Last Location
Remembers the last panel you accessed
and returns to it when you log back in to
the GUI.
Set Look and Feel
Provides options for changing the
appearance of the SEP EMC.
Show Tree Lines
Toggles display of guidelines in the
Command Explorer pane on and off.
About
Displays version and copyright information
for SEP.
Edit Preferences
Help
Description
Status Line
The status line at the bottom of the EMC
screen displays system messages.
Alarms
Allows you to view a list of recent alarms
generated by all the SEP hosts to which
the EMC is connected.
Table 3-2. EMC Console Options
Users Guide v5.2.1
3-6
Deepnines Security Edge Platform
3.6
EMC Version Number
The EMC version number is used to verify consistency between the management
console and the SEP platforms in the network. Each SEP platform and corresponding
EMC must use the exact same system version. This is required for proper connectivity
and will be necessary to avoid any connectivity issues.
To View EMC Version:
1. Select Help >About
The About Information panel is displayed showing the current EMC version number. The
version must match the SEP platform. Matching the build number is also recommended.
Users Guide v5.2.1
3-7
Deepnines Security Edge Platform
License Setup
4
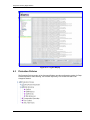
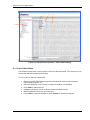
4.1 Overview
SEP licensing configuration options allow you to modify licensing information. You can renew
or extend your SEP license or request a new SEP license by completing the fields supplied in
the menu and you will receive new information from Deepnines support. If you are logging in
to the SEP EMC console for the first time, you will receive a message on the top left corner of
the screen showing “license.xml does not exist”.
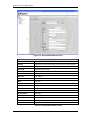
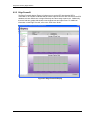
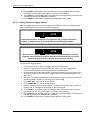
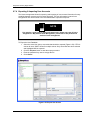
4.2 Obtaining Your License
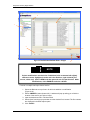
1. Click on the Request/Renew tab as shown on the Details screen in Figure. 4-1 to
bring up the SMTP Server Information screen as shown on Figure 4.2. Refer to
Table 4-1 for Request/Renew menu fields.
Figure 4-1. License Detail Screen
Users Guide v5.2.1
4-1
Deepnines Security Edge Platform
Figure 4.2. Request/Renew Menu Screen
Request/Renew Menu Fields
SMTP Server
IP address of mail server
Timeout
Indicates amount of seconds before server times out. Leave at default.
From Address
Your email address that identifies the SEP (Server)
System ID
Populated system ID field
Company Name
Your company name
Address 1
Your address
Address 2
Your address
City
Your city
State
Your state
Country
Select country from pull-down menu
Zip
Your zip code
Email
Your email address
Phone
Your telephone
Primary Name
Your name
Primary Email
Your primary email address
Primary Phone
Your primary telephone number
Email License To
Client email address (identifies admin who will maintain the SEP
Deepnines Contact Mail
Populated with Deepnines contact email
Table 4-1. Request/Renew Menu Fields
Users Guide v5.2.1
4-2
Deepnines Security Edge Platform
2. Input data in all fields of the Request/Renew screen. (System ID is already
populated with your System ID)
3. Click <SAVE CHANGES>.
4. Click <REQUEST/RENEW LICENSE>.
Deepnines support will receive your request via email and review all information.
Deepnines support processes information and emails you with an attached file that
contains relevant license information. Open this file attachment and save it on your
computer.
5. Click the <Import> tab. A window appears requesting file to be imported.
6. Enter the file name of the file attachment you saved on your computer and click
OK.
Your license has been activated and you can monitor and configure the Security Edge
Platform from your EMC. Refer to Chapter 6, “SEP Resources” that describe the license
setup for the SEP platform.
Users Guide v5.2.1
4-3
Deepnines Security Edge Platform
Configuring SEP
5.1
5
Overview
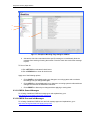
You can view complete system health information of the SEP by viewing the System Resources
and Network Traffic displays. These are contained in the Monitors section of the Command
Explorer and provide a graphical representation of the health of your system. The System
Resource monitor displays link status, engine status, fail-over state, suspicious or bad file
modes, CPU, disk and memory utilization, as well as packet per second, interrupts per second,
last update and system uptime. The Network Traffic monitor displays the aggregate traffic
traversing the SEP both inbound and outbound. For more detailed information on these
displays, refer to Section 6.2, “Monitors” in this manual.
Although the SEP Traffic manager contains variables that are set by Deepnines for optimal
performance, there may be certain conditions where changes or adjustments need to be made
by you for the respective network. This section covers how-to instructions for setting up and
configuring SEP functions.
5.2
How to Setup Email Anti-Virus Scanning
The most common way to receive a virus is through an infected email. There area anti-virus
software programs that attempt to identify, thwart and eliminate computer viruses and other
malicious software (malware).
Simple Mail Transfer Protocol (SMTP) and Post Office Protocol version 3 (POP3) are the de
facto standards for email transmissions across the Internet using TCP/IP connections. Many
subscribers to individual Internet service provider email accounts access their email with client
software that uses SMTP or POP3. You can easily setup anti-virus scanning by configuring the
flow control for SMTP and POP3 email. Perform the following procedures below. For additional
information on Flow Control, refer to Section 6.3.4, “Flow Control” in this manual.
To configure flow control for SMTP,
1. Navigate to the Protection Policy, highlight and click on Flow Control. The Flow Control
screen appears (Figure 5-1).
2. Click on Match Rules tab on top row of tabs.
3. Create a new Flow Control configuration for SMTP traffic by clicking <NEW>.
4. Enter data for Name and Group.
5. Click and place check mark in small box next to Protocol. Click on pull-down menu to
display options. Protocol = TCP(6).
6. Click and place check mark in small box next to Inside Port Range. Inside Port
Range = 25-25.
7. Click and place check mark in small box next to Outside Port Range. Outside Port
Range = 25-25.
8. Click and place check mark in small box next to Direction. Click on pull-down to display
options. Direction = Both
Users Guide v5.1.7
5-1
Deepnines Security Edge Platform
9.
10.
11.
12.
13.
14.
15.
Click on Control tab on top row of tabs.
Click and place check mark in small box in Conversation (Figure 5-2).
Select Conversations / Limit = 1000 by selecting up & down arrows.
Select Control only from pull-down menu.
Click Protocol Handling tab on top row of tabs.
Select Mail: SMTP button (Figure 5-3).
Click <SAVE>.
1
2
4
5
6
7
8
3
Figure 5-1. Configuring SMTP – Match Rules Screen
Users Guide v5.1.7
5-2
Deepnines Security Edge Platform
9
10
12
11
Figure 5-2. Configuring SMTP – Control Screen
13
14
15
Figure 5-3. Configuring SMTP – Protocol Handling Screen
Users Guide v5.1.7
5-3
Deepnines Security Edge Platform
To configure flow control for POP3,
1. Navigate to the Protection Policy, highlight and click on Flow Control. The Flow Control
screen appears (Figure 5-4).
2. Create a new Flow Control configuration for POP3 traffic by clicking <NEW>.
3. Enter data for Name and Group.
4. Click on Match Rules tab on top row of tabs.
5. Click and place check mark in small box next to Protocol. Click on pull-down menu to
display options. Protocol = TCP(6).
6. Click and place check mark in small box next to Inside Port Range. Inside Port
Range = 110 -110.
7. Click and place check mark in small box next to Outside Port Range. Outside Port
Range = 110 -110.
8. Click and place check mark in small box next to Direction. Click on pull-down to display
options. Direction = Both
9. Click on Control tab on top row of tabs.
10. Click and place check mark in small box in Conversation (Figure 5-5).
11. Select Conversations / Limit = 1000 by selecting up & down arrows.
12. Select Control Only from pull-down menu.
13. Click Protocol Handling tab on top row of tabs.
14. Select Mail: POP3 button (Figure 5-6).
15. Click <SAVE>.
1
4
3
1
5
6
6
7
6
8
6
2
Figure 5-4. Configuring POP3 – Match Rules Screen
Users Guide v5.1.7
5-4
Deepnines Security Edge Platform
9
6
10
10
6
11
10
6
12
10
6
Figure 5-5. Configuring POP3 – Control Screen
13
10
6
14
10
6
15
10
6
Figure 5-6. Configuring POP3 – Protocol Handling Screen
Users Guide v5.1.7
5-5
Deepnines Security Edge Platform
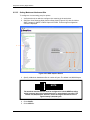
5.3
How to Create a Flow Spec for IPS and IPS/IDS
This example illustrates how to create a normal flow spec for IPS protection on conversation
rate of TCP port 80. If needed, it can be changed to also control on bit/packet rate. This
example can be modified for any other type of TCP traffic. In this particular flow, protection for
inbound/outbound traffic is described.
Perform the following steps to create flow specs for IPS and IPS/IDS use:
1. Navigate to the Protection Policy, highlight and click on Flow Control. The Flow Control
screen appears (Figure 5-7).
2. Create a new Flow Control configuration by clicking <NEW>.
3. Enter data for Name and Group.
4. Click on Match Rules tab on top row of tabs.
5. Click and place check mark in small box next to Protocol. Click on pull-down menu to
display options. Protocol = TCP(6).
6. Click and place a check mark in the small box next to either Inside Port Range or
Outside Port. The Port Range should be 80-80.
7. Click and place check mark in small box next to Direction. Click on pull-down to display
options. Direction = Both
8. Click on Control tab on top row of tabs (Figure 5-8).
9. Click and place check mark in small box in Conversation.
10. Select Conversations / Limit = 50 by selecting up & down arrows.
11. Select Control Only from pull-down menu.
12. Click Protocol Handling tab on top row of tabs (Figure 5-9).
13. Select <NONE>.
14. Click <SAVE>.
To change the configuration for IDS protection,
1. Click on Control tab on top row of tabs (Figure 5-10).
2. Click and place a check mark in small box next to Deep Packet Inspection to enable it.
3. Click <SAVE>.
Users Guide v5.1.7
5-6
Deepnines Security Edge Platform
1
3
4
5
5
6
7
5
2
Figure 5-7. Creating a Flow Spec for IPS and IPS/IDS - Match Rules Screen
9
8
11
10
Figure 5-8. Creating a Flow Spec For IPS and IPS/IDS– Control Screen
Users Guide v5.1.7
5-7
Deepnines Security Edge Platform
12
13
14
Figure 5-9. Creating a Flow Spec For IPS and IPS/IDS – Protocol Handling Screen
1
2
3
Figure 5-10. Creating a Flow Spec For IDS – Control Screen
Users Guide v5.1.7
5-8
Deepnines Security Edge Platform
5.4
How to Setup URL Filtering
To properly set up URL Filtering, you need to create your URL rule sets, create the flow tags
contained in the active directory groups, and create all the flow specs.
NOTE
The new black and white lists will behave the same as admin black and white lists.
The only distinction is that instead of applying globally, they will be applicable per
ruleset and, therefore, per user.
URL Filter Rules make rules on URL categories per rule set.
To Create a New Ruleset:
1.
2.
3.
4.
5.
Log in to the SEP host.
Select URL Filter Rules from the Protection Policies folder.
Click on <NEW RULESET> (Figure 6-20). A New Ruleset screen appears.
Select desired option from the “Copy From” pull-down menu.
Enter the desired name and description
for the ruleset in the fields provided and click
GHGH
<OK>. The ruleset name will appear in
field
GHJ of pull-down menu at top middle of screen.
To Create New Category-Based Rules:
1. Select and highlight one of pre-set categories listed to edit (Figure 6-21).
2. Select action desired from pull-down menu <ALLOW> <BLOCK> <REDIRECT>.
ALLOW: Selecting this action allows a request.
BLOCK: Selecting this action allows a block.
REDIRECT: Selecting this action allows for redirect. Make certain that you specify the
complete URL i.e., "http://www.deepnines.com". If you want to redirect www.xyz.com to
www.deepnines.com, by entering www.deepnines.com, you will get
http://www.xyz.com/www.deepnines.com and not http://www.deepnines.com .
3. Place check mark in Log Enabled box to allow logging of all activity
4. Click <SAVE>.
Users Guide v5.1.7
5-9
Deepnines Security Edge Platform
2
4
5
3
Figure 6-20. URL Filter Categories Actions
To edit an existing Rule Set
1. Select and highlight one of pre-set categories listed to edit.
2. Select action desired from pull-down menu <ALLOW> <BLOCK> <REDIRECT> to
change.
3. Place check mark in Log Enabled box to allow logging of all activity
4. Click <SAVE>.
5.4.1 Flow Spec Schedules
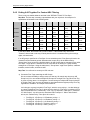
You can turn Flow Specs on and off based on a 5-part schedule. The 5 parts of the schedule
consists of:
Start of Morning (default 8am)
Start of Afternoon (default 3pm)
Start of Evening (default 5:30pm)
Start of Night (default 9pm)
Weekend (default Saturday & Sunday)
Users Guide v5.1.7
5-10
Deepnines Security Edge Platform
NOTE
Flow Specs do not have priorities. We do not have the concept of a best matching
Flow Spec. If you define an FTP Flow Spec as "ALWAYS ON" and another FTP Flow
Spec as "MORNINGS", they both are valid. Because it is in the morning, it does not
mean that matching Flow Spec has priority.
Scheduling Options Include:
Always On
This is the default and it is active 24x7.
Disabled
To turn off a flow spec, you disable it.
School Day
From the start of the morning until the start of the afternoon.
Afternoon
From the start of the afternoon until the start of the evening.
Evening
From the start of the evening until the start of the night.
Full Day
From the start of the GHGH
morning until the start of the evening.
Day and Evening
From the start of the morning
GHJ until the start of the night.
After School
From the start of the afternoon until the start of the night
Nights
From the start of the night until the start of the morning.
Weekends
From 12:00 AM Saturday morning until 11:59 PM Sunday night.
Nights and Weekends
See previous entries
Schedule View:
Schedule Name
Night/AM (Mid-T1) School Day (T1-T2) Afternoon (T2-T3) Evening (T3-T4) Night/PM (T4-Mid)
12am - 8am
8am - 3pm
3pm - 5:30pm
5:30pm - 9pm
9pm - 12am
ALWAYS ON (everyday)
DISABLED (everyday)
SCHOOLDAY (M-F)
AFTERNOON (M-F)
EVENING (M-F)
FULL DAY (M-F)
DAY & EVENING (M-F)
AFTER SCHOOL (M-F)
NIGHTS (M-F)
WEEKENDS (Sat/Sun)
NIGHTS & WEEKENDS
Monday - Friday
Saturday/Sunday
Users Guide v5.1.7
5-11
Deepnines Security Edge Platform
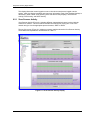
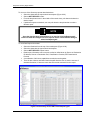
5.4.2 Putting It All Together For Custom URL Filtering
There is only one default behavior and that is the "DEFAULT POLICY" Flow Spec.
Step One: The first step is creating a spreadsheet with your objectives. An example of a
spreadsheet is illustrated in the following table.
AD Group
8:00 AM
3:00 PM
5:30 PM
9:00 PM
Weekend
K-5
Students
URL Rule
Set 01
URL Rule
Set 01
Default
Policy
Default
Policy
Default
Policy
6-8
Students
URL Rule
Set 01
URL Rule
Set 02
URL Rule
Set 02
Default
Policy
URL Rule
Set 02
9-12
Students
URL Rule
Set 02
URL Rule
Set 03
URL Rule
Set 03
URL Rule
Set 03
URL Rule
Set 03
Teachers
URL Rule
Set 02
URL Rule
Set 04
URL Rule
Set 04
URL Rule
Set 04
URL Rule
Set 04
Admin
URL Rule
Set 04
URL Rule
Set 04
URL Rule
Set 04
URL Rule
Set 04
URL Rule
Set 04
Group
None
URL Rule
Set 01
URL Rule
Set 01
URL Rule
Set 01
Default
Policy
Default
Policy
In the above table, the Default Policy is set to "Block". If the Default Policy were set to
“Forward”, there would not be any controls placed on the K-12 students during the evenings,
nights, and weekends.
If an AD group is specified in a Flow Spec for one schedule period, Flow Specs will need to be
created for all the schedule periods. Otherwise the control will go to the Default Policy.
“Group None” does not specify a default behavior for AD Groups that are managed in any other
Flow Spec. “Group None” is intended to cover users that do not belong to a group already
managed in a Flow Spec. Using the table above, "Group None" might cover parents, substitute
teachers, teacher‟s aids, and kitchen staff.
Step Two: You will need to create your URL rule sets.
a) Create the Flow Tags containing the AD Groups.
We do not have the ability to assign users to a flow tag. All controls are done at an AD
Group level. You can combine multiple AD Groups into a single Flow Tag. Each Flow Tag
is given a Priority where 1 is the highest. If a user belongs to multiple AD Groups included
in multiple Flow Tags, the user will always be associated with the highest priority Flow Tag
regardless of schedule. An example of this would be:
Joe belongs to a group included in Flow Tag X, which is set to priority 1. Joe also belongs
to a group included in Flow Tag Y, which is set to priority 2. Flow Tag X is included in Flow
Spec X scheduled for the "School Day". Flow Tag Y is included in Flow Spec Y scheduled
for "After School". Joe will never be associated with Flow Spec Y. When "After School"
arrives, the “Default Policy” Flow Spec will control it.
Users Guide v5.1.7
FlowTag #1:
FlowTag #2:
FlowTag #3:
FlowTag #4:
FlowTag #5:
AD Group = K-5 Students; priority = 1
AD Group = 6-8 Students; priority = 2
AD Group = 9-12 Students; priority = 3
AD Group = Teachers; priority = 4
AD Group = Admin; priority = 5
5-12
Deepnines Security Edge Platform
“Group None” is created by default
b) Create ALL the Flow Specs.
HTTP FS #1
Flow Tag #1
URL Rule Set 01
Schedule = Full Day
HTTP FS #2
Flow Tag #2
URL Rule Set 01
Schedule = School Day
HTTP FS #3
Flow Tag #2
URL Rule Set 02
Schedule = After School
HTTP FS #4
Flow Tag #2
URL Rule Set 01
Schedule = Weekends
HTTP FS #5
Flow Tag #3
URL Rule Set 02
Schedule = School Day
HTTP FS #6
Flow Tag #3
URL Rule Set 03
Schedule = After School
HTTP FS #7
Flow Tag #3
URL Rule Set 03
Schedule = Nights and Weekends
HTTP FS #8
Flow Tag #4
URL Rule Set 02
Schedule = School Day
HTTP FS #9
Flow Tag #4
URL Rule Set 04
Schedule = After School
HTTP FS #10
Flow Tag #4
URL Rule Set 04
Schedule = Nights and Weekends
HTTP FS #11
Flow Tag #5
URL Rule Set 04
Users Guide v5.1.7
5-13
Deepnines Security Edge Platform
Schedule = Always On
HTTP FS #12
Group None (GRP_NONE)
URL Rule Set 01
Schedule = Day and Evening
For additional information on URL Filtering, refer to Section 6.5.16, “URL Filters,
ADDITIONAL HOW-TOs
Create New Custom DPI Rules
Reconfigure a New Network Interface Card or Reconfigure Existing Ones
Access the Reporting System
Access the Hallpass System
Users Guide v5.1.7
5-14
Deepnines Security Edge Platform
SEP Resources
6.1
6
Overview
This section provides an overview of the folder resources available to configure and control the
SEP from the Command Explorer pane. Available resources are:
Monitors
Protection Policies
Reporting
Setup
Update
Users
Operations
Expanding on each of these folder resources allows you to select informational and configurable
settings that are displayed.
NOTE
Do not attempt to change any system-configuration parameters for the Security
Edge Platform at the operating system level. Attempting to do so could break the
SEP appliance. All system-configuration parameters, such as the unit’s IP address,
must be configured through the EMC.
6.2
Monitors
The Monitors section of the Command Explorer provides a graphical representation of the
following displays.
GHGH
GHJ
Users Guide v5.1.7
6-1
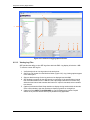
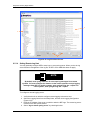
Deepnines Security Edge Platform
This display allows the current logged on user to view other users that are logged onto the
system. It will also display hostname and logon time information. Each of the graphical displays is
discussed in detail. Under Virus Scanning, there are three activity displays; Virus Scanner
Activity, POP3 Activity, and SMTP Activity.
6.2.1 Virus Scanner Activity
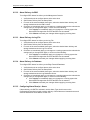
Virus Scanner Activity (Figure 6-1) displays different characteristics that are involved with the
overall virus scanner. The virus scanner will take the email that is coming into or out of the
network and give it to the appropriate protocol scanner, SMTP or POP3.
The top of the menu (Figure 6-1) displays numerous statistics about the Virus Scanner Activity.
These labels and explanations are described in Table 6-1.
Figure 6-1. Virus Scanner Activity Display
Users Guide v5.1.7
6-2
Deepnines Security Edge Platform
Label
Explanation
Attachments
Scanned
Displays the total number of email attachments scanned since the up time date/time.
Infected
Attachments
Displays the total number of virus infected attachments taken out of emails since the
up time data/time.
Bytes Scanned
The total number of bytes scanned of attachments.
Up Since
Displays when the Virus Scanner engine was last started.
Last Signature
Update
Displays when the last signature update was performed.
Repaired
Attachments
Shows the number of attachments that were repaired (virus removed and sent
original attachment)
Un-repairable
Attachments
Shows the number of attachments that were removed. * (see note)
Signature
Version
Displays the current anti-virus signature version being used by the Virus Scanner.
Table 6-1. Label and Explanations
NOTE
If an attachment is unrepairable, the attachment is replaced with a text file. This text
file has the same file name as the virus, but the extension is .txt. If the user opens the
file, they will see a message that the original attachment was infected and has been
deleted. These messages can be customized and are discussed further in this
manual.
The line graphs allow the user to view how many active emails are being scanned by the Virus
Scanner. You can also view if there are any email conversations waiting in the queue and the
overall scan rate of the Virus Scanner. There are 224 workers assigned to the Virus Scanner that
are distributed out to the SMTP and POP3 scanners (112 each).
6.2.2 SMTP Activity
SMTP Activity displays different characteristics that are involved with the SMTP virus scanner.
The SMTP scanner will take the SMTP emails coming into or out of the network and then scan it
GHGH
against the signature database. The top of the menu (Figure 6-2) displays numerous statistics
about the Virus Scanner Activity. These labels GHJ
and explanations are described in Table 6-2.
Users Guide v5.1.7
6-3
Deepnines Security Edge Platform
Figure 6-2. SMTP Activity Display
Label
Explanation
Email Processed
Displays the total number of SMTP emails processed or scanned since the
up time date/time.
Infected Emails
Displays the total number of virus infected SMTP emails since the up time
data/time.
Bytes Processed
The total number of bytes scanned of SMTP emails.
Up Since
Displays when the SMTP engine was last started.
Repaired Emails
Shows the number of emails that were repaired (virus removed and sent
original email)
Un-Repairable Emails
Shows the number of emails that were removed. * (see below note)
Table 6-2. Label and Explanations
Users Guide v5.1.7
6-4
Deepnines Security Edge Platform
NOTE
If an email is un-repairable and contains an attachment, the attachment is replaced
with a text file. This text file has the same file name as the virus but the file extension
is .txt. If the user opens the file they will see a message that the original attachment
was infected and has been deleted. These messages can be customized and are
discussed further under the configuration section.
The line graphs will allow the user to view how many active workers are being used by the SMTP
Scanner, as well as if there are any email conversations waiting in the queue. There are 112
assigned to the SMTP Scanner. Depending on the number of emails in the queue it may be
necessary to assign more workers to the SMTP scanner. Please contact Deepnines Technical
Support for assistance with this procedure.
6.2.3 POP3 Activity
POP3 Activity will display different characteristics that are involved with the POP3 virus scanner.
The POP3 scanner will take the POP3 emailsGHGH
coming into or out of the network and then scan it
against the signature database. The top of the menu (Figure 6-3) displays numerous statistics
about the Virus Scanner Activity. These labelsGHJ
and explanations are described in Table 6-3.
Figure 6-3. POP3 Activity Display
Users Guide v5.1.7
6-5
Deepnines Security Edge Platform
Label
Explanation
Email Processed
Displays the total number of POP3 emails processed or scanned since the up
time date/time.
Infected Emails
Displays the total number of virus infected POP3 emails since the up time
data/time.
Bytes Processed
The total number of bytes scanned of POP3 emails.
Up Since
Displays when the POP3 engine was last started.
Repaired Emails
Shows the number of emails that were repaired (virus removed and sent
original email)
Un-Repairable Emails
Shows the number of emails that were removed. * (see below note)
Table 6-3. POP3 Activity Display
NOTE
If an attachment is un-repairable, the attachment is replaced with a text file. This text
file has the same file name as the virus, but the extension is .txt. If the user opens
the file, they will see a message that the original attachment was infected and has
been deleted. These messages can be customized and are discussed further in this
manual.
The line graphs allows the user to view how many active workers are being used by the
POP3Scanner, as well as if there are any email conversations waiting in the queue. There are
112 assigned to the POP3 Scanner. Depending on the number of emails in the queue it may be
necessary to assign more workers to the POP3 scanner. Please contact Deepnines Technical
Support for assistance with this procedure.
Each of the graphical displays contain the following controls:
A 3D check box, which allows you to switch between three-dimensional and twodimensional graphs and charts.
GHGH
An Update Rate control, which allows
you to specify the refresh rate for the graphs and
charts displayed in the window. By default
GHJ it is set to 5, changing to 1 will increase the
frequency of updates to 1 second.
A zoom in, zoom out and auto range by right clicking on your mouse and selecting the
desired setting. If you zoom in/out and want to return to the original setting. Select Auto
Range > Both Axes.
Users Guide v5.1.7
6-6
Deepnines Security Edge Platform
6.2.2 System Resources
The System Resources display (Figure 6-4) allows the administrator to view complete system
health information. This includes link status, engine status, fail-over state, suspicious or bad file
modes, CPU, disk and memory utilization, as well as packet per second, interrupts per second,
last update and system uptime.
Figure 6-4. System Resource Display
6.2.2 Network Traffic
To view the Network Traffic, navigate to the Monitors section and select Network Traffic. Within
this page (Figure 6-5) you can view the aggregate traffic traversing the SEP both inbound and
outbound.
Users Guide v5.1.7
6-7
Deepnines Security Edge Platform
There are 3 different lines that are visible on each graph and are outlined in Table 6-4.
Offered (Yellow Line)
The amount of traffic that is matching the particular flow
Allowed (Green Line)
The amount of traffic that has passed all tests and is allowed in
the network.
Blocked (Red Line)
The amount of traffic that is blocked within that flow.
Table 6-4. Colored Graph Lines
This directly correlates to the selection at the bottom of the page. You can view the Network Traffic
by Bit Rate, Byte Rate, Packet Rate or Conversation Data i.e., you might see the offered (yellow
line) hovering around 4,000,000. If the Bit Rate is selected at the bottom of the page then this is
representative of 4Mbps of aggregate bandwidth. (1,000,000 bits = 1Mpbs, 600,000 bits=600Kbps)
Fig 6-5. Network Traffic Display
Users Guide v5.1.7
6-8
Deepnines Security Edge Platform
Also contained on the Network Traffic display are two pie charts labeled, “Offered Volume by
Flow Specifier” and “Blocked Volume by Flow Specifier”. Each of these are explained as
follows:
Offered Volume by Flow Specifier:
This pie chart displays the dissection of the incoming and outgoing traffic while applying it to each
Flow Specifier that has been set up. The top 10-20 Flow Specifiers will be represented. For
example, if you took the Internet connection and sliced it in half, peered into it, this would be the
traffic that is making up that connection. If a mouse is hovered over the top of any of the sections, it
will display the name of the Flow Specifier, show the count of bits, and display a percentage of
bandwidth used.
Blocked Volume by Flow Specifier:
This pie chart is similar to the Offered Volume by Flow Specifier pie chart but is representative of
the amount of traffic that is violating a certain policy within the SEP, and is being blocked or curbed
down. Again it will display the top 10-20 Flow Specifiers that have been or are getting blocked. If a
mouse is hovered over the top of any of the sections, it will display the name of the Flow Specifier,
show the count of bits being blocked, and the percentage of overall bandwidth that is being blocked
in that particular Flow Specifier.
NOTE
If the Blocked Volume by Flow Specifier is entirely one shade or showing one flow
specifier, it does not mean that all of the traffic of that flow specifier is getting blocked.
It means that out of the blocking that is occurring, that 100% happens to fall within that
one Flow Specifier.
DEFCON:
This chart illustrates the defense condition of the network (1-5:1 being the most critical, 5 being the
least critical). Depending on how much your network is under attack i.e., flow spec being violated,
the DEFCON chart will show condition.
Other Features within Network Traffic:
GHGH in the Network Traffic monitor. Towards the
The total number of conversations is also represented
bottom left you will see the Total Conversations.GHJ
This is represented as the number of conversation
that we have in our KGH tables.
There is also the ability to view the graphs and charts in 2D mode. By deselecting the 3D
check box the visualization will become 2D.
The Update rate is described later in this document.
Users Guide v5.1.7
6-9
Deepnines Security Edge Platform
6.2.3 Flow Statistics
For each of the flow specifiers that were defined the administrator can view the real-time statistics
for that particular flow. For example, if the HTTP-Incoming TCP port 80 was defined then you
can select the corresponding Flow Statistic to view the new connections per second, the total bit
rate of incoming HTTP traffic and the complete packet rate.
There are 4 different lines that are visible on each graph and are outlined in Table 6-5.
Offered (Yellow Line)
The amount of traffic that is matching the particular flow
Allowed (Green Line)
The amount of traffic that has passed all tests and is allowed
in the network.
Blocked (Red Line)
The amount of traffic that is blocked within that flow.
Historical (Blue Line)
The historical amount of traffic that this flow has seen.
Table 6-5. Colored Graph Lines
To view a Flow Statistic for a defined Flow Specifier, perform the following:
1. Log in to the SEP host.
2. Select Flow Statistics from the Monitors folder.
3. Select from the drop down menu (bottom left) the particular Flow Specifier Name that you
want to view statistics for.
NOTE
If the historical limit is set to zero then no traffic has been seen on this flow in
the last 10 minutes. If the historical limit is very low then there has been traffic
but it has now discontinued.
4. Select the desired group from the Group drop down menu. The Connection, Bit and
Packet charts will start to fill in with the corresponding real-time information as shown in
(Figure 6-6).
GHGH
GHJ
Users Guide v5.1.7
6-10
Deepnines Security Edge Platform
Figure 6-6. Flow Statistics Display
Viewing Current and Pending Conversations
At the bottom of the Flow Statistics graph the Current and Pending Conversations are displayed
as taken from the KGH table and pending table. Current conversations have met all criteria for
entering or leaving the network, while pending conversations are partial connections.
6.2.4 Top Talkers
The Top Talkers Report is a snapshot (Figure 6-7) representing which conversations or flows are
using most of the bandwidth. The refresh rate is set to 60 seconds by default but can be
shortened by any user. Additionally, you can instantly get a snapshot of the top talkers by
selecting „Get Report‟.
User-selectable information that is displayed in the report is based on the 5-tuple information that
the SEP Traffic Manager has in its KGH tables. To limit the information that is returned by the IP
address, port or protocol, the user simply unchecks the unwanted tuple. The user can then select
“Get Report” or wait until the next refresh.
Users Guide v5.1.7
6-11
Deepnines Security Edge Platform
Figure 6-7. Top Talkers Display
Sorting top talker information can be done by selecting or pressing the information header of that
particular column. The listed information is displayed as follows:
Source IP
Source Port
Destination IP
Destination Port
Protocol
Total Packets
Total Bytes
Dropped Packets
Dropped Bytes
Users Guide v5.1.7
6-12
Deepnines Security Edge Platform
6.2.5 Edge ForensiX
The Edge ForensiX display (Figure 6-8) allows you to see the EFX host that the SEP is
connected to, the number of offloads that have been captured from the SEP and sent to the EFX
database, the last offload rate, average offload rate and the average capture rate. Additionally,
there are real-time graphs that show the actual offload rate and capture rate. For additional
information on the Edge ForensiX, refer to the “EFX Users Guide”.
Figure 6-8. Edge ForensiX Display
Users Guide v5.1.7
6-13
Deepnines Security Edge Platform
6.2.6 Users
The User display (Figure 6-9) shows users currently logged onto the SEP.
Figure 6-9. Users Display
6.2.7 Alarm Viewer
There are numerous places in the Management Console to view alarms that are generated by the
SEP. The alarms can be viewed in both the Monitors section and the top Tree View of the EMC.
Each is explained below in detail.
NOTE
You must have alarms enabled within the Alarm Delivery section of the Set-up folder
to view alarms within the EMC. By default all alarms are enabled to be viewable in the
EMC.
Users Guide v5.1.7
6-14
Deepnines Security Edge Platform
In Monitors
To view alarms in the Monitors section of the EMC, navigate to the Alarm Viewer section of the
Monitors folder as shown below.
As alarms are generated they will be viewable in this window. If clearing the alarms is desired,
select <CLEAR> from the bottom right. This will clear the field and start inserting any new
alarms.
In Top Tree View
To view alarms in the Tree View section of the EMC, navigate to the Alarms section of the Top
Tree view that is labeled Alarms as shown below.
As alarms are generated they will be viewable in this window (Figure 6-10). If clearing the alarms
is desired, click <CLEAR> from the bottom right. This will clear the field and start inserting any
new alarms.
NOTE
If you are logged into more than one SEP then the above alarms explanation will
apply to and both SEP’s will be viewable from the Top Tree View Alarms folder .
SEP‟s will be viewable from the Top Tree View Alarms folder.
GHGH
GHJ
Users Guide v5.1.7
6-15
Deepnines Security Edge Platform
Figure 6-10. Alarm Viewer Display
6.2.8 Log File Viewer
The SEP provides the ability to view SEP logs from within the EMC. Log display is limited to
1 MB. To view the current SEP log file, perform the following:
1. Verify that the unit to view log entries is the active host.
2. Select Log File Viewer from the Monitors folder. The Log Viewing options appear in the
Action pane (Figure 6-11).
3. Select a date/time range for the log entries to be displayed and click <OK>.
4. SEP displays log entries for the time interval you specified. If the specified time interval
has more entries than fit in the 1 MB limit, the output begins with the most recent entry
within the time interval and truncates later entries. If output is truncated, select a smaller
time interval.
5. (Optional) Activate the Word Wrap checkbox to display the log entries within the bounds
of the current window. Clear the checkbox to display log entries on a single line.
3. (Optional) Click <COPY> to Clipboard to copy all displayed log entries. Copied entries
are in plain text format and may be pasted into any application.
Users Guide v5.1.7
6-16
Deepnines Security Edge Platform
Figure 6-11. Log File Display
6.3
Protection Policies
The Protection Policies section of the Command Explorer provides configuration options for Deep
Packet Inspections, Static Blocking, Conversation Symmetry, Flow Control and URL Filter
Categories Actions.
Users Guide v5.1.7
6-17
Deepnines Security Edge Platform
6.3.1 Deep Packet Inspection
Deep Packet Inspection provides another layer of inspection for a variety of intrusions. Deep
Packet Inspections is disabled on each flow specifier by default. You have the option to enable it
for each flow control. Once enabled, you can disable it again if needed. Before using the
Deepnines Deep Packet Inspection engine, refer to Appendix A, “DPI Rules” for a short tutorial on
the rules, and structure of the rules.
6.3.1.1 Actions
DPI categories can be globally enabled or disabled along with altering the logging of enabled
categories.
To ignore, enable, enable with logging, or logging only on signature categories, perform the
following:
1.
Select by clicking >Deep Packet Inspection>Actions from the Protection Policies
folder. The Actions Display is displayed (Figure 6-12).
2. Highlight desired classification if you wish to change action.
3. Select type of action from the Action pull-down menu.
4. Click <SAVE> to save the results or click <RESET> to cancel the changes.
2
1
3
4
Figure 6-12. Deep Packet Inspections – Actions Display
Users Guide v5.1.7
6-18
Deepnines Security Edge Platform
The Action category classifications are listed in Table 6-6.
Drop Silently
Signature is enabled, but no logging of the triggered signature is written
to disk. Alert will be seen in the reporting database.
Drop With Log
Signature classification is enabled and signature logging is
enabled. Alert will be seen in the reporting database.
Log Only
Signature blocking is disabled but event is still written to the logs. Alert
will be seen in the reporting database.
Ignore
Ignores the classification completely with no logging of signature
events. Alert will not be visible in the reporting database.
Table 6-6. Category Classifications
NOTE
If the administrator is going to be looking for a specific attack within the log files,
the Action setting will need to be set to Drop With Log, otherwise Deepnines
recommends that DPI Actions be set to Drop Silently when blocking is desired. This
will allow the administrator to still view the alert in the reports and assist in
conserving processing capabilities.
6.3.1.2 Rules Selection
DPI Rules selection contains general groups of rules associated by type. If expanded, these
individual rules will be visible and can be selected/deselected as desired. Additionally, if the
entire group is not wanted, de-selecting the check box associated with that group of rules will
disable all rules in that group. There are two tabs on the Rules Selection Display; Rules Selection
and Rule Details.
To view active/inactive rules or to select/deselect rule groups in the Rules Selection tab, perform
GHGH
the following:
GHJ
1. Select by clicking >Deep Packet Inspection>Rules Selection from the Protection Policies
folder (Figure 6-13).
2. Select the Rules Selection tab at the top of the menu. Signature groups are listed under
the Rule Selection tab.
3. Click on to expand that particular group of rules.
4. Check or uncheck the desired rule.
5. Click <SAVE> to save the results or click <RESET> to cancel the changes.
Users Guide v5.1.7
6-19
Deepnines Security Edge Platform
2
1
3
4
5
Figure 6-13. Deep Packet Inspections – Rules Selection Display
To view, select and edit rules files in the Rules Details tab, perform the following:
1. Select by clicking >Deep Packet Inspection>Rules Selection from the Protection Policies
folder (Figure 6-14).
2. Select the Rules Details tab at the top of the menu.
3. Select a rules file from the drop-down menu to view.
4. Highlight desired alert field in the main body of menu if you wish to change action. The
selected edited field is shown in the “Edit Selected Rule” field.
5. Select type of action from the Action pull-down menu.
6. Click the <Add to User Rules> button.
Users Guide v5.1.7
6-20
Deepnines Security Edge Platform
2
3
4
1
6
5
Figure 6-14. Deep Packet Inspections – Rules Details Display
6.3.1.3 User Defined Rules
You can build custom rules or import groups of new rules that are desired. DPI custom rules can
be built and added from existing rules as well.
To view, modify or add new custom rules:
1. Select by clicking >Deep Packet Inspection>User Defined Rules from the Protection
Policies folder (Figure 6-15).
2. Select the Single tab on top of menu for single rule addition or modification.
3. Click <New> to add a new rule.
4. Highlight by clicking on rule to modify an existing User Defined Rule.
5. Make modifications to the rule in the Rule box.
6. Press <Save> to save the changes or press <Reset> to reverse the changes.
Users Guide v5.1.7
6-21
Deepnines Security Edge Platform
2
4
1
3
5
Fig 6-15. The DPI User Defined Rules – Single
6
NOTE
If minor modifications are desired or if additional rules are wanted with slightly
different content, highlight the entire rule in the Rule box, right click with your
mouse, select copy. Select <NEW> and then paste the rule into the Rule box. Make
modifications, click <ENABLE> and then <SAVE>.
For bulk or multiple rule import from a text file:
1. Select the Bulk tab on top of menu for bulk rule addition or modification
(Figure 6-16).
2. Select <IMPORT> button (bottom left). A window will pop up asking you to find the
location of the text file you wish to import.
3. Input the desired text file in File Name field.
4. Select Open from the pop up window once the desired file is located. The file contents
are displayed in the Bulk explorer GHGH
pane.
5. Click <SAVE>.
GHJ
Users Guide v5.1.7
6-22
Deepnines Security Edge Platform
The newly imported Bulk rules will now be visible in the Single tab as individual User Defined
Rules and can be Selected or Deselected as wanted. Newly imported Bulk rules will automatically
be enabled for DPI scanning. Single or individual defined rules will have to be enabled at the
time of creation or after they have been saved.
1
3
4
5
2
Users Guide v5.1.7
Fig 6-16. The DPI User Defined Rules – Bulk
6-23
Deepnines Security Edge Platform
6.3.2 Static Blocking
Some packet types should always be blocked from entering or leaving your network. SEP
automatically and unconditionally blocks the following packet types:
Packets with identical source and destination addresses
Packets with invalid header formats
Packets with broadcast source MAC addresses
Some packet types are useful in special circumstances, but for most networks it is unnecessary
traffic. Attackers often use these obscure packets to prepare for, or as the basis of, an attack. By
default, SEP automatically blocks most of these message types. You can, however, unblock any
of these message types if your network requires them.
For example, SEP automatically blocks multicast message types. However, these message types
are used by applications that support video conferencing. If your network supports video
conferencing, you must turn off static blocking for these message types.
Configurable static blocking is available for the following message types:
ICMPv4 Messages
ICMPv6 Error messages
ICMPv6 Info messages
Miscellaneous messages
To configure Static Blocking:
1. Verify that the unit on which to configure static blocking is the active host.
2. Select Static Blocking from the Protection Policies folder.
3. Click the message type to be configured. A list of messages of that type that can be
blocked using SEP static blocking appears in the Action pane (Figure 6-17).
Users Guide v5.1.7
6-24
Deepnines Security Edge Platform
2
3
4
Fig 6-17. Example of Blocking Flags listing for ICMPv4
4. Activate the check box associated with a specific message to unconditionally block the
message from entering or leaving the network. Clear the check box to allow the message
to pass.
To Set or Clear All:
1. Click <SET ALL> to activate all check boxes.
2. Click <CLEAR ALL> to clear all check boxes.
Apply one of the following options:
Click <SAVE> to immediately apply your changes to a running system and to maintain
the settings until you change them again.
Click <APPLY> to immediately apply your changes to a running system but discard those
changes the next time the SEP host is rebooted.
Click <RESET> to discard your changes without applying or saving them.
6.3.2.1 ICMPv4 General Messages
For a listing of additional ICMPv4 message types and explanations, go to:
http://www.iana.org/assignments/icmp-parameters
6.3.2.2 ICMPv6 Error and Info Messages
For a listing of additional ICMPv6 error and info message types and explanations, go to:
http://tools.ietf.org/html/draft-ietf-ipngwg-icmp-v3-05
Users Guide v5.1.7
6-25
Deepnines Security Edge Platform
6.3.2.3 Miscellaneous Messages
Miscellaneous Messages include IPv4 broadcast, IPv4 multicast and IPv4 packets with IP header
options; IPv6 multicast and IPv6 packets with IP header options; and Packets using Explicit
Congestion Notification (ECN).
NOTE
If your network supports IPv6, do not block neighbor solicitation and neighbor
advertisement messages, located in the ICMPv6 Info group, and IPv6 multicast
messages, located in the miscellaneous group. IPv6 does not work correctly when
these message types are blocked.
NOTE
That the Information Request and Information Reply messages were originally
created to allow devices to determine an IP address and possibly other configuration
information. This function was later implemented using protocols such as RARP,
BOOTP and DHCP, and these message
types obsolete and can be blocked.
GHGH
GHJ
6.3.3 Conversation Symmetry
Conversation Symmetry allows the SEP to provide protection or state-like measures on
connectionless traffic. Connectionless protocols have no real beginning and end. Most security
appliances will not monitor connectionless protocols. As a result, it is easy for DoS or other types
of attacks to be directed at devices that are listening for connectionless protocols i.e., DNS
Server.
Conversation Symmetry is designed to insureGHGH
proper 2-way traffic by controlling the number of
requests and responses assigned to a specificGHJ
protocol. Consequently, TCP and ICMP are not
controlled by this function, but provided with their own functions. TCP is always checked for
proper behavior to the protocol, including sequence numbers, and most types of ICMP are
blocked by default (configurable) except for echo requests/replies and certain destination
unreachable messages that are needed for MTU discovery. The controls of the Conversation
Symmetry allow you to define how many outgoing packets there can be before a response is
seen.
To configure Conversation Symmetry:
1.
2.
3.
4.
Select Conversation Symmetry from the Protection Policies folder (Figure 6-18).
Click <NEW> from menu (bottom left of screen).
Select Protocol from pull-down menu.
Select desired Conversation Requests (0-65,535).
5. Select desired Conversation Responses 0-65,535).
Users Guide v5.1.7
6-26
Deepnines Security Edge Platform
Apply one of the following options:
Click <SAVE> to immediately apply your changes to a running system and to maintain
the settings until you change them again.
Click <APPLY> to immediately apply your changes to a running system but discard those
changes the next time the SEP host is rebooted.
Click <RESET> to discard your changes without applying or saving them.
1
3
4
5
2
Fig 6-18. Conversion Symmetry Menu
The Action category classifications are listed as follows:
Protocol: This pull-down menu gives a list of the IP Protocols
Conversation Request: This is for incoming requests and can be set from 0
to 65,535
Conversation Response: This is for outgoing response and can be set from
0-65,535
Users Guide v5.1.7
6-27
Deepnines Security Edge Platform
6.3.4 Flow Control
Flow specifiers control the flow of traffic through the SEP unit. Using flow specifiers, you can
control the type and amount of traffic that enters or leaves your network. Additionally, you can
create flow specifiers to control a specific protocol, inside or outside IP address, and/or inside or
outside port, specifying an unconditional action (forward or block) or controlling the flow based on
connections, packets, or bits per second.
SEP combines the limits you set in a flow specifier combined with the historical analysis of your
network traffic to control the flow of traffic through the SEP. This will maximize the flow of good
traffic while minimizing the flow of harmful traffic thus preventing network flooding.
Flow specifiers are created to examine and meter any IPv4 or IPv6 packet attempting to cross
your network boundaries. To completely protect your network, create a flow specifier to match
each packet type that crosses your network boundary.
You may require more than one specifier for a specific packet type i.e., creating one flow specifier
to handle all TCP packets crossing your network boundaries and another to handle all TCP traffic
entering or leaving via port 25 (SMTP traffic). An SMTP packet would match both flow specifiers.
When a packet matches one or more flow specifiers, SEP applies all the actions from the
matching flow specifiers to the packet. You can create a flow specifier to apply to a single host or
a group of hosts.
NOTE
Once you create a flow specifier, the name field cannot be changed. However the
rule contents can be modified, saved and applied in real time.
6.3.4.1 Pre-Configured Flow Specifiers
The SEP system provides the following pre-configured flow specifiers:
Default Policy
The Default Policy flow specifier controls all packets that match no other flow specifier. This flow
specifier cannot be deleted. The matching fields of this flow specifier cannot be modified but the
control fields can be modified. The Default Policy is set to forward by default.
ARP/RARP
GHGH
GHJ
The ARP/RARP flow specifier controls all Address Resolution Protocol and Reverse Address
Resolution Protocol packets. This flow specifier cannot be deleted. The matching fields of this
flow specifier cannot be modified. The control fields of this flow specifier are user configurable.
The ARP/RARP policy is set to forward by default.
ForensiX Capture cannot include the packet body for ARP/RARP. Selecting both MAC Header
and Protocol Headers captures the entire packet.
Users Guide v5.1.7
6-28
Deepnines Security Edge Platform
OVERLOAD
The OVERLOAD flow specifier is only used for counting. It has no controls and does not do any
blocking. It is used to count packets that are dropped because the flow table has many entries.
Since there are more than 1.5 million flow table entries, the possibility of some kind of attack is
certain. But not all packets are dropped in this case. The number of drops increases as the
number of flow table entries increases toward 3 million.
It should be the case that the number of dropped flows and the number of dropped packets is
identical, because the dropping happens before a flow table entry is created. Additionally, only
hosts with an Unknown state are blocked. These are hosts that have not successfully opened a
TCP conversation, which is also typical of an attack. This means that internal users should not
be blocked once they have been able to access any external site. If a flow table is too full,
packets are dropped without creating new flow table entries. This usually only occurs during an
attack.
Fragments
Packets transmitted over the Internet are rarely fragmented. In general, packet fragmentation only
occurs when a packet is too large to be sent over a particular network segment or link in its
entirety i.e., when a packet that originated on a T1 connection must be transmitted over a dial-up
connection. Modern businesses with T1 connections or better will rarely, if ever, receive
fragmented packets. So if a fragmented packet arrives, it is immediately a suspect.
The Fragments flow specifier controls all packet fragments, regardless of protocol, and maintains
statistics on fragmented packets. The purpose of this flow specifier is to collect information on
fragmented packets for forensic capture and system monitors.
Fragmentation control is managed elsewhere in the system. This flow specifier cannot be deleted.
The matching fields of this flow specifier cannot be modified. The control fields of this flow
specifier are ignored. A packet may be fragmented into 3 packets and still be allowed to pass by
default. There are other checks that occur with fragments that can lead to blocking them such as
order of arrival, overlap size, etc.
Malformed
The Malformed flow specifier controls all packets with invalid data that cannot be matched to any
other flow specifier, for example a packet that is shorter than the minimum packet length. The
purpose of this flow specifier is to collect information on malformed packets for forensic capture
and system monitors. Malformed packet control is managed elsewhere in the system. This flow
specifier cannot be deleted. The matching fields of this flow specifier cannot be modified. The
control fields of this flow specifier are ignored.
Edge ForensiX capture cannot include the protocol headers for Malformed Packets.
ICMP
The ICMP flow specifier controls all ICMP packets that are not specifically blocked by the
system‟s static blocking rules. By default, it set to forward. The matching fields of this flow
specifier can be modified. The control fields of this flow specifier may be modified.
Users Guide v5.1.7
6-29
Deepnines Security Edge Platform
6.3.4.2 Creating and Maintaining Flow Specifiers
You can create as many flow specifiers as necessary to control the traffic that enters and leaves
your network. You will need to create a flow specifier for each protocol to be allowed into the
network. The Default flow specifier controls all traffic that does not match any other flow specifier
or is unwanted on the network.
You can create flow specifiers to match any number of specific criteria, including inside or outside
port and/or inside or outside IP address (including net mask). If traffic passing through SEP
matches more than one flow specifier, SEP selects the disposition that provides the most
aggressive network protection.
To create, modify or delete a Flow Specifier (Figure 6-19):
1. Select Flow Control from the Protection Policies folder.
2. Select <NEW> to create a new Flow Specification.
NOTE
For new Flow Specifier creation, make sure to click <NEW> for a brand new flow
specifier. Clicking <NEW RULE> will add a rule inside an existing flow specifier. If
this occurs and is not wanted, click <RESET> and start over with the <NEW> button.
3. Enter the Name of the flow specifier. The name can be anything, however it is best to
name it something that pertains to the flow specifier you are creating i.e., if you want to
monitor/control the outgoing SMTP email traffic, then the name of the flow specifier could
be „SMTP outbound‟.
4. Adjust the horizontal splitter on menu to view all of table and data view. Continue reading
the sections below to fill in the rest of the desired information (Refer to Figure 6-19).
GHGH
GHJ
Users Guide v5.1.7
6-30
Deepnines Security Edge Platform
1
4
3
2
Fig 6-19. Flow Control Menu
Match Rules
Match rules is a general term for the rule or rules that will select traffic to which a flow specifier
will apply. For example, you make a flow specifier called SMTP outbound and there are two email
servers in the DMZ that email should always go to. Then you would create one match rule using
the IP address of one of the email servers and then add a second match rule for the second email
server‟s IP address.
NOTE
It is very important that you make certain as to not save a flow specifier with a match
rule that is completely empty. If so, it will match all traffic which is usually not
intended.
6-31
Users Guide v5.1.7
GHGH
GHJ
Deepnines Security Edge Platform
Group Naming
If you desire to assign this Flow Specifier to a group name then enter the desired group name into
the Group field. This will allow you to view all of the Flow Specifier that pertain to that group by
selecting the Filter Group drop down menu (top center of pane) and selecting the desired group.
Grouping is primarily used when large numbers of Flow Specifier volumes are created so that one
can find the desired rule more quickly.
Defining Protocols
To define a particular protocol for the Flow Specifier that is being created; check the box next to
protocol. The drop down menu will now be active and can be scrolled through to find the desired
protocol. It will default to TCP (6).
If the protocol number is known, one can enter that protocol number into the field and then press
Tab. The SEP will automatically look it up and display the corresponding protocol name and
number.
Defining IP Addresses
To define a particular IP address, Source or Destination, check the box next to the Inside or
Outside Address field. This field will now become active and the desired IP address can be
entered into the field.
The subnet mask will default to a /32 (single IP address). If a range is desired, enter the IP
address range and then change the corresponding subnet mask. For example, a Class C needs
to be defined for 10.8.200.0. The subnet mask would need to change from /32 to a /24.
Include
If Include is selected, the match rule is normal.
Exclude
If Exclude is selected, the match rule causes any matching flow to be excluded from control by
the flow spec, even if it would otherwise match.
Users Guide v5.1.7
6-32
Deepnines Security Edge Platform
Defining Each
The Each feature that is within the Flow Specifier is applied to the Outside and Inside IP
addresses only, primarily because it will pertain to each individual IP address. For example:
The Administrator has created a rule for incoming HTTP traffic and has set the control to 5Mbps
of bandwidth and DPI. It is almost impossible to know what outside IP addresses will be visiting
your website but the way the rule is set up one of those IP addresses can flood you with at least
5Mbps of traffic before action would be taken (unless it is an attack picked up by DPI). However,
if the administrator wanted to protect the web server from such traffic, one could enable the each
feature and then bring down the bandwidth control that is desired from each host. The
administrator now sets the bandwidth from 5Mbps to 500Kbps. Each host coming into the
network would be allowed 500Kbps of bandwidth.
The each feature ensures that not one individual user on the network will consume all of the
available bandwidth, whether it be good or bad traffic.
Defining Ports
Defining ports for the Flow Specifier can be accomplished by check the box next to the desired
port. The port can be entered by itself or in a range form. If only a single port is desired, enter the
port number in the first field and then click the mouse on the second field. It will automatically
populate with the same port number.
If a port range is desired, enter the starting port number in the first field and then the end of the
port range in the last field.
NOTE
It is important that you make certain to set the direction for the match rule.
Defining Bridge ID
Bridge ID can be defined only if the SEP is residing on a VLAN trunk and per VLAN group policy
is desired. Checking the box next to Bridge ID can enable Bridge ID. The pull down menu will
now be active. Pulling the down the menu will show all of the VLAN IDs that the SEP has seen.
The administrator can select the appropriate Bridge ID that this rule will apply to.
Defining Directionality
GHGH
Defining Direction for the Flow Specifier provides
GHJ another layer of protection from hackers and
attackers by defining where the flow is going to be originating from. For example: If the Flow
Specifier is created for HTTP outbound traffic; Protocol would be TCP (6), Outside port number
would be 80, direction would be set to „FROM INSIDE‟. The session will start on the inside of the
network and go out to the Internet.
Applying a Match Rules
If putting two flow tags in a single rule, both must match. If matching multiple flow tags separately
is desired, then a separate match rule must be created for each flow tag. Once all of the criteria
for the Match Rule have been defined, the administrator can apply it to the Flow Specifier by
pressing the Update button (Refer to Figure 6-20).
Users Guide v5.1.7
6-33
Deepnines Security Edge Platform
Multiple Match Rule
If additional rules are desired within the Flow Specifier:
1. After the Update button has been pressed, click <NEW RULE>.
2. Define the Protocol, IP addresses and ports.
3. Click <UPDATE> to apply to the Flow Specifier.
If no additional rules are desired for the Flow Specifier, Click on the Control tab (middle of the
pane) and read below for applying control.
Control
The control portion of the Flow Specifier defines how the matched traffic is going to be treated if it
is seen on the network; traversing the SEP. Numerous control methods are listed as follows
(Table 6-7):
Action – Block
All of the traffic matching the Flow Specifier will be blocked.
Action – Forward
All of the traffic matching the Flow Specifier will be forwarded and
not controlled. This should not be used if at all possible.
Conversation
The defined number will control new conversations.
Bit
The defined number will control the total bit rate per second.
Packet
The defined number will control total packets per second.
Table 6-7. Flow Specifier Control Methods
To block the traffic for the Flow Specifier:
1. Check the action box. The drop down menu will become active.
2. Pull down the menu and select block.
To forward the traffic for the Flow Specifier:
1. Check the action box. The drop down menu will become active.
2. Pull down the menu and select <Forward>.
NOTE
When in forwarding mode, there is minimal checking that is occurring and
attacks or other unwanted traffic could pass into or out of the network.
Additionally, DPI will not be active on the Flow Specifier when forward is
selected.
6-34
Users Guide v5.1.7
GHGH
Deepnines Security Edge Platform
To control the flow of traffic for the Flow Specifier by Conversation rate:
1. Check the Conversation box. The conversation field below will become active.
2. Enter an amount of new conversations per second for the Flow Specifier.
3. If unsure of the correct number set the number to a high rate and then read the Control
Options section of this manual.
NOTE
The conversation rate is for new conversations per second. It does not control
or take into account the number of existing conversations.
To control the flow of traffic for the Flow Specifier by bit rate per second:
1. Check the Bit box. The bit field below will become active.
4. Enter the bit volume amount for the Flow Specifier.
5. If unsure of the correct number set the number to a high rate and refer to the Control
Options as listed.
Reference
GHGH
1,000,000 bits
= 1Mpbs
GHJ
500,000 bits = 500Kbps
NOTE
Bit rate directly correlates to the bandwidth. If a bit rate is defined that is larger
than the actual Internet connection bandwidth, then protection could be negated.
To control the flow of traffic for the Flow Specifier by packet rate per second:
1. Check the Packet box. The packet field below will become active.
2. Enter the packet volume per second for the Flow Specifier.
3. If unsure of the correct number set the number to a high rate and then read the
Control Options section below.
The Control fields; Conversation, Bit and Packet can be set if desired. It is important to note that
if only the Conversation field is used and the
connection is under the limit, no other rate control
GHGH
will apply to this Flow Specifier. It is generally a good idea to use both Conversation Rate and Bit
GHJ
rate.
Users Guide v5.1.7
6-35
Deepnines Security Edge Platform
Control Options
There are numerous control options for Conversation, Bit and Packet rate settings. The control
options allow a rate limit to be set to only monitor the rate, rate events (alert only), Control or
Control and Rate events (alert) (Table 6-8). The control options are listed as follows:
Monitor
The monitors of the Flow Specifier will be viewable in the Monitors>Flow Statistics
section. The flow will not be controlled.
Rate Events
Only
There will be an alert message generated when the set limit is met and the Flow
Statistics will be viewable.
Control Only
The traffic will be controlled if limits are met without alerting.
Control +
Rate Events
The traffic will be controlled if limits are met and an alert will be issued.
Table 6-8. Control Options
NOTE
When either the Monitor or Rate Events Only is selected, there is no control on
the flow. If the traffic matches another Flow Specifier, the matching Flow Specifier
will control it. Upon applying or saving these control options, a pop up window
will be shown reiterating this message.
To change the control options for a Flow Specifier:
1.
2.
3.
4.
5.
Ensure that the Control Tab of the Flow Control section is viewable.
Ensure that at least one, Conversation, Bit or Packet rate check box is enabled.
Assign a value to the corresponding field, ex. 1,000,000 bits for Bit Rate control.
To the right of the input field, pull down the drop down menu.
Select the desired Control Option.
Enabling DPI
GHGH
GHJ
To enable Deep Packet Inspection for the Flow Specifier:
1. Check the DPI box below the control fields to enable DPI.
2. Uncheck the DPI box to disable DPI for the Flow Specifier.
NOTE
There must be a control of conversation, bit or packet rate set to enable DPI
scanning on the traffic within the Flow Specifier.
Users Guide v5.1.7
6-36
Deepnines Security Edge Platform
Connection Timeout
Connection Timeout will take out any conversation that has been left open and has had no
activity for 5 minutes (300 seconds). The settings on the connection timeout are set to 300
seconds by default.
To change or disable connection timeout:
1. Locate the connection timeout settings towards the bottom of the Control tab.
2. Enter a new time, in seconds, for the Flow Specifier to change timeout settings.
3. Uncheck the check box to completely disable connection timeout for the Flow Specifier.
NOTE
This option is NOT recommended. A long timeout is suggested i.e., 1,000,000
(one million). This is a little less than 12 days.
NOTE
While there are certain instances that connection timeout should be disabled,
every effort should be made to increase the timeout value first. If connection
timeout is disabled, connections that are made within the Flow Specifier will not
be timed out. If the number of connections
GHGHreaches a significant amount it could
impact system
performance.
GHJ
System Logging
System Logging is an option that can enable logging on a per Flow Specifier basis. The debug
logging will give an administrator an inside view as to the decision to drop a packet or allow it.
This logging can be very resource intensive and should only be turned on after a Certified
Deepnines Engineer has instructed to do so.
GHGH
GHJ
!
CAUTION !!
The SEP System Logging settings will impact system performance. Local
logging should only be enabled during critical troubleshooting periods and only
for very short durations. Separate reporting functionality is available and active
within the SEP to show statistics of what is getting blocked.
Users Guide v5.1.7
6-37
Deepnines Security Edge Platform
Protocol Handling
After completion of the Control Tab, if any protocol handling is desired for the Flow Specifier then
the Protocol Handling Tab will need to be set. This will allow an administrator to define further the
control methods used by the SEP.
It is important to note that the Protocol Handling Tab should only be accessed if you are defining
Flow Specifiers for the following rules. Descriptions and functions are also discussed (Table 6-9).
FTP
Since passive FTP will select a randomly generated Data Channel port after
the initial Command Channel is set up (TCP port 21), this setting allows the
SEP to monitor the data channel for port numbers and allow the data channel
connections to be accepted when it would otherwise be blocked.
SMTP
This will enable SMTP Virus Scanning for the Flow Specifier being defined. At
least one of the source or destination ports on the Match Rules tab must be set
to port 25 for SMTP Virus Scanning to work.
POP3
This will enable POP3 Virus Scanning for the Flow Specifier being defined. At
least one of the source or destination ports on the Match Rules tab must be set
to port 110 for POP3 Virus Scanning to work.
HSRP
In general cases, some installations such as HSRP (Hot Stand-by Routing
Protocol) will be used by routers, firewalls or switches that the SEP is
connected to. This will allow HSRP hello packets to pass properly. Information
for setting the correct Flow Specifiers for HSRP can be found below.
RIP
In general cases, RIPv1 and RIPv2 are used by routers that are placed in front
of or behind the SEP. Selecting RIP will allow this protocol to work properly.
Information for setting the correct Flow Specifiers for RIPv1 and RIPv2 can be
found below.
HTTP
When selected, this will enable URL Filter rules and the ability to control URL
access based on user groups if you have Deepnines Active Directory User
Services installed.
EIQ
Redirect
The EIQ Redirect option redirects traffic to the EIQ server for the purpose of
remediation. It is automatically configured by EIQ. Users do not need to select
or deselect this button.
Table 6-9. Descriptions and Functions
The Flow Specifier for HSRP requires one match rule for each participating router:
For routers outside Sleuth9:
Set the outside IP address to the real IP address of the outside router, the subnet mask
to 32, and the port to 1985.
Set the inside IP address to the IP for the multicast message (224.0.0.2), the subnet
mask to 32, and the port to 1985.
For routers inside Sleuth9:
Set the outside IP address to the IP for the multicast message (224.0.0.2), the subnet
mask to 32, and the port to 1985.
Set the inside IP address to the real IP address of the inside router, the subnet mask to
32, and the port to 1985.
Users Guide v5.1.7
6-38
Deepnines Security Edge Platform
The Flow Specifier for RIPv1 requires one match rule per router:
For the outside router(s):
Set the outside IP address to the IP address of the outside router, the subnet mask to 32,
and leave the port blank.
Set the inside IP address to the IP subnet for the broadcast message (e.g.x.x.x.0), the
subnet mask to 24, and the port to 520.
For the inside router(s):
Set the outside IP address to the IP subnet for the broadcast message (e.g.,x.x.x.0), the
subnet mask to 24, and the port to 520.
Set the inside IP address to the IP address of the inside router, the subnet mask to 32,
and leave the port blank.
Configuring a Sleuth9 Perimeter Platform positioned between two RIPv2 routers requires two
match rules per router:
The first match rule should be configured exactly as the match rule for RIPv1 is configured
(see the previous section).
For the second match rule for the outside router(s):
Set the outside IP address to the IP address of the outside router, the subnet mask to 32,
and the port to 520.
Set the inside IP address to address for the multicast message (224.0.0.9), the subnet
mask to 32, and the port to 520.
For the second match rule for the inside router(s):
Set the outside IP address to the address for the multicast message (224.0.0.9), the
subnet mask to 32, and the port to 520
Set the inside IP address to the IP address of the inside router, the subnet mask to 32,
and the port to 520.
Edge ForensiX™
The Edge ForensiX tab of the Flow Specifier allows the capture of either protocol headers or the
entire payload of the packets matching that flow. This information is stored locally on the SEP in
an EFX partition. Once the files reach 32MB in size, they will automatically be transferred to the
EFX Database System.
To enable this option, it is required that you have the Edge ForensiX Appliance as well as the
SEP. Refer to the “EFX Users Guide” for instructions on how to capture packet information.
Saving Flow Specifiers
Once all criteria for the Flow Specifier are defined, the administrator can save or apply the rule to
put the Flow Specifier in motion.
To save or apply a Flow Specifier:
1. Click <SAVE> to immediately apply your changes to a running system and to maintain
the settings until you change them again, or click one of the following:
2. Click <APPLY> to immediately apply your changes to a running system but discard those
changes the next time the SEP host is restarted.
3. Click <RESET> to discard your changes without applying or saving them.
Users Guide v5.1.7
6-39
Deepnines Security Edge Platform
6.3.4.3 Exporting and Importing Flow Specifiers
You may be required to import or export Flow Specifiers. This may include exporting Flow
Specifiers for back up purposes, exporting a single Flow Specifier to import it into another SEP or
importing Flow Specifiers after performing an upgrade or rebuilding of the system. The options
apply as listed:
Individual Flow Specifiers
To export a Flow Specifier:
1.
2.
3.
4.
5.
6.
7.
Log in to the SEP host.
Select Flow Control from the Protection Policies folder.
Highlight the desired Flow Specifier to export.
At the bottom middle of the pane select Export.
Navigate to the local system folder that you want to save the configuration file to.
Name the file as to remember which Flow Specifier it is.
Press <SAVE>.
To import a Flow Specifier:
1.
2.
3.
4.
5.
6.
Log in to the SEP host.
Select Flow Control from the Protection Policies folder.
At the bottom middle of the pane select Import.
Navigate to the local system folder that you want to import the configuration file from.
Press <OPEN>.
Confirm your options to Import the Flow Specifier.
Multiple Flow Specifiers
To export a Group or Multiple Flow Specifiers:
1. Log in to the SEP host.
2. Select Flow Control from the Protection Policies folder.
3. Highlight the desired Flow Specifiers to export by selecting the first one, holding down the
SHIFT key and then click on the last one to be exported. Additionally, the SHIFT and
up/down arrows can be used.
4. At the bottom middle of the pane select <EXPORT>.
5. Navigate to the local system folder that you want to save the configuration file to.
6. Name the file as necessary.
7. Press <SAVE>.
To import a Flow Specifier:
1.
2.
3.
4.
5.
6.
Log in to the SEP host.
Select Flow Control from the Protection Policies folder.
At the bottom middle of the pane select Import.
Navigate to the local system folder that you want to import the configuration file from.
Press <OPEN>.
Confirm your options to Import the Flow Specifiers. The SEP will confirm your actions for
each Flow Specifier in that group. Selecting <Yes to All> will import without questions.
Users Guide v5.1.7
6-40
Deepnines Security Edge Platform
6.3.5 URL Filter Rules
URL Filtering controls HTTP traffic by inspecting the URLs being requested. It provides the
following:
Three-layer filtering based on user created admin black and white lists, website
categories, and other third-party blacklists
Regular expression matching for admin black and white lists
Allow, block and redirect actions for HTTP requests
Customizable error messages for blocked access
Automatic updates for content database
Filtering out of search engine caches
Gathering for statistics
URL Filter Rules make rules on URL categories per rule set.
To Create a New Ruleset:
1.
2.
3.
4.
5.
Log in to the SEP host.
Select URL Filter Rules from the Protection Policies folder.
Click <NEW RULESET> (Figure 6-20). A New Ruleset screen appears.
Select desired option from the “Copy From” pull-down menu.
Enter the desired name and description for the ruleset in the fields provided and
click <OK>. The ruleset name will appear in field of pull-down menu at top middle of
screen.
To Create New Category-Based Rules:
1. Select and highlight one of pre-set categories listed to edit (Figure 6-21).
2. Select action desired from pull-down menu <ALLOW> <BLOCK> <REDIRECT>.
ALLOW: Selecting this action allows a request.
BLOCK: Selecting this action allows a block.
REDIRECT: Selecting this action allows for redirect. Make certain that you specify the
complete URL i.e., "http://www.deepnines.com". If you want to redirect www.xyz.com to
www.deepnines.com, by entering www.deepnines.com, you will get
http://www.xyz.com/www.deepnines.com and not http://www.deepnines.com .
3. Place check mark in Log Enabled box to allow logging of all activity
4. Click <SAVE>.
Users Guide v5.1.7
6-41
Deepnines Security Edge Platform
2
4
5
3
Figure 6-20. URL Filter Categories Actions
To edit an existing Rule Set
1. Select and highlight one of pre-set categories listed to edit.
2. Select action desired from pull-down menu <ALLOW> <BLOCK> <REDIRECT> to
change.
3. Place check mark in Log Enabled box to allow logging of all activity
4. Click <SAVE>.
Users Guide v5.1.7
6-42
Deepnines Security Edge Platform
6.4
Reporting
The Reporting section of the EMC allows the administrator to obtain summary and detail
information about what types of anti-viruses, network anomalies, signature violations and URL
Filters have been detected from within the SEP. The reporting data can be search by date and
can be viewed in many different ways.
To view a report, navigate to the Reporting folder of the EMC.
There are four different reporting categories:
Anti-Virus
Network Anomalies
Signature Violations
URL Filters
The Anti-Virus reporting will give the administrator summary and detailed information about the
different types of viruses detected by the SEP, whether it was cleaned or un-cleaned (deleted),
top email senders and receivers, as well as the detail about each.
The Network Anomalies reporting will give the administrator summary and detail information
about what types of anomalies have been seen, the source or destination IP address of
detections, the direction of where the detections came from, as well as, other detail information.
The Signature Violations reporting will give the administrator summary and detail information
about what types of Deep Packet Inspection signatures have been detected. Signature
Identification numbers, classifications, signature message detail, count and individual address
information detail is also viewable.
The URL Filters reporting will give the administrator a summary and detailed trend analysis of
URLs that are blocked, allowed or redirected.
Users Guide v5.1.7
6-43
Deepnines Security Edge Platform
6.4.1 Generating Reports
For each reporting type (Anti-Virus, Network Anomalies, Signature Violations, URL Filters), the
administrator will be presented with the same type of initial configuration that will be necessary to
pull report data.
To search report data, a date from which the report should start needs to be defined.
Select the From: date.
1. From the top of the report pane, select the drop down bar from the From: panel to expose
a selectable calendar (Figure 6-21).
2. Select the day that is desired to search from by clicking on that day.
3. To select a time, the user can click on the hour, minute or second hand and while holding
the left mouse button down, drag the hand to the desired time. Alternatively, the user can
enter the information into the date field by clicking on the date and then typing the
information into the window.
1
2
3
Figure 6-21. Reporting Pane Displaying From Date Calendar
To search report data, a date from which the report should end needs to be defined..
Select the To: date.
1. From the top of the report pane, select the drop down bar under the To: panel to expose
a selectable calendar (Figure 6-22).
2. Select the day that is desired to search from by clicking on that day.
3. To select a time, the user can click on the hour, minute or second hand and while holding
the left mouse button down, drag the hand to the desired time.
4. Alternatively, the user can enter the information into the date field by clicking on the date
and then typing the information into the window.
Users Guide v5.1.7
6-44
Deepnines Security Edge Platform
1
2
3
Figure 6-22. Reporting Pane Displaying To Date Calendar
To generate the report, ensure the desired dates are selected and then click the
<GET REPORT> button. The data will start to fill in the report. It could take up to a minute for
the report generation to be completed depending on the time selected and number of alerts.
NOTE
Reporting data is only viewable for the last 15 days of detections.
The below sections will describe each report and the different methods to obtain information from
them.
6.4.2 Anti-Virus Report
The anti-virus report allows administrators to view what types of viruses have been detected and
stopped by the SEP unit, as well as, detailed information about the email that was infected.
In Section 6.4.1 we talked about how to pull reports. In this section, we describe what types of
GHGH
reports are available and how to use them.
GHJ
There are two tabs at the top left of the results pane.
Summary - The types of summary reports are described in the below chart (Figure 6-23)
Detail – Per detail of the violation detection
Users Guide v5.1.7
6-45
Deepnines Security Edge Platform
Table 6-10 lists each summary report type and their descriptions.
Summary Report
Type
Description
Virus Name
Will list Virus names and number of occurrences of each.
Sender
Will show the top sender of emails. This shows emails sent not only
viruses.
Receiver
Will show the top receiver of emails, this shows emails received not
only viruses.
Cleaned Viruses
Will show the virus name and count. Cleaned viruses mean the SEP
was able to correct the virus and keep the original email.
Uncleaned Viruses
Will show the virus name and count. Un-cleaned viruses mean the
SEP was not able to clean the virus and therefore took the infected
attachment out of the email and replaced it with a text file explain such.
Table 6-10. Summary Report Types
Figure 6-23. Summary Report - Types
Users Guide v5.1.7
6-46
Deepnines Security Edge Platform
To view one of the Summary reports described above:
Select the dates that the report should encompass.
Click <GET REPORT> button.
From the drop down menu in the middle of the results view, pull down and select the
desired report.
If additional reports are desired, user can pull down the drop down bar to select a
different report.
NOTE
Once the date has been selected there is no need to click Get Report again, unless the
date has changed. All of the reports can be viewed without having to select Get Report
again.
To view Detail report information:
Select the Detail tab from the top of the results pane.
Select the dates that the report should encompass.
Click <GET REPORT> button.
Detail report information can be sorted, scrolled or drilled down by Sender Contains,
Receiver Contains, Virus Name Contains and Cleaned Status.
6.4.3 Network Anomalies Report
GHGH
GHJIn this section, we describe what types of
In Section 6.4.1 we talked about how to pull reports.
reports are available and how to use them.
The Network Anomaly Report allows administrators to view what types of network anomalies
have been detected and stopped by the SEP unit, as well as, detailed information about the
anomaly.
There are two tabs at the top left of the results pane.
Summary - The types of summary reports are described in the below chart (Figure 6-24)
Detail – Per detail of the violation detection (Figure 6-25)
Users Guide v5.1.7
6-47
Deepnines Security Edge Platform
Table 6-11 lists each summary report type and their descriptions.
Report Type
Description
Sender
Will display the top senders of network anomalies.
Receiver
Will display the top receivers of network anomalies.
Protocol
Will display the Protocols in which the anomaly occurred.
Bridge
Will display in which bridge the anomaly was detected.
Packet Origin
Will display the number of anomalies detected from outside hosts and
inside hosts.
Bandwidth
Consumed
Will display violation type, violation detector, Flow Specifier and the
number of bytes that make up the anomalies detected.
Packet Dropped
Will display violation type, violation detector, Flow Specifier and the
number of packets dropped that make up the anomalies detected.
Violation Type
Will display if the violation type was from a protocol or network
anomaly.
Flow Specifier
Will display the Flow Specifier in which the anomaly was from. A
report of No Flow Specifier means that the packet was dropped
before it was put into Flow Specifiers from either stateless or
malformed.
Table 6-11. Report Types
Figure 6-24. Network Anomalies Report Types – Summary Tab
Users Guide v5.1.7
6-48
Deepnines Security Edge Platform
To view one of the Summary reports described above:
Select the dates that the report should encompass (Figure 6-24)
Select <GET REPORT> button.
From the drop down menu in the middle of the results view, pull down and select the
desired report.
If additional reports are desired, user can pull down the drop down bar to select a
different report.
NOTE
Once the date has been selected there is no need to click Get Report again, unless
the date has changed. All of the reports can be viewed without having to select Get
Report again.
To view Detail report information:
Select the Detail tab from the top of the results pane.
Select the dates that the report should encompass (Figure 6-25).
Select <GET REPORT> button.
Detail report information can be sorted, scrolled or drilled down by Source or Destination
IP address, Source or Destination Port, Protocol, Direction, Violation Type, Bride ID or
Flow Spec.
A combination of drill down capabilities can also be used together.
GHGH
There is also a Newer and Older feature that will allow the user to see the next set of
detailed information, if there are more GHJ
than 500 records returned from the report.
Figure 6-25. Network Anomalies Report Types – Details Tab
Users Guide v5.1.7
6-49
Deepnines Security Edge Platform
6.4.3.1 Type of Anomalies
There are two basic types of anomalies:
Protocol Anomalies: These are dropped for any reason other than rate control
Traffic Anomalies: These are dropped due to some form of rate control
The protocol anomalies have a number of sub-categories, although the category is not explicitly
logged. The strings in quotes are what are expected in the anomalies report (See table 6-12).
Bad Packet:
“noProtoHdr”
Usually the packet is too short.
“Malformed”
Other problem that renders the header invalid.
Stateless:
“LAND attack“
A packet type that crashed old PCs.
“Multicast violation”
IP multicast blocked (configurable)
“Broadcast violation”
IP broadcast blocked (configurable)
“IP header options violation”
IPv4 header options blocked (configurable).
“ECN violation”
Explicit Congestion Notification blocked (RFC 3136) (configurable).
“Unsupported IPv6 header
violation”
Problem with IPv6 protocol header.
“Unsupported IPv6 header option
violation”
IPv6 header options blocked (configurable).
“ICMP violation”
Blocked ICMP type (configurable).
Stateful:
“Invalid TCP sequence number”
TCP sequence number does not match current window for flow.
“FSTATUS_NEW flag error”
A TCP packet other than a SYN was received for an unknown flow.
Usually the result of handling a packet for a flow that has been timed
out or closed for some other reason.
“FSTATUS_PENDING FIN retry
error”
Retransmitted FIN has invalid sequence number.
“FSTATUS_PENDING flag error”
Invalid TCP packet during connection setup
“FSTATUS_CURRENT FIN retry
error”
Retransmitted FIN has invalid sequence number.
“FSTATUS_CURRENT flag
error”
Invalid TCP packet for established flow.
“FSTATUS_GRACE flag error”
Invalid TCP packet for flow being picked up in grace period. When
the SEP starts up after a failover, it attempts to learn the state of any
in-progress flows for a period of time known as grace period, without
blocking them outright.
“FSTATUS_GRACE grace
period expired”
Need packets in both directions before grace period expires. "M&N
error", Conversation symmetry problem. For most protocols, must see
traffic in both directions (configurable)
“FSTATUS_PENDING FLAG
ERROR”
This is an indication of asymmetrical routing, where the SEP is only
seeing traffic in one direction.
Users Guide v5.1.7
6-50
Deepnines Security Edge Platform
Fragments:
(various problems with fragmented packets)
“frag-nomatch”
Does not match previous fragment
"frag-toomany"
More than configured maximum number of fragments (default is 3).
"frag-badoffset"
Offset does not match previous fragment, or is otherwise bad.
"frag-toobig"
Reassembled packet would be bigger than 64K bytes.
"frag-badfirst"
First fragment must be at least 256 bytes*, or some other problem.
"frag-badlength"
Length of data must be multiple of 4 bytes except for last fragment.
"frag-inactive"
A previous fragment was dropped, later fragments no longer
accepted.
Table 6-12. Types of Anomalies
6.4.4 Signature Violations Report
In Section 6.4.1 we talked about how to pull reports. In this section, we describe what types of
reports are available and how to use them.
The Signature Violations Report allows administrators to view what types of signatures have been
detected by the SEP unit, as well as, detailed information about the DPI detections.
There are two tabs at the top left of the results pane.
Summary - The types of summary reports are described in the below chart (Figure 6-26)
Detail – Per detail of the violation detection (Figure 6-27)
Table 6-13 lists each summary report type and their descriptions.
Report Type
Description
Signature ID
Will display the Signature ID number, the classification it belongs to, the
message of the actual signature and the number of times that signature ID was
detected.
Classification
Will display only the classification from which the violation occurred and the
number of times it has been detected.
Sender
Will display the IP address of the senders that a violation has occurred. These
can display both outside and inside IP addresses, as well as, the count
associated with the IP address.
Receiver
Will display the IP address of the destined receiver that a violation has occurred.
This report can display both outside and inside IP addresses, as well as, the
count associated with the IP address.
Bandwidth
Consumed
Will display the Signature ID number, Classification it belongs to, the full
message of the violations and the byte count associated with each rule.
Depending on the action set on each of the classifications this can be
representative of the amount of bandwidth that could be saved by blocking this
type of violation.
Table 6-13. Report Types
Users Guide v5.1.7
6-51
Deepnines Security Edge Platform
Figure 6-26. Summary View of Signature Violations Report Types
To view one of the Summary reports described above:
Select the dates that the report should encompass.
Select <GET REPORT> button.
From the drop down menu in the middle of the results view, pull down and select the
desired report.
If additional reports are desired, user can pull down the drop down bar to select a
different report.
NOTE
Once the date has been selected there is no need to click Get Report again, unless the
date has changed. All of the reports can be viewed without having to select Get
Report again.
To view Detail report information:
Select the Detail tab from the top of the results pane (Figure 6-27).
Select the dates that the report should encompass.
Select <GET REPORT> Report button.
Users Guide v5.1.7
GHGH
GHJ
6-52
Deepnines Security Edge Platform
Detail report information can be sorted, scrolled or drilled down by Source or Destination
IP address, Source or Destination Port, Classification Contains, SID Contains and
Protocol.
A combination of drill down capabilities can also be used together.
There is also a Newer and Older feature that will allow the user to see the next set of
detailed information, if there are more than 500 records returned from the report
Figure 6-27. Detail View of Signature Violations Information
6.4.5 URL Filters
The URL Filters Report allows administrators to view a summary and detailed trend analysis of
URLs that are blocked, allowed or redirected.
In Section 6.4.1 we talked about how to pull reports. In this section, we describe what types of
reports are available and how to use them.
There are two tabs at the top left of the results pane.
Summary - The types of summary reports are described in the below chart (Figure 6-28).
Detail – Per detail of the violation detection (Figure 6-29).
Users Guide v5.1.7
6-53
Deepnines Security Edge Platform
Table 6-14 lists each report type and their descriptions.
Report Type
Description
User totals
Lists total number of filtering actions taken per user.
Users by
action
Lists users by actions.
Category total
Lists total number of filtering actions per category.
Categories by
action
Lists categories by action.
Destination
URL totals
Lists total number of filtering actions per destination URL.
Destination
URLs by
action
Lists filtering actions per destination URL by action.
Source IP
totals
Lists total number of filtering actions per source IP.
Table 6-14. Report Types
Figure 6-28. Summary View of URL Filters Report Types
Users Guide v5.1.7
6-54
Deepnines Security Edge Platform
To view one of the Summary reports described above:
Select the dates that the report should encompass (Figure 6-28).
Select <GET REPORT> button.
From the drop down menu in the middle of the results view, pull down and select the
desired report.
If additional reports are desired, user can pull down the drop down bar to select a
different report.
NOTE
Once the date has been selected there is no need to click Get Report again,
unless the date has changed. All of the reports can be viewed without having to
select Get Report again.
To view Detail report information:
Select the Detail tab from the top of the results pane (Figure 6-29).
Select the dates that the report should encompass.
Select <GET REPORT> Report button.
Detail report information can be sorted, scrolled or drilled down by Source or Destination
IP address, Source or Destination Port, Classification Contains, SID Contains and
Protocol.
A combination of drill down capabilities can also be used together.
GHGH
There is also a Newer and Older feature
that will allow the user to see the next set of
detailed information, if there are moreGHJ
than 500 records returned from the report.
Figure 6-29. Summary View of URL Filters Report Types
Users Guide v5.1.7
6-55
Deepnines Security Edge Platform
6.4.6 Saving and Printing Reports
Both Summary and Detail reports can be saved to the administrator‟s computer. This will allow
the administrator to email, archive or print out the report information.
To save reports:
Select the <SAVE> button from the desired report.
Select the location or folder on the user‟s computer where the report is to be saved.
Name the file to signify the date that the report was generated.
Example: Detail_report_08-05-2007.htm
By default the file extension is .html, make sure to name the file .htm extension.
Click <SAVE> to save the report.
To print reports:
Select the <PRINT> button from the desired report.
When the printer select window appears, select the desired printer.
Select any other desired printing options.
Select <OK> to print.
NOTE
The print options could vary depending on operating system or printer type.
NOTE
Ensure in the printer pop-up menu that the amount of data to print is not too
large. Printing the detail report could be in the hundreds of pages if not drilled
down.
GHGH
GHJ
GHGH
GHJ
Users Guide v5.1.7
6-56
Deepnines Security Edge Platform
6.5
Setup
The Setup section of the Command Explorer provides setup configuration options for the
following operations:
6.5.1 Logging
SEP provides a number of configurable logging options, within two categories. General logging
options include logging system alarms and logging audit entries. Users assigned the “May
configure general logging privilege” are allowed to set these options.
Advanced logging options include various SEP Executive, Traffic Manager, Virus Scanning, and
miscellaneous log entries.
NOTE
Required Permission: To configure a remote logging server, you must have the
“May Configure Advanced Logging” permission.
When logs are kept locally, the maximum size for each log file is 20MB. When a log file reaches
the 20MB limit, SEP automatically creates a new log file. SEP can maintain 5 log files, storing
100MB of data at any one time. Once the limit of five 20MB files is reached, SEP deletes the
oldest log file before creating a new one, maintaining the 5-file limit while continuing data logging.
GHGH
GHJ
Users Guide v5.1.7
6-57
Deepnines Security Edge Platform
6.5.1.1
Setting General Logging Options
General logging options include alarm delivery and audit entries only.
NOTE
Required Permissions: Users who are assigned the “May Configure General
Logging” privilege are able to set alarm delivery and audit logging options.
To set alarm logging options:
1. Verify that the unit to set general logging options is the active host.
2. Select Alarm Delivery from the Setup folder (Figure 6-30).
GHGH
GHJ
Figure 6-30. General Logging Options Screen
3.
4.
5.
6.
Enter the IP address of the SMTP Server to be used for email alarm delivery.
Enter a Timeout value in seconds for SEP connection to the mail server.
In the From Address field, enter the email address that SEP will use to mail alarm data.
Activate the checkboxes in the Log File column for each alarm type to be written to the
log.
7. Activate the Log to local syslog checkbox to writ e the alarm entries to the local system
log and/or activate the Log to remote syslog server checkbox (if a remote system log has
been configured) to write the alarm entries to the remote system log.
Users Guide v5.1.7
6-58
Deepnines Security Edge Platform
8. Click <SAVE> to immediately apply your changes to a running system and to maintain
the settings until you change them again, or click one of the following:
9. Click <APPLY> to immediately apply your changes to a running system but discard those
changes the next time the SEP host is restarted.
10. Click <RESET> to discard your changes without applying or saving them.
6.5.1.2
Setting Advanced Logging Options
Advanced logging options include several options for the SEP Executive, the Traffic Manager,
and virus scanning as well as some miscellaneous options.
NOTE
Required Permissions: Users who are assigned the “May Configure Advanced
Logging” privilege are able to set alarm delivery and audit logging options.
NOTE
Because these logging options quickly consume available disk space and may
negatively impact system performance, Deepnines recommends that you reserve
advanced logging options for Deepnines service personnel only.
To set advanced logging options:
GHGH
GHJ
1. Verify that the unit to set advanced logging options is the active host.
2. Select the Logging folder from the Setup folder (Figure 6-31). The Logging folder
contains three other folders and the miscellaneous command option.
3. Open the folder associated with the SEP component for which to set logging options and
if necessary, select a command option. Logging options for that category appear in the
Action pane.
4. Activate the checkbox associated with the message to be logged or clear the checkbox to
omit the message from the log, or perform one of the following:
GHGH
5. Click <SET ALL> to activate all the checkboxes.
GHJ
6. Click <CLEAR ALL> to clear all the checkboxes.
7. Select a message severity level from the list. The default is Warning. When you select a
severity level, all messages of that severity or above are logged.
8. Click <SAVE> to immediately apply your changes to a running system and to maintain
the settings until you change them again, or click one of the following:
9. Click <APPLY> to immediately apply your changes to a running system but discard those
changes the next time the Sleuth9 host is restarted.
10. Click <RESET> to discard your changes without applying or saving them.
Users Guide v5.1.7
6-59
Deepnines Security Edge Platform
3
2
4
5
6
7
9
8
10
Figure 6-31. Advanced Logging Options Screen
6.5.1.3
Viewing Log Files
SEP provides the ability to view SEP logs from within the EMC. Log display is limited to 1 MB.
To view the current SEP log file:
1. Verify that the unit to view log entries is the active host.
2. Select Log File Viewer from the Monitors folder (Figure 6-32). Log viewing options appear
in the Action pane.
3. Select a date/time range for the log entries to be displayed and click OK.
4. SEP displays log entries for the time interval you specified. If the specified time interval
has more entries than fit in the 1 MB limit, the output begins with the most recent entry
within the time interval and truncates later entries. If output is truncated, select a smaller
time interval.
5. (Optional) Activate the Word Wrap checkbox to display the log entries within the bounds
of the current window; clear the checkbox to display log entries on a single line.
6. (Optional) Click <COPY TO CLIPBOARD> to copy all displayed log entries. Copied
entries are in plain text format and may be pasted into any application.
Users Guide v5.1.7
6-60
Deepnines Security Edge Platform
4
2
3
Figure 6-32. Log File Viewer Screen
6.5.1.4
Setting Remote Log Host
You may optionally configure SEP to save logs on a remote log server. When you do, the log
server assumes management of the log file, so SEP‟s 5-file 20MB limit does not apply.
NOTE
By default, most syslog daemons do not accept log messages from remote
systems. You must configure the daemon on the remote system to accept logging
messages from SEP. On Solaris systems, start syslogd using the –t option. On
Linux systems, start syslogd using the –r option.
To configure a remote logging server:
1. Verify that the unit on which to configure remote logging is the active host.
2. Select the Logging folder from the Setup folder, and then click Logging Configuration
(Figure 6-33).
3. Enter the IP address of the server on which to write the SEP logs. The remote log server
must be on the SEP private subnet.
4. Select “log to remote syslog server” by checking this box.
Users Guide v5.1.7
GHGH
GHJ
6-61
Deepnines Security Edge Platform
5. Click <SAVE> to immediately apply your changes to a running system and to maintain
the settings until you change them again, or click one of the following:
a. Click <APPLY> to immediately apply your changes to a running system but discard
those changes the next time the SEP host is rebooted.
b. Click <RESET> to discard your changes without applying or saving them.
2
4
3
5
Figure 6-33. Logging Configuration Screen
NOTE
By default, most syslog daemons do not accept log messages from remote
systems. You must configure the daemon on the remote system to accept logging
messages from SEP. On Solaris systems, start syslogd using the –t option. On
Linux systems, start syslogd using the –r option.
Users Guide v5.1.7
GHGH
GHJ
6-62
Deepnines Security Edge Platform
6.5.2
Virus Scanning
SEP provides integrated virus scanning for SMTP and POP3 email traffic. By default, SMTP
traffic is defined as TCP over port 25 and POP3 traffic is defined as TCP over port 110. To
adapt itself to the unique demands of your network, however, SEP provides the capability to
assign virus scanning to any flow specifier, no matter what match rules are defined, although it
is not recommended. This flexibility introduces the possibility for error. Take care not to specify
virus scanning for any protocol other than SMTP and POP3 or unpredictable results, including
completely blocking all traffic that matches the flow specifier, can occur.
When you create a flow specifier for TCP packet traffic that specifies virus scanning, the SEP
system assembles the individual packets into a complete message and routes the message to
the appropriate proxy. The proxy delivers the message to the virus scanning module for
processing. Messages that are virus-free or cleaned and repaired are returned to the proxy,
which then forwards the message to its destination. Messages that cannot be repaired are
blocked and the system forwards a notification message to the intended recipient.
6.5.2.1
Activating Virus Scanning
To activate virus scanning:
1. Verify that the unit on which to activate virus scanning is the active host.
2. Create or edit a flow specifier that governs TCP packet traffic over the port on which the
type of traffic to be scanned is transmitted (typically, port 25 for SMTP traffic and port 110
for POP3 traffic).
NOTE
Attempting to activate virus scanning for a flow type that does not have a
corresponding SEP engine produces unpredictable results.
3. Apply or save your changes.
6.5.2.2
Customizing Virus Scanning Messages
SEP notifies a message‟s intended recipient when a virus was detected and cleaned from an
attachment, when a virus was detected and the attachment could not be repaired, and when an
attachment is too long to be scanned for viruses. You can customize the messages that SEP
transmits in these situations.
To customize virus scanning messages:
GHGH
1. Verify that the unit on which to customize
virus scanning messages is the active host.
GHJ
2. Open the Virus Scanning folder from the
Setup folder (Figure 6-34). Current system
messages appear in the Virus Alert Message folder.
3. Customize the messages as desired. Messages may be of any length and may contain
any combination of alphanumeric characters, symbol and punctuation characters, and
spaces.
4. Click <SAVE> to immediately apply your changes to a running system and to maintain
the settings until you change them again, or click one of the following:
Users Guide v5.1.7
6-63
Deepnines Security Edge Platform
a. Click <APPLY> to immediately apply your changes to a running system but discard
those changes the next time the Sleuth9 host is restarted.
b. Click <RESET> to discard your changes without applying or saving them.
3
2
4
Figure 6-34. The Virus Alert Messages Display
6.5.2.3
Configuring Virus Scanning Options
SEP allows you to configure each of the available virus scanning engines to provide a
maximum attachment size and to specify Edge ForensiX capture of virus data.
6.5.2.4
Capturing Virus and Emails
To Capture Virus and Emails to the Edge ForensiX System.
1. Activate the Capture When Repaired check box to capture data about viruses that were
successfully removed from attachments;
2. Activate the Capture When Unrecoverable check box to capture data about viruses that
could not be removed from attachments.
3. To capture data about all viruses found in attachments, activate both check boxes.
4. Click <SAVE> to immediately apply your changes to a running system and to maintain
the settings until you change them again, or click one of the following:
a. Click <APPLY> to immediately apply your changes to a running system but
discard those changes the next time the SEP host is rebooted.
b. Click <RESET> to discard your changes without applying or saving them.
Users Guide v5.1.7
6-64
Deepnines Security Edge Platform
6.5.2.5
Setting Maximum Attachment Size
To configure a virus scanning proxy for options:
1. Verify that the unit on which to configure virus scanning is the active host.
2. Select the Virus Scanning folder from the Setup folder (Figure 6-35), then click either
SMTP Capture for SMTP or POP3 Capture for POP3. Current engine configuration
values are displayed.
2
3
5
4
Figure 6-35. SMTP Capture Screen
3. Specify a Maximum Attachment Size in number of bytes. The default is 8,000,000 bytes.
NOTE
The maximum attachment size must be configured to include MIME encoding,
which increases the original attachment size by approximately one-third. The
default of 8,000,000 bytes, therefore, allows an original attachment size of
approximately 6,000,000 bytes.
4. Click <SAVE>.
5. Click <APPLY>.
Users Guide v5.1.7
6-65
Deepnines Security Edge Platform
6.5.2.6
Stopping/Starting Virus Scanning
Activating virus scanning is a two-part process. First, start the appropriate engine (POP3 or
SMTP) for the email to be scanned if it is not already running, then start the virus scanner
component. The engine intercepts email traffic and routes it to the Virus Scanner component.
The Virus Scanner component returns the email traffic to the engine after processing, and the
engine transmits the message appropriately.
Starting Virus Scanning
To start virus scanning:
1.
2.
3.
4.
Verify that the unit to start virus scanning is the active host.
Select the appropriate engine folder (POP3 or SMTP) from the Operations panel.
Click <START>.
Click <YES> to confirm your action.
Stopping virus scanning
To stop virus scanning:
1. Verify that the unit to stop virus scanning is the active host.
2. Select the appropriate engine folder (POP3 or SMTP) from the Operation folder.
3. Click <STOP>.
4. Click <YES> to confirm your action.
6.5.2.7
Updating Virus Signatures – Automatic
Virus signature (.dat) files define viruses for the virus scanning module. New virus signature
files are released almost daily and may also be released as new virus threats are discovered.
The SEP automatically downloads and installs virus signature files on a schedule of your
choosing from Deepnines website. Each SEP will download the signature files.
6.5.3
Alarm Delivery
Configuring SEP alarms allows you to specify which alarms are delivered by the SEP system
and where alarm data is stored (Figure 6-36).
Users Guide v5.1.7
6-66
Deepnines Security Edge Platform
4
6
5
3
Figure 6-36. Alarm Delivery Screen
6.5.3.1
Alarm Delivery via SMTP
To configure SEP alarms for SMTP delivery:
1. Verify that the unit to configure alarms is the active host.
2. Verify that a default gateway host has been entered for the system in the System
Identification folder within the Setup.
3. Select Alarm Delivery from the Setup folder.
4. In the SMTP Server field, enter the name of the mail server that SEP will use to send
alarms.
5. In the From Address field, enter an email address that will signify that the alert came from
the SEP i.e., [email protected].
6. Enter a Timeout value in seconds for the SEP mail server connection.
7. For each of the seven available alarm types, select the desired alarm delivery and
storage methods under the SMTP column.
8. Click <SAVE> to immediately apply your changes to a running system and to maintain
the settings until you change them again, or click one of the following:
a. Click <APPLY> to immediately apply your changes to a running system but
discard those changes the next time the SEP host is restarted.
b. Click <RESET> to discard your changes without applying or saving them.
Users Guide v5.1.7
6-67
Deepnines Security Edge Platform
6.5.3.2
Alarm Delivery via EMC
To configure SEP alarms for delivery to the Management Console:
1. Verify that the unit to configure alarms is the active host.
2. Select Alarm Delivery from the Setup folder.
3. For each of the seven available alarm types, select the desired alarm delivery and
storage methods under the EMC column.
4. Click Save to immediately apply your changes to a running system and to maintain the
settings until you change them again, or click one of the following:
a. Click <Apply> to immediately apply your changes to a running system but
discard those changes the next time the SEP host is restarted.
b. Click <Reset> to discard your changes without applying or saving them.
6.5.3.3
Alarm Delivery via Log File
To configure SEP alarms for delivery to the Log File:
1. Verify that the unit to configure alarms is the active host.
2. Select Alarm Delivery from the Setup folder.
3. For each of the seven available alarm types, select the desired alarm delivery and
storage methods under the Log File column.
4. Click Save to immediately apply your changes to a running system and to maintain the
settings until you change them again, or click one of the following:
a. Click <Apply> to immediately apply your changes to a running system but
discard those changes the next time the SEP host is restarted.
b. Click <Reset> to discard your changes without applying or saving them.
6.5.3.4
Alarm Delivery via Database
To configure SEP alarms for delivery to the Edge ForensiX Database:
1. Verify that the unit to configure alarms is the active host.
2. Select Alarm Delivery from the Setup folder.
3. For each of the seven available alarm types, select the desired alarm delivery and
storage methods under the Log Database column.
4. Click Save to immediately apply your changes to a running system and to maintain the
settings until you change them again, or click one of the following:
a. Click <Apply> to immediately apply your changes to a running system but
discard those changes the next time the SEP host is restarted.
b. Click <Reset> to discard your changes without applying or saving them.
6.5.3.5
Configuring Alarm Receipt – Users
If alarm delivery via SMTP is activated, use the Alarm Type check boxes on the
Configuration/Users Action panel to assign delivery of email alarms to interested users and
enter the destination email address for the user.
Users Guide v5.1.7
6-68
Deepnines Security Edge Platform
NOTE
Required Permission: You must have the “May Choose Which Alarms to Receive”
permission to configure alarm receipt for yourself. You must have super-user
privilege to configure alarm receipt for other users.
6.5.4
Bridges
Once the interfaces are defined then you will need to place them into a bridge so that the SEP
will understand what pairs of interfaces go together. You can have multiple bridges defined but
only one can be active at a time. Additionally, you will need to remember what the settings were
on the interfaces that you defined.
To create a new bridge:
1.
2.
3.
4.
5.
6.
Log in to the SEP host.
GHGH
Select Bridges from the Setup folder (Figure
GHJ 6-37).
Click <New>.
Enter the bridge name i.e., “VLAN Bridge”.
From the drop down box, select the correct encapsulation type.
From the drop down box labeled Inside Interface, select the correct inside interface that
was defined.
7. From the drop down box labeled Outside Interface, select the correct outside interface
that was defined.
8. Check the Enable box, to set the bridge in active mode.
9. Click <Apply> to apply the changes.
NOTE
Upon reboot or restart the configuration changes will be canceled.
10. Click <Save> to make the changes persistent to the SEP configuration file.
11. Click <Reset> to cancel any changes made.
NOTE
If you have a bridge currently enabled, it will need to be disabled to apply the new
defined bridge. There can only beGHGH
one active bridge at a time on the SEP.
GHJ
Users Guide v5.1.7
6-69
Deepnines Security Edge Platform
2
4
8
5
6
3
7
9
10
11
Figure 6-37. Bridges Screen
6.5.5
EdgeForensiX (EFX)
To enable forensic capture:
1. Verify that the unit on which to enable capturing is the active host.
2. Select Edge ForensiX from the Setup folder (Figure 6-38). The Edge ForensiX
configuration screen is displayed.
3. Activate the Capture check box. The Overwrite check box determines what happens
when the partition used to store captured data is full.
4. Activate by placing a check mark in the Overwrite check box to allow SEP to overwrite
previously captured data with new data. This allows capturing forensic data to continue
uninterrupted.
5. Clear by removing check mark in the Overwrite check box to instruct SEP to stop
capturing forensic data when the partition is full. This allows previously captured data not
to be lost.
6. Activate by placing a check mark in the Auto Offload checkbox to instruct SEP to
automatically offload captured data to the EFX appliance periodically.
7. Clear by removing the check mark in the Auto Offload checkbox to halt data offloading.
8. Enter a Timeout value for SEP‟s connection to the forensic database. This should stay at
default setting unless otherwise instructed by Deepnines Engineers.
9. Type the name of the EFX appliance or the IP address (IPv4 only) in the Database Host
Address field.
10. Click <Save> to immediately apply your changes to a running system and to maintain the
settings until you change them again, or perform one of the following:
Users Guide v5.1.7
6-70
Deepnines Security Edge Platform
a. Click <Apply> to immediately apply your changes to a running system but
discard those changes the next time the SEP host is restarted.
b. Click <Reset> to discard your changes without applying or saving them.
2
3
4
6
8
9
10
Figure 6-38. Edge ForensiX™ Configuration Display
NOTE
The displayed port number is the port on which the EFX appliance listens for
packet offloads. Do not change this number.
For additional explanation on the Edge ForensiX Capturing System (EFX™), refer to the
“EFX Users Guide”.
Users Guide v5.1.7
GHGH
GHJ
6-71
Deepnines Security Edge Platform
6.5.5.1
Turning On/Off Capturing
The Edge ForensiX tab of the Flow Specifier will allow the capture of either protocol headers or
the entire payload of the packets matching that flow. This information is stored locally on the
SEP in an EFX partition, and once the files reach 32MB in size they will automatically be
transferred to the EFX Database System.
To enable this option, it is required that you have the Edge ForensiX Appliance as well as the
SEP. Refer to the “EFX Users Guide” on how to capture packet information.
6.5.5.2
Monitoring Offloads to the EFX
The amount of files that have been offloaded from the SEP appliance to the EFX appliance is
visible in the Edge ForensiX pane. To view up to date information:
1)
2)
3)
4)
Navigate to the Edge ForensiX pane from the Monitors section of the EMC (Figure 6-39).
The page will list the EFX host IP or hostname at the top of the pane.
The number of offloads is displayed below the host IP information.
More information can be obtained in the “EFX Users Guide”.
Figure 6-39. Edge ForensiX Screen
Users Guide v5.1.7
6-72
Deepnines Security Edge Platform
6.5.6 Flow Tags
A flowtag is a relatively short identifier (8 characters long) that can be added to the flow status
information for a conversation (protocol session between a pair of hosts). Flowtags associated
with a flow can then be used as additional fields to match the flow to control functions; that is, a
Match Rule can be defined to require one or two specific flowtag values in order to match a flow.
To create a New Rule:
1.
2.
3.
4.
5.
6.
Log in to the SEP host.
Select Flow Tags from the Setup folder (Figure 6-40).
Click <New Rule>.
Select from two options in Tag Source Type: DPI Rule ID or by Directory Group.
From the drop down box, select Tag Name.
Click <Save> to save the changes.
2
4
5
3
6
Figure 6-40. Flow Tags Screen
Users Guide v5.1.7
6-73
Deepnines Security Edge Platform
6.5.7 Hosts List
White and black hosts lists can be configured from this screen. Any HTTP requests that match an
IP Address in the white list will be allowed access, while those HTTP requests that match an IP
Address in the black list will be blocked.
To add a host address:
1.
2.
3.
4.
5.
Log in to the SEP host.
Select Flow Tags from the Setup folder (Figure 6-41).
Select Trusted List or Untrusted List tab.
Click <Add>. A pull-down menu appears.
Click <Save> to save the changes.
3
4
2
5
Figure 6-41. Hosts Lists Screen
Users Guide v5.1.7
6-74
Deepnines Security Edge Platform
6.5.8
Interfaces
The SEP has two main types of configurations; Frontline and Edge. The Edge series is
designed to reside outside of the router and the encapsulation type will need to be configured
on the outside and inside interfaces. The Frontline series is designed for the Ethernet
environment and will need to be configured if the SEP is to reside on a VLAN trunk.
By default the SEP is configured for Ethernet for both the inside and outside interface. If the
SEP is to be placed into a different location, perform the following steps to define a new
interface type.
1.
2.
3.
4.
Log in to the SEP host.
Select Interfaces from the Setup folder (Figure 6-41).
Click <New>.
Enter the name of the interface i.e., “VLAN outside”.
5. The ZFT button is checked and cannot be changed.
NOTE
There can only be one Administration Interface on the SEP.
6. Select the drop down box to select the encapsulation type (Table 6-15).
AAL5
Used for Frontline Series on connections that are ATM.
CHDLC
Used for Frontline Series on Internet connections that is communicating from one
Cisco router to another Cisco Router.
Ethernet
Default Edge Series Encapsulation Type
Ethernet
1Q
For Edge Series that need to reside on a VLAN trunk connection. It allows for
packet processing while lookingGHGH
at the VLAN tag ID.
HDLC
GHJconnections that is linked together with nonUsed for Frontline Series on Internet
Cisco routers.
Raw IP
For Frontline Series using clear channel Internet connections.
Table 6-15. Encapsulation Types
7. Select on which side of the SEP the interface will reside; Outside (WAN) or Inside (LAN).
8. Insert the logical device from the system. Example; Eth1, HDLC1, etc.
9. Click <Apply> to apply the changes.
Users Guide v5.1.7
6-75
Deepnines Security Edge Platform
NOTE
Upon reboot or restart the configuration changes will be canceled.
10. Click <Save> to make the changes persistent to the SEP configuration file.
11. Click <Reset> to cancel any changes made.
NOTE
You cannot have duplicating interfaces defined. Thus you only need to define a
new interface(s).
GHGH
GHJ
GHGH
GHJ
2
4
5
6
7
8
3
9
10
Figure 6-41. Interfaces Screen
Users Guide v5.1.7
6-76
11
Deepnines Security Edge Platform
6.5.9
Licenses
For complete information on licenses, go to Chapter 4, “License Setup”.
6.5.10 Mirror Control
Mirror Control is a duplicate SEP that acts as a secondary or backup applicable only to High
Availability (HA) environments.
Figure 6-42. Mirror Control
Option
Description
Connection
Timeout
This is how long a SEP waits until giving up each time it tries to
establish a new connection to the configured mirror SEP.
Connection
Frequency
The connection retry interval is how long the SEP waits between
attempts to establish a connection to a configured mirror SEP.
Failover
Dampening
This is how long before a SEP will become primary again after
changing to secondary.
Failover Grace
Period
The grace period timeout is the length of time after the SEP first
becomes primary that it will accept as valid in-progress TCP
connections for which it did not see the connection setup.
Table 6-16. Mirror Control Options and Descriptions
Users Guide v5.1.7
6-77
Deepnines Security Edge Platform
6.5.11
Mirror Host
Setting the Mirror Hosts for the SEP‟s to be placed into a high availability configuration is a
two-step process.
To set the Mirror Host on SEP unit 1 (Figure 6-43):
1.
2.
3.
4.
Log in to the SEP host to be the Primary Unit.
Select Mirror Host from the Setup folder.
Enter the IP address of the SEP unit 2 or alternate SEP.
Click <Save> to immediately apply your changes to a running system and to maintain
the settings until you change them again, or click one of the following:
a. Click <Apply> to immediately apply your changes to a running system but discard
those changes the next time the SEP host is rebooted.
b. Click <Reset> to discard your changes without applying or saving them.
To set the Mirror Host on SEP unit 2 (Figure 6-41):
1.
2.
3.
4.
Log in to the SEP host to be the Alternate Unit.
Select Mirror Host from the Setup folder.
Enter the IP address of the SEP unit 1 or primary SEP.
Click <Save> to immediately apply your changes to a running system and to maintain
the settings until you change them again, or click one of the following:
a. Click <Apply> to immediately apply your changes to a running system but
discard those changes the next time the SEP host is rebooted.
b. Click <Reset> to discard your changes without applying or saving them.
2
3
4
Figure 6-43. Mirror Control
Users Guide v5.1.7
6-78
Deepnines Security Edge Platform
6.5.11.1 Viewing Systems Health
Each SEP unit continuously monitors its own health and can report on its condition.
To quickly display the health level of any SEP host:
1. Log in to the host to monitor.
2. Locate the host name in the Command Explorer pane of the Edge Management
Console and position the mouse cursor over the name. The unit‟s health is displayed
in a pop-up that disappears when you move the mouse cursor off the name.
100%
The SEP unit is operating normally.
60%
The SEP unit is operating in a degraded condition, but it is still capable of
functioning.
40%
SEP has detected an external fault, such as a failed internal/external link.
35%
One or more of the SEP Virus Scanning daemons is not running
25%
Available memory (RAM) is below 5% of the total available memory
20%
The Security Edge Platform Traffic Manager is not running
10%
SEP has detected a possible intrusion, the signature of a key system file has
changed, the permissions or ownership of a key system file has changed, or
suspicious files have been detected.
To view complete system health statistics:
1. Log in to the host whose health is to be monitored.
2. Select System Resources from the Monitors folder (Figure 6-44).
Users Guide v5.1.7
6-79
Deepnines Security Edge Platform
Figure 6-44. System Resources Screen
6.5.11.2 Automatic Mirroring Configuration Changes
When both high-availability SEP units are running, configuration changes made to one are
automatically mirrored to the other. Changes may be made to either the primary or alternate
unit.
If one of the SEP units is not running, configuration changes are not mirrored and must be
made to the other unit after it boots.
SEP mirrors the following configuration changes:
Alarm and audit changes
Remote log host changes
Changes and additions to SEP user profiles
Changes and additions to flow specifiers
Changes and additions to static blocking rules
Changes to virus scanning messages
Changes to virus scanning engines
Virus scanning signature updates
Users Guide v5.1.7
6-80
Deepnines Security Edge Platform
6.5.12
Reporting Configuration
The Reporting Configuration option (Figure 6-45) allows administrators to clean or purge
reporting databases for data that is older in nature. By default the three different reports will
purge automatically every 15 days. This is user-configurable to allow more or less reporting
time in the database.
The available configurable options are:
Save Anti-Virus Report up to:
Set to 15 days by default.
Save DPI Signatures Report
up to:
Set to 15 days by default.
Save Network Anomaly
Report up to:
Set to 15 days by default.
Run Clean-up Script
Everyday at:
Set to every hour by default.
Purge Now Buttons
Will instantly purge the database regardless of
configured days.
Purge All Reports:
Will purge all of the report data for AV, DPI and Network
Anomalies Reports.
Delete All Reports:
Will delete any of the previously queried reports that are
still on the system.
Figure 6-45. Reporting Condition Screen
Users Guide v5.1.7
6-81
Deepnines Security Edge Platform
NOTE
The reporting system that resides on the SEP is very robust and contains
detailed information. It is recommended to leave the default settings in place
and to save copies of the reports in HTML format for historical reporting
purposes.
6.5.13
Save Configuration
The SEP User Interfaces allows you to export or import SEP configuration files.
To export a configuration file:
1.
2.
3.
4.
5.
6.
Log in to the SEP host.
Select Save Configuration from the Setup folder.
Select Export.
Navigate to the local system folder that you want to save the configuration file to.
Press <Save>.
GHGH
The SEP will encrypt the configuration file when the export occurs, so you will need
GHJ
to set a password.
7. Confirm password and Select <OK>.
To import a configuration file:
1.
2.
3.
4.
5.
Log in to the SEP host.
Select Save Configuration from the Setup folder.
Select Import.
Navigate to the local system folder that you have saved the configuration file.
Press <Open>.
NOTE
You will be prompted, stating that the entire configuration will be imported and
all components of the SEP will be shutdown and restarted. This will
momentarily stop traffic on the network while the import is made.
7. Click <Yes> when prompted to modify the entire configuration file.
8. The SEP will decrypt the configuration file when the import occurs, so you will need
to enter your password.
9. Confirm password and click <OK>.
10. Click <Yes> or <No> if you want to replace configuration file on host <hostname>.
6-82
Users Guide v5.1.7
GHGH
GHJ
Deepnines Security Edge Platform
6.5.14
System Identification
The SEP System Identification configuration options include setting the default gateway for
email alarm notification, specifying the IP address for the SEP administrative interface, and
assigning cluster and node IDs to SEP units.
To set SEP System Identification Configuration options:
1. Log in to the SEP host.
2. Select System Identification from the Setup folder (Figure 6-46).
Figure 6-46. System Identification Screen
Option
Description
System Name
The unqualified name of the SEP host machine
System ID
This number is automatically generated by the SEP and cannot be
changed.
Default Gateway
The IP address of the default system gateway.
Admin IP
The IP address and optional subnet mask of the SEP unit‟s
administrative interface.
Cluster ID
(Optional)
An integer used to identify a SEP cluster. When one or ore SEP
clusters are in place, a cluster ID can be used to identify the source of
alarms and log messages.
Node ID
(Optional)
An integer used to identify a SEP node. When one or more SEP units
are in place (for example, in high-availability configurations) a node ID
can be used to identify the source of alarms and log messages.
Table 6-16. System Identification Options and Descriptions
Users Guide v5.1.7
6-83
Deepnines Security Edge Platform
3. Enter data in the appropriate fields displayed.
NOTE
Upon reboot or restart the configuration changes will be canceled.
4. Click <Save> to make the changes persistent to the SEP configuration file.
5. Click <Reset> to cancel any changes made.
NOTE
If you change the Admin IP of the SEP you will immediately loose connectivity to
the device. After saving you should log out of the EMC and then login again with
the new Admin IP of the SEP.
6.5.15
Traffic Manager
The SEP Traffic Manager contains variables that are set by Deepnines Research and
GHGH
Development for optimal performance. Under
certain conditions changes or adjustments may
need to be made for the respective network.GHJ
NOTE
Any changes to the Traffic Manager other than those mentioned below can
severely impact performance.
To set SEP Traffic Manager Configuration options:
1. Log in to the SEP host.
GHGH
2. Select Traffic Manager from the Setup folder
GHJ
3. Apply changes (if applicable) to fields (Figure 6-47). Options and their descriptions are
listed in Table 6-17.
4. Click <Apply> to apply the changes.
5. Click <Save> to make the changes persistent to the SEP configuration file.
6. Click <Reset> to cancel any changes made.
GHGH
GHJ
Users Guide v5.1.7
6-84
Deepnines Security Edge Platform
Forwarding Mode
The SEP has two modes of operation; Normal and Bypass.
The default state is in Normal operation in which all traffic pass
through the Traffic Manager. In Bypass mode, no traffic is
examined or can be blocked and will pass from one interface to
the other.
Scan Threshold
<NEED DATA>
Scan Window (in mins)
<NEED DATA>
Scanner Block Timeout
(in mins)
<NEED DATA>
Start of Morning
<NEED DATA>
Start of Afternoon
<NEED DATA>
Start of Evening
<NEED DATA>
Start of Night
<NEED DATA>
Flowspec Schedules
<NEED DATA>
Adaptive Window Open
Set to 3x historical limit by default. This controls the rate at
which the adaptive rate control window opens.
Adaptive Window Close
Set to 5x historical limit by default. This controls the rate at
which the adaptive rate control window will close.
Note: If there are frequent spikes in traffic on your network, changing the open to 10 and
the close to 50 may aid in the amount of blocking that is occurring from instant packet rate
controls.
Metrics Delta-T
<NEED DATA>
Instantaneous Tau
<NEED DATA>
History Tau
<NEED DATA>
Pending Setup Timeout
(in secs)
<NEED DATA>
Current Activity Timeout
(in secs)
<NEED DATA>
IPv4 Flowtable Slots
<NEED DATA>
IPv6 Flowtable Slots
<NEED DATA>
Users Guide v5.1.7
6-85
Deepnines Security Edge Platform
IPv4 KGH Slots
<NEED DATA>
IPv6 KGH SLots
<NEED DATA>
Maximum Fragments
Set to 3 fragments per packet by default. If fragments are
usually seen on your network this may need to increase to 5. It
is not recommended to increase the fragments to over 5, as
this is usually a sign of another networking problem.
Inactive Removal
Timeout
(in secs)
Timed Metrics Report
Passes
<NEED DATA>
<NEED DATA>
Do ARP
<NEED DATA>
Enable Host State
<NEED DATA>
Table 6-17. Traffic Manager Options and Descriptions
2
Figure 6-47. Traffic Manager Screen
Users Guide v5.1.7
6-86
Deepnines Security Edge Platform
NOTE
Upon reboot or restart, the configuration changes will be canceled.
6.5.16 URL Filters
URL Filtering controls HTTP traffic by inspecting the URLs being requested. It provides three
layer filtering based on user-created admin black and white lists, Website categories, and other
third-party blacklists. URL Filtering provides the following actions for HTTP requests; Allow,
Block and Redirect. The URL Filter screen is displayed in Figure 6-48.
GHGH
GHJ
Figure 6-48. URL Filter Screen
Option
Description
White List
User-requested URLs that are matched against the white list are allowed.
Black List
User-requested URLs that are matched against the black list are blocked.
Error Page
Allows the user to create a template for blocked pages returned to users.
Options
Allows the user to configure URL filtering.
Use Log
Only Mode
URL filtering actions are logged only but not executed.
Table 6-18. URL Filters Tabs and Descriptions
Users Guide v5.1.7
6-87
Deepnines Security Edge Platform
6.5.17 Users
For complete information on users, go to Section 6.7, “Users”.
6.6
Update
The Update section of the Command Explorer provides setup configuration options for DPI
Signature Updates and URL Server Updates.
6.6.1
DPI Signature Updates
DPI Signature updates can be obtained directly from the open source community. By
registering at snort.org and obtaining an oink code, one can get the latest rules from the
community. The DPI Signature Updates screen is displayed in Figure 6-49.
Figure 6-49. DPI Signature Updates Screen
6.6.2
URL Server Updates
Deepnines Technical Services researches and develops new rules that will stop a number of
threats or unwanted behavior and will release those on its website. Additionally, Deepnines
Technical Services will send out email alerts on the new available rules and how they can be
obtain for current customers.
Users Guide v5.1.7
6-88
Deepnines Security Edge Platform
6.7
Users
The Users section of the Command Explorer provides setup configuration options for Auditing,
Current, Manage Users, and Operations.
SEP administrators are required to log in to a SEP host before they can access system
information or make changes to the system configuration. Users must have an account on each
SEP host they are to have access to.
NOTE
Required Permission: You must have the “May Perform User Management
permission to perform the operations described in this section. Users with this
permission are SEP super users and can assign any permission to other users. There
must be at least one SEP super user for each SEP host.
6.7.1 Creating/Maintaining User Accounts
When you create a user account, you provide the SEP user with a user ID and password that is
used to log in to the SEP host. You must create a user account on each SEP host that a user will
access. User accounts may also include the user‟s email address and specify the alarm types of
interest to the user. When email and alarm types are configured for a SEP user, SEP
automatically notifies the user when alarms of interest are generated.
Additionally, user accounts include permissions, allowing you to limit user access to actions
appropriate for that user. You can create userGHGH
accounts from either the Setup folder or the Users
folder.
GHJ
To create a user account:
1. Verify that the unit on which to create the new user account is the active host. Use the
System Resources tab in the Command Explorer to view information pertaining to the
status of the currently connected SEP.
2. From the Setup folder, select Users. User configuration options appear in the Action
pane.
3. From the Users folder, select Manage. User configuration options appear in the action
pane.
Users Guide v5.1.7
6-89
Deepnines Security Edge Platform
NOTE
There are two locations to manage users. The Setup folder and the Users folder in the
Command Explorer window both have action pane windows to manage and configure
users.
4. Click <New>. The Manage Users configuration screen is displayed (Figure 6-50).
GHGH
GHJ
Figure 6-50. Manage Users Screen
5. Enter user information following the guidelines in Table 6-19.
Users Guide v5.1.7
6-90
Deepnines Security Edge Platform
Field
Requirements
User ID
Minimum length: 3 characters. Maximum length: 32 characters. Not case
sensitive.
Password
Minimum length: 8 characters. Maximum length: 32 characters. Must contain
at least 2 alphabetic characters and 1 numeric or special character. Cannot
contain the user ID or any permutations of the user ID.
Verify Password
Re-enter the password.
Full Name
Optional no minimum length Maximum length: 256 characters
Email Address
Optional used to deliver system alarms by email. No minimum length.
Maximum length: 256 characters Must be one or more valid email
addresses, including any scheme required for email server addressing or
wireless message device access. Multiple email addresses can be
separated by a space or a comma and must not exceed the maximum field
length of 256 characters.
Table 6-19. Manage Users Fields & Requirements
NOTE
All users can change their own password, full name, and SMTP address with these
same steps.
6. If the user is to receive system alarms, activate the check box associated with the alarm
of interest (Table 6-20). The Select All button offers the ability to activate all alarm check
boxes. The Clear All button offers the ability to clear all the alarm check boxes.
Alarm Type
Contents
Authentication Alarms
Alarms generated when an attempt to log in to a SEP host
fails.
Flow Specifier Alarms
Alarms generated when traffic levels reach the limits
entered on any flow specifier that is configured to
GHGH
generate
alarms.
Edge ForensiX System Alarms
Alarms generated when the partitions for the Edge
ForensiX System are full.
High Availability Health Alarms
Alarms generated when the health level of a SEP host
changes.
High Availability Status alarms
Alarms generated when a SEP host changes from primary
mode to alternate mode or from alternate to primary.
GHJ
Users Guide v5.1.7
6-91
Deepnines Security Edge Platform
Virus Detect Alarms
Alarms generated when a virus is detected.
Virus Signature Updated Alarms
Alarms generated when a virus signature is updated.
Table 6-20. Alarm Types
7. Assign permissions to the user by activating the check box associated with the
permission to be granted (Table 6-21). The Select All button offers the ability to activate
all permission check boxes. The Clear All button offers the ability to clear all permission
check boxes.
Permission
Meaning
May choose which alarms to receive
The user may edit the Alarms section of the user
account. Users must have this permission to assign
or modify alarms for themselves.
May configure Edge ForensiX System
The user may access and make changes to the
Configuration/EFX section of the Sleuth9 EMC.
May configure advanced logging
The user may access and make changes to the
Configuration/Logging section of the SEP EMC.
May configure auditing
The user may access and make changes to the
Users / Auditing Folder
The user may access and make changes to the
Protection Policies/Flow Control section of the SEP
EMC.
May configure flow specifiers
May perform advanced configuration
The user may access and make changes to the
Configuration/Advanced section of the SEP EMC.
May perform general configuration
The user may access and make changes to the
general Configuration section of the SEP EMC.
May perform system operations
The user may access and execute commands in the
Operations section of the SEP EMC.
May perform user management
May view ForensiX database
May view log files
May view monitors
The user may create and edit user accounts. Users
must have this permission to assign or modify
permissions for themselves and other users. Users
with this permission are SEP super users; there must
be at least one super user account for each SEP
host.
The user may only view the Edge ForensiX database.
The user may view SEP log files.
The user may access and view the action screens in
the Monitors section of the SEP EMC.
Table 6-21. Permissions Types
Users Guide v5.1.7
6-92
Deepnines Security Edge Platform
NOTE
Advanced logging options or changes may result in a negative impact to system
performance or may fill the system logs exceptionally quickly. Deepnines strongly
recommends that you assign this permission judiciously.
8. When you are finished configuring the user account, click <Save>.
6.7.1 Modifying User Accounts
You can modify any existing user account to change any information except the user name. If the
username must be changed, delete the user account and create a new one.
NOTE
GHGH
GHJ
To change your own alarm types, you must have the May choose which alarms to
receive permission assigned to yourself. To change another user’s permissions, you
must have the May Perform User Management permission.
6.7.2 Deleting User Accounts
1. Verify that the unit that contains the user account to be deleted is the active host.
2. Log in to the SEP Host.
3. Select Users from the Users/Manage folder (Figure 6-51). Alternatively, select Manage
from the Users folder.
4. In the user list at the top of the Action pane, select one or more user accounts to be
deleted, and then click <Delete>.
5. Click <Yes> to confirm your action.
GHGH
GHJ
NOTE
Any user who is assigned the May Perform User Management permission is a
SEP super user. There must be at least one super user account on each SEP
host. You cannot delete the only super-user account on any SEP host.
Users Guide v5.1.7
6-93
Deepnines Security Edge Platform
4
3
5
Figure 6-51. Manage Users Screen – Delete User Accounts
6.7.3 Viewing Current Users
You can view a list of all users who are currently logged in to the active SEP host. Up to 32 users
can log in to a SEP host at one time.
To view a list of logged in users:
1. Verify that the unit on which to view logged in users is the active host.
2. Select <Users> from the Monitors folder (Figure 6-52). A list of users who are logged in
appears in the Action pane. Alternatively, select <Current> from the Users folder.
Figure 6-52. Viewing Current Users Screen
Users Guide v5.1.7
6-94
Deepnines Security Edge Platform
6.7.4 Exporting & Importing User Accounts
The Users management allows for exporting and importing of user account information for easy
portability between systems and for backup purposes. The user information is stored in an
encrypted file and can be saved to the local administrator‟s personal computer.
NOTE
You must be a super user to export and import users. Super users are all users
assigned the” May Perform User Management” permission in the permissions
section of user management.
To Export the User Database:
1. Select the users from the top user table that should be exported (Figure 6-53). CTRL-A
selects all users, SHIFT allows for multiple selects. Only users that have been selected
and highlighted will be exported.
2. Click the <Export> button to start the export procedure.
3. Enter the password key used to encrypt the file.
4. Click <Save>.
GHGH
GHJ
Figure 6-53. Export User Screen
Users Guide v5.1.7
6-95
Deepnines Security Edge Platform
NOTE
This password must be used to unencrypt the file for any future system
imports of the users file.
To Import the User Database:
1.
2.
3.
4.
5.
Connect to the correct active system intended to import the user database.
Open the Manage Users folder (Figure 6-54).
Click the <Import> button to start the export procedure.
Enter the password key used to encrypt the file.
Click <Open>.
GHGH
GHJ
Figure 6-54. Import User Screen
Users Guide v5.1.7
6-96
Deepnines Security Edge Platform
NOTE
The same password used to encrypt the original export file must be used
during the import procedure.
6.7.5 Configuring User Audit Information
User Audit Information is used to log the activity of users to the local system log. This provides
accountability of all user activity.
NOTE
It is strongly suggested to give eachGHGH
administrator a individual account to control
and monitor individual activities. Single
GHJor group logins do not provide accurate
accountability of user activities.
1. To set audit logging options:
2. Verify that the unit on which to set general logging options is the active host.
3. Open the Users folder, and then click Auditing (Figure 6-55). The Audit Logging options
screen is displayed.
GHGH
GHJ
Figure 6-55. Audit Logging Options Screen
Users Guide v5.1.7
6-97
Deepnines Security Edge Platform
6.7.6 Viewing SEP Users Audit Information
SEP automatically maintains an audit trail that includes all user login information and all
configuration change information as well as all failed login attempts. Audit information is written to
the SEP log. For more information on SEP logging, see Section 6.5.1.3, “Viewing Log Files”.
6.7.7 Operations
Use the commands in the Operation section (Figure 6-56) of the EMC Command Explorer to start
and stop SEP components.
NOTE
You must have the “May Perform System Operations” permission to execute the
operations described in this section.
GHGH
GHJ
Figure 6-56. Operations Screen
Users Guide v5.1.7
6-98
Deepnines Security Edge Platform
6.7.7.1 Rebooting SEP
Before rebooting, be advised that although the Security Edge Platform is designed to run
continuously, there may be times when you need to reboot the system.
The System: Reboot command brings the system down gracefully.
NOTE
Networks with High Availability configurations, rebooting the primary SEP unit
causes managed failover and the alternate unit assumes responsibility for managing
traffic. As long as the primary unit remains in good health, rebooting the alternate
unit has no effect on traffic flow.
NOTE
To maintain accurately mirrored configurations, both primary and alternate SEP
units must be running when configuration changes are made.
GHGH
If only a single SEP unit is installed, traffic flow
is halted while the system reboots.
GHJ
To reboot the SEP system:
1. Verify that you are logged in to the platform to be rebooted and that it is the active host.
Use the System Resources tab in the Command Explorer to view information pertaining
to the status of the currently connected SEP.
2. Select System: Reboot from the Operation panel (Figure 6-57).
3. Click <Yes> to confirm your action.
GHGH
GHJ
NOTE
If a Fail to Wire card exists, rebooting the system will also not stop traffic.
Users Guide v5.1.7
6-99
Deepnines Security Edge Platform
Figure 6-57. Reboot The SEP System
6.7.7.2 Shutting Down SEP
Although the Security Edge Platform is designed to run continuously, there may be times when
you need to shutdown the system, perhaps to relocate it. The System: Shutdown command
brings the system down gracefully.
NOTE
Networks with High Availability configurations, shutting down the primary SEP unit
causes managed fail-over and the alternate unit assumes responsibility for
managing traffic. As long as the primary unit remains in good health, shutting down
the alternate unit has no effect on traffic flow.
NOTE
To maintain accurately mirrored configurations, both primary and alternate SEP
units must be running when configuration changes are made.
GHGH
GHJ
6-100
Users Guide v5.1.7
GHGH
Deepnines Security Edge Platform
If only a single SEP unit is installed, traffic flow is halted when the system shuts down.
To shut down the SEP unit:
1. Verify that you are logged in to the platform to be shut down and that it is the active host.
Use the System Resources tab in the Command Explorer to view information pertaining
to the status of the currently connected SEP.
2. Select System: Shutdown from the Operation panel (Figure 6-58).
3. Click <Yes> to confirm your actions.
Figure 6-58. Shut Down the SEP System
NOTE
If a Fail to Wire card exists, rebooting the system will also not stop traffic.
GHGH
GHJ
Users Guide v5.1.7
6-101
Deepnines Security Edge Platform
7
Technical Support/Additional Resources
7.1
Support Numbers
Personalized Support for Critical Operations
ATC offers around-the-clock, personalized, proactive and skilled support from an assigned
technical support engineer who is familiar with your Deepnines product deployment and support
history.
7.2
Contact by Telephone at 1-866-DEEP9-12 (866-333-7912)
Contact by Email at [email protected]
Online Support
Visit www.deepnines.com to download and/or view documents and datasheets that can assist
you with deployment scenarios, offer troubleshooting tips and product management features.
7.3
Training Classes
Deepnines offers training courses that cover various aspects and technical features typically not
covered in the basic SEP training course. This expert training covers advance troubleshooting
techniques and granular tuning of the Security Edge Platform. To take advantage of this expert
training or to request more information, contact Deepnines via Email at: [email protected].
Users Guide v5.1.7
7-1
Deepnines Security Edge Platform
Appendix
A.0
A
DPI Rules
Deep Packet Inspection provides another layer of inspection for a variety of intrusions.
Deep Packet Inspections is disabled on each flow specifier by default. You have the
option to enable it for each flow control. Once enabled, you can disable it again if needed.
A.1
DPI Rule Writing
Before using the Deepnines Deep Packet Inspection engine, a short tutorial on the rules
and how they work along with a short brief on the structure of the rules will help you use
the DPI solution to its highest potential.
A.1.1 Rule Headers
Rule headers can be divided into four main categories:
Rule Action
The action to take upon matching the signature rule
Protocol
The type of protocol, i.e., TCP, UDP, etc.
Source Information
Where the packets are coming from.
Destination Information
Where the packets are going to.
Table A-1. Rule Headers
A.1.1.1 Matching Ports
The Deep Packet inspection rules can be matched to specific ports. The rule can
include a source port, destination port, or both.
alert udp any 19 <> any 7 (msg:”DOS Msg”; reference:cve,
CAN-1999; classtype…..
When the engine sees UDP packets going from any IP address to any other IP address
from port 19 to port 7.
Users Guide v5.1.7
A-1
Deepnines Security Edge Platform
A.1.1.2 Matching Simple Strings
Below is a simple example of string matching. Below the signature is looking for
wwwboard password rule:
Alert tcp $EXTERNAL_NET any -> $HTTP_SERVERS $HTTP_PORTS (msg:”WEB-CGI
/wwwboard/passwd.txt access”; flow:to_server,established;
uricontent:”/wwwboard/passwd.txt”; nocase; reference:arachnids,463;
reference:cve,CVE-1999-0953; reference:nessus,10321;
reference:bugtraq,649;classtype:attempted-recon; sid:807; rev:7;)
This is a network reconnaissance attack. By checking for the presence of a password
file in a default location, the attacker can crack the file (if present) and try to use the
same password elsewhere on your network, potentially gaining authentication
credentials that attacker should not possess.
How do we detect this type of attack? Viewing the source and destination ports isn‟t
going to help us much. Most Web Traffic is going to flow over a number of defined
HTTP ports; usually 80,8080, and 443. The source port is most often a high randomly
selected port; therefore viewing the content of the packet is the best method. With the
string matching content, you can select only traffic that matches the simple string
“/wwwboard/passwd.txt”. This will be in the HTTP request of almost anyone attempting
this type of attack.
A.2
Update Methods
A.2.1
Oink Code
Signature updates can be obtained directly from the open source community. By
registering at snort.org and obtaining an oink code, one can get the latest rules from
the community.
A.2.2
VRT
VRT rules are the latest tested rules that can be obtained. There is an annual fee
associated with this service. More information can be obtained through Deepnines
Technical Support on this service and associated fees.
A.2.3
Deepnines Website
Deepnines Technical Services researches and develops new rules that will stop a
number of threats or unwanted behavior and will release those on the website.
Additionally, Deepnines Technical Services will send out email alerts on the new
available rules and how they can be obtain for current customers.
A.2.4
DPI Actions
DPI categories can be globally enabled or disabled along with altering the logging of
enabled categories.
To ignore, enable, enable with logging, or logging only on signature categories :
1. Select Deep Packet Inspection - Actions from the Protection Policies folder.
Signature category classifications are listed and described in Table A-1.
Users Guide v5.1.7
A-2
Deepnines Security Edge Platform
Drop Silently
Signature is enabled, but no logging of the triggered
signature is written to disk. Alert will be seen in the
reporting database.
Drop With Log
Signature classification is enabled and signature logging is
enabled. Alert will be seen in the reporting database.
Log Only
Signature blocking is disabled but event is still written to
the logs. Alert will be seen in the reporting database.
Ignore
Ignores the classification completely with no logging of
signature events. Alert will not be visible in the reporting
database
Table A-1. Signature Category Classifications
NOTE
If the administrator is going to be looking for a specific attack within the log files, the
Action setting will need to be set to “Drop With Log”, otherwise Deepnines
recommends that DPI Actions be set to “Drop Silently” when blocking is desired.
This will allow the administrator to still view the alert in the reports and assist in
conserving processing capabilities.
A.3
DPI Rules Selection
DPI Rules selection contains general groups of rules associated by type. If expanded
individual rules will be visible and can be selected/deselected as desired. Additionally,
if the entire group is unwanted merely unselecting the check box associated with that
group of rules will disable all rules in that group.
To view active/inactive rules or to select/deselect rule groups:
1. Select Deep Packet Inspection – Rules Selection from the Protection Policies
folder.
GHGH
2. Signature groups are listedGHJ
in the main panel.
3. Click on to expand that particular group of rules.
4. Check or uncheck the desired rule.
5. Click <Save> to save the results or click <Reset> to cancel the changes.
A.4
DPI Custom Rules (User Defined Rules)
Deepnines has built the user interface in such a way to allow administrators to build
custom rules or import groups of new rules that are desired. DPI custom rules can be
built and added from existing rules as well. Below will explain this section further.
Users Guide v5.1.7
A-3
Deepnines Security Edge Platform
To view, modify or add new custom rules:
1. Select Deep Packet Inspection – User Defined Rules from the Protection
Policies folder (Figure A-1).
For single rule addition or modification:
2. Single Tab is selected in the Explorer Pane.
3. Click <New> to add a new rule.
4. To modify an existing User Defined Rule, highlight that rules by clicking on it in
the Explorer Pane (top of the page).
5. Make modifications to the rule in the Rule box.
6. Click <Save> to save the changes or click <Reset> to reverse the changes.
Figure A-1. DPI User Defined Rules Screen - Single Tab
NOTE
If minor modifications are desired or if additional rules are wanted with slightly
different content, highlight the entire rule in the Rule box, right click with your
mouse, select copy. Click <NEW> (bottom left) and then paste the rule into the
Rule box. Make modifications, click <Enable> and then click <Save>.
Users Guide v5.1.7
A-4
Deepnines Security Edge Platform
For bulk or multiple rule import from a text file, select the Bulk tab from the Explorer
Pane (Figure A-2).
1. Select import button (bottom left). A window will pop up asking you to find the
location of the text file you wish to import.
2. Find the desired text file.
3. Click <Open> from the pop up window once the desired file is located. The file
contents will then be displayed in the Bulk explorer pane.
4. Review the contents or that the new rules to be imported are correct and then
click <Save>. The newly imported Bulk rules will now be visible in the Single
tab as individual User Defined Rules and can be Selected or Deselected as
wanted.
Figure A-2. DPI User Defined Rules Screen - Bulk Tab
Newly imported Bulk rules will automatically be enabled for DPI scanning. Single or
individual defined rules will have to be enabled at the time of creation or after they have
been saved.
Users Guide v5.1.7
A-5
Deepnines Security Edge Platform
G
Glossary
ADAPTIVE RATE
CONTROL
You can configure this setting in Traffic Manager to control the rate of
malicious traffic coming into the SEP.
ARP
Address Resolution Protocol (ARP) is a protocol for mapping an Internet
Protocol address (IP address) to a physical machine address that is
recognized in the local network.
AV
Anti-Virus
BRIDGE
A Bridge connects two interfaces together so that traffic can pass through it.
CGI
Common Gateway Interface (CGI) is a standard for interfacing external
applications with information servers, such as HTTP or Web servers.
CONVERSION
SYMMETRY
Conversation Symmetry allows the SEP to provide protection or state-like
measures on connectionless traffic. It is designed to insure proper 2-way
traffic by controlling the number of requests and responses assigned to a
specific protocol.
CPU
Central Processing Unit. Sometimes referred to simply as the processor or
central processor, the CPU is where most calculations take place.
DMZ
In computer networking, DMZ is a firewall configuration for securing local
area networks (LANs).
DPI – Deep
Packet
Inspection
As part of “Protection Policies”, Deep Packet Inspection provides another
layer of inspection for a variety of intrusions.
EDGE
The Edge device is a SEP device that is placed outside or in front of your
router, taking the connection from your ISP.
EDGEFORENSIX
The EdgeForensiX (EFX) system can be used to store forensic information in
the Postgresql database for historical analysis.
EFX
See EdgeForensiX
FLOW TAGS
A Flowtag is a relatively short identifier that can be added to the flow status
information for a conversation (protocol session between a pair of hosts).
FLOWSPECS
A flow specification (or "flow spec") is a data structure used by internetwork
hosts to request special services of the internetwork, often guarantees about
how the internetwork will handle some of the hosts' traffic.
FRONTLINE
The Frontline device is a SEP device used for LAN deployments on Ethernet
or Gigabit Fiber connections.
HTTP
Hypertext Transfer Protocol (HTTP) is a communications protocol used to
transfer or convey information on the World Wide Web.
ICMP
Internet Control Message Protocol, an extension to the Internet Protocol (IP)
defined by RFC 792. ICMP supports packets containing error, control, and
informational messages. The PING command, for example, uses ICMP to
test an Internet connection.
Users Guide v.5.1.7
G-1
Deepnines Security Edge Platform
KGH
(Good Known Hosts). A table containing all the good known hosts that are
available on the system.
MIRROR
CONTROL
Control function settings for the High Availability.
MIRROR HOST
Control function settings for the High Availability.
P2P
A peer-to-peer (or "P2P") computer network exploits diverse connectivity
between participants in a network and the cumulative bandwidth of network
participants rather than conventional centralized resources where a relatively
low number of servers provide the core value to a service or application.
POP3
Post Office Protocol version 3 (POP3) is the de facto standard for email
transmissions across the Internet using TCP/IP connections
RARP
Reverse Address Resolution Protocol (RARP) is a network layer protocol
used to obtain an IP address for a given hardware address (such as an
Ethernet address).
SEP
The Security Edge Platform (SEP) is a unified threat management (UTM)
appliance that is deployed in front of the router or at critical points in the
network architecture and acts as the first line of defense for the network.
SMTP
Simple Mail Transfer Protocol (SMTP) is the de facto standard for email
transmissions across the Internet using TCP/IP connections
STATIC
BLOCKING
As part of “Protection Policies”, Static Blocking provides built-in blocking for
known traffic anomalies.
TOP TALKERS
The Top Talkers Report is a snapshot representing which conversations or
flows are using most of the bandwidth.
TRAFFIC
MANAGER
The SEP Traffic Manager contains variables that are set by Deepnines
Research and Development for optimal performance.
UTP/IPS
Unified Threat Protection/Intrusion Prevention System. UTP protects against
multiples attack types. IPS prevents attacks rather than detecting.
VLAN
Virtual LAN, commonly known as a vLAN or as a VLAN, is a method of
creating independent logical networks within a physical network.
VRT RULES
VRT rules are the latest tested rules that can be obtained. There is an annual
fee associated with this service.
Users Guide v.5.1.7
G-2