1
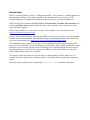
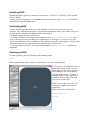
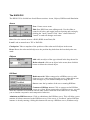
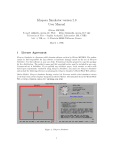
KiKS is a Khepera Simulator
user guide
Theodor Storm <[email protected]>
Introduction ....................................................................................................................................2
Installing KiKS ...............................................................................................................................3
Calibrating KiKS.............................................................................................................................3
Starting up KiKS.............................................................................................................................3
The KiKS GUI.................................................................................................................................4
Arena ...........................................................................................................................................4
Objects .........................................................................................................................................4
KiKSnet .......................................................................................................................................4
Simulation ....................................................................................................................................5
Creating the simulated environment..............................................................................................6
Defining an arena matrix..............................................................................................................6
Creating an arena matrix from a TIF image file ...........................................................................6
Examples ......................................................................................................................................6
Controlling simulated kheperas .....................................................................................................8
KiKSnet .........................................................................................................................................10
How To start a KiKSnet server..................................................................................................10
How to start a KiKSnet server the easier way (Windows only) ...................................................10
Running behaviours on a KiKSnet server..................................................................................10
More on KiKSnet and server administrators ..............................................................................11
Introduction
KiKS is an abbreviation for ”Kiks is a Khepera Simulator”. The program is a Matlab application
that simulates a Khepera (II) robot connected to the computer in a very realistic way. The
simulated Khepera is controlled from Matlab in the same way as real, physical Kheperas.
KiKS currently also simulates the K213 Linear Vision module, the Radio Turret module, and
the fictional Battle Turret which equips the robot with a compass, a laser cannon, and a few
other unrealistic gadgets.
KiKS requires Matlab r11.1 (or newer versions). The simulator can be downloaded from
http://www.tstorm.se/projects/kiks/.
In order for the demo behaviors included with KiKS to work, you also need to have the kMatlab
modules from K-team installed. The kMatlab package is included and installed with KiKS, and
can also be downloaded from http://www.k-team.com/download/khepera.html.
The kMatlab package contains a set of three core commands (kopen.dll, ksend.dll, kclose.dll)
that are used to communicate with real Kheperas from Matlab. Also, a number of Matlab scripts
that takes care of message parsing and error handling when controlling Kheperas are included,
and although they are not in any way required for KiKS to work, these scripts are used in the
demos simply because they are very handy.
The purpose of this document is to describe the core functionality of KiKS. Make sure you
examine the demos in the kiks2.x.x\demos folder for detailed information about the supported
turrets.
Note that in this document, text written using fixed width font are Matlab commands.
Installing KiKS
Unpack the KiKS zip file to a location of your choice. A ”kiks2.x.x” directory will be created.
Start up Matlab.
Change directory (using the ”cd” command) to the kiks directory. Run kiks_setup to add the
kiks2 directories to the Matlab path.
Calibrating KiKS
In order for you to get the most out of this simulator, it needs to run a few tests on your
computer. This calibration procedure is performed automatically when you run kiks_setup, but
can also be run standalone by following these instructions.
· In Matlab, change directory to kiks2.x.x\.
· If you have a Khepera connected to the computer, run kiks_calibrate(port,baud) where
’port’ is the serial port the real khepera is connected to (0=serial port 1, 1=serial port 2) and
’baud’ is the baud rate of the real khepera. The calibration may take a few minutes, don’t use the
computer and run as few applications as possible during the calibration.
· If you do not have a Khepera connected to the computer, run kiks_calibrate without any
arguments.
Starting up KiKS
To start up KiKS, type the following at the Matlab prompt:
kiks;
KiKS should start up and a window resembling the one below should appear.
You can move the simulated robot by
placing the mouse pointer over the
black square on the robot, pressing
and holding the left mouse button,
and moving the mouse. To rotate a
simulated robot, simply repeat this
procedure but over any of the dark
green areas on the robot.
KiKS is now ready to be used. Try
running the simple avoid-obstacle
behavior in
kiks2.x.x\demos\avoid\avoid.m.
cd demos\avoid\
avoid;
The KiKS GUI
The KiKS GUI is divided into four different sections: Arena, Objects, KiKSnet and Simulation.
Arena
New: Creates a new arena.
Edit: Puts KiKS into arena editing mode. Use the slider to
control wall color, and toggle between drawing and erasing by
clicking the ”mode” button. Click ”done” when finished or
”cancel” to undo all changes and return.
Save: Save the current arena to a KAD (KiKS Arena Data) file.
Load: Load an arena from a TIF or KAD file.
Checkpoint: Takes a snapshot of the positions of the robot and all objects in the arena.
Reset: Resets the robot and all objects to the position they had when the last checkpoint was
made.
Objects
Add: adds an object of the type selected in the drop-down list.
Delete selected: click on an object in the arena, then click this
button to delete the selected object.
KiKSnet
Radio turret id: When connected to a KiKSnet server, each
client recieves a radio turret ID by the server. Other clients can
send messages to your simulated Khepera using this ID.
Server: enter the ip number of the server running KiKSnet.
Connect to KiKSnet server: Click to connect to the KiKSnet
server as a client. When connected to a KiKSnet server, you will
share the simulated environment with all other clients connected to the same server, allowing
you to simulate cooperative and competetive behaviors.
Administrate KiKSnet server: Click to administrate the KiKSnet server. This will allow you to
monitor all clients connected to the KiKSnet server. If the server is ”localhost” and no KiKSnet
instance is already running, clicking this button will start up a KiKSnet server (Windows only).
Simulation
||: Pause the simulation.
||>: When paused, steps forward in the simulation.
Halt: Use this button instead of pressing Ctrl-C when you want to
interrupt a running behavior. Pressing Ctrl-C during a simulation
will mess up the internal state of the simulator.
Monitor simulation details: Brings up a window that shows you
detailed information about the simulated Khepera, including sensor
readings.
Simulated robot: Switch which type of robot you want to simulate.
Currently Khepera and Khepera II are supported.
Time mode: Choose between High Precision, which is slower but
highly realistic since it even takes the speed of the simulated serial
port into consideration, or Wall Clock which is faster but more
simplistic.
Time acceleration method: ”emulate CPU speed” is only available
in ”high precision” time mode and realistically emulates another
CPU. Choose a slower CPU than the one your computer is equipped
with to speed up the simulation.
”Target speed” is more simplistic, but allows for very fast
simulations. Use this if speed is more important than realism.
Movement limit: Decides how often the position of the simulated robot can be updated. Set this
limit higher to get smoother movement at the cost of simulation speed.
Interpolation limit: Set this to a lower value for more precise collision detection at the cost of
simulation speed.
Grid: Toggle grid on/off.
Redraw: Redraw the visualization.
Enable/disable visualization: Toggle visualization on/off. Simulation speed will increase
noticably if you turn off visualization.
Creating the simulated environment
The most simple way to create the simulated environment is by clicking the ”new” button under
”arena” to create an empty arena, and then clicking ”edit” to add walls to the arena.
However, arenas can also be created in a few other ways. An ARENA matrix and an optional
COLORMASK matrix can be used to specify the simulated environment.
ARENA should be a matrix describing the arena or a string containing the filename of a file to
load the arena from.
If ARENA is empty, a default arena is created and a robot is spawned.
If ARENA is the filename of a TIF image file, KiKS will convert the image to an arena, start up,
and spawn a robot.
If ARENA is the filename of a KAD file, KiKS will load the arena from this file.
If ARENA is an m*n matrix, an arena corresponding to the matrix is created and one robot will
be spawned.
Defining an arena matrix
Each matrix element must be one of the following:
<0=Khepera start position (absolute value defines the start angle)
0=no obstacle
1=wall
2=light source
3=ball
4=cylinder
One matrix element corresponds to 1 square millimeter. The environment may be of any size.
You may also provide a COLORMASK matrix. This matrix tells KiKS what color the walls
defined by the ARENA matrix are. The COLORMASK matrix must be the same size as the
arena matrix.
For each ’1’ element in the ARENA matrix at position [x,y], set [x,y] in the COLORMASK
matrix to the color you want the wall to have.
Creating an arena matrix from a TIF image file
Draw a grayscale (256 colors) picture using your favorite image editor, save the picture as .tif,
and use the command
[arena,colormask]=kiks_tif2arena(’filename’)
where filename is the name of the .tif file.
All completely black areas (RGB=#000000) will be regarded as floor by this function, and the
rest of the colors should be used to draw the walls. So if you want a black wall, draw it using
RGB #010101.
There are a few sample pictures in the demos\football\, demos\race\, and demos\battle\
directories.
Examples
Here are a few examples on how to define arenas.
kiks(zeros(500,500));
will start up KiKS and create an empty arena of 500x500mm size. The sequence
ARENA=zeros(400,600);
ARENA(1:100,1:100)=1;
kiks(ARENA);
will start up KiKS and create a 400mm high and 600mm wide arena with a 100x100mm obstacle
in the top left corner and the code sequence
[ARENA,COLORMASK]=kiks_tif2arena(’myfile.tif’);
kiks(ARENA,COLORMASK);
or simply
kiks(’myfile.tif’);
Will convert the picture myfile.tif into an arena and a colormask and start up KiKS.
You can switch arenas while KiKS is running by using the kiks_arena() command.
Controlling the simulated Khepera
KiKS simulates a Khepera connected to the serial port, and you use three commands to
communicate with the robot:
kiks_kopen, kiks_ksend, and kiks_kclose.
These commands work just like the kopen.dll, ksend.dll, and kclose.dll modules that K-team
provide - in fact, you can use the kiks_k* commands to control real Kheperas aswell as
simulated Kheperas.
When calling kiks_kopen with serial port# -1, KiKS is activated and a working environment for
a simulated Khepera is created. If, however, the serial port# = 0 kiks_kopen will simply forward
the call to kopen.dll.
kiks_ksend and kiks_kclose use the ’ref’ array returned by kiks_kopen/kopen to detect if the call
should be forwarded to ksend.dll/kclose.dll or if the call should be sent to a simulated Khepera.
A small code sample:
port=-1; % simulated Khepera
baud=9600; % use 9600 baud
ref=kiks_kopen([port,baud,1]); % open the port for communication
kiks_ksend([’B’ 10],ref) % read version
kiks_ksend([’D,10,0’ 10],ref) % set left motor speed to 10 pulses and right
motor speed to 0 pulses
kiks_ksend([’D,0,0’ 10],ref) % set left motor speed 0 0 pulses and right
motor speed to 0 pulses
kiks_kclose(ref); % close the port
IMPORTANT NOTE: Matlab doesn’t support threads or any other kind of background
processing of commands. For this reason, the position of the robot only updates when you call
the kiks_kopen, kiks_ksend, kiks_kclose, or kiks_ktime functions.
If you enter the above commands at the Matlab prompt you will notice that this means that the
robot will make a leap each time you call kiks_ksend. Since KiKS accurately interpolates the
movement of the robot between each call to kiks_ksend, this is only a cosmetic problem, but a
real Khepera would start moving instantly after the kiks_ksend([’D,10,0’ 10],ref)
command, and keep moving smoothly until you entered the kiks_ksend([’D,0,0’ 10],ref)
command.
To get the same smooth movement in KiKS without using a loop to make sure kiks_ksend is
called continously, you must run KiKS in active mode by clicking the ’go active’ button in the
bottom left corner of the GUI.
In active mode, KiKS takes control of the Matlab session and keeps the simulated world updated
while still allowing you to execute any Matlab commands in the command line interface at the
bottom of the GUI. All Matlab commands, including scripts and functions, can be run using the
KiKS command line interface.
Try switching KiKS to active mode by clicking the ’go active’ button. The ’go active’ button
will be replaced by a ’go passive’ button. Enter the above commands, one at a time, in the
command line interface. You will notice that the simulated robot starts moving smoothly when
you enter the kiks_ksend([’D,10,0’ 10],ref) command, and keep moving smoothly until
you have entered kiks_ksend([’D,0,0’ 10],ref).
You will also notice that you cannot type commands in the main Matlab window until you have
returned keyboard control to Matlab by clicking the ’go passive’ button in the KiKS GUI.
Also try running the demo behaviors in active and passive mode. There will be no difference in
smoothness of the movement of the simulated robot. The reason for this is that the demos call
kiks_ksend continously to read sensors and set motor speeds. The simulated world is updated
each time kiks_ksend is called, and thus the simulated world will update continously.
You can also control real Kheperas using the kiks_k* functions. Simply setting port to 0 or 1
(depending on which serial port your Khepera is connected to) will send the commands to the
real Khepera.
Kiks_ktime and kiks_pause are two new functions that only work in conjunction with
kiks_kopen/kiks_ksend/kiks_kclose. Kiks_time(num) returns elapsed time since the serial port
#num (simulated or real) was opened. If the port has not been opened, kiks_ktime will return [].
Kiks_pause(time) is intended to be used instead of pause(time). It allows for the simulator to
make use of CPU time that would otherwise be spent doing nothing at all.
If you are familiar with using kMatlab to control Kheperas, getting used to KiKS should be very
easy. It’s only a matter of using kiks_kopen, kiks_ksend, and kiks_close instead of using kopen,
ksend, and kclose. Look in the KiKS\demos\ folder for a few code examples.
KiKS supports all commands found in the Khepera user manual except for the following:
- Configure PID controller (’F’)
- Read A/D input (’I’)
- Set PWM (’P’)
- Read a byte on the extension bus (’R’)
- Write a byte on the extension bus (’W’)
KiKSnet
KiKSnet allows several instances of KiKS to share a common arena, in order to simulate
cooperative or competetive behaviors. KiKS uses TCP/IP to communicate with KiKSnet.
How To start a KiKSnet server
?
Use Windows Explorer to browse to the \kiks2.x.x\KiKSnet folder.
?
Double-click ’kiksnet.exe’.
The KiKSnet server application will start up, and KiKSnet will tell you that it is waiting for a
server administrator to connect. This is due to the fact that when KiKSnet starts up, it does not
have an arena for robots to move in.
To upload an arena to KiKSnet:
?
Start up Matlab and KiKS.
?
Set the arena you want to use with the kiks_arena command or by loading an arena file using
the ”load” button.
?
Make sure the ’server’ field in KiKS says ’localhost’.
?
Click the ’administrate KiKSnet server’ button in the KiKS GUI.
KiKS will now connect to the KiKSnet server and upload the current arena. Note that the KiKS
GUI has changed—this KiKS session is monitoring the KiKSnet server.
KiKSnet is now ready to accept clients.
How to start a KiKSnet server the easier way (Windows only)
? Start up Matlab and KiKS.
? Set the arena you want to use with the kiks_arena command, or load an arena by clicking the
”load” button.
? Click the ’administrate KiKSnet server’ button.
? When the ”Set administrator password’ dialog appears, enter a password of your choice.
KiKS will start up a KiKSnet server in the background and automatically connect to it as an
administrator and upload the current arena. Anyone trying to connect to the server as an
administrator will be prompted to enter the password you chose.
KiKSnet is now ready to accept clients.
Running behaviours on a KiKSnet server
To connect a KiKS robot to the KiKSnet server, enter the IP number (or name) of the KiKSnet
server in the ’server’ field in the KiKS GUI and click the ’connect to KiKSnet server’ button.
KiKS clients connecting to KiKSnet will download the arena from the server automatically.
From now on, most things work as usual. You cannot add objects to the arena (this will be
handled by the server administrator once KiKSnet supports lights and objects), and you cannot
move the robot using the mouse while running a behaviour (once you have called kiks_kopen,
you will not be able to move the robot using the mouse until you have called kiks_kclose).
Try running the ’avoid’ behaviour and watch in amazement as the robot cluelessly wanders
around in cyberspace.
The radio turret and a ’robot wars’-inspired battle turret are fully supported by KiKSnet,
which should open up plenty of interesting opportunities for on-line cooperative and competetive
behaviours. Of course, the K213 linear vision camera works as usual when connected to
KiKSnet. The ’Battle’ behaviour (kiks2.x.x\demos\battle) demonstrates use of the Battle Turret,
the Radio Turret, and the K213 Linear Vision Turret when connected to a KiKSnet server.
More on KiKSnet and server administrators
Currently, the server administrator only serves one purpose: to upload an arena to the KiKSnet
server, which happens automatically when you connect by clicking the ’administrate KiKSnet
server’ button.
Once that is done, the server administrator does not fill a purpose on the KiKSnet server other
than passively monitoring the robots that connect to the server.
The server administrator can disconnect from the server at any time, and KiKSnet will keep
running.
To stop the KiKSnet server, activate the KiKSnet console window (by clicking its title bar) and
press Ctrl-C.
Also note that KiKSnet does not need to run on the same machine as the server administrator is
connecting from. Just make sure you enter the right IP number in the ’server’ field, and you can
administrate a server on the other side of the globe, if you want. The machine running KiKSnet
will only need the files in the kiks2.x.x\KiKSnet folder.
Since administrators can connect from any computer, KiKSnet can and should be password
protected. If you start KiKSnet from the KiKS GUI, you will be prompted to set an administrator
password.
You can also set an administrator password by simply passing the password as an argument to
kiksnet.exe:
?
Start a command prompt by clicking Start-Run... in Windows.
?
Change directory (using the ’cd’ command) to the KiKSnet directory.
?
Type ’kiksnet mypassword’ and hit enter to start up KiKS with the administrator password
set to ’mypassword’.