1
QVP/PC286
Powerful 286 PC Emulator for the Amiga 500
The following points were either not mentioned in the
manual or were not stressed strongly enough and bear
repeating:
1. During the installation of the PC286 board, check to make
sure that all 100 pins of the mini-slot are correctly inserted
into the connector on the PC286 unit. Misalignment can
cause serious damage to both the PC286 unit and the
A500HD or A530 sub-systems.
2. When reconnecting the case of the A500HD (or theA530)
it is essential that you correctly connect the power wires
for the fan. If you connect the wires and power on the
unit, but the fan does not spin, then merely reverse the
connection for the fan wires. The heat generated by the
hard drive inside the plastic case can build up without the
fan runningr.c£using the other components inside the case
to fail.
3. When assigning RAM to the PC286 emulator, be sure to
reserve a minimum of 256 kilobytes for the Amiga's
use under AmigaDOS. Failure to do so may result in a
total lockup of both machines.
xxxxxx-xx
^
GVP/PC286
May, 1992
4. When assigning RAM to the PC286 emulator, be sure to
use increments of 16 bytes.
MS-DOS makes certain
assumtions about 'paragraphs' of RAM (16 byte chunks),
but the configuration software allows any increment of
RAM to be added. Setting the MS-DOS memory size to
an unusual amount, such as 537kb, will most likely result
in having MS-DOS programs fail or freeze when trying to
load or allocate memory.
5. The GVP/PC286 emulator utilizes an actual 80C286
processor in almost exactly the same way as a standard PC
clone. If a software compatibility issue arises, the vendor
of the software package should be contacted first to see if
there are any special requirements for running their
software on a clone; more often than not this is the case
rather than a problem with the PC286 itself.
6. When using the PC286 with a GVP A530-Turbo accelerator
for the Amiga 500, it is important to have the 68030's
data caches turned off until after the PC286 is up and
running. Turning the cache on while the P286 is not
running, and then attempting to start the PC286 will most
likely cause the PC286 to freeze and crash.
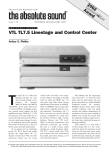
GVP/PC286
GVP/PC
286
Emulator
16-MHz 80286 PC Compatibility
for the
GVPA500HD
and
A530 Combo
Expansion Chassis.
GVP/PC286
Copyright 1991 by Great Valley Products, Inc. (GVP). All rights
reserved. The GVP/PC286 board, emulation software, utilities and
manual are protected under international copyright laws and
agreements. No part of this package may be reproduced in any
form, physical, electronic, photographic, or otherwise, without the
expressed written consent of GVP.
AT, XT and IBM are registered trademarks of International Business
Machines Corporation.
Microsoft, MS/DOS, Windows 3.0 are
registered trademarks of Microsoft Corporation. Norton's Utilities,
Syslnfo and SI are registered trademarks of Symantec, Inc. Lotus,
1,2,3, dBase, AutoCAD, Framework are all registered trademarks and
properties of their respective companies.
Portions of the GVP/PC286 board design employ patented
technologies under license from Vortex Computersysteme GmbH.
Other titles and registered trademarks mentioned in this manual are
the properties of their respective companies.
GVP guarantees that, on leaving the premises, the product is in a
working condition and meets all manufacturing and performance
specifications. No further guarantee is expressed or implied.
GVP assumes no responsibility as to the fitness or suitability of this
product for any commercial or non-commercial application. GVP
assumes no liability for the loss or destruction of data and programs
used in connection with this product.
GVP does not guarantee that this product will work with any other
product from another manufacturer unless explicitly stated in this
manual. The GVP/PC286 board has been designed to mount inside,
and work with, the GVP A500 HD and A530 Combo expansion
products only.
jj
GVP/PC286
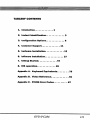
TABLE OF CONTENTS
1. Introduction
1
2. Product Identification
3
3. Configuration Options
6
4. Customer Support
11
5. Hardware Installation
13
6. Software Installation
27
7. Getting Started
8. DOS operation
57
65
Appendix A. Keyboard Equivalents
79
Appendix B. Video Reference...
81
Appendix C. PC286 Error Codes
GVP/PC286
87
III
IV
GVP/PC286
1. INTRODUCTION
GVP/PC286 is a high performance AT/PC compatible
hardware emulation designed specifically for use with the GVP
Series II A500 HD and A530 Combo expansions. Both of
these GVP expansion products provide high-performance
enhancement to the standard Amiga 500 in an easy to install,
warranty-safe package.
Central to the design of both GVP A500 HD and A530
Combo expansions is a bus-direct Mini-Slot that provides
additional expansion possibilities. The GVP/PC286 emulator
board is the first peripheral designed to use this Mini-Slot.
The GVP/PC286 board converts your Amiga 500 into a fully
compatible IBM AT "clone," which runs concurrently as a
process under AmigaDOS. This means that the same
multitasking Amiga can perform both AmigaDOS and
MS/DOS operations simultaneously!
AT Performance
The GVP/PC286 emulator employs a 16 bit CMOS 80286
Central Processing Unit, running at 16 MHz. The board
comes equipped with 512 kBytes of its own BAM and a socket
for the addition of an optional 80C287-12 math coprocessor.
These features combine to give the GVP/PC286 board an
impressive system performance rating. The popular Norton's
Utilities evaluation of computing performance, Syslnfo (SI),
which compares the machine under test with the theoretical
limits of an original IBM PC/XT, rates the GVP/PC286
board as equivalent to 15 XTs! That's performance
comparable to many 386 machines currently on the market.
GVP/PC286
The GVP/PC286 board's use of low-power CMOS chips and
advanced Very Large Scale Integration (VLSI) custom circuitry
allow for an extremely compact and efficient layout and the
GVP-licensed AT ROM/BIOS ensures full compatibility with
virtually all existing AT applications.
System Configuration
With its 512 kilobytes of onboard memory, the GVP/PC286
board allows A500 systems with just 512k of original memory
to function as a complete 640k MS/DOS system. The
GVP/PC286 board can also recognize any additional FAST
BAM and access it in either Extended or Expanded Memory
models.
The GVP/PC286 support software allows for the partitioning
and use of any SCSI hard drive connected to the A500 HD or
A530 Combo SCSI controller as a DOS partition. This
enables the board to boot directly into MS/DOS from hard
disk and provides for almost unlimited storage of MS/DOS
applications and data.
The GVP/PC286 emulation provides two different ways of
working with hard drive resources. These will be detailed in
Chapter 3. Configuration Options. Each method has its own
benefits and it is possible to use both simultaneously on
different partitions. Users will want to study this section and
make some basic hard drive decisions before continuing with
the installation.
GVP/PC286
2. PRODUCT IDENTIFICATION
• Fully compatible 16 MHz PC/AT emulator
• CMOS 80C286-16 CPU chip
• 512 kBytes onboard RAM
• Norton SI index of 15
• Socket for optional 80C287-12 math coprocessor
• Compact Surface Mounted Technology (SMT) circuit
board for high integration, low power consumption
and reduced cost
• Custom Very Large Scale Integration (VLSI) support
chips for lower component count
• Fully AT compatible ROM/BIOS
• Full 640 kByte base memory as minimum standard
configuration
• Ability to address additional FAST RAM as either
Extended or Expanded Memory
• Runs unrestricted in '286 Protected Mode
• Supports Microsoft Windows 3.0
•
Emulates EGA and VGA monochrome graphics,
CGA 16-color graphics, Hercules, Olivetti and
Toshiba 3100 display standards
•
Works transparently with A500-based flicker
eliminators
GVP/PC286
• Runs as a concurrent process within the AmigaDOS
operating system
•
Reads and writes MS/DOS file system on any
standard Amiga floppy drive
• Full support for MS/DOS partitions on GVP Series II
SCSI hard disks
• Recognizes the Amiga mouse as a Microsoft Serial
mouse (on COM 1 or COM 2)
• Recognizes the Amiga's Parallel port as LPT1
• Recognizes the Amiga's Serial port as either COM 2
or COM 1 (depending on mouse setting)
• Emulates the PC/AT alert beep through Amiga audio
hardware
• Recognizes and uses the Amiga's Real-Time clock
• Compatible with all versions of MS/DOS from 3.2
through 5.0, as well as DR-DOS 5.0 & 6.0
•
Comes complete with GVP/PC286 board, User
manual, AmigaDOS format System disk and PC
format Utilities disk
•
Customer support and periodic software updates
through GVP's Technical Support service
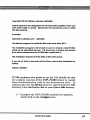
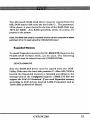
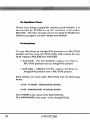
Please read the file README.TXT on your GVP/PC286
distribution disk for any last minute changes or addenda to this
document. This file can be read using the More utility under
AmigaDOS or output to your chosen Preferences printer.
GVP/PC286
This manual describes the installation and operation of the
GVP/PC286 board only. If you are not already familiar with the
basic functionality of the Amiga 500, including use of the mouse to
make menu selections and control screen operations, duplication of
disks, etc., please read the manuals that came with your computer.
For information on the formatting and partitioning of SCSI hard
disks, refer to the GVP manuals that accompanied your A500 HD
or A530 Combo expansion.
Note: This product is intended to be used with either the A500 HD or A530
Combo expansion products manufactured and sold by Great Valley
Products. No other use is supported.
This product does not include the MS/DOS operating system,
documentation on MS/DOS, or any DOS applications. The purchaser
assumes full responsiblity for the legal acquisition and use of these
properties.
Data Security
Before proceeding, make a copy of the GVP/PC286 distribution
disk. The other disk, DOS Utilities, is in MS/DOS format and will
be unreadable by your Amiga until the GVP/PC286 is running.
As soon as you can, make a backup copy of it. Keep the original
disks in a safe place. The manual that comes with an Amiga will
describe how to make disk copies under AmigaDOS. A standard
MS/DOS reference will describe the process of copying disks
under that operating system.
If your A500 HD has been in service as a SCSI controller and you
already have one or more partitions of data on a hard disk, it is
strongly advised that you do a complete system backup before
proceeding to install the GVP/PC286 board. The GVP/PC286
board provides two different ways to use your hard disk resources
under MS/DOS emulation. They are detailed fully in Chapter 3.
Configuration Options. We recommend you read this discussion
and decide, before installation, how you wish to build your
Amiga/AT system.
GVP/PC286
3. CONFIGURATION OPTIONS
MS/DOS and Amiga systems have different configuration require
ments. Generally, combining hardware on a PC requires setting
battery maintained memory tables through the use of diagnostic or
system setup software, provided by the manufacturer, and adding
software drivers to the PC's startup routine, CONFIG.SYS.
Amiga users are spared much of this confusion because of the
Amiga's auto-configuring architecture. The following information
is not intended to be a DOS system configuration reference. Refer
to your MS/DOS or application manuals for more complete
information on what DOS expects.
Extended vs. Expanded Memory
Before the advent of the Intel 80286, all DOS applications and the
DOS operating system were limited to a maximum of 640 kilobytes
of memory. This 640k represented the entire RAM space available
to DOS applications. Under DOS, program code and data had to
be small enough to be contained in this space; along with the
DOS, itself. More memory — so called Extended Memory— could
be added to systems equipped with a '286 or higher, but, as it lay
beyond the addressing capabilities of DOS, it was good for little
more than disk caches and RAM disks.
As program functionality and data structure requirements tested
the limits of the base 640k machines, three major DOS companies,
Lotus, Intel and Microsoft (LIM), developed a technology stand
ard for increasing memory resources beyond a single Megabyte.
The LIM standard for Expanded Memory greatly extends the
functionality of a DOS machine by making this RAM useful to
correctly written applications. Data can be stored there and
operated upon by these applications. Programs can also be loaded
into it and executed.
GVP/PC286
But, whereas the Amiga automatically finds and uses any memory that's
installed, a DOS system requires the use of a software driver, an Expanded
Memory Manager (e.g.: EMM.SYS), to make use of Expanded Memory.
The DOS format utilities disk included with GVP/PC286 includes such an
Expanded Memory Manager.
Note: Users are again instructed to read the README.TXT file on the GVP.PC286
distribution disk. This file contains a list of all the DOS programs included with the
DOS Utilities disk.
By the release of DOS 5.0 (and Digital Research's DR-DOS 5.0), the
capability had been added to directly convert Extended Memory into
something called High Memory (through the use of the utility program,
HIMEM.SYS) on systems equipped with a '286 or higher CPU. High
Memory provides a way for DOS, and certain other correctly written
software, to effectively use Extended RAM.
Similarly, Windows 3.0, by Microsoft, in its Standard Mode, includes the
ability to use Extended memory for real work. It achieves this by running
the 80286 chip in its Protected Mode. Protected Mode allows the processor
to function as a 32-bit machine capable of addressing up to 16 Megabytes.
When using the GVP/PC286 Configure program, you will be able to
specify how much of your Amiga's memory will be recognized as Extended
and how much as Expanded RAM. Those planning to use Windows 3.0
will probably want to assign all their RAM as Extended memory. Those
who specify Expanded memory will have to make sure they run EMM.SYS,
or some other Expanded Memory Manager, in order for this RAM to
become available to LIM compatible programs (e.g.: Lotus 1,23 version
2.2) under MS/DOS.
Hard Drives and Partitions
Hard drives are physical data storage devices with a fixed capacity. Parti
tions are logical devices — also called volumes — that are created on a hard
drive. A hard drive can contain one, or several, partitions.
GVP/PC286
7
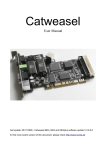
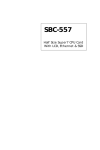
Hard Drive 1
with 1 Partition
Hard Drive 2
with 3 different sized Partitions
Figure 3.1 - Hard drives and Partitions.
On a MS/DOS machine, the first hard drive partition is always drive C:.
Versions of DOS earlier than 3.3 provided support for C: and D: partitions
only. Later versions allow for many more partitions.
DOS Partitions and AmigaDOS
Normally, a hard drive that the Amiga can read cannot be read by DOS;
and one that is formatted under MS/DOS will be unreadable by
AmigaDOS. GVP supports the creation of MS/DOS partitions in the
following ways (illustrated in Figure 3.2):
A. Separate AmigaDOS and MS/DOS partitions on different
physical drives.
B. Separate AmigaDOS and MS/DOS partitions on the same
physical drive.
8
GVP/PC286
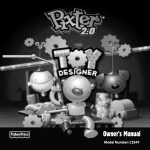
A. Separate Hard Drives
for AmigaDOS and MS/DOS.
Hard Drive 1
AmigaDOS format
with AmigaDOS Partition
MS/DOS format
Hard Drive 2
with MS/DOS Partition
Hard Drive 3
with AmigaDOS Partition
B. Single Hard Drive
with 2 MS/DOS Partitions
and 1 AmigaDOS Partition
C. Single Hard Drive
with 1 AmigaDOS Partition
containing 2 MS/DOS format files.
Figure 3.2 - Hard Drive Configurations supported by GVP/PC286.
GVP/PC286
C.
Creation of a MS/DOS partition as a fixed-size/*/* on an
AmigaDOS partition.
Since hard drive configuration for the GVP/PC286 requires the more or
less permanent allocation of hardware resources, it is a good idea to
consider these several methods before proceeding.
In many ways, method A (employing separate hard drivesfor AmigaDOS
and MS/DOS partitions) is the most satisfying. Maintaining separate disk
drives effectively isolates each type of data into its own subsystem. Each
MS/DOS drive must first be prepped and mounted by AmigaDOS. It can
then be formatted under MS/DOS using FDISK.COM Not everyone has
access to more than one hard drive, however.
Method B requires that a new partition be created on your AmigaDOS hard
drive. This is accomplished using the FaaastPrep utility that came with
your A500 HD. The Partition is specified and recorded in FaaastPrep just
as any ordinary AmigaDOS partition, but it is not formatted under the
AmigaDOS system. Instead, the PC286 emulator is started and the DOS
utility FDISK.COM is used to format the partition under DOS.
Both methods A and B allow for hard drive performance up to the limits of
the specific hardware and DOS software. Method C carries some additional
overhead, but provides for a slight increase in data security. This method
involves permanently allocating some large chunk of an AmigaDOS
partition as a MS/DOS file.
The PC286 emulator will treat this single file as a physical hard drive
partition and write data into it. The data format used within the file will be
one that DOS understands, but the file, itself, will look like any other
AmigaDOS file to the A500 filing system. One benefit to this method is
that standard Amiga backup utilities (e.g.: Quarterback from Central Coast
Software or GVP's own TapeStore) are able to archive your MS/DOS
partitions.
Explicit descriptions of how to build each of these hard disk systems is
provided in the Getting Started section; Chapter 7. It would be wise,
however, to decide at this time, which method you intend to use.
10
GVP/PC286
4. CUSTOMER SUPPORT
Customer Service for the GVP/PC286 board is provided by Great Valley
Products, Inc. Our service lines are open 9:15 a.m. to 6:00 p.m. Eastern
Time in the United States at (215) 337-8770. Additionally, GVP maintains
a 24-hour Bulletin Board Service at (215) 337-5815 and a FAXlinc at
(215) 337-9922.
In order to be eligible for telephone support, purchasers of the GVP/
PC286 board must complete and mail in the Product Registration card that
accompanies this manual. Doing so will ensure that you receive all
forthcoming product information and updates. The mailing address for
GVP is:
Great Valley Products, Inc.
600 Clark Avenue
King of Prussia, PA 19406
USA
GVP/PC286
U
12
GVP/PC286
5. HARDWARE INSTALLATION
Package Contents:
• GVP/PC286 board in antistatic envelope
• One AmigaDOS format 3.5" disk containing PC286
emulation software and installation utilities
•
One MS/DOS format 3.5" disk containing
GVP/PC286 DOS utilities
• This manual and User Registration card
What You Need:
The following required items are not provided in this package
and must be supplied by the user.
• Amiga 500 computer system
• GVP Series IIA500 HD expansion
or
• A530 Combo expansion
• Anti-static wrist strap (availablefrom Radio Shack)
• MS/DOS 3.2 or later
• DOS application software
Optional Items:
• 80C287-12 math coprocessor
GVP/PC286
13
The only tool required to install a GVP/PC286 board is a
medium-sized crosspoint screwdriver.
WARNING: The GVP/PC286 board achieves its small size
and high performance through the use of CMOS VLSI chip
technology. These chips are extremely sensitive to damage
from static electricity. Observe completely the following
cautions and instructions during installation. GVP assumes no
responsibility for damage to PC286 board components
resulting from improper handling.
The following instructions refer specifically to an A500 HD
expansion product. The installation process is identical for an
A530 Combo expansion and users of that product should
follow the same steps exactly.
WARNING: Before proceeding, make sure that all power to
the Amiga and A500 HD is shut off. Remove any peripheral
and power cables.
1. If your A500 HD is already attached to the Amiga's
expansion bus, spearate them and move the A500
HD to a clear workspace.
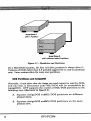
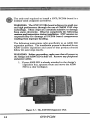
Figure 5.1-The A500 HD Expansion Unit.
14
GVP/PC286
2. Turn the A500 HD unit upside down. Refer to Figure
5.2 and, using the crosspoint screwdriver, remove three
screws as indicated.
Remove 3 Screws
Figure 5.2 - Underside ofA500 HD.
3. With the screws removed, turn the A500 HD right-sideup and carefully lift the plastic cover.
CAUTION: The A500 HD cooling fan and Game Switch are
mounted on the plastic cover and wired to the A500 HD circuit
board. Use care when lifting oflFthe cover not to break these wires.
4. Note the connection points for the cooling fan and Game
Switch wires. They are attached with press-fit connectors
to terminal posts on the main circuit board.
GVP/PC286
15
5. Pull to free the connecting wires and then set aside
the top cover. Note the polarity of each connection
as well as its position.
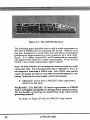
Figure 5.3 -A500 HD with cover removed.
6. Note the position, near the A500 HD bus conneaor,
of the GVP Mini-Expansion slot (see Figure 5.4).
This is where you will be installing the GVP/PC286
board.
16
GVP/PC286
Figure 5.4 - Mini Expansion Slot
WARNING: Be sure to use an anti-static wrist strap and to
properly ground yourselfwhile performing the remaining steps.
Failure to do so may result in irreparable damage to the
GVP/PC286 board.
7. After grounding youself, break the seal on the anti
static envelope that contains the GVP/PC286
board. Carefully remove the board and lay it flat on
the envelope.
GVP/PC286
17
Figure 5.5 - The GVP/PC286 board.
The following steps describe how to add a math coprocessor to
the GVP/PC286 prior to installing the board. Software that
has been designed to work with one will show tremendous
performance improvements in the presence of a math chip.
Excel, 1-2-3, dBase, AutoCAD, and Framework are examples
of programs that look for a math coprocessor. If you do not
intend to use a math coprocessor, skip to step 9.
Note: Pay strict attention to the designator when purchasing a math
coprocessor chip. The only supported chip is a 80C287-12. The C in
the designator indicates a CMOS chip. Non-CMOS chips require
much more power and will not work with the GVP/PC286 board. The
trailing 12 indicates the coprocessor's rated dock speed.
8. (Optional) If you have a 80C287 math coprocessor,
install it at this time.
WARNING: The 80C287-12 math coprocessor is a CMOS
device and highly susceptible to damage from static electricity.
Do not handle or attempt to install this chip without first
grounding yourself.
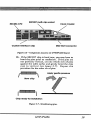
8a. Refer to Figure 5.6 for the 80C287 chip location.
18
GVP/PC286
80C286 CPU
80C287 math chip socket
Custom Interface chip
Clock Crystal
Mini-Slot Connector
Figure 5.6 - Component Locations on GVP/PC286 board.
8b. If the 80C287 chip is brand new, you may have to
bend the pins prior to installation. If the pins are
not perfectly vertical, rest one whole row of pins
against the table surface and gently bend the chip
case to vertical (see Figure 5.7).
procedure for the other row of pins.
Repeat the
Apply gentle pressure
New chip
Chip ready for installation
Figure 5.7- Straightening pins.
GVP/PC286
19
8c. Locate the 80C287 coprocessor pins into the socket
holes. Make sure the chip is correctly oriented. The
key notch on the chip should match that of Figure
5.8.
8d. Taking care that no pins are bent or misaligned,
press the chip firmly into the socket. It should seat
securely.
8e. Inspect the chip and socket arrangement for broken
or bent pins.
Orientation notch
Figure 5.8- 80C287 Chip Installed
Now the GVP/PC286 board is ready to install into your A500
HD.
9. If there is an adhesive anti-static mat applied to the
non-component side of the GVP/PC286 board,
peel this off.
10.
20
Match the socket on the lower edge of the
GVP/PC286 board with the pins of the A500 HD
Mini Expansion slot. There is only one way that this
can be done.
GVP/PC286
Figure 5.9- Locating the GVP/PC286 board onto
Mini Expansion slot.
11. Taking care to correctly align all the pins, push the
GVP/PC286 board straight down until firmly
seated.
The A500 HD and PC286 board assembly should now look
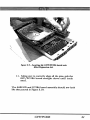
like that pictured in Figure 5.10.
GVP/PC286
21
Figure 5.10 - Correctly installed GVP/PC286 board.
12. Reconnect the A500 HD cooling fan and Game
Switch leads and replace the cover. Be sure to check
the polarity of these connections. If the fan fails to
operate or the Game Switch works in reverse, the
polarity of the connectors is wrong.
13. Secure the cover onto the A500 HD using the
screws removed earlier.
14. Align the A500 HD edge connector with the
expansion bus of the Amiga 500.
22
GVP/PC286
Figure 5.11 -Align A500HD bus connector
with Amiga expansion port.
15. Taking care to properly mate the connectors, slide
the A500 HD expansion module into the Amiga's
chassis expansion bus. There should be a snug,
positive fit.
16. Reconnect any removed power and peripheral
cables. Apply power and boot the Amiga using your
normal system disk. If you experience any unusual
symptoms, switch off the power immediately and
recheck all your work.
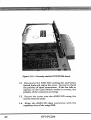
GVP/PC286
23
Figure 5.12- Correafy installed A500 HD subsysUm.
24
GVP/PC286
Installation Test
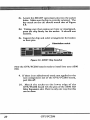
1. Insert a copy of the GVP/PC286 distribution disk into
DFO: and power up the machine.
2. You will be presented with a series of messages and then a
Workbench screen will open.
3. Open the GVP_PC286 drawer and double-click the
PC286 icon. There will be a brief pause and then the
machine will reset itself. This is expected.
4.
The Amiga will then ask you to insert an MS/DOS
System disk into DFO:
5. When you see the request for MS/DOS, you have just
demonstrated that the GVP/PC286 board works. You
may now proceed to load a DOS disk as prompted, or to
reset your computer and proceed with the next chapter,
Software Installation.
Note: When you reset AmigaDOS (Ctrl + Left Amiga + Right Amiga), the
PC286 (if active) will remain active during the reboot.
It will be reset
along with AmigaDOS. but you do not have to reload the PC286 program.
Under PC286 emulation. MS/DOS can be reset using the standard Ctrl + Alt
+ Del key combination. PC286 emulation can be removed from the sytem
by pressing Left Amiga + Right Amiga + Q.
Neither of these reset
operations will affect a simultaneously running AmigaDOS session.
GVP/PC286
25
Hardware Troubleshooting
If the machine fails to boot, investigate the following possible
causes:
• Either the Amiga 500 or A500 HD is not connected to its
power supply.
• The monitor is not connected or turned on.
• The A500 HD is not correctly seated into the Amiga's
expansion bay.
• The installation was not successful. Examine the Mini
Expansion slot and the GVP/PC286 board for broken
or bent pins or other signs of damage.
26
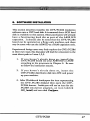
GVP/PC286
6. SOFTWARE INSTALLATION
This section describes installing the GVP/PC286 emulation
software onto a GVP hard disk. It is assumed that a SCSI hard
disk is available to this system. Most purchasers will already
have a functioning hard disk as part of the A500 HD
expansion. It should also be noted that the GVP/PC286
board can be operated on a floppy-only machine, and there
may be some who use the A500 HD as a BAM expansion only.
Experienced Amiga users may freely explore the GVP/PC286
in their own ways; this discussion will lead the newcomer in the
most direct path to Lotus 1,2,3.
1.
If you haven't already done so, install the
GVP/PC286 board into your A500 HD or A530
according to the procedures in Chapter 5. Be sure
to follow the instructions exactly.
2.
If you haven't already done so, insert the
GVP/PC286 distribution disk into DFO: and power
up your machine.
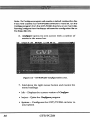
3. After Workbench loads, open the icon representing
the GVPJ?C286 disk and then open the GVP_
PC286 drawer. Inside, you will see an icon for the
PC286 emulation program, an icon labeled
and one called Configure.
GVP/PC286
27
/ m
vF
aEnBHeH
mm
M
51?BBSS in
.i - GVP/PC2^d //wJb contents.
4. To move the GVP/PC286 emulator software onto
your hard disk, double click on the HDJLnstall
Icon.
The following message will be displayed on your screen.
Figure 6.2 - HD_Install scrip.
28
GVP/PC286
Type EXECUTE HDJNSTALL (device) <RETURN>
where (device) is the designator for the hard drive partition where you
wish GVP/PC286 to reside. Remember to include the colon (:) after
the device name.
Example:
EXECUTE HDJNSTALL DH1: <RETURN>
This tells the program to install the files onto hard drive DH1:
The installation program will check to see if a drawer called PC286
exists on the specified device. If it does not, a drawer and drawer
icon will be created and the PC286 files copied into it.
The installation requires at least 450k of free disk space.
If you do not wish to proceed at this time, cancel the installation by
typing
ENDCU <RETURN>
PC286 purchasers who prefer to use the CLI should note that
the complete contents of the GVPJC286 drawer are copied
from the distribution disk to the destination drive. In
addition, the file rct.library must be copied from the libs:
directory of the distribution disk to your System libs: directory.
5. To prepare the GVP/PC286 emulator for operation,
double click on the Configure icon.
GVP/PC286
29
Note: The Configure program will create a default configuration file.
If you have copied your GVP/PC286 software to hard disk, run the
Configure program from the GVP_PC286 directory on your hard disk.
Running Configure from the floppy will save the configuration file on
the floppy disk only.
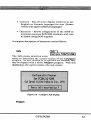
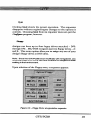
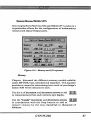
6.
Configure opens its own screen with a number of
entries in the menu bar.
Figure 6.3 - GVP/PC286 Configuration screen.
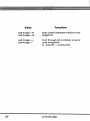
7. Hold down the right mouse button and examine the
menu headings:
• Info - Displays the current version of Configure
• Project - Quits the Configure program
• Options - Configures the GVP/PC286 emulator to
your system
30
GVP/PC286
•
Country - Sets all screen display elements to use
English or German languages for text (future
versions will support additional languages)
•
Operation - Allows configuration of the A500 to
maximize resources for PC286 emulation and even
to disable AmigaDOS altogether
A complete descriptions of these menu entries follows:
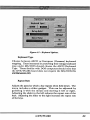
Info
MqI
The Info menu selection exists
Configure PC286/5121588]
solely to determine the current version of the Configure
program. As new versions of the software are released, they
may be shipped with a newer Configure program. With this
distribution, the current version is the only version.
Configuration Program
for PC286/512-A5B8
Great Valley Products Im, 1991
j
Press left House-button !
Figure 6.4 - Configure Info display.
Project
GVP/PC286
31
Project
Choose Qpit to exit the configure program. If
you modified any of the Options settings, a requester will
appear asking if you wish to save your new defaults to the
configuration file.
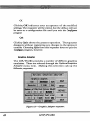
Options
Options
Keyboard
The options menu provides the
means by which you can
customize the PC286 emulation
Hard disk
Graphics adapter
H/H/R$23
to your liking. Settings made
here can always be modified at
some future date by simply
running the Configure program
again.
ops TEXT- 8
ops graphics
48 __
89x25
88x25
88x25
In addition, graphic
emulation modes can be changed while running under
MS/DOS by executing the various programs supplied with the
DOS Utilities disk. The Options settings include:
Keyboard
The Keyboard option presents a requester which controls how
the Amiga's keyboard is interpreted under MS/DOS.
32
GVP/PC286
I Option: Keyboard
Keyboard type:
I
I
mmt j
m 1
Figure 6.5- Keyboard Options.
Keyboard Type
Choose between ASCII or European (German) keyboard
mapping. Users interested in preserving their Amiga keyboard
map under MS/DOS should choose the ASCII Keyboard
Type. Those familiar with DOS computers should note that
the GVP/PC286 board does not require the MS/DOS file
KEYBOARD.SYS.
Repeat Rate
Adjusts the speed at which a key repeats when held down. The
menu includes a slider gadget. This can be adjusted by
grabbing it with the mouse and moving it left or right.
Adjusting the slider to the left reduces the repeat rate of the
keys. Adjusting the slider to the right increases the repeat rate
of the keys.
GVP/PC286
33
Delay Kate
Adjusts the length of time a key must be held before it begins
repeating. This option also includes a slider control. Adjusting
the slider to the left decreases the repeat delay, making the
keyboard less sensitive. Adjusting the slider to the right
increases the delay, making the keyboard more sensitive.
Help
Clicking the Help button opens a text screen describing the
various options available to this requester.
Reset
Clicking the Reset button undoes any modifications made
since the last saved Default.
Default
Clicking the Default button resets all Options selections to the
factory defaults. This choice overrides any previously saved
user defaults.
OK
Clicking OK indicates your acceptance of the modified
settings. The requester will be exited, but the defaults will not
be saved to a configuration file until you exit the Configure
program.
34
GVP/PC286
Quit
Clicking Quit aborts the present operation. The requester
disappears without registering any changes to the options it
controls. Choosing Quit from this requester does not quit the
Configure program, however.
Floppy
Amigas can have up to four floppy drives attached - DFO:
through DF3:. MS/DOS recognizes just two floppy drives - A:
and B:. This menu option allows you to assign any two of your
Amiga's floppy drives as DOS drives.
Note: Since the GVP/PC286 board muffltasks with AmigaDOS, any
drives identified as A: and B: will still be available to AmigaDOS when
working in that environment.
Upon selection of the Floppy menu, a requester appears:
Figure 6.6- Floppy Drive Interpretation requester.
GVP/PC286
35
The Floppy Option menu entry also allows you to specify 40
track (360k) or 80 track (720k) densities for floppy disk
operation. While the GVP/PC286 board is fully capable of
recognizing and addressing high-density (1.2 Megabyte 5.25" or
1.44 Megabyte 3.5") drives, these devices are currently not
available on the Amiga.
Auto Diskchange
The Amiga's multitasking nature requires it to closely monitor
every time a floppy disk is inserted or ejected. This prevents
one program from corrupting data that might be in use by
another simultaneously running program.
Users of DOS machines, on the other hand, are quite
accustomed to removing and inserting floppy disks at will. If
the Auto Diskchange button is set to ON, the Amiga will
continue to monitor floppy drive activity and check or validate
any disk, whether MS/DOS or AmigaDOS, as soon as it is
inserted. The drive light will come on for several seconds and
no activity will be permitted until the disk has been validated.
This can introduce annoying interruptions into a DOS work
session. Selecting Auto Diskchange OFF disables the
AmigaDOS disk checking while working in MS/DOS. In any
case, disks will always be inspected and validated as soon as you
switch back to AmigaDOS operation.
Help
Clicking the Help button opens a text screen describing the
various options available to this requester.
36
GVP/PC286
Reset
Clicking the Reset button undoes any modifications made
since the last saved Default.
Default
Clicking the Default button resets all Options selections to the
factory defaults. This choice overrides any previously saved
user defaults.
OK
Clicking OK indicates your acceptance of the modified
settings. The requester will be exited, but the defaults will not
be saved to a configuration file until you exit the Configure
program.
Quit
Clicking Quit aborts the present operation. The requester
disappears without registering any changes to the options it
controls. Choosing Quit from this requester does not quit the
Configure program, however.
GVP/PC286
37
Hard Disk
The GVP/PC286 board provides three methods for using hard
disk resources. These are described in Chapter 3. Configura
tion Options. The choices involve either dedicating a hard
drive partition to be formatted under MS/DOS or the creation
of a large (multi-Megabyte) AmigaDOS file on an existing
AmigaDOS partition for use under DOS emulation. Specific
case studies of these methods will be provided in Chapter 7.
Getting Started.
Whichever method is chosen, the device assignments are made
using the Options/Hard Disk menu selection. It is important to
note that both methods of hard drive storage can be used
simultaneously on a single GVP/PC286 Amiga system. Upon
selection, a requester appears:
Figure 6.7 - Hard Drive selection requester.
38
GVP/PC286
When assigning DOS partitions to an Amiga hard drive
partition (methods A and B as described in Chapter 3)^ simply
supply the appropriate drive identifier under the DOS partition
name (refer to Figure 6.6; DOS Q DOS D, or DOS E).
If you choose to employ the DOSfile method (method C as
described in Chapter 3), a little more calculation is required.
Initially, you will type the drive identifier and your choice of
filename in the appropriate slot.
In order for the Amiga to know how much dataspace to
reserve, we must specify a size, expressed in terms of logical
starting and ending cylinders on an imaginary DOS hard drive.
The Amiga may put the file anywhere it chooses, but the
cylinder values will persuade DOS that it is talking to a known
device.
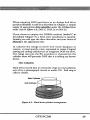
Drive Cylinders
Hard Drives record data in concentric rings on round platters;
sort of like a phonograph record or audio CD. Each ring is
called a cylinder.
Start Cylinder I
End Cylinder f
Figure 6.8- Hard drive cylinder arrangement.
GVP/PC286
39
For its purposes, the PC286 assumes a cylinder to contain
approximately 108kb. That's the product of 8 heads x 27
blocks per track x 512 bytes per block; a more or less typical
arrangement for hard drives on a DOS machine.
To create a DOSfile of a given size, divide 108,000 into the
total desired MS/DOS partition size. For instance, a 20
Megabyte partition, divided by 108kb per cylinder, yields 180
cylinders (we are willing in this case, to round figures down in
order to simplify our calculations).
Using this technique, a 60 Megabyte DOSfile on the Amiga
can be made to contain three 20 Megabyte MS/DOS
partitions. They would be specified as follows:
DH0:MYDOSFILE,0,180
DH0:MYDOSFILE,181,361
DH0:MYDOSFILE,362,543
How many partitions?
DOS versions 3.3 and later can directly employ up to 24 hard
drive partitions. Once mounted under AmigaDOS1, they may
be configured using the FDISK.COMDOS utility. Versions of
lm GVP's A500 HD and A530 SCSI controllers use Auto-mount technology.
In most cases, as soon as you power up your system, all hard drives, whether
AmigaDOS or MS/DOS formatted, will be mounted by the SCSI controller
and ready to use.
40
GVF/PC286
be configured using the FDISK.COM DOS utility. Versions of
MS/DOS earlier than 3.3 provided support for a maximum of
two hard drive partitions - C: and D:. If you are using such a
version of DOS, and would still like to use additional
partitions, the GVP/PC286 can assign them using this
requester.
In addition to selecting hard disk partition assignments, this
menu option allows you to specify whether to boot into MS/
DOS from the C: hard drive partition or from floppy. If you
select Floppy, The GVP/PC286 emulator will always prompt
you for a MS/DOS system floppy regardless of the number or
configuration of hard drives attached.
Help
Clicking the Help button opens a text screen describing the
various options available to this requester.
Reset
Clicking the Reset button undoes any modifications made
since the last saved Default.
Default
Clicking the Default button resets all Options selections to the
factory defaults. This choice overrides any previously saved
user defaults.
GVP/PC286
41
OK
Clicking OK indicates your acceptance of the modified
settings. The requester will be exited, but the defaults will not
be saved to a configuration file until you exit the Configure
program.
Quit
Clicking Quit aborts the present operation. The requester
disappears without registering any changes to the options it
controls. Choosing Quit from this requester does not quit the
Configure program, however.
Graphics Adapter
The GVP/PC286 provides a number of different graphics
emulations. These are selected through the Options/Graphics
Adapter menu item.
Making this selection calls up the
following requester:
{Option: Graphics
Graphics
of CGA-Text Colors 88x25:
U i * 1 a 1
flemle* t*KMr«it$i Uni site,
Figure 6.9- Graphics Adapter requester.
42
GVP/PC286
Graphics Adapter
The GVP/PC286 supports the following PC graphic display
emulations:
CGA text and graphics
Olivetti text and graphics
Hercules text and graphics
Toshiba T3100 text and graphics
EGA-monochrome graphics
VGA-monochrome graphics
Click the button for the display adapter you wish to emulate.
Number of CGA text colors
Each mode has a different number of colors available; 16, 8, 4,
or monochrome. In monochrome, two colors (black and
white, usually) are used and the screen is dithered to
approximate shades of gray.
It is important to note that your system's performance will be
greatly affected by the number of colors you choose. Since the
PC286 must share its memory and display resources with an
otherwise ftdly functioning Amiga 500, both sysbystems will be
significantly slowed. The more colors you ask for, the more
resources the PC286 must borrow from the Amiga.
Click the button that corresponds with the number of colors
you wish to use. Clicking Auto will automatically choose the
maximum number of colors the chosen emulation will support.
GVP/PC286
43
Graphics emulation modes can also be changed while running
under MS/DOS. The following utilities are provided on the
DOS Utilities disk for this purpose:
• CGA.EXE
• V400.EXE
• MDA.EXE
• EGA.EXE
• VGA.EXE
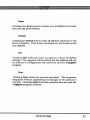
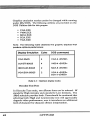
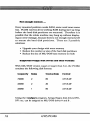
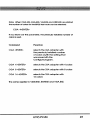
Note: The following table describes the graphic displays that
produce optimum performance:
Display Emulation
Colors
DOS command
CGA 80x25
4
CGA4<ENTER>
OLIVETTI 80X25
4
V4004<ENTER>
HERCULES 80X25
2
MDA 8 <ENTER>
VGA/EGA 80X25
2
VGA4<ENTER>
EGA 4 <ENTER>
Table 6.1- Optimum display modes.
Hercules Text Font
In Hercules Text mode, two different fonts can be selected. H
stands for High intensity and L stands for Low Intensity. The
H&L selection provides both. Users should be cautioned that
selecting both High and Low intensity text will appreciably
degrade video performance, since it introduces an additional
level of character-by-character software interpretation.
44
GVP/PC286
Font Size
Two font sizes are supported. 8x16 and 8x8. Choose a text
font size that matches the display resolution selected above (40
columns vs. 80 columns). Click on the button that corresponds
with the chosen size.
Screen
Choosing Inverse will provide inverted text rendering modes
(white text on a black field becomes black text on a whitefield).
Choosing Blinking enables blinking text rendering mode
(charactersflash on and off).
As with High and Low intensity modes, choosing either
Inverse or Blinking characters will add interpretation overhead
to the display, slowing performance. Choosing both will
compound the performance degradation.
Help
Clicking the Help button opens a text screen describing the
various options available to this requester.
Reset
Clicking the Reset button undoes any modifications made
since the last saved Default.
Default
Clicking the Default button resets all Options selections to the
factory defaults. This choice overrides any previously saved
user defaults.
GVP/PC286
45
OK
Clicking OK indicates your acceptance of the modified
settings. The requester will be exited, but the defaults will not
be saved to a configuration file until you exit the Configure
program.
Quit
Clicking Quit aborts the present operation. The requester
disappears without registering any changes to the options it
controls. Choosing Quit from this requester does not quit the
Configure program, however.
46
GVP/PC286
Memory/Mouse/RS232/LPTl
Selecting Options/Memory/Mouse/RS232/LPTl produces a
requester that allows for the configuration of both memory
resources and Input/Output ports.
0Ption:He«ory/tlouse/RS232/lPT1
M timi
step;.
HOP
n
9
Extended: 3684 (KB m< > »i.
Expanded: #
J KB
KESET
BETAULT
Mouse;
JftKEHMj
COM2
f
RS232:
««f
OFT"
|
mi:
orr 1 mgj S278|
-
OK
QUIT
Figure 6.10 - Memory and I/O requester.
Memory
Chapter 3 discussed the different memory models available
under MS/DOS; base, extended and expanded. This requester
provides the means for determining how much of your Amiga's
system RAM will be allocated to each.
Use the set of increment and decrement arrows to add
{ }
or remove memory from each memory type display.
——-*
Use the "chunky" increment and decrement arrows,
f§|f|||
in coordination with the Step button to add or
remove memory by the tens, hundreds or thousands of
kilobytes.
GVP/PC286
47
Mouse and Serial
The Amiga has only one serial port and a separate port for
mouse input. On a PC, there are usually two assignable serial
devices, COM1 and COM2. The Amiga's mouse is
recognized by the GVP/PC286 as a Microsoft Serial mouse.
It can be assigned to either COM1 or COM2.
Whichever serial port is not assigned to the mouse will be
mapped onto the Amiga's serial port. It is also possible to
switch off the RS232 (serial) port under MS/DOS (if, for
instance, the Amiga is already using its serial port to run a BBS
or laser printer).
Users should be aware that PC286 will take over the serial port
if RS232 is selected in this requester. Access from the Amiga
will be blocked.
Parallel
The Amiga's parallel port can be assigned as LPTl to either
DOS port address $278 or $378. It can also be disabled.Users
should be aware that PC286 will take over the parallel port if
LPTl is assigned in this requester. Access from the Amiga will
be blocked.
Help
Clicking the Help button opens a text screen describing the
various options available to this requester.
Reset
Clicking the Reset button undoes any modifications made
since the last saved Default.
48
GVP/PC286
Default
Clicking the Default button resets all Options selections to the
factory defaults. This choice overrides any previously saved
user defaults.
OK
Clicking OK indicates your acceptance of the modified
settings. The requester will be exited, but the defaults will not
be saved to a configuration file until you exit the Configure
program.
Quit
Clicking Quit aborts the present operation. The requester
disappears without registering any changes to the options it
controls. Choosing Quit from this requester does not quit the
Configure program, however.
Display Colors
Each display emulation has a 2, 4, 8 or 16 color palette
associated with it. These palettes can be adjusted and saved so
that any change in display mode will also load the default
palette for that mode.
Select each configuration separately from the Options menu:
GVP/PC286
49
Colors TEXT-16 40x25
CGA, Olivetti and T3100 display emulations can display on a
40 column by 25 line character-based screen using 16 colors.
This mode, if chosen, can be expected to produce moderate
performance degradation The colors for this resolution are
adjusted by sliding the Red (R), Green (G), and Blue (B)
sliders.
Figure 6.11 - CGA 40x25,16 color palette adjustment.
50
GVP/PC286
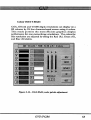
Colors TEXT-16 80x25
CGA, Olivetti and T3100 display emulations can display on a
80 column by 25 line character-based screen using 16 colors.
This mode, if chosen, can be expected to produce severe
performance degradation. The colors for this resolution are
adjusted by sliding the Red (R), Green (G), and Blue (B)
sliders.
Figure 6.12 - CGA 80x25,16 color palette adjustment.
GVP/PC286
51
Colors TEXT-8 80x25
CGA, Olivetti and T3100 display emulations can display on a
80 column by 25 line character-based screen using 8 colors.
This mode, if chosen, can be expected to produce moderate
performance degradation. The colors for this resolution are
adjusted by sliding the Red (R), Green (G), and Blue (B)
sliders.
- ttlutti -13188 - tat« X to - 8 Colors
Figure 6.13 - CGA 80x25, 8 color palette adjustment.
52
GVP/PC286
Colors TEXT-4 80x25
CGA, Olivetti and T3100 display emulations can display on a
80 column by 25 line character-based screen using 4 colors.
This mode permits the most efficient graphics display
performance for non-monochrome emulations. The colors for
this resolution are adjusted by sliding the Red (R), Green (G),
and Blue (B) sliders.
CGA - Olivetti - 13188 fexl 88 x 25 - 4
t* 4* }*
Figure 6.14 - CGA 80x25,4 color paktte adjustment.
GVP/PC286
53
Color graphics
This palette allows you to set the colors for CGA Lowresolution palettes 1 & 2 (3 colors). It also determines the
foreground and background colors for Hercules-graphics,
EGA-monochrome and VGA-monochrome emulations and
the High-resolution (2 color) modes for CGA, Olivetti, and
T3100.
Note: Both Olivetti and T3100 emulations support a 640x400 high-
resolution graphics display using 2 colors.
Users of monochrome should beware of assigning the same
colors to both foreground and background palette entries.
This will result in an invisible display.
Colors GRAPHICS: CGA/Hercu1es/T3188/01ivetti
CGA-Mes Palette l:
«- B-
CGA-LoRes Palette 2:
JEFAULI
EGA, VGA, CW HiRes.HeKulK Graphic,
I31BI/Olivetti
*♦
fif !♦
Pit
Figure 6.15 - Colorgraphics palette adjustment.
54
GVP/PC286
Country
Most of the GVP/PC286 program display elements draw on
text-file resources that can be "localized," or rendered in
different languages. The current version of PC286 supports
both English and German language displays, help screens, etc.
Future versions will extend this flexibility to include many
other languages.
Operation
The Operation menu provides control over how much of your
Amiga the GVP/PC286 "gets." These selections disable the
AmigaDOS functions to varying degrees.
Stop Amiga Boot
Normally, PC286 boots into MS/DOS as soon as it is enabled.
While this is happening, the Amiga also continues to boot into
AmigaDOS (usually in a, screen hidden behind the DOS screen).
When you select Stop Amiga Boot, the Amiga's normal
s:startup-scquence script file is terminated. The Amiga will
come up, but it will remain in an elementary stage.
Workbench will not be loaded and memory will not be
allocated for disk buffers and resident control structures.
The principal reason for using this menu option is to maximize
the amount of memory and system resources available to the
PC286 emulation.
GVP/PC286
55
PC 286 only
An even more extreme way to improve DOS performance is to
select PC 286 only. This menu selection actually prevents the
Amiga from booting at all. The GVP/PC286 gets all of the
system's resources and does not have to contend with display
or I/O operations happening in AmigaDOS at all.
Exiting Configure
When ready, select Project/Quit from the Configure menu bar
or click the close box in the main window. If no changes have
been made, the program will exit peacefully to the Workbench
screen.
If even one configuration option has been modified, you will
be presented with a requester asking if you want to save the
new settings into your configuration file. Indicating Tes will
cause the file to be written. If you choose not to save the file,
click No and the program will exit cleanly.
56
GVP/PC286
7. Getting Started
Hani Drive Case Studies
Rickie has an Amiga 500 equipped with an A500 HD and has
just installed the GVP/PC286 board into his system. He has
an 80 Megabyte hard drive and four Megabytes of memory.
Karen has a similar setup, but she has two external hard drives;
one of them a Ricoh removable cartridge drive. Tom has
recently upgraded his A500 with an 8 Megabyte A530 combo
system and the PC286. He has one large, 450 Megabyte drive
in addition to his 40 Megabyte internal drive.
Each of our case studies has different needs and different
resources. By studying how they set up and run their systems,
we should gain some appreciation of the flexibility of the
GVP/PC286 system. We should also, it is hoped, understand
enough to construct our own optimum A500/PC286 system.
Rickie
After performing the hardware installation test and
determining that his system works, Rickie resets his machine
and lets it boot into AmigaDOS. Taking the time to be
careful, Rickie completely backs up the contents of his hard
drive.
GVP/PC286
57
Rickie's hard drive is about one-third full. He doesn't have
many DOS programs that he needs to run, but he has inherited
a mailing list database containing about 20 Megabytes of
model airplane hobbyists' addresses and telephone numbers.
Rickie concludes that he can devote 30 megabytes of his hard
drive to a DOS partition.
That leaves approximately 25
Megabytes for future growth.
Upon completion of his backup, Rickie restarts FaaastPrep and
subdivides his single partition hard drive into one 50 Megabyte
partition for AmigaDOS (DHO:) and one 30 Megabyte
partition for MS/DOS (DH1:). He proceeds to format the
AmigaDOS side and then restore his data to the DHO:
partition.
With his newly constituted system back in operation, Rickie
opens the GVP_PC286 drawer on his AmigaDOS partition
and starts the Configure program.
Since his mailing list application will work perfectly well in a 4-
color screen, Rickie selects the CGA 80x25 Text mode in 4
colors.
As for memory, Rickie decides to allocate two
megabytes to Expanded Memory. He makes a note to himself
to remember to install EMM.SYS on his DOS drive and to add
it to his CONFIG.SYS file, as well.
Rickie calls up the Options/Hard Drive requester. Under DOS
C, he enters DHL Until the hard drive is formatted and has
DOS installed, Rickie must leave PC286 configured to boot
from floppy. Later, he will change this to make his machine
hard disk bootable.
58
GVP/PC286
The rest of the default settings look pretty good to Rickie;
mouse, LPT, etc. He selects Project/Quit and indicates for the
settings to be saved into his Configuration file.
When he starts up the PC286 program, Rickie is prompted for
a DOS system disk. He inserts a version of MS/DOS and
proceeds to install it according to the instructions in his DOS
manual.
The first thing he must do is to prepare the MS/DOS partition
C:. He uses the DOS program FDISK.COMto prepare the
partition and, upon returning to DOS, issues the following
command:
FORMAT
C: /$
<ENTER>
The parameter /s tells the DOS floppy to copy its system files
to the new partition, making it bootable.
When complete, Rickie types:
COPY
V
C:
<ENTER>
This copies all the files on the DOS floppy to the hard disk
partition. He then performs the same operation to copy all the
files from his GVP/PC286 DOS Utilities disk to the hard drive
as well.
Finally, Rickie uses the DOS command EDLIN to edit his
DOS startup script CONFIG.SYS. He adds the command for
EMM.SYS that will enable his Expanded memory.
GVP/PC286
59
When finished, Rickie switches off his machine. After a minute
or so, he powers up and returns to the Configure program.
After modifying his configuration file to boot from hard drive,
he is all set to try out the new 286 subsystem.
Rickie double clicks the PC286 program icon.
In a few
seconds, his system resets and, when it comes back up, the PC
emulator begins to boot directly off the C: partition.
Karen
Karen's roommate is an exchange student from Frankfurt,
Germany. They are both studying medicine at college and
must share the same computer for all their schoolwork. It is
Karen's intention to prepare separate Ricoh cartridges for
herself and her roommate.
Like Rickie, Karen backs up her entire system before installing
the GVP/PC286. She uses FaaastPrep to prepare and mount
each of her Ricoh cartridges (RHO: and RH1:). Then, she
prepares a 10 Megabyte partition on her other, fixed, hard
drive. This will become the DOS machine's boot disk. The
Ricoh cartridges will then become data storage devices for
herself and her roommate. When that is done, she installs the
board and software onto her AmigaDOS boot drive.
60
GVP/PC286
Following a similar procedure to that described above, Karen
chooses graphics modes, memory configuration and I/O
preferences. Under Hard Drives, Karen enters DH1
as the
DOS boot drive C:. For herself, she assigns RHO to DOS D:
and, for her roommate, RH1 as DOS E:.
She must use FDISK.COMto prepare each partition and then
format each one using the DOS command FORMAT. When
finished, she is able to copy all the DOS system files to DH1:
and make it the bootable drive in her configuration file.
Once the system is operational, Karen's roommate creates her
own configuration file that specifies a German keyboard and
German language text prompts.
Tom
Tom is a maker of multimedia software. He needs DOS
compatibility to move picture and sound files from one
platform to the other. Since he deals with huge amounts of
data, he chooses to use the DOSfile method for his partitions.
This choice is motivated by the fact that backing up a 450
Megabyte hard drive can take a very long time. If he uses the
DOSfile method, he can take advantage of GVP's Tapcstorc
tape backup system to do periodic disk image backups (its most
efficient mode).
GVP/PC286
61
After backing up his existing data, Tom uses Configure to
create a 200 Megabyte DOSfile on his main drive. He also
creates a much smaller DOSfile on his internal hard disk to act
as a boot partition.
His entries in the Options/Hard Disk requester look like this:
DOSC
DH0:BootFlle,0,75
DOSD
DH0:BootFile,76,2076
Note: Recall that only one DOSFIIe may be used, but that It may
contain as many as 24 separate DOS partitions. The first cylinder must
always be 0.
Because Tom is running an A530 accelerator, he can expect to
experience much less of the system performance degradation
that using DOSfiles forces on standard A500 systems. For this
same reason, his is also able to run Windows 3.0 in 16 color
mode with only modest slowdowns.
Go Pc286!
These examples are presented purely to illustrate the range of
configuration possibilities available to users of GVP/PC286.
Your own choices should be motivated by the kinds of work
you need to do and the resources at your disposal.
When your system is configured to your liking, double click on
the PC286 icon to launch the PC emulator.
62
GVP/PC286
Compatibility Notes
DOS 3.3 and Extended Partitions
Versions of MS.DOS older than 3.3 were able to mount and
use only two hard disk partitions - C: and D:. PC286 allows
you to use additional hard drive partitions through its
Configure program.
Users of DOS 3.3 or later, however, may choose to use that
operating system's support of Extended Partitions, instead. In
this case, only C: and D: need be assigned under Configure.
The other partitions, however many there may be, can be
added using FDISK.COM under MS/DOS.
GVP/PC286
63
64
GVP/PC286
8. DOS Operation
DOS Version Compatibility
The GVP/PC286 emulator will work with versions of
MS/DOS 3.2 or later. Earlier versions will work, but they do
not support 80 track floppy disks, which creates a problem
when used with the Amiga drives. Unless the user has a 5.25"
floppy drive, a 3.5" MS/DOS system disk (720k format) is
required.
Configuration
The GVP/PC286 leaves the factory with the following default
configuration file. Users will want to run the Configure
program to alter these defaults.
• Amiga DFO: = DOS drive A:
• AmigaDOS disk-change recognition OFF
• No hard disk assignments
• Hercules Text emulation
- 2 colors
- 8x8 font
• 640k base memory
• Ok Extended memory
• Ok Expanded memory
• Amiga mouse = COM1
(a Microsoft compatible mouse driver must be supplied)
• RS232 serial port = COM2
• Parallel port = LPT1
GVP/PC286
65
Disk Changes under MS/DOS
The Amiga's multitasking nature requires it to closely monitor
every time a floppy disk is inserted or ejected. This prevents
one program from corrupting data that might be in use by
another simultaneously running program.
Users of DOS machines, on the other hand, are quite
accustomed to removing and inserting floppy disks at will. If
the Auto Diskchange button is set to ON, the Amiga will
continue to monitor floppy drive activity and check or validate
any disk, whether MS/DOS or AmigaDOS, as soon as it is
inserted. The drive light will come on for several seconds and
no activity will be permitted until the disk has been validated.
This can introduce annoying interruptions into a DOS work
session.
Selecting Auto Diskchange OFF disables the
AmigaDOS disk checking while working in MS/DOS. In any
case, disks will always be inspected and validated as soon as you
switch back to AmigaDOS operation.
When running under MS/DOS, you can enable or disable the
Auto-Diskchange detection by holding down the left Amiga
key and typing the Keypad "I" key.
Memory Test
Whenever a DOS machine starts up, it runs through a self-test
diagnostic. Normally, this test checks all of your memory chips
before proceeding. If you have a lot of memory assigned to
Extended or Expanded RAM, you may wish to bypass this part
of the self-test.
66
GVP/PC286
Pressing the Escape (ESC) key immediately after booting into
DOS will skip past the memory test.
MS/DOS System Reset
The GVP/PC286 can be reset just as any PC or AT system:
simultaneously press the Control (Ctrl), Alternate (Alp) and
Delete (Del) keys. Resetting MS/DOS will not reset the
Amiga.
Moving between AmigaDOS and MS/DOS
As with most other AmigaDOS applications, the PC286
emulator runs as a separate process under AmigaDOS and
maintains its own screen. Unless you tell it otherwise,
AmigaDOS will continue to run in its own screen behind the
DOS screen.
You can swap screens using the Left Amiga key in combination
with either the *m*ox 'ir^keys. It is possible to be viewing
one screen while your input devices (keyboard and mouse) are
active in the other. Clicking the left mouse button while
viewing a particular screen will activate the input devices for
that screen.
PC286 Emulation software
When you run the HD_Install utility on the GVP/PC286
distribution disk, all the necessary files will be copied together
into your chosen destination directory. These include the
program binary and the various support files (such as
configuration settings, multi-language overlays, etc.).
GVP/PC286
67
Any time you decide to move these files around, it is important
to keep them all together in the same directory. Similarly, if
you receive an update disk from GVP, be sure to replace the
old file with new ones.
Users should note that they may have to recreate their
configuration settings after copying update files to their system.
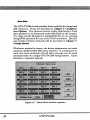
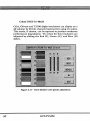
Running PC286
When PC286 is started, the emulation software automatically
detects the memory configuration specified in the
configuration file and initializes itself accordingly. Shortly after
reset, the following display appears:
6VP/PC286/512k Enulator for the Rniga
CPU-B8286
HPU-B8287
FRST-RHH
B8SE MEMORY
EXT. MEMORY
EXP. MEMORY
16 MHz
com
COM2
installed
M6KB
1024KB
LPTI
(c) 19)1 Great Valley Products
BIOS Version:2.88
NS House
RS232
HEHHODE
:NTSC/H8-22
Centronics Enulator
:6VP/PC28i
VIDEO : VGA Mono
(c) Copyright 1991
6reat Valley Products
Figure 8.1- PC286 DOS boot screen.
The various entries in this display can be interpreted as follows:
68
GVP/PC286
• CPU80286 - 16 MHz standard for GVP/PC286.
• NPU 80287 - reads Installed only if one is present.
• FAST RAM - displays the amount of RAM on the
PC286 board
•
Base Memory - 640kb Maximum standard value.
This can be reduced using the Configure program.
•
Ext. Memory -
Assigned Extended memory.
Determined by the settings in Configuration file
•
Exp. Memory - Assigned Expanded memory.
Determined by the settings in Configuration file.
•
COM1 - Displays the current assignment of COM1
(This defaults to Microsoft serial mouse)
• COM2 - Displays the current assignment of COM2.
(This defaults to RS232)
• LPT1- Displays the current assignment of the Parallel
port
•
Video - Displays the assigned video emulation as
contained in the Configuration file.
•
BIOS Version - Current version number of the
emulator BIOS
GVP/PC286
69
•
MEMMODE - Current video display arrangement
(PALorNTSC)
• Emulator - Displays current setting of Mode menu in
Configuration file.
Using PC286 with Memory Expansions
It is important for all memory expansion products used in
conjunction with PC286 to be fully reliable. GVP's FaaastPrep disk comes with a utility called MemTest. This should be
run before attempting to use PC286 in DOS emulation.
In addition to the standard 640 kilobyte base memory,
GVP/PC286 can use up to 6 Megabytes of Extended or
Expanded memory. This is much more than a typical DOS
machine can support without expensive add-in cards. All RAM
available to an Amiga should be transparently useable by
PC286.
PC286 and Windows 3.0
Windows 3.0 is a new graphical user interface for PC systems
that allow them to work similarly to a real Amiga. Unlike
earlier versions of Windows, 3.0 is able to run the 80286
processor in Protected mode (Windows Standard Mode).
Protected mode for an 80286 chip allows it to directly address
up to 16 Megabytes of RAM. This greatly increases its utility
for complex operations like graphics manipulation.
In an Amiga that has 5 Megabytes of total RAM installed, for
example, up to 4 Megabytes of that memory is available for use
70
GVP/PC286
by Windows 3.0 running in Standard mode. This memory is
not used merely as data storage (the normal function of
Extended memory)^ but as real, application space where
programs can be loaded and run.
To use Windows 3.0 in Standard Mode on the PC286, you
will need the following:
• An Amiga with more than 1 Megabyte of BAM.
• At least 10 Megabytes of free hard disk space
Use Configure to assign some or all of your additional memory
to Extended memory. Save this setting and start PC286
emulation.
Install Windows 3.0 on your system. It's installation and set
up program will automatically insert the necessary drivers into
your CONFIG.SYS file.
Note; Any lime you change your system configuration, be sure to
include the Windows HIMEM.SYS driver.
Users of Windows 3.0 will probably want to select VGAMonochrome (640x480) emulation when building their
Configuration file. Otherwise, before starting Windows, be
sure to run the utility program VGA.EXE, included on the
GVP/PC286 Dos Utilities disk.
Once these preparations are made, you can configure and run
Windows 3.0 just as its own documentation describes.
GVP/PC286
71
Notes on Windows 3.0 and Display modes
Certain programs cannot run together with Windows 3.0 in
Standard Mode. (e.g. EXCEL 2.01 or WORD 5.0). To use
these programs with the Extended memory, program updates
from Microsoft are required. They are normally reasonably
priced (after sending in the original disks). Otherwise, these
products can be used with Windows in Real mode.
If you operate an NTSC Amiga 500 (USA standard), we
recommend choosing "Olivetti AT&T PVC-display"
(640*400) instead of the "VGA-monochrome" display. The
reason is that on an NTSC Amiga, the VGA-monochrome
screen with its 640*480 resolution does not fit completely into
your Amiga-screen (you normally have to scroll it up and down
with special key combinations described below). If you choose to
use the Olivetti emulation, substitute "V400" for "VGA" in
the above Windows Installation procedure.
Using a RAM-Disk with RAMDRIVE.SYS
To install a RAM-Disk using RAMDRWE.SYS the following
command must be entered into the CONFIG.SYS file (using a
text editor like EDLIN):
DEVICE=RAMDRIVE.SYS 1234 /e
72
GVP/PC286
The Microsoft RAM-Disk driver must be copied from the
MS/DOS system disk onto the hard disk C:. The parameter,
1234, above, is your choice for the size of the RAM-Disk (e,g.
3072 for 3MB). Any RAM specified, must, of course, be
present in the system.
Note: The RAM-Disk loses its contents as soon as the computer is either
switched off or it is reset using the CTRL/ALT/DEL keys!
Expanded Memory
To install Expanded memory the file EMM.STS, found on the
PC286 DOS Utilities Disk, can be used. The following
command must be entered into the CONFIG.SYS file.
DEVICE=EMM.SYS
Also the EMM.SYS driver must be copied from the DOS-
Utility Disk onto the hard disk partition C. After MS/DOS is
booted the Expanded memory is installed according to the
settings used in the Configure program. (EMM.STS does not
support the LIM 4.0 Standard. Ifyou need Expanded memory
according to LIM 4.0you need an LIM4.0-emulator such as
Turbo-EMS ofMerrill & Bryan).
GVP/PC286
73
Not enough memory ...
Every mounted partition needs RAM, some need more some
less. PC286 reserves all its working RAM during start-up long
before the hard disk partitions are mounted. Therefore it is
possible that the whole machine may hang up without display
ing an error-message, because there is not enough memory left
to mount the hard disk partitions. There are 3 possible
solutions:
• Upgrade your Amiga with more memory
• Reduce the number or size of the hard disk partitions
• Reduce the size of MS/DOS base memory to 512k
Supported Floppy Disk Drives and their Formats
With MS/DOS version equal or larger than 3.2, the PC286
emulates the following disk formats:
Capacity
Sides
Tracks/Side
Format
720KB
2
80
3.575.25-
360KB
2
40
3.5"/5.25"
360KB
1
80
3.575.25"
Using the Configure program, Amiga floppy disk drives DFO:,
DF1: etc. can be assigned to MS/DOS drives A and B .
74
GVP/PC286
When the PC286 is loaded, the standard floppy format setting
is 3.5" with 720kb. If you have selected an external 360kb
floppy drive (a 40 track unit) as floppy drive B, you must be
sure to use the DBJVPARM command to ensure that the disk
will be correctly formatted to 360kb.
Note: The Amiga 500 does not allow the operation of MS/DOS high
density disks (5.2571.2Mb or 3.571.44Mb). In spite of this restriction,
the PC286 emulator BIOS already contains all relevant functions to
handle high density disks.
As soon as a usable HD-floppy-kit is
available, we will support it with an upgrade.
Amiga mouse/Microsoft Mouse
To install the Amiga mouse as a Microsoft compatible mouse
the driver MOUSE.SYS or a compatible driver must be
supplied. The following command must be entered into the
CONFIG.SYS file:
DEVICE=MOUSE.SYS
Many programs (eg. WORD 5.5) require their own mouse
drivers. Such drivers are delivered with the program. In some
cases, the mouse driver is already integrated in the main
program (e.g. Windows 3.0). PC286 interprets the original
Amiga Mouse as a serial Microsoft Mouse on either COMl or
COM2. All Mouse drivers that use a Microsoft serial mouse
are automatically compatible.
GVP/PC286
75
The Realtime Clock
If there is an Amiga compatible realtime clock available, it is
interpreted by PC286 as an AT realtime clock under
MS/DOS. The time and date can be set using the Workbench
Preferences program (see your Amiga user manual).
File-transfers
To copy files from an AmigaDOS partition to a MS/DOS
partition and vice versa, the DOS Utility Disk contains the two
small programs P2A.EXEznd A2P.EXE:
•
P2A.EXE - PC TO AMIGA, copies a file from a
MS/DOS partition into an AmigaDOS partition
• A2P.EXE - AMIGA TO PC, copies a file from an
AmigaDOS partition into a MS/DOS partition.
Both utilities are used under MS/DOS with the following
format:
OP2A PCNAME AMIGANAME<ENTER>
C>A2P AMIGANAME PCNAME<ENTER>
The PCNAME is the name of the MS/DOS file.
The AMIGANAME is the name of the AmigaDOS file.
76
GVP/PC286
PCNAME: DRIVEASUBDIRl\...\SUBDIRn\FILENAME
AMIGANAME: DEVICE:PATHl/.../PATHn/FILENAME
Examples:
PCNAMES:
C:\TEST\BIG.TXT
A:FUN.ASC
AMIGANAME: DH0:ASCFILES/PC286/TRANSF.TXT
For the "PCNAME," DRIVE and SUBDIRs can be omitted if
the file that should be transferred is located in the same
directory as P2A or A2P. For the "AMIGANAME," the
complete path must always be used. Wildcards are not
supported. When the transfer is in progress each 64kb of data
transferred will be represented by a dot (.) on the display
screen.
GVP/PC286
77
78
GVP/PC286
Appendix A. Keyboard Equivalents
PC286 emulates an 84-key IBM-AT keyboard. The numeric
keypad on the Amiga keyboard is available in the same
definition as when used in AmigaDOS. The following special
key combinations are available during the operation of the
PC286:
Note: on older A500 keyboards the left Amiga-key may carry the
Commodore-logo Instead of the Amiga-logo.
Keys
Left Amiga +
Function
Invert screen (White text on black
Keypad 0
screen changes to black on white)
Left Amiga +
Scroll Hercules graphic screen Left or
Keypad 1
Left Amiga +
Scroll VGA graphic screen up (NTSC)
Disk-change recognition under DOS
Keypad 2
enabled/disabled
left Amiga +
Scroll Hercules graphic screen Right
Keypad 3
Left Amiga +
Right Amiga+ S
Left Amiga +
or VGA graphic screen Down (NTSC)
Hardware Reset of GVP/PC286
Quit PC286 and clear program from
Right Amiga+ Q
memory. Restore AmigaDOS.
Ctrl + Alt + Del
Software Reset of MS/DOS
GVP/PC286
79
Function
Keys
Left Amiga + N
Swap screens between MS/DOS and
Left Amiga + M
AmIgaDOS
Left Amiga + +
Scroll through all available screens
Left Amiga + -
under AmIgaDOS
(+ = forward; - = backward)
80
GVP/PC286
APPENDIX B. VIDEO REFERENCE
The programs CGA, MDA, V400, EGA, VGA
and INVERS
PC286 supports the following video-emulations:
Mode
Type
Colors
Format
CGA-Mode 0
TEXT
16u;
40*25 characters
CGA-Mode 1
TEXT
16(1)
40*25 characters
CGA-Mode 2
TEXT
80*25 characters
CGA-Mode 3
TEXT
i/(i)
CGA-Mode 4
GRAPHICS
4
CGA-Mode 5
GRAPHICS
4
320*200 pixel
CGA-Mode 6
GRAPHICS
2
640*200 pixel
MDA
TEXT
2
80*25 characters
Hercules
GRAPHICS
2
720*348G) pixel
Toshiba 3100
GRAPHICS
2
640*400 pixel
Olivetti
GRAPHICS
2
640*400 pixel
EGA-mono
GRAPHICS
2
640*350 pixel
VGA-mono
GRAPHICS
2
640*480(3)pixel
80*25 characters
320*200 pixel
Notes:
(1) 16 different colors in CGA textmode can be assigned to 4.8 or 16
MS/DOS-colors. The number of colors chosen, directly affects
the video-output performance of the PC286.
GVP/PC286
81
(2) In Hercules-Mode the screen can be scrolled left and right
through the 720 pixel resolution by using the mleft Amiga +
keypad 1" and "left Amiga + keypad 3 /
(3) Only important for NTSC operation. In VGA-monochrome mode
the screen can be scrolled up and down through the 480 pixel
resolution by using the mleft Amiga + keypad 1" and mleft Amiga
+ keypad 3" keys.
Switching the video-emulation under MS/DOS
Using the Configure program, the video-emulation and
number of colors can be set. Independent of these settings,
the following programs can be used under MS/DOS to switch
the emulation mode.
CGAJEKE (for CGA emulation with 4, 8 and, 16 colors)
MDA.EXE (for Hercules emulation)
EGA.EXE (for EGA-monochrome emulation)
VGA.EXE (for VGA-monochrome emulation)
V400.EXE (for T3100/Olivetti emulation)
Using the INVERS.EXE program, the screen can be switched
between normal and inverse mode. These programs can be
found on the PC286 DOS Utilities disk. Also, after a DOS
reset (pressing the "Control," "Alternate,"and "Delete" keys),
the configuration set using these programs is srestored.
82
GVP/PC286
Note: When CGA.EXE, EGA.EXE. VGA.EXE and V400.EXE are started
the number of colors for the 80*25 text-mode can be selected:
CGA 4<ENTER>
If you leave out this parameter, the previously installed number of
colors is used.
Command
Function
CGA <ENTER>
selects the CGA adapter with
the previously installed number
of colors or with the setting that
was saved with the
Configure program.
CGA 4 <ENTER>
selects the CGA adapter with 4 colors
CGA 8 <ENTER>
selects the CGA adapter with 8 colors
CGA 16<ENTER>
selects the CGA adapter with
16 colors
The same applies to V400.EXE, EGA.EXE and VGA.EXE.
GVP/PC286
83
Switching the Hercules emulation:
Command
MDA<ENTER>
Function
selects the Hercules emulation
with the previously Installed font
or with the setting that was saved
with the Configure program.
MDA8<ENTER>
selects the Hercules emulation with
a 8x8 font (flicker free)
MDA16<ENTER>
selects the Hercules emulation
with a 8x16 font
Important: The selected graphics adapter and the number of
colors are not affected by a DOS Reset (e#. CTRL-ALT-DEL).
84
GVP/PC286
The Programs VHIGH, VLOW, SSCR and HSCR
Certain programs synchronize their video memory access to
the vertical flyback (VBL) from the video controller to produce
a flicker free picture. Here they await a pulse of a certain
length from the VBL.
As the PC286 video-emulation is software-based, it is not
possible to produce a "natural" copy of the VBL pulse. The
standard configuration is VLOW (i.e. a short VBL Pulse).
If a program simply hangs after starting, it could be that it is in
an endless loop waiting for a long VBL pulse. In this case,
reset the PC286 and, before restarting the program, start the
THIGH program. An example of such a program is the editor
from Norton's utilities: NRCOM. VHIGH, if selected, does
not stay installed after a system reset. After a reset the videoemulation is once again in VLOWmodc.
Scrolling
SSCR.EXE
switch on the Softscroll-fiinction in
text-mode (Default).
HSCR.EXE
switch on the Hardscroll-ftinction in
text-mode
With Softscroll enabled (soft = smooth), the scroll is performed
with the Blitter. This achieves a smooth scrolling screen at the
expense of system overhead. With Hardscroll enabled, the
scroll is managed indirectly by the video emulations's screen
update.
GVP/PC286
85
86
GVP/PC286
APPENDIX C. PC286 ERROR-CODES
If during the operation of PC286 an error occurs, the
following alert message will be displayed:
PC286 Fatal Loader Error xx
Press any mousebutton
The following error-codes are possible:
Code
0
Solution
Reason
dos.library not found
Switch off and restart
A500.
l
icon.library not found
Copy icon.library into
libs:.
2
PC286.cfg not found
Copy PC286.cfg to
correct directory or run
Configure.
3
PC286.cfg is corrupt
Copy PC286.cfg to
correct directory or run
Configure.
4
Insufficient memory
Finish other tasks or
switch the A500 off and
restart the whole system
GVP/PC286
87
PC286.dsg not found
Copy PC286.dsg from
the distribution disk to
the correct directory.
6,7
PC286.dsg corrupt
Copy PC286.dsg from
the distribution disk to
the correct directory.
Hardware test failure
Switch off and restart
A500.
Insufficient memory
Finish other tasks or
switch off the A500 and
restart the whole system.
10
PC286.bin not found
Copy PC286.bin from
the distribution disk to
the correct directory.
11
PC286.bin corrupt
Copy Pc286.bin from the
distribution disk to the
correct directory.
12
PC286 checksum error
Copy PC286 from the
distribution disk to the
correct directory.
13
PC286 already running
There is only one PC286
task possible.
14
15
Incompatible memory
Try another memory
model
model.
Floppy DF1: not found
Deselect DF1: with
Configure.
88
GVP/PC286
▼
T
KING OF PRUSSIA, PA 1940B
BOO CLARK AVENUE
GREAT VALLEY PRODUCTS
GREAT VALLEY PRODUCTS
LIMITED WARRANTY REGISTRATION
Please fill out this card and return it immediately! It allows us to let you know about new
developments as well as more easily support you.
Phone
City/State/Zip or City/Country/Postal Code
Occupation
Date of purchase
Primary user
Purchased (rom
□ Male □ Female □ Family
Aga
Rjrchased from: a Dealer D Distributor D Catalog
□ Mail-Drder □ End-User □ Other
Uses (check all that appfy): a Corporate
□ Small business
_
Unit/Serial »
▼
▼
Unit/Serial #
▼
What features do you like best?.
D Home business
□ Personal
■ Check all that you own: D camcorder
' □ VCR □ MIDI synthesizer Q PC a C64
* OA500 GA2000 DA300D DCDTV
a Toaster □ Other
• How would you rate the following:
(1 = excellent, 5 = poor)
Packaging
What features/aspects do you like least?.
Ease-of-use_
Documentation
Value
9 Overall quality
•
Suggestions for improvements:.
▼
▼
T
• Influences: □ Product Features □ Quality
• D Salesperson D Dealer □ User Group
□ Educational Discount
□ Trade Show
□ Advertising
.
□ Amiga World Q Amazing Computing
.
a Cither
• ▼
Other GVP products owned:.
▼
T
Trade Shows you plan to attend:
, □ World of Commodore D COMDEX
B D Ami Expo a CES a NAB
■
D Other
The following points were either not mentioned in the
manual or were not stressed strongly enough and bear
repeating:
1. During the installation of the PC286 board, check to make
sure that all 100 pins of the mini-slot are correctly inserted
into the connector on the PC286 unit. Misalignment can
cause serious damage to both the PC286 unit and the
A500HD or A530 sub-systems.
2. When reconnecting the case of the A500HD (or theA530)
it is essential that you correctly connect the power wires
for the fan. If you connect the wires and power on the
unit, but the fan does not spin, then merely reverse the
connection for the fan wires. The heat generated by the
hard drive inside the plastic case can build up without the
fan runningr.c£using the other components inside the case
to fail.
3. When assigning RAM to the PC286 emulator, be sure to
reserve a minimum of 256 kilobytes for the Amiga's
use under AmigaDOS. Failure to do so may result in a
total lockup of both machines.
xxxxxx-xx
^
GVP/PC286
May, 1992
GREAT VALLEY PRODUCTS, INC.
600 Clark Avenue. King of Prussia, PA 19406
Phone 215-337-8770 • FAX 215-337-9922
GVP/PC2B6 and Series II are trademarks ol Great Valley Products Inc.
Ad other product names and trademarks aro the property oi their respective owners.
11991 Grmt uj'kt, f-■',.", h