1
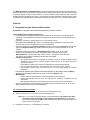
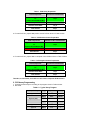
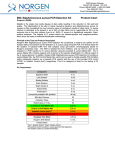
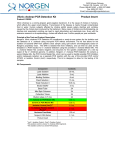
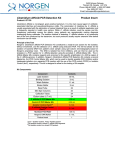
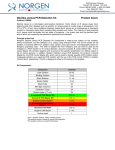
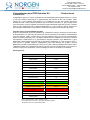
3430 Schmon Parkway Thorold, ON, Canada L2V 4Y6 Phone: 866-667-4362 (905) 227-8848 Fax: (905) 227-1061 Email: [email protected] Campylobacter jejuni PCR Detection Kit Product Insert Product # 36100 Campylobacter jejuni is a curved, rod-shaped and microaerophillic gram negative bacterium. It is one of the most common causal agents of gastroenteritis with diarrhea as the main symptom. While infection of C. jejuni is seldom life-threatening, it is considered one of the most common food-borne bacteria with over 2 million people infected per year in US alone. Infection of C. jejuni usually results from consumption of poorly prepared food including undercooked meat (particularly poultry), untreated water or raw unpasteurized milk. Traditional identification of C. jejuni involves culturing, however the microaerophilic characteristic of this bacterium make the enrichment process laborious and costly. Principle of the Test and Product Description Norgen’s Campylobacter jejuni PCR Detection Kit constituents a ready-to-use system for the isolation and the detection of C. jejuni using end-point PCR. The kit first allows for the isolation of bacterial DNA from milk samples, poultry carcass rinse or enriched samples using spin-column chromatography based on Norgen’s proprietary resin. The DNA is isolated free from inhibitors, and can then be used as the template in a PCR reaction for C. jejuni detection using the provided C. jejuni Master Mix. C. jejuni Master Mix contains reagents and enzymes for the specific amplification of a 321 bp region of the C. jejuni genome. In addition, Norgen’s Campylobacter jejuni PCR Detection Kit contains a second Master Mix, the PCR Control Master Mix, which can be used to identify possible PCR inhibition and/or inadequate isolation via a separate PCR reaction with the use of the provided PCR control (PCRC) or Isolation Control (IsoC), respectively. This kit is designed to allow for the testing of 24 samples. Kit Components: Component Contents Digestion Buffer 3 mL 12 mL 4 mL 15 mL 5 mL 8 mL 6 mg 60 mg Lysis Solution Binding Solution Wash Solution I Wash Solution II Elution Buffer Proteinase K Lysozyme Mini Filter Spin Columns 25 Collection Tubes 25 Elution tubes (1.7 mL) 25 C. jejuni 2x PCR Master Mix 0.35 mL Control 2x PCR Master Mix 0.35 mL Isolation Control (IsoC)*a C. jejuni Positive Control (PosC)*b Nuclease Free-Water 0.3 mL 1.25 mL Norgen’s DNA Marker 0.1 mL Product Insert 1 0.1 mL * IsoC = Isolation Control ; PosC= Positive Control a b The positive control is cloned C. jejuni genomic DNA fragments. The isolation control is a cloned PCR product. Customer-Supplied Reagents and Equipment Disposable powder-free gloves Benchtop microcentrifuge Micropipettors Sterile pipette tips with filters PCR tubes 96 – 100% ethanol 37C incubator 55C incubator Storage Conditions and Product Stability All buffers should be kept tightly sealed and stored at room temperature (15-25oC). Buffers can be stored for up to 1 year without showing any reduction in performance. The Lysozyme should be stored at -20°C upon arrival, and the Digestion Buffer should be stored at -20°C after addition of the Lysozyme. The Proteinase K should be stored at -20°C upon arrival and after reconstitution. These reagents should remain stable for at least 1 year when stored at these conditions. The C. jejuni 2x PCR Master Mix, Control 2X PCR Master Mix, Isolation Control (IsoC), and C. jejuni Positive Control (PosC) should be kept tightly sealed and stored at -20oC. These can be stored for up to 1 year without showing any reduction in performance. Repeated thawing and freezing (> 2 x) of these reagents should be avoided, as this may reduce the sensitivity. If the reagents are to be used only intermittently, they should be frozen in aliquots. General Precautions The user should exercise the following precautions when using the kit: Use sterile pipette tips with filters. Store and extract positive material (specimens, controls and amplicons) separately from all other reagents and add it to the reaction mix in a spatially separated facility. Thaw all components thoroughly at room temperature before starting an assay. When thawed, mix the components and centrifuge briefly. Work quickly on ice. Quality Control In accordance with Norgen’s ISO 9001 and ISO 13485-certified Quality Management System, each lot of Norgen’s Campylobacter jejuni PCR Detection Kit, including the C. jejuni 2x PCR Master Mix, Control 2X PCR Master Mix, Isolation Control (IsoC) and C. jejuni Positive Control (PosC) are tested against predetermined specifications to ensure consistent product quality. Product Use Limitations Norgen’s C. jejuni PCR Detection Kit is designed for research purposes only. It is not intended for human or diagnostic use. Product Warranty and Satisfaction Guarantee NORGEN BIOTEK CORPORATION guarantees the performance of all products in the manner described in our product manual. The customer must determine the suitability of the product for its particular use. Safety Information Biosafety level 2 practices are recommended for works involving Campylobacter jejuni. Ensure the appropriate containment equipment and facilities are used for activities involving cultures or potentially infectious clinical materials. Ensure that a suitable lab coat, disposable gloves and protective goggles are worn when working with chemicals. For more information, please consult the appropriate Material Safety Data Sheets (MSDSs). These are available as convenient PDF files online at www.norgenbiotek.com. CAUTION: DO NOT add bleach or acidic solutions directly to the sample-preparation waste. The Binding Solution and Wash Solution I contain guanidine salts, and should be handled with care. Guanidine salts form highly reactive compounds when combined with bleach, thus care must be taken to properly dispose of any of these solutions. If liquid containing these buffers is spilt, clean with suitable laboratory detergent and water. If the spilt liquid contains potentially infectious agents, clean the affected area first with laboratory detergent and water, and then with 1% (v/v) sodium hypochlorite. Protocol A. Campylobacter jejuni Genomic DNA Isolation Precaution: All samples must be treated as potentially infectious material. Important Notes Prior to Beginning Protocol: A variable speed centrifuge should be used for maximum kit performance. If a variable speed centrifuge is not available a fixed speed centrifuge can be used, however reduced yields may be observed. Preheat an incubator or heating block to 37°C and another to 55°C. Reconstitute the Proteinase K in 300 L of molecular biology grade water, aliquot into small fractions and store the unused portions at -20°C until needed. Add the provided amount of Digestion Buffer to the tube containing the Lysozyme, and mix well. Aliquot the Digestion Buffer into small fractions and store the unused portions at -20°C until needed. Prepare a working concentration of Wash Solution II by adding 15 mL of 96 - 100% ethanol (to be provided by the user) to the supplied bottle containing concentrated Wash Solution II. This will give a final volume of 20 mL. The label on the bottle has a box that can be checked to indicate that ethanol has been added. Isolation Control (IsoC) An Isolation Control (IsoC) is supplied. This allows the user to control the DNA isolation procedure. For this assay, add the Isolation Control (IsoC) to the lysate during the isolation procedure The Isolation Controk (IsoC) must not be added to the sample material directly. Do not freeze and thaw the C. jejuni Isolation Control (IsoC) more than 2 times. The Isolation Control (IsoC) must be kept on ice at all times during the isolation procedure. The steps for preparing the lysate are different depending on the starting material (Step 1). However, the subsequent steps are the same in all cases (Steps 2 – 4). Milk Samples Freshly collected milk samples or enriched samples are recommended Frozen milk samples may be used, but note that the sensitivity of detection may be decreased Milk samples collected into preservatives (such as bronopol) are not recommended The PCR components of Campylobacter jejuni PCR Detection Kit should remain at -20oC until DNA is extracted and ready for PCR amplification. 1A. Lysate Preparation from Milk a. Vortex the milk sample for 10 to 15 seconds or invert several times to mix. b. Aliquot a maximum of 1 mL of milk into a microcentrifuge tube. Note: Up to 1 mL of milk is recommended for normal milk samples. For samples with high leukocyte counts, up to 200 L of milk sample is recommended. If the sample is very viscous and difficult to pipette, pass the sample through an 18-gauge syringe a few times to reduce the viscosity. c. Centrifuge at 14,000 x g (~14,000 RPM) for 3 minutes. d. Pour off the supernatant by quickly inverting the tube and gently tapping it against the wall of the waste container. This tapping is to ensure that the creamy layer present on the top of the milk sample after centrifugation is removed. Clean any remaining white solid from the microcentrifuge tube wall by using a clean cotton swab. Ensure that the pellet is not dislodged. e. Resuspend the pellet in 100 L of Digestion Buffer. Incubate at 37°C for 45 minutes. Note: Ensure that the provided Lysozyme has been added to the Digestion Buffer. After incubation, add 300 L of Lysis Solution and 10 L of reconstituted Proteinase K to the digestion mixture and mix well by vortexing. g. Incubate the lysate at 55°C for 45 minutes. Mix the lysate occasionally by vortexing. f. 1B. Lysate Preparation from Poultry Carcass or Meat Rinse a. Collect poultry carcass or meat rinse by standard procedure. Note: For example, place the carcass or meat sample in a plastic bag containing 100 mL of sterile water. Seal the bag and shake for 3 minutes b. Aliquot a maximum of 1 mL of the rinse into a microcentrifuge tube. c. Centrifuge at 14,000 x g (~14,000 RPM) for 3 minutes. d. Pour off the supernatant by quickly inverting the tube e. Resuspend the pellet in 100 L of Digestion Buffer. Incubate at 37°C for 45 minutes. Note: Ensure that the provided Lysozyme has been added to the Digestion Buffer. After incubation, add 300 L of Lysis Solution and 10 L of reconstituted Proteinase K to the digestion mixture and mix well by vortexing. g. Incubate the lysate at 55°C for 45 minutes. Mix the lysate occasionally by vortexing. f. 1C. Lysate Preparation from Enriched or Cultured Samples a. Grow the sample under standard protocol for C. jejuni. Note: Standard culture of C. jejuni involves growth on Campy-Cefex agar under a microaerobic environment at 42oC for 36 to 48 hours. b. Scrap cells off the plate and resuspend in 1 mL of sterile water or sterile saline (0.9% NaCl). Transfer the resuspension to a nuclease free microcentrifuge tube. c. Centrifuge at 14,000 x g (~14,000 RPM) for 3 minutes. d. Pour off the supernatant by quickly inverting the tube e. Resuspend the pellet in 100 L of Digestion Buffer. Incubate at 37°C for 45 minutes. Note: Ensure that the provided Lysozyme has been added to the Digestion Buffer. After incubation, add 300 L of Lysis Solution and 10 L of reconstituted Proteinase K to the digestion mixture and mix well by vortexing. g. Incubate the lysate at 55°C for 45 minutes. Mix the lysate occasionally by vortexing. f. 2. Sample Binding to Column a. After incubation, add 40 L of Binding Solution, 10 L of Isolation Control (IsoC) and 180 L of 96-100% ethanol to the lysis mixture, and mix by vortexing. Note: Ensure that the Isolation Contro (IsoC) is added for subsequent control detection in the PCR protocol b. For Milk or Carcass Rinse only: Spin the sample for 10 seconds at 14,000 x g (~14,000 RPM). A thin layer of lipid may form on the top of the aqueous phase. Using a pipette, carefully transfer the clear aqueous phase only to a spin column that has been attached to a collection tube. For other samples: Transfer the lysate-ethanol mix to a spin column that has been attached to a collection tube. c. Centrifuge the column assembly for 3 minutes at 14,000 x g (~14,000 RPM) to bind the bacterial DNA. Note: If all the liquid does not pass through the column, spin for an additional 2 minutes at 14,000 x g (~14,000 RPM). If a small amount of liquid still remains on the top the column, proceed to Step 3a with the addition of Wash Solution I. 3. Column Wash a. Apply 500 L of Wash Solution I to the column and centrifuge for 2 minutes at 14,000 x g (~14,000 RPM). b. Discard the flowthrough and reassemble the column and the collection tube. c. Apply 500 L of Wash Solution II to the column and centrifuge again for 2 minutes at 14,000 x g (~14,000 RPM). Note: Ensure the appropriate amount of ethanol has been added to Wash Solution II. d. e. Discard the flowthrough and reassemble the column and the collection tube. Centrifuge for 2 minutes at 14,000 x g (~14,000 RPM) to ensure the resin is completely dry. Discard the collection tube. 4. DNA Elution a. Transfer the spin column to a provided 1.7 mL Elution tube. b. Apply 75 L of Elution Buffer to the column and centrifuge at 2,600 x g (~6,000 RPM) for 2 minutes. c. Spin for an additional 2 minutes at 14,000 x g (~14,000 RPM) to complete the DNA elution. B. Campylobacter jejuni PCR Assay Preparation Notes: Before use, suitable amounts of all PCR components should be completely thawed at room temperature, vortexed and centrifuged briefly. The amount of C. jejuni 2X PCR Master Mix and Control 2X PCR Master Mix provided is enough for up to 32 PCR reactions (24 sample PCR, 4 positive control PCR and 4 no template control PCR) each. For each sample, one PCR reaction using the C. jejuni 2X PCR Master Mix and one PCR reaction using Control 2X PCR Master Mix should be set up in order to have a proper interpretation of the result. For every PCR run, one reaction containing C. jejuni Positive Control (PosC) and one reaction as no template control must be included for proper interpretation of results. The recommended minimum number of DNA samples tested per PCR run is 6. Using a lower volume from the sample than recommended may affect the sensitivity of C. jejuni Limit of Detection. 1. Prepare the PCR for sample detection (Set #1, using C. jejuni 2X PCR Master Mix) and control detection (Set #2, using Conrtol 2X PCR Master Mix) as shown in Table 1 below. The recommended amount of sample DNA to be used is 2.5 µL. However, a volume between 1 and 5 µL of sample DNA may be used as template. Ensure that one C. jejuni detection reaction and one control reaction is prepared for each DNA sample. Adjust the final volume of the PCR reaction to 20 µL using the Nuclease-Free Water provided. Table 1. PCR Assay Preparation PCR Components Volume Per PCR Reaction C. jejuni 2X PCR Master Mix Or Control 2X PCR Master Mix 10 µL Sample DNA 2.5 µL Nuclease-Free Water 7.5 µL Total Volume 20 µL 2. For each PCR run, prepare one positive control PCR as shown in Table 2 below: Table 2. PCR Positive Control Preparation PCR Components Volume Per RT- PCR Reaction C. jejuni 2X PCR Master Mix Or Control 2X PCR Master Mix 10 µL Positive Control (PosC) 10 µL Total Volume 20 µL 3. For each PCR run, prepare one no template control PCR as shown in Table 3 below: Table 3. PCR Negative Control Preparation PCR Components Volume Per PCR Reaction C. jejuni 2X PCR Master Mix Or Control 2X PCR Master Mix 10 µL Nuclease-Free Water 10 µL Total Volume 20 µL Therefore, at a minimum, each PCR run will contain 6 separate PCR reactions C. PCR Assay Programming 1. Program the thermocylcer according to the program shown in Table 4 below. 2. Run PCR. Table 4. C. jejuni Assay Program One Step PCR Cycle Cycle 1 Cycle 2 (35x) Step Temperature o Duration Step 1 95 C 5 min Step 1 94oC 15 sec o Step 2 60 C 30 sec Step 3 72oC 45 sec o Cycle 3 Step 1 72 C 5 min Cycle 4 Step 1 4oC ∞ D. Campylobacter jejuni PCR Assay Results Interpretation 1. For the analysis of the PCR data, the entire 15-20 µL PCR Reaction should be loaded on a 1X TAE 1.7% Agarose DNA gel along with 10 L of Norgen’s DNA Marker (provided). Prepare enough agarose gel for running one set of PCR of C. jejuni detection and one set of PCR for controls detection. 2. The PCR products should be resolved on the 1X TAE 1.7% Agarose gel at 150V for 30 minutes (Gel running time will be vary depending on an electrophoresis apparatus). 3. Sample results are provided below: M C. jejuni NC 2000 1500 1000 750 500 C. jejuni Target 300 150 Figure 1: A representative 1X TAE 1.7% agarose gel showing the amplification of C. jejuni under different concentration (C. jejuni Target) using the C. jejuni 2X PCR Master Mix. The size of the C. jejuni target amplicon corresponds to 321 bp as represented by the provided DNA Marker (M). NC = Negative Control. 1 2 3 4 5 6 NC 2000 1500 1000 750 500 300 Isolation Control 150 PCR Control Figure 2: A representative 1X TAE 1.7% agarose gel showing the amplification of Isolation Control and PCR Control under different conditions using the Control 2X PCR Master Mix. The size of the Isolation Control amplicon and PCR Control amplicon correspond to 499 bp and 150 bp, respectively, as represented by the provided DNA Marker (M). Lanes 1 to 5 showed detection of both Isolation Control and PCR Control, suggesting that the DNA isolation as well as the PCR reaction was successful. Lane 6 showed only the detection of PCR Control suggesting that while the PCR was successful, the isolation failed to recover even the spiked-in Isolation control. NC = Negative Control. Table 5. Interpretation of PCR Assay Results Input Type Target reaction C. jejuni Target Control Reaction Interpretation C. jejuni IsoC Band (499 bp) C. jejuni PCRC Band (321 bp) X X X Valid X Valid X X Positive X X Negative X Re-test Positive Control Negative Control Sample X Sample Sample Band (150 bp) Sample Re-test Sample X Sample X Sample X Sample X Negative X X Positive Positive Re-test ** For results obtained that are not covered in Table 5 above, please refer to the Troubleshooting Section. E. Campylobacter jejuni PCR Assay Specificity and Sensitivity The specificity of Norgen’s Campylobacter jejuni PCR Detection Kit is first and foremost ensured by the selection of the C. jejuni -specific primers, as well as the selection of stringent reaction conditions. The primers were checked for possible homologies to all GenBank published sequences by sequence comparison analysis. The specific detectability of all relevant strains has thus been ensured by a database alignment and by PCR amplification with the following food-borne disease-causing bacteria commonly found E coli Streptococcus agalatiae Streptococcus dysgalatiae Staphylococcus aureus. Listeria monocytogenes Salmonella sp. F. Linear Range The linear range (analytical measurement) of Norgen’s Campylobacter jejuni PCR Detection Kit was determined by analysing a dilution series of a C. jejuni quantification standard ranging from 1 x 10⁷ cfu/µl to 1 x 10⁻¹ cfu/µl. Each dilution has been tested in replicates (n = 4) using Norgen’s Campylobacter jejuni PCR Detection Kit on 1X TAE 1.7% Agarose gel. The linear range of Norgen’s Campylobacter jejuni PCR Detection Kit has been determined to cover concentrations from 1 x 10² cfu/µl to at least 1 x 10⁶ cfu/µl Under the conditions of the Norgen’s Campylobacter jejuni DNA Isolation procedure, Norgen’s Campylobacter jejuni PCR detection Kit covers a linear range from 1,000 cfu/mL milk to at least 1 x 10⁷ cfu/mL milk. Frequently Asked Questions 1. How many samples should be included per PCR run? Norgen’s Campylobacter jejuni PCR Detection Kit is designed to test 24 samples. For every 6 samples, a non-template control and a Positive Control must be included. It is preferable to pool and test 6 samples at a time. If not, the provided Positive Control is enough to run 3 samples at a time. 2. How can I interpret my results if neither the PCR control (PCRC) nor the Isolation Control (IsoC) amplifies? If neither the PCR control nor the Isolation Control amplifies, the sample must be re-tested. If the positive control showed amplification, then the problem occurred during the isolation, where as if the Positive control did not amplify, therefore the Problem has occurred during the setup of the PCR assay reaction. 3. How should it be interpreted if only the PCR control (PCRC) showed amplification but neither the C. jejuni target nor the Isolation Control (IsoC) amplified for a sample? This indicates a poor isolation. The isolation procedure must be repeated. 4. How should it be interpreted if only the Isolation Control (IsoC) was amplified in a sample? The sample tested can be considered as C. jejuni negative. 5. How should it be interpreted if only the C. jejuni target and the PCR control (PCRC) were amplified in a sample? The sample tested can be considered as C. jejuni positive. 6. How should it be interpreted if only the C. jejuni target was amplified in a sample? The sample tested should be considered as C. jejuni positive. At high C. jejuni cell input, the C. jejuni amplicon will be predominant and thus the PCR control (PCRC) as well as the Isolation Control (IsoC) may not amplify as they compete for PCR resources. 7. How should it be interpreted if only the PCR control (PCRC) and the Isolation Control (IsoC) showed amplification in a sample? The sample tested can be considered negative 8. Can I freeze and thaw the provided enzymes for DNA isolation? Repeated freeze/thaw of the reconstituted Proteinase K and Lysozyme will reduce the activity of the enzymes and hence the isolation efficiency. The result is lower DNA yield. It is recommended to divide the reconstituted enzymes into smaller working aliquots prior to freezing. 9. What If my incubation temperature during extraction varied from the specified 37C or 55C for Lysozyme and Proteinase K, respectively? At other temperatures the activity of both the Proteinase K and Lysozyme will be reduced. This will result in a reduction in your DNA yields. 10. What If my incubation time varied from the 45 minutes specified in the product manual? Less than 45 minutes will result in a lower DNA yields. More than 45 minutes may not affect your DNA yields. 11. What If I forgot to do a dry spin after my second wash? Your first DNA elution will be contaminated with the Wash Solution. This may dilute the DNA yield in your first elution and it may interfere with the PCR detection, as ethanol is known to be a PCR inhibitor. 12. What If I forgot to add Isolation Control (IsoC) during the Isolation? It is recommended that the isolation is repeated. Related Products Milk Bacterial DNA Isolation Kit Product # 21500 Bacterial Genomic DNA Isolation Kit 17900 Reference J. Parkhill et al. 2000. The genome sequence of the food-borne pathogen Campylobacter jejuni reveals hypervariable sequences. Nature 403: 665-668. Technical Assistance NORGEN’s Technical Service Department is staffed by experienced scientists with extensive practical and theoretical expertise in sample and assay technologies and the use of NORGEN products. If you have any questions or experience any difficulties regarding Norgen’s Campylobacter jejuni PCR Detection Kit or NORGEN products in general, please do not hesitate to contact us. NORGEN customers are a valuable source of information regarding advanced or specialized uses of our products. This information is helpful to other scientists as well as to the researchers at NORGEN. We therefore encourage you to contact us if you have any suggestions about product performance or new applications and techniques. For technical assistance and more information, please contact our Technical Support Team between the hours of 8:30 and 5:30 (Eastern Standard Time) at (905) 227-8848 or Toll Free at 1-866-667-4362. or call one of the NORGEN local distributors (www.norgenbiotek.com) or through email at [email protected]. 3430 Schmon Parkway, Thorold, ON Canada L2V 4Y6 Phone: (905) 227-8848 Fax: (905) 227-1061 Toll Free in North America: 1-866-667-4362 ©2013 Norgen Biotek Corp. PI36100-4