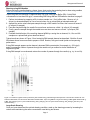
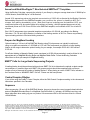
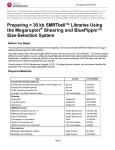
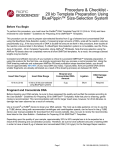
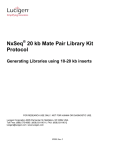
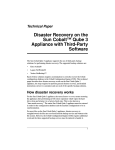
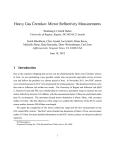
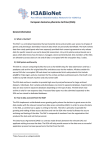
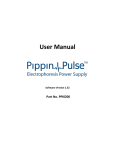
1
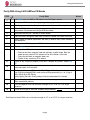
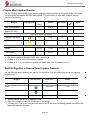
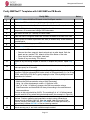
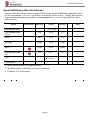
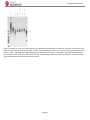
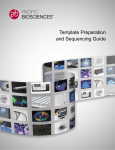
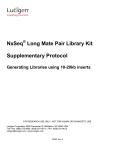
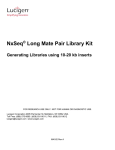
Unsupported Protocol
Please note: the shared protocols described herein may not have been validated by Pacific Biosciences and are provided as-is and
without any warranty. Use of these protocols is offered to those customers who understand and accept the associated term s and
®
conditions and wish to take advantage of their potential to help prepare samples for analysis using the PacBio System. If any of
these protocols are to be used in a production environment, it is the responsibility of the end user to perform the required validation.
Preparing >30 kb SMRTbell™ Libraries Using
Needle Shearing and BluePippin™ SizeSelection System
Before You Begin
This document provides recommendations for preparing >30 kb size-selected SMRTbell libraries from 5 µg of
starting sheared genomic DNA (gDNA).
Only high-quality, high molecular weight gDNA may be used for producing >30 kb libraries. To ensure success,
gDNA size and integrity must be verified by pulsed field gel electrophoresis before beginning library preparation.
Additionally, conditions for shearing gDNA to a size that can support producing >30 kb libraries must also be
determined and verified empirically for each sample.
Overall yields of >30 kb libraries are typically 5-10%. For large genome projects, we recommend starting this
procedure with >20 µg of high quality gDNA sample.
Required Materials
Item
Pulsed Field Gel Electrophoresis
Vendor
Part Number
Pulsed Field Gel Electrophoresis System: CHEF Mapper XA
Bio-Rad
170-3670
Pulsed Field Certified Agarose
Bio-Rad
162-0137
CHEF DNA Size Standard 5 kb
Bio-Rad
170-3624
Invitrogen 1 kb DNA extension ladder
Life Technologies
10511-012
26G Blunt End Needles
SAI Infusion
B26-150
1 mL Luer-Lok Tip Syringe
Becton Dickinson
309628
SMRTbell Template Prep Kit 1.0
Pacific Biosciences
100-259-100
SMRTbell Damage Repair Kit
Pacific Biosciences
100-465-900
AMPure PB Beads
Pacific Biosciences
100-265-900
Tube rotator (or equivalent)
VWR
10136-084
Shearing
SMRTbell Library
Qubit 3.0 Fluorometer and
Life Technologies
Q33216
dsDNA HS Assay Kit or equivalent
Life Technologies
Q32854
BluePippin Size-Selection System
Sage Science
BLU0001
BluePippin Gel Cassettes
Sage Science
PAC30KB
Size Selection
Page 1
Unsupported Protocol
Workflow
QC gDNA by pulsed field gel electrophoresis
↓
Optimize shearing conditions (test shears) and QC by PFGE
↓
Large scale shears and QC by PFGE
ExoVII treatment, DNA damage repair, End repair
↓
0.45x AMPure PB bead purification
↓
Adapter ligation
↓
Exonuclease digestion
↓
0.45x AMPure PB bead purification
↓
Size-selection
↓
0.45x AMPure PB bead purification
↓
DNA damage repair
↓
0.45x AMPure PB bead purification
QC
↓
Prepare for sequencing
Figure 1: Workflow for preparing >30 kb SMRTbell libraries.
Page 2
Unsupported Protocol
Evaluate Genomic DNA Quality
We highly recommend using the Bio-Rad CHEF Mapper XA Pulsed Field Electrophoresis for resolution
above 50 kb. Other systems do not provide good resolution above 50 kb. Genomic DNA suitable for
preparing >30-kb libraries will migrate almost exclusively above ~50 kb (for example, see Figure 2, Sample
1). If significant portion of the gDNA migrates below ~50 kb (for example, see Figure 2, Sample 2), do not
proceed with the 30 kb size selection protocol. Instead, refer to “Shared Protocol - 20 kb Template
Preparation Using BluePippin Size-Selection System (15 kb Size Cutoff)” for recommendations on how to
prepare >6-kb to >15-kb libraries.
Figure 2: Evaluation of gDNA quality by pulsed-field gel electrophoresis. Lane 1 contains the 1 kb extension DNA ladder, and
Lane 4 the Bio-Rad 5 kb DNA ladder. Sample 1 provides an example of high quality, high molecular weight gDNA. The
gDNA of Sample 2 should not be used for the production of a >30-kb library.
Optimize Shearing Conditions and Shear gDNA
To ensure sufficient yields of final >30 kb libraries, input gDNA must be sheared carefully so that the
average size of fragmented DNA remains well above the desired size-selection cut-off. The response of
individual gDNA samples to recommended shearing parameters may differ and must be determined
empirically and evaluated by pulsed field gel electrophoresis. Test shears are highly recommended.
Note that for preparing >30 kb libraries, gDNA may be sheared by using a 26G needle. Here we provide
initial starting parameters methods as well as strategies for optimization of gDNA shearing.
Page 3
Unsupported Protocol
Shearing using 26G Needles
Before performing needle shearing, please view a short movie demonstrating how to shear using needles
https://s3.amazonaws.com/files.pacb.com/mp4/needle-shearing.mp4
Adjust the gDNA concentration to approximately 250 ng/µL with Elution Buffer (EB). If initial DNA
concentration is less than 250 ng/µL, concentrate gDNA using AMPure PB Beads as described on page 6.
1. Perform test shears by preparing a 50 µl volume sample in a 1.5 ml LoBind tube. Remove a 1 µL
aliquot (un-sheared sample) for use as control when run on pulsed-field gel electrophoresis gel.
2. Aspirate the entire volume and pass sample through a 26G needle five times, then remove a second 1
µL aliquot (5x sample).
3. Pass the sample through the needle five more times and remove a third 1 µL aliquot (10x sample).
4. Finally, pass the sample through the needle ten more times and remove a fourth 1 µL aliquot (20x
sample).
5. Evaluate the distribution of the resulting sheared gDNA by running the un-sheared, 5x, 10x, and 20x
samples on a pulsed-field gel as described above.
Typical results are shown in Figure 3 for a bacterial gDNA sample sheared as described. Both the 5x and
20x shears shown here were used to prepare >30 kb libraries, with good overall yields and sequencing
performance.
If the gDNA sample appears under-sheared, decrease DNA concentration (for example, try 125 ng/µL)
and/or increase the number of passes through the needle until you achieve a similar distribution of
fragmented gDNA.
If the gDNA sample is over-sheared, reduce the number of passes through the needle (e.g., try 1x and 2x).
Figure 3: Evaluation of gDNA shears produced by 26G needles using pulsed-field gel electrophoresis. The first lane contains the 1 kb
extension DNA ladder, and the last the Bio-Rad 5 kb DNA ladder. Input K12 gDNA=E.coli genomic DNA; g-TUBE=gDNA sheared with gTUBE; 26G_250ng/ul_5x=5 cycles needle shearing; 26G_250ng/ul_10x=10 cycles needle shearing; 26G_250ng/ul_20x=20 cycles
needle shearing.
Large Scale Shearing
Once you have determined the optimal shearing condition, scale up the shearing process by increasing the
volume while maintaining the same concentration used during test shears.
Page 4
Unsupported Protocol
Concentrate DNA Using AMPure PB Beads (if necessary)
If the concentration of sheared gDNA is less than 140 ng/µL, concentrate the sheared gDNA using AMPure
PB Bead purification before proceeding. If the sheared gDNA concentration is greater than 140 ng/uL,
adjust gDNA concentration to 140 ng/µL with EB and proceed directly to ExoVII treatment below.
ST EP
1
Concentrate DNA
Add 0.45X volume of AMPure® PB magnetic beads.
μL of sample X 0.45X =
μL of beads
Note that the beads must be brought to room temperature and all AMPure PB bead
purification steps should be performed at room temperature.
Before using, mix the bead reagent well until the solution appears homogenous.
Pipette the reagent slowly since the bead mixture is viscous and precise volumes
are critical to the purification process.
2
Mix bead/DNA solution thoroughly by tapping the tube gently. Do not pipet to mix.
3
Quickly spin down the tube (for 1 second) to collect the beads.
4
Allow the DNA to bind to beads by gentle end-over-end rotation for 20
minutes at room temperature. We recommend using a VWR tube rotator.
5
Spin down the tube (for 1 second) to collect beads.
6
Place the tube in a magnetic bead rack until the beads collect to the side of the tube
and the solution appears clear. The actual time required to collect the beads to the
side depends on the volume of beads added.
7
With the tube still on the magnetic bead rack, slowly pipette off cleared
supernatant and save in another tube. Avoid disturbing the bead pellet.
If the DNA is not recovered at the end of this Procedure, you can add equal
volumes of AMPure PB beads to the saved supernatant and repeat the AMPure PB
bead purification steps to recover the DNA.
8
W ash beads with freshly prepared 70% ethanol.
Note that 70% ethanol is hygroscopic and should be prepared FRESH to achieve
optimal results. Also, 70% ethanol should be stored in a tightly capped
polypropylene tube for no m ore than 3 days.
– Do not remove the tube from the magnetic rack.
– Use a sufficient volume of 70% ethanol to fill the tube (1.5 mL for 1.5 m L tube
or 2 m L for 2 m L tube). Slowly dispense the 70% ethanol against the side of
the tube opposite the beads. Let the tube sit for 30 seconds.
– Do not disturb the bead pellet.
– After 30 seconds, pipette and discard the 70% ethanol.
9
Repeat step 8.
10
Remove residual 70% ethanol.
11
– Remove tube from magnetic bead rack and spin to pellet beads. Both the
beads and any residual 70% ethanol will be at the bottom of the tube.
– Place the tube back on m magnetic bead rack.
– Pipette off any remaining 70% ethanol.
Check for any remaining droplets in the tube. If droplets are present, repeat step 10.
Page 5
Notes
Unsupported Protocol
ST EP
Concentrate DNA
12
Remove the tube from the magnetic bead rack and allow beads to air-dry (with the
tube caps open) for 60 seconds.
13
Calculate appropriate volume of Elution Buffer.
ng X 0.5 / (
ng/μL) =
μL of Elution Buffer needed
The minimum DNA concentration required to proceed to the next step (End-Repair)
is 140 ng/μL with preferred m ass of at least 5 μg.
14
Add the Pacific Biosciences® Elution Buffer volume (calculated in step 13) to your
beads. Tap the tube with finger gently to mix. Do not pipet to mix.
– Elute the DNA by gentle letting the mix stand at room temperature for 2 minutes
– Spin the tube down to pellet beads, then place the tube back on the magnetic
bead rack.
– Perform concentration measurements. Verify your DNA concentration using a
Nanodrop® or Qubit® quantitation platform . If the DNA concentration is
estimated to be equal to or below 12 ng/μL, a Qubit system reading is
required. W hen performing a Qubit system reading, ensure that your sample
is within the range of the Qubit kit you are using. For proper concentration
calculations, incorporate the dilution factor (used when diluting your sample) to
be within range of the Qubit kit and the dilution factor when diluting your
sample with the working solution. The latter part of this dilution factor can be
calculated automatically by the Qubit system.
– Discard the beads.
15
Perform concentration measurements.
– Measure the DNA concentration using a Qubit fluorometer.
– Using 1 μL of the eluted sample, make a 1:10 dilution in EB.
– Use 1 µL of this 1:10 dilution to measure the DNA concentration using a Qubit
fluorometer and the dsDNA HS Assay kit according to the manufacturer’s
recommendations.
Yield up to this point should be 40-60%. The remaining 9 μL of 1:10 diluted sample
may be used for QC by pulsed field gel electrophoresis (see example in Figure 4).
16
The sheared DNA can be stored for up to 24 hours at 4°C or at -20°C for longer
duration.
17
Actual recovery per μL and total available sample material:
Page 6
Notes
Unsupported Protocol
ExoVII Pre-treatment of DNA
Use the following table to set up a reaction to remove single-stranded ends from 5 µg of sheared gDNA at
140 ng/µL. If starting with more than 5 µg of sheared gDNA, scale reaction volumes proportionally (i.e., for
10 μg of DNA scale the total volume to 96 μL).
Reagent
Sheared DNA (5 µg)
Tube Cap Color
Stock Conc.
−
Volume
Final Conc.
36.0 μL
−
DNA Dam age Repair
Buffer
10 X
5.0 μL
1X
NAD+
100 X
0.5 μL
1X
ATP high
10 mM
5.0 μL
1 mM
dNTP
10 mM
0.5 μL
0.1 mM
ExoVII
10 U/μL
1.0 μL
0.2 U/μL
48.0 μL
−
Total Volume
2. Mix the reaction well by gently tapping the tube.
3. Spin down contents of tube with a quick spin in a microfuge.
4. Incubate at 37°C for 15 minutes, then return the reaction to 4°C.
Page 7
Notes
Unsupported Protocol
Repair DNA Damage
Use the following table to prepare your reaction. For more than 5 µg input DNA, scale all reaction volumes
proportionally.
Reagent
DNA (ExoVII treated)
Tube Cap Color
Stock Conc.
−
DNA Damage Repair
Mix
25 X
Total Volume
Volume
Final Conc.
48 μL
−
2.0 μL
1X
50.0 μL
−
Notes
1. Mix the reaction well by gently tapping the tube.
2. Spin down contents of tube with a quick spin in a microfuge.
3. Incubate at 37°C for 60 minutes, return the reaction to 4°C for 1 to 5 minutes.
Repair Ends
Use the following table to prepare your reaction. For more than 5 µg input DNA, scale all reaction volumes
proportionally.
Reagent
DNA (Dam age
Repaired)
End Repair Mix
Tube Cap Color
Stock Conc.
−
20 X
Total Volume
Volume
Final Conc.
52.0 μL
−
2.5 μL
1X
52.5 μL
−
1. Mix the reaction well by gently tapping the tube.
2. Spin down contents of tube with a quick spin in a microfuge.
3. Incubate at 25°C for 5-10 minutes, return the reaction to 4°C.
Page 8
Notes
Unsupported Protocol
Purify DNA Using 0.45X AMPure PB Beads
ST EP
Purify DNA
1
Add 0.45X volume of AMPure PB beads to the End-Repair reaction.
2
Mix the bead/DNA solution thoroughly by gently tapping the tube.
3
Quickly spin down the tube (for 1 second) to collect the beads. Do not pellet beads.
4
Allow the DNA to bind to beads by gentle rotation for 20 minutes at room
temperature. We recommend using a VW R tube rotator.
5
Spin down the tube (for 1 second) to collect beads.
6
Place the tube in a magnetic bead rack to collect the beads to the side of the tube.
7
Slowly pipette off cleared supernatant and save (in another tube). Avoid disturbing
the bead pellet.
8
W ash beads with freshly prepared 70% ethanol.
9
Repeat step 8.
10
Remove residual 70% ethanol.
– Remove tube from magnetic bead rack and spin to pellet beads. Both the
beads and any residual 70% ethanol will be at the bottom of the tube.
– Place the tube back on magnetic bead rack.
– Pipette off any remaining 70% ethanol.
11
Check for any remaining droplets in the tube. If droplets are present, repeat step
10.
12
Rem ove the tube from the magnetic bead rack and allow beads to air-dry (with
tube caps open) for 60 seconds.
13
For 5 µg input sheared gDNA, elute in 23 µL Elution buffer. If you started with more
than 5 µg input sheared gDNA, scale volume of EB proportionally (i.e., for 10 μg of
DNA, elute in 46 μL EB). Mix by
gently tapping the tube. Elute by letting it sit at room temperature for 2 minutes.
14
Optional: Verify your DNA amount and concentration using a
Qubit quantitation platform.
15
The End-Repaired DNA can be stored overnight at 4°C or at -20°C for longer
durations.
16
Actual recovery per μL and total available sample material:
End-Repaired insert DNA can be stored overnight at 4°C or at -20°C for longer durations.
Page 9
Notes
Unsupported Protocol
Prepare Blunt-Ligation Reaction
Use the following table to prepare your reaction, adding the components below in the order listed. Be sure to
mix insert gDNA and adapter BEFORE adding ligase. For more than 5 µg input DNA, scale all reaction
volumes proportionally.
Reagent
Tube Cap Color
Stock
Volume
Final Conc.
Notes
Conc.
DNA (End Repaired)
−
23.0 μL
20 μM
Annealed Blunt
Adapter (20 μM)
10 μL
5 μM
Finger tap to mix before proceeding
Tem plate Prep Buffer
10 X
4.0 μL
1X
ATP low
1 mM
2.0 μL
0.05 mM
Finger tap to mix before proceeding
Ligase
Total Volume
1.
2.
3.
4.
−
30 U/μL
1.0 μL
0.75 U/μL
−
40.0 μL
−
Mix the reaction well by gently tapping the tube.
Spin down contents of tube with a quick spin in a microfuge.
Incubate at 25°C or room temperature overnight.
Incubate at 65°C for 10 minutes to inactivate the ligase, then return the reaction to 4°C.
ExoIII/VII Digestion to Remove Failed Ligation Products
Use the following table to prepare your reaction. For more than 5 µg input DNA,scale all reaction volumes
proportionally.
Reagent
Tube Cap Color
Stock Conc.
Volume
40 μL
Ligated DNA
ExoIII
100.0 U/μL
1.0 μL
ExoVII
10.0 U/μL
1.0 μL
42 μL
Tot al Volume
1. Mix the reaction well by gently tapping the tube.
2. Spin down contents of tube with a quick spin in a microfuge
3. Incubate at 37°C for 1 hour, then return the reaction to 4°C. You must immediately proceed with AMPure PB
bead purification after this step.
Page 10
Unsupported Protocol
Purify SMRTbell™ Templates with 0.45X AMPure PB Beads
ST EP
Purify DNA
1
Add 0.45X volume of AMPure PB beads to the End-Repair reaction.
2
Mix the bead/DNA solution thoroughly by gently tapping the tube.
3
Quickly spin down the tube (for 1 second) to collect the beads. Do not pellet beads.
4
Allow the DNA to bind to beads by gentle rotation for 20 minutes at room
temperature. W e recomm end using a VW R tube rotator.
5
Spin down the tube (for 1 second) to collect beads.
6
Place the tube in a magnetic bead rack to collect the beads to the side of the tube.
7
Slowly pipette off cleared supernatant and save (in another tube). Avoid disturbing
the bead pellet.
8
W ash beads with freshly prepared 70% ethanol.
9
Repeat step 8.
10
Rem ove residual 70% ethanol.
– Rem ove tube from magnetic bead rack and spin to pellet beads. Both the
beads and any residual 70% ethanol will be at the bottom of the tube.
– Place the tube back on magnetic bead rack.
– Pipette off any remaining 70% ethanol.
11
Check for any remaining droplets in the tube. If droplets are present, repeat step
10.
12
Remove the tube from the magnetic bead rack and allow beads to air-dry (with
tube caps open) for 60 seconds.
13
For up to 10 µg input sheared gDNA, elute in 31 µL Elution buffer. If you started with
more than 5 µg input sheared gDNA, scale volume of EB proportionally (i.e., for 20 μg
of DNA, elute in 62 μL EB). Mix by gently tapping the tube. Elute by letting it sit at room
temperature for 2 minutes.
14
Verify your DNA amount and concentration using a Qubit quantitation platform.
– Measure the DNA concentration using a Qubit fluorometer.
– Using 1 μL of the eluted sample, make a 1:10 dilution in EB.
– Use 1 µL of this 1:10 dilution to measure the DNA concentration using a
Qubit fluorometer and the dsDNA HS Assay kit according to the manufacturer’s
recommendations.
Yield up to this point should be 40-60%. The remaining 9 μL of 1:10 diluted sample
may be used for QC by pulsed field gel electrophoresis (see example in Figure 4).
15
Optional: Perform qualitative and quantitative analysis using a Bioanalyzer
instrument with the DNA 12000 Kit. Note that typical yield at this point of the
process (following End-Repair and one 0.45X AMPure PB bead purification) is
approximately between 80-100% of the total starting material.
16
Actual recovery per μL and total available sample material:
Page 11
Notes
Unsupported Protocol
Proceed immediately with size-selection after AMPure PB Bead purification of exonuclease-treated libraries.
Samples may be stored at -20°C for short periods at this stage, if necessary.
Size-Selection Using the BluePippin™ System
Follow the instructions in the BluePippin User Manual and User Guides (see www.sagescience.com), and the
specific recommendations below, for >30 kb or 40 kb size-selection of the SMRTbell tem plates.
Note that you must use BluePippin Software v6.20 and the “0.75%, DF Marker U1 high-pass 30 kb – 40 kb
v3” run protocol for this procedure. A new size standard is required for this protocol. Use the U1
marker.
1. Prepare up to 5 μg SMRTbell templates in a final volume of 30 μL Elution Buffer for each lane. Size
selection using this protocol can be aggressive and if not careful, recovery may be impacted. It is not
recommended to use less than 4 μg per lane.
2. Bring the Loading Solution to room temperature, then add 10 μL of the Loading Solution to the 30 μL DNA
sample. For multiple lanes, scale volumes proportionally. The Loading Solution is viscous so pipet slowly to
ensure complete transfer into the DNA sample.
a. Mix by tapping the tube gently; do not vortex.
b. Spin briefly to collect the contents at the bottom of the tube.
3. Follow the manufacturer’s recommendations to set up a run protocol.
a. When setting up the run protocol, select the “0.75% DF marker S1 high-pass 30-40kb v3” cassette
definition file.
b. Using the “Range” selection mode, enter the desired “BPstart” value of 30000 or 40000 bp. A “BP
End” value of 80000 bp should automatically appear. Be sure to assign a marker lane.
4. Load samples and start the run. Be sure to include the U1 marker in the correct lane. Typical run times are
~10 hours.
5. To maximize recovery of eluted DNA, wait at least 45 minutes after the run terminates before removing the
sample from the elution chamber.
a. Collect the eluate into a 1.5 mL DNA LoBind tube.
b. Wash elution well with 40 µL of Sage Science’s 0.1% Tween-20 Wash Solution, and add wash to
eluted sample. Washing the elution well may increase yield 10-20%.
Page 12
Unsupported Protocol
Purify Size-Selected SMRTbell™ Templates with 0.45X AMPure PB Beads
ST EP
Purify DNA
1
Add 0.45X volume of AMPure PB beads to the End-Repair reaction.
2
Mix the bead/DNA solution thoroughly by gently tapping the tube.
3
Quickly spin down the tube (for 1 second) to collect the beads. Do not pellet beads.
4
Allow the DNA to bind to beads by gentle rotation for 20 minutes at room temperature.
We recommend using a VW R tube rotator.
5
Spin down the tube (for 1 second) to collect beads.
6
Place the tube in a magnetic bead rack to collect the beads to the side of the tube.
7
Slowly pipette off cleared supernatant and save (in another tube). Avoid disturbing
the bead pellet.
8
W ash beads with freshly prepared 70% ethanol.
9
Repeat step 8.
10
Notes
Remove residual 70% ethanol.
– Remove tube from magnetic bead rack and spin to pellet beads. Both the
beads and any residual 70% ethanol will be at the bottom of the tube.
– Place the tube back on magnetic bead rack.
– Pipette off any remaining 70% ethanol.
11
Check for any remaining droplets in the tube. If droplets are present, repeat step
10.
12
Remove the tube from the magnetic bead rack and allow beads to air-dry (with
tube caps open) for 60 seconds.
13
For up to 5 µg input non-size-selected library gDNA, elute in 23 µL Elution buffer.
If you size-selected more than 5 µg of SMRTbell template, scale volume of EB
proportionally (i.e., for up to 10 μg of input DNA, elute in 20 μL EB).
Mix by
gently tapping the tube, elute by letting the tube sit for two minutes at room temperature.
14
Verify your DNA amount and concentration using a Qubit quantitation platform.
– Using 1 μL of the purified sample, make a 1:10 dilution in EB.
– Use 1 µL of this 1:10 dilution to measure the DNA concentration using a Qubit
fluorometer and the dsDNA HS Assay kit according to the manufacturer’s
recommendations.
Size-selection set yield should be 20-40%. The remaining 9 μL of 1:10 diluted
sample may be used for QC by pulsed field gel electrophoresis.
15
Actual recovery per μL and total available sample material:
AMPure PB bead purified, size-selected libraries may be stored at -20°C.
Page 13
Unsupported Protocol
Repair DNA Damage After Size-Selection
Using the table below, set up a reaction to repair any DNA damage present in SMRTbell templates after >30 kb
or >40 kb size-selection. For up to 5 µg of DNA, use a reaction volume of 50 µL. If starting with more than
5 µg of size-selected template, scale reaction volumes proportionally (i.e., for up to 10 μg of DNA use a 100 μL
reaction volume).
Reagent
Size-selected DNA
Tube Cap Color
Stock Conc.
Volume
−
μL for 5.0 μg
Final Conc.
−
DNA Dam age Repair
Buffer
10 X
5.0 μL
1X
NAD+
100 X
0.5 μL
1X
ATP high
10 mM
5.0 μL
1 mM
dNTP
10 mM
0.5 μL
0.1 mM
H2O
2.0 μL
25 X
DNA Dam age Repair
Mix
−
μL to adjust to
50.0 μL
50.0 μL
Total Volume
2. Mix the reaction well by gently tapping the tube.
3. Spin down contents of tube with a quick spin in a microfuge.
4. Incubate at 37°C for 60 minutes.
Page 14
1X
−
−
Notes
Unsupported Protocol
Purify Damage-Repaired, Size-Selected SMRTbell™ Templates with 0.45X AMPure
PB Beads
ST EP
Purify DNA
1
Add 0.45X volume of AMPure PB beads to the End-Repair reaction.
2
Mix the bead/DNA solution thoroughly by gently tapping the tube.
3
Quickly spin down the tube (for 1 second) to collect the beads. Do not pellet beads.
4
Allow the DNA to bind to beads by gentle rotation for 20 minutes at room
temperature. We recommend using a VW R tube rotator.
5
Spin down the tube (for 1 second) to collect beads.
6
Place the tube in a magnetic bead rack to collect the beads to the side of the tube.
7
Slowly pipette off cleared supernatant and save (in another tube). Avoid disturbing
the bead pellet.
8
W ash beads with freshly prepared 70% ethanol.
9
Repeat step 8.
10
Notes
Remove residual 70% ethanol.
– Remove tube from magnetic bead rack and spin to pellet beads. Both the
beads and any residual 70% ethanol will be at the bottom of the tube.
– Place the tube back on magnetic bead rack.
– Pipette off any remaining 70% ethanol.
11
Check for any remaining droplets in the tube. If droplets are present, repeat step
10.
12
Rem ove the tube from the magnetic bead rack and allow beads to air-dry (with
tube caps open) for 60 seconds.
13
For up to 5 µg size-selected library, elute in 10 µL Elution buffer.
For more than 5 µg of SMRTbell template, scale volume of EB proportionally
(i.e., for up to 10 μg of input DNA, elute in 20 μL EB).
Mix by gently tapping the tube, elute by letting it sit for two minutes at room temperature.
14
Verify your DNA amount and concentration using a Qubit quantitation platform.
– Using 1 μL of the purified sample, make a 1:10 dilution in EB.
– Use 1 µL of this 1:10 dilution to measure the DNA concentration using a Qubit
fluorometer and the dsDNA HS Assay kit according to the manufacturer’s
recommendations.
The remaining 9 μL of 1:10 diluted sample may be used for QC by pulsed field gel
electrophoresis (see example in Figure 4).
Page 15
Unsupported Protocol
Figure 4: Evaluation of >30 kb and >40 kb libraries using pulsed-field gel electrophoresis. The first lane contains the 1 kb extension DNA
ladder, and the last the Bio-Rad 5 kb DNA ladder. Samples are as indicated above each lane. 5x=5 cycles needle shearing NoSS=no size
selection, >30kb = 30kb cutoff with no DNA Damage repair treatment after size selection, >30kb_DDR = 30kb cutoff with DNA Damage
repair treatment after size selection, >40kb = 40kb cutoff with no DNA Damage repair treatment after size selection, >40kb_DDR = 40kb
cutoff with DNA Damage repair treatment after size selection.
.
Page 16
Unsupported Protocol
Anneal and Bind BluePippin™ Size-Selected SMRTbell™ Templates
Using the Binding Calculator, compute the molarity of your library by using an average insert size of 30000 bp for
>30 kb libraries, and 40000 bp for >40 kb libraries.
Anneal 2 0 X sequencing prim er at a template concentration of 0.833 nM, as directed by the Binding Calculator.
Before adding the primer to the SMRTbell template, pre-condition the primer by heating to 80ºC for 2
minutes, then placing immediately on ice. (Note that if kept on ice during use, and stored at -20ºC, preconditioned primer may be used multiple times without re-heating.) Add the appropriate amounts of preconditioned primer and 10X Primer Buffer to the SMRTbell template, and incubate at 20ºC for at least 30
minutes.
Bind 10X P6 polym erase at an annealed template concentration of 0.500 nM, according to the Binding
Calculator. For >30 and >40 kb libraries, incubation of the binding reaction at 30ºC for 4 hours may modestly
improve loading relative to 30 minute binding reactions.
Prepare for MagBead Loading
Optimal loading of >30 and >40 kb SMRTbell libraries using P6 polymerase can typically be achieved
using an on-plate concentration of ~0.225nM to 0.375 nM. We recommend you perform an initial loading
titration in this range to determine optimal loading for your sample, for example 0.225 nM, 0.300 nM and
0.375 nM.
For efficient binding to Magnetic Beads, bound complexes (at 0.500 nM concentration) must be diluted in the
appropriate ratio of MagBead Binding Buffer and MagBead Wash Buffer. Follow the Binding Calculator
instructions to dilute your sample for MagBead binding.
SMRT® Cells for Large-Scale Sequencing Projects
A loading titration should be performed with each new SMRT Cell lot to determine the optimal on-plate sample
concentrations. If possible, large multi-SMRT Cell genome projects should be completed with a minimum
number of lots to decrease the number of loading titrations. When placing an order of SMRT Cells, indicate on
the Purchase Order to ‘MINIMIZE SMRT Cell lots’. Please use this exact phrase.
Control Complex Dilution
If you will be using the PacBio® Control Complex, dilute the DNA Control Complex according to the volumes and
instructions specified in the Calculator.
Sequence
When sequencing >30 and >40 kb SMRTbell libraries, be sure to choose the correct magnetic bead collection
protocol (MagBead Standard Seq v2 or MagBead OneCellPerWell v1), indicate a 20,000 bp insert size, and
select stage start when setting up your run protocol. We recommend 240 or 360 minute movies for >30 and
>40 kb libraries.
For Research Use Only. Not for use in diagnostic procedures. © Copyright 2015, Pacific Biosciences of California, Inc. All rights reserved. Information in this
document is subject to change without notice. Pacific Biosciences assumes no responsibility for any errors or omissions in this document. Certain notices, terms,
conditions and/o r use restrictions may pertain to your use of Pacific Biosciences products and/or third p arty products. Please refer to the applicable Pacific Biosciences
Terms and Conditions of S ale and to the applicable license terms at http://www.pacificbiosciences.com/lice nses.html. Pacific Biosciences, the Pacific Biosciences
logo, PacBio, S MRT, SMRTbell and Iso-Seq are trademarks of Pacific Biosciences. BluePippin and SageELF are trademarks of Sage Science, Inc. NGS-go and
NGSengine are trademarks of GenDx. All other trademarks are the sole property of their respective owners
Page 17