1
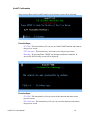
UndoIT 2.0
User Manual
Table of Contents
Ch. 1: After Installing UndoIT 2.0 from the Installation CD.................................................................3
Ch. 2: Activating UndoIT 2.0................................................................................................................5
Ch. 3: Command Overview...................................................................................................................7
Ch. 4: Function Overview.....................................................................................................................8
Ch. 5: 5 Ways to Use UndoIT to Safeguard Your Company & Your Career.....................................14
Ch. 6: UndoIT Function & “UNDO” Command.................................................................................17
Ch. 7: UndoIT Object History Function & “WRKOBJHST” Command............................................21
Ch. 8: UndoIT Snapshot Search Function & “SNAPSHOT” Command............................................24
UndoIT 2.0 User Manual
2
Chapter 1:
After Installing UndoIT 2.0 from the Installation CD:
If UndoIT 2.0 was installed for the first time:
If UndoIT 2.0 is not already installed, then the first user who uses the install CD will
automatically be setup as the Administrator and will be authorized to all UndoIT 2.0
commands. In addition, the user will automatically be authorized to the following
functions:
•
•
•
•
•
•
•
•
•
UndoIT Administration
UndoIT System Setup
Command Setup
Administrator/User Setup
User Setup
Archive Maintenance
UndoIT (UNDO Command)
UndoIT Snapshot Search (SNAPSHOT Command)
UndoIT Object History (WRKOBJHST Command)
The user can access all authorized functions by typing EMPOWER on any command line.
If UndoIT 2.0 was already installed:
If UndoIT 2.0 is already installed, then any user who uses the install CD will automatically
be authorized to all UndoIT 2.0 commands. In addition, the user will automatically be
authorized to the following functions:
• UndoIT (UNDO Command)
• UndoIT Snapshot Search (SNAPSHOT Command)
• UndoIT Object History (WRKOBJHST Command)
The user can access all authorized functions by typing EMPOWER on any command line.
UndoIT 2.0 User Manual
3
Archiving for the following commands is supported in UndoIT 2.0. The
commands with an (*) are automatically activated during the first time
installation of UndoIT 2.0:
ADDLIBLE
CHGCMD (*)
CHGDSPF (*)
CHGDTAARA (*)
CHGJOBD (*)
CHGJOB (*)
CHGLF (*)
CHGLFM (*)
CHGLIBL
CHGPF (*)
CHGPFM (*)
CHGPGM (*)
CHGPRF (*)
CHGPRTF (*)
CHGSAVF (*)
CHGSRCPF (*)
CLRPFM (*)
CPYF (*)
CRTDTAARA (*)
CRTDTAQ (*)
CRTJOBQ (*)
CRTMSGF (*)
CRTPF (*)
CRTSAVF (*)
DLTCMD (*)
DLTDTAARA (*)
DLTDTAQ (*)
DLTF (*)
DLTJOBD (*)
DLTMOD (*)
DLTMSGF (*)
DLTOUTQ (*)
DLTPGM (*)
DLTQRY (*)
DLTSRVPGM (*)
MOVOBJ (*)
RMVLIBLE
RMVM (*)
RNMM (*)
RNMOBJ (*)
Chapter 2:
Activating UndoIT 2.0
After UndoIT has been installed UndoIT 2.0 must be “activated” in order to function. As a
User, it is important to note that UndoIT 2.0 can be activated one of three ways:
1. Activate UndoIT for a Machine using the System Library List
2. Activate UndoIT for a Machine using Command Validation
3. Activate UndoIT for a Job
Activate UndoIT for a Machine using the System Library List
To determine whether the Administrator has activated UndoIT for your entire
machine (iSeries or AS/400), see if the EMPOWER400 library is above QSYS in
your library list. You can determine this by typing “DSPLIBL” on the command
line.
If the EMPOWER400 library is above QSYS in your library list, then you don’t
need to do anything else to activate UndoIT. You can ignore the rest of this
section.
For more information on activating UndoIT for a Machine using the System
Library List, see the UndoIT 2.0 Admin manual.
Activate UndoIT for a Machine using Command Validation
To determine whether the Administrator has activated UndoIT for your entire
machine (iSeries or AS/400) using Command Validation, see if there is a validation
program associated to any UndoIT capable command in library QSYS. You can
determine this on the DLTF command, for instance, by typing the following on the
command line:
DSPCMD QSYS/DLTF
If the “Validity Checking Program” is “DLTF” in library “EMPOWERLIB”, then
your system is setup for Command Validation activation, and you don’t need to
do anything else to activate UndoIT. You can ignore the rest of this section.
If it is “*NONE”, then your system isn’t setup for Command Validation activation.
For more information on activating UndoIT for a Machine using Command
Validation, see the UndoIT 2.0 Admin manual.
UndoIT 2.0 User Manual
5
Activate UndoIT for a Job
If the Administrator has not setup UndoIT to be active for your entire machine, it is
necessary to active UndoIT per job (session, etc.). Activating UndoIT by Job is a
very simple process. For any job that you wish to provide undo capabilities simply
execute the following command in the QGPL library:
STRUNDO
For convenience, it is highly recommended that this command be added to an Initial
Login Program for each User profile intending to use UndoIT. In order to stop
archiving/disable UndoIT for a particular job, simply execute the following
command in the QGPL library:
ENDUNDO
UndoIT 2.0 User Manual
6
Chapter 3:
Command Overview
UndoIT 2.0 introduces the following new iSeries (AS/400) commands.
These commands are stored in the QGPL library:
STRUNDO
This command activates UndoIT for a particular job. Please refer to the “Activating
UndoIT 2.0” section for further information.
ENDUNDO
This command deactivates UndoIT for a particular job. Please refer to the “Activating
UndoIT 2.0” section for further information.
These commands are stored in the EMPOWER400 library:
UNDO
This command allows the user to select from previously entered commands and undo the
action of these commands. The user can also access any generated Snapshots from within
this command. Please refer to the UNDO Command section for further information.
SNAPSHOT
This command allows the user to see all Snapshots generated by any UndoIT authorized
user. Snapshots, for instance, can include the image of a data area, file or program prior to
a change; or a member, file or program prior to deletion from the system. The user may
view and/or restore the object to a user-defined library. Please refer to the SNAPSHOT
Command section for further information.
WRKOBJHST
This command allows the user to see the history of an object including creation
information, move and rename information, any Snapshots generated for this object, and
any number of other commands executed on a particular object. Have you ever wanted to
know who modified a particular object such as a data area, file or job description, and
wanted to know what the attributes were prior to the modification? Then WRKOBJHST
will provide what you are looking for. Please refer to the WRKOBJHST Command
section for further information.
EMPOWER
This command displays all UndoIT functions the user is authorized to.
UndoIT 2.0 User Manual
7
Chapter 4:
Function Overview
This section briefly explains each function (option) available to you as a User of UndoIT:
• UndoIT (UNDO Command)
• UndoIT Snapshot Search (SNAPSHOT Command)
• UndoIT Object History (WRKOBJHST Command)
The following functions may or may not be available to you as a user. This will depend
upon what the Administrator has assigned to you. Please refer to the UndoIT 2.0 Admin
manual for a detailed explanation of the following User functions:
•
•
•
•
•
•
UndoIT Administration
UndoIT System Setup
Command Setup
Administrator/User Setup
User Setup
Archive Maintenance
To access UndoIT functions, type "EMPOWER" (upper or lower case) on any command
line. You will be presented with a screen similar to below:
UndoIT 2.0 User Manual
8
The screen above shows all UndoIT user-level functions you may be authorized to (in this
case UndoIT, Object History, Snapshot).
UndoIT 2.0 User Manual
9
UndoIT
Type '1' next to UndoIT and press the ENTER key. A screen similar to the one below will
be displayed.
The UndoIT function allows you to undo the actions of previously entered commands. For
instance, you can undo a delete of a file, undo a modification to a library list, or undo a
removal of a file member. Pressing F9 allows the user to cycle through previously entered
commands. Pressing Enter will display a confirmation screen prior to undoing the
command. See UndoIT Function & “UNDO” Command section for more information.
UndoIT 2.0 User Manual
10
UndoIT Object History
Type '1' next to UndoIT Object History and press the ENTER key. A screen similar to the
one below will be displayed.
On this screen, enter the name and/or type of the object you wish to see the history for (in
the example, the object being searched is named “FILE022602”). Pressing Enter on this
screen will result in the following screen being displayed:
UndoIT 2.0 User Manual
11
This object has had 4 commands associated with it. It was first created, then
moved, then changed and finally deleted. As the user, you can see the details
behind each of these commands (full command, time, user, etc.) You can view the
Snapshot of the file prior to the change occurring. In addition, you can see the
actual object that was deleted and/or restore it if you wish. See UndoIT Object
HIstory Function & “WRKOBJHST” Command section for more information.
UndoIT 2.0 User Manual
12
UndoIT Snapshot Search
Type '1' next to UndoIT Snapshot Search and press the ENTER key. A screen similar to
the one below will be displayed.
See UndoIT Snapshot Search Function & “SNAPSHOT” Command section for
more information.
UndoIT 2.0 User Manual
13
Chapter 5:
5 Ways to Use UndoIT to Safeguard
Your Company & Your Career
Add Power to Your...
1. Development
In software development, things change constantly. The same object may be
created, updated or deleted multiple times each day. Make your software
development teams more productive by activating UndoIT for all team members of
your current project. UndoIT’s Snapshot feature provides a powerful audit trail of
object changes and deletions. This enables comparisons of previous objects, object
attributes and, if necessary, restoration of previously deleted objects.
2. Testing
Testing can be a tedious, time-consuming task for any organization. Testing
software oftentimes involves many repetitive tasks, including resetting objects and
data back to their original values. UndoIT can help reduce testing time and research
by allowing testers to easily restore any deleted objects. In addition, UndoIT
provides helpful insight to testers via a step-by-step audit log of most changes made
to objects including data areas, files, programs, job descriptions, etc.
3. Research
Have you ever wondered who changed an object such as a file, data area or job
description? Have you ever wanted to know what the original values were for an
object, or maybe would like to compare a current version with a previous version
that has already been deleted from the system? Oftentimes object attributes may be
changed purposefully or inadvertently, but the original values can’t be remembered.
UndoIT provides powerful research capabilities for programmers and
administrators via the SNAPSHOT and WRKOBJHST commands.
UndoIT 2.0 User Manual
14
4. Updates
UndoIT’s undo capabilities provide a new level of confidence for developers,
administrators and testers when performing updates to objects. Have you removed
a member by accident? Or maybe accidentally deleted a data area? Or maybe
changed the attributes on a job description by mistake? Don’t worry, UndoIT’s
Snapshot feature allows you to research, compare, undo and/or restore the objects
if you wish. You can now remove members, change files, and delete objects with a
new level of confidence.
5. Recovery Plan
Every iSeries (AS/400) has a “Window of Vulnerability”. The Window of
Vulnerability exists between the last backup and the next backup (usually nightly).
How is a company vulnerable during this time period? Any changes to objects
during this “Window” isn’t archived. File journalling doesn’t address this issue, it
only archives file data, not objects and object attributes. Mirroring technology
doesn’t address this issue. High-availability systems doesn’t address this issue.
Suppose a problem occurs (for any number of reasons) that results in the necessity
to restore from backups. Once the objects are restored from the backup media, they
are only as current as when the backup took place. What about any changes that
took place during the day to the objects? File journalling will solve the problem for
the file data, but what about changes to objects such as data areas, job descriptions,
programs, etc.? What about the attribute changes to a file, program or any other
object? UndoIT is a real-time object audit and archiving system. UndoIT closes
the “Window of Vulnerability” for corporations by providing a powerful,
instantaneous archive of vital changes and deletions to objects.
UndoIT 2.0 User Manual
15
Chapter 6:
UndoIT Function
& “UNDO” Command
You can access the UndoIT Function one of two ways:
1. Using the “EMPOWER” Command:
• Type "EMPOWER" on any command line and press the Enter key
• Type '1' next to UndoIT 2.0 and press the Enter key
2. Using the “UNDO” Command:
• Type "UNDO" on any command line and press the Enter key
You will be presented with a screen similar to the one below:
The UndoIT function allows you to undo the actions of previously entered commands. For
instance, you can undo a delete of a file, undo a modification to a library list, or undo a
removal of a file member. To undo a command, press the Enter key or F9 to retrieve a
previously entered command.
UndoIT 2.0 User Manual
16
Function Keys:
F3 = Exit: This function key will exit the UndoIT function and return you to the previous
screen.
F4 = Prompt: This function key will display the detail of the command.
F9 = Previous: This function key will display the previously entered commands that have
the capability to be undone.
F10 = Detail: This function key will display the UndoIT Detail screen.
Enter key: By pressing Enter the UndoIT Confirmation screen will be displayed.
UndoIT 2.0 User Manual
17
UndoIT Confirmation
After pressing Enter in the UndoIT window, the following screen will be displayed:
Function Keys:
F3 = Exit: This function key will exit you out of the UndoIT function and return to
the previous screen.
F12 = Previous: This function key will return you to the previous screen.
Enter key: By pressing Enter, UndoIT will attempt to undo the command. If
successful, the following screen will be displayed.
Function Keys:
F3 = Exit: This function key will exit you out of the function and return to the
previous screen.
F12 = Previous: This function key will exit you out of the function and return to
the previous screen.
UndoIT 2.0 User Manual
18
UndoIT Detail
After pressing F10 in the UndoIT window, the following screen will be displayed:
This screen displays all commands that have been logged for you by UndoIT. You can
view the detail of the logged commands, undo the commands, view the snapshots and more
from this screen. Not all commands can be undone. Some commands are designed to take
snapshots only - this is indicated by an “*” on the subfile display.
Options:
1 = Undo: Type '1' next to the Command(s) you wish to undo. A confirmation
screen will be displayed. By pressing Enter, UndoIT will attempt to undo the
command.
2 = Access Snapshot: Type '2' next to the Command(s) to view the Snapshot. The
Snapshot Function will be displayed. See UndoIT Snapshot Search Function
& “SNAPSHOT” Command for more information.
5 = Detail: Type '5' next to the Command(s) to see the detail of the command
entered.
UndoIT 2.0 User Manual
19
Function Keys:
F3 = Exit: This function key will exit you out of the UndoIT Detail screen and
return you to the previous screen.
F5 = Refresh: This function key will reset the screen to exactly the way it was
when you first entered the screen.
F11 = Alt View: This function key displays additional detail about the command
log.
F12 = Previous: This function key will return you to the previous screen.
UndoIT 2.0 User Manual
20
Chapter 7:
UndoIT Object History Function
& “WRKOBJHST” Command
You can access the Object History Function one of two ways:
1. Using the “EMPOWER” Command:
• Type "EMPOWER" on any command line and press the Enter key
• Type '1' next to UndoIT Object History and press the Enter key
2. Using the “WRKOBJHST” Command:
• Type "WRKOBJHST" on any command line and press the Enter key
You will be presented with a screen similar to the one below:
Enter the name of the object that you wish to view the history for. In addition, you may
choose to narrow you selection by entering the library and/or object type. By pressing
Enter, the Object History Detail screen will be displayed.
UndoIT 2.0 User Manual
21
Entry Fields:
Object: Type the object name you wish to research into this field. Enter the full
object name.
Library: Type the library name you wish to search into this field. If you are not
sure where the object resides (resided), then leave the default value of “*ALL”.
Object Type: Type the object type into this field. If you wish to view all object
types, then leave the default value of “*ALL”.
Function Keys:
F3, F4, F5, F12, F13: These are the standard functions keys for entering
commands. Use each command as necessary.
UndoIT 2.0 User Manual
22
Object History Detail
After entering the object name and pressing the Enter key, the following screen will be
displayed:
Options:
2 = Access Snapshot: Type '2' next to the Command(s) to view the Snapshot. The
Snapshot Function will be displayed. See UndoIT Snapshot Search Function
& “SNAPSHOT” Command for more information.
5 = Detail: Type '5' next to the Command(s) to see the detail of the command
entered.
Function Keys:
F3 = Exit: This function key will exit you out of the UndoIT Detail screen and
return you to the previous screen.
F5 = Refresh: This function key will reset the screen to exactly the way it was
when you first entered the screen.
F11 = Alt View: This function key displays additional detail about the command
log.
F12 = Previous: This function key will return you to the previous screen.
UndoIT 2.0 User Manual
23
Chapter 8:
UndoIT Snapshot Search Function
& “SNAPSHOT” Command
You can access the UndoIT Snapshot Search Function one of four ways:
1. Using the “EMPOWER” Command:
• Type "EMPOWER" on any command line and press the Enter key
• Type '1' next to UndoIT Snapshot Search and press the Enter key
2. Using the “SNAPSHOT” Command:
• Type "SNAPSHOT" on any command line and press the Enter key
3. From within the UndoIT Detail screen:
• Type option ‘2’ next to the Command and press the Enter key
4. From within the Object History Detail screen:
• Type option ‘2’ next to the Command and press the Enter key
You will be presented with a screen similar to the one below:
UndoIT 2.0 User Manual
24
From this screen you can search all of the UndoIT archives for any user. You can filter
down your search by entering values into the Name, Type, User and/or Library fields. In
addition, you can view the archive information such as the Before Image of an object, or the
actual data in a deleted file. Where applicable, you can choose to restore an object to any
user-defined library.
Entry Fields:
Filter (Name, Type, User, Library): You can narrow down your search by entering
any combination of these fields. You may enter Full or Partial values into the
fields. Note: These fields are automatically entered when accessing the Snapshot
function from the UndoIT Detail screen and the Object History Detail screen.
Options:
1 = Restore: Type '1' next to the log to restore the object. This option is not valid
for “Before Image Attribute” archives. After pressing Enter you will be allowed to
enter the library where to restore the object. A confirmation screen will then be
displayed.
5 = Display: Type '5' next to the Command(s) to see the object archive. The results
will vary depending on the type of archive selected. Changes to a file will show the
Before Image Snapshot, while a deleted file or member will display the actual data
that was deleted, for instance.
Function Keys:
F3 = Exit: This function key will exit you out of the screen and return you to the
previous screen.
F5 = Refresh: This function key will reset the screen to exactly the way it was
when you first entered the screen.
F11 = Alt View: This function key displays additional detail about the Snapshot
archive log.
F12 = Previous: This function key will return you to the previous screen.
F15 = Change Sort: This function key will allow you to resort the screen to one of
the following predefined sort options:
•
•
•
•
•
UndoIT 2.0 User Manual
Name, Date
Date
Command, User, Date
Type, Name, Date
User, Date
25