1
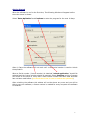
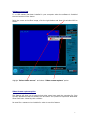
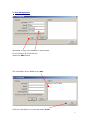
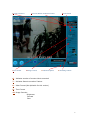
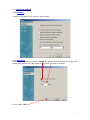
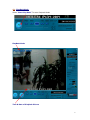
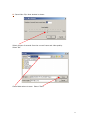
Dvr4Home
User Manual v.1.5A
Introduction
This software has been designed to be user friendly and at the same time gives
you sophisticated Digital Video Recording features only found in very expensive
Surveillance systems at a fraction of their cost, using your existing computer at your
Home or office.
Applications
. - Just with your existing computer with no USB Camera Installed, the software can be
used to monitor the use of your computer by any other members of your Home, Or
employees at the office.
.-If an Inexpensive USB Camera is installed, You can record any event that happens,
using The Motion Detection Feature that will allow you to record only when movement
is detected avoiding unnecessary use of hard drive Capacity.
.-Access your computer from anywhere using the remote version. From work you will
be able to view your home; or from home you will be able to check your office or
warehouse, any time anywhere!
.-An inexpensive USB Camera (Web Cam) can be used but if a professional camera is
required for a specific application it can be used using a USB Video Adapter which will
permit to connect any CCTV Camera to your system. For more information please
contact your distributor.
.-If more than one camera is required you will be able to select any of them from the
Main screen or simply show every camera connected during an interval of time.
.-Where a Conventional CCTV System is installed with standard analog CCTV
equipment with no remote viewing, the video output from the quad or multiplexer Can
be connected to any computer in the site with Internet access and with DVR4Home
software now you will add remote viewing upgrading your existing Equipment with a
fraction of a cost of other options in the market.
These are the most common applications the software can be used for but read this
Manual and we are sure you will find some useful applications that will give you peace
of mind and make you feel a little more secure and safe.
1
Getting Started
When the software is run for the first time, The following Window will appear before
the main screen is shown.
Select “Enter Aplication” and Continue to enter the program for the next 10 days.
After 10 Days the software will not work until a valid serial number is used to Unlock
the aplication.
When a Serial number (license number) is obtained “unlock application” should Be
selected and the license number should be entered. Select Continue and the Program
will conect to the sever to verify that a valid license number has been Used and that
has not been used before (You should be on line in order to unlock The aplication).
After unlocking the software this window will not be shown any more and you will be
Able to use your software, a license number is needed for every computer the software
Is installed.
2
Software Overview
If no USB camera has been installed in your computer when the software is Installed
the next screen will be shown.
Point the cursor at the Blue image, click the right botton and then this window Will be
shown.
Higlight “Select video source” and select “video screen capture” option.
Video Screen capture option
This feature will alow you to record what other users have used the computer for. One
of many aplications that this feature can be used is for a parent to supervise What Web
Sites have been visited by their children.
No need for a camera to be installed in order to use this feature.
3
1 Server IP Address
Main Screen
2 Starts/Stops Record Mode 3 Enters/Exit PlayBack Mode 4 Date & Time 5 Password Activation
1.- IP Address, Required by the remote Program for remote connection.
2.- Start/Stop Record Mode.
3.- Enters Play Back Mode.
4.- Date & Time Display.
4
5.-User Management.
Remember to save your password in a save place.
To use Dynamic IP check this box.
Select the “Add” Button.
The information will be added in this box.
Verify the information is correct and select “Close”
5
6 Clients Connected
9 Time Format
7 Activates Remote Transmision feature
10 Image Controls
11 Advanced Options
8 Video format
12 Recording Controls
6.- Indicates number of remote clients conected.
7.- Activates Remote conection Feature.
8.- Video Format (Not Aplicable for this version)
9.- Time Format
10.-Image Controls:
Brightness
Contrast
Color
6
11.- Advanced Options
11.a Generals
Configure This page to your specific requirements.
11.b Recording
If you have more that one camera, enable this feature and the System will display and
record each camera every 3 seconds or The value you enter in this box.
To exit select “OK”
7
11.c NETWORK
In this page the user can change the server port number. Example, if there are more
than 1 DVR4Home software installed in a Local Area Network only one computer will
have Internet access. The port must Be changed by your network administrator in
order for the rest of the computers To have Internet access. For more information call
your local distributor.
12.- Recording Controls
a) “FPS’ (Frames per Second), default value is 15, indicates that the system will
record at a max 15 Frames per Second.
Note: Incresing this value will Reduce Recording Time capacity.
b) “Folder Size”
This folder is located in Hard Drive “C”, “DVR Clips”. In this folder is where All
video clips are recorded. User can reduce or increase folder size depending On
Hard Drive Capacity.
Default value is 5000 Mega Bytes, this indicates the Max Value for this Folder,
when this value is reached the system will start FIFO (first In First Out) Feature,
old pictures are erased and replaced buy new ones and keeping The size of the
folder at 5000 Mega Bytes.
a) “MD” Feature
When Activated (Recomended for better performace) systems will only record
when motion is detected avoiding unecesary use of hard drive capacity.
b) “Sensitivity”
Decreases or increases Motion Detection Sensitivity.
8
12.- PlayBack Mode
Select “Start Play Back” To enter Playback Mode.
PlayBack Mode
Time & Date of PlayBack Picture
9
1
2
3
4
5
6
7
8
9
1 Exits/Enters Play Back Mode
2.- Play Back previous Frame (picture) one at a time.
3.- Reverse Play Back.
4.- Pauses Play Back.
5.- Forward Play Back.
6.- Fast Search, move tap back or forward to find desired recording.
7.- Play Back Next Frame one at a time.
8.- Select day, the next window appears.
Select month and day, days in bold indicates there are recordings
10
9.- Save Video Clip. Next window is shown.
Select number of seconds from the current frame and video quality.
Select “Ok”
Chose folder where to save. Select “Save”
11