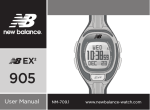
1
EX2
904
User Manual
NM-707.1
www.newbalance-watch.com
1
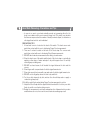
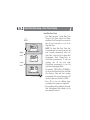
Design of the Watch
Thank you for purchasing this watch. Please read this manual thoroughly before using
the watch!
Stainless Steel
Top Cover
[HR]
back
sensor
Light
Start/Stop/Lap
[EL]
[S/S]
Mode
[M]
Reset
[R]
Start/Stop/Lap
[S/S]
Back View of the Watch
Front View of the Watch
WARNING !
• DO NOT use this Watch for commercial or professional purposes.
• Make sure that you fully understand the functions and limitations of this watch before
using it.
• This Watch is a supplementary device for measuring heart rate; it is NOT a substitute
for medical devices. You should periodically compare the heart rate reading acquired
by this watch with the reading from a doctor.
• Consult a doctor or trainer before setting your Upper and Lower heart rate limits.
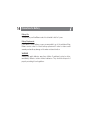
2
Buttons Operation Summary
Mode Button [M]
• Press to select one of the functional modes
• In function modes: Hold to select setting display
• In any setting display: Press to choose between different settings.
• Press and hold the button to exit setting sequence.
Start/Stop/Lap Button [S/S]
• In Current Time Mode: Press to show Alarm Time and Hold to enter the setting of
Daily Alarm Mode
• In Heart Rate Chronograph Mode: Press to start the counting or take Laps,
Hold to stop counting.
• In Timer Mode: Press to start or stop counting.
• In setting displays: Press to change the settings.
Reset Button [R]
• In Heart Rate Chronograph Mode: Press to select sub-functional modes.
When the counting is stopped, Hold to reset display to zero
• In Timer Mode (Stop Counting): Hold to reset the timer to target time
• In setting displays: press to change the settings.
Light Button [EL]
• In any mode/display, press to turn ON the EL back light for about 3 seconds.
Note: The button operations are summarized above, for detailed operating instructions,
please continue reading.
3
Specifications
Current Time Mode
• Time System: am, pm, hour, minute,
second
• Time Format: 12-hour or 24-hour format
• Calendar: date and day of week display
(Auto-Calendar function for day of week
and leap year)
Daily Alarm
• Daily alarm and hourly chime
• Alarm Sound: 1 minute
Timer Mode
• Resolution: 1 second
• Measuring range:
9 hours 59 minutes 59 seconds
• Timer sounds: Last 10 seconds will beep
every second and beep for 15 seconds
when count to zero.
Memory Mode
• Lap recall / Total lap time recall
• Lap average heart rate recall
• Total average heart rate recall
Back Light
• Back Light Type: Electro-Luminescent
(EL) back light
Heart Rate Chronograph Mode
Heart Rate Measurement
• Range for chest strap: 40 to 240 bpm
• Range for finger touch: 40 to 200 bpm
• Heart Rate Zone Alert
• 4 Heart Rate Zone selectable
• 3 Activity Level selectable
Chronograph
• Resolution: 1/100 second
• Measuring range:
9 hours 59 minutes 59.99 seconds
• Maximum: 25 Laps
Heart Rate Zone Timer
• Resolution: 1 second
• Measuring range:
9 hours 59 minutes 59 seconds
Calorie Consumption
• Range: 0 to 9999 kilo-calorie
Fat Burnt
• Range: 0 to 9999 gram
Others
• 5 ATM water resistance
4
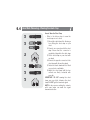
Major Function Modes
Finger-Touch HR
Measurement Display
Hold [HR]
[M]
Current Time Mode
Release [HR]
[M]
Heart Rate Chronograph
Mode
[M]
[M]
Memory Mode
Timer Mode
5
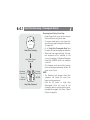
Current Time Mode
Day of
week
Date
current
time
Current Time Display
release
[S/S]
hold
[S/S]
Daily Alarm Display
Current Time Mode
• Current Time Mode includes two
functional displays:
1) Current Time Display
2) Daily Alarm Display
Current Time Display
• The day of week and date exhibits
on the 1st row of display.
• The current time (hour, minute,
second) exhibits on the 2nd row of
display.
Daily Alarm Display
• The preset daily alarm time (hours,
minutes) exhibits on the display.
To Select between the Current Time
Display and Daily Alarm Display
• Press and hold the [S/S] button to
show the Daily Alarm Display.
• When you release the [S/S] button
within 2 seconds, it will go back to
the Current Time Display.
• If you hold more than 2 seconds, it
will go to alarm setting display.
5.1
Current Time Mode - Setting Sequence
Current Time Mode
hold
[M]
hold
[M]
chime
ON/OFF
Second
[M]
[M]
Time
format
Minute
[M]
[M]
Hour
day
[M]
Year
[M]
[M]
month
[M]
beep
ON/OFF
[M]
[M]
[S/S]
or [R]
gender
Weight
[M]
[M]
Weight
Unit
year of
birth
[M]
Height
Unit
[M]
[M]
Height
Increase /
Decrease the
setting by 1
hold
[S/S]
or [R]
scroll
the setting
faster
5.1
Current Time Mode - Setting Sequence
To Set the Current Time Mode
• To set the current time, date, and other settings, press and hold the [M] button for
about 2 seconds to select the setting display (the second digits will start flashing).
The Setting Sequence
• When the second digits start flashing, press the [M] button to move the flashing
following the setting sequence of the diagram in previous page or press the [S/S] or
[R] button to reset the second digits to zero.
• If one of the settings (minute, hour, year, month, day, 'BIRTH'-birth year, 'HGT'-height,
'WGT'-weight) is flashing, press the [S/S] or [R] button to scroll through the setting
(hold the button down to scroll the setting at a faster pace).
• When the '12Hr' or '24Hr' icon is flashing, press the [S/S] or [R] button to switch
between '12Hr' (12 hour format) and '24Hr' (24 hour format).
• When the hourly chime (CHIME) or beep tone (BEEP) 'on' or 'oFF' icon is flashing,
press the [S/S] or [R] button to turn ON ('on') or OFF ('oFF'). And when the hourly
chime is ON, indicator ' ' will be appeared and the watch will beep once on every
hour.
• When the Gender 'F' or 'M' icon is flashing, press the [S/S] or [R] button to switch
between 'F' (Female) and 'M' (Male).
• When the Height Unit 'In' or 'CM' icon is flashing, press the [S/S] or [R] button to
switch between 'In' (Inch) and 'CM' (Centimeter).
• When the Weight Unit 'kG' or 'LB' icon is flashing, press the [S/S] or [R] button to
switch between 'kG' (Kilogram) and 'LB' (Pound).
• When the setting is completed, press and hold the [M] button for about 2 seconds to
exit the setting sequence. The setting display will return to Current Time Mode
automatically if there is NO key-stroke for about 1 minute.
5.2
Current Time Mode - Daily Alarm
Daily Alarm Display
• In the Daily Alarm Display, Alarm Time
(hours, minutes) appears on the 2 row of the
display.
Normal Time Mode
release
[S/S]
Hold
[S/S]
Daily Alarm Display
daily alarm time
(hours, minutes)
Daily Alarm ON and OFF
• When the Daily Alarm Indicator '
'
appears (which means the daily alarm is ON),
the watch starts beeping at the alarm time.
Daily Alarm Sound
• The alarm beeps for 1 minute when the daily
alarm function is turned ON.
• You can stop the beeping by pressing any
button.
5.3
Current Time Mode - Setting the Daily Alarm
To Set the Daily Alarm Function
• In the Current Time Mode: Press and hold the
[S/S] button for more than 2 seconds to enter
the alarm setting display (the 'on' or 'oFF' will
start flashing).
Current Time Mode
Hold
[M]
Hold [S/S]
more than 2 sec.
[M]
Alarm
ON/OFF
[M]
Hour
[M]
Minute
Daily Alarm Setting Sequence
hold
[S/S] or [R]
scroll
the setting
faster
[S/S]
or [R]
Increase /
Decrease the
setting by 1
The Setting Sequence
• Press the [M] button to select between Alarm
ON/OFF, hour and minute setting.
• When the 'on' or 'oFF' flashes on the display,
press the [S/S] or [R] button to turn ON or
OFF the alarm.
• When the 'hour' or 'minute' digit flashes on
the display, press the [S/S] or [R] button to
scroll through the setting (hold down the
button to scroll the setting at a faster pace).
• Press and hold the [M] button for about 2
seconds to exit the setting sequence.
• The setting display will change to Current
Time Mode automatically if there is NO
key-stroke for about 1 minute.
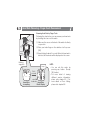
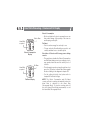
6.0
Heart Rate Measuring - Sensors Configurations
Stainless Steel
Top Cover
[HR]
back
sensor
Watch
Back View
Watch
Front View
Elastic band
Soft Belt
Chest Strap
Front View
contact
release slot
Battery Door
contact
Chest Strap
Back View
6.1
Heart Rate Measuring - Precautions and Tips
• In exercise or sports, your heart naturally speeds up in pumping blood to the
body in accordance with your increased energy level. This watch can calculate
that increase expressed as the number of beats per minute (bpm) to determine a
safe target heart rate for each individual.
PRECAUTIONS/TIPS
1. A heart rate sensor is located on the back of the watch. The back sensor must
make firm contact with the user’s skin during Finger-Touch measurement.
2. There are 2 contacts located on the back of the chest strap. The sensors must
make firm contact with user’s skin during Chest-Strap measurement.
3. DO NOT take heart rate measurement when diving or under water.
4. Clean the back cover of the watch and the back of the chest strap occasionally by
applying a few drops of water and wipe it dry with a paper towel. It can help
removing any residual grease.
5. DO NOT use hand cream; it will insulate the signal between the skin and the
sensors.
6. Clean fingers with soap and water for better signal transmission.
7. Clean skin around chest area with soap and water for better signal transmission.
8. DO NOT use the fingertips where the skin is dry and thick.
9. For those with extremely dry skin, moisten the skin with tap water or apply a
conductive gel may help.
10. Hold the watch firmly when taking Finger-Touch measurement in motion.
11. Adjust the Chest Strap with the supplied elastic band until it is hold on your chest
firmly to avoid loosen it when doing exercise.
12. During the measurement, avoid any awkward motion. Awkward motion creates
undesired muscle noise; hence an incorrect heart rate reading may result.
6.2
Heart Rate Measuring - Heart Rate Zone
%
EMHR
USR
AROBIC FAT-B HLTH
(Fat
(User(Aerobic)burnt) (Health) defined)
Above Zone
Upper
Limit
80%
75%
65%
In Zone
Lower
Limit
65%
55%
50%
Below Zone
Heart Rate Zone
User
defined
What is Heart Rate Zone?
Some
particular
training/exercise
objectives like ‘aerobics’, ‘fat burnt’ or
‘health’ that require trainees/exercisers
maintaining their heart rates (exercise
paces) within one particular heart rate
zone during the exercise.
WARNING: Consult a doctor or trainer
prior to set the heart rate alert zone for a
serious cardio-fitness training.
How to Select a Zone (for Heart Rate Zone Alert)?
In general, users may get the cardio-fitness training advices from those prestigious
organizations’ website, for example:
• http://www.heart.org/HEARTORG/Conditions/CongenitalHeartDefects/
CareTreatmentforCongenitalHeartDefects/Congenital-HeartDefects-and-PhysicalActivity_UCM_307738_Article.jsp
by American Heart Association.
• http://en.wikipedia.org/wiki/Heart_rate#Training_zones
by Wikipedia.
• This Watch includes three pre-defined heart rate zones (“AROBIC”, “FAT-B” and
“HEALTH”) and one user-defined heart rate zone (”USR”) for user selection.
• The upper and lower limit of these Zones is shown on the adjacent diagram.
Check chapter 6.6 for the details on how to select a Zone.
6.2.1
Heart Rate Measuring - Heart Rate Zone Alert
Heart rate
(beats per minute)
‘
Visual
Indication
’ indicator shown
Audio
Indication
‘beep’
The Above Heart Rate Zone
the upper
limit
‘
’ indicator shown
NO beep sound
The Desirable Heart Rate Zone
the lower
limit
‘
’ indicator shown
‘beep’
The Below Heart Rate Zone
The Different Heart Rate Zones and
the Corresponding Indications
Note:
• When taking a heart rate measurement, various visual indicators will be displayed
according to the different zones. A single beep will sound to alert whether heart
rate is out of the present zone.
• Please refer chapter 6.6 for details on turn ON/OFF Zone Alert.
6.2.2
Heart Rate Measuring - About EMHR and %EMHR
percentage
of estimated
maximum
heart rate
heart
rate
in bpm
Heart Rate
Chronograph Mode
Estimated Maximum Heart Rate (EMHR):
• EMHR = 220 - user age.
• Example: What is Tom's EMHR at his
age of 27?
• EMHR = 220 - 27 = 193.
NOTE: This Watch can calculate the EMHR
for user the age up to 99.
Percentage of Estimated Maximum Heart
Rate (%EMHR):
• %EMHR =
Acquired heart rate ÷ EMHR X 100%
• Example: What is Tom's %EMHR if he
has acquired a heart rate of 78.
• %EMHR = 78 ÷ 193 X 100% = 40%
• During exercise or sports, your heart
naturally speeds up pumping blood to the
body in accordance with your increased
energy level.
• The Heart Rate Chronograph Mode and
Instant Heart Rate Mode shows the
current heart rate in terms of:
• Heart Rate (e.g 78) : The number of
heart beats per minute (bpm), and
• Percentage of Estimated Maximum
Heart (e.g 40%): The percentage of
the acquired heart rate with respect to
one's estimated maximum heart rate.
Percentage of Estimated Maximum Heart
Rate
• It is a useful figure for analysing the
cardio-fitness of a person.
• It can be used to define a heart rate zone
for cardio-fitness training.
• Consult your doctor for more information
on the implications of Percentage of
Estimated Maximum Heart Rate.
NOTE: The user MUST input his/her age and
gender into the watch. Check chapter 5.1 for
the details on age and gender settings.
6.3
Heart Rate Measuring - Finger-Touch Measurement
Measuring Heart Rate by Finger-Touch
Following the steps below, you can measure your heart rate
by touching the sensor on the watch.
(1) Make sure the sensor on the back of the watch sits firmly
on your skin.
(2) Place your index finger on the stainless steel top cover
[HR].
user's
wrist
(3) Keep holding for about 5 seconds. When the heart rate is
detected, the heart rate will be displayed on the screen.
flashing
segments
beep
5 to 8
seconds
Heart Rate
is sampling
result
heart rate Heart Rate
Result Display
NOTE:
• You can exit this mode by
pressing any button. (Except
[EL] button)
• For more detail of viewing
different exercise information,
please refer chapter 6.5. / For
more details on Zone Setting,
please refer chapter 6.6.
6.4
Heart Rate Measuring - Wearing the chest strap
How to Wear the Chest Strap
• Refer to the below steps to wear the
chest strap on one’s chest:
1) Extend the elastic band for allowing a
loose fitting the chest strap on your
chest.
2) Connect one connector with the chest
strap. Ensure that the connector is
completely lodged into the chest strap.
3) Fit the chest strap on your chest with
one hand.
4) Connect the opposite connector to the
chest strap with the another hand.
5) Fasten the elastic band until it is fitted
on your chest comfortably.
6) Adjust the chest strap until the two
contacts are firmly contacted with
your skin.
IMPORTANT: DO NOT wearing the chest
strap over your cloth, otherwise the chest
strap CANNOT get the heart rate signal.
NOTE: In dry seasons, wetting the contacts
with some water can make the signal
transmission better.
6.4.1
Heart Rate Measuring - Chronograph Display
Heart Rate Scanning
Heart Rate Signal
detected
Maximum
Heart rate
Average
Heart rate
Result
Heart rate
%EMHR
Heart Rate Captured
Measuring Heart Rate by Chest Strap
• Beside Finger-Touch, users can also measure
their heart rate by using chest strap.
• To measure heart rate by chest strap, first,
wear the chest strap following the instruction
of chapter 6.4.
• Go to “Heart Rate Chronograph Mode” and
the watch will start measuring automatically.
• When heart rate signal detected, the heart
rate measured will be exhibited on the
screen. Percentage of Estimated Maximum
Heart Rate (%EMHR) will also be exhibited
on the left.
• The Maximum heart rate and the Average
heart rate during measurement will also be
shown on the 1st row.
NOTE:
• The Maximum and Average Heart Rate
calculation will include the result from
finger-touch measurement.
• Hold the [R] button in Heart Rate
Chronograph Mode will reset all the
calculations and records stored in the watch,
including Chronograph, Zone Timer, Fat and
Calorie consumption.
6.5
Heart Rate Measuring - Heart Rate Chronograph Mode
Heart Rate Chronograph Mode and the
Sub-Function Displays
[R]
In Zone Timer
Below Zone Timer
[R]
[R]
Above Zone Timer
Chronograph
[R]
[R]
Calorie Consumption
Max. / Avg. Heart Rate
[R]
[R]
Fat Burnt
Current Time
Heart Rate Chronograph
Sub-Function Display
• In the Heart Rate Chronograph Mode,
there are 8 different displays for
showing the exercise information.
They are:
• Maximum / Average Heart Rate
Display,
• Chronograph Display,
• Below Zone Timer Display,
• In Zone Timer Display,
• Above Zone Timer Display,
• Calorie Consumption Display,
• Fat Burnt Display and,
• Current Time Display.
•
Press
[R]
to
scroll
different
Sub-Function Displays from the top
row of the display.
6.5.1
Heart Rate Measuring - Chronograph Display
Lap
Number
Note:
(flashing)
This diagram illustrates
the flow among different
functional displays only,
Chronograph
hence, these displays
Lap Display
DO NOT conform to fact
Auto Return
in all instances.
[S/S]
after 5 sec.
[S/S]
Chronograph
'Zero' Display
Running
Chronograph
Counting Display
the chronograph
stop counting
Hold [S/S]
Hold [R]
Chronograph
Stop Counting Display
To Use the Chronograph
• In 'Zero' Display, press the [S/S]
button once to start the counting.
When it is counting, hold the [S/S]
button to stop the counting, and
the accumulative elapsed time will
appear.
• Press the [S/S] button once to
take a Lap Record.
To Reset the Chronograph
• When the chronograph is stopped,
hold the [R] button to reset the
chronograph (ready for a new
counting).
NOTE
• Once start counting, it will
measure chest strap heart rate. In
order to measure Finger-Touch
heart rate at this moment, re-enter
Chronograph Mode by key [M].
• While taking Lap Time, the
average heart rate for the Lap is
also recorded.
• When the Chronograph is reset,
the records will also be reset.
6.5.2
Heart Rate Measuring - Zone Timer Display
%
EMHR
Upper
Limit
Lower
Limit
Above Zone Timer
In Zone Timer
Below Zone Timer
Heart Rate Zone Timer
• This Watch provides 3 Heart Rate Zone
Timer: In Zone Timer, Above Zone Timer
and Below Zone Timer, which can count the
time of user’s heart rate in or out of the
Heart Rate Zone.
NOTE: The Heart Rate Zone Timer that
correspond with the current heart rate will
start counting automatically when the
Heart Rate is detected in the Heart Rate
Chronograph Mode (Finger-Touch or
Chest-Strap measurement). To stop the
counting, take off the chest strap
(Chest-Strap measurement) or exit the
Heart Rate Chronograph Mode.
For example, “FAT-B” (55% to 75%EMHR) is
set for the Heart Rate Zone Alert, the Below
Zone Exercise Timer will start counting
automatically if the current heart rate is fall
into the ‘below’ zone, like 40% of EMHR.
• Press [R] to view the different timer
according to the sequence in chapter 6.5.
• These readings will be updated to the Heart
Rate Chronograph Mode display all the
time during the exercise.
6.5.3
Heart Rate Measuring - Calorie and Fat Display
Calorie Burn
Heart Rate
acquired
Calorie Consumption
Display
Heart Rate
acquired
Fat Burn
Fat Burnt Display
Calorie Consumption
• By the calculation of calorie consumption, we can
have a brief image of the quality of the exercise
and keeping our body fit.
Fat Burnt
• Fat is stored as energy for our body to use.
• To keep our body fit and healthy, we need to eat
sensibly and burn excess stored body fat.
Calculation of Calorie and Fat energy source during
exercise
• This watch can calculate the Calorie Consumption
and Fat Burnt during exercise according to user’s
age, gender, heart rate and the activity level of
exercise.
• This information can be reviewed in real time. Just
press the [R] button in Heart Rate Chronograph
Mode according to the diagram in chapter 6.5.
• For the setting of activity level, please refer to
chapter 6.6 for detail settings.
NOTE: The Calorie Consumption and Fat Burnt
counter will start counting automatically when the
Heart Rate is detected in the Heart Rate
Chronograph Mode. To stop the counting, take off
the chest strap (Chest-Strap measurement) or exit
the Heart Rate Chronograph Mode.
6.6
Heart Rate Measuring - Zone Setting Sequence
To Set the Heart Rate Zone
• In the Heart Rate Chronograph Mode: Press and hold
the [M] button to enter the Zone setting display (the 1st
row will start flashing).
The Setting Sequence
• Press the [M] button to select different setting
following the sequence of the adjacent diagram.
• When the 'USR', 'HEALTH', 'FAT-B' or 'AROBIC' flashes
Hold [M]
Hold [M]
on the display, press the [S/S] or [R] button to select
target Heart Rate Zone. (For different Heart Rate Zone
[M] Activity Level
detail, please refer chapter 6.2)
Zone
• When the 'on' or '- -' flashes on the display, press the
Selection
Select
[S/S] or [R] button to turn ON or OFF the Zone Alert. If
[M]
[M]
any of the Zone Alert is ON, 'ZONE' icon will be shown.
•
When the digits flashes on the display, press the [S/S]
User's Zone
Above
or [R] button to scroll the Zone Limit setting (Hold
Zone Alert
Upper Limit
down to scroll at a faster speed and the corresponding
%EMHR will be calculated on the right).
[M]
[M]
• When the 'LOW', 'MEDIUM' or 'HIGH' flashes on the
Below
User's Zone
display, press the [S/S] or [R] button to select activity
Lower Limit
Zone Alert
level (Low, Medium or High) for the exercise.
• Press and hold the [M] button for about 2 seconds to
hold
exit the setting sequence.
[S/S] or [R]
[S/S] or [R]
• The setting display will return to Heart Rate
scroll
Scroll
Chronograph Mode automatically if there is NO
the setting
key-stroke for about 1 minute.
the setting
Heart Rate
Chronograph Mode
faster
7
Memory Mode
Auto
Switch
Total Time
The Total Lap Display
Total
Lap
Numbers
[S/S]*
[S/S]*
[S/S]*
Lap Time
Lap Number
Other Laps / HR
Records
*Press [R] to review in reverse direction
Memory Mode
• This watch can record up to
25 Lap Times during exercise
to be reviewed at a later time.
• The Lap Time exhibits on the
1st row of display.
• The last measured Heart Rate
will exhibit on the left hand
side of the 2rd row of display.
• The Lap Number exhibits on
the right hand side of the 2rd
row of display.
To Recall Records
• In the Memory Mode, press
[S/S] or [R] button to select
which record you want to
check.
8
Timer Mode - Setting Sequence
To Set the Timer Mode
• To set the pre-defined target
time in timer mode, press and
hold the [M] button for about 2
seconds (the 'Hour' digits will
start flashing)
Timer Mode
Hold [M]
Hold [M]
[M]
Timer
Hour
Timer
Minute
[M]
Timer
Second
[M]
Timer Setting Sequence
hold
[S/S] or [R]
scroll
the setting
faster
[S/S] or [R]
Increase /
Decrease
setting by 1
The Setting Sequence
• When the 'Hour' digits start to
flash, press the [M] button to
move the flash following the
sequence of
the adjacent
diagram.
• When one of the settings (hour,
minute, second) is flashing, press
the [S/S] or [R] button to scroll
through the setting (hold down
the button to scroll the setting at
a faster pace).
• Press and hold the [M] button for
about 2 seconds to exit the
setting sequence.
• The setting display will return to
Timer Mode automatically if NO
keystroke has been activated for
about 1 minute.
8.1
Timer Mode - Using Timer
To Use the Timer Mode
• Once a target time has been set (for
example 3 hours), press the [S/S]
button once to start the countdown.
The countdown time will be displayed
Timer Mode
continuously
throughout
the
(Finish Counting)
countdown.
• To stop counting, press the [S/S]
Hold [R]
button once.
4:59’59”
Current Time
To Reload the Timer
• Hold the [R] button to reload the
timer to the preset target time when
[S/S]
the counting is stopped.
• To start the counting at a target time,
Pre-defined
set a new value for the pre-defined
Target
Time
Timer Mode
Timer Mode
target time. Check the previous
(Timer initialized)
(Counting) counting
chapter 8.0 for more detail on how to
set the Target Time.
[S/S]
Timer Alarm Sound
• When the timer reaches the last 10
Hold [R]
seconds, the watch will beep once for
Note:
each second left. When it hits zero, the
This diagram illustrates the flow
watch will beep for about 15 seconds
among different functional
stop
displays only, hence, these
counting • You can stop the beeping by pressing
Timer Mode
displays DO NOT conform to
any button.
(Stop Counting)
fact in all instances.
9
Battery Replacement for Chest Strap
Back View
• If the Chest Strap stops transmitting heart rate signal to
the watch (NO heart rate reading show on the Watch),
it might be due to the battery of the Chest Strap
running out.
• If it is the case, it is recommended to replace the
battery by an authorized service agency.
How to Replace the Battery for the Chest Strap
1. Turn the cover with a coin counterclockwise so that the
arrow on the cover turns from ‘Dot’ to ‘Arrow’.
2. Turn the cover further gently to pop it out.
3. Put aside the battery cover.
4. Remove the exhausted battery.
5. Insert a new battery with the (+) side of the battery
upward.
6. IMPORTANT: Make sure that the sealing rubber (o-ring)
is placed correctly in its slot (on the side of the cover)
before the battery cover is replaced.
7. Put the battery cover back with the arrow on the cover
points to ‘Arrow’, and then press the cover down gently
until it is on the same level with the case’s surface.
8. Turn the cover with the coin clockwise so that the
arrow on the cover turns from ‘Arrow’ to ‘Dot’.
Tips: In case the chest strap CANNOT properly reset (NO
signal transmission), connect the (+) and (-) battery
contact of the chest strap with the metal shell (+ ve) of the
battery (Steps A,B,C) and reinstall the battery for normal
operations.
10
Potential Causes for NO Heart Rate Reading or Long Response Time
1) Cause: Dry Skin.
Solution: Apply conductive gel or saliva thoroughly to chest area (Chest-Strap
measurement) or finger (Finger-Touch measurement). Even water will help if
conductive gel is not available.
2) Cause: Not firmly with user’s skin.
Solution: Make sure the chest strap is firmly over the chest and the Watch is
placed securely on wrist.
3) Cause: Muscle tremors caused by holding too hard.
Solution: Make sure the chest strap is firmly over the chest and the Watch is
placed securely on wrist.
4) Cause: Dead skin on wrist, finger or chest.
Solution: Usually rubbing your skin with a towel will help.
5) Cause: A thin layer of body grease insulate the ECG signal which prevents the
Chest Strap or Watch from picking up one’s ECG.
Solution: Wipe chest / wrist and the back of Chest Strap / watch with a tissue or
soft towel.
6) Cause: Hairy skin.
Solution: Apply conductive gel to chest area or wrist.
7) Cause: Irregular heartbeats.
Solution: N/A It is difficult to consistently pick up a reading for those with irregular
heart beats. Inconsistent response times are expected for those with arrhythmia.
8) Cause: Battery Low.
Solution: It might be due to the battery level of the Chest Strap / watch is low.
Replace the battery and try again.
9) Cause: Interference of other RF devices (Chest-Strap Measurement)
Solution: Depart from the place where RF source potentially exist.
11
Care and Maintenance
• This watch contains electronic components. Never attempt to open the case or
remove the back cover.
• Avoid exposing the watch to extreme temperature, chemicals which will
damage the watch.
• Keep the watch away from the conditions of strong electric field and static
electricity.
• Avoid rough usage or severe impact. The watch is designed to withstand impact
under normal use. It is advisable to subject it to severe impact or rough usage.
• Clean your watch occasionally with a soft moistened cloth only. Avoid using
chemicals, especially soap as the waterproof gasket will corrode.
• Store the watch in a dry place when it is not in use.
12
Precautions for Straps
• Exposure to water often makes a strap fragile and it may soon tear.
• Don’t apply perfume or moisturizers around your wrist as the chemicals can
erode the metal, leather and plastic of watch straps.
• The strap’s condition will depend on the owner’s wearing habits as well as the
climate of the place where the person lives. An original replacement on straps
is possible to be re-ordered through an authorized service center.
• PU straps are usually very hardwearing, please wash them with mild soapy
water only.
• There may be discoloration for light color and transparent straps after normal
wear for some time.
• In case if there is any severe or persistent skin reaction, such as severe redness,
itching, rash or hives, you should stop wearing this watch, and consult your
doctor.
13
Precautions for Water Resistance
All New Balance watches are designed to withstand use as indicated on the below
chart.
Indication
Level of
resistance
Water-related use
Light spray
perspiration,
light rain, etc
Bathing,
etc
Swimming,
etc
3ATM
(30 meters)
5ATM
(50 meters)
10ATM
(100 meters)
• Water damage may occur if the push buttons are pressed under water.
• Should water or condensation appear in the watch, please check the watch
immediately as corrosion of electronic parts can occur inside the case.
14
Precautions for Battery
Battery Life
The battery in your New Balance watch is estimated to last for 2 years.
Battery Replacement
If the watch is out of battery, you are recommended to go to the authorized New
Balance service center for correct battery replacement in order to retain a valid
warranty and avoid any damage on the water resistance function.
WARNING!
Always keep watch batteries away from children. If swallowed, contact a doctor
immediately. Batteries contain chemical substances. They should be disposed of
properly according to local regulations.
Authorized Licensee of New Balance Athletic Shoe, Inc.
New Balance and Flying NB are registered trademarks of
New Balance Athletic Shoe, Inc.