1
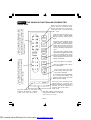
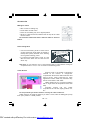
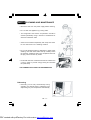
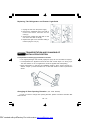
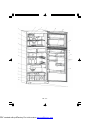
ELECTRONIC
NO-FROST REFRIGERATOR
Instruction booklet
Index
BEFORE USING THE APPLIANCE ..................................................................... 2
Safety Instructions ..................................................................................................... 2
Recommendations ................................................................................................... 3
Installation and Switching On The Appliance ......................................................... 4
Before Switching On .................................................................................................. 4
THE VARIOUS FUNCTION AND POSSIBILITIES ............................................... 5
Control Panel ............................................................................................................. 5
Switching on the appliance ...................................................................................... 6
Mode Button (MODE) ...................................................................................................... 6
Super Freeze Mode ........................................................................................................ 6
Super Cool Mode ............................................................................................................. 7
Turbo Mode ...................................................................................................................... 8
Holiday Mode ................................................................................................................... 8
Economy Mode (ECO) ..................................................................................................... 8
Screen Saver Mode ........................................................................................................ 9
No light Mode ................................................................................................................... 9
Door open alarm Function .............................................................................................. 9
Freezer compartment temperature adjustment .......................................................... 10
Cooler compartment temperature adjustment ............................................................. 11
Warnings about temperature settings .................................................................. 11
Accessories ............................................................................................................. 12
Making Ice Cubes .......................................................................................................... 12
Fast Freezing Shelf ...................................................................................................... 12
Chiller Shelves ............................................................................................................... 12
Drawer ........................................................................................................................... 13
Wine Rack ...................................................................................................................... 13
Crisper and Crisper Shelf ............................................................................................ 13
Sliding Compartment ..................................................................................................... 14
Fresh Dial ....................................................................................................................... 14
REMOVING THE CRISPER COVER ............................................................................... 15
ARRANGING FOOD IN THE APPLIANCE ......................................................... 16
Refrigerator Compartment ..................................................................................... 16
Freezer Compartment ............................................................................................. 16
CLEANING AND MAINTENANCE ...................................................................... 17
Defrosting ................................................................................................................ 17
Replacing The Refrigerator and Freezer Light Bulb ............................................ 18
UK - 1 -
PDF created with pdfFactory Pro trial version www.pdffactory.com
TRANSPORTATION AND CHANGING OF INSTALLATION POSITION .............. 18
Changing of Door Opening Direction .................................................................... 18
BEFORE CALLING YOUR AFTER SALES SERVICE ......................................... 19
THE PARTS OF THE APPLIANCE AND THE COMPARTMENTS ....................... 22
PART- 1. BEFORE USING THE APPLIANCE
Safety Instructions
• If the model contains R600a-see name plate under refrigerant (the coolant isobutane),
naturals gas that, is very environmentally friendly but also combustible. W hen
transporting and installing the unit care must be taken to ensure that none of the
refrigeration circuit components become damaged. In the event of damage avoid
naked flames or ignition sources and ventilate the room in which the unit is placed
for a few minutes.
Warning: Keep ventilation openings in appliance enclosure or in structure for building
in, clear of obstruction.
• Do not use mechanical devices or other artificial means to accelerate the defrosting
process.
• Do not use electrical appliances in the refrigerator or freezer compartment of the
appliance.
• If this appliance is to replace an old refrigerator with a lock; break or remove the lock
as a safety measure before storing it, to protect children while playing might lock
themselves inside.
• Old refrigerators and freezers contain insulation gases and refrigerant, which must
be disposed of properly. Entrust the disposal of a scrap unit categorically to
competence of your local waste disposal service and contact your local authority or
your dealer if you have any questions. Please ensure that the pipe of work of your
refrigerating unit does not get damaged prior to being picked-up by the relevant waste
disposal service.
IMPORTANT NOTE:
Please read this booklet before installing and switching on this appliance. The
manufacturer assumes no responsibility for incorrect installation and usage as described
in this booklet.
UK - 2 -
PDF created with pdfFactory Pro trial version www.pdffactory.com
Recommendations
Warning: Do not use mechanical devices or other artificial means to accelerate the
defrosting process. Do not use electrical appliances in the food storage of the appliance.
Keep the appliance ventilation openings free. Do not damage the refrigerator’s refrigerant
circuit.
• Do not use adopters or shunts which could cause
overheating or burning.
• Do not plug old, warped power supply cables.
• Do not twist and bend the cables.
• Do not allow children to play with the appliance. Children must
NEVER sit on drawers/shelves or hang from the door.
• Do not plug the power supply with wet hands.
• Do not place containers (glass bottles or tin containers) of liquids
into the freezer especially gassy liquids as they could cause
the container to burst during freezing.
• Bottles, which contain a high percentage of alcohol must be
sealed well and placed vertically in the refrigerator.
• Do not touch the cooling surfaces, especially with wet hands as
you could be burnt or hurt.
• Do not eat ice, which have just been removed from the freezer.
• The appliance is not intended for use by people (including children) with reduced
physical, sensory or mental capabilities, or lack of experience and knowledge, unless
they have been given supervision or instruction concerning use of the appliance by
a person responsible for their safety. Children should be supervised to ensure that
they don’t play with the appliance.
• If the supply cord is damaged it must be replaced by the manufacturer or service
agent or appointed person.
UK - 3 -
PDF created with pdfFactory Pro trial version www.pdffactory.com
Installation and Switching On The Appliance
• This appliance is connecting to 220-240V and 50 Hz.
• You can offer help from the service to install and switching on the appliance without
any cost.
• Before making the connection to the power supply, ensure that the voltage on the
nameplate corresponds to the voltage of electrical system in your home.
• If the socket does not match the refrigerator plug, replace the plug with a suitable
one (at least 16 A)
• Insert the plug into a socket with an efficient ground connection. If the socket has no
ground contact, we suggest you call an electrician for assistance.
• Manufacturer is not responsible for failure to complete the ground connection as
described in this booklet.
• Do not place the appliance in direct sunlight.
• Do not use in open air and shall not be exposed to the rain.
• Place the refrigerator far from heat sources and in a
well-ventilated position. The refrigerator should be at least 50
cm from radiators, gas or coal stoves and 5 cm far from electrical
stoves.
• Keep the top free for at least 15 cm.
• Do not place heavy and lots of things on the appliance.
• If the appliance is installed next to another refrigerator or freezer,
observe a minimum distance of 2 cm to prevent condensation.
• The appliance must be stand firmly and level on the floor Use
the two front levelling-feet to compensate for an even floor.
• Install the distance adjustment plastic (the part with black vanes
at the rear) by turning it 90° to prevent the condenser from
touching the wall.
• In order to have air circulation under the appliance, the space
under the appliance must be open. Don’t close it with carpet ,
etc.
• The outside of the appliance and the accessories inside should
be cleaned with a solution of water and liquid soap; the inside
of the appliance with sodium bicarbonate dissolved in lukewarm
water. After drying replace all the accessories.
Before Switching On
• Wait after 3 hours before plugging the appliance in to the main power
to ensure proper performance.
• There can be an odour when you first switch on the appliance. It will
disappear after the appliance starts to cool.
UK - 4 -
PDF created with pdfFactory Pro trial version www.pdffactory.com
PART- 2. THE VARIOUS FUNCTION AND POSSIBILITIES
Freezer Compartment Temperature Bars
When -16°C is active, 1 bar lights; when -18°C is
active 2 bars light; when -20°C is active 3 bars
light; when -22°C is active 4 bars light; when -24°C
is active 5 bars light.
Cooler Compartment Temperature Bars
When +8 is active, 1 bar lights; when +6 is active
, 2 bars light; when +4 is active, 3 bars light; when
+2 is active , 4 bars light.
Control Panel
W ith each pushing on this button, the
temperture decreases of 2 degrees.
(-16°C, -18°C, -20°C, -22°C, -24°C)
W hen this mode is selected, your appliance works in ec onomical mode.
During mode economy symbol lights,
cooler part shows +4°C, freezer part
shows -18°C.
W hen this mode is selected, your
appliance works in Holiday Mode.
During mode only holiday symbol
lights.
When this mode is selected, Super
Freeze mode is engaged. During
mode Super Freeze symbol lighst,
Freezer bars don’t light. Cooler part
shows setting temperature and
bars light according to temperature
value.
When this mode is selected, Super
Cool mode is engaged. During mode
super cool symbol lights, Cooler
bars don’t light.Freezer part shows
setting temperature and bars show
setting temperature.
This symbol lights in low-voltage
When your appliance has a failure,
this symbol lights.
Turbo symbol lights when both
Super cooling and super freezing symbol is selected
If user goes on pushing Mode Button, in a sequence, Holiday, Fast
Freezing, Super Cooling and Turbo
Modes can be selected.
W hen you press and hold screen
saving button for 3 sec onds, this
mode is activated. W hile this mode is
activated, if no key is pressed for 5
seconds, lights of the control
panel go off.
With each pushing on this button, the
temperture decreases of 2 degrees.
(+8°C,+6°C, +4°C, +2°C)
UK - 5 -
PDF created with pdfFactory Pro trial version www.pdffactory.com
Switching on the appliance
After the equipment is attached to the wall outlet, all symbols appear on the screen for
2 seconds and then the initial temperature value of -18oC is displayed in the deep freezer
setting indicator and the initial temperature value of +4 oC is displayed in the refrigerator
setting indicator.
Mode Button (MODE)
• Press mode button once.
• When you press mode button first , economy symbol will blink
and in in 1 second if none of button is pushed, symbol will
blink 3 times and sound beep.
• If user goes on pushing mode button, in a sequence, holiday,
fast freezing, super cooling and turbo modes can be
selected.There will be no mode selected in 6th pushing of mode
button.
• When the wanted symbol is in the screen, do not push any button
in 1 second. Symbol will blink 3 times and you will sound beep.
• With the sound of beep, wanted mode will be selected and will
be seen in the screen.
Super Freeze Mode
When will apply ;
• To freeze lots of food that cannot fit into “Fast Freezing Shelf”.
• To freeze prepared foods
• To freeze faster
• To conceal fresh foods and vegetables
How to use ;
• Press mode buton until Super Freezing symbol will light.
• Symbol will blink 3 times and a beep of confirmation will sound
if user does not push any button within 1 seconds.
• During this mode , ‘super freeze’ symbol will lighten.Freezer
• Bars will not lighten.Cooler part will show setting temperature
and bars will lighten according to temperature value.
• 3 hours after being activated, your refrigerator starts giving signals. This signal tells
that the quickfreezer compartment is ready for the foods to be placed in it. Your
refrigerator will give intermittent beep sounds for 1 minute in every 5 minutes; provided
that the doors are not opened, this signal giving will last 1 hour. When this sound is
heard, foods to be frozen must be placed away from the already frozen ones. When
UK - 6 -
PDF created with pdfFactory Pro trial version www.pdffactory.com
the door of the freezer or cooler is opened, this signal stops. When your foods are
cooled enough, your refrigerator will automatically go out of the quick freezing mode.
After a period of maximum 24 hours after the function is activated, the freezing process
will be completed.
• During this mode , cooler temperature adjusting can be done.
• Freezer temperature adjusting can be done but will not be active until super freezing
finishes.
• Holiday and Economy modes will not work until Super Freezing mode finishes.
• Mode will be cancelled if selected super freezing mode symbol again.
Note: “SUPER FREEZE” will be cancelled automatically after 24 hour or when freezer
Sensor <-32°C.
Super Cool Mode
When will apply;
• To cool the prepared foods.
• To cool and conceal a lots of food in refrigerator compartment.
• To cool the drinks more quickly.
How to use;
• Press mod button until super cooling symbol will light.
• Symbol will blink 3 times and a beep of confirmation will sound
if user does not push any button within 1 seconds.
• ‘Super Cool’ symbol will light during this mode.Cooler Bars will
not light.Freezer part will show setting temperature and bars
will show setting temperature.
• Holiday and Economy modes will not work until super cooling mode finishes.
• Super Freezing and Freezer temperature adjusting can be enabled.
• Refrigerator temperature adjusting can be done but will not be active until super
cooling finishes.
• Mode will be cancelled if selected super cooling mode symbol again.
Note: W hen the sensor of the refrigerator compartment reaches -4°C or the function
stops automatically after 8 hours. The reason of this time period was restricted as 8
hours is to prevent food freezing risks which can be occured by powerful cooling attribute.
UK - 7 -
PDF created with pdfFactory Pro trial version www.pdffactory.com
Turbo Mode
When will apply;
• Turbo symbol will light when both Super cooling and super
freezing symbol is selected
How to use ;
• Press Mode button until Turbo symbol will light. Symbol will blink
3 times and a beep of confirmation will sound if user does not
push any button within 1 seconds.
• When “Turbo” mode is on, ‘super cool’ and ‘super freeze’ symbol
will light.
• Freezer and cooler bar graphic lights will be off.
• Holiday and Economy modes will not work until “Turbo” mode
finishes.
• Freezer and cooler temperature’s adjusting can be done but will not be active until
turbo mode is deactivated.
• Mode will be cancelled if selected turbo mode symbol again
Holiday Mode
When will apply;
• If you will go to holiday and you want to load out the cooler part,
you can use holiday mode.
How to use ;
• Press mod button until Holiday symbol will light.
• Symbol will blink 3 times and a beep of confirmation will sound
if user does not push any button within 1 seconds.
• Freezer compartment will go on working with the set value
defined on the control circuit during the holiday mode.
• During this mode, holiday symbol will light.
• Cooler temperature segment and freezer temperature segment
and bar graphic lights will be off.
• Mode will be cancelled if selected holiday symbol again.
• Appliance will go on to work with previous manually adjusted values. If no temperature
values have been adj usted manually, it will go on with initial values (Freezer
Compartment -18°C and Refrigerator Compartment +4°C)
Economy Mode (ECO)
When will apply;
• When you want to work your appliance in economical mode.
• If you want to use at a set value is defined on the control circuit.
• Both compartments will work in the normal regulation with the set values
UK - 8 -
PDF created with pdfFactory Pro trial version www.pdffactory.com
How to use ;
• Press Mode button until Economy symbol will light.
• Symbol will blink 3 times and a beep of confirmation will sound
if user does not push any button within 1 seconds.
• During mode economy symbol will light, cooler part will show
+4°C, freezer part will show -18°C.
• The other modes will not work till economy mode finishes.
• Mode can be cancelled by selecting symbol again.
Screen Saver Mode
When will apply;
• If you do not want the control panel lights to be on and consume
energy unnecessarily while you have not made any changes in
your settings, you may activate this mode.
How to use ;
• When you press and hold screen saving button for 3 seconds,
this mode will be activated.
• While this mode is activated, if no key is pressed for 5 seconds,
lights of the control panel will go off.
• If you press on any key when the control panel’s light’s are off,
currrent settings appear on the display to let you make any
change you wish. If you do not cancel the screen saving mode
or press any key for 5 seconds, control panel will dim again.
• To cancel the screen saving mode, press any button and hold the screen saving
mode button again for 3 seconds.
No light Mode
When will apply;
• If you want to disable lamps for both of compartments, you can choose this mode.
Lamps will not light till mode is cancelled.
Setting This Mode;
• Push both cooler and freezer button at the same time, open and close freezer door 3
times.
Cancelling This Mode;
• Function can be cancelled by the same way or after 24 hours appliance will directly
cancel it.
Door open alarm Function
If cooler or freezer door is opened more than 2 minutes , appliance sounds ‘beep
beep’.
UK - 9 -
PDF created with pdfFactory Pro trial version www.pdffactory.com
Freezer compartment temperature adjustment
• At first the freezer display will show -18°C.
• Press once “F” button.
• The first pushing of freezer button, user will see -16°C and bar
which is near -16°C will light.
• With each pushing on this button, the temperture decreases of
2 degrees. (-16°C, -18°C, -20°C, -22°C, -24°C) Number
segment and bar will blink 3 times and a beep of confirmation
will sound.
• When -16°C is active, 1 bar will light; when -18°C active 2 bars
will light; when -20°C is active 3 bars will light; when -22°C is
active 4 bars will light; when -24°C is active 5 bars will light.
• If appliance was set to holiday, super freeze, super cool economy
mode or turbo mode before temp. Adjusting, appliance will go
on to work in previous mode. W hen previous mode is cancelled
/ finished manually or automatically appliance will start to work
in adjusted values.
Note**: If Ambient sensor is > 38°C then user will not be able to adjust freezer
Compartment‘s temp. to -22°C and -24°C. Then only -16°C, -18°C, -20°C will be available.
Recommended Settings For Freezer Compartment Temperature
Temperature Bar
1 Bar
2 Bars or 3 Bars
4 Bars or 5 Bars
When to use it?
For little amount stoking
Normal stoking
For lots of food stocking
UK - 10 -
PDF created with pdfFactory Pro trial version www.pdffactory.com
Freezer Cabinet Inside
Temperature
-16°C
-18°C or -20°C
-22°C or -24°C
Cooler compartment temperature adjustment
• At first the cooler part will show +4°C.
• Press once “C” button.
• The first pushing of cooler button, user will see +8°C and bar
which is near +8°C will light.
• With each pushing on this button, the temperture decreases of
2 degrees. (+8°C,+6°C, +4°C, +2°C) Number segment and bar
will blink 3 times and a beep of confirmation will sound.
• When number segment is +2°C. If you push refrigerator button,
the number segment will go on from +8°C. W hen +8 is active, 1
bar will light; when +6 is active, 2 bars will light; when +4 is
active, 3 bars will light; when +2 is active, 4 bars will light.
• If appliance was set to holiday, super freeze, super cool,
economy or turbo mode before temp. adjusting, appliance will
go on to work in previous mode. W hen previous mode is
cancelled / finished manually or automatically appliance will
start to work in adjusted values.
Recommended Settings For Cooler Compartment Temperature
Temperature Bar
4 Bar
3 Bars or 2 Bars
1 Bar
When to use it?
For lots of food stocking
Normal stoking
For little amount stoking
Cooler Cabinet Inside
Temperature
+2°C
+4°C or +6°C
+8°C
Warnings about temperature settings
• Your temperature settings will still be valid during any power failure. Childproof function
will be cancelled during power failures.
• Operating your refrigerator in ambient temperatures below 10oC is not recommended
for its efficiency.
• The temperature settings should be made by taking into consideration how often the
cooler and freezer door is opened and closed, and how much food is stored in it.
• Do not switch to another adjustment before completing a setting.
• Depending on the ambient temperature, your refrigerator must operate nonstop up
to 24 hours in order to cool down completely after it is plugged in for the first
time.During this period, do not open the doors of your refrigerator frequently and do
not overfill.
• To prevent any damage on the compressor of your refrigerator when you want to
restart your refrigerator after unplugging it or after a power failure is restored, there
is a function which makes your refrigerator operate after a 5-minute delay. Your
refrigerator will start operating normally after 5 minutes.
When you first switch on the appliance, for starting a suitable cooling, the appliance
should work 24 hours continuously until it cools down to sufficient temperature. During
this time do not open the door so often and do not place a lot of food inside the appliance.
UK - 11 -
PDF created with pdfFactory Pro trial version www.pdffactory.com
Accessories
Making Ice Cubes
• Take out the ice making tray
• Fill the water in level of line.
• Place the ice making tray in its original position
• When ice cubes are formed, twist the lever to drop off ice cubes
into the icebox.
Do not fill the icebox with water in order to make ice. It can be
broken.
Fast Freezing Shelf
• Use the fast freezing shelf to freeze home
cooking (and fresh foods which is wanted to
freeze) more quickly because of the freezing
room’s greater freezing power.
• For opening the shelf pull the cover up, and
slide it in to the shelf. You can close it in the
same way
Note that; be sure that the cover of fast freezing shelf is closed before closing the
compartment door. If not, it can not show its fast freezing power.
Chiller Shelves
Klape
Keeping food in the Chiller compartment
instead of the freezer or refrigerator
compartment allows food retain freshness and
flavour longer, while preserving its fresh
appearance. W hen chiller tray becomes dirty,
remove it and wash it with water.
(Water freezes at 0°C, but foods containing
salt or sugar freeze at temperature lower than
that)
Normally people
use
the chiller
compartment for raw fish, lightly pickled, rice,
etc...
Do not put foods you want to freeze or ice trays in order to make ice.
Chiller shelf can be used as drawer if you want. For this, take the sliding part (cover)
from open positon to closed position.
UK - 12 -
PDF created with pdfFactory Pro trial version www.pdffactory.com
Drawer
Drawer compartment has four pieces of
drawer boxes in order to allow you to keep your
foods and use these for breakfast easily.
For consumer’s usage comfort and for the
optimum of storage foods, you can easily move
your drawer to right or to left direction.
Also you can easily pull the drawer
compartment and take it out when needed.
Note: In order to prevent drying of the foods and mixing of the smells you should close
drawer boxes cover.
Wine Rack
It allows you to keep your bottles in horizontal
position depending on your storage of
refrigerator.
You can easily load the shelf under the wine
rack by moving wine rack to right or to left.
If you do not need to this accessory please
pull the glass shelf towards you and then take
out wine rack from glass shelf by moving it to
right or left. Please do not forget that you can fix
it any of glass shelves in your product.
Note: to prevent of spilling the drinks in your bottle please keep your bottle lid as
closed.
Crisper and Crisper Shelf
The crisper compartment absorbs and
decomposes ethylene gas (*) emitted from fruits
and vegetables with a “FILTER” in the crisper shelf,
keeping fruits and vegetables fresh. The filter also
eliminates unpleasant odours from inside the
crisper, and control the excess water released by
the vegetables, maintaining a high humidity
environment inside the crisper. W hen the crisper
shelf become dirty, remove the filter by taking out
the filter cover and wash the crisper cover with water.
Crisper
Sebzelik
Cover
rafı
Filter
Nem tutucu filtre
Filterkapağı
Cover
Filtre
! Do not wash the “Humidity-Control Filter” with water.
(*)NOTE; Ethylene gas is a gas, produced from fruits and vegetables, which accelerates
the ageing of fruits and vegetables. For example, spinach and broccoli turn to yellow
colour easily in places where ethylene gas is abundant.
UK - 13 -
PDF created with pdfFactory Pro trial version www.pdffactory.com
Sliding Compartment
• The foods in the sliding compartment are retained in the same temperature as
refrigeretor compartments. So it should not be used as crisper or chiller shelves.
• The Sliding Compartment allows foods are maintained more regularly.
Removing The Sliding Compartment;
• Pull the compartment out as far as possible
• Pull the front of part up and out.
NOTE: Make the inverse of the same operation for the resetting the sliding
compartment.
Fresh Dial
In case of the crisper is totally full, the
fresh dial is located in front of crisper,
should be opened. By means of this the
air in the crisper and humidity rate will be
controlled and endurance life will be
increased.
Fresh Dial
UK - 14 -
PDF created with pdfFactory Pro trial version www.pdffactory.com
REMOVING THE CRISPER COVER
First Step: Removing the crispers
• Turn the front covers of crisper to the position
which back side touch the crisper cover.
• Pull the crisper out as far as possible.
• Pull the front part up and out.
Note that; be sure that the front covers of crisper are closed
before closing the refrigerator door.
Second Step: Taking out the partition crisper
center between the crispers.
• Turn the front covers of crisper to the position
which back side touch the crisper cover.
• Bend the Partiton toward left from the bottom of
the part.
• Take out the Partiton crisper.
Third Step: Taking out the crisper cover with front
covers.
• Pull the crisper cover when front covers of crisper
are closed.
• Pull the crisper cover up and out.
• Don't split the front covers of crisper from the
crisper cover.If not, the crisper cover can be
breaked.
Fourth Step: Spliting the crisper cover from the
front covers of crisper.
• Bend the pim slot where is beside to crisper cover.
• Take out the front cover of crisper.
NOTE: Make the inverse of the same operation for the resetting the crisper cover.
All written and visual descriptions in the accessories may vary according
to the appliance model.
UK - 15 -
PDF created with pdfFactory Pro trial version www.pdffactory.com
PART- 3. ARRANGING FOOD IN THE APPLIANCE
Refrigerator Compartment
• To set the refrigerator compartment to 5 graphic bar will be enough for normal conditions.
• To reduce humidity and consequent increase of frost never place liquids in unsealed containers
in the refrigerator.
• Never place warm food in the refrigerator. Warm food should be allowed to cool at room
temperature and should be arranged to ensure adequate air circulation in the refrigerator
compartment.
• Arrange the meat and cleaned fish (wrapped in packages or sheets of plastic) which you will
use in 1-2 days.
• You can put the fruits and vegetables into crisper without packing.
Freezer Compartment
• To set the freezer compartment to 5 graphic bar will be enough for normal conditions.
• The use of freezer is, storing of deep-frozen or frozen foods for long periods of time and
making ice cubes.
• Do not put fresh and warm foods to the freezer door shelves to be frozen. Only use for
storage of frozen foods.
• Do not put fresh and warm food with frozen food side by side as it can thaw the frozen food.
• Use the fast freezing shelf to freeze home cooking (and the foods which is wanted to freeze)
more quickly because of the freezing room’s greater freezing power.
• While freezing fresh foods (i.e. meat, fish and mincemeat) divide them in parts you will use in
one time.
• While freezing fresh foods ; Maximum amount of fresh food (in kg) that can be frozen in 24
hours is indicated on the appliance label.
• For optimum appliance performance to reach maximum freezing capacity , turn the freezer
thermostat knob to position max 24 hours before placing fresh food inthe freezer.
• After placing fresh food in the freezer ,24 hours on max position is generally sufficient,After 24
hours, don not need to set the feezer thermostat knob to position max.
• Attention; In order to save energy, When freezing small amounts of food, don not need to set
the freezer thermostat knob to position max.
• For storing the frozen foods; the instructions shown on frozen food packages should
always be followed carefully and if no information is provided food should not be stored for
more than 3 months from the purchased date.
• When buying frozen foods ensure that these have been frozen at suitable temperatures
and that the packing is intact.
• Frozen foods should be transported in appopriate containers to maintain the quality of the food
and should be returned to the freezing surfaces of the unit in the shortest possible time.
• If a package of frozen food shows the sign of humidity and abnormal swelling it is probable that
it has been previously stored at an unsuitable temperature and that the contents have
deteriorated.
• The storage life of frozen foods depends on the room temperature, thermostat setting,
how often the door is opened, the type of food and the length of time required to transport the
product from the shop to your home. Always follow the instructions printed on the package
and never exceed the maximum storage life indicated.
UK - 16 -
PDF created with pdfFactory Pro trial version www.pdffactory.com
PART- 4. CLEANING AND MAINTENANCE
• Disconnect unit from the power supply before cleaning.
• Do not clean the appliance by pouring water.
• The refrigerator and freezer compartment should be
cleaned periodically using a solution of bicarbonate of
soda and lukewarm water
• Clean the accessories separately with soap and water.
Do not clean them in the washing machine.
• Do not use abrasive products, detergents or soaps. After
washing, rinse with clean water and dry carefully. When
the cleaning operations have been completed reconnect
the plug of the unit with dry hands.
• You should clean the condenser with broom at least once
a year in order to provide energy saving and increase
the productivity.
THE POWER SUPPLY MUST BE DISCONNECTED.
Defrosting
• Defrosting occurs fully automatically during
operation; the defrost water is collected by the
evaporating tray and evaporates automatically.
Evaporating
tray
UK - 17 -
PDF created with pdfFactory Pro trial version www.pdffactory.com
Replacing The Refrigerator and Freezer Light Bulb
1. Unplug the unit from the power supply,
2. Remove the refrigerator light cover with a
minus screw driver, and take out the
cover.(A)
3. Change the present light bulb with a new
one of not more than 15 W.(B)
4. Replace the light cover and after waiting 5
minutes plug the unit.(C)
PART- 5.
TRANSPORTATION AND CHANGING OF
INSTALLATION POSITION
Transportation and Changing of Installation Position
• The original packages and foamed polystyrene (PS) can be concealed if required.
• In transportation the appliance should be tied with a wide stripe or a strong rope.
The rules written on the corrugated box must be applied while transporting.
• Before transporting or changing old installation position, all the moving objects (i.e.,
shelves, crisper…) should be taken out or fixed with bands in order to prevent the
shake.
Changing of Door Opening Direction
(For some models)
In case you need to change door-opening direction, please consult the domestic after
sales service.
UK - 18 -
PDF created with pdfFactory Pro trial version www.pdffactory.com
PART- 6. BEFORE CALLING YOUR AFTER SALES SERVICE
If your refrigerator is not working properly, it may be a minor problem, therefore check
the following, before calling an electrician to save time and money.
ERROR
TYPE
MEANING
SR
Failure
Warning
There is / are some
part(s) Out of order or
Call Service after 1 hour when you
see the failure
there is a failure in cooling
process
LOW
WOLTAGE
Low
Woltage
When the power supply This not a failure. This prevents any
gets lower than 170V the damages on the compressor. This
appliance gets to steady
warning will off after the voltage
position.
gets required level
WHY
WHAT TO DO
What to do if your refrigerator does not operate;
Check that;
• There is no power ,
• The general switch in your home is disconnected ,
• The thermostat setting is on« 0 »position ,
• The socket is not sufficient. To check this, plug in another appliance that you know
which is working into the same socket.
What to do if your refrigerator performs poorly;
Check that;
• You have not overloaded the appliance ,
• The doors are closed perfectly ,
• There is no dust on the condenser ,
• There is enough place at the rear and side walls.
If there is noise;
The cooling gas which circulates in the refrigerator circuit may make a slight noise
(bubbling sound) even when the compressor is not running. Do not worry this is quite
normal. If these sounds are different check that;
• The appliance is well levelled
• Nothing is touching the rear.
• The stuffs on the appliance are vibrating.
UK - 19 -
PDF created with pdfFactory Pro trial version www.pdffactory.com
If your fridge is operating too loudly;
Normal Noises
Cracking (Ice cracking) Noise:
• During automatic defrosting.
• When the appliance is cooled or warmed (due to expansion of appliance material).
Short cracking
• Heard when the thermostat switches the compressor on/off.
Compressor noise
• Normal motor noise. This noise means that the compressor operates normally
Compressor may cause more noise for a short time when it is activated.
Bubbling noise and splash:
• This noise is caused by the flow of the refrigerant in the tubes of the system.
Water flow noise:
• Normal flow noise of water flowing to the evaporation container during defrosting.
This noise can be heard during defrosting.
Air Blow Noise:
• Normal fan noise. This noise can be heard in No-Frost fridge during normal operation
of the system due to the circulation of air.
If the edges of fridge cabinet that the door joint contact are warm;
• Especially in summer (hot weather), the surfaces that the joint contact may get warmer
during the operation of the compressor, this is normal.
If humidity builds up inside the fridge;
• Are all food packed properly? Are the containers dried before placing them in the
fridge?
• Are the fridge doors opened frequently? Humidity of the room gets in the fridge when
the doors are opened. Humidity build up will be faster when you open the doors
more frequently, especially if the humidity of the room is high.
• Building up of water drops on the rear wall after automatic defrosting is normal. (in
Static Models)
If the doors are not opened and closed properly;
• Do the food packages prevent closing of the door?
• Are the door compartments, shelves and drawers placed properly?
• Are door joints broken or torn?
• Is your fridge on a level surface?
UK - 20 -
PDF created with pdfFactory Pro trial version www.pdffactory.com
If your fridge is not cooling enough;
Your fridge is designed to operate in the ambient temperature intervals stated in the
standards, according to the climate class stated in the information label. W e do not
recommend operating your fridge out of stated temperatures value limits in terms of cooling
effectiveness.
Climate Class
T
ST
N
SN
Ambient Temperature (°C)
Between 16 and 43 (°C)
Between 16 and 38 (°C)
Between 16 and 32 (°C)
Between 10 and 32 (°C)
Recommendations
• In order to increase space and improve the appearance,the « cooling section » is
positioned inside the back wall of the refrigerator compartment. W hen the appliance
is running, this wall is covered with frost or water drops,according to weather the
compressor is running or not. Do not worry. This is quite normal. The appliance
should be defrosted only if an excessively thick layer forms on the wall.
• If the appliance is not used for long time (for example during the summer holidays)set
te thermostat knob to « 0 » position. Defrost and clean the refrigerator leaving the
door open to prevent the formation of midew and smell.
Conformity Information
• Tropical Class is defined for the environment temperatures between 16°C and 43°C
in accordance with the TS EN ISO 15502 Standards.
• The appliance is designed in compliance with the EN15502, IEC60335-1 /
IEC60335-2-24, 2004/108/EC standards.
• The appliance complies with the “EEE” Regulation.
UK - 21 -
PDF created with pdfFactory Pro trial version www.pdffactory.com
PART- 7.
THE PARTS OF THE APPLIANCE AND THE
COMPARTMENTS
1- Fast Freezing shelf
2- Ice tray
3- Ice box
4- Freezer lamb box / cover
5- Freezer shelf
6- Freezer compartmenr
7- Chiller shelves
8- Refrigerator compartment
9- Refrigerator shelves
10- Refrigerator lamb box / cover
11- Sliding compartment
12- Crisper cover
13- Crisper front cover
14- Crisper
15- Fresh dial
16- Kick plate
17- Levelling feet
18- Bottom shelf
19- Floating shelf
20- Aroma box
21- Top shelf
22- Top shelf cover
23- Refrigerator lamb button
24- Freezer door shelf
25- Freezer lamb button
This presentation is only for information about the parts of the appliance.
Parts may vary according to the appliance model.
UK - 22 -
PDF created with pdfFactory Pro trial version www.pdffactory.com
UK - 23 -
PDF created with pdfFactory Pro trial version www.pdffactory.com