1
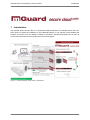
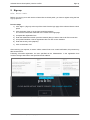
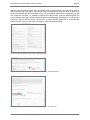
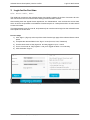
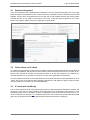
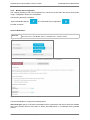
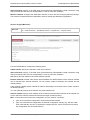
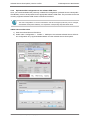
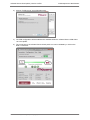
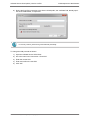
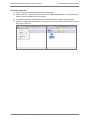
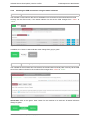
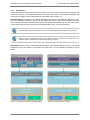
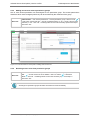
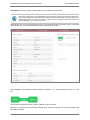
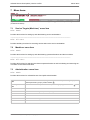
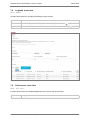
mGuard Secure Cloud public | Version 2.3 EN Table of Contents 1 Introduction . . . . . . . . . . . . . . . . . . . . . . . . . . . . . . . . . . . . . . . . . . .1 1.1 1.2 1.3 1.4 1.5 1.6 1.7 1.8 Addresses . . . . . . . . . . . . . . . . . . . . . . . . . . . . . . . . . . . . . . . . . . . . . . . . . . Browser compatibility. . . . . . . . . . . . . . . . . . . . . . . . . . . . . . . . . . . . . . . . . . Supported languages. . . . . . . . . . . . . . . . . . . . . . . . . . . . . . . . . . . . . . . . . . mGuard compatibility . . . . . . . . . . . . . . . . . . . . . . . . . . . . . . . . . . . . . . . . . . Important information. . . . . . . . . . . . . . . . . . . . . . . . . . . . . . . . . . . . . . . . . . Available editions & tariffs . . . . . . . . . . . . . . . . . . . . . . . . . . . . . . . . . . . . . . Operating elements . . . . . . . . . . . . . . . . . . . . . . . . . . . . . . . . . . . . . . . . . . . Recommended screen resolution . . . . . . . . . . . . . . . . . . . . . . . . . . . . . . . . 2 2 2 3 3 4 5 5 2 Sign up . . . . . . . . . . . . . . . . . . . . . . . . . . . . . . . . . . . . . . . . . . . . . . .6 3 Login for the first time . . . . . . . . . . . . . . . . . . . . . . . . . . . . . . . . . . .8 3.1 3.2 3.3 3.4 3.5 4 Initial steps as an administrator . . . . . . . . . . . . . . . . . . . . . . . . . .11 4.1 4.2 4.3 4.4 5 Password forgotten? . . . . . . . . . . . . . . . . . . . . . . . . . . . . . . . . . . . . . . . . . . 9 Online check via IP check . . . . . . . . . . . . . . . . . . . . . . . . . . . . . . . . . . . . . . 9 IP check with JavaScript . . . . . . . . . . . . . . . . . . . . . . . . . . . . . . . . . . . . . . . 9 IP check via Java applet . . . . . . . . . . . . . . . . . . . . . . . . . . . . . . . . . . . . . . 10 Autodetect mechanism . . . . . . . . . . . . . . . . . . . . . . . . . . . . . . . . . . . . . . . 10 Service Workstations and Service Targets (Machines) . . . . . . . . . . . . . . . Configure a VPN connection (VPN Builder) . . . . . . . . . . . . . . . . . . . . . . . 4.2.1 Preconditions . . . . . . . . . . . . . . . . . . . . . . . . . . . . . . . . . . . . . . . . . . 4.2.2 Build a VPN configuration. . . . . . . . . . . . . . . . . . . . . . . . . . . . . . . . . 4.2.3 Download the VPN configuration . . . . . . . . . . . . . . . . . . . . . . . . . . . 4.2.4 Upload the VPN configuration to the mGuard . . . . . . . . . . . . . . . . . 4.2.5 Upload the VPN configuration to the software VPN client . . . . . . . . 4.2.6 Checking the VPN connections using the status indicators . . . . . . . User administration . . . . . . . . . . . . . . . . . . . . . . . . . . . . . . . . . . . . . . . . . . 4.3.1 Add new user . . . . . . . . . . . . . . . . . . . . . . . . . . . . . . . . . . . . . . . . . . 4.3.2 Edit user / Change role. . . . . . . . . . . . . . . . . . . . . . . . . . . . . . . . . . . 4.3.3 Delete user . . . . . . . . . . . . . . . . . . . . . . . . . . . . . . . . . . . . . . . . . . . . 4.3.4 Permissions . . . . . . . . . . . . . . . . . . . . . . . . . . . . . . . . . . . . . . . . . . . 4.3.5 Assigning access permissions to a user (premium feature) . . . . . . . 4.3.6 Edit / delete access permissions of a user (premium feature) . . . . . Access permissions (premium feature) . . . . . . . . . . . . . . . . . . . . . . . . . . . 4.4.1 Adding new permission groups . . . . . . . . . . . . . . . . . . . . . . . . . . . . 4.4.2 Deleting permission groups . . . . . . . . . . . . . . . . . . . . . . . . . . . . . . . 4.4.3 Adding new access rules to permission groups . . . . . . . . . . . . . . . . 4.4.4 Revoking access rules from permission groups . . . . . . . . . . . . . . . . 11 13 13 14 16 17 19 23 24 24 24 24 25 26 26 27 27 27 28 28 First steps as a user . . . . . . . . . . . . . . . . . . . . . . . . . . . . . . . . . . .29 5.1 5.2 5.3 5.4 Login to the mGuard Secure Cloud public (Sign in) . . . . . . . . . . . . . . . . . Check the online status of the service workstation . . . . . . . . . . . . . . . . . . Choose Operator/Location. . . . . . . . . . . . . . . . . . . . . . . . . . . . . . . . . . . . . Connecting the service workstation to the machine . . . . . . . . . . . . . . . . . Innominate Security Technologies | I15003_en_02 | Quick Guide 29 30 30 30 mGuard Secure Cloud public | Version 2.3 EN 6 Tariff upgrade . . . . . . . . . . . . . . . . . . . . . . . . . . . . . . . . . . . . . . . . .33 6.1 7 Request additional packages (mGuard Secure Cloud public Shop) . . . . . 34 Menu items . . . . . . . . . . . . . . . . . . . . . . . . . . . . . . . . . . . . . . . . . . .35 7.1 7.2 7.3 7.4 7.5 7.6 7.7 7.8 ´Service Targets (Machines)´ menu item. . . . . . . . . . . . . . . . . . . . . . . . . . ´Machines´ menu item . . . . . . . . . . . . . . . . . . . . . . . . . . . . . . . . . . . . . . . . ´Administration´ menu item . . . . . . . . . . . . . . . . . . . . . . . . . . . . . . . . . . . . ´Logbook´ menu item. . . . . . . . . . . . . . . . . . . . . . . . . . . . . . . . . . . . . . . . . ´Preferences´ menu Item . . . . . . . . . . . . . . . . . . . . . . . . . . . . . . . . . . . . . . ´Contact´ link . . . . . . . . . . . . . . . . . . . . . . . . . . . . . . . . . . . . . . . . . . . . . . . ´Language´ link . . . . . . . . . . . . . . . . . . . . . . . . . . . . . . . . . . . . . . . . . . . . . ´Help & Support´ link . . . . . . . . . . . . . . . . . . . . . . . . . . . . . . . . . . . . . . . . . 35 35 35 36 36 37 37 37 8 Frequently Asked Questions (FAQs) . . . . . . . . . . . . . . . . . . . . . .38 9 Known limitations . . . . . . . . . . . . . . . . . . . . . . . . . . . . . . . . . . . . .41 10 Service for mGuard Secure Cloud customers . . . . . . . . . . . . . .41 11 Publisher. . . . . . . . . . . . . . . . . . . . . . . . . . . . . . . . . . . . . . . . . . . . .41 Innominate Security Technologies | I15003_en_02 | Quick Guide mGuard Secure Cloud public | Version 2.3 EN Introduction 1 Introduction The mGuard Secure Cloud public is a cloud-based VPN infrastructure for industrial remote services, which does not require the installation of any additional software. It only requires a SSL-capable web browser. Any device such as desktop computers, notebooks, netbooks and tablets can be used to access the mGuard Secure Cloud public and your service targets. Figure 1.1: mGuard Secure Cloud public // Architecture Innominate Security Technologies | I15003_en_02 | Quick Guide 1 mGuard Secure Cloud public | Version 2.3 EN 1.1 Introduction Addresses Customers can reach their mGuard Secure Cloud public instance using the ´Choose country´ selector in the upper right corner. German customers can reach their mGuard Secure Cloud public instance using the ´Choose country´ link via the following web address (data center in Berlin, Germany): https://de.cloud.mguard.com/ Customers in the USA, Canada, Central and South America can access a separate physical mGuard Secure Cloud public instance via the following web address (computer center in Harrisburg, PA, USA): https://us.cloud.mguard.com/ Italian customers reach their mGuard Secure Cloud public instance via the following web address (data center in Berlin, Germany): https://it.cloud.mguard.com/ Customers from Austria, Belgium, Switzerland, Denmark, Spain, Finland, France, UK, the Netherlands, Norway, and Sweden get their own virtual mGuard Secure Cloud instance, which is physically operated in a professional data center in Berlin, Germany. All other customers should select ´others | not listed´. 1.2 Browser compatibility We recommend the use of secure browsers such as Firefox (version 17.0 or later), Google Chrome (version 28.0 or later) or Apple Safari (version 5.1.7 or later). The use of cookies must be enabled in the browser (see FAQs, Section 8). Please note: the use of Internet Explorer 8 lead to an increased security risk and the use of Internet Explorer 9 offer a poorer user experience. We therefore recommend the use of one of the above mentioned browser or – if this is not possible - an upgrade to Internet Explorer 10 or higher. 1.3 Supported languages The mGuard Secure Cloud public User Interface is available in 3 different languages: English German Italian Your preferred language can be switched with the help of the language selector. The language selector is always available in the upper right corner of the user interface. Figure 1.2: mGuard Secure Cloud public // Language selector Innominate Security Technologies | I15003_en_02 | Quick Guide 2 mGuard Secure Cloud public | Version 2.3 EN 1.4 Introduction mGuard compatibility Please note that all the mGuard devices connected to the mGuard Secure Cloud public must have firmware Version 7.5 or later. The latest mGuard firmware can be downloaded at http://www.innominate.com/en/downloads/firmware. 1.5 Important information If the service workstation is connected to the Internet via a proxy server (Sections 3.2 and 3.3), please ensure that a relevant exception for the mGuard Secure Cloud is entered in the settings for the browser and/or operating system so that the necessary IP check (Sections 3.2) can be performed. Otherwise the status indicator for the service workstation does not change to online status (green) (Section 4.2.6): Internet Explorer 10 / Windows: Tools (Alt-X) > Internet options > 'Connections' tab > Local Area Network (LAN) settings > LAN settings > Proxy server > Use a proxy server for your LAN > Exceptions > 'ip-check.de.mguard.com' or 'ip-check.us.mguard.com' Firefox: Tools > Options > Advanced > Network > Connection > Settings > Manual proxy configuration > No proxy for > 'ip-check.de.mguard.com' or 'ip-check.us.mguard.com' Chrome / Windows: Settings > Options > Under the Hood > Network > Change proxy settings > 'Connections' tab > Settings for Local Area Network > LAN settings > Proxy server > Use proxy server for LAN > Exceptions > 'ipcheck.de.mguard.com' or 'ip-check.us.mguard.com' If it is not possible to configure the relevant proxy exception, the IP check can also be performed using a Java applet (Section 3.4). Innominate Security Technologies | I15003_en_02 | Quick Guide 3 mGuard Secure Cloud public | Version 2.3 EN 1.6 Introduction Available editions & tariffs For customers in the EU, the mGuard Secure Cloud public is available in the following editions: mGuard Secure Cloud public Edition Description Evaluation Edition Max. runtime: 30 days Number of users: unlimited (features equal to Premium Edition) Number of machines: 1 Number of concurrent user sessions: 1 Transfer volume per user session in GB/month: 1 Guaranteed bandwidth per user session in Mbit/s: none Guaranteed yearly availability: none Permission model: enhanced Hotline: phone, e-mail mGuard Secure Cloud public Edition Description Premium Edition Min. runtime: 12 months Number of users: unlimited Number of machines: min. 5 (expandable) Number of concurrent user sessions: 1 (expandable) Transfer volume per user session in GB/month: unlimited Guaranteed bandwidth per user session in Mbit/s: 1 Guaranteed yearly availability: 98% Permission model: enhanced Hotline: phone, e-mail Consists of 1 x SC-101010 and 1 x SC-101020 additional bookable packages Order number Description SC-101010 mGuard Secure Cloud public Premium Seat 1 additional concurrent user session SC-101020 mGuard Secure Cloud public Premium Machine Package 5 additional machine connections mGuard Secure Cloud public Edition Description Basic Edition Number of users: unlimited Number of machines: unlimited Number of concurrent user sessions: 1 Transfer volume per user session in GB/month: 1 Guaranteed bandwidth per user session in Mbit/s: none Guaranteed yearly availability: none Permission model: standard Hotline: e-mail additional bookable packages Order number Description SC-100010 mGuard Secure Cloud public Premium Seat 1 additional concurrent user session Innominate Security Technologies | I15003_en_02 | Quick Guide 4 mGuard Secure Cloud public | Version 2.3 EN 1.7 Introduction Operating elements For the navigation via the mGuard Secure Cloud public user interface (UI), the following color coding is used: mGuard red: Active menu items and tabs. Hint: Explanatory text on the user interface can be faded out by clicking on the Icon on the text ´Show Hint…´ to show the hint text again Blue: Primary and secondary control elements (e.g., icons, buttons) Green: ´online´and ´Start´ status indicators Red: ´offline´ and ´Stop´ status indicators : 1.8 . Click The star icon tags premium features Recommended screen resolution The mGuard Secure Cloud public Web User Interface (UI) should be used with a minimum screen resolution of 1200 x 800 pixel. Figure 1.3: mGuard Secure Cloud public // Web UI Innominate Security Technologies | I15003_en_02 | Quick Guide 5 mGuard Secure Cloud public | Version 2.3 EN Sign up 2 Sign up Role: Master Admin Before you can log on to and use the mGuard Secure Cloud public, you have to register using the free sign up process. Process steps 1) Click 'Sign in | Sign up' at the top of the cloud UI at the login page of the mGuard Secure Cloud public. 2) Click the button 'Sign up' in the login panel that appears. Or: Click the framed link 'SIGN UP' in the center of the login page. 3) Complete the registration form. 4) Enter the destination network (machine network) that you want to reach via VPN connection. 5) Accept the Evaluation License Agreement due to a click on the checkbox. 6) Enter the security code (captcha). 7) Click on the button 'OK'. After receiving your request, a ´tenant´ will be created. Due to our careful verification, this process may take several hours. Following successful registration, the user specified as the ´Masteradmin´ in the registration form receives the login data sent to the specified e-mail address. Figure 2.1: mGuard Secure Cloud public // Sign up Innominate Security Technologies | I15003_en_02 | Quick Guide 6 mGuard Secure Cloud public | Version 2.3 EN Sign up Within the mGuard Secure Cloud public, the tenant is the top instance and is a closed unit in terms of data technology and organization. The mGuard Secure Cloud therefore offers the option of disjunctive, tenant-oriented data recording, presentation (UI), and configuration. Each tenant can therefore only see and modify their own data, i.e., all data is protected from other tenants. Only the assigned tenant can access this data, although in certain exceptional cases (troubleshooting, administration or change management) it may be that the Secure Cloud service or parties explicitly authorized by Innominate are granted access, however never other customers or other unauthorized parties. Figure 2.2: mGuard Secure Cloud public // Registration form Figure 2.3: mGuard Secure Cloud public // Registration form – Machine network Figure 2.4: mGuard Secure Cloud public // Registration form – Security code Innominate Security Technologies | I15003_en_02 | Quick Guide 7 mGuard Secure Cloud public | Version 2.3 EN Login for the first time 3 Login for the first time Role: Master Admin, Admin The initial login process for the mGuard Secure Cloud public is always in the form of a tenant. All activities carried out in the Cloud are therefore always performed within a tenant. After sending back the signed license agreement, the ´Masteradmin´ user receives the access data, which is sent to the specified e-mail address. Please keep this in a safe place and do not allow others access to this data. This data (tenant/account ID, user ID, and password) can now be used to login into the mGuard Secure Cloud public for the first time. Process steps 1) Click 'Sign in | Sign up' at the top of the cloud UI at the login page of the mGuard Secure Cloud public. 2) Complete the relevant fields in the ´Sign in´ area (Account, User, Password) 3) Put the check mark at ´Stay signed in´ and stay logged in up to 1 month 4) Put no check mark at ´Stay signed in´ and you´ll logged out after 1 hour inactivity 5) Click the button ´Sign in´. Figure 3.1: mGuard Secure Cloud public // Signing in Innominate Security Technologies | I15003_en_02 | Quick Guide 8 mGuard Secure Cloud public | Version 2.3 EN 3.1 Login for the first time Password forgotten? If you have forgotten your login/password combination, use the ´Password forgotten´ link in the login panel to request a new password. The correct tenant/user combination must be entered in the form that appears. A link to set a new password is sent to the user e-mail address stored in the Cloud. Please note that this link is only valid for a maximum of 24 hours. If this link does not appear in your inbox within a few minutes, please check your spam filter or spam folder. Figure 3.2: mGuard Secure Cloud public // Password reset 3.2 Online check via IP check To enable the mGuard Secure Cloud public to detect a logical connection between the web browser of the service workstation and the service VPN tunnel to the mGuard Secure Cloud, an IP check is performed. This involves an HTTPS call (including session ID of the web session) to the address 'ipcheck.de.mguard.com' or 'ip-check.us.mguard.com' by the encrypted service VPN tunnel. On a successful HTTPS call, in the mGuard Secure Cloud public the status of the web session is set to ´online´ and in the UI the service status indicator changes from red (offline) to green (online). Secure VPN connections to machines can now be established. 3.3 IP check with JavaScript The IP check always uses an Ajax request (asynchronous data transmission between a browser and the server). If the use of a proxy server for the HTTPS protocol is configured in the browser or in the operating system, then an exception must be configured for the host 'ip-check.de.mguard.com' or 'ipcheck.us.mguard.com' (Section 1.5). Otherwise the HTTPS call would not be routed to the VPN tunnel (the proxy would send the call to the Internet without effect and receive no response). Innominate Security Technologies | I15003_en_02 | Quick Guide 9 mGuard Secure Cloud public | Version 2.3 EN 3.4 Login for the first time IP check via Java applet Since it cannot be assumed that the user is able to configure a proxy exception without problems, the mGuard Secure Cloud public provides an alternative procedure for the IP check. When a proxy server is detected, a Java applet is called in the browser, which makes the relevant HTTPS call without the mandatory use of a proxy server. The IP check via applet is supported for the following browsers with Java Runtime Environment (JRE) Version 1.6 or 1.7: Microsoft Windows Firefox Version 11 or later Google Chrome Version 24 or later Microsoft Internet Explorer Version 8 or later Linux Firefox Version 18 or later Apple Mac OS X Safari Version 5 or later The Java plug-in (part of the relevant JRE) must be activated in the relevant browser (in the Internet zone the scripting of Java applets must also be enabled). When the applet is initiated for the first time, you must agree that the applet can be run (see figure). We recommend activating the option ´Do not show this again for apps from the publisher and location above´ (check the box and click on ´Run´). Figure 3.3: IP check applet 3.5 Autodetect mechanism The mGuard Secure Cloud public now automatically detects the process used (JavaScript or applet) to perform the IP check. The successful method is stored in a cookie on your local computer. If there is no method stored in a cookie, the IP check is always performed with JavaScript first. Innominate Security Technologies | I15003_en_02 | Quick Guide 10 mGuard Secure Cloud public | Version 2.3 EN Initial steps as an administrator 4 Initial steps as an administrator Role: Master Admin, Admin After logging into the mGuard Secure Cloud public, you always start at the ´Service Targets (Machines)´ menu item. This is so that during servicing a remote service can be started for the relevant machine as quickly as possible. However, initially you will just find an empty page, without machines and without operators or locations for machines. The following organizational steps and processes provide a quick and easy means of establishing a secure connection between the service workstation and the machine. 4.1 Service Workstations and Service Targets (Machines) The service organization in the Secure Cloud is divided into two areas: ´Service Workstations´ and ´Service Targets (Machines)´. In the menu item ´Service Workstations´ the workstations for your service staff can be created. In the menu item ´Service Targets (Machines)´ operators or locations (first level) and their associated machines (second level) can be created. Hint If the number of tabs of all operators/locations is too big to be shown on the display, operators/locations can be filtered by alphabetic or numeric criteria. Start with the creation of service workstations by selecting the menu item ´Service Workstations´. Level 1: Create service workstations Menu item ´Service Workstations´ > tab > ´Add new workstation´ Level 1: Edit service workstations Menu item ´Service Workstations´ > select workstation and click and click > select ´Workstation Information´ > edit workstation information > click button ´OK´ Level 1: Delete service workstations Menu item ´Service Workstations´ > select workstation and click ton ´Delete´ > VPN administration > click but- In the next step, add the operators and locations of your machines and assign the service targets (machines). Select the menu item ´Service Targets (Machines)´. Innominate Security Technologies | I15003_en_02 | Quick Guide 11 mGuard Secure Cloud public | Version 2.3 EN Initial steps as an administrator Level 1: Create operators/locations ´Service Targets (Machines)´ > tab Menu item > ´Add new operator/location´ > insert description of operator/location > click button ´OK´ Level 1: Edit operators/locations Service Targets (Machines)´ > select <operator/location> tab Menu item > ´Edit operator/location´ and enter meaningful data > click button ´OK´ Level 1: Delete operators/locations ´Service Targets (Machines)´ > select <operator/location> tab > click button ´Delete operator/ location´ Menu item Hint An operator/location can only be deleted if there are no assigned machines. Thus, you have to delete all machines under an operator/location first. Level 2: Create Service Targets (Machines) Menu item ´Service Targets (Machines)´ > select tab <operator/location> > select tab ´Create new machine´ > insert descriptions for machine > click button ´OK´ Level 2: Edit Service Targets (Machines) Menu item ´Service Targets (Machines)´ > tab <operator/location> > select machine and click ´Edit machine information´ > > click button ´OK´ Level 2: Delete machines Menu item ´Service Targets (Machines)´ > tab <operator/location> select machine and click ´Machine administration´ > Machine: click button ´Delete´ Innominate Security Technologies | I15003_en_02 | Quick Guide > area 12 mGuard Secure Cloud public | Version 2.3 EN Initial steps as an administrator Level 2: Machine information > Add location data (optional) To add precise positioning data (latitude and longitude) to each machine, proceed as follows: ´Service Targets (Machines)´ > tab <operator/location> > select machine and click ´Edit machine information´ Menu item 4.2 > > click into the field 'Positioning data (Lat,Long)' > an Open- StreetMap-Window appears > click on the magnifier icon > enter the location name dedicated to your machine > select the proper name from the drop down list box > click button 'OK' > click button 'OK' Configure a VPN connection (VPN Builder) The service session between service workstations and service targets (machines) is secured via an encrypted VPN tunnel (Virtual Private Network). Before a service workstation can connect to a service target (machine) via the VPN tunnel, the associated VPN clients must be configured in order to establish a VPN connection to the mGuard Secure Cloud public. Service workstations can be connected to the cloud using either software VPN clients or mGuard devices. Service targets (machines) can only be connected to the cloud using mGuard devices. The creation (building) of VPN configurations is carried out by and within the Secure Cloud public using the VPN Builder. The built VPN configurations are made available for download afterwards. After the import of the VPN configuration into the corresponding VPN clients (service workstation and service target (machine)) is finished, the clients are configured for the connection to the Secure Cloud public and able to establish a VPN tunnel to the cloud. The configuration of the VPN clients is described in the following sections. 4.2.1 Preconditions The VPN connections between VPN clients and the mGuard Secure Cloud public are based on the IPsec protocol. The communication based on the IPsec protocol is carried out using UDP port 500 (IKE) and UDP port 4500 (NAT Traversal). Hint The UDP ports 500 and 4500 must be open on both VPN clients (service workstation and service target (machine)). This also applies to routers used during connection and existing firewall rules. TCP encapsulation In case it is not possible to establish a VPN connection using UDP ports 500 and 4500, the IPsec connection must be tunneled. Therefor the option ‘TCP encapsulation‘ must be enabled to transmit UDP packets encapsulated inside TCP packets. The standard port used in this case is the HTTPS-Port 443. Port 443 must therefore be opened permanently on both sides of the connection. Innominate Security Technologies | I15003_en_02 | Quick Guide 13 mGuard Secure Cloud public | Version 2.3 EN 4.2.2 Initial steps as an administrator Build a VPN configuration The creation (building) of the VPN configurations is carried out by and within the Secure Cloud public using a configuration wizard, the VPN Builder. The following buttons are available: ´Open VPN Builder Wizard´ and ´Download VPN configuration´ . Proceed as follows: Service Workstation Menu item ´Service Workstations´ > ´All workstations´ tab > Select workstation # > VPN administration > VPN connection > VPN Builder´ button > Complete form > ´Request´ button Figure 4.1: VPN Builder for service VPN configuration Use the VPN Builder to configure the following items: VPN client type: Specify, if the service workstation will be connected to the Secure Cloud via software VPN client (mGuard Secure VPN Client or Shrew Soft VPN-Client) or via hardware client (mGuard device). Innominate Security Technologies | I15003_en_02 | Quick Guide 14 mGuard Secure Cloud public | Version 2.3 EN Initial steps as an administrator VPN connection: Specify, if the VPN client (mGuard device) shall establish a VPN connection using UDP port 4500 and 500 via TCP encapsulation in case of connection problems. Machine network: Configure the destination network, to which the service target (machine) belongs. The network corresponds with the destination network, already provided during registration. Service Targets (Machines) Menu item ´Service Targets (Machines)´ > ´Location/operator´ tab > Select machine # > VPN administration > VPN connection > ´VPN Builder´ button > Complete form > ´Request´ button Figure 4.2: VPN Builder for machine configuration Use the VPN Builder to configure the following items: mGuard mode: Specify the operation mode of the mGuard. VPN connection: Specify, if the VPN client (mGuard device) shall establish a VPN connection using UDP port 4500 and 500 via TCP encapsulation in case of connection problems. 3G: Specify the login details of the mobile network operator. External network: Indicate under which network address the WAN interface of the machine mGuard can be reached from external networks. You can specify a static IP address, the netmask and the default gateway. If the machine mGuard gets its external IP address dynamically from a DHCP server, select "Dynamic IP address (DHCP)". You can optionally specify the IP address of a distinct DNS server. Internal network: Specify the IP address of the machine mGuard and the netmask of the internal network to which the machine mGuard and the service target (machine) belong. Misc.: Choose the format of the VPN configuration for your machine connection: type .atv to upload the configuration via the mGuard web interface type .ecs to activate the configuration via external configuration memory (e.g. SD card, USB stick). Note that the "ecs file" is contained in a zipped "tgz file", which must be used to import the configuration into the mGuard device. Innominate Security Technologies | I15003_en_02 | Quick Guide 15 mGuard Secure Cloud public | Version 2.3 EN Initial steps as an administrator If the VPN connection of the machine mGuard shall be initiated via a key switch (Service-IO), the feature can be activated here. After the VPN configuration has been created, it can be downloaded directly from the Secure Cloud public and be imported into the appropriate VPN client. Hint The VPN configurations for service workstations and service targets (machines) can be changed, downloaded arbitrarily. Just repeat the corresponding steps described above. 4.2.3 Download the VPN configuration The VPN configurations for the service workstation and the service target (machine) will be available for download immediately and may be stored and used locally for further configuration of the VPN clients. Menu item ´Service Workstations´ > ´All workstations´ tab > Select workstation # > VPN administration > VPN configuration: > ´Download´ button The corresponding configuration (.zip file extension in case of the mGuard Secure VPN Client or .vpn file extension for the Shrew Soft VPN client) for the machine can be downloaded and stored locally for further configuration of the machine mGuard. Menu item ´Service Targets (Machines)´ > ´Location/operator´ tab > Select machine # > VPN administration > VPN configuration: > ´Download´ button The corresponding configuration (file extension .atv or .ecs for encrypted configurations with firmware version 7.6.1) for the machine can be downloaded and stored locally for further configuration of the machine mGuard. Innominate Security Technologies | I15003_en_02 | Quick Guide 16 mGuard Secure Cloud public | Version 2.3 EN 4.2.4 Initial steps as an administrator Upload the VPN configuration to the mGuard Once you have downloaded and locally stored the VPN configuration, previously created in the Secure Cloud public (VPN Builder), the configuration file must be imported to the appropriate VPN client. Hint The status of all the variables of the mGuard device that have not been configured in the Secure Cloud will be set to factory default. Hint For tailored machine configurations that can not be configured by the VPN-Builder (e.g. firewall rules) the Premium-Edition gives you the possibility to deposit so-called ATV Includes in the Secure Cloud backend. These predefined values can be applied to the complete account-level or only to individual machines. If you have any questions, please contact the Secure Cloud Support. Figure 4.3: mGuard Web UI To import a configuration into the mGuard devce, log in to the web interface (UI mGuard) on the mGuard. Then proceed as follows: mGuard UI ´Administration´ menu item > ´Configuration profiles´ tab > ´Upload Configuration to Profile´ Select and use the previously downloaded VPN configuration with the file extension .atv. Make sure that the correct configuration file has been selected. After uploading the configuration to the mGuard, it will be listed as a new configuration profile. Please activate the new configuration profile by clicking on the button 'Restore' (A green check mark indicates the activated profile). Dependent on the chosen mGuard mode (Stealth or Router), the mGuard can subsequently be reached via the management ip address: https://1.1.1.1 or https://192.168.1.1. Innominate Security Technologies | I15003_en_02 | Quick Guide 17 mGuard Secure Cloud public | Version 2.3 EN Initial steps as an administrator Hint After the configuration has been activated in the mGuard device, remote access to the web UI via HTTPS is only possible, if the service workstation has established an active VPN connection. The mGuard can also be configured using an SD card or a USB flash drive. To do so, a configuration file (ecs file), zipped in a tgz-container, must be used. The configuration file is loaded, decrypted, and used as a valid configuration. Hint Back up all existing configurations on the mGuard device before you import the configuration file created in the Secure Cloud via SD card / USB drive to the device. All variables, not configured in the Secure Cloud, will be set to factory default. Hint The VPN configurations for service workstations and service targets (machines) can be changed, downloaded and imported arbitrarily. Just repeat the corresponding steps described above. Innominate Security Technologies | I15003_en_02 | Quick Guide 18 mGuard Secure Cloud public | Version 2.3 EN 4.2.5 Initial steps as an administrator Upload the VPN configuration to the software VPN client Once you have downloaded the previously created VPN configuration (mGuard Secure Cloud public VPN Builder), it has to be imported into the appropriate software VPN client. The procedure for the two currently supported software VPN clients is described as follows: Hint The VPN configurations for service workstations and service targets (machines) can be changed, downloaded and imported arbitrarily. Just repeat the corresponding steps described above. mGuard Secure VPN Client 1) Start the mGuard Secure VPN Client. 2) Select under ´Configuration´ > ´Profiles´ > ´Add/Import´ the relevant mGuard Secure VPN Client configuration file (*.zip) downloaded before from the mGuard Secure Cloud public. Innominate Security Technologies | I15003_en_02 | Quick Guide 19 mGuard Secure Cloud public | Version 2.3 EN Initial steps as an administrator 3) Choose ´Profile Import´ as configuration type. 4) The VPN configuration will be loaded and is available within the mGuard Secure VPN Client as a new profile. 5) The connection to the mGuard Secure Cloud public can now be initiated by a click on the slider ´Connection´. Innominate Security Technologies | I15003_en_02 | Quick Guide 20 mGuard Secure Cloud public | Version 2.3 EN Initial steps as an administrator 6) During the first VPN connection to the Secure Cloud public, the certificate PIN, already specified in the VPN Builder, is requested. Hint For security reasons, please change the initial PIN periodically. To change the PIN proceed as follows: 1) Open the mGuard Secure VPN Client. 2) Go to the menu item 'Connection > Enter PIN'. 3) Enter the current PIN. 4) Enter and confirm the new PIN. 5) Click 'OK'. Innominate Security Technologies | I15003_en_02 | Quick Guide 21 mGuard Secure Cloud public | Version 2.3 EN Initial steps as an administrator Shrew Soft VPN Client 1) Start the Shrew Soft VPN Client (VPN Access Manager). 2) Select under File > Import the relevant Shrew Soft VPN configuration file (*.vpn), downloaded before from the mGuard Secure Cloud public. 3) The VPN configuration will be loaded and is available within the Shrew Soft VPN Client. 4) Select the configuration and start the connection to the mGuard Secure Cloud public by a simple click on ´Connect´. Innominate Security Technologies | I15003_en_02 | Quick Guide 22 mGuard Secure Cloud public | Version 2.3 EN 4.2.6 Initial steps as an administrator Checking the VPN connections using the status indicators Menu item ´Service Workstations´ > ´active VPNs´ tab > Workstation # > online The mGuard or VPN client for the service workstation has connected to the mGuard Secure Cloud correctly via the VPN tunnel, if the status indicator for the service VPN changes from ´offline´ to ´online´. Figure 4.4: mGuard Web UI // Service VPN online In addition, the ´Service´ status indicator must change from grey to green. Menu item ´Service Targets (Machines)´ > ´active VPNs´ tab > Machine # > online The mGuard for the machine has connected to the mGuard Secure Cloud public correctly via the VPN tunnel if the status indicator for the machine VPN changes from ´offline´ to ´online´. Figure 4.5: mGuard Web UI // Machine VPN online Quick Start: Click on the green ´Start´ button for the machine to be serviced. All status indicators change to green. Innominate Security Technologies | I15003_en_02 | Quick Guide 23 mGuard Secure Cloud public | Version 2.3 EN 4.3 Initial steps as an administrator User administration Figure 4.6: mGuard Secure Cloud public // User administration 4.3.1 Add new user Menu item 4.3.2 Edit user / Change role Menu item 4.3.3 ´Administration´ > Tab ´User administration´ > click button ´New user´ > Insert user name, last name, first name, select role, insert password, repeat password > click button ´OK´ ´Administration´ > Tab ´User administration´ > select user > click ´edit´ > click button ´OK´ > edit information Delete user Menu item ´Administration´ > Tab ´User administration´ > select user > click ´delete´ click button ´OK´ Innominate Security Technologies | I15003_en_02 | Quick Guide 24 mGuard Secure Cloud public | Version 2.3 EN 4.3.4 Initial steps as an administrator Permissions Access permissions allow granular control over which users can access what locations / operators and machines in the form of user-defined permissions and permission groups. This feature is available only in the Premium Edition of the mGuard Secure Cloud public (see Chapter 4.4). Premium Edition: In addition to the default permission group that is automatically assigned to each new user, additional permission groups can be assigned to users in the premium edition. However, these are only active when the default permission group was revoked before from the user. Prior to this, access rules and permission groups must be defined under the tab ´Access permissions´. Hint New permission groups will only become activ, if the default permission group has been revoked. Hint Please note that the default permission group allows access to all operators / locations and all machines within a tenant and thus overrides all other permissions. Basic Edition: Each user is first automatically assigned to the default permission group. The default permission group can neither be removed in the basic tariff, nor can additional permission groups added. Figure 4.7: Permission architecture Premium Edition | Innominate Security Technologies | I15003_en_02 | Quick Guide Permission architecture Basic Edition 25 mGuard Secure Cloud public | Version 2.3 EN 4.3.5 Assigning access permissions to a user (premium feature Menu item 4.3.6 Initial steps as an administrator ) ´Administration´ > Tab ´User administration´ > choose user > click icon ´Edit´ click button ´Add permission´ > choose a permission group > click button ´OK´ > add additional permission groups or click button ´OK´ Edit / delete access permissions of a user (premium feature ) ´Administration´ > Tab ´User administration´ > choose user > click icon ´Edit´ Menu item for editing ´OK or icon for deleting > > click icon of already assigned permission groups > click button Figure 4.8: mGuard Secure Cloud public // User administration > Add permission group Innominate Security Technologies | I15003_en_02 | Quick Guide 26 mGuard Secure Cloud public | Version 2.3 EN 4.4 Access permissions (premium feature Initial steps as an administrator ) Premium Edition: With the help of access rules any access rights to locations / operators and their machines can be defined and summarized in permission groups. These permission groups can then be assigned to users in the user management. Previously defined permission groups can only be deleted if NO user is assigned to (referenced). Basic Edition: Basic Edition does not allow defining own access rules and permission groups. Only the permission group ´Default´ is displayed. Hint Please note that the permission group 'Default' allows access to ALL locations/operators and machines and can not be deleted or edited. Figure 4.9: mGuard Secure Cloud public // Access permissions overview 4.4.1 Adding new permission groups A permission group defines, which machines can be accessed by the users of the permission group. For this purpose one or more access permissions are applied within a permission group that regulate the access to the service targets (machinery). ´Administration´ > Tab ´Access permissions´ > click button ´New permission group´ > define name of permission group > click button ´OK´ Menu item 4.4.2 Deleting permission groups ´Administration´ > Tab ´Access permissions´ > choose permission group to delete > click icon Menu item ´Delete´ > click button ´OK´ Hint Permission groups can only be deleted if they are NOT assigned to any user (referenced). If you get an related error message, go to the user administration tab and revoke the permission group from the relevant users. Innominate Security Technologies | I15003_en_02 | Quick Guide 27 mGuard Secure Cloud public | Version 2.3 EN 4.4.3 Initial steps as an administrator Adding new access rules to permission groups One or more access permission can be assigned to one permission group. The access permissions determine which service targets (machines) can be accessed by the members of the group. Administration´ > Tab ´Access permissions´ > choose permission group > click icon ´Edit´ > click button ´Add access rule´ > choose a Operator/location or ´All´ > choose ´Service target (machine)´ or ´All´ > click ´OK´ > if adding further access rules necessary repeat these steps > click button ´OK´ Menu item Figure 4.10: mGuard Secure Cloud public // adding new access rule 4.4.4 Revoking access rules from permission groups ´Administration´ > Tab ´ Access permissions ´ > choose permission group > click icon ´Edit´ > choose access rule to be deleted > click icon ´Delete´ > click button ´Delete access rule´ > if deleting further access rules necessary repeat these steps > click button ´OK´ Menu item Hint All changes for permission groups will affect the referenced users immediately. Innominate Security Technologies | I15003_en_02 | Quick Guide 28 mGuard Secure Cloud public | Version 2.3 EN First steps as a user 5 First steps as a user Role: User The following steps and processes provide a quick and easy means of establishing a secure remote maintenance connection between the service workstation and the machine. 5.1 Login to the mGuard Secure Cloud public (Sign in) Your personal login data (tenant ID, user ID, and password) can be used to log into the mGuard Secure Cloud public. Process steps 1) Click 'Sign in | Sign up' at the top of the cloud UI at the login page of the mGuard Secure Cloud public. 2) Complete the relevant fields in the ´Sign in´ area (Account, User, Password) 3) Put the check mark at ´Stay signed in´ and stay logged in up to 1 month 4) Put no check mark at ´Stay signed in´ and you´ll logged out after 1 hour inactivity 5) Click the button ´Sign in´. Figure 5.1: Login to the mGuard Secure Cloud public Innominate Security Technologies | I15003_en_02 | Quick Guide 29 mGuard Secure Cloud public | Version 2.3 EN 5.2 First steps as a user Check the online status of the service workstation If your service workstation has established a VPN connection to the Secure Cloud, the status indicator ´Service´ must have a green background color. If the status indicator ´Service´ has a red background color, check the connection of you service workstation (mGuard device or software VPN client) or if the VPN connection has been started. Alternatively, the status can be checked as follows: Menu item 5.3 ´Service Workstations´ > ´active VPNs´ tab > Workstation # > online Choose Operator/Location To connect to a machine with of specific operator/location via VPN tunnel, an operator/location has to be selected. Proceed as follows: Menu item ´Service Targets (Machines)´ > select tab with desired operator/location Hint If the number of tabs of all operators/locations is too big to be shown on the display, operators/locations can be filtered by alphabetic or numeric criteria. 5.4 Connecting the service workstation to the machine Menu item ´Service Targets (Machines)´ > ´active VPNs´ tab > Machine # > online As soon as the status indicator of the target machine has the green ´online´ status, the machine mGuard has connected to the mGuard Secure Cloud public correctly via the VPN tunnel. Figure 5.2: mGuard Secure Cloud public // Machine VPN online Innominate Security Technologies | I15003_en_02 | Quick Guide 30 mGuard Secure Cloud public | Version 2.3 EN First steps as a user Quick Start: Click on the green ´Start´ button for the machine to be serviced. Hint Even if the machine has not yet established a VPN connection to the Secure Cloud, the green Start button can be clicked. A route to the machine will then be started and a VPN connection will be established automatically as soon as the VPN connection from the machine to the Secure Cloud has been established, e. g. by using a key switch. Alternatively click on the machine to be serviced. The machine master card opens. Click on the green ´Start´ button in the ´Connect workstation to this machine via VPN´ field. Figure 5.3: mGuard Secure Cloud public // Machine information The workstation is routed to the machine mGuard. The green ´Start´ button changes to a red ´Stop´ button. All the status indicators (Service | Routing | Machine) are now green. Machines, connecting from the internal network of the machine mGuard, can now be reached under their real IP address. Innominate Security Technologies | I15003_en_02 | Quick Guide 31 mGuard Secure Cloud public | Version 2.3 EN First steps as a user Result A highly secure IPsec VPN connection between your mGuard VPN client of the service workstation and the mGuard VPN client of the machine has been established via the Secure Cloud. Remote maintenance can now be performed with complete transparency and secure encryption using any required service tools. Innominate Security Technologies | I15003_en_02 | Quick Guide 32 mGuard Secure Cloud public | Version 2.3 EN Tariff upgrade 6 Tariff upgrade Administrators of customers of the mGuard Secure Cloud public in the EU can change their tariff at any time as follows: Menu item ´Administration´ > Tab ´Account data´ > Area ´Account status´ Your current tariff will be shown (here: Tariff ´Basic´). Initiate a tariff upgrade due to a click on the button ´Tariff upgrade´. All features and prices of the related tariff can be seen at: Menu item ´Administration´ > Tab ´Prices´ Figure 6.1: Initiate tariff upgrade Figure 6.2: Tariff upgrade message After a successful tariff upgrade you will request a message with all relevant information via e-mail. Innominate Security Technologies | I15003_en_02 | Quick Guide 33 mGuard Secure Cloud public | Version 2.3 EN Tariff upgrade The following upgrade matrix shows the possible tariff uprades within the mGuard Secure Cloud public: Source tariff Target tariff Evaluation Edition Basic Edition Basic Edition Available upgrade packages of target tariff Basic Seat Package Premium Edition Premium Seat Package Premium Machine Package Evaluation Edition Premium Edition Premium Seat Package Premium Machine Package 6.1 Request additional packages (mGuard Secure Cloud public Shop) Enhancements for your tariff can be purchased with the ´Request packages´ button which then opens the mGuard Secure Cloud public shopping cart. Figure 6.3: mGuard Secure Cloud public // Request packages The available enhancements for your tariff can be selected and requested within the mGuard Secure Cloud public shopping cart by clicking the button 'Request'. Innominate Security Technologies | I15003_en_02 | Quick Guide 34 mGuard Secure Cloud public | Version 2.3 EN Menu items 7 Menu items Figure 7.1: Status indicator: Service (VPN tunnel active/inactive) | Routing (performed/not performed) | Machine (available/unavailable) 7.1 ´Service Targets (Machines)´ menu item Role: Admin Provides all functions for setting up and administering service workstations. _______________________________________________________________________ Role: All users Provides auxiliary functions for executing service tasks at the service workstation. 7.2 ´Machines´ menu item Role: Admin Provides all functions for setting up and administering operators/locations and their machines. _______________________________________________________________________ Role: All users Provides all functions for selecting the relevant operator/location as well as initiating and executing service tasks on the relevant machine. 7.3 ´Administration´ menu item Role: Admin Provides all functions for mGuard Secure Cloud public administration. User administration overview/add/edit/delete users, assign and revoke roles and permission groups (self- Access permissions overview/add/edit/delete permissions and permission groups (premium feature VPN-connection overview/states of all VPN connections Account data current tariff/tariff change/request add. packages/overview Master data overview Prices overview available editions Info & Downloads notes on mGuard configuration/download VPN clients and manuals Release Notes information about the latest Secure Cloud version defined permission groups: premium feature Innominate Security Technologies | I15003_en_02 | Quick Guide ) ) 35 mGuard Secure Cloud public | Version 2.3 EN 7.4 ´Logbook´ Menu items menu item Role: Admin Provides all functions for recording and analyzing service tasks. Functions View monthly connection data Ad-hoc filtering and online analysis of connection data (premium feature ) Download monthly connection data as CSV, XLS and PDF file (premium feature ) Figure 7.2: mGuard Secure Cloud public // Logbook 7.5 ´Preferences´ menu Item Role: All users Provides all functions for individual adjustments to the user's work environment. Function Change password Innominate Security Technologies | I15003_en_02 | Quick Guide 36 mGuard Secure Cloud public | Version 2.3 EN 7.6 ´Contact´ Menu items link Role: All users Clicking on the ´Contact´ link opens a contact form in a modal dialog box. Use this form to contact our mGuard Secure Cloud Support Team directly. 7.7 ´Language´ link Role: All users Click on the ´Language: German´, ´Language: English´ or ´Language: Italian´ link to switch the UI language of the mGuard Secure Cloud public to English (EN), Italian (IT) or German (DE). 7.8 ´Help & Support´ link Role: All users Clicking on the ´Help´ link opens a dialog box where you can open or download a version of the Quick Guide in PDF format in your selected language. The hotline phone numbers (Premium Edition) and email addresses are also listed here. Innominate Security Technologies | I15003_en_02 | Quick Guide 37 mGuard Secure Cloud public | Version 2.3 EN Frequently Asked Questions (FAQs) 8 Frequently Asked Questions (FAQs) I have signed up for the Secure Cloud, but have not received a reply yet. Since your registration data has to be checked carefully during normal office hours (Berlin time zone) by our Secure Cloud Service team, this process may take a while. The process is a preventive measure designed to stop untrustworthy individuals and institutions from registering and logging in. How do I get functional VPN configurations without technical know-how? Don't worry. With the support of the VPN Builder and its simple user guidance many questions can already be answered during configuration. If there are remaining questions, the ´Secure Cloud-Service´ will be pleased to help you. Just contact our public hotline. How can I contact the mGuard Secure Cloud public hotline? Clicking on the link ´Help & Support´ opens a dialog box where you can open or download a version of the Quick Guide in PDF format in your selected language. The hotline phone numbers (Premium Edition) and e-mail addresses are also listed here. Can I test the mGuard Secure Cloud public without obligation? Of course. Following successful registration, every mGuard Secure Cloud tenant can test one service connection and one machine connection free of charge for 30 days (Premium features). Both VPN connections can be configured with the VPN Builder and tested thoroughly. When the test phase expires, the test connections can be converted into productive VPN connections on request. Please contact our Secure Cloud Service team for this. Innominate Security Technologies | I15003_en_02 | Quick Guide 38 mGuard Secure Cloud public | Version 2.3 EN Frequently Asked Questions (FAQs) Can I also use the mGuard Secure Cloud with other VPN products? Unfortunately not. The mGuard Secure Cloud is currently only available for mGuard customers and users. The only exception is that service workstations may also be connected to the mGuard Secure Cloud via certified IPsec VPN clients. How do I cancel individual contracts? Contracts for VPN connections can be canceled for both service and machine connections on the relevant service workstation or machine master card by the ´Admin´ and ´Masteradmin´ roles at the end of each calendar year (area ´VPN administration´). Why does the mGuard Secure Cloud public work with IPsec VPNs? IPsec is acknowledged to be the most secure standard for VPN connections, it is ideal for site-to-site VPNs, and is already integrated in the future-proof IPv6 standard. Innominate Security Technologies | I15003_en_02 | Quick Guide 39 mGuard Secure Cloud public | Version 2.3 EN Frequently Asked Questions (FAQs) Where can I view my connection data? The most relevant connection data is visible to the ´Admin´ and ´Masteradmin´ roles here: Menu item ´Administration´ > VPN connections´: overview of all VPN connections including status. Which Software VPN clients are supported by the mGuard Secure Cloud public? Currently we support the following IPsec Software VPN clients for service workstations: mGuard Secure VPN Client: Shrew Soft: http://www.innominate.com/ http://www.shrew.net/ I have entered my login data correctly but still can't log into the Cloud. Please make sure that your browser accepts cookies for the address https://de.cloud.mguard.com (respectively https://us.cloud.mguard.com or https://it.cloud.mguard.com). Cookie settings for Firefox Menu > Options > Privacy > History > select ´Accept cookies´. Cookie settings for Internet Explorer: Tools > Internet options > Privacy > if you want to have automatic cookie handling, set the slider to ´Medium´. Cookie Settings for Google Chrome: Menu > Settings > Show advanced settings >Privacy > Content settings > Cookies > set ´Allow local data to be set (recommended)´. Innominate Security Technologies | I15003_en_02 | Quick Guide 40 mGuard Secure Cloud public | Version 2.3 EN Known limitations 9 Known limitations Currently there are no known issues for our customers. 10 Service for mGuard Secure Cloud customers Clicking on the link ´Help & Support´ opens a dialog box where you can open or download a version of the Quick Guide in PDF format in your selected language. The hotline phone numbers (Premium Edition ) and e-mail addresses are also listed here. 11 Publisher Innominate Security Technologies AG Rudower Chaussee 13 12489 Berlin Germany [email protected] www.innominate.com This user manual, including all illustrations contained herein, is copyright protected. Any changes to the contents or the publication of extracts of this document are prohibited. © 2015 Innominate Security Technologies AG Innominate Security Technologies | I15003_en_02 | Quick Guide 41