1
TWedge
Universal Data Acquisition Software
Versi on 3. 1
User Manual
17 Apri l 2015
T EC-I T Dat env erarbei t ung G m bH
Han s-W agner -St ra sse 6
A-4400 St eyr, Au st ri a
t ++ 43 (0)725 2 727 20
f ++ 43 (0)725 2 727 20 77
of f i ce@ t ec -it . com
www. t ec -i t . com
T Wed g e User Man u al
1
Content
1
Content
Table of Figures
List of Tables
2
4
4
Disclaimer
5
3.1
3.2
3.3
3.4
3.5
Introduction
About
Supported Interfaces
Key Features
Supported Operating Systems
Training Videos
6
6
6
7
7
8
4.1
4.2
4.2.1
4.2.2
4.2.3
4.3
4.4
4.4.1
4.4.2
4.5
Common Operations
Abstract
Configure TWedge
Interface
Action
Advanced (Optional)
Load and Save Configurations
Run Data Acquisition
Start/Stop
Execution Log and Debugging
Optional: Adjust System Service
1.1
1.2
2
3
4
9
9
9
9
9
9
10
10
10
10
10
5
User Interface
5.1
Main Window
5.2
Menu
5.2.1
File
5.2.2
Device List
5.2.3
Device
5.2.3.1
Configure
5.2.4
Help
5.3
Toolbar
5.4
Device List
5.5
Device Window
5.5.1
Device View
5.5.2
Summary View
5.6
Log
5.7
Statistics
5.8
System Tray
11
11
11
12
12
12
13
14
14
15
16
16
16
17
18
19
6
Device Configuration
6.1
Abstract
6.2
Interface
6.2.1
Interface
6.2.1.1
Serial Interface
6.2.1.2
Bluetooth Client / Server
6.2.1.3
TCP Client / Server
6.2.1.4
UDP Client / Server
6.2.1.5
UDB HID Device
6.2.1.6
WebSocket Client / Server
6.2.1.7
Null Device
6.2.2
Data
6.2.3
Advanced
6.3
Action
6.4
Parameters
6.5
Advanced
6.5.1
Hotkey
6.5.2
Timer
6.5.3
Script
6.5.4
Description
6.5.5
Log and Debug Settings
6.5.5.1
Logging
6.5.5.2
Debugging
20
20
20
21
21
21
22
22
22
23
23
23
25
25
27
28
28
29
30
30
31
31
32
7
Settings
7.1
Settings
7.1.1
General
7.1.1.1
Startup
7.1.1.2
Appearance
33
33
33
33
33
Page 2 of 49
T Wed g e User Man u al
7.1.2
7.1.3
7.1.4
7.2
7.2.1
7.2.2
8
8.1
8.2
8.2.1
8.2.2
9
Advanced
System Service
V8 JavaScript
Lock
Application-Wide Settings
Per Device Settings
34
34
34
34
35
35
Licensing
License Types
Entering your License Data
Online Activation using the Activation Key
Manual Licensing
36
36
36
36
37
Contact and Support Information
38
Appendix A : Device Status Overview
A.1
Device Statuses
A.2
Summary Statuses
39
39
39
Appendix B :
B.1
B.1.1
B.1.2
B.1.3
B.2
B.2.1
B.2.2
B.3
B.3.1
40
40
40
40
40
41
41
41
42
42
Additional Information on Interfaces
USB HID Device
Switching Applications using Win+Tab
Marking Text Passages in Microsoft Word
Remote Desktop
Serial Port
No Handshake
RS-485
WebSocket
Known Issues and Limitations
Appendix C : JavaScript Debugging
C.1
Prerequisites
C.2
Install and Configure Eclipse
C.2.1
Install the Google Chrome Developer Tools
C.2.2
Create a New Debug Configuration
C.3
Debug the Script
C.3.1
Enable Debugging
C.3.2
Start TWedge
C.3.3
Start the Debugger
43
43
43
43
44
44
45
45
45
Appendix D : Run TWedge as Service
D.1
Select the Configuration
D.2
Start/Stop the Service
D.3
Event Viewer
D.4
Runtime Logs
D.5
Known Restrictions when running as Service
46
46
46
47
47
47
Appendix E : Action Templates
E.1
General
E.2
Create Custom Templates
49
49
49
Page 3 of 49
T Wed g e User Man u al
1.1
Table of Figures
Figure 1: Data Acquisition with TWedge
6
Figure 2: TWedge Main Window
11
Figure 3: Toolbar
14
Figure 4: Device List
15
Figure 5: Context Menu for the Selected Device
15
Figure 6: Device Window
16
Figure 7: Device Log
17
Figure 8: Device Statistics
18
Figure 9: Tray Icon
19
Figure 10: Interface Settings
20
Figure 11: Data Packet Settings
24
Figure 12: Advanced Interface Settings
25
Figure 13: Select Action
26
Figure 14: Change Parameters
27
Figure 15: Hotkey
28
Figure 16: Timer
29
Figure 17: Script Editor
30
Figure 18: Description
30
Figure 19: Log and Debug Settings
31
Figure 20: Settings
33
Figure 21: Lock
34
Figure 22: License Dialog – Online Activation
36
Figure 23: License Dialog – Manual Licensing
37
Figure 24: Remote Desktop Settings for Keyboard Scanners
41
Figure 25: No Handshake Settings
41
Figure 26: RS-485 Settings
41
Figure 27: Add the Google Chrome Developer Tools
43
Figure 28: Create a New Debug Configuration
44
Figure 29: Debugging the TWedge Script
45
Figure 30: TWedge Service Configuration
46
Figure 31: TWedge Service
46
Figure 32: TWedge Service Event Log
47
1.2
List of Tables
Table 1: Device Statuses
39
Table 2: Summary Statuses
39
Page 4 of 49
T Wed g e User Man u al
2
Disclaimer
The actual version of this product (document) is available as is. TEC-IT declines all warranties
which go beyond applicable rights. The licensee (or reader) bears all risks that might take place
during the use of the system (the documentation). TEC-IT and its contractual partners cannot be
penalized for direct and indirect damages or losses (this includes non-restrictive, damages through
loss of revenues, constriction in the exercise of business, loss of business information or any kind of
commercial loss), which is caused by use or inability to use the product (documentation), although
the possibility of such damage was pointed out by TEC-IT.
We reserve all rights to this document and the information contained therein. Reproduction,
use or disclosure to third parties without express authority is strictly forbidden.
Für dieses Dokument und den darin dargestellten Gegenstand behalten wir uns alle Rechte
vor. Vervielfältigung, Bekanntgabe an Dritte oder Verwendung außerhalb des vereinbarten
Zweckes sind nicht gestattet.
© 1998-2015
TEC-IT Datenverarbeitung GmbH
Hans-Wagner-Str. 6
A-4400 Austria
t.: +43 (0)7252 72720
f.: +43 (0)7252 72720 77
http://www.tec-it.com
Page 5 of 49
T Wed g e User Man u al
3
Introduction
3.1
About
TWedge is a versatile and universal data collection software which works with serial (RS-232, RS®
485), Bluetooth , TCP, UDP and USB HID devices. Additionally it supports data exchange via
WebSockets. The collected data can be stored directly in files or databases, forwarded to target
applications via keystroke simulation, entered into spreadsheets like Microsoft Excel, sent to webservices, and so on. It is even possible to convert data between interfaces and protocols (e.g., COM
to TCP). The processing capabilities are unlimited. All aspects of the data acquisition logic can be
configured with the integrated scripting capabilities.
Furthermore TWedge is extremely easy to use. The most common usage scenarios are covered by
predefined configuration templates.
Figure 1: Data Acquisition with TWedge
3.2
Supported Interfaces
The following interfaces are supported:
Serial interface (physical and virtual COM ports)
Bluetooth® client and server (native, no virtual COM port is required)
TCP/IP client and server
UDP client and server
USB HID device (barcode scanners and keyboards)
WebSocket client and server
Null device for simulating test data
Page 6 of 49
T Wed g e User Man u al
3.3
Key Features
Below you find the most important TWedge features at a glance:
Multiple Devices
A single TWedge instance is able to handle multiple devices in
parallel. The maximum number of device connections is limited
by the license kind and the available system resources.
Read/Write
Bidirectional device communication is supported.
Connection Recovery
Interrupted TCP, Bluetooth and virtual COM port connections
can be re-established automatically.
Protocol Conversion
It is possible to transform data between different interfaces
and/or protocols (e.g. COM to TCP). According action templates
are included.
Action Templates
TWedge provides ready-to-use templates which cover common
data collection and data acquisition scenarios.
Hotkeys and Timers
For each device multiple user-defined hotkeys and/or timers are
supported.
Password Protection
The TWedge configuration and the user interface can be
password protected. Privacy and security are enhanced, user
errors are reduced.
Keyboard Wedge
TWedge is able to inject data into arbitrary applications by
simulating keystrokes. This also works in terminal server or
RDP environments.
Database Support
ODBC databases (e.g., Microsoft Access, ORACLE or SQL
Server) can be accessed directly via SQL commands.
Microsoft Excel
Support
Data can be forwarded to Excel worksheets via DDE (dynamic
data exchange).
File Access
CSV and text files can be created, modified and accessed.
Clipboard Support
The content of the system clipboard can be accessed.
Shell Execution
Arbitrary applications can be executed via script code.
User Interaction
TWedge provides user interaction elements like message
boxes and basic input dialogs.
Flexible Scripting
Automatically generated JavaScript code encapsulates the
complete data acquisition logic. If required, every aspect of this
logic can be customized.
Ultra-Fast
TWedge embeds the well-known V8 JavaScript engine (as
used in the Chrome browser).
Easy Troubleshooting
Troubleshooting is easy with JavaScript debugger support and
round-robin log files.
Background Service
TWedge provides a standard desktop application which may
also be operated as Windows system service in the
background. Additional software or extra configuration efforts
are not required.
3.4
Supported Operating Systems
TWedge requires one of the operating systems listed below. It works with 32-bit and 64-bit
operating systems and can be used with Citrix ® and Terminal Server installations.
®
Microsoft Windows Vista
®
Microsoft Windows 7
Page 7 of 49
T Wed g e User Man u al
Microsoft® Windows 8
Microsoft® Windows Server 2003
Microsoft® Windows Server 2008 and 2008 R2
®
Microsoft Windows Server 2012 and 2012 R2
TWedge can also be used on the following operating systems. Please consider that TEC-IT
supports these constellations on a voluntary basis (without any legal entitlements).
3.5
®
Microsoft Windows XP
Windows® Embedded (based on Windows XP)
®
Windows Embedded POSReady
Training Videos
If you are interested in TWedge training videos, please refer to the following playlist on our
YouTube channel: http://www.youtube.com/playlist?list=PL0116E1262438C3E0.
Page 8 of 49
T Wed g e User Man u al
4
Common Operations
4.1
Abstract
After starting TWedge you need to adjust the interface settings and you are prompted to select an
action template (see section 4.2). The current configuration can be tested by starting the data
acquisition (see section 4.4). When finished, save the configuration for future use (see section 4.3).
If required, a saved configuration can be used to run TWedge as system service (see section 4.5).
4.2
Configure TWedge
After installation (or when selecting File ► New from the menu) TWedge starts with a default configuration. This configuration contains one device. More devices may be added on demand.
For setting up the device use the menu Device ► Configure (see also chapter 6).
The following settings are adjusted:
4.2.1
Interface
► The most important step is to configure the interface. If the interface settings do not match
the settings of the connected device the data may not be received (or it may not be received
correctly).
To change the interface settings use the menu Device ► Configure ► Interface… (see section 6.2).
4.2.2
Action
► The selected action determines the behavior for the device. There are predefined action
templates for simulating keystrokes (which allows you to write data to arbitrary applications),
for accessing databases, for exchanging data with Microsoft Excel and for other purposes.
To change the action use the menu Device ► Configure ► Action… (see section 6.3).
Please note that some actions can be parameterized. You can edit the parameter list via the menu
Device ► Configure ► Parameters… (see section 6.4).
4.2.3
Advanced (Optional)
► If the selected template does not meet your requirements you can make subsequent adjustments in the generated data acquisition script.
Script changes are required whenever you want to
change the existing functionality,
add any individual hotkey and timer functions (see sections 6.5.1 and 6.5.2),
modify the parameter list (see section 6.4) or
create your own action templates (see section E.2).
To open the script editor use the menu Device ► Configure ► Advanced ► Script Editor… (see
section 6.5.3).
For detailed information on the script, please refer to the TWedge JavaScript Reference.
Page 9 of 49
T Wed g e User Man u al
4.3
Load and Save Configurations
When starting TWedge the most recently used configuration is loaded automatically.
In order to save the current configuration use the menu File ► Save (or Save As). For loading a
configuration use the menu File ► Open…
TWedge configuration files are identified by the file extension “.TWG ”.
► Please note that TWedge allows you to lock specific settings and controls within the current
configuration and protect them with a password. Locked configurations can be loaded and
started without any restrictions. However, viewing or modifying the settings is not possible
unless you know the password. For further information, please refer to section 7.2.
4.4
4.4.1
Run Data Acquisition
Start/Stop
There are two possibilities to start data acquisition:
Usually you will start all devices by pressing the button
in the toolbar (or by selecting
Start All from the device list menu).
If you want to start a single device only, first select it in the device list. Then click Start in the
device window (or select Start from the device menu).
► Please note that TWedge can also be configured to start all devices automatically as soon
as the configuration is loaded. For details, please refer to section 7.1.1.
While running, TWedge will execute the script from the script editor (= the assigned action) – see
section 6.5.3.
To stop data acquisition click the button
in the toolbar (or select Stop All from the device list
menu). In order to stop a single device, click Stop in the device window (or select Stop from the
device menu).
4.4.2
Execution Log and Debugging
While data acquisition is running TWedge creates different kinds of runtime messages. These
messages inform you about current processing steps or possible execution errors. You can inspect
them in the log window.
Please note:
► The log level (info, warning, error) is adjustable per device (see section 6.5.5).
► On demand you can enable the creation of log files.
Furthermore, TWedge provides the support for an external debugger. For details, please refer to
Appendix C.
4.5
Optional: Adjust System Service
If required, TWedge may be configured to run as system service. For details, please refer to
Appendix D.
Page 10 of 49
T Wed g e User Man u al
5
User Interface
This chapter will give you an overview over the TWedge user interface.
5.1
Main Window
Figure 2: TWedge Main Window
The main window is divided into the following areas:
5.2
Menu (see section 5.2)
Toolbar (see section 5.3)
Device List (see section 5.4)
Device Window (see section 5.5)
Menu
The menu provides the functions described below. It consists of the following sections:
File (see section 5.2.1)
Device List (see section 5.2.2)
Device (see section 5.2.3)
Help (see section 5.2.3.1)
Page 11 of 49
T Wed g e User Man u al
5.2.1
File
The File menu allows you to load and save configurations. Additionally it offers configuration specific adjustments.
5.2.2
New
Creates a new configuration.
Shortcut: Ctrl+N
Open…
Opens an existing configuration.
Shortcut: Ctrl+O
Save
Saves the current configuration.
Shortcut: Ctrl+S
Save As…
Saves the current configuration with a new name.
Settings…
Opens the settings dialog (see section 7.1).
Lock…
Locks (or unlocks) the selected settings in the current configuration and protects them
with an arbitrary password (see section 7.2).
Use this function if you want to prevent unauthorized users from viewing or modif ying
specific settings (e.g., interface settings, script code, …).
When loading a locked configuration you can start data acquisition as usual, but you
cannot view or modify any of the protected settings, unless you know the password.
Clear all Logs…
Clears all individual device logs and the summary log.
Recent Files
This list gives you quick access to the ten most recently opened files.
Exit
Exits TWedge.
Shortcut: Ctrl+Q
Device List
The Device List menu relates to all devices in the device list. It allows you to start/stop all devices
with a single command. Furthermore it allows you to add or remove devices.
5.2.3
Show Device List
Shows or hides the device list (see also section 5.4).
Add Device
Adds a device to the device list.
Remove Device
Removes a device from the device list.
Shortcut: DEL
Start All
Starts data acquisition for all enabled devices in the device list.
Shortcut: F5
Restart All
Restarts data acquisition for all enabled devices in the device list.
Shortcut: F6
Stop All
Stops data acquisition for all enabled devices in the device list.
Shortcut: F7
Show Summary
Log
Shows the summary log window.
The summary log shows the log messages of all devices in chronological order.
See also section 5.6.
Show Summary
Statistics
Shows the summary statistics window.
The summary statistics provide statistical information about all devices in the device list
(e.g., the amount of received data since data acquisition was started).
See also section 5.7.
Clear Summary Log
Clears the summary log.
Export Summary
Log
Exports the summary log to a text file.
Device
The Device menu relates to the current device. It allows you to configure the device, or to start/stop
it.
Configure
Configures the selected device.
Use this sub-menu to configure the communication interface and the data acquisition
Page 12 of 49
T Wed g e User Man u al
behavior (see section 5.2.3.1).
Enabled
Enables or disables the selected device.
Start
Starts data acquisition for the selected device.
Shortcut: Ctrl+F5
Restart
Restarts data acquisition for the selected device.
Shortcut: Ctrl+F6
Stop
Stops data acquisition for the selected device.
Shortcut: Ctrl+F7
Show Log
Shows the log window for the selected device (see section 5.6).
Show Statistics
Shows the statistics window for the selected device (see section 5.7).
Clear Log
Clears the log for the selected device.
Export Log
Exports the log for the selected device to a text file.
Move Device Up
Moves the selected device up one position in the device list.
Please note: The display order corresponds to the order in which the devices are started
when selecting the command Start All.
Move Device Down
Moves the selected device down one position in the device list.
Please note: The display order corresponds to the order in which the devices are started
when selecting the command Start All.
Simulate Device
Data
Simulates a received data packet for the selected device.
This function is only available while TWedge is running.
You can disable this command by unchecking “Enable Simulate Device Data” in the
Settings dialog (see section 7.1.1.2).
5.2.3.1
Configure
The Configuration menu allows you to configure the communication interface and the data acquisition behavior.
Interface…
Configures the interface which is used for receiving (or sending) data (see section 6.2).
Shortcut: Ctrl+I
Action…
Selects the action for the current device (see section 6.3).
The action defines all aspects of the device behavior (e.g., the action which should be
performed whenever data is received).
Shortcut: Ctrl+T
Parameters…
Changes the parameters for the selected action (see section 6.4).
Shortcut: Ctrl+P
Advanced
Hotkey…
Opens the hotkey dialog (see section 6.5.1).
The hotkey function allows you to trigger individual code
execution whenever a specific key is pressed.
Timer…
Opens the timer dialog (see section 6.5.2).
The timer function allows you to trigger individual code
execution in given time intervals.
Script Editor…
Opens the script editor (see section 6.5.3).
The script editor allows you to edit the code behind the selected action. You can make minor adjustments only or you
can rewrite the complete script. For more information on the
script, please refer to the TWedge JavaScript Reference.
Shortcut: Ctrl+E
Description…
Allows you to edit the device name and the description (see
section 6.5.4).
Shortcut: F2
Log and Debug
Settings…
In the log and debug settings you specify the log level for the
message log and you make pre-adjustments for the use of an
external debugger (see section 6.5.5)
Page 13 of 49
T Wed g e User Man u al
5.2.4
Help
The Help menu contains links to the user manual and to other product or company related topics.
Help
Displays the TWedge user manual.
Shortcut: F1
Buy TWedge
Opens the TEC-IT online order form.
License…
Opens the TWedge license dialog (see chapter 8).
Check for
Updates…
Checks for TWedge software updates. Internet connectivity is required.
Online Information
If you want to learn more about our products, please visit us on the web:
About TWedge…
5.3
TEC-IT Web Site
Opens the page http://www.tec-it.com. On this page
you will find the latest product downloads and user
manuals.
YouTube Videos
Opens the “Data Acquisition Software” playlist on the
TEC-IT YouTube channel.
Facebook
Opens the TEC-IT Facebook page.
Google+
Opens the TEC-IT Google+ page.
Twitter
Opens the TEC-IT Twitter page.
Android Apps
Opens the TEC-IT android apps in the Google Play
Store.
Shows detailed version and copyright information.
Toolbar
The toolbar provides quick access to the most commonly used functions:
Figure 3: Toolbar
Use the toolbar to
show or hide the device list (see also section 5.4),
start, restart or stop all devices within the current configuration,
simulate incoming data for the selected device, or to
open the user manual.
Page 14 of 49
T Wed g e User Man u al
5.4
Device List
The device list shows all devices specified in the current configuration.
Figure 4: Device List
Figure 5: Context Menu for the Selected Device
You can show or hide the device list by clicking the toolbar button .
For adding or for removing devices use the appropriate links in the header (see ).
The list view in shows all defined devices. It shows the name, the connection type and some
characteristic information for each single device. The dot on the left side indicates the status of the
device (= running, stopped, error, …). The color code corresponds to the texts in .
For a list of possible states and their meanings see section A.1.
When you right-click a list item in a context menu will appear (see ). Use this menu to configure
or to start/stop the selected device. The context menu is the same menu as described in section
5.2.3.
The panel displays statistics about how many devices are specified and how many of them are
currently in which state.
Page 15 of 49
T Wed g e User Man u al
5.5
Device Window
The device window displays information about the selected device. This is either
5.5.1
detailed information about the selected device (see 5.5.1) or
summary information about all devices in the current configuration (see 5.5.2) –
if the root node “Devices” is selected in the device list.
Device View
The figure below shows the device view for “Device-1”:
Figure 6: Device Window
The header displays the device name and description, as well as some textual information about
the interface (see ).
The color bar in indicates the status of the device (= running, stopped, error, …).
For a list of possible states and their meanings see section A.1.
The checkbox in lets you quickly enable or disable the device.
Use the links in to configure the device (see also section 5.2.3.1), or to start/stop data acquisition.
The main area in displays the message log respectively the statistics page. You can choose
between the two different views by clicking the appropriate link in .
For detailed information about the log page and about the statistics page see sections 5.6 and 5.7.
5.5.2
Summary View
If the root node “Devices” is selected (see Figure 4, ) the device window in Figure 6 looks slightly
different. Its content will not refer to a single device but to all devices in the device list.
There will be links to “Start All” and to “Stop All” devices. The status indicator will show a summary
status (see section A.2) and the links in will refer to a summary log and to a summary statistics
page.
Page 16 of 49
T Wed g e User Man u al
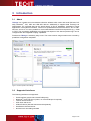
5.6
Log
The log window displays important runtime messages for the selected device (respectively for all
devices if the summary view is selected).
The figure below shows the device log for “Device-1”:
Figure 7: Device Log
The list contains the following columns:
Level
The severity level of the log message.
The following icons are used:
<none>
Information.
Warning.
Error.
Please note: You can double-click an error message to open the script editor and go to
the line where the error occurred.
Occurrence
The date and time when the log entry was generated.
Error Code
Shows the error code if available.
Additional error codes may be provided in the error message.
Device
The device for which the log message was generated.
This column is only available in the summary log for all devices.
Message
The actual log message.
This is either a
system message or a
user message.
System messages are messages that are automatically generated by TWedge upon specific events.
User messages are triggered per code within the script and are therefore fully customizable.
The links below the list view provide additional functions:
Clear Log
Deletes all items in the log window.
Export Log
Exports the log to a text file.
Page 17 of 49
T Wed g e User Man u al
Please note:
► The log window is limited to a given number of lines. When exceeding this limit the oldest
messages will be discarded automatically. You can change the limit (for the current configuration) in the settings dialog – see section 7.1.2.
► In order to write all messages to a log file you can enable the log file creation in the Log and
Debug Settings (see section 6.5.5).
► In the Log and Debug Settings you can also specify the logging level for messages (No
Logs, Errors, Warnings, Information). Thus you may, for example, suppress all information
messages in order to reduce the log output.
5.7
Statistics
The statistics page provides statistical information about the selected device (respectively about all
devices if the summary view is selected).
The figure below shows the statistics for “Device-1”:
Figure 8: Device Statistics
The view contains the following values:
Started at
The starting date and time of the current TWedge session.
Received Data
The most recently received data packet as plain data string.
(= The data packet which was received in the function onData() respectively by calling
1
1
Received data packet = All bytes that were identified as one packet according to the adjustments described in section
6.2.2.
Page 18 of 49
T Wed g e User Man u al
hConn.GetNextDataPacket() in the script.)
1
Hex
The most recently received data packet in hex notation.
Clients Connected
The number of connected clients when running in server mode (TCP, UDP or Bluetooth
server). Please note that currently all server connections are limited to one client.
Received
The number of bytes respectively data packets which were received since the data
acquisition was started. The timestamp gives the time when the most recent data packet
was ready for reading.
Unprocessed
The number of unprocessed bytes respectively data packets . This data is currently
available in the internal buffer but not yet fetched by the user.
Sent
The number of bytes respectively data packets which were transmitted since the data
acquisition was started. The timestamp gives the time, when the most recent data was
transmitted.
onData
The number of times how often the onData() function was triggered since the data
acquisition was started.
onTimer
The number of times how often the onTimer() function was triggered since the data
acquisition was started.
onHotkey
The number of times how often the onHotkey() function was triggered since the data
acquisition was started.
onSignal
Not implemented yet. This value is always 0.
onConnectionLost
The number of times how often the onConnectionLost() function was triggered since the
data acquisition was started.
Open Retries
The number of open retries since data acquisition was started.
5.8
1
1
2
System Tray
Whenever “Minimize to system tray” is enabled (see section 7.1.1.2), TWedge will minimize to the
system tray instead of the taskbar (see ). A right-click on the tray icon brings up a context menu
(see ).
Figure 9: Tray Icon
The color of the tray icon indicates the status of TWedge (see also section A.2):
Stopped.
Running.
Error.
2
Transmitted data packet = All bytes that were transmitted within one function call.
Page 19 of 49
T Wed g e User Man u al
6
Device Configuration
6.1
Abstract
In order to configure the selected device click on the link Configure… in the device window or
select Device ► Configure from the menu. Alternatively use the context menu in the device list.
In the configuration menu you select the device interface (see section 6.2) and a so-called action
template for the requested data acquisition task (see section 6.3). Please note that some of the
templates provide parameters for additional adjustments. These parameters are edited in a
separate dialog (see section 6.5). For documentation purposes you can enter an appropriate name
and description for the device (see section 6.5.4).
If hotkeys and timers are required the generated JavaScript code needs to be customized (see
sections 6.5.1 to 6.5.3). For troubleshooting use the built-in logging and debugging features (see
section 6.5.5).
Please note:
► TWedge collects and processes device data in the form of data packets. If the received data
is grouped incorrectly (e.g., truncated data or too much data in a single packet) please check
the data packet adjustments (see section 6.2.2).
6.2
Interface
In the Interface dialog (shortcut Ctrl+I) you specify the connection type and the connection parameters. You edit the settings for the data packet generation and you adjust connection related
timeouts and delays.
Figure 10: Interface Settings
Page 20 of 49
T Wed g e User Man u al
The interface dialog consists of three tabs:
Interface (see section 6.2.1)
Data (see section 6.2.2)
Advanced (see section 6.2.3)
6.2.1
Interface
In the Interface tab you select the interface type and adjust the connection parameters. The respective settings are described below.
Please note:
► All server connections (TCP, UDP and Bluetooth server) are currently limited to one simultaneous client connection.
► If an existing connection is lost, TWedge can try to re-establish the connection automatically
(see setting “Reconnect automatically”). This works for TCP and Bluetooth clients and for
virtual COM port connections.
6.2.1.1
Serial Interface
The serial interface (RS-232, RS-485) is used for data transmission via (physical or virtual) COM
ports.
COM-Port
The COM port to which the device is connected (COM1 to COM256).
Baud Rate
The transmission speed in bits per second (9600, …, 115200, …, 256000).
Data Bits
The number of data bits per transmission unit.
Stop Bits
The number of stop bits per transmission unit.
Parity
The use of parity bits per transmission unit.
XOn/XOff
Enables or disables the Xon/Xoff protocol for data flow control.
OCTS (CTS
Handshaking)
Enables or disables the monitoring of the CTS (clear-to-send) signal for output flow control.
ODSR (DSR
Handshaking)
Enables or disables the monitoring of the DSR (data-set-ready) signal for output flow
control.
IDSR (DSR Sensitivity)
Enables or disables the DSR (data-set-ready) circuit sensitivity.
DTR Circuit
The flow control for the DTR (data-terminal-ready) circuit.
RTS Circuit
The flow control for the RTS (request-to-send) circuit.
Monitor Virtual Port
Enables or disables the monitoring of virtual COM ports.
If enabled, TWedge will try to detect the removal of USB COM devices (e.g., if the USB
device was powered off or unplugged). Based on this detection you can trigger automatic
reconnection attempts (see below).
You can choose between two different monitoring methods: Get/SetCommState and GetDefaultCommConfig. Please note that these methods are undocumented and thus may not
work reliably with your VCP driver (= virtual COM port driver).
Reconnect
automatically
<on/off>
Enables or disables the automatic reconnection for USB COM devices.
Retries
The number of reconnection attempts before an error is reported.
Latency Time
The delay time between the reconnection attempts.
6.2.1.2
Bluetooth Client / Server
The Bluetooth interface is used for connecting to wireless Bluetooth devices. It uses the Serial Port
Profile (SPP) for data transmission.
Page 21 of 49
T Wed g e User Man u al
Device
The name of the Bluetooth server.
3
TWedge automatically scans for paired Bluetooth devices and lists them in the dropdown
box. When choosing a device from the list its Bluetooth address will be written to the
Address field below.
Address
The address of the Bluetooth server.
Port / Channel
This field should be always left empty.
If <empty> or 0, the port (= the RFCOMM channel) is detected automatically.
SPP Display Name
When acting as Bluetooth server this name will be displayed in the profile selection dialog
during the pairing process for the client. This allows you to identify the TWedge device in
case of doubt.
Reconnect
automatically
<on/off>
Enables or disables the automatic recovery for lost connections.
Retries
The number of reconnection attempts before an error is reported.
Latency Time
The delay time between the reconnection attempts.
6.2.1.3
TCP Client / Server
The TCP interface is used for data transmissions via LAN, WLAN etc.
Host / IP
The host name (e.g., www.example.com) or the IP address (e.g., 127.0.0.1) of the TCP/IP
server.
Service / Port
The service name (e.g., http) or the port number (e.g., 80).
Use keep-alive
<on/off>
Enables or disables the TCP keep-alive with the given time interval.
This setting must be enabled in order to detect a lost connection in a
reasonable time (the default keep-alive interval is 2 hours).
A connection may be lost if the host application crashes, if a network
cable is unplugged, if you are moving out of range with a wireless
device, or the like.
The TCP client relies on the keep-alive for starting reconnection
attempts. If the server detects a lost connection it will free the
connection socket so that a new client can connect.
Keep-Alive
Interval
The time interval for sending the keep-alive packets.
<on/off>
Enables or disables the automatic recovery for lost TCP connections.
In order to detect a lost connection within the desired time, please
make sure to use the keep-alive settings described above.
Retries
The number of reconnection attempts before an error is reported.
Latency Time
The delay time between the reconnection attempts.
Reconnect
automatically
6.2.1.4
UDP Client / Server
The connectionless UDP protocol sends datagrams via LAN, WLAN, etc.
Host / IP
The host name (e.g., www.example.com) or the IP address (e.g., 127.0.0.1) of the TCP/IP
server.
Service / Port
The service name (e.g., http) or the port number (e.g., 80).
6.2.1.5
UDB HID Device
The USB HID interface is intended for barcode scanners which are operating in HID keyboard
mode.
► For known issues on this interface type, please refer to Appendix B.
3
In order to use a Bluetooth device you first have to pair it with the PC on which TWedge is running.
Page 22 of 49
T Wed g e User Man u al
Device
The HID keyboard device.
TWedge automatically scans for available devices and lists them in the dropdown box.
Upon selection of a device the following fields will display additional information:
Internal Name
The internal name of the selected device.
Vendor ID
The vendor ID of the selected device as hex number.
Product ID
The product ID of the selected device as hex number.
Input Language
The keyboard layout of the USB HID device.
Whenever possible, the USB HID device (e.g., the barcode scanner) should be configured
to use the same regional settings as the host PC where TWedge is running, and the input
language should be set to “System Language” (= default).
If this is not possible you can compensate any mismatching regional settings between the
USB HID device and the TWedge PC by selecting the respective device language.
Suppress keystrokes
Enables or disables the blocking of keystrokes.
If enabled, the keystrokes from the selected USB HID device are blocked from reaching the
focused application window.
Unicode
Enables or disables the simulation of Unicode input.
If enabled, the received data will be provided as Unicode data (instead of ASCII data).
Usually you will not need this feature unless you want a 2-byte representation for each
received character.
6.2.1.6
WebSocket Client / Server
The WebSocket interface may be used for real-time data exchange with HTML 5 web pages.
Host / IP
The host name (e.g., www.example.com) or the IP address (e.g., 127.0.0.1) of the WebSocket server.
Port
The port number (e.g., 80).
Mode
The mode for WebSocket write operations (UTF-8 encoded Text, Binary).
It identifies the payload data of the sent data frames.
Poll Timeout
The time interval for the internal service loop (which is responsible for accepting new WebSocket connections and for sending/receiving data frames).
Low timeouts allow high transmission rates.
We recommend using the default value.
Reconnect
automatically
<on/off>
Enables or disables the automatic recovery for lost WebSocket connections.
Retries
The number of reconnection attempts before an error is reported.
Latency Time
The delay time between the reconnection attempts.
6.2.1.7
Null Device
The null device is provided for testing purposes only. You may use it to simulate input if you don’t
have any data acquisition device at hand. The null device loops through the alphabet and returns
data packages with 20 bytes each.
This interface has no adjustable settings.
6.2.2
Data
In the Data tab you configure the parameters for data packet generation.
Page 23 of 49
T Wed g e User Man u al
Figure 11: Data Packet Settings
TWedge groups device data automatically into packets. The data packets are processed as a
single unit (e.g., transmitted to a target application as keystrokes). A data packet is defined by its
size (), by the maximum time required for receiving it () and by a delimiter string (). You can
combine these settings as required.
Max. Length
This parameter specifies the maximum number of bytes per package. One package may
never exceed the “Max. Length”. However, it may have less than the specified number of
bytes if the timeout was reached or if a delimiter was found.
4
If No size limit is enabled there is no size limit for creating data packages . Only the “Read
Timeout” (as well as an optional delimiter) will be used for splitting the incoming data.
Read Timeout
All data received within “Timeout” milliseconds will be accumulated into one data package.
The timer begins to run as soon as the first (new) byte of the data transmission is received
and it stops the given number of milliseconds later. All data which was received within that
time period forms one data package.
However, only a maximum number of bytes (property "Max. Length") will be included into
one package. Any overrun will start another packet. If a delimiter is found before the time is
elapsed, a new package will be started, as well.
If No time limit is activated, there is no time limit for creating data packages. Only the value
“Max. Length” (as well as an optional delimiter) will be used for splitting the incoming data.
Delimiter
Include Delimiter
The delimiter is a character (or a character sequence), which is used for splitting the
incoming data. With each occurrence of the delimiter in the incoming data stream a new
package is created. The delimiter condition is processed prior to the other conditions size
and timeout.
These are common delimiter strings:
Escape sequence for Carriage Return
\r
(you may also use the hex code “\x0d”)
Escape sequence for Line Feed
\n
(you may also use the hex code “\x0a”)
Carriage Return + Line Feed
\r\n
(you may also use the hex code “\x0d\x0a”)
This flag specifies if the delimiter should remain part of the data package or if it should be
omitted (stripped off).
Sample: If your barcode reader automatically appends a carriage return + line feed at the end of the scanned barcodes you
could use the delimiter string “\r\n” to identify data packets. Even if the “Read Timeout” was one minute or more you would
still receive the packages in a reasonable time containing one barcode each.
4
Actually there is a limitation to 4 MB due to the internal buffer size. However, you will hardly ever collect that much data in a
single packet.
Page 24 of 49
T Wed g e User Man u al
6.2.3
Advanced
In the Advanced tab you adjust timeouts and other settings.
Figure 12: Advanced Interface Settings
Open Timeout
The open timeout for the connection.
If the connection cannot be opened within the given time interval an error is reported.
Close Timeout
The close timeout for the connection.
If the connection cannot be closed within the given time interval an error is reported.
Sleep after Data
Received
The time interval to be waited after a new data packet was read.
The purpose of this setting is to reduce the frequency of incoming data packets when
testing or debugging a script (e.g., if you are using the Null device, which is continuously
delivering data – see above).
Open Retries
The number of connection retries, if the device could not be opened with the first attempt.
Sleep after Open Failed
The delay between failed open attempts.
If the open failed TWedge waits the given time interval before retrying to open the
connection.
6.3
Action
In the Action dialog (shortcut Ctrl+T) you select the action template for the current device.
Page 25 of 49
T Wed g e User Man u al
Figure 13: Select Action
► The action template is a script which specifies the device behavior. When selecting one of
the given templates any previously selected action will be overwritten.
► Advanced users may edit the script after it was assigned and customize it according to their
own requirements.
► For basic usage no additional adjustments are required.
You can choose from numerous predefined templates which are grouped by category. There are
templates for the most common purposes like simulating the received data as keystrokes (which
allows you to paste the received data to an arbitrary application), for writing the received data to a
database or for forwarding all incoming data to Microsoft Excel via DDE.
After assigning the template you will be asked to edit the parameters for the action (see section
6.4). These parameters allow you to define values that are internally used by the script (e.g., the
name of an output file).
Advanced users may also assign hotkeys (see 6.5.1) or create custom timer functions (see 6.5.2).
Actually you may rewrite the complete action using the script editor (see section 6.5.3) or create
your own custom template (see section E.2).
► For more information on the script, please refer to the TWedge JavaScript Reference.
Page 26 of 49
T Wed g e User Man u al
6.4
Parameters
In the Parameters dialog (shortcut Ctrl+P) you edit the parameters for the script.
Figure 14: Change Parameters
The parameters are used to pass custom values to the script (without the need of knowing the
actual implementation). They are used to provide file names, ODBC connection strings, the parameters for a second data connection, and other action specific values.
Each action provides different parameters.
Please note:
► Advanced users may edit the parameter definitions for the current script via the script editor
(see section 6.5.3). For more information on the parameter declaration, please refer to the
TWedge JavaScript Reference.
Page 27 of 49
T Wed g e User Man u al
6.5
Advanced
Please note:
► Some of the following adjustments require you to make code changes in the script. If you
need any assistance with the implementation, please contact out support team. We will be
glad to help you.
6.5.1
Hotkey
In the Hotkey dialog (shortcut Ctrl+H) you enable or disable the hotkey processing for the current
device.
Figure 15: Hotkey
Enable Hotkey Event
Enables or disables the hotkey processing.
If enabled a hotkey will be created and the according event function onHotkey() will be
registered. The required changes in the script are generated automatically.
In order to customize the hotkey function, please edit the respective code in the script
editor (see section 6.5.3).
Hotkey
The assigned hotkey.
Use the button Detect Hotkey… to specify (or to change) the key assignment.
The following auto-generated code registers the hotkey “F9” and associates it with the event
handler function onHotkey():
// register the hotkey
// (this code is automatically inserted at the beginning of the script)
hInstance.RegisterHotkey("F9", onHotkey);
Whenever the hotkey is pressed the onHotkey() function is executed. This function can be
customized according to your requirements. (Example: You could use the hotkey to transmit a
control code which initiates the connected device to send the measured data.)
// onHotkey event handler
function onHotkey ()
{
// Your code here
}
For additional information on the script, please refer to the TWedge JavaScript Reference (see also
).
Page 28 of 49
T Wed g e User Man u al
Please note:
► TWedge supports multiple hotkeys. However, only one hotkey can be configured via the
user interface. The code for additional hotkeys must be inserted manually.
6.5.2
Timer
In the Timer dialog (shortcut Ctrl+M) you enable or disable the timer execution for the current
device.
Figure 16: Timer
Enable Timer Event
Enables or disables the timer execution.
If enabled a timer will be created and the according event function onTimer() will be
registered. The required changes in the script are generated automatically.
In order to customize the timer function, please edit the respective code in the script editor
(see section 6.5.3).
Interval
The execution interval for the timer function.
The following auto-generated code registers the timer named “Timer” and associates it with the
event handler function onTimer(). In the functions onStart() and onStop() the timer will be
started respectively stopped.
// create the timer
// (this code is automatically inserted at the beginning of the script)
hInstance.RegisterTimer("Timer", onTimer);
// start the timer with the given time interval
// (this code is automatically inserted in the function onStart)
hInstance.StartTimer("Timer", 5000);
// stop the timer
// (this code is automatically inserted in the function onStop)
hInstance.StopTimer("Timer");
Whenever a timer event is triggered the onTimer() function is executed. This function can be
customized according to your requirements.
// onTimer event handler
function onTimer ()
{
// Your code here
}
Page 29 of 49
T Wed g e User Man u al
For additional information on the script, please refer to the TWedge JavaScript Reference (see also
).
Please note:
► TWedge supports multiple timers. However, only one timer can be configured via the user
interface. The code for additional timers must be inserted manually.
6.5.3
Script
In the Script Editor (shortcut Ctrl+E) you customize the action for the current device.
Figure 17: Script Editor
The editor shows the script which is executed while the device is running ( = the selected action).
You can customize or rewrite the complete script. However, please note that some parts of the
script are generated automatically. Changes of such sections will be overwritten by TWedge without
further notice.
For additional information on the script, please refer to the TWedge JavaScript Reference (see also
).
6.5.4
Description
In the Description dialog (shortcut F2) you edit the device name and the description.
Figure 18: Description
Device Name
The device name which is displayed in the user interface.
Description
An optional device description.
Page 30 of 49
T Wed g e User Man u al
The description text will be displayed in the header of the device window (below the
generated textual description).
6.5.5
Log and Debug Settings
On this dialog you adjust the log levels and the log file creation rules. Furthermore you can enable
JavaScript debugging (see also Appendix C).
Figure 19: Log and Debug Settings
6.5.5.1
Logging
System Log Level
Specifies the system log level for the current device.
TWedge natively generates specific information, warning and error messages. In order to
suppress some of these messages, please select the according system log level:
No Log – no system messages are displayed.
Errors – only error messages are displayed.
Warnings (default) – only warning and error messages are displayed.
Information – all kinds of system messages are displayed.
User Log Level
Specifies the user log level for the current device.
TWedge allows you to generate arbitrary information, warning and error messages within
the JavaScript code. In order to suppress some of these messages, please select the
according user log level:
No Log – no user messages are displayed.
Errors – only error messages are displayed.
Warnings – only warning and error messages are displayed.
Information (default) – all kinds of user messages are displayed.
Write Log to File
Enables/disables the log file creation.
If enabled, all messages from the log window are additionally written to log files.
Maximum File Size
The maximum file size for log files.
Whenever the maximum file size is exceeded, TWedge will start a new log file.
Maximum Number of
Files
The maximum number of log files.
Whenever the maximum number of files is exceeded, the oldest log file will be deleted
automatically. – This option is only available in conjunction with the maximum file size.
Log Path
The log file directory.
This read-only field helps you to locate the correct file path in the Windows Explorer.
This is usually located under "%temp%\TEC-IT\TWedge\3.1"
Page 31 of 49
T Wed g e User Man u al
6.5.5.2
Debugging
Enable Debugging
Enables or disables script debugging.
Enable this feature if you want to use the external debugger for the current script.
Port Number
The port number that will be used to communicate with the debugger.
For detailed information on TWedge script debugging, please refer to Appendix C.
Page 32 of 49
T Wed g e User Man u al
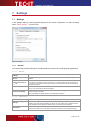
7
Settings
7.1
Settings
In the settings dialog you specify general settings for the current configuration. To open the dialog
select File ► Settings… from the menu.
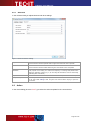
Figure 20: Settings
7.1.1
General
The General tab provides settings for the startup behavior and for the overall program appearance.
7.1.1.1
Startup
Automatically minimize
TWedge
If enabled, TWedge will be minimized automatically whenever the configuration is loaded.
Automatically start
devices
If enabled, TWedge will automatically start all devices whenever the configuration is
loaded.
Sequential device
startup with a delay of
___ ms
If enabled, the button Start All will start one device after the other.
This setting guarantees that the next device is not started before the previous device is
running (or in error state) and the given delay time has elapsed since the start attempt for
the previous device.
Stop startup on error
If enabled, the sequential device startup will be interrupted on the first occurrence of an
error. Any running devices will not be stopped.
Allow multiple
instances of TWedge
If enabled, the user may start more than one instance of TWedge, otherwise always the
same instance is activated.
Running TWedge as System Service is not affected by this option.
7.1.1.2
Appearance
Minimize to system tray
If enabled, TWedge will minimize to system tray instead of the taskbar (see section 5.8).
Quiet mode (suppress
dialogs)
If enabled, TWedge will suppress all kinds of input and message boxes.
Please note: When starting TWedge as service the quiet mode will be enabled automatically regardless of this adjustment. Services may not provide any GUI elements.
Enable Simulate Device
Data button
If enabled, TWedge will enable the “Simulate Device Data” function.
This function allows you to enter arbitrary data and simulate it as incoming data package.
Page 33 of 49
T Wed g e User Man u al
7.1.2
Advanced
In the Advanced tab you adjust the following user interface settings.
View Refresh Interval
The time interval in which the log window is updated.
Log List Size
The log list size limits the number of messages in the log windows (see section 5.6).
Old messages will be discarded automatically.
7.1.3
System Service
The System Service tab allows you to select (or to clear) the configuration that should be used
when running TWedge as service.
Select Configuration…
Selects the configuration file.
Clear Configuration…
Clears any previously assigned configuration.
Start Services Console
Starts the windows services management console (see also Figure 31).
For detailed information on the TWedge service, please refer to Appendix D.
7.1.4
V8 JavaScript
The V8 JavaScript tab exposes settings for the internally used Google V8 JavaScript engine.
V8 JavaScript startup
flags
7.2
Sets the given V8 flags from string.
You will have to restart TWedge in order to bring the changes into effect.
Please use this option with care! – Possible flags and their effects are not officially
documented.
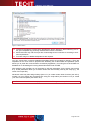
Lock
If you want to protect your configuration from unauthorized changes select File ► Lock… from the
menu. This function allows you to lock specific settings within the current configuration and protect
them with a password. Selected controls on the user interface may be locked as well.
Figure 21: Lock
Page 34 of 49
T Wed g e User Man u al
In the dialog enter an arbitrary password and select the settings that you want to protect (for details
see below). If you confirm the dialog the lock will be applied immediately.
For accessing any of the protected settings the whole configuration needs to be unlocked. Select
File ►Unlock… from the menu and enter the required password.
7.2.1
Application-Wide Settings
The following locks apply to the settings dialog and to the device list.
TWedge Settings
Locks the settings dialog (see section 7.1).
Add/Remove Device
Locks the device list. No device may be added or removed.
This setting is locked automatically, if at least one of the “per device settings” is locked
(except the log and debug settings).
Restart Command
Prevents the devices from being restarted.
Stop Command
Prevents the devices from being stopped.
Furthermore, the TWedge application may not be closed if at least one device is running.
7.2.2
Per Device Settings
These locks are related to the device configuration.
General
Locks the device description dialog (see section 6.5.4).
Besides that, it prevents the device from being enabled or disabled.
Interface
Locks the interface dialog (see section 6.2.1).
Script
Locks the script dialog including the hotkey and timer settings (see sections 6.5.1 to 6.5.3).
Furthermore, the script inside the configuration file will be encrypted. Thus the user has no
chance to inspect it.
Whenever the script is locked, the debugging feature will be disabled automatically.
Parameters
Locks the parameters dialog (see section 6.4).
Log and Debug
Locks the log and debug settings dialog (see section 6.5.5).
Page 35 of 49
T Wed g e User Man u al
8
Licensing
8.1
License Types
Please check out http://www.tec-it.com/order for available license types and pricing.
8.2
Entering your License Data
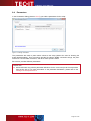
To enter the license data select Help ► License… from the menu. The dialog below will appear.
TWedge provides two methods for entering the license data:
8.2.1
Online Activation using the Activation Key (see 8.2.1).
This is the default method. Internet access is required.
Manual Licensing (see 8.2.2).
Please get in touch us with us if your system has no internet access or if you prefer to use
the manual activation for any other reason. We will be glad to send you the license data
which is suitable for manual licensing
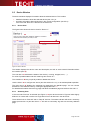
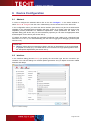
Online Activation using the Activation Key
If you have received an activation key from TEC-IT, please use the online activation .
Figure 22: License Dialog – Online Activation
The following steps are required to license the product:
1. In field enter the activation key.
2. In field enter your email address. A license certification will be sent to this address
automatically.
3. Complete all remaining data (Company, Country, ZIP Code, City). For a successful
activation all fields are required.
4. Confirm the entered data by clicking Send.
A message will inform you about the successful activation. In case of problems or errors, please
contact TEC-IT.
Page 36 of 49
T Wed g e User Man u al
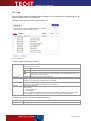
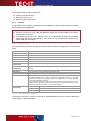
8.2.2
Manual Licensing
Manual licensing is the alternative method for licensing if your system has no Internet connection.
Select manual licensing and enter the license data as provided by TEC-IT.
► Please enter the license data exactly as you received it from TEC-IT!
Spacing and upper/lower case letters are to be considered. To avoid typing errors, it is
recommended to use “copy and paste” whenever possible: Copy the data from the license
email which you have received from TEC-IT and paste it in the license dialog.
► Single licenses
If you are interested in a single (workstation) license, please tell us the so-called "System ID”
of the target computer. You can find the System ID in the licensing dialog (see below).
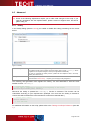
Figure 23: License Dialog – Manual Licensing
The following steps are required to license the product:
1. At the top of the dialog you see the System ID () of your computer.
For single licenses we will ask you to send us the System ID of the target computer.
2. In the field “Product” select “TWedge”, “TWedge Pro” or “TWedge Datacenter”
depending on the version you have purchased.
3. In the field “Licensee” enter the name of the license holder.
4. In the field “Kind of License” select the kind of license that you have purchased.
5. In the field “Number of Licenses” enter the number of licenses that you have purchased.
6. In the field “Your License-Key” enter the license key exactly as received from TEC-IT.
7. Confirm the dialog with OK.
A message will inform you about the successful licensing. In case of problems or errors, please
contact TEC-IT.
Page 37 of 49
T Wed g e User Man u al
9
Contact and Support Information
TEC-IT Datenverarbeitung GmbH
Address:
Phone:
Fax:
Email:
Web:
Hans-Wagner-Str. 6
AT-4400 Steyr
Austria/Europe
+43 / (0)7252 / 72 72 0
+43 / (0)7252 / 72 72 0 – 77
mailto:[email protected]
http://www.tec-it.com
AIX is a registered trademark of IBM Corporation.
Avery and all Avery brands, product names and codes are trademarks of Avery Dennison Corporation.
HTML, DHTML, XML, XHTML are trademarks or registered trademarks of W3C, World Wide Web Consortium, Laboratory for Computer
Science NE43-358, Massachusetts Institute of Technology, 545 Technology Square, Cambridge, MA 02139.
JAVA® is a registered trademark of Sun Microsystems, Inc., 901 San Antonio Road, Palo Alto, CA 94303 USA.
JAVASCRIPT® is a registered trademark of Sun Microsystems, Inc., used under license for technology invented and implemented by
Netscape.
Microsoft®, Windows®, Microsoft Word, Microsoft Excel® are registered trademarks of Microsoft Corporation.
Navision® is a registered trademark of Microsoft Business Solutions ApS in the United States and/or other countries.
Oracle® is a registered trademark of Oracle Corporation.
PCL® is a registered trademark of the Hewlett-Packard Company.
PostScript® is a registered trademark of Adobe Systems Inc.
SAP, SAP Logo, R/2, R/3, ABAP, SAPscript are trademarks or registered trademarks of SAP AG in Germany (and in several other countries).
All other products mentioned are trademarks or registered trademarks of their respective companies. If any trademark on our web site or in this
document is not marked as trademark (or registered trademark), we ask you to send us a short message (mailto:[email protected])
Page 38 of 49
T Wed g e User Man u al
Appendix A: Device Status Overview
A.1 Device Statuses
The device view distinguishes the following statuses:
Status
Description
Disabled
The device is disabled.
To enable the device use the checkbox in the device window (see Figure 6, ) or the device
menu (see section 5.2.3).
Error
An error occurred during script execution.
Double-click the error message in the log window to open the script editor and go to the line
where the error occurred.
In Event Handler
The device is currently executing one of the event handler functions (onData, onHotkey,
etc.).
This status will only be noticeable when using time consuming calls inside an event handler
function.
Invalid
The device configuration is invalid or incomplete (maybe it could not be loaded completely).
Please try to reload the configuration or recreate the device definition within the current
configuration!
No Action Selected
The device has currently no action assigned.
Please select an action from the respective dialog (see section 6.3)!
Reconnecting
The device is currently reconnecting.
(= The connection was lost and TWedge is trying to reconnect – see also section 6.2.1,
properties “Reconnect automatically” with the according number of retries.)
Running
The device is currently running.
(= The connection was successfully established and script execution is running.)
Starting
The device is currently starting.
(= Script execution has started and the device is currently trying to open the connection.)
Stopped
The device is currently stopped.
(= Script execution has stopped.)
Stopping
The device is currently stopping.
(= Script execution is about to stop and the device is currently trying to close the
connection.)
Table 1: Device Statuses
A.2 Summary Statuses
The summary view and the tray icon use the following status indicators:
Status
Description
Disabled
All devices are disabled (respectively “invalid” or they have “no action selected”).
Stopped
All devices are stopped.
Running
One or more devices are running (respectively “starting”, “stopping” or in “event handler”).
None of the devices is in error state.
Error
One or more devices are in error state.
Table 2: Summary Statuses
Page 39 of 49
T Wed g e User Man u al
Appendix B: Additional Information on Interfaces
B.1 USB HID Device
The interface “USB HID Device” is intended for barcode scanners which are operating in HID
keyboard mode (and therefore provide the data as keystrokes just like a keyboard).
Please note:
► When using this connection type you may experience problems in conjunction with the keys
Ctrl, Alt and Win. This is due to the nature of the internal implementation and may probably
not be fixed. Nevertheless we would ask you to contact us with the details in case of a
problem.
► When the option “Suppress keystrokes” is enabled, key combinations like Ctrl+Alt+Del,
Alt+Tab and Alt+Esc will remain fully operational.
The following problems are known:
B.1.1
Switching Applications using Win+Tab
If the option “Suppress keystrokes” is enabled, the application switcher will sometimes not close
when releasing the windows key.
Solution:
B.1.2
Press the Windows key once again or click with the mouse on the window that you want to
switch to.
Marking Text Passages in Microsoft Word
If you want to mark text passages in Microsoft Word with Shift+Left/Right you will notice a delay for
the Shift key.
Solution:
B.1.3
There is no known solution for this problem.
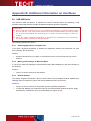
Remote Desktop
The setting “Suppress keystrokes” does not work inside a remote desktop window. Besides that,
TWedge does not capture any input if the remote desktop window has the focus.
Solutions:
There is no known solution for the problem with the keystroke suppression.
In order that TWedge can capture the input for the remote desktop window the option “Apply
Windows key combinations” may not be activated (see Figure 23, ).
Page 40 of 49
T Wed g e User Man u al
Figure 24: Remote Desktop Settings for Keyboard Scanners
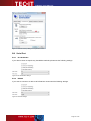
B.2 Serial Port
B.2.1
No Handshake
If your device does not require any handshake methods, please use the following settings:
Figure 25: No Handshake Settings
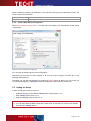
B.2.2
RS-485
If you want to connect to a device via RS-485 we recommend the following settings:
Figure 26: RS-485 Settings
Page 41 of 49
T Wed g e User Man u al
B.3 WebSocket
B.3.1
Known Issues and Limitations
The WebSocket client/server cannot receive data packets bigger or equal 64K.
The connection will close unexpectedly.
Multiple servers can be started on the same host with the same port.
However, only the first server will actually serve clients.
Multiple clients can connect to one server.
(A physical limitation to one client is currently not implemented because the internal
connection count cannot be determined reliably.)
However, only one of the clients (indeterminate which one) will receive data. The server can
receive data from all clients.
Page 42 of 49
T Wed g e User Man u al
Appendix C: JavaScript Debugging
C.1 Prerequisites
For debugging the Eclipse IDE and the Google Chrome Developer Tools are required. For details
see below.
C.2 Install and Configure Eclipse
Download and install the Eclipse IDE from http://www.eclipse.org/downloads/
(e.g., the “Eclipse IDE for Java Developers”)
After installation you need to configure Eclipse:
- Install the Google Chrome Developer Tools (see section C.2.1) and
- create a new debug configuration (see section C.2.2).
Please note that Eclipse requires a Java runtime environment (JRE) in order to run.
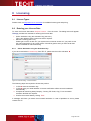
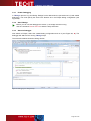
C.2.1
Install the Google Chrome Developer Tools
Start Eclipse and select Help ► Install New Software… from the menu.
Figure 27: Add the Google Chrome Developer Tools
Page 43 of 49
T Wed g e User Man u al
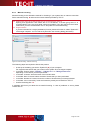
Add the following repository (by clicking ). Then select the Google Chrome Developer Tools in the
product list and install them.
Name
e.g., chromedevtools
Location
http://chromedevtools.googlecode.com/svn/update/dev/
C.2.2
Create a New Debug Configuration
Select Run ► Debug Configurations… from the menu and create a new “Standalone V8 VM” debug
configuration.
Figure 28: Create a New Debug Configuration
You can keep all default values for this configuration.
Remember the port that you have entered in . You will need to specify the same port in the
TWedge debug settings.
Thereafter you can start the debugger by pressing the Debug button . Before you can do this you
must enable debugging in TWedge and start the respective script execution (see below).
C.3 Debug the Script
In order to debug the script you have to:
Enable debugging for the desired TWedge device (see section C.3.1)
Start TWedge (see section C.3.2)
Start the Debugger (see section C.3.3)
Please note:
► You can also debug multiple scripts at the same time. In this case you need to use different
ports for each TWedge device.
Page 44 of 49
T Wed g e User Man u al
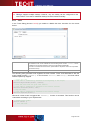
C.3.1
Enable Debugging
In TWedge open the Log and Debug Settings for the desired device (see section 6.5.5) and enable
debugging. You must specify the same Port Number as in the Eclipse debug configuration (see
Figure 28).
C.3.2
Start TWedge
Before you can use the debugger the device (= the script) must be running.
Use the command Start or Start All to start the script execution.
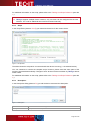
C.3.3
Start the Debugger
Now switch to Eclipse, select the created debug configuration and run it (see Figure 28, ). The
debugger will attach to the running TWedge script.
The screenshot below shows the debug window.
Figure 29: Debugging the TWedge Script
Page 45 of 49
T Wed g e User Man u al
Appendix D: Run TWedge as Service
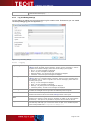
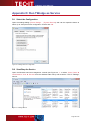
D.1 Select the Configuration
Open the settings dialog (File ► Settings… | System Services) and use the respective button to
select (or to clear) the service configuration. Confirm with OK.
Figure 30: TWedge Service Configuration
D.2 Start/Stop the Service
Open the Windows services management console (see Figure 30, or select Control Panel ►
Administrative Tools ► Services from the Windows start menu) and locate the “TEC-IT TWedge”
service.
Figure 31: TWedge Service
Page 46 of 49
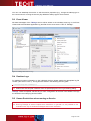
T Wed g e User Man u al
You can now start/stop the service or edit the service properties (e.g., change the startup type or
the user account for running the service). By default the startup type is set to manual.
D.3 Event Viewer
All status messages of the TWedge service will be written to the windows event log. In the Event
Viewer select the Windows application log and filter for the event source “TEC-IT TWedge”.
Figure 32: TWedge Service Event Log
D.4 Runtime Logs
For additional runtime information on the individual devices, please enable the appropriate log file
creation (see section 6.5.5.1). The log files are stored in the following directory path:
C:\Windows\Temp\TEC-IT\TWedge\3.1
► Please note that this path is different from the path displayed on the log and debug dialog!
TWedge creates a separate sub-directory for each configuration at the time it was loaded. The logs
are located in the underlying devices folders.
D.5 Known Restrictions when running as Service
Please note:
► Running TWedge as service implies some restrictions. In general it is not possible to use
methods which rely on Windows messages and/or user interaction.
Page 47 of 49
T Wed g e User Man u al
Examples for features that will not work when running as service:
Hotkey support, keystroke simulation and clipboard.
USB HID data capture.
Window and application control (e.g., ActivateWindow()).
Dynamic Data Exchange (DDE).
Page 48 of 49
T Wed g e User Man u al
Appendix E: Action Templates
E.1 General
The TWedge action templates are JavaScript (.js) files with a specific syntax (see TWedge JavaScript Reference).
They are located in the following directory:
%programdata%\TEC-IT\TWedge\3.1\template
Whenever you select the action for a device (see section 6.3) the according template is copied to
the script editor (see section 6.5.3). At the specially marked positions in the script some additional
generated code is inserted (for example, the code for the connection object and all connection
parameters).
E.2 Create Custom Templates
If required, you can provide your own templates files (or modify the existing ones).
In order to create a custom template we recommend the following approach:
Copy one of the existing templates and save it with an appropriate file name.
Edit the meta information in the header. This information is used in the user interface as
follows:
- The script name and description are be displayed in the action dialog (see section 6.3).
- The parameter definitions are provided in the parameters dialog (see section 6.4).
Customize the script as required.
When editing the script take care not to change any standard identifier or function names.
Do not remove any comments for the automatic code generation.
Page 49 of 49