1
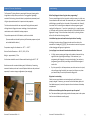
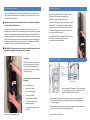
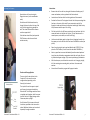
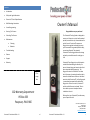
Contents Introduction Safety and Legal Information ProtectorXT Parts & Specifications Wall Mounting Instructions Access Programming Securing The Firearm Congratulations on your purchase! Unlocking The Firearm Maintenance The ProtectorXT Locking Station is designed to secure your firearm in a vertical wall-mounted position, accessible to only those authorized to unlock the unit. ProtectorXT uses proven fingerprint recognition technology to secure your firearm with the greatest possible safety, convenience & speed. The patented ProtectorXT technology provides safe storage and easily controlled access for a shot gun or rifle. Cleaning Batteries Troubleshooting Returns Support Warranty Owner’s Manual ProtectorXT uses fingerprints as the biometric method of authenticating the identity of a person. Human beings are known to have their own unique individual fingerprints. The fingerprints stored in ProtectorXT are those which the owner has entered as authorized to access the locked firearm. When an individual wants to unlock ProtectorXT, his/her fingerprint is scanned and compared to the authorized fingerprints. If there is a match, ProtectorXT unlocks and the firearm is released. There is also a back-up numeric touchpad release included on the unit. Place stamp here SSD Warranty Department PO Box 356 Pocopson, PA 19366 ProtectorXT User Manual 2014 v.2.1 We hope that your ProtectorXT provides many years of peace of mind. Salus Security Devices, LLC PO Box 356 Pocopson, PA 19366 (855)-562-5551 www.protectorxt.com 16 ProtectorXT User Manual 2014 v.2.1 1 WARRANTY Salus Security Devices, LLC PROTECTORXT The ProtectorXT (the ”Product”) is brought to you by Salus Security Devices, LLC. Safety is our primary concern. Please carefully read and follow the product and firearm safety guidelines. For a period of one year after purchase, if the Product fails to operate in accordance with Salus’s accompanying documentation, then upon our receipt of your written notice of a warranty claim, we will take reasonable steps to repair or replace the Product. If we cannot repair or replace a defective Product after our receipt of your timely notice we reserve the right to refund the amounts you actually paid for the Product. The warranty stated in this provision is your sole remedy and our sole liability for any claim regarding the Product and its operation. INCIDENTAL, CONSEQUENTIAL DAMAGES, & LIMITATIONS: EXCEPT FOR THE WARRANTIES EXPRESSLY STATED IN THIS DOCUMENT, SALUS DISCLAIMS ALL WARRANTIES, EXPRESSED OR IMPLIED, INCLUDING BUT NOT LIMITED TO ANY IMPLIED WARRANTY OF MERCHANTABILITY OR FITNESS FOR A PARTICULAR PURPOSE FOR THE PRODUCT. THE purchaser’s sole and exclusive remedy against Salus shall be for the repair and replacement of the Product as stated in the prior paragraph. No other remedy; including but not limited to incidental or consequential damages for injury to person or property, installation, removal, or any other incidental or consequential loss, damage or costs shall be available to the purchaser, or any other person. Product Use THE PRODUCT IS DESIGNED FOR QUICK ACCESS WHILE DETERRING UNAUTHORIZED ACCESS, BUT IS NOT TO BE CONSIDERED THEFT-PROOF. FOR EXTENDED STORAGE WHILE AWAY FROM HOME OR LODGE, WE RECOMMEND STORING FIREARMS IN A REGULAR GUN SAFE/VAULT. RELEASE: READ AND FOLLOW ALL LABELS AND INSTRUCTIONS FOR THE PRODUCT. DO NOT USE THE PRODUCT if it is damaged as a result of accident, improper installation, intentional damage, abuse, vandalism, negligence, misuse, improper operating conditions, or extreme natural phenomena. Purchaser assumes all liability and responsibility including but not limited to the usage and storage of any firearms in their possession. Purchaser releases Salus Security Devices and its officers from any and all liability associated with purchase and use of the Product. For warranty activation, please return this card or enter online. DO NOT USE THE PRODUCT if it has been exposed to excessive heat, as in the case of fire. Warranty The product must be bolted to a structural support (e.g., a building stud) for a wall or other sturdy structure that is strong enough to resist any one’s prying the product off the supporting structure. Recommended hardware is supplied to mount the unit, but stronger hardware can be substituted. Name Street Address City State Postal Code ProtectorXT Model Purchased The product should be placed in a location that is convenient for access by approved users. Date Purchased DO NOT leave the product unlocked and accessible by unauthorized persons. Lot Number Mail to: SSD, PO Box 356, Pocopson, PA 19366 or go online to: www.ProtectorXT.com ProtectorXT User Manual 2014 v.2.1 2 ProtectorXT User Manual 2014 v.2.1 15 Returns Firearm Safety ProtectorXT is backed by a 100% satisfaction guarantee. If you are not happy with the product, simply return the device in its original condition within 30 days for a full refund. If you own a firearm and do not know how to operate it, do not experiment with it. Point it in a safe direction, keep your finger off the trigger and store it securely. Seek competent assistance and instruction at once. ALWAYS keep the firearm pointed in a safe direction. To return the Product under our guarantee or warranty policy (see next page), please securely package the ProtectorXT, preferably in its original packaging, and send with your claim explanation and purchase receipt to: NEVER assume that a firearm is unloaded. ALWAYS keep your finger off the trigger until ready to shoot. DO NOT rely on your firearm’s safety features. Protector XT Returns 9101 Yellow Brick Road ,Suite I Rosedale, MD 21237 ALWAYS use care when handling a loaded firearm. KNOW your target and what is beyond the target prior to shooting. KNOW how to use your firearm safely. LEARN the mechanical and handling characteristics of the firearm that you are using. Support BE SURE the firearm is safe to operate. For support, please refer to our website at http://www.protectorxt.com, email us at [email protected], or telephone us at 1-855-562-5551 . REGULARLY clean your firearm or have it serviced to ensure that it operates correctly and safely. DO NOT alter or modify your firearm. USE ONLY the correct ammunition for your firearm. My System Notes WEAR eye and ear protection as appropriate when shooting. NEVER use alcohol or over-the-counter, prescription or other drugs before or while shooting. Model Name/Number: Serial Number (if applicable): STORE firearms so they are not accessible to unauthorized persons. Date Purchased: Manual Code: Certain types of firearms and many shooting activities require additional safety precautions. People whose prints are in the system: INSTRUCT any children that will be in the vicinity of firearms to do the following upon finding a firearm: STOP, DON’T TOUCH, LEAVE THE AREA and TELL AN ADULT. Legal Compliance Most states impose some form of legal duty on adults to take reasonable steps to deny access by children to dangerous substances or instruments. It is the individual firearm owner’s responsibility to understand and follow all laws regarding firearm purchase, ownership, storage, transport, etc. Contact your state police and/or local police for information regarding such laws. ProtectorXT User Manual 2014 v.2.1 14 ProtectorXT User Manual 2014 v.2.1 3 Troubleshooting ProtectorXT Parts and Specifications The ProtectorXT Locking Station is comprised of a base unit housing with a hinged door to safely secure your firearm. The rugged but lightweight material of the housing, door and shelves is polycarbonate, commonly used in fighter plane windscreens for its impact resistant properties. What if my fingerprint doesn’t register when programming? There are some fingerprints that cannot be read by a scanner, in which case the combination code can be used. We recommend you try thumb, index and middle fingers, pressed firmly on the reader of the mounted unit. Generally, the natural oils of a clean finger are adequate to allow programming and reading of the fingerprint. If your skin is particularly dry, try applying some oil, like hand cream, which can enhance the ability of the reader to read the fingerprint’s image. If the unit has been heavily used, try cleaning the lens with a soft cloth and lens cleaning solution. The lock mechanism and latch are comprised of lock grade heavy metals utilizing biometric fingerprint sensor technology. A touch-pad numeric combination code is included for backup purposes. The product operates with 4 AA batteries, which are included. (Firearm models are included in pictures for illustration purposes only and not included with the device.) Temperature range for the biometrics -40 o F — +120 o F I reinitialized my system and now the touch-pad code isn’t working. Initializing the system clears all fingerprints and resets the code to the manufacturer’s setting of [1][2][3][4]. See instructions to restart the process of code changing and fingerprint registration. I put my finger in one time and it works and another time it does not. Exterior Product Dimensions — 38.5”h, 9.5”d, 6.25”w Weight— approximately 7.5 lbs. It’s likely you are pressing your finger on the reader at too much of any angle from the original registered image. If this continues, try reprogramming the fingerprint at a more natural angle. You can also try programming your most likely used finger at a few different angles to resolve this. Dry skin, especially in cold temperatures, can also be an issue. In a pinch, rub your finger along the side of your nose or back of your ear, where your natural body oils can help lubricate the fingerprint. Unit has been tested for use with firearms with barrel lengths of 18” - 28” Product comes with an external battery pack, 4AA batteries, 3 mounting screws with washers, and user’s manual. Optional shelves can be purchased separately for various storage configurations (see next page). My system is not working. Check to ensure your batteries are inserted properly and that they are properly charged. If necessary, you can use the external battery pack, with fresh batteries properly inserted, to operate the unit and access the battery compartment. Will the external battery pack allow anyone to open the system? No. The external battery pack simply provides the same power to the system that the internal batteries normally supply. ProtectorXT User Manual 2014 v.2.1 4 ProtectorXT User Manual 2014 v.2.1 13 Maintenance Cleaning Regularly clean the biometric reader lens to remove any build up of oils and dust. The polycarbonate surfaces of the ProtectorXT unit, as well as the lens, can be cleaned using a soft cloth and lens cleaning solution, such as would be used for eyeglasses. Replacing Batteries Batteries should be replaced annually, or as soon as possible if the RED LED light goes out while you are operating the system, signaling that the battery voltage is low. To replace the batteries, open the battery compartment, remove the old batteries, and replace with 4 AA long life batteries, positioning as shown in the photo. When replacing the battery compartment cover, please be sure the latch on the cover is firmly seated to the left in the locked position Battery Compartment and RESET button inside door. ProtectorXT User Manual 2014 v.2.1 12 ProtectorXT User Manual 2014 v.2.1 5 Wall Mounting Instructions Unlocking The Firearm The Unit Housing provides support for all components of the ProtectorXT locking station. The device can be installed in a space as small as 4'h x 13”w (to allow for door clearance). Grasp the barrel of the firearm below the barrel collar with one hand while operating the fingerprint reader with the other hand. Make sure placement of the unit allows the door to be opened completely for clear retrieval of the firearm. ProtectorXT can be secured to a wall stud or other similar surface in a building, room or other structure such as a garage, hunting camp or shooting range, or on a weather-protected post. Mounting holes are provided on the product's unit housing. The unit is designed to be installed vertically, with the end of the firearm’s barrel at the top, above head height, and the fingerprint reader positioned for convenient reach (see picture). Between 44” and 48” from floor to center of reader should suit most people. Press the START button. The fingerprint sensor light will turn RED. Put a finger that has been added to memory on the sensor until the RED light turns off. Remove the finger from the sensor, flip open the door, and remove the firearm. If the RED and GREEN LEDs flash three times at the same time, the fingerprint was not read successfully or was never added. IMPORTANT: Please mount the unit so that the end of the firearm’s barrel is well above head height for safety and ease of removal. Positioning Trigger Guard Trap Spacer Position the ProtectorXT vertically with end of the firearm’s barrel at the top, above head height, with the biometric controls at a level for convenient reach. For installation, you will need the following: ProtectorXT User Manual 2014 v.2.1 ProtectorXT Unit Level (not included) Pencil (not included) Drill (not included) Stud finder (not included) 3 2-inch #10 screws, with washers (included) Phillips head screwdriver (not included) Close-up View 1. After mounting the ProtectorXT, insert the firearm you want to store in the unit to determine if the spacer is needed to ensure a snug fit. 2. Before removing the adhesive tape covering, first dry fit the spacer to determine proper placement along the underside of the Trigger Guard Trap (see diagram). 3. Remove the adhesive tape covering from the spacer and place the spacer as fitted in #2, pressing firmly to ensure adhesion. 6 ProtectorXT User Manual 2014 v.2.1 11 Securing The Firearm Instructions: Open the door of the unit using the fingerprint sensor (or the combination code). Guide the end of the firearm barrel up through the barrel collar at the top of the unit, with the trigger facing toward the wall. Then lower the butt of the firearm onto the support shelf. Push the door closed firmly and press the START button so that the metal latch catches securely. Remove the unit from the box, along with the external battery pack, 3 screws and washers, and any optional shelf units ordered. Locate the wall stud on which the locking station will be mounted. Position the ProtectorXT unit against the wall with the top mounting hole lined up on the center of the stud. Ensure convenient reach of the fingerprint reader and the barrel collar above head height. Mark the top hole placement with the pencil for drilling. Drill the top hole for the #10 screw, position the unit and insert the first screw and washer to hold the unit in place. (This will be easier with a second person, one to hold, one to do the drilling.) Use the external battery pack to charge the unit, plugging the cord into the power port on the left side of the unit near the biometric reader (see photo). Open the unit using the touch-pad and default code [1][2][3][4], then press the START button. (You will reset this code after installation.) Now is a good time to remove the batteries from the external pack and insert them into the battery compartment inside the unit’s door. Be sure to follow the diagram on page 12 for correct positioning of the batteries. With the door open, use the level to ensure the unit is hanging straight, drill the remaining two mounting holes, and insert the screws with washers. Almost there! Proceed to program the fingerprint reader. Shelves and Storage Options There are slots for two shelves in the ProtectorXT, to be used in various configurations, depending on the firearm(s) to be stored. The top shelf is used to support a pistolgrip firearm, leaving space below for a second shelf. The handgun model will store a standard sized handgun, while the ammo shelf will hold six 12-gauge shotgun shells. Please see photo on page 5. Each ProtectorXT unit comes with one of the shelves, specified at the time order is placed. Additional shelves can be ordered separately through our website. ProtectorXT User Manual 2014 v.2.1 10 ProtectorXT User Manual 2014 v.2.1 7 ProtectorXT Biometric and Code Operation System Initialization – Clearing All Fingerprints ProtectorXT can store up to 32 fingerprint digital images and provide recognition and response in less than 2 seconds. There is also a touch-pad numeric combination code for backup purposes, which we recommend you reset to your own code before beginning fingerprint programming. The first step is to initialize your system before adding user fingerprints. We recommend that each individual authorized to access the firearm program at least 3 fingers/ thumb of each hand (total 6 fingerprints). Although you will likely use just one finger most of the time to access the firearm, we recommend programming multiple fingers in case something, like an injury (for example, a cut finger) alters the primary fingerprint. For back-up purposes, we also recommend that at least 2 individuals have access to the ProtectorXT secured firearm. Note that this same process will clear all fingerprint memory and reset the numeric code to the factory setting. Press and hold the red RESET button for 10 seconds. The green LED will flash. When you hear one long beep, your system has initialized successfully. Fingerprint Operation Adding user fingerprints Press red RESET button once and release. You will hear two short beeps and the fingerprint sensor on the front of the unit flashes RED. Manual Entry Code Our systems are set at the factory to be accessed by entering the numeric code: [1] [2] [3] [4]. IT IS VERY IMPORTANT that you change to a code known only by you and those whom you wish to access the ProtectorXT. ** Changing your manual code When the RED sensor light turns on, hold the finger you wish to add firmly on the sensor. When you hear two short beeps and long ‘beep’ , you have successfully added a fingerprint. If you hear three short ‘beeps’ it means that the fingerprint was not added properly. Note: If you press the red RESET button and immediately hear three beeps, it means that the fingerprint memory is full. Unlocking using a Fingerprint To change the code, press and hold the [1] key for approximately 3 seconds until the GREEN LED lights . Press the START button. The fingerprint sensor light will turn RED. Put a finger that has been added to memory on the sensor until the RED light turns off. Remove the finger from the sensor. Input the old code, then press the START button to confirm. You will hear a ‘beep.’ When you hear one long ‘beep’ and a GREEN LED lights, the door may be opened. Input your new code (1 to 8 digits) then press the START button to confirm Enter your new code again and press the START button. One long ‘beep’ signals that you have changed the manual entry code successfully. If the RED and GREEN LEDs flash three times at the same time, the fingerprint was not read successfully or was never added. If you hear 3 beeps, you did not change the code successfully. Deleting fingerprints ** NOTE: Please record your combination code in a safe location, to be used for emergency access in case of fingerprint failure. Press and hold the red RESET button for 10 seconds. The green LED will flash. When you hear one long beep, all fingerprints have been deleted., and the numeric code has been reset to the factory setting of [1][2][3][4]. Opening the door using your code Input your code then press the START button You will hear one long ‘beep’ and the latch will allow the door to be opened. Note: When you are operating the system and the RED LED light goes out, the unit is signaling that the battery voltage is low and that you must change the batteries as soon as possible. See page 12. ProtectorXT User Manual 2014 v.2.1 8 It is recommended that authorized users practice opening the unit several times, including in darkness, on a monthly basis, in order to become comfortable with the process, regardless of the circumstances of the need to retrieve the firearm. ProtectorXT User Manual 2014 v.2.1 9