1
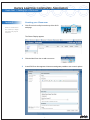
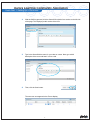
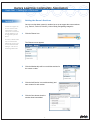
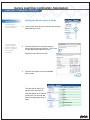
Aurora Learning Community Association
Quick Start 1: Setting Up a Classroom
xxxx
Arch User’s Manual
Quick Start 1:
Setting up a Classroom
© ALCA 2011
Aurora Learning Community Association
Quick Start 1: Setting Up a Classroom
Logging into Your ALCA Community
Section 1
It is necessary to log in to create and set up a room for your classroom or course. To do
this, enter the following Url in the url field of a web browser. Then, click the Enter key.
http://www.alcaweb.org
The ALCA web site will display. The content found on ALCA’s home page may vary.
2
Click the Login link.
3
Enter your Username and Password.
The utility bar appears at the top of the ALCA home page.
Then, click the Login button.
2
Aurora Learning Community Association
Quick Start 1: Setting Up a Classroom
Section 2
Creating your Classroom
1
What is a Virtual Room?
In a virtual way it simply
represents your physical
classroom.
Click Rooms in the utility bar at the top of the ALCA
web page.
The Rooms Display appears.
2
Click the New Room icon to add a new room.
3
A new Edit Room form appears. Numerous settings are possible to set a room’s options.
3
Aurora Learning Community Association
Quick Start 1: Setting Up a Classroom
4
5
With the Shift key pressed, click the Name & Description form section on the left side
of the page. This displays just this section of the form.
Type in the Name field the name for your class or course. Next, type a brief
description of the room and how it is to be used.
6
Then, click the Save button.
The new room now appears in the Rooms display.
4
Aurora Learning Community Association
Quick Start 1: Setting Up a Classroom
Section 3
A Room can support one
or more sections of the
same subject or course.
That is, two or more class
periods of Biology I can
be supported in just one
Room.
Setting the Room’s Sections
Once a room has been created, it needs to be set up to support the course sections
(e.g., Period 1, Period 2, Period 5), Units of Study, and grading categories.
1
Click the Planner icon.
In essense, a Room needs
only one instructional
Planner but can have two
or more task/assessment
managers. This saves a
teacher significant time.
The Planner screen appears.
2
Click the Membership edit icon to edit the sections for
the course or class.
3
Click the Add Section icon to add section(s) and
enter a name for each section.
4
Click the Save button when the
sections have been added.
5
Aurora Learning Community Association
Quick Start 1: Setting Up a Classroom
Section 4
The Task Manager
documents learning on
the part of students.
Setting the Room’s Units of Study
1
Click the Task Units edit icon to edit the Units of Study
addressed by this room.
Creating assessment
categories supports
the documentation of
formative, summative,
and benchmark
assessments.
2
Click the Add Unit icon to add the Unit(s) of
Study. Enter the name for each unit. Then, enter
the start date and end date for the unit.
Repeat for each unit in the course.
3
Click the Save button to save the identified
units of study.
The new Units of Study now
appear in the Task Units list.
They also appear in the Task list.
At this point, one can now add
tasks to the appropriate units of
study.
6
Aurora Learning Community Association
Quick Start 1: Setting Up a Classroom
Section 5
The Task Manager
documents learning on
the part of students.
Setting the Room’s Assessment Categories
1
Click the Task Categories edit icon to edit the assessment
categories.
Creating assessment
categories supports
the documentation of
formative, summative,
and benchmark
assessments.
2
Click the Add Category icon to add the
first category. This category should
represent the entire grading period (e.g.,
1st Semeter).
3
Click the Add Child icon to add a
sub-category.
Then, enter the name for
the sub-category.
4
To add additional subcategories on the same
level, click the Add
Category icon under the
sub-category.
5
Click the Save button to save the
tasks categories.
The new categories now
appear in the Task Category
list.
7

![INSTALL GUIDE OEM-AL(RS)-FM6-[ADS-ALCA]-EN](http://vs1.manualzilla.com/store/data/005732796_1-2697dd4b3634b9609d4f115002bbbdbf-150x150.png)