1
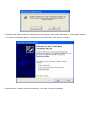
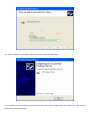
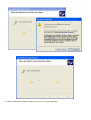
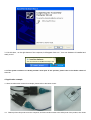
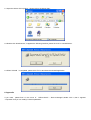
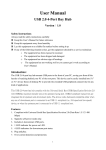
USB TO RS232 * 2 cable
Installation & User’s Manual
1. Brief Introduction
The USB TO RS232*2 Cable provides economical solution for RS232 serial device to connect the USB host
computer , which can plug and play , hot-swapping, enable notebook computers to connect industrial control
machine and other RS232 serial devices , and serial transmitting speed up to 230K , its transmission supports USB
1.1 as well as USB 2.0 .
2. Specifications & Features
2.1 USB specification revision 1.1 compliant
2.2 Supports RS232 serial interface
2.3 Plug and play, no need to set up I/O protocol and IRQ.
2.4 Supports two separate RS232 serial interfaces
2.5 Supports Win98se/Me/2000/XP/2003 and Mac OS 10.X
3. Installing Driver
Note: Firstly please don’t insert USB connectors of this product to the computer.
Please install driver according to following steps:
3.1 Please open the driver of this product,re , refer to the below chart :
3.2 Double click “Setup.exe” , it appears below interface, then please click “ Install” to install the driver .
3.3 While you are installing , it has appeared following two interface , please click “Continue Anway” to continue your
installation.
3.4 When Installation is completed, please click “Exit” to terminate the application.
3.5 Please insert USB connectors of this product to the computer, then system will identify it , and appears interface
of “Found New Hardware Wizard” . Please select “No,not this time”, click “ Next” to continue .
3.6 Please select “Install the software automatically”, click “Next” to continue installation.
3.7 While you are installing , it has appeared the following interface , please select “Continue Anway” to continue your
installation.
3.8 When installation is completed , please click “Finish” to exit this application.
3.9 The system continues to identify one of the serial port of this product, please select “ No, not this time”, click “ Next” to
install driver of the first serial port .
3.10 Please select “ Install the software automatically”, and click “ Next”
3.11 While you are installing , it has appeared the following interface , please select “Continue Anway” to continue your
installation.
3.12 When installation is completed, please click “ Finish” to exit this application.
3.13 At this time , on the right bottom of the computer, it will appear foam cue “ Your new hardware is installed and
ready to use”.
3.14 The system continues to identify another serial port of this product, please refer to the below charts of
3.9~3.13
4. Application example
4.1 Here we take serial mouses for example, please refer to the below charts :
4.2 Please pull out this product from the computer, and insert serial mouses to the serial ports of the product, then insert
USB port of this product to the computer .
Note: Serial devices do not support hot-swapping, but USB device can support, so firstly we must pull out this product and
connect to the serial mouses, at last connect to USB port of the computer . Otherwise we need to restart the computer ,
then system can identify it .
4.3 After connection to the computer , system will identify it , search for it and install drivers automatically.
4.4 When installation is completed , On the right bottom of the computer, it will appear a foam cue “ Your new
hardware is installed and ready to use”.
4.5 The new driver is installed and ready to use.
5. Uninstall drivers
5.1 Open the drivers of this product , please refer to the below chart :
5.2 Double click “MosUnst.exe”, it appears the following interface, please click “Ok” to uninstall driver .
5.3 When Uninstall is completed, please click “Exit” to terminate the uninstall application.
6. Appendix
If you need , please find it in the menu of
“USB-to-Serial”--- “Device Manager”,double click it ,then it appears
“ Properties” and you can modify it’ relevant parameter .
6.1 In the menu of “Features”—“COM Port Number” , many port numbers for your option and you can modify
according to your need, please click OK to configure Serial port.
6.2 If you need to modify the port setting, please select “Configure Serial Port” button to enter into the port setting
interface , and modify according to your need, please click “Set “ , then modification is completed.