1
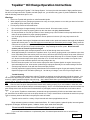
Black Rubber Spacer Suction Probe STEP 1 Insert the long suction probe into the black rubber spacer until flush with end. Pinch Clamp Black Rubber Spacer Clear Plastic Hose STEP 2 Slip the white clamp over the clear plastic hose approximately 3”. Insert the rubber spacer into the clear plastic hose, approximately 1/2”. (Use soap and water or lubricant for easier assembly). NOTE: Suction Suction probe probe assembly assembly NOTE: Rubber gasket must be on the Cap Rubber gasket must be on the rim can to seal. rim of can to seal. Cap Pump 21/2” Gasket Washer-Spout Assembly Rim of Can 1-3/4”Gasket Rim of Can ................................ Cap assembly Cap spout spout assembly .. STEP 3 Remove the small blue cap from can and replace with the Cap-Spout Assembly. Insert washer-spout assembly through hole in silver cap. Press gasket into cap/spout assembly. Hand tighten assembly to can enough to hold vacuum. Push the clear plastic hose over the spout, approximately 1/2”. Pump to can assembly STEP 4 Remove the large blue cap from can and replace with the vacuum pump. Press 2 1/2” gasket into inside of pump cap. Screw cap on the can. Gasket will seal to can's rim. Hand tighten reasonably enough to hold vacuum. Do not over tighten, this could distort gasket and cause it to leak air. Topsider™ Oil Change Operation Instructions Thank you for purchasing the Topsider™ Oil Change System. You have joined the thousands of highly satisfied users. No other oil changer works like Topsider, and with proper use, you will have many years of product satisfaction. Please read the following instructions prior to use. Warnings 1. 2. 3. 4. 5. 6. 7. 8. 9. Never use Topsider with gasoline or other flammable liquids. When preparing for use (pumping air pressure into unit), do not put pressure on can with your hand or foot.Hold can steady at pump barrel per step 2 below. Do not pump more than instructed below. Run a cold engine for approximately 2-3 minutes to heat oil. Oil must be warm, not hot. Be sure the pinch clamp is properly placed on the clear hose and tightly pinched closed. Do not push down on can with your hand or foot to steady pump. Use one hand on the pump handle and the other on the pump barrel for proper pumping operation. Use 30-40 pump strokes to develop optimum vacuum pressure in the can. (Do not pump more than 40 strokes). Remove dipstick from engine. Straighten the narrow white suction probe and measure the length of the dipstick against the suction probe. In fact, we highly recommend that you mark with a pen this length. Slowly insert the marked suction probe into dipstick tube. When you reach your mark on the probe then insert it carefully another 1 to 3 inches until you feel it “bump” into the oil pan. Stop inserting the suction probe. Never force the suction probe or insert it beyond this length! Release/open white pinch clamp and watch for the oil to flow through clear vacuum hose. Allow approximately 8-10 minutes for Topsider to work. If you hear a gurgling sound or see bubbles in the clear hose, immediately move the suction probe in a slow up and down (and circular) motion for the most efficient oil removal. If more vacuum power is needed, close the pinch clamp and pump 10 to 15 times. Repeat if needed, or if vacuum suction stops. Never pump more than 10 to 15 times when the can contains oil or liquids. Over pumping can create excessive pressure and may collapse the can. Remove the suction probe. Use clean cloth to wipe probe clean. Replace dipstick in engine. Unscrew capspout assembly from can. Insert suction probe through cap-spout assembly for convenient storage. Remove vacuum pump and seal oil can with the extra metal caps provided. Carefully replenish oil supply following manufacturers recommended engine oil type and capacity. Recheck dipstick for proper oil fill level after replacing oil. As with any oil change, never over fill your engine with oil. Trouble Shooting The key problem most people have with the Topsider are gaskets not sealing properly to hold the vacuum. You can check this by listening for air leaks. If a leak is detected, check gaskets for wear and misalignment. Lubricate with motor oil, replace gaskets and tighten cap until snug. Also, double check where you have placed these gaskets (see reverse side for assembly instructions). Just keep in mind that the gaskets have to come in direct contact with the can’s rim. Check to see if the pinch clamp has been closed and is sealing properly (If you see bubbles in clear tube, after creating vacuum in tank, the pinch clamp is not closed properly.) Also, it is recommended that when stored to release the pinch clamp so the hose does not become distorted due to prolonged pressure (a distorted hose could reduce the oil flow). If you use the Topsider to extract water, please take the pump assembly off after use and allow water to drain out, then add oil in the black cap's hole at the pump handle end. Pump it several times to lubricate the seals in the pump. This is necessary because the seals in the pump are made of leather. Topsider can be used for a variety of liquid removal and clean up applications such as: Bilge and water systems on boats, transmission fluids, R.V. water systems, hydraulic liquids, lawn and garden equipment oil changes, differential grease, radiators, drains, traps, water lines and spills. Do not use with hazardous and flammable liquid, such as gasoline. If you need further assistance or replacement parts, visit www.airpoweramerica.com or call toll free at 1.800.225.2224. 6.26.14