1
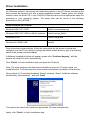
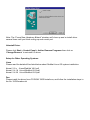
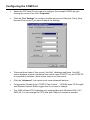
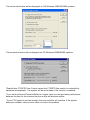
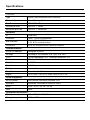
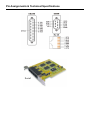
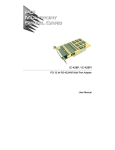
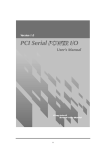
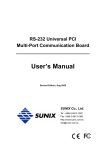
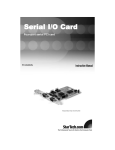
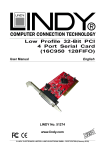
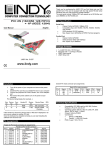
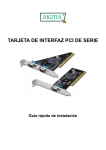
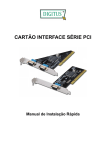
IC104SA
PCI 32 bit RS-232 Multi Port Adapter
User Manual
Introduction
ATEN universal PCI Multi-port serial card attaches DB-9 or 25 Male RS-232 Serial ports on
your system for POS, ATM and industrial automation applications through RJ-45 ports.
IC104SA works with both 3.3 or 5 voltage and 32 or 64 bit PCI bus, allowing this multi-port
serial card to be installed in virtually any available PC system and compatible with all major
operating systems. Users do not need any jumper to set I/O address and IRQ location.
There is no conflict with other interface cards or devices because of PCI plug-n-play
function. Furthermore, IC-104SA, can satisfy with some devices are designed for particular
I/O address. You can assign serial ports Re-Map to ISA address 3F8, 3E8, 2F8, 2E8 under
DOS, Win9x, ME, NT operation system.
With the trend of sharing maximum
bandwidth, reducing power
consumption and speeding up
transmission speed, the PCI bus
standard has moved from 32bit
PCI/5V to 64bit PCI/3.3V.
The IC104SA can be plugged into either type slot.
Features
Fully compliable with PCI Spec. Ver 2.2 standard.
Supports both 64-bit & 32-bit PCI Bus and 3.3V & 5V connector keys.
High speed serial ports support baud rates up to 921.6Kbps.
Provides 128Kbyte maximize size FIFO memory which is 1024 times faster than
existing serial cards on the market. High-tech 128K FIFO can reduce CPU loading,
interrupting and improve system performance dramatically.
Assign serial ports Re-Map to ISA address 3F8, 3E8, 2F8, 2E8 automatically
under DOS, Win9x, ME, NT.
Plug and Play, I/O address and IRQ assigned by BIOS.
Works with various types of DB9M / DB25M serial devices through RJ-45 port.
®
®
®
®
Ready for the Intel Itanium and AMD Athlon 64 64-bit CPUs running Microsoft
®
Windows XP 64-bit Edition Version 2003 and Windows® Sever 2003 for 64-bit
Itanium-based or Extended Systems.
ATEN industrial host controller series are certified by WHQL, CE, FCC approval.
Ideal for 56K V.90 external modems, ISDN terminal adapters, PDA, UPS, barcode
scanners and other high-speed serial port devices.
Package list
1 - PCI Serial IO Card
4 - RJ-45 to DB9 or DB25 Male cable
1 - CD Driver
1 - User Manual
Hardware Requirements
Pentium or equivalent computer with an available PCI slot.
CD-ROM / DVD-ROM required for software installation.
Windows 3.1x/95/98SE/ME/NT4.0/2000/XP, DOS, Linux OS.
Installation
Follow the instructions given below to install the Serial PCI Card:
1.
Turn your computer off and remove the power plug from the wall outlet.
2.
Remove the cover of your computer case.
3.
If necessary, remove the metal cover plate on the rear of a free PCI slot.
4.
Insert the Serial PCI card into a free PCI slot and screw in place.
5.
Place the cover back onto the computer.
6.
Insert the plug into the plug socket, power up your PC.
Driver Installation
On Windows systems, the system will detect the present of the PCI Serial card during the
boot process and prompt you with a driver installation wizard. Please ignore the wizard.
Instead, insert the driver CD in your CD/DVD ROM drive and run the appropriate setup file
according to your operating system. The setup files can be found in the following
directories on the CD ROM:
Driver Location on CD ROM
Windows 2000 / XP / 2003
\win2k and xp\setup.exe
Windows 2000 / XP / 2003 on 64-bit systems
\win2k and xp_64bit\
Windows NT4.0
\winNT\setup.exe
Windows 95 / 98SE / ME:
\win9x\
Once the setup program begins, follow the instructions on the screen to setup and
configure your card. If you want to change the default install directory, type in a directory
name at the prompt and press Next.
A Software Installation Notice will appear, please click “Continue Anyway”, and the
system will install the driver automatically.
Click “Finish” to finish installation step and eject the CD driver.
Note: The driver program will detect and uninstall any previous I/O driver which you
installed before. This step may take a few minutes and please be patient of the process.
Now go back to “Found New Hardware Wizard” windows Select “Install the software
automatically (Recommend) ” and click “Next”.
The system will search and install the appropriate I/O driver automatically.
Lastly, click “Finish” to finish installation step.
Note: The “Found New Hardware Wizard” windows will show up and re-install driver
several times until you finish setting up each serial port.
Uninstall Driver
Please click Start > Control Panel > Add or Remove Programs then click on
“Change/Remove” to uninstall I/O driver.
Setup for Other Operating Systems
Linux
Please read the detailed files listed below about RedHat Linux OS system installation:
Kernal: 2.2.x :\Linux\RedHat V6.0.pdf
Kernal: 2.4.18 :\Linux\RedHat V8.0.pdf
Kernal: 2.4.20 :\Linux\RedHat V9.0.pdf
Dos
Please install the driver from CD ROM: \DOS\install.exe, and follow the installation steps in
the file: \DOS\readme.txt
Verifying the Serial PCI Card
When Windows finishes installing the driver, you can verify the card is recognized by the
OS by checking:
Control Panel>System-Hardware>Device Manager>Ports [COM&LPT] it should show
the PCI Multifunction adapter.
Note: If you install PCI serial ports to your system, you will be requested to restart your
computer when you finish setting up each serial port. Click “Yes” if all serial ports have
been installed, otherwise click “No”.
Configuring the COM Port
Select the PCI Serial Port you want to configure (for example COM3) by right
clicking the mouse, then click “Properties”.
Click the “Port Settings” to configure the Bits per second, Data bits, Parity, Stop
bits and Flow control if you need to adjust the settings.
There are three kinds of flow control: Xon/Xoff, Hardware and None. Xon/Xoff
uses a software protocol, Hardware flow control uses RTS/CTS, but the RTS/CTS
is controlled by software. None means there is no flow control.
Click the “Advanced” if you want to set more advanced features.
Configure the “Enable Auto CTS/RTS Flow Control”, “16/32/64 bytes FIFO length”,
and Receive/Transmit Buffer trigger level if you want to change.
The 128K software FIFO adjusting only supports Microsoft Windows 2000 / XP /
2003 OS. You can change the FIFO size and COM port number as needed.
The screen shot below will be displayed on OS Windows 2000/XP/2003 systems:
The screenshot below will be displayed on OS Windows 95/98SE/ME systems:
*Enable Auto CTS/RTS Flow Control means the CTS/RTS flow control is controlled by
hardware automatically. The system will be more stable if the function is enabled.
*If you set the Receive/Transmit Buffer to a higher value you will get faster performance
because the time for the interrupt service routine will become shorter.
*If your CPU speed is not fast enough, the receive buffer will overflow. If the system
becomes unstable, select a lower value to correct this problem.
Specifications
Function
Type
Serial Communication Host Controller
Mode of Operation
Hand-Shaking Mode
Bus Transceivers
RS-232 Full-Duplex
Drivers per Line
RS-232 1 Driver
Receivers per Line
RS-232 1 Receivers
Hardware
IC
SUN1889
Controller
UART (16C650 compatible)
64-bit & 32-bit PCI Bus
3.3V & 5V connector keys
Four RJ-45 ports to four DB9M or DB25M
Bus Interface
Connector
Communications
IRQ & I/O address
Assigned by BIOS
Re-Map
Re-Map to ISA address 3F8, 3E8, 2F8, 2E8
FIFO
32 byte hardware FIFO, 128Kbyte software FIFO
Baud rate
75bps ~ 921.6 Kbps
Data bit
4,5,6,7,8
Stop bit
1,1.5,2
Parity
even, odd, none, mark, space
Flow Control
None, Xon/Xoff, Hardware
Signal
DCD, RxD, TxD, DTR, GND, DSR, RTS, CTS
Driver Supported
64-bit System
Intel Itanium and AMD Athlon64 CPU
Microsoft
Windows 3.x/9x/Me/NT/2000/XP/2003
Linux
2.0.x / 2.2.x / 2.4.18 / 2.4.20
DOS
DOS
Operation Environment
Operation temperature
0°C ~ 57°, 5 to 95% RH
Storage temperature-
20°C ~ 85°C
Pin Assignments & Technical Specifications
Serial
Limited Warranty
IN NO EVENT SHALL THE DIRECT VENDOR'S LIABILITY FOR DIRECT, INDIRECT,
SPECIAL, INCIDENTAL, OR CONSEQUENTIAL DAMAGES RESULTING FROM THE
USE OF THE PRODUCT, DISK, OR ITS DOCUMENTATION EXCEED THE PRICE PAID
FOR THE PRODUCT.
The direct vendor makes no warranty or representation, expressed, implied, or statutory
with respect to the contents or use of this documentation, and especially disclaims its
quality, performance, merchantability, or fitness for any particular purpose. The direct
vendor also reserves the right to revise or update the device or documentation without
obligation to notify any individual or entity of such revisions, or update. For further inquiries,
please contact your direct vendor.
Note: This equipment has been tested and found to comply with the
limits for a Class B digital device, pursuant to Part 15 of the FCC
Rules. These limits are designed to provide reasonable protection
against harmful interference in a residential installation. This
equipment generates, uses and can radiate radio frequency energy,
and if not installed and used in accordance with the instruction manual,
may cause interference to radio communications. However, there is no
guarantee that interference will not occur in a particular installation. If
this equipment does cause harmful interference to radio or television
reception, which can be determined by turning the equipment off and
on, the user is encouraged to try to correct the interference by one or
more of the following measures:
Reorient or relocate the receiving antenna;
Increase the separation between the equipment and receiver;
Connect the equipment into an outlet on a circuit different from that
which the receiver is connected;
Consult the dealer or an experienced radio/television technician for
help.