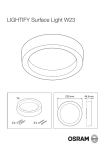
1
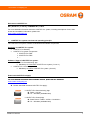
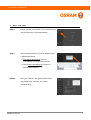
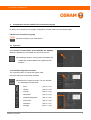
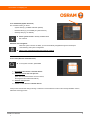
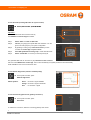
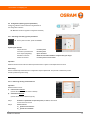
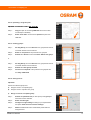
www.osram.com/lightify-pro LIGHTIFY G Pro o Commissioning and control via Smart Device (Tablet / Smart Phone) Content Page Welcome to LIGHTIFY Pro 3 ciple 1. LIGHTIFY Pro system overview and operating princ 3 2. Installation information 4 3. Start – first steps 5 ning App 4. Configuration with the LIGHTIFY Pro Commission 7 4.1. Functions 7 4.1.1. Selection and activation of the LIGHTIFY Y Pro Gateway 7 4.1.2. Dashboard (System Overview) 7 4.1.2.1. Scan (Add new network devices) 8 s) 4.1.2.2. Identify (Identify network endpoints 9 4.1.2.3. Canvas (System configuration inte erface) 10 4.1.2.4. QR Codes (User access configuration) 11 4.1.2.5. Network diagnostics (Check of nettwork quality) 11 4.1.2.6. Disconnecting (Disconnect gatewa ay connection) 11 4.1.2.7. Gateways 12 4.1.2.8. Settings 12 ord 4.1.2.8.1. Set Commissioning Passwo 12 4 1 2 8 2 Configuration 4.1.2.8.2. C fi ti B Backup k 12 4.1.2.8.3. Configuration Restore 12 4.1.2.8.4. Print System Report 12 4.1.2.8.5. Firmware Updates 12 4.1.2.8.6. System Maintenance (ATTE ENTION!) 12 4.2.Configuration 4.2. Configuration (Setting system parameters) 4.2.1. Activating and setting system parameters s LIGHTIFY Pro installation 13 13 1 www.osram.com/lightify-pro Content Page 4.2.1.1. Removing existing network devvices 13 4.2.1.2. Uploading / using floor plan 14 4.2.1.3. Creating groups 14 4.2.1.4. Saving scenes 14 4.2.1.5. Calling and setting the operating mode 15 4.2.1.6. Activating the group-in group fu unction (swarm) 16 4.2.1.7. Activating switches / push-butto ons and sensors 16 5. Control with the LIGHTIFY Pro Control App 5.1. Control functions LIGHTIFY Pro installation 17 17 2 www.osram.com/lightify-pro Welcome to LIGHTIFY Pro M Many thanks th k for f purchasing h i a LIGHTIFY Pro P product. d t o system, including descriptions of use, data For more detailed information about the LIGHTIFY Pro sheets and installation information, please see: www.osram.com/lightify-pro 1. LIGHTIFY Pro system overview and operating principle The LIGHTIFY Pro system contains of hardware and software s components Hardware of LIGHTIFY Pro system: LIGHTIFY Pro Gateway LIGHTIFY Pro system components LIGHTIFY Pro DSE LIGHTIFY Pro PBC … Software / Apps of LIGHTIFY Pro system: LIGHTIFY Pro Commissioning App Mandatory to commission LIGHTIFY Pro P system ( see 4.) LIGHTIFY Pro Control App Mandatory to control LIGHTIFY Pro syystem ( see 5.) Download LIGHTIFY Pro app(s) For more detailed information about available versionss, s please visit our website at: www.osram.com/lightify-pro p(s). Please download the latest LIGHTIFY Pro app = LIGHTIFY Pro Commissionin ng App Tablet – IOS 8.x PC – Windows (available later) = LIGHTIFY Pro Control App Smart Phone / Tablet – IOS 8.x / Android 4.x PC – Windows (available later) LIGHTIFY Pro installation 3 www.osram.com/lightify-pro Before starting the installation Please make sure that following conditions are fulfilled: f 1. Smart Device available? IOS 8.x Tablet Smart Phone IOS 8.x / Android d 4.x 2. App(s) downloaded and installed on your Sm mart Device? Commissioning App Tablet – IOS 8.x Control App Smart Ph hone / Tablet – IOS 8.x 8 x / Android 4 4.x x 3. Shall an existing IT network be used at the installation site? ated in IT network LIGHTIFY Pro System to be integra LIGHTIFY Pro System used indepe endently CLIENT mode HOTSPOT mode Operating principle Network overview: 2. Installation information - Please see the respective installation inform mation of each LIGHTIFY Pro product! LIGHTIFY Pro installation 4 www.osram.com/lightify-pro 3. Start – first steps Step 1: Download latest app(s): www.osram m.com/lightify-pro ommissioning App = LIGHTIFY Pro Co Tablet – IOS S 8.x PC – Windo ows ((available later)) = LIGHTIFY Pro Co ontrol App Smart Phon ne / Tablet – IOS 8.x / Android 4.x PC – Windo ows (available later) Step 2: Make up your mind whether an existing IT network can/shall be used or not: egration Answer: YES, I want IT network inte CLIENT mode (with Router) ndently Answer: NO, it should work indepen HOTSPOT mode ((w/o Router)) Step 3: Please install the Gateway, switch itt ON and establish a connection between the Gateway and your Smart Device: CLIENT-Mode (with Router) WIFI access code: Contact your IT system administrator HOTSPOT HOTSPOT-Mode Mode (w/o Router) WIFI access code: see backside e of your Gateway LIGHTIFY Pro installation 5 www.osram.com/lightify-pro 3. Start – first steps Step 4: Please activate your LIGHTIFY Pro Commissioning App and select the connected Gatew way. Step 5: After Gateway selection you will be asked to enter a personal password. Enter personal password to prote ect your Gateway from unautorized access. a During initial commissioning you have to confirm password once. READY: Now y your LIGHTIFY Pro system y sta atus will be activated and you can start your sys stem commissioning. LIGHTIFY Pro installation 6 www.osram.com/lightify-pro 4. Configuration with the LIGHTIFY Pro Comm missioning app n is shown with use of the following app: In section 4, the LIGHTIFY Pro system configuration LIGHTIFY Pro Commissioning app Open the app on your smart device. 4.1 Functions 4.1.1 Selection and activation of the LIGHTIFY Prro Gateway Select the gateway to be activated from the list on th he left left. ameters are Following activation, all the system para loaded and made available on the grap phical user interface. 4.1.2 Dashboard (System Overview) The overview informs you about the system state and is the start point for all further activities. Based on the system overview, you can n activate the following functional areas: LIGHTIFY Pro installation - Scan (see e: 4.1.2.1) - Identify (see e: 4.1.2.2) - Canvas (see e: 4.1.2.3) - QR Codes (see e: 4.1.2.4) - Network Diagnostics (see e: 4.1.2.5) - Disconnect (see e: 4.1.2.6) - Gateways (see e: 4.1.2.7) - Settings (see e: 4 4.1.2.8) 1 2 8) 7 www.osram.com/lightify-pro 4.1.2. Dashboard (System Overview) The overview informs yyou about: - System state (e.g. available software updates) - es) Network status (e.g. accessibility of system device - Gateway data (e.g. IP address) Direct system control is already available e within the overview. Automatic user navigation: When the system overview is called, you are a automatically navigated through the first steps to commissioning and system configuration. shing symbols Observe the highlighted graphically flas 4.1.2.1 Scan (Add new network devices) In the system overview, press Scan. 1. Disconnect new devices / network devices 2. Select the time for the scan process (Note: The more devices there are to be read in, the longer the time selected should be) 3. Start the scan process 4. Switch on new devices / network devices If the process was aborted during scanning or if devices / network devices could not be correctly identified / read in, restart the scanning process. LIGHTIFY Pro installation 1 8 www.osram.com/lightify-pro 4.1.2.2 Identify (Identify network endpoints) In the system overview, press Identify. You can identify the following 3 product types: 1. Lights (lamps, luminaires) 2 Push 2. Push-buttons buttons / switches (manual operating interfac ce) 3. Sensors (motion and daylight sensors) Clicking the symbols informs you about the specific operatting principle during identification. Select the first product to be identified and start the process. process To start identification, press the specific symbol and follow the instructions. First identification completed: If the network device selected by you has been identified, iti can then be directly used and configured. see 4.1.2.3 Canvas Important: A network device may contain several configurable end po oints, e g LIGHTIFY Pro DSE see diagram on right e.g. Carrying out further identifications: Restart the process to identify other network devices. LIGHTIFY Pro installation 1 9 www.osram.com/lightify-pro 4.1.2.3 Canvas (System configuration interface) In the system overview, press the Canvas. Orientation: Left - List of products / network devices The view can be changed betw ween "Endpoints" and "Devices" Top - Display settings g betw ween "Groups", p , "Devices" and "Connections" The view can be changed Center - Canvas Below - Functions for system configurration "New group", "Selection", "IIdentification", "Layout" and "Help" Operating the canvas: x short press = 1x - Object selection - Activation of parameter list = 2x x short press - Move object (drag&drop) = pre ess and hold - Establish connections = dra aw connection between 2 objects with your fiinger - Delete connections = 1x x short press on Connection Configuration of network devices: See 4.2: Configuration (setting syste em parameters) Data saving: D t is Data i automatically t ti ll saved d after ft each h configuration fi ti step t is i implemented. i l t d Thi This process iis iindicated di t d b by a d data t transfer symbol during data saving. LIGHTIFY Pro installation 10 www.osram.com/lightify-pro 4.1.2.4 QR Codes (Creating QR Codes for system control) In the system overview overview, press QR Codes. Codes Important: QR Codes determines which functions used by the LIGHTIFY Pro Control App are enabled. Step 1: Select “Add” and name the QR Code Step 2: Choose your group(s) for specific QR Code activatiion. You are given a list of all groups in your system configuration n Step 3: By pressing on each group, select the functions yo ou wish to enable for Control App and press “Done” Step 4: Press QR symbol behind each group to create fin nal QR Code Step 5: Select “Create PDF” to choose your favored print layout l The generated QR code can be read in by any smart device wiith a camera with use of the LIGHTIFY Pro Control app. The functions enab bled by the system permissions are automatically made available for use on the smart device used. 4.1.2.5 Network diagnostics (Check of network quality) In the system overview, press Network diagnostics. Status symbols: Green - connection / signal available Orange - connection / signal is moderate e Red - no connection / signal 4.1.2.6 Disconnecting (Disconnect gateway connection) In the system overview, press Disconnect. To restore the connection, select the connecting gateway from the t list. 1 LIGHTIFY Pro installation 11 www.osram.com/lightify-pro 4.1.2.7 Gateways In the system overview overview, press Gateways Important: The list on the left shows your connected Gateway only. If you liike to connect to another Gateway, please disconnect first and than set up new connection (WLAN) to the next Gateway. 4.1.2.8 Settings In the system overview, press Settings 4.1.2.8.1 Set Commissioning Password Change your System Password here, if require ed. 4.1.2.8.2 Configuration Backup Use the Backup function to store your system configuration c on an USB stick for safety. 4.1.2.8.3 Configuration Restore Use the Restore function to recover a saved syystem configuration. 4.1.2.8.4 Print System Report Use the System Report Print function to receivve a PDF based report of the complete system configuration. 4.1.2.8.5 Firmware Updates Use the Firmware Updates function to download / upload new firmware to your system. Step 1: Download Firmware Updates from the internet firstt – IMPORTANT: Internet connection required! Step p 2: Upload p Firmware Updates p to yyour system y compone p ents 4.1.2.8.6 System Maintenance Use System Maintenance functions to reload / rediscover / reset / fix system data. ATTENTION! The System Maintenance functions can change or delete your system settings. ! 1 LIGHTIFY Pro installation 12 www.osram.com/lightify-pro 4.2. Configuration (Setting system parameters) Configuring individual network devices is implemented in the configuration interface. See 4.1.2.3: Canvas (System configuration interface) 4.2.1. Activating and setting system parameters In the system overview, press the Canvas. Operating the Canvas: Object selection ss = 1x short pres Activation of parameter list = 2x short pres ss Move object (drag&drop) = press and ho old Establish connection = draw the con nnection between 2 objects with your finger Delete connections = 1x short pres ss on Connection Important: egard to their implemented functions. Different network devices will show different parameter lists in re Data saving: Data is automatically saved after each configuration step is impllemented. This process is indicated by a data transfer symbol during data saving. 4.2.1.1. Removing existing network devices Important: Network devices can be: a) removed from Canvas (device still exist and can be used in network) b) deleted from Network (device will not exist in network anymore) Step 1: Activate the parameter list (2x short press) off device, which shall be removed from canvas Step 2: Please choose: a) „Remove from Canvas“ b) „Delete from network“ 1 LIGHTIFY Pro installation 13 www.osram.com/lightify-pro 4.2.1.2. Uploading / using floor plan Important: Useable data formats: PDF, PDF JPG, JPG GIF Step 1: Copy floor plan to an existing USB stick and conn nect stick to USB input on Gateway Step 2: Select “Floor Plan” in Canvas and upload floor plan p from USB stick 4.2.1.3. Creating groups Step 1: Via drag & drop, move the devices to be grouped from the list of network devices onto the Canvas Step 2: Select the end points of the products to be group ped Step 3: Activate the "Select" function and select "Add to o new group" or Step 1: Via drag & drop, move the devices to be grouped from the list of network devices onto the Canvas Step 2: Activate the "New group" function Step 3: Connect the end points of the products to be gro ouped with the newly established 4.2.1.4. Saving scenes Important: Scenes are saved at group level. a) Assign a scene to a complete group b) Assign a scene to a product in a group a) Assign a scene to a complete group: Step 1: Activate the parameter list (2x short press) of the e group for which the scene is intended Step 2: Select "Control light" Step 3: Configure the light setting according to your requirements and press "New scene from current settings" Step 4: Name the scene that is then automatically saved with the assigned name 1 LIGHTIFY Pro installation 14 www.osram.com/lightify-pro b) Assign a scene to a product in a group: Step 1: Activate the parameter list (2x short press) of th he end point / product for which the scene is intended Step 2: Select "Control light" Step 3: Configure the light setting according to your requirements Step 4: e group Activate the parameter list (2x short press) of the containing the end point / product p 5: Step Select "Scene management" g in the p parameter list Step 6: Add a scene to the list and name the scene. Th his is then automatically saved under the assigned name ed under "Scene management" in the parameter list All saved scenes can be displayed, edited and activate 4.2.1.5. Calling and setting the operating mode Step 1: Activate the parameter list (2x short press) of th he group for which the operating mode is intended Step 2: Select "Operating mode" Step 3: Select "Display selection" for the following pre-cconfigured operating modes: 1. Office 2. Meeting room 3. Corridor 4. Staircase 5. Sanitary room 6. Classroom or Configure the required operating mode yourself by using the parameter list: 1. T1 Time 2. On Level 3. T2 Time 4. Hold Level Step 4: e parameter list: Activate / deactivate additional functions in the Semi-automatic = manual switch-on req quired via push-button / switch Staircase function = light signal / power dip shortly before switch-off 1 LIGHTIFY Pro installation 15 www.osram.com/lightify-pro 4.2.1.6. Activate the group-in-group function (swarm) Important: A group-in-group function is based on a minimum of 2 single grroups. Each single group must still be individually configured, but can be additionally integrated into a higher-leve el group (swarm group) for higher-level functions. Step 1: Establish at least 2 groups gg groups p See: 4.2.1.3.: Creating Step 2: Activate the "New group" function Step 3: Connect the already created groups with the newly created swarm group Step 4: Activate the parameter list (2x short press) of the swarm group Step 5: Activate "Swarm mode" in the parameter list The single groups in the swarm still keep their set para ameters if these are not modified at single group level. 4.2.1.7. Activating switches / push-buttons and sensors Important: Activating switches / push-buttons and/or sensors is a group fu unction, means creating a group before activating certain devices is necessary first hand ( see: 4.2.1.3.: Creating groups) and this group has to be connected to min. 1 light point (lamp, luminaire). Step 1: Via drag & drop, move the devices to be grouped d from the list of network devices onto the Canvas or use an exissting device on canvas Step 2: Connect the end points of the products to be activated with the newly created group or an existing group Step 3: Activate the parameter list (2x short press) 1 LIGHTIFY Pro installation 16 www.osram.com/lightify-pro 5. Control with LIGHTIFY Pro Control App In section 5, the LIGHTIFY Pro system control is shown with use of the following app: LIGHTIFY Pro Control App Open the app on your smart device. 5.1. Control functions Important: Exclusively only QR codes created by the LIGHTIFY Pro Commissioning C App ( see 4.) can be used, other QR codes will not be sccanned or can not be used. p of the Scan a QR code generated in the system permissions Step 1: LIGHTIFY Pro Commissioning App by ussing the camera of your smart device All luminaires / rooms (luminaire groups s) and their respective light functions enabled by the system permissions of the LIGHTIFY Pro o Commissioning app are automatically made available for control on the smart device used. LIGHTIFY Pro installation 1 17 www.osram.com/lightify-pro 5.1. Control functions Step 2: Select a room / group to open the respective light functions available. Step 3: g the intuitive Control your light installation by operating user interface. Information: ol the light installation. The LIGHTIFY Pro Control App can only be used to contro Requested changes for control functions or a re-commission ning of the light installation has to be done by using the LIGHTIFY Pro Commissioning App. After re-commissionin ng a new QR code has to be created to activate new light functions on your smart device. 1 LIGHTIFY Pro installation 18