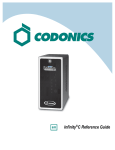
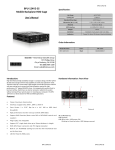
1
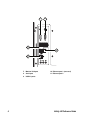
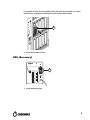
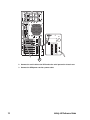
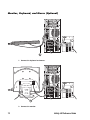
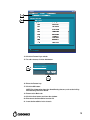
the
ct to 2)
is subje e, and
ration erferenc may
s. Ope ul int that
Rule e harmf rference
the FCC caus ng inte
15 of not cludi
part e may in
reil
with devic ived,
appa
plies This e rece
03. Cet
e com ns: 1) rferenc
ICES-0 da.
devic itio inte
dian du Cana e
This two cond pt any
acce .
Cana -003
rectiv
fol owing e must operation lies with e NMB ncil di ing to
Cou
this devicundesired ratus comprm a la norm of EC States relat and
nts
1-1
e
caus digital appaB est confo ireme e Member EN 6060
B se
the requ of th imits of
Class Clas
This e de la ormity with of the lawsClass B l
numeriqu is in conf oximation fies the
product he appr uct satis
This C on t This prod
93/42/EEdevices.
cal
medi 11.
R
CISP
ical Disc.
TM Med
.A
Virtua in the U.S
g
Made Pendin d
nts
Pate hts Reserve
All Rig
isher
Publ
an 13
ornla nds
a
BV, EsdoNetherl
rtner4U The
CEpa Maarn, 6.26 Dr.
DB 16.53
3951 +31.6.5 1 Englewood0 USA
e:
Phon Inc.,1799 OH, 4413
nics ts
Codo burg Heigh
le
Midd
D
SIFIE
CLAS
ETL MS TO
FOR
CON 60601-1
UL STD D TO
TIFIE
x CER2 NO. 601.1
xxxxxxSA STD C22.
/C
CAN
DLE
L / MO
MODE TUA-2
VIR
Infinity® LX Reference Guide
Table of Contents
Components ........................................................................................................................................... 1
Hardware Setup...................................................................................................................................... 5
SmartDrive Configuration ..................................................................................................................... 13
Startup .................................................................................................................................................. 16
Login ..................................................................................................................................................... 18
System Configuration ........................................................................................................................... 21
DICOM Setup ....................................................................................................................................... 22
Monitoring Status.................................................................................................................................. 26
Troubleshooting .................................................................................................................................... 30
Shutdown.............................................................................................................................................. 31
iii
Components
Unpacked Components
1
5
6
2
4
3
9
8
7
1.
2.
3.
4.
5.
Chassis
Chassis key
SmartDrive
Documentation
Power cords
6.
7.
8.
9.
Ethernet cable
Installation disc
User’s Manual disc
Hard drives
1
Chassis Front
1
6
7
2
3
4
5
1.
2.
3.
4.
2
Power button
Status lights
Mute button
Hard drive slots
5. SmartDrive USB port
6. Disc drive
7. Front door
Infinity LX Reference Guide
Chassis Rear
1
2
3
4
5
6
1. Power supply connectors
2. Power supplies
3. Power on lights
4. Power supply switches
5. Connector panel
6. Serial Attached SCSI (SAS) port
3
7
8
9
10
11
7. Monitor VGA port
8. Serial port
9. USB 2.0 ports
4
10. Ethernet port 1 (not used)
11. Ethernet port 2
Infinity LX Reference Guide
Hardware Setup
CAUTION: Only trained users should install and configure the system.
Power, Ethernet, and SmartDrive
1. Place the chassis on a solid level surface.
2
2. Turn off the power supply switches.
3
4
3. Connect the power cords.
4. Secure the power cords with the attached clips.
5
5
5. Connect the Ethernet cable to Ethernet port 2.
1
055
-55
55
5-0
55
6
9
8
7
6
6. Insert the SmartDrive (optionally program the SmartDrive; refer to SmartDrive
Configuration p. 13).
6
Infinity LX Reference Guide
Hard Drive Installation
11
12
13
1
2
3
4
5
6
7
8
9
10
1. Match the number on the top of each hard drive to the number on the slot.
7
2
2. Open the hard drive levers.
CAUTION: Use care when unpacking and handling hard drives. Handle only the
front, side edges, and face with the label, not the underside or the backplane of the
drive. Do not touch any exposed electronics.
3
3. Insert hard drives in the chassis.
CAUTION: When installing the drive, it is important to install it all the way into its
slot. Push the drive as far into the slot as it will go (and flush with the neighboring
drives). There is some resistance as the back of the drive is seated in the cage, and
8
Infinity LX Reference Guide
it is possible to latch the lever without having the drive fully installed. It is critical
that all drives are properly installed prior to the initial system startup.
4
4. Close the hard drive levers.
UPS (Accessory)
1
1. Insert the battery plug.
9
2
2. Connect the serial cable to the UPS and to the serial port on the chassis rear.
3. Connect the UPS power cord to a power outlet.
10
Infinity LX Reference Guide
4
4. Connect the chassis power cords to the UPS.
11
Monitor, Keyboard, and Mouse (Optional)
1
1. Connect the keyboard and mouse.
2
2. Connect the monitor.
12
Infinity LX Reference Guide
NOTE: It is recommended that the monitor power cord be connected to the same
outlet as the chassis or UPS power cord.
SmartDrive Configuration
CAUTION: Do not reconfigure or modify the software except as described in
configuration tasks documented in this manual.
1. Remove the SmartDrive from the chassis.
2. Connect the SmartDrive to a PC.
3. Run Configurator.exe.
13
4. Enter the site name and site contact.
5. Select Dynamic or Static for the IP address Acquisition Type.
6. If Static was selected, enter the system IP address and other network settings.
Make sure no spaces are in the System Name entry.
NOTE: The Gateway IP address cannot be set to 0.0.0.0.
7. A DNS Server entry is required for remote LogMeIn support.
8. Select a locale.
9. Select the Purge Temporary Studies option if you want temporary studies to be
automatically deleted when the system reaches 95% full.
10. If you want to set aside a minimum amount of temporary space, enter an
amount in tenths of a TB in the Minimum Temporary Space field.
11. Select a level of concurrent associations you want the system to try to use if
exporting or SmartRouting studies.
12. Enter the e-mail server information for system messages.
13. To manage Feature Keys, click the Advanced tab.
14
Infinity LX Reference Guide
14. Click the Feature Keys subtab.
15. To add a feature, click the Add button.
16. Enter the Feature key.
17. Click the OK button.
NOTE: For information about the SmartRouting features, refer to the Infinity
SmartRouting Reference Guide.
18. Return to the Basic tab.
19. Click the Save button and close the window.
20. Disconnect the SmartDrive from the PC.
21. Insert the SmartDrive in the chassis.
15
Startup
1
1. If the monitor is installed, press the monitor power button.
2. If there is a UPS, power on the UPS.
3
3. Turn on the power supply switches.
16
Infinity LX Reference Guide
4
4. Press the chassis power button.
5. Wait five minutes for startup to complete, indicated by six audible beeps.
6. If there is no local monitor, refer to “Login Using Remote Desktop” on p. 18.
If there is a local monitor installed, refer to “Login Using Local Monitor” on
p. 20.
17
Login
Login Using Remote Desktop
1. From a PC on the network or a PC connected to the system using an Ethernet
crossover cable, start the Windows Remote Desktop Connection application.
NOTE: If the PC does not have the Remote Desktop Connection application,
download the application from the Microsoft Windows website.
2. Click the Options button.
3. On the Experience tab, change the connection speed to LAN (10Mbps or
higher).
18
Infinity LX Reference Guide
4. On the Display tab, change the Color to True Color 24-bit or True Color 32-bit.
5. On the General tab, enter the system IP address.
6. Enter the administrator user name — admin.
7. Enter the administrator password (the default is “codonics”).
8. Click the Connect button.
19
CAUTION: When shutting down a PC, make sure that you are not actually shutting
down Infinity LX from an open Remote Desktop Connection session. Doing so
could inadvertently disconnect other Infinity LX users or interrupt drive recovery
operations, resulting in data loss.
Login Using Local Monitor
1. At the Windows login, enter the administrator user name — admin.
2. Enter the administrator password (the default is “codonics”).
3. Click the OK button.
20
Infinity LX Reference Guide
System Configuration
CAUTION: Only trained users should install and configure the system.
CAUTION: Do not reconfigure or modify the software except as described in
configuration tasks documented in this manual.
Users
The system includes three user logins: admin, manager, and operator. The initial
password for all three is codonics. To change the passwords, refer to the Infinity LX
User’s Manual.
Date and Time
Use the Windows Control Panel to set the date and time for the system.
21
DICOM Setup
Allowing Access by DICOM Stations
1. Run the Administration tool.
2. At the login, enter the administrator user name — admin.
NOTE: Entries in the User field are converted to uppercase automatically.
3. Enter the administrator password (the default is “codonics”).
4. Click the OK button.
22
Infinity LX Reference Guide
5. Click DICOM Stations.
6. Click the Add button.
23
7. Select the preconfigured station.
8. Click the OK button.
9. Enter an alias name for the station.
10. Enter the station’s Calling AE Title.
11. Enter the station’s host name or IP address.
12. Click OK.
13. Add other stations as needed.
24
Infinity LX Reference Guide
14. When all stations have been added, click the Save All button.
15. Click the Yes button.
Host Settings for Storing DICOM Studies
Called AE Title
TCP Port
Description
temp
104
Place studies in temporary storage.
perm
104
Place studies in permanent storage.
NOTE: The temp and perm Called AE Titles are default host settings and must be
lower case to work properly.
Testing Store and Retrieve
Store and retrieve operations should be tested before making Infinity LX available for
general use. This entails storing a study from a DICOM station, opening Study
Manager on Infinity LX to verify that the study was received, then retrieving the study
from the DICOM station. For more information, refer to the Infinity LX User’s Manual.
25
Monitoring Status
Detailed Status Information
1. Open the System Status Tool.
26
Infinity LX Reference Guide
2. Click branches in the component tree to display status details.
27
Dashboard Status Information
1. Storage capacity
2. Network
3. UPS
4. Hard drives
5. System temperature
1. Processing status: Infinity LX is ready to process or is processing requests.
2. Alert condition: Infinity LX can still process jobs but requires user attention.
3. Fault condition: Infinity LX cannot process jobs and requires user attention.
28
Infinity LX Reference Guide
Front Panel Status Lights
1
5
2
6
3
4
1. Power
4. Network 2 Activity (not used)
2. Not used
5. Hard drive power
3. Network 1 Activity
6. Hard drive status
Status Light
Indication
Power
Blue: Power on
Network 1 activity
Green: Network activity
Hard drive power
Blue: Power on
Hard drive status
Off: No disk activity
Green: Disk activity
Red: Hard drive fault
29
Troubleshooting
Problem
Solution
Startup fails.
Check the power cables.
Check the power switches on the rear panel.
Verify that the SmartDrive is connected.
Check the UPS.
Login fails.
Verify the user name.
Verify the password case (upper case and lower case).
Network not responding.
Check the system IP address and other network settings.
Verify that the network cable is connected to Ethernet port 2 (lower Ethernet
port).
Verify that the SmartDrive is connected.
DICOM station cannot
connect.
Check all IP addresses and other network settings.
Check the AE Title and DICOM port in the Administration tool.
Ping the system from the DICOM station.
Verify that the network cable is connected to Ethernet port 2 (lower Ethernet
port).
Verify that the SmartDrive is connected.
One hard drive status light is
red.
Replace the hard drive.
Multiple hard drive status
lights are red.
Contact Codonics Technical Support.
Phone: +1-440-243-1198
Toll Free: 800-444-1198 (USA only)
E-mail: [email protected]
Power supply module has
failed.
Replace the power supply module.
System responses are slow.
Wait for jobs to complete.
Check the status lights.
The system shuts down
unexpectedly.
Make sure you did not inadvertently shut down the system from the Remote
Desktop Connection application.
If you did, restart Infinity LX and check its status using the System Status tool.
For additional assistance, contact Codonics Technical Support.
A specific Windows
application cannot be found.
Make sure that you are searching from your normal Windows desktop and not
from the remote desktop.
System performance is slow.
Set PDU size to maximum of 128 KB on the Query/Retrieve client and Store
client.
NOTE: For additional troubleshooting issues, refer to the Infinity LX User’s Manual.
30
Infinity LX Reference Guide
Shutdown
1. In the Start menu of the remote desktop or local monitor, select System
Shutdown.
2. Click the Shutdown button.
All registered and unregistered trademarks are the property of their respective owners.
Specifications subject to change without notice. Patent Pending.
Copyright © 2008-2009 by Codonics, Inc. Printed in U.S.A. Part Number 900-434-004.01.
31