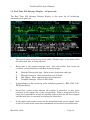
1
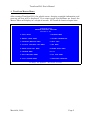
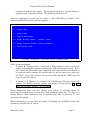
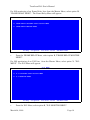
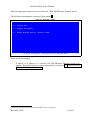
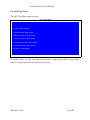
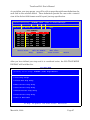
TranScan/8583 User’s Manual March 24, 2000 Copyright 1987-2000 Ontrac Consulting, Inc. 45 Chaucer Court San Ramon, CA 94583 TranScan/8583 User’s Manual Preface This document contains procedures for use of the TranScan/85831 to capture and/or display messages which are formatted in one of the supported dialects of ISO/8583 message format. TranScan/8583 will take a message formatted according to ISO/8583 standards, parse it, and display it in an easily readable format. ISO/8583 is the ISO standard for message formats for Bankcard interfaces. The major international, and many regional, ATM and POS switches, use ISO/8583. TranScan/8583 can also perform functions found in traditional Line Monitors/Protocol Analyzers. The description of these additional functions can be found in the IDS Manual of Operation for Sherlock Models 5415 and 5475. The Material presented in this publication is copyright-protected by Ontrac Consulting, Inc. and may not be reproduced in any form, by any method for any purpose without the prior written consent of Ontrac. It is against the law to copy the software, except in accordance with the terms of the licensing agreement. 1 March 24, 2000 Page ii TranScan/8583 User’s Manual Table of Contents 1. INTRODUCTION TO TRANSCAN......................................................................................................................1 1.1 TRANSCAN AS A TRADITIONAL MONITOR AND APPLICATION ..............................................................................1 1.2 OPERATIONAL PRINCIPLES...................................................................................................................................1 2. SOFTWARE INSTALLATION .............................................................................................................................3 3. STARTING TRANSCAN .......................................................................................................................................4 4. TRANSCAN MASTER MENU..............................................................................................................................5 5. ISO MESSAGE REAL TIME DISPLAY AND/OR CAPTURE DATA................................................................6 5.1 ISO MESSAGE CAPTURE/DISPLAY ON BISYNC LINES ............................................................................................7 5.2 ISO MESSAGE CAPTURE/DISPLAY FOR SNA, X.25 AND FRAME RELAY.................................................................9 5.3 REAL TIME ISO MESSAGE DISPLAY -- ALL PROTOCOLS .....................................................................................14 6. DISPLAYING ISO CAPTURED DATA .............................................................................................................16 6.1 DISPLAYING CAPTURED BISYNC DATA..............................................................................................................17 6.2 DISPLAYING CAPTURED SNA DATA ..................................................................................................................18 6.3 DISPLAYING CAPTURED FRAME RELAY DATA ...................................................................................................19 6.4 DISPLAYING CAPTURED X.25 DATA ..................................................................................................................21 6.5 ISO MESSAGES DISPLAY OPTIONS ....................................................................................................................22 7. CHANGING DIALECTS......................................................................................................................................23 8. SETTING AND USING ISO TRAPS...................................................................................................................24 8.1 TRAPPING OVERVIEW ........................................................................................................................................24 8.2 TRAP ORGANIZATION ........................................................................................................................................25 8.3 DEFINING TRAPS ................................................................................................................................................26 8.4 USING TRAPS IN REAL TIME DISPLAY AND CAPTURED ISO DATA DISPLAY ......................................................28 8.4.1 Real Time ISO Trapping Display..............................................................................................................28 8.4.2 Captured ISO Trapping Display ...............................................................................................................28 9. PRINTING MESSAGES.......................................................................................................................................30 10. SNA AND X.25 DECODE-REAL TIME & CAPTURED DATA DISPLAY .................................................32 11. CHANGING THE TRANSCAN CONFIGURATION .....................................................................................33 12. QUICK REFERENCE ........................................................................................................................................34 12.1 REAL TIME MONITOR AND/OR CAPTURE DATA OF ISO BITMAP MESSAGES ....................................................34 12.2 DISPLAY PREVIOUSLY CAPTURED ISO BITMAP MESSAGE DATA .....................................................................34 12.3 PRINTING/EXPORTING MESSAGES ....................................................................................................................35 12.4 SNA DECODE OPTION .....................................................................................................................................35 12.4.1 SNA Decode - Real Time Monitor...........................................................................................................35 12.4.2 SNA Decode Option - Display Previously Captured Data......................................................................35 12.5 X.25 DECODE OPTION .....................................................................................................................................36 12.5.1 X.25 Decode - Real Time Monitor ..........................................................................................................36 12.5.2 X.25 Decode Option - Display Previously Captured Data .....................................................................36 13. TROUBLE SHOOTING .....................................................................................................................................37 March 24, 2000 Page iii TranScan/8583 User’s Manual 1. Introduction to TranScan TranScan/8583 is a hardware and software package designed to support the monitoring and analysis of communications messages on Bank Card networks. TranScan provides a rich set of layered functions, addressing the needs of such varied groups as Network Technicians running Bank Card Networks, Software Developers implementing new functions for those networks and Network Certifiers ensuring the capability of Network participants. 1.1 TranScan as a Traditional Monitor and Application TranScan is built on top of traditional data scope (or line monitor) functions. Thus, it can perform a range of functions from displaying and capturing non-interpreted data on communications lines, to performing such functions as Bit Error Rate Testing (BERT and BLERT). When displaying complex communications protocols, such as SNA and X.25, TranScan offers higher level mnemonic decoding functions. TranScan also contains a programming capability in the Data Solve Language, allowing users to create and run programs that act as network endpoints. The Data Solve functions include the incorporation of previously captured data into program data streams. These "non-ISO" set of functions are described in detail in the IDS Sherlock Manual of Operation. This manual will provide more detail on those functions pertaining to the higher level analysis of communications messages. Originally, TranScan was designed to parse and display various dialects of the ISO/8583 Message Format for BankCard Processors. This ISO standard has had a number of different transmission implementations. The TranScan has added support for many of these dialects to support the user base who gateways into the different Bank Card Networks. The TranScan has grown in function and now handles a number of different "higher level" or application level message formats that are not ISO/8583 yet are specifiable in our table driven format. We encourage our users to send us specifications for their message formats for inclusion in their system as a new dialect. So, as on the various screens you see the word "ISO", please substitute "application message" in your mind, as TranScan now handles much more than the ISO/8583 formats. 1.2 Operational Principles. As you use TranScan, please remember the following general operational principles: • When in doubt, hit the F1 key for help. The F2 key will return you to where you were. March 24, 2000 Page 1 TranScan/8583 User’s Manual • • • • • • As you move through the menu functions, you will find that at the bottom of the screen are displayed some of your keyboard choices and their meaning. Because all of the possible commands available cannot fit on the bottom of the screen, when you are in any of the "ISO" display functions, you may hit "O" for a complete list of all the keyboard options available to you at this point as well as a brief description of their affect. To return to where you were before hitting "O", hit "Z" or the “esc” key to refresh the screen. The “ESC” key will always take you out of the current function you are in and return you back to the previous menu level from which you came. The "enter" key is used to accept the default for any menu choice you have selected. There is a background printer called the "spooler" to which you can print a file at any time. In the non-ISO screens, use the F10 key to print that screen. From an ISO data display screen, chooses "P" to bring up the print prompts. From most screens, hitting F9 will bring up a printer status window. Whenever you capture data, all of the line data is put to disk. This is regardless of which view (ISO vs protocol level), which ISO dialect, or any traps that may be in effect during the capture. This means that you can re-display that captured data with any other view, dialect or trap. Also, RS232 and V35 control leads are captured with the data. All files captured while in the ISO display mode are kept as "mega-capture" files. These are files which can be up to 2 Gigabytes in size. These files are identified with a DOS suffix of ".MCD". Smaller captured files can be used for non-ISO capturing and are identified by a DOS suffix of ".CD". You can look at any of these files with any view -- ISO or non-ISO. March 24, 2000 Page 2 TranScan/8583 User’s Manual 2. Software Installation When you receive your system, you will also have received detailed installation instructions. During the install process you will have selected which hard drive and which starting subdirectory to use when the system is installed. The defaults are "C:" for the hard drive, and \SMART for the top directory level. In this manual, we will refer to those defaults, so please mentally substitute your choices if you did not use the defaults. As you receive software updates to your system, they will be accompanied by instructions. If new fields have been added to a dialect, an upgrade may only involve copying in some tables. If the software function has changed, then a fuller install will occur. In either case, the installation will only require you to put the diskette in your A: or B: drive and key in (as appropriate): A:INSTALL After the software has been installed, you will find that three sub-directories have been created: • • • \SMART\SYSTEM contains the software programs \SMART\SVDATA will contain the files you save. These include captured monitoring files as well as saved setups, traps and Data Solve programs. \SMART\SVISO contains the parsing table TranScan uses. March 24, 2000 Page 3 TranScan/8583 User’s Manual 3. Starting TranScan If yours is a standard DOS system, the TranScan will be loaded on every boot. Sometimes, however, it may be necessary to exit to DOS in order to copy a file to diskette, etc. and then return to the TranScan program. To start TranScan, at the DOS prompt: • enter "\TRANSCAN" or • • enter DOS command "CD \SMART\SYSTEM" enter "SVS Either should start the TranScan software. March 24, 2000 Page 4 TranScan/8583 User’s Manual 4. TranScan Master Menu After starting TranScan/8583, the splash screen, showing copyright information and start-up self test will be displayed. If no start-up self test problems are found, the Master Menu will display in a couple of seconds. All TranScan function begins here. MAIN MENU TranScan/8583 NETWORK/PROTOCOL ANALYZER Version 3.00 A-AUTO SETUP I-PRINTER MENU B-MANUAL SETUP MENU J-SYSTEM INFORMATION C-DATATRAP/MONITOR MENU K-SELF TEST D-DISPLAY CAPTURED DATA MENU L-SNA MENU E-ERROR RATE TEST MENU M-FRAME RELAY MENU F-PROGRAM MENU N-X.25 G-EDIT MESSAGES MENU O-ISO TRAP MENU H-DISK STORAGE MENU P-CONFIGURE TRANSCAN F1-Help March 24, 2000 F9-Spooler F10-Print Screen Page 5 TranScan/8583 User’s Manual 5. ISO Message Real Time Display and/or Capture Data This section covers how to monitor a communications line that has messages formatted in one of the supported ISO/8583 dialects. When monitoring a communications line, there are three modes available: • Display parsed and labeled data fields in real time while capturing all of the original data to a pre-specified disk file, • Display the data without capturing it to disk, • Capture all of the data to disk without displaying it in real time. When performing the real time application level monitoring function, choose the menu selection based on the underlying communications protocol of the line. Once the protocol-based decision has been made, the menus are almost identical between the different protocols. From the main menu, there are four paths for displaying and capturing ISO data. One path is for lines with BiSync protocol, the three other paths are for SNA, X.25, and Frame Relay protocols. Once down a level in either path, the menus are very similar, as will be seen in the following sections. March 24, 2000 Page 6 TranScan/8583 User’s Manual 5.1 ISO Message Capture/Display on BiSync Lines The following describes the steps for ISO monitoring of a BiSync communication line. To cause time stamps to be displayed and saved with each frame message, choose the "B-Manual Setup" from the main menu and then choose "O- Timestamp", and select “Frame”. From the Master Menu, select option C, "DATATRAP/MONITOR MENU". Datatrap/Monitor Menu will appear: The DATATRAP/MONITOR MENU ABCDEFGHIJK- TD Trap RD Trap Trap Position Timer Run Datatrap/Monitor Mega-Capture File Name Mega-Capture File Control Mega-Capture File Size Run Mega-Capture Run ISO Message Format Set ISO Traps F1-Help : : : : NONE NONE [.......T.......] TD TRAP TO TD TRAP : C:\SMART\SVDATA\MEGACAP : CONTINUOUS : 10 F9-Spooler F10-Print Screen ESC-Main Menu If capturing the file to disk is desired, the Mega-Capture file parameters can be changed or the current defaults can be used. • To set up a new file name, select option F, "Mega-Capture File Name". • Press enter twice to use the default disk drive (C:) and default path name (\SMART\SVDATA\). (Note that these values will reflect the disk and paths chosen during the installation, and are changeable via option P, Configure TranScan, from the main menu.) • Then enter the file name you wish (1 to 8 alpha-numeric characters) and press the "enter" key. • If desired, to change the file control (e.g. continuous wrap of file, or stop when file is full), select option G "Mega-Capture File Control". Then select the desired control type from the list of options. • If desired, change the Mega-Capture file size by selecting option H. Size is specified in block units, where each block is 8K of data. A file size of 10 blocks will be able to capture approximately 5 minutes worth of data at 9,600 bps line. (The actual time will vary depending on how many messages are being March 24, 2000 Page 7 TranScan/8583 User’s Manual transmitted and the line speed.) The maximum file size is 130,000 blocks or approximately 1 giga-byte of data. The minimum block size is 2. After the appropriate options are set, select J, "Run ISO Message Format". The following intermediate screen will then appear: RUN ISO MESSAGE FORMAT A - Display Only B - Capture Only C - Display and Capture D - Change Message Dialect (Current: VISA) E - Change Protocol CodeSet (Current: EBCDIC) F - Show Control Leads F1-Help F9-Spooler F10-Print Screen ESC-Main Menu Select the desired option: • If option B, "Capture Only", is selected, a Mega-Capture status screen will appear indicating that capture is taking place with a block status count. If you have chosen the file control type, "Stop when full", then the file will continue to be captured until it reaches its specified size, or will be saved as is when you hit "ESC". If you have chosen a wrap-around file, hitting the "ESC" key will cause the file to be saved. • If Option A or Option C is selected, the ISO Message Monitor screen will appear. For details on those screens and options, see the section 5.3 “Real Time ISO Message Display -- all protocols”. Before monitoring data, you may change your dialect by selecting option D, positioning the selection bar on your choice and hitting the enter key. You may also change dialects while displaying real or captured ISO data by pressing "L" and answering the prompt. Before monitoring, you also have the option of bringing up an RS232 control lead window by selecting the "F" option. March 24, 2000 Page 8 TranScan/8583 User’s Manual 5.2 ISO Message Capture/Display for SNA, X.25 and Frame Relay For ISO monitoring of an SNA line, from the Master Menu, select option L, "SNA MENU". The SNA Menu will appear: SNA MENU A- SNA CAPTURED DATA DISPLAY MENU B- SNA MONITOR MENU F1-Help • F9-Spooler F10-Print Screen ESC-Main Menu From the SNA Menu, select option B, "SNA MONITOR MENU". March 24, 2000 Page 9 TranScan/8583 User’s Manual For ISO monitoring of an Frame Relay line, from the Master Menu, select option M, "FRAME RELAY MENU". The Frame Relay Menu will appear: FRAME RELAY MENU A- FRAME RELAY CAPTURED DATA DISPLAY MENU B- FRAME RELAY MONITOR MENU F1-Help • F9-Spooler F10-Print Screen ESC-Main Menu From the FRAME RELAY Menu, select option B, "FRAME RELAY MONITOR MENU". For ISO monitoring of an X.25 line, from the Master Menu, select option N, "X.25 MENU". The X.25 Menu will appear: X.25 MENU A- X.25 CAPTURED DATA DISPLAY MENU B- X.25 MONITOR MENU F1-Help • F9-Spooler F10-Print Screen ESC-Main Menu From the X.25 Menu, select option B, "X.25 MONITOR MENU". March 24, 2000 Page 10 TranScan/8583 User’s Manual The SNA, Frame Relay, or X.25 monitor menu will appear. Below is the SNA Monitor Menu. The Frame Relay and X.25 monitor menu are similar, except the Frame Relay monitor menu will have DLCI and SAP filter options, instead of TD and RD Trap options. SNA MONITOR MENU ABCDEFGHIJK- TD Trap RD Trap Trap Position SDLC Station Address Frame Timestamp ISO Capture File Name ISO Capture File Control ISO Capture File Size Run SNA Monitor Run ISO Message Format Set ISO Traps F1-Help : : : : : : : : F9-Spooler NONE NONE [.......T.......] ALL OFF C:\SMART\SVDATA\MEGACAP CONTINUOUS 10 F10-Print Screen ESC-Main Menu If capturing the file to disk is desired, the Mega-Capture file parameters can be changed or the current defaults can be used. • To set up a new file name, select the "ISO Capture File Name" option. • Press enter twice to use the default disk drive (C:) and default path name (\SMART\SVDATA\). (Note that these values will reflect the disk and paths chosen during installation). • Then enter the file name you wish (1 to 8 alpha-numeric characters) and press the "enter" key. • To change the file control (e.g. continuous wrap of file, or stop when file is full), select the "ISO Capture File Control" option, then select the desired control type from the list of options. • To change the maximum captured file size, select the “ISO Capture File Size”, option. Size is specified in block units, where each block is 8K of data. A file size of 10 blocks will be able to capture approximately 5 minutes worth of data on a 9,600 bps line. (The actual time will vary depending on how many messages are being transmitted and the line speed.) The maximum file size is March 24, 2000 Page 11 TranScan/8583 User’s Manual 130,000 blocks or approximately 1 giga-byte of data. The minimum block size is 2. Other options are available: • To have time stamps saved with the data, choose the “Frame Timestamp” option, and select “B-FRAME”. • For SNA and X.25, data can be filtered for a specific SDLC Station Address. Select this option and enter the 2 hexadecimal digit address, e.g. C1. All data that is not from or to the specified SDLC station address will not be displayed, nor will it be captured to file. • For Frame Relay, data can be filtered for a specific DLCI. Select option “A DLCI Filters”, and enter the 4 digit DLCI to monitor. • For Frame Relay, data can be filtered on DSAP and/or SSAP. Select option “B - SAP Filters”. You are then given 5 options: ⇒ A-All SAPs ⇒ B-SSAP Only ⇒ C-DSAP Only ⇒ D-SSAP & DSAP ⇒ E-SAP Pair For options B through E, enter the 2 hexadecimal digit SAP address(es). March 24, 2000 Page 12 TranScan/8583 User’s Manual After the appropriate options are set, select the, "Run ISO Message Format" option. The following intermediate screen will then appear2: RUN ISO MESSAGE FORMAT A - Display Only C - Display and Capture D - Change Message Dialect (Current: VISA) F1-Help F9-Spooler F10-Print Screen ESC-SNA Menu Select the desired option. • 2 If Option A or Option C is selected, the ISO Message Monitor screen will appear. For detail on those screens and options, see section 5.3 Real Time ISO Message Display -- all protocols. A message stating “Protocol Changed to SDLC” may also appear. March 24, 2000 Page 13 TranScan/8583 User’s Manual 5.3 Real Time ISO Message Display -- all protocols The Real Time ISO Message Monitor Display is the same for all underlying communications protocols. • The top left corner of the screen shows either "Display Only" or the name of the file into which data is being collected. • Below that is the current message view. For each dialect, four views are available, as described here with their keyboard trigger. BCHD- Message Routing and type. Show source, destination and type. Message Overview. Show selected but not all fields. Hex display. Show unparsed hex view of the data. Complete message. Show all ISO fields. • In parentheses at the screen top is the underlying protocol – BSC, SNA, X.25, FR (Frame Relay). • Second line, screen center contains the number of characters or data bytes currently in the capture file, if one was specified. When a wrap-around file is being used, parentheses around the number indicate that the file has wrapped and that new data is currently overlaying the oldest data. • In the upper right screen corner are the transmitted and receive legend colors as well as counts of the characters transmitted and received in each direction. March 24, 2000 Page 14 TranScan/8583 User’s Manual • In the body of the screen, the messages are displayed. Each message is preceded by a header which contains a sequential message number followed by the decimal-based length of the message. Note that message direction is indicated by color corresponding to the upper right legend. Actual data values are in high intensity tones while the field labels are in low intensity tones. If the parse and decode of the ISO message reveal a violation of the ISO parsing table, then the offending field will be highlighted in red and will be followed by an error message. Any field in error will be shown, regardless of the current message view. If you have selected message frame time stamping, you have four different permutations for including the time stamp in the message display. By toggling on the "W" key, you can see them all. • The bottom portion of the screen shows various keyboard options for changing views and freezing the display. If you freeze the display, you can scroll around in those messages which currently fill up the "display buffer". This will normally be from 20 to 30 messages. Meanwhile, if you have specified display and capture, all of the data is still going to the disk file. The use of keyboard characters for scrolling through the cursor between messages while frozen and also while displaying previously captured data is described in section "Moving Through Captured Data." Don't forget that at any time in this display, you may hit "O" to display all of the current options. "U" unfreezes the screen and puts the view back in synch with those messages going to disk. • When you have captured enough data, hit the "ESC" key, and the file will be saved and closed. Note that when you exit from display and capture, a box appears saying "Updating header of block n of m". This indicates that the file capture index file has been saved, thus preserving the sequential number integrity of the captured file. March 24, 2000 Page 15 TranScan/8583 User’s Manual 6. Displaying ISO Captured Data This section describes the procedure to display data that has already been captured to disk. To display data previously captured to disk, first select option H, "DISK STORAGE MENU", from the Master Menu. (Note: if data just captured to file is to be displayed, then this step can be skipped as the last captured data file is still retained.) The Disk Storage Menu will be displayed: DISK STORAGE MENU A- Save Setup Program and Messages B- Save Captured Data C- Save Both D- Load Setup Program and Messages E- Load Captured Data F- Load Both G- Load Mega-Captured Data C:\SMART\SVDATA\ H- Delete Functions I- Rename Captured Data J- Rename Mega-Captured Data F1-Help F9-Spooler F10-Print Screen ESC-Main Menu Select option, G "LOAD MEGA-CAPTURED DATA". • • Press the "enter" key twice to select the default drive (C:) and path (\SMART\SVDATA\) Select the desired file by highlighting the file name, using the up/down cursor keys, and the “page-up”/”page-down” keys, then pressing the “enter” key. A message "LOADING: filename" will appear briefly. When the message disappears, the file is ready to display. (The "LOADING:..." message may flash very quickly on the screen.) When finshed viewing the captured data, press the "ESC" key to return to the Master Menu. March 24, 2000 Page 16 TranScan/8583 User’s Manual 6.1 Displaying Captured BiSync Data To display data captured from BiSync lines, enter the following options: • From the Master Menu, select option D, "DISPLAY CAPTURED DATA MENU". The following will appear: DISPLAY CAPTURED DATA MENU A- Split TD/RD B- TD Only C- RD Only D- Character Interleave E- Row Interleave F- ISO Message Format G- Set ISO Traps H- Change Message Dialect (Current: VISA) Z- Captured File Information F1-Help F9-Spooler F10-Print Screen ESC-Return Select option F, "ISO FORMAT". The Captured Data display will appear. Captured ISO messages are now displayed, starting with the first one available from the file. (Note: this may not be message number 1 if the "CONTINUOUS" mode was used and the file has wrapped.) For information on how to scroll around the captured data, see section 6.5 ISO Messages Display Options. March 24, 2000 Page 17 TranScan/8583 User’s Manual 6.2 Displaying Captured SNA Data For SNA lines, enter the following options: • • From the Master Menu, select L, "SNA MENU" to get the SNA menu. Select option A, "SNA CAPTURED DATA DISPLAY MENU" and the next menu appears: CAPTURED SNA DATA DISPLAY MENU A- TD Only B- RD Only C- TD and RD D- ISO Message Format E- Set ISO Traps F- Change Message Dialect (Current: VISA) Z- Captured File Information F1-Help F9-Spooler F10-Print Screen ESC-Return Select option D, "ISO Message Format" and the ISO Captured Data Display screen will appear. Captured ISO messages are now displayed, starting with the first one available from the file. (Note that this may not be message number 1 if the "CONTINUOUS" mode was used and the file has wrapped.) For information on how to scroll around the captured data, see section 6.5 ISO Messages Display Options. When finished viewing captured data, • press "ESC" to return to the SNA Menu, • then press "ESC", to return to the Master Menu. March 24, 2000 Page 18 TranScan/8583 User’s Manual 6.3 Displaying Captured Frame Relay Data For Frame Relay lines, enter the following options: • • From the Master Menu, select M, "FRAME RELAY MENU" to get the Frame Relay menu. Select option A, " FRAME RELAY CAPTURED DATA DISPLAY MENU" and the next menu appears: CAPTURED FRAME RELAY DATA DISPLAY MENU Captured File Name Captured DLCI Filter Captured SAP Filters B - Current SAP Filters : : : X25DEMO2 ALL ALL : ALL C - Change Message Dialect: MASTERCARD D - Set ISO Traps E - Display ISO Messages Z - Captured File Information F1-Help F9-Spooler F10-Print Screen ESC-Previous Menu From the above screen, SAP filters can be entered to filter the captured data for display. Select option “B - Current SAP Filters”, the following options may be selected: ⇒ A-All SAPs ⇒ B-SSAP Only ⇒ C-DSAP Only ⇒ D-SSAP & DSAP ⇒ E-SAP Pair For options B through E, enter the 2 hexadecimal digit SAP address(es). Select option E, "Display ISO Message Format" and the ISO Captured Data Display screen will appear. Captured ISO messages are now displayed, starting with the first one available from the file. (Note that this may not be message number 1 if the "CONTINUOUS" mode was used and the file has wrapped.) For information on how to scroll around the captured data, see section 6.5 ISO Messages Display Options. March 24, 2000 Page 19 TranScan/8583 User’s Manual When finished viewing captured data, • press "ESC" to return to the Captured Frame Relay Captured Data Display Menu, • then press "ESC", to return to the Frame Relay Menu, • then press "ESC", to return to the Master Menu. March 24, 2000 Page 20 TranScan/8583 User’s Manual 6.4 Displaying Captured X.25 Data For X.25 lines, enter the following options: • • From the Master Menu, select N, "X.25 MENU" to get the X.25 menu. Select option A, "X.25 CAPTURED DATA DISPLAY MENU" and the next menu appears: CAPTURED X25 DATA DISPLAY MENU B - Change Message Dialect : VISA C - Load Mega-Captured Data : C:\SMART\SVDATA\ D - Display Raw Data E - Display Link Level F - Display Packet Level G - Display ISO Message Format H - Set ISO Traps Z - Captured File Information F1-Help F9-Spooler F10-Print Screen ESC-Previous Menu Select option G, "Display ISO Message Format" and the ISO Captured Data Display screen will appear. Captured ISO messages are now displayed, starting with the first one available from the file. (Note that this may not be message number 1 if the "CONTINUOUS" mode was used and the file has wrapped.) For information on how to scroll around the captured data, see section 6.5 ISO Messages Display Options. When finished viewing captured data, • press "ESC" to return to the Captured X.25 Captured Data Display Menu,. • then press "ESC", to return to the X.25 Menu,. • then press "ESC", to return to the Master Menu. March 24, 2000 Page 21 TranScan/8583 User’s Manual 6.5 ISO Messages Display Options The following list of options is available in ISO display mode, either in freeze mode during realtime display, or while displaying a captured file. Press “O” from the captured data display menu to see these options: CURRENTLY AVAILABLE OPTIONS B-Display Msg Routing, Type C-Display Msg Overview D-Display Complete Msg E-Show Blanks as Non-Blank G-Toggle Field Labels (Bit Number/Name) H-Display Hex Msg L-Change Dialect N-Find Msg Number P-Print R-Display Ruler at Cursor S-Turn Sound On/Off W-Toggle Timestamp Display Z-Refresh Current Display 2-25 Line Display 4-43 Line Display 5-50 Line Display 8-28 Line Display +-Show Blanks as Non-Blank --Show Blanks as Non-Blank Most of these options are self-explanatory. For the few that are not: E G N R 2-8 + - In some messages, it is unclear whether there are a blanks (spaces) in a field or not. Use option E, in conjunction with the "+" and "-" options, to show blanks as a non-blank character. Label for fields can either be a "symbolic" label or an ISO bit number label. The G option toggles between the two. Jump to a specified message number. Creates, where the cursor is, a ruler line to help you count characters in a field. Various display options for number of lines per screen. Normally screen is set to 25 line display. Selects the "next" in the available set up characters to substitute for "blank" in a message. Selects the "previous" in the available set of characters to substitute for "blank" in a message. March 24, 2000 Page 22 TranScan/8583 User’s Manual 7. Changing Dialects TranScan/8583 supports multiple dialects of the ISO/8583 standard. There are a number of states during processing when you can change from one dialect to another. While in real time or captured data display, if you enter "L" the following menu will appear: CHOOSE DIALECT DELUXE-AUTO ↑ DLX-HEX BIT DLX-EBC BIT DLX-ASC BIT FMT8-HONOR FMT8-INTER EBCDIC CHAR EBMS EPSS HEXADECIMAL HYPERCOM JCB MASTERCARD NONISO-1 ON/X (VISA) PLUS/8583 SHAZAM-XP SHAZAM-NXP SHAZAM-AUTO > VISA < ↓ Select the desired dialect option from this menu by positioning the selection bar using the cursor and pressing “enter”. After selecting the dialect, you may be prompted for "skip over" bytes. Some dialects have an ambiguous parsing footprint when their messages are preceded by device emulation control bytes. The "skip over" allows the parser to avoid those control bytes. As an example, Visa never requires specification of skip over bytes while MasterCard on bisync does. March 24, 2000 Page 23 TranScan/8583 User’s Manual 8. Setting and Using ISO Traps 8.1 Trapping Overview ISO Trapping allows Transcan to check for specific data conditions in ISO Messages and to use these "traps" to create filters for ISO Display and printed output. On the ISO message display screen trapped messages will be shown with a yellow "T" in place of the directionally colored "#" in the "msg#" field. The label and data for trapped fields will also be yellow. On monochrome or gray-scale monitors the "T" and the field labels will blink. Trapped fields will be processed like error fields, which means that trapped fields will be displayed regardless of current message display option (B,C,D). The following print options are provided: • • • Print all messages (trapped & not trapped) Print trapped messages only Print not trapped messages only The following display options are provided: • • • Show all messages (trapped & not trapped) Show trapped messages only Show not trapped messages only In addition, a summary of active traps and their definitions can be displayed while viewing ISO messages. The ISO Trap menu can be activated from multiple menus: • Main Menu, option O, ISO TRAP MENU • All of the protocol specific menus, wherever the “ISO Message Display” option appears, the “Set ISO Traps” option also appears. It is important to remember that when a Trap Group is loaded, it will stay active until explicitly unloaded, or TranScan is exited. When a Trap Group is created, it is loaded and active. March 24, 2000 Page 24 TranScan/8583 User’s Manual 8.2 Trap Organization Trap Group A group of traps is stored in a file with an .ITF file extension. A Numbered Trap Each file can have up to 16 "Trap #"s specified. Multiple numbered traps are logical “OR” conditon. Trap Field Each Trap # can have up to 16 separate ISO message fields to check for specific conditions. Multiple trap fields in a single numbered trap are logical “AND” condition. Currently, all fields in all Trap #'s for the currently loaded Trap Group are considered active for trapping. This means that all conditions will be checked in all messages. An ISO message will be considered "trapped" when it meets ALL of the trap criteria (logical AND) in ANY Trap # (logical OR). Put simply, if a message meets all of the field criteria for any active trap, it is considered a "trapped message." All Trap definitions are DIALECT DEPENDENT. The ISO field definitions can change from dialect to dialect (e.g. VISA to MASTERCARD) and will cause unpredictable results when Traps for one dialect are paired with messages from another dialect. March 24, 2000 Page 25 TranScan/8583 User’s Manual 8.3 Defining Traps The ISO Trap Menu appears below. ISO TRAP MENU L-List Trap Groups C-Create New Trap Group E-Edit Current Trap Group S-Save Current Trap Group U-Unload Current Trap Group V-View Current Trap Group X-eXit to Main Menu F1-Help F9-Spooler F10-Print Screen ESC-Return From this menu, you can load and thus activate a trap group, unload a trap group, create a trap group or edit an existing trap group. March 24, 2000 Page 26 TranScan/8583 User’s Manual As you define your trap groups, you will be able to page through format definitions for each field in the selected dialect. These definitions provide the user with a tutorial view of the dialect field formats useful beyond just trap specification. Current Group:Trap: Bit # Field Name TX1_004 AMT TX1_022 POS ENT MD >TX1_000 TX1_002 TX1_003 TX1_004 TX1_005 TX1_006 TX1_007 TX1 008 ADD TRAP # 1 HIGHAMT (VISA - Base I & Debit Messages Type Len Op Field Value BCD 12N GE 000000002500 BCD 4N LT 0200 BIT NUMBERS BITMAP MAP PRI ACCT BCD PROC CD BCD AMT BCD SETL AMT BCD BILL AMT BCD TRNS DT BCD BILL FEE BCD 2 < 19NV 6N 12N 12N 12N 10N 8N A-Add Field R-Replicate Field O-Edit Operator T-Set TRAP ON ERROR D-Delete Field B-Edit Bit Number V-Edit Value F1-Help F9-Spooler F10-Print Screen ESC-Return After you have defined your trap and it is considered active, the ISO TRAP MENU DISPLAY will look like this: ISO TRAP MENU Currently Active Group: HIGHAMT (VISA) High Amounts L-List Trap Groups C-Create New Trap Group E-Edit Current Trap Group S-Save Current Trap Group U-Unload Current Trap Group V-View Current Trap Group X-eXit to Main Menu F1-Help March 24, 2000 F9-Spooler F10-Print Screen ESC-Return Page 27 TranScan/8583 User’s Manual This Trap Group will be in effect until you unload it or exit TranScan. Be sure to unload your traps on a shared TranScan and always check for loaded traps when you take over a shared system. 8.4 Using Traps in Real Time Display and Captured ISO Data Display Once a Trap Group has been loaded, it will be in effect during both real time and captured data displays. 8.4.1 Real Time ISO Trapping Display During real time ISO data display (with optional capture), counts are maintained on the number of trap occurrences during this monitoring session. Using the "T" keyboard option, you may choose to see all messages (A), trapped messages only (T), or untrapped messages only (U). A trap summary count (S) is also available. The summary of those counts as shown on the screen below, will overlay the top left portion of the realtime ISO display. TRAP SUMMARY Total Messages : Trapped Messages : Showing: All Messages 571 156 Remember that regardless of the Trap Group filter you may be using while displaying and capturing your ISO data, all of the data is going to the hard drive. 8.4.2 Captured ISO Trapping Display When you request to view an ISO file while you have a Trap Group Filter active, you will first see a summary of all of the occurrences of your traps within the groups. To see the file itself, press "ESC". March 24, 2000 Page 28 TranScan/8583 User’s Manual ISO TRAP SUMMARY Captured File: SNADEMO Trap Group: HIGHAMT Trap Note > 1 2 3 4 5 6 7 8 9 10 11 12 13 14 15 16 Count High amount, manual key entered High amount, mag stripe read F1-Help 1< 6 Enter-View Trapped Fields F9-Spooler F10-Print Screen ESC-Return Once you are viewing an ISO file with trapping, you may use the "J-Jump Next Trap" and "K-Jump Prev Trap" keyboard options to move forward to the next trap or back to the previous trap. March 24, 2000 Page 29 TranScan/8583 User’s Manual 9. Printing Messages The TranScan can be configured for two types of printers: • • A generic epson-compatible printer. An HP DeskJet or LaserJet PCL printer. Printer configuration is accomplished by invoking the "P-CONFIGURE TRANSCAN" option on the Main Menu. Messages may be printed from either the Captured Data display or the real time ISO Message Monitor display. In order to print messages from the real time Monitor display, first freeze the screen with option "F"3. From the display screen, selection option "P" for printing. The following menu will appear: PRINT/EXPORT CAPTURED DATA Format: Trapped: Range: Available: A C E F P R S T F1 Esc Complete Msg All Messages Msg 3 to Msg Msg 1 to Msg 3 48 -Create Ascii image file (DEMOSNA.A02) -Create print image file (DEMOSNA.P00) -Create pre-Export file (DEMOSNA.E01) -Format change -Print messages directly to printer -Range change -Send messages to background printer -Trapped range change -Help -Exit Set the desired format and message range "from" and "to" message numbers before printing. The format choices appear when you enter "F" and are the same 4 formats as for real time display: • • • • HEX Complete Msg Message Overview Message Routing and type 3 While in freeze of realtime ISO display, only the messages in the display buffer are available for printing. March 24, 2000 Page 30 TranScan/8583 User’s Manual To change the message number range for printing, enter "R". Note that the available range is displayed for you. If a Trap Group is currently active, you may select "T" and decide to print All Messages, Trapped Messages only or Untrapped Messages only. There are 3 ways to print. • "S" sends the print job to a background printer which allows you to return to monitoring while the job prints. This option is only applicable while running under DOS. Windows has its own printer spooler. • "P" sends the print job directly to the printer. The system will remain in this menu until printing completes.4 • "C" creates a print file to be copied on diskette and moved to another printer. The file naming convention is file-name.Pnn, where file-name is the name of the file currently being captured, if in real time, or already captured if printing display of captured data. "nn" is a unique number starting with 00 as the first generated. This file is put in the \SMART\SVDATA directory. There are two file export functions from the print menu: • "A" creates an ASCII image file, one line per message. These files can also be manipulated by ASCII file editors or programs. The file naming convention is file-name.Ann, where file-name is the name of the file currently being captured, if in real time, or already captured if printing display of captured data. "nn" is a unique number starting with 00 as the first generated. This file is put in the \SMART\SVDATA directory. • "E" creates a pre-Export file. These files can imported into Microsoft Access or other database programs. The file naming convention is file-name.Enn, where file-name is the name of the file currently being captured, if in real time; or already captured, if printing display of captured data. "nn" is a unique number starting with 00 as the first generated. This file is put in the \SMART\SVDATA directory. Contact TranScan support to receive a Windows program to create a MS Access database from these files. 4 If running under Windows, the Windows print spooler will handle printed output. March 24, 2000 Page 31 TranScan/8583 User’s Manual 10. SNA and X.25 Decode-Real Time & Captured Data Display An option available with the TranScan/8583 provides for decoding of SNA and X.25 transmissions. For a complete description on the use of these options, see Manual of Operation for the Model 5300 SNA Option, or Sherlock Manual of Operation. March 24, 2000 Page 32 TranScan/8583 User’s Manual 11. Changing the TranScan Configuration To re-configure TranScan, select the "P-CONFIGURE TRANSCAN" Master Menu option. The following screen will be displayed: CONFIGURATION MENU ABCDEFGHIJKLMNOPS- Interface Adapter Type Base I/O Address Printer Port Initialization File Name Path For SVISO.* Files Path For Disk Storage Paper Width/Page Length Printer Type Monitor Type Installation ID OK to use Expanded Memory? ISO Transmit/Receive Colors Display Color - Background Display Color - Foreground Display Color - Received Data Display Color - Cursor Save Parameters F1-Help F9-Spooler : : : : : : : : : Internal Board 300 H Parallel Port 1 (378 H) VISO C:\SMART\SVISO\ C:\SMART\SVDATA\ 80 cols/66 lines HP DeskJet Plus/LaserJet COLOR Monitor : YES : : : : BLUE Bright GREEN Bright WHITE Bright RED F10-Print Screen NON-ISO ISO Transmit Receive _ Transmit Receive ESC-Main Menu The options are described as follows: AYour choices are a) the internal board, b) the external parallel port version, c) enhanced parallel port (ECP) BFor internal board, this will normally be 300H and matches board dip switches. For parallel port, this will normally by 378H. CSelect the printer port address. DOverride of setup parms. Use a ---.ST file. EDOS path for parsing tables. Contact Ontrac if changing. FPath name for saving your files of all types. GPrinter paper page and width. HGeneric or HP PCL printer. IChoose the monitor type or let TranScan figure it out with AUTO choice. JProvide an ID that will display on each screen. (To distinguish local from remote screen) KTranScan to use expanded memory. Recommend this is set to Yes. LChoose ISO display colors. M-P- Choose non-ISO display colors SChoose if you want to save your current configuration selections. Choose the "S-Save Parameters" to save the new configuration. To maintain the old one, hit "ESC". March 24, 2000 Page 33 TranScan/8583 User’s Manual 12. Quick Reference Below is a quick reference for capturing, displaying, and printing communications data. 12.1 Real Time Monitor and/or Capture Data of ISO Bitmap Messages • • • • For BiSync, select option C from the Master Menu. For SNA, select option L from the Master Menu, then option B, SNA Monitor Menu. For Frame Relay, select option M from the Master Menu, then option B, Frame Relay Monitor Menu. For X.25, select option L from the Master Menu, then option B, X.25 Monitor Menu. If capturing data, • • • • set ISO Capture File options: name, control and size. Select option Run/Monitor ISO Message Format. From the "RUN ISO MENU", select desired option A, B or C When display/capture complete or when desired, press "ESC" to exit display/capture mode. 12.2 Display Previously Captured ISO Bitmap Message Data If data file to be displayed was not just captured: • From Master Menu, select option H. • From Disk Storage Menu, select option G. • Press "enter" twice to use the default drive and path. • Select the desired file and press the “enter” key. • Press "ESC" to return to the Master Menu. For BiSync lines: • From the Master Menu, select option D. • From the Display Captured Data Menu, select option F. • When finished viewing captured data, press "ESC" to return to the Master Menu. For SNA lines: • From the "Master Menu", select L. • From the "SNA Menu", select A. • From the "Captured SNA Data Display Menu", select D, ISO Message Format. March 24, 2000 Page 34 TranScan/8583 User’s Manual For Frame Relay lines: • From the "Master Menu", select M. • From the "Frame Relay Menu", select A. • From the "Frame Relay Captured Data Display Menu", select E, Display ISO Messages. For X.25 lines: • From the "Master Menu", select N. • From the "X.25 Menu", select A. • From the "Captured X.25 Data Display Menu", select G, Display ISO Message Format. 12.3 Printing/Exporting Messages Display formatted ISO messages either through the real time Monitor display or the Captured Data display. • • • • • If using the real time display, freeze the display, option F. Select option P. If change in format is desired, press "F" and select desired format. If change in message range desired, press "R", then set range. Select desired print option: S, P, or C for print; A or E for exporting to a file. 12.4 SNA Decode Option 12.4.1 SNA Decode - Real Time Monitor To display decoding of the SNA protocol layers in real time: • From the "Master Menu", select L. • From the "SNA Menu" select B. • From the "SNA Monitor Menu" select I. • From the screen that displays the SNA/SDLC counters, the various SNA and SDLC decoding levels may now be selected. • When monitoring is finished, press "ESC", then "ESC" again to return to Master Menu. 12.4.2 SNA Decode Option - Display Previously Captured Data To display decoding of the SNA protocol layers in a captured file: If data file to be displayed was not just captured: • From Master Menu, select option H. • From Disk Storage Menu, select option G. • Press "enter" twice to use the default drive and path. • Select the desired file and press the “enter” key. March 24, 2000 Page 35 TranScan/8583 User’s Manual • Press "ESC" to return to the Master Menu. In all cases, • From the "Master Menu", select L. • From the "SNA Master Menu" select A. • From the "Captured SNA Data Display Menu" select C. • The various SNA and SDLC decoding levels may now be selected. • When finished viewing captured data, press "ESC" to return to the SNA Menu. • Then press "ESC" to return to the Master Menu. 12.5 X.25 Decode Option 12.5.1 X.25 Decode - Real Time Monitor To display decoding of the X.25 protocol layers in real time: • From the "Master Menu", select N. • From the " X.25Menu" select B. • From the "X.25 Monitor Menu" select J. • From the screen that displays the X.25 counters, the various X.25 decoding levels may now be selected. • When monitoring is finished, press "ESC", then "ESC" again to return to Master Menu. 12.5.2 X.25 Decode Option - Display Previously Captured Data To display decoding of the X.25 protocol layers in a captured file: If data file to be displayed was not just captured: • From Master Menu, select option H. • From Disk Storage Menu, select option G. • Press "enter" twice to use the default drive and path. • Select the desired file and press the “enter” key. • Press "ESC" to return to the Master Menu. In all cases, • From the "Master Menu", select N. • From the " X.25 Master Menu" select A. • From the "Captured X.25 Data Display Menu", the various X.25 decoding levels, D, E, or F may now be selected. • When finished viewing captured data, press "ESC" to return to the X.25 Menu. • Then press "ESC" to return to the Master Menu. March 24, 2000 Page 36 TranScan/8583 User’s Manual 13. Trouble Shooting This section covers various errors that may occur with TranScan/8583. For additional support, send e-mail to [email protected] or phone 415-835-1000. Problem "HARDWARE FAILURE" message appears box. • • • No ISO messages Displayed in Real Time display • • No ISO messages displayed from Captured file. • • • Master Menu does not appear on the screen • • • • March 24, 2000 Description/Action to take Check that the TranScan 5300 box is turned on. Check cable connections to the TranScan hardware box. If all else fails, power off the TranScan hardware box, then power it back on. If a message "Waiting for Data" is displayed check patch connection to line being monitored. Also check leads on 5300 box. If the numbers in the upper right-hand corner are increasing, then protocol data is being transmitted but no messages are being sent (e.g. no STX on a BiSync line). There may not have been any messages on the communications Displayed from line when capturing data. Protocol data may have been written over captured messages on a "CONTINUOUS" file. See also Corrective Action for "No ISO messages Displayed in Real Time display", above. If another menu appears, hit "ESC" key two or three times. If the DOS prompt "\SMART\SYSTEM" appears, type "SVS" or “\transcan” then press "enter". If under Windows, and there is no DOS prompt, start MS/DOS, then type “\transcan”, then press ”enter”. If the above actions do not solve the problem, reboot the PC; or shut down and turn off the PC, wait about 20 seconds, then turn the PC on. Page 37 TranScan/8583 User’s Manual ISO message print not generating any output under Windows 95/98/NT. March 24, 2000 For printing from DOS program under Windows 95/98/NT, the printer must have a DOS LPTn assigned. 1) From the Windows “Start” button, select “Settings”/”Control Panel”. 2) Double click the “Printers” icon. 3) Right click on the printer and click “Properties” 4) Click on the “Details” tab 5) Click the “Capture Printer Port…” tab 6) From the “Device” drop down list, select “LPT1” 7) Check the “Reconnect at Logon” check box 8) Click “OK” 9) Click “OK” again. Page 38 TranScan/8583 User’s Manual End of Document March 24, 2000 Page 39