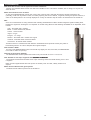
1
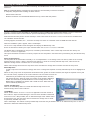
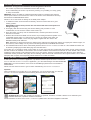
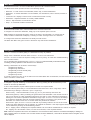
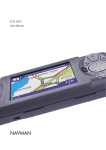
SmartS™ Professional
User Manual
1
Index
Important Notice ........................................................................................................................................................................................ 3
System Requirements .............................................................................................................................................................................. 3
S ™ Professional ..................................................................................................................................................... 3
Installing Smart
SmartS
Installing the NAVMAN GPS ....................................................................................................................................................................... 4
Installation Of Maps ................................................................................................................................................................................... 4
Hardware Installation ................................................................................................................................................................................ 5
S ™ Professional .......................................................................................................................................................... 5
Using Smart
SmartS
Main Menu ................................................................................................................................................................................................. 6
Quick Nav ................................................................................................................................................................................................... 6
Navigation .................................................................................................................................................................................................. 6
Navigation By Address .............................................................................................................................................................................. 6
Navigation By Intersection ......................................................................................................................................................................... 7
Navigation by Points of Interest (POI) ....................................................................................................................................................... 7
Navigation by Favorite Destination ............................................................................................................................................................ 7
Navigation by Recent Destination ............................................................................................................................................................. 8
Navigation Screen Options ....................................................................................................................................................................... 8
Map Screen ................................................................................................................................................................................................ 8
Route Planning without a Position Fix ...................................................................................................................................................... 8
Navigation Screen ..................................................................................................................................................................................... 8
Combination Screen ................................................................................................................................................................................. 9
Instruction List ........................................................................................................................................................................................... 9
GPS Status ................................................................................................................................................................................................ 9
Setup Options .......................................................................................................................................................................................... 10
Technical Specifications .......................................................................................................................................................................... 10
Frequently Asked Questions .................................................................................................................................................................... 11
Troubleshooting ...................................................................................................................................................................................... 12
End User Licence and Warranty Agreement ........................................................................................................................................... 13
Contact Us ............................................................................................................................................................................................... 14
2
User Manual
Important Notice
When using your NAVMAN GPS in a vehicle, it is your sole responsibility to place, secure, and use the device in a manner that will
not cause accidents, personal injury or property damage, or in any manner obstruct your view or vehicle safety equipment. The
user of this product is solely responsible for observing safe driving practices. Do not operate your NAVMAN GPS while driving.
Park the vehicle first. It is your sole responsibility that the vehicle mount installation instructions are read carefully, understood,
and followed.
NAVMAN NZ LIMITED DISCLAIM ALL LIABILITY FOR ANY USE OF THIS PRODUCT IN A WAY THAT MAY CAUSE ACCIDENTS,
DAMAGE OR THAT MAY VIOLATE THE LAW.
System Requirements
Computer System Requirements
IBM® Compatible 486 PC or higher, Dual Speed CD-ROM or higher, Microsoft® Windows® 98, ME, 2000 or XP, Microsoft®
ActiveSync® 3.5 or higher. Internet connection for installation.
iPAQ™ Pocket PC Requirements
iPAQ™ H3700, H3800 or H3900 Series.
Memory minimum 64MB. Application - 3MB for storage, 8MB for execution. Map sizes range from 1.5MB to 50MB. An optional
memory card is recommended for additional storage.
Connection to internet is required
An internet connection is required to activate the software and complete the installation.
S™ Professional
Installing Smart
SmartS
·
Ensure the iPAQ is not connected to the NAVMAN GPS receiver. Reset the iPAQ and then place it into the ActiveSync cradle. Then
insert SmartS™ Professional CD into your CD-ROM drive.
The Installation Wizard will start.
If nothing happens, click Start, run, then enter “d:\setup.exe” where “d” is the letter of the CDROM drive. Click OK.
·
Select “Install SmartST™ Professional”.
·
Follow the on-screen instructions to complete the installation of the SmartS™ Professional
application.
·
Use the Product Key to activate the software, select “Activate Software” and follow the
instructions.
·
Select “Map Download Software”. See Installation Of Maps for further instructions on how to
add or delete a map.
Completing the software activation process activates SmartS™ Professional and ensures
access to support and service pack updates.
3
Installing the NAVMAN GPS
Now that the software has been installed successfully, the NAVMAN GPS can be attached to the
Pocket PC.
Note: The NAVMAN GPS is powered from the Pocket PC’s internal battery. Ensure the Pocket PC
is adequately charged before installing the GPS receiver.
·
Switch off the Pocket PC.
·
Slide the Pocket PC onto the NAVMAN GPS from the top, until it clicks into position.
Installation Of Maps
SmartS™ Professional must be installed on the Pocket PC prior to installing maps. Please ensure that the SmartS™ Professional
application has been closed on the Pocket PC. Open the Task Manager to view and close SmartS™ Professional.
Reset the iPAQ and then place it into the ActiveSync cradle. Then insert the SmartS™ Professional CD into the CD-ROM drive.
The Installation Wizard will start.
If nothing happens, click Start, Run…, then enter “d:\setup.exe” where “d” is the letter of the CD-ROM drive and click OK.
When the installation options appear, select “Install Maps”.
The SmartS™ Map Installer screen will appear and display the Master Map. This
shows the total area covered by the maps contained within the SmartS™ Professional CD-ROM.
The Master Map is subdivided into map zones, bounded by black borders, and it is these map zones that are used by the
SmartS™ Professional application.
This system minimizes the amount of memory required to store map data in the Pocket PC by transferring only the selected map
zones.
Select The Storage Area.
The map data can be stored either internally or on a CompactFlash™ or SD storage card. The memory status of the currently
selected device is shown. If there is insufficient free memory to store the currently selected map zones, either choose an
alternative storage device or deselect one or more map zones.
Please select storage device from the drop-down menu and select the storage area to transfer and store the map zones.
Select Map Zones.
· To add a map zone to the Pocket PC simply click on the coverage area required. Currently selected map zones are highlighted in
green.
Select as many map zones as required but remember that the greater the number selected, the larger the required memory will
be. The total memory required for the current selection is shown below the zone list.
·
Click Find City to locate the map zone containing the specific location. The Find
City window will open, where the name of a location can be entered. Selecting a
location from the Find City list will indicate the correct coverage area on the
Master Map by highlighting the location with a small red cross. Select this map
zone for transfer by clicking on it.
Transfer The Map Zones.
Click on the Install Maps button to transfer the selected map zones to the
selected storage area on the Pocket PC.
Loaded Maps
Please ensure that the SmartS™ Professional application has been closed on
the Pocket PC. Open the Task Manager to view and close SmartST Professional.
From the SmartS™ Map Installer, click on Refresh Storage Areas. Please select
storage device from the drop-down menu and select the storage area to check
for previously installed map zones.
Click Loaded Maps. This will list currently installed map zones that may be deleted. Click on an individual map zone or click on
Select All to delete the selected map zones.
4
Hardware Installation
IMPORTANT: Throughout the installation the following must be observed:
·
The suction cup surface and windshield must be clean and dry.
·
Avoid contaminating the suction cup surface by touching or by installing in a dusty, greasy
or damp environment.
WARNING: Owners of H3800 or H3900 series iPAQ Pocket PC’s should ensure that the
vehicle power cable is removed from the socket in the bottom of the iPAQ before removing
the iPAQ from the NAVMAN GPS Jacket.
Failure to do so could result in damage to the iPAQ power adapter.
1. To install the suction mount bracket successfully, choose a location that has a good
viewing position.
IMPORTANT: Ensure that this position does not interfere with the normal operation of
airbags in any way.
2. Thoroughly clean the surface using the alcohol cleaning pad provided. To avoid
contamination, do not touch the surface of the suction cup.
3. Press the suction cup firmly onto the cleaned surface, and then press down the lever
mounted on the base.
4. Slide the GPS receiver and iPAQ onto the suction cup mounting bracket and position it at a
comfortable viewing angle. For continuous use, connect the vehicle power cable. For
H3800 and H3900 models, connect the plug adaptor supplied with the iPAQ to the
NAVMAN vehicle power cable first.
Note: Remember to always disconnect the vehicle power cable from the iPAQ when starting or stopping the vehicle's engine, as
the accessory socket voltage can vary which could damage the iPAQ or NAVMAN GPS Receiver.
5. The NAVMAN GPS receiver will be automatically detected when SmartS™ Professional is first run. GPS satellite information can
be viewed by displaying the GPS Status page from the Main Menu.
It may take up to 10 minutes to obtain a first position fix. A clear view of the sky will decrease first position fix time. During this time
the GPS receiver will establish communication with the GPS satellites and download the almanac for each satellite. This process
enables the GPS receiver to get subsequent fixes much more quickly. Owners of vehicles fitted with athermic (heat reflecting)
windshields should purchase a third party GPS re-radiating antenna which will retransmit the GPS signal inside the car to ensure
adequate GPS reception. See Frequently Asked Questions for further information.
Using SmartST Professional
To start the SmartS™ Professional application, tap START and then tap the SmartS™ Professional
icon. To close the SmartS™ Professional application, go to the Task Manager and select Close this
Application. For more information on the use of the Task Manager please refer to the Pocket PC
documentation.
Please read the tutorial screens to gain a better understanding of SmartS™ Professional.
Important:
When synchronizing your Pocket PC to your desktop PC, it is recommended that you close the
SmartS™ Professional application before inserting the Pocket PC into the cradle.
PLEASE NOTE: Indoor GPS reception is generally not possible. Therefore, to enable a GPS fix to be obtained by the
NAVMAN GPS 3450, operation outdoors is essential.
For full instructions on how to use SmartS™ Professional, please refer to the manual supplied on CD-ROM.
5
Main Menu
To access the SmartS™ Professional Main Menu press the LEFT hardware button.
The Main Menu screen provides access to the following options:
• Quick Nav - For fast access to the Quick Nav, Return Trip, or Recent destinations
• Destination - To set the destination to a new Address, new Intersection, Point of Interest, Favorite or
Recent
•
Instruction List - Display a route as a list of instructions instead of a map
• GPS Status - Graphical indication of currently visible satellites
• Volume - Adjust direction announcement volume
• Setup - To customize SmartST Professional
Quick Nav
To access the Quick Nav menu, enter the Main Menu and select Quick Nav.
To navigate to a Quick Nav destination, simply tap on the required option in the list.
Note: A GPS fix is required at this point in order for the route to be calculated. If no current GPS fix
exists, SmartST Professional will display a “Waiting For GPS” message until a fix is obtained.
To configure the Quick Nav destinations see the By Favorite section.
The Quick Nav Menu also gives access to the Return Trip and Recent Destinations.
Navigation
SmartS™ Professional makes getting to a destination as easy as possible.
Simply enter a destination and then follow SmartS™ Professional’s instructions.
SmartS™ Professional does not require a starting point for a journey, as routes are calculated starting
from a current location.
For any deviation from the planned route, SmartS™ Professional will automatically recalculate the route,
constantly providing updated accurate directions to the destination.
Entering a destination can be done in several ways:
·
Navigation By Address
·
Navigation By Intersection
·
Navigation By Point Of Interest (POI)
·
Navigation By Favorite
·
Navigation By Recent
To cancel a route at any time, go to the main menu and select Quick Nav or Destination, and then select Yes to the prompt “Do you
wish to cancel the current route”.
Navigation By Address
To navigate to a specific address go to the Destination Menu by pressing the LEFT hardware key on the
Pocket PC and then tap Destination.
To find a street address, tap the Address option and enter the required details.
Note: For easier keyboard entry it is recommended that the Pocket PC is set to ‘Large Keys’. This is
accessed through Settings > Personal > Input > Large Keys
·
Select Country - Select the destination country (e.g. U.S.A.) from the drop down menu list.
·
Select Area (optional) - Start by indicating the general area of the destination. This could be a Town or
City but can also be any other geographical area such as a state or county. Selecting an Area before
entering the road name is optional but advisable for large maps. SmartS™ Professional will attempt
to pre-empt the destination with each character entered. Often it is necessary to only enter the first
few letters of a location before one or several names are presented for selection.
·
Select Road - Again, SmartS™ Professional will offer any matching locations. As soon as the correct
location has been determined, tap the selection to complete the address. If the maps support House Numbering, the destination
can be finalized by entering the house/building number.
·
Show - Tapping “Show” will display the requested address. No route will be calculated and no GPS fix is required.
·
Go - Tapping “Go” will calculate a route, from the current location, to the requested address.
Note: A GPS fix is required for the route to be calculated. If no current GPS fix exists, SmartST™ Professional will display a “Waiting For
GPS” message until a fix is obtained. Once a current location has been established, a route will be calculated and the navigation screen
will be displayed.
6
Navigation By Intersection
·
Go to the Main Menu by pressing the LEFT hardware key on the Pocket PC and then tap
Destination to access the Destination Menu. Tap the Intersection option and enter the required
details to find the required intersection.
·
Select Country - Select the destination country (e.g. U.S.A.) from the drop down menu list.
·
Select Area (optional) - Start by indicating the general area of the destination. This could be a Town
or City but can also be any other geographical area such as a state or county. Selecting an Area
before entering the road name is optional but advisable for large maps.
·
Select Road - SmartS™ Professional will offer any matching locations. As soon as the correct
location has been determined, tap the required option in the list.
·
Select Intersection - All intersections with the requested road are displayed. Locate the desired
intersection and select by tapping.
·
Show - Tapping “Show” will display the requested intersection. No route will be calculated and no
GPS fix is required.
Go - Tapping Go will calculate a route, from the current location, to the requested intersection.
Note: A GPS fix is required for the route to be calculated. If no current GPS fix exists, SmartS™ Professional will display a “Waiting
For GPS” message until a fix is obtained. Once a current location has been established, a route will be calculated and the
navigation screen will be displayed.
Navigation by Points of Interest (POI)
Navigation to a point of interest is very similar to that of an address or intersection.
·
Select Country - Select the destination country (e.g. U.S.A.) from the drop down menu list.
·
Select a category or to view every POI, leave as All.
·
Options for the selected category are available under the Type drop-down menu.
·
Indicate the area of interest.
·
Tapping
·
Show - Tapping “Show” will display the requested point of interest. No route will be calculated and
no GPS fix is required.
·
Go - Tapping “Go” will calculate a route, from the current location, to the requested point of interest.
·
Info - Tapping “Info” will display more detailed information about the requested point of interest.
This includes the Name, Street, Area, Phone Number and Post Code (if available).
will display the search results. Tap the required POI from the list.
To display the POI icons on the map the required POI category must be enabled from the Setup
pages. See Setup Options.
Navigation by Favorite Destination
SmartS™ Professional stores common destinations as favorites.
·
To add a location to the Favorite list, find and display the desired location on screen. Do this by
entering an Address, Intersection or Point of Interest as described above.
·
Tap and Hold the location to be added and select Add to Favorites from the pop-up menu. The
location selected will be added to the general Favorites list.
To navigate to a Favorite location, firstly go to the Destination Menu.
To access the Destination Menu, go to the Main Menu by pressing the LEFT hardware key on the
Pocket PC and then tap Destination.
To view the Favorites list, tap the Favorites option.
·
To alter the details of a Favorite, tap Edit. To save a Favorite as one of the three Quick Nav
destinations, select one of the Quick Nav’s from the Save As drop down list. The icon for the
Favorite or Quick Nav can be also modified by selecting the Change Icon button.
·
To remove a Favorite from the list, tap Delete.
·
To display a Favorite Location on the map, tap Show.
·
To Navigate to a Favorite, tap on an entry in the list and then tap Go.
Note:- A GPS fix is required for the route to be calculated. If no current GPS fix exists, SmartS™ Professional will display an
“Awaiting GPS Fix” window until a fix is obtained. Once the current location has been established, a route can be calculated and
the route navigation screen will be displayed.
7
Navigation by Recent Destination
SmartS™ Professional will store up to 20 of the most recent destinations.
To access the Recent Destinations Menu, go to the Main Menu by pressing the LEFT hardware key
on the Pocket PC and then tap Destination.
·
To view Recent Destinations, tap the Recent option.
·
To select a recent destination tap on the desired destination in the Recent list.
·
Show - Tapping “Show” will display the Recent. No route will be calculated and no GPS fix is
required.
·
Go - Tapping “Go” will calculate a route, from the current location, to the Recent.
·
To return to any one of these destinations simply tap on the desired destination in the Recent list.
Note:- A GPS fix is required for the route to be calculated
Navigation Screen Options
SmartS™ Professional has three user selectable navigation screen options. To alter the Navigation view, press the RIGHT
hardware key on the Pocket PC. Please note that a route must have been calculated before these options are available. For
information on how to calculate a route, please see Navigation.
Map Screen
When the Map Screen is selected, the following information is displayed:
·
Local area map
·
Current location and heading (GPS Locator)
·
Current road or street name
·
Current time
·
Map scale
The map is oriented to North and the GPS locator indicates position, heading and GPS fix status (blue
circle = fix, red circle = no fix) In this mode, the map can be scrolled in any direction by dragging the
stylus across the screen. Tap the
icon to re-centre the vehicle position on the map.
The map can be zoomed in and out by pressing the UP or DOWN hardware keys on the Pocket PC.
To select and display the name of a street name, tapping and holding on a street/Road.
The selected street name is displayed at the top of the pop-up menu.
Route Planning without a Position Fix
Routes can also be planned without a GPS fix from the pop-up menu.
First select a departure location by tapping and holding on a street/road, and then selecting Set as departure.
Secondly select a destination location. Either tap and hold on a street/road, and selecting Navigate to, or select a Destination as
indicated in the Navigation section.
The route will be calculated and displayed on the Combination Screen.
Navigation Screen
To alter the Navigation view, press the RIGHT hardware key on the Pocket PC. When the Navigation Screen is selected, the
following information is displayed:
·
Next road or street name
·
Turn Indicator
·
Distance to turn
·
Current road or street name
·
User Display 1
·
User Display 2
In this mode, tapping on the Turn Indicator icon will cause SmartS™ Professional to announce the
current instruction. User Display 1 and 2 can be independently configured by tapping on it’s icon to
display the following information:
·
Current Speed
·
Current Time
·
Distance To Go (DTG) to destination
·
Estimated Time of Arrival (ETA)
·
Time to Go (TTG)
8
Combination Screen
To alter the Navigation view, press the RIGHT hardware key on the Pocket PC. When the Combination Navigation Screen is selected, the following information is displayed:
·
Next road or street name
·
Turn Indicator
·
Local Area Map
·
Current location (GPS Locator)
·
Map Scale
·
User Display 1
·
Current road or street name
In this mode, tapping on the Turn Indicator icon will cause SmartS™ Professional to announce the
current instruction. In this mode the map is presented in “Heads-up Display” style. The GPS locator
will always point straight up and the map will rotate around it.
The map can be zoomed in and out by pressing the UP or DOWN hardware key on the Pocket PC.
User Display 1 can be independently configured by tapping on it’s icon to display the following information:
·
Current Speed
·
Current Time
·
Distance To Go (DTG) to destination
·
Estimated Time of Arrival (ETA)
·
Time to Go (TTG)
Instruction List
In addition to the three navigation displays, the routes can be displayed as a list of instructions. To
access the Instruction List, go to the Main Menu and tap Instruction List.
SmartS™ Professional can display route information in a variety of ways. By tapping the Instruction
List, any calculated route will be displayed as a set of instructions with turn by turn details,
corresponding road information and distances.
As each point is reached, the list is automatically updated to show the current location along the
calculated route. Tapping on the UP and DOWN icons will scroll the Instruction List forward and
backward.
Note 1: A route needs to have already been calculated before an Instruction List is available. For
information on how to calculate a route, please see Navigation.
Note 2: The distance displayed to the left of each turn instruction is the total distance from the current
position to that particular instruction. Distances will only be displayed if the NAVMAN GPS has a
current fix.
GPS Status
The NAVMAN GPS system relies on the reception of signals transmitted by the Global Positioning
System satellites orbiting the earth.
To view the current status of GPS reception go to the Main Menu and tap GPS Status.
The GPS Status display shows a visual representation of what the NAVMAN GPS receiver is
receiving.
The ON/OFF button in the top left corner provides a method of disabling the GPS receiver to save
power when not in use. The display box adjacent to the ON/OFF button displays the current GPS
COM port setting that is automatically allocated and the communications baud rate (for example
57,600).
Latitude and longitude are displayed along with a North pointing Compass, the heading in degrees
and ground speed. Tapping the Latitude/Longitude values will toggle the units display between
degrees, minutes and decimal seconds, decimal degrees, degrees and decimal minutes.
A yellow segment indicates a satellite that is being tracked but is not contributing to a fix. A red
segment indicates a satellite that is contributing to a 2D fix. A green segment indicates a satellite
that is used for a 3D fix. A 2D fix indicates only the minimum number of satellites are being tracked to maintain a valid fix, while a
3D fix indicates that more than the minimum number are in track. A 3D fix is more accurate than a 2D fix.
The circle underneath the segment display is green when there is a valid fix (2D or 3D), and red when no fix is available. The time
and date displayed are in UTC (Coordinated Universal Time), where UTC is the current term for what was commonly referred to
as Greenwich Mean Time (GMT).
9
Setup Options
To access the Setup Menu, go to the Main Menu and tap Setup. SmartS™ Professional can be
customized to suit a range of specific requirements, including the map display “look”.
Display tab:
· Select day or night color scheme to improve the contrast in light and dark environments.
·
The Map Color Scheme can be selected from the drop-down menu.
Guidance tab:
· Tick box to enable or disable voice guidance
·
Voice Scheme drop-down menu. This is to select either a male or female voice
·
Distance units. The distance of measure can be selected in miles (feet) or kilometers (meters).
Routing tab:
· Route Type. The route type can be toggled between the Quickest Time and Shortest Distance.
·
Route Options. The route options include avoiding Toll Roads (pay to use roads) and Urban Areas
(inner city or built up areas).
·
Rerouting. The Back -on - track automatic rerouting can be disabled.
·
Record Route. Tap the Start button to begin recording travel on a route. This feature is for
troubleshooting purpose only when contacting NAVMAN support.
Note: Changes will only take effect when the next route is planned.
Points Of Interest tab:
· Display. Show points of interest (POI) on the map.
·
Categories. The display of POI’s can be filtered by the following categories: Shopping, Entertainment, Amenities, Food and Drink, Buildings and Monuments, Accommodation, Transport,
Automotive Facilities, Sports Facilities, Institutions, Medical Services, and Natural Attractions.
About tab:
The About Screen displays the version number of the SmartS™ Professional software.
Technical Specifications
GPS Receiver: Type 12 channel parallel, automatic selection.
Memory Card: CompactFlash™ Cards Type I & II
Time To First Fix:
Hot start: 15 seconds typical
Warm start: 48 seconds typical
Cold start: 120 seconds typical
Accuracy of Position Fix:
The accuracy of the GPS position is typically better than 5 m (16 feet), 95% of
the time under optimum conditions
Interface: iPAQ™ Pocket PC Option Pack Interface
Update Rate: Typically every second once fix established
Output Message: NMEA 0183 Ver: 2.20, GPGGA, GPGSA, GPRMC and GPGSV
Power: GPS Powered from iPAQ™ Pocket PC
External Power: 12 V DC vehicle power cable
EMC compliance (CE): EN300339
10
Frequently Asked Questions
· How much does it cost to run the system once I have installed it?
Nothing! The NAVMAN GPS receiver uses data from satellites in orbit. This data is available, free of charge, for anyone who
wants to use it.
· Where will and where will it not work?
As long as the NAVMAN GPS receiver has a clear view of the sky and is held with the antenna oriented towards the sky (vertically), it
will work anywhere on earth, accurately reporting the current Latitude, Longitude, heading and speed. However, in order for the GPS
position to be correctly displayed on a map, the relevant map will need to be transferred to the Pocket PC.
· How accurate is GPS?
Accuracy of the NAVMAN GPS system can and will vary slightly. For 95% of the time, the NAVMAN GPS is accurate to within 5m.
· How often is the position updated?
The NAVMAN GPS receiver updates the location every second with SmartST Professional
· How detailed are the maps supplied with Smart
SmartS
Professional?
S™ Professional
The SmartS™ Professional CD-ROM stores maps containing street level detail allowing door to door navigation.
Maps are also supplemented with POI’s (Points of Interest) such as hotels, railway stations and airports.
· Where does the GPS receiver get its power?
The GPS receiver takes its power from the Pocket PC.
11
Troubleshooting
How much does it cost to run the system once I have installed it?
· Nothing! The NAVMAN GPS receiver uses data from satellites in orbit. This data is available, free of charge, for anyone who
wants to use it.
Where will and where will it not work?
· As long as the NAVMAN GPS receiver has a clear view of the sky and is held with the antenna oriented towards the sky
(vertically), it will work anywhere on earth, accurately reporting the current Latitude, Longitude, heading and speed. However, in
order for the GPS position to be correctly displayed on a map, the relevant map will need to be transferred to the Pocket PC.
Note:
· Some car manufacturers are using athermic heat reflecting windshields that reflect all electromagnetic signals including GPS,
blocking the signal from entering the car. Reported car models using athermic heat reflecting windshields as of September, 2002
include:
Audi - all models 2001 onwards
BMW - 7 Series models E38, E65/66
Citroen - Xsara Picasso
Jaguar - X-Type
Peugeot - “07” range
Renault - all models 2001 onward and Laguna
Vauxhall - all models 2002 inward and Zafira
VW Passat - all models 2002 onwards
Therefore owners of vehicles fitted with athermic windshields should purchase a third party GPS rebroadcasting antenna to ensure adequate GPS signal reception.
How accurate is GPS?
· Accuracy of the NAVMAN GPS system can and will vary slightly. For 95% of the time, the NAVMAN GPS
is accurate to within 5m (16 feet).
How often is the position updated?
· The NAVMAN GPS receiver updates the location every second with SmartS™ Professional.
How detailed are the maps supplied with Smart
SmartS
Professional?
S™ Professional
· The SmartST Professional CD-ROM stores maps containing street level detail allowing door to door
navigation.
Maps are also supplemented with POIs (Points of Interest) such as hotels, railway stations and
airports.
Where does the GPS receiver get its power?
· The GPS receiver takes its power from the Pocket PC.
12
End User Licence and Warranty Agreement
Software Product License:
IMPORTANT - PLEASE READ CAREFULLY
NAVMAN (THE LICENSOR) IS WILLING TO LICENSE THE SMARTST PROFESSIONAL SOFTWARE (THE SOFTWARE) TO YOU
(THE CUSTOMER) ONLY IF YOU ACCEPT ALL THE TERMS OF THIS LICENCE. PLEASE READ THE TERMS CAREFULLY,
BECAUSE USING THIS SOFTWARE WILL BE DEEMED TO BE YOUR ACCEPTANCE THAT YOU ARE USING IT ON THE
FOLLOWING TERMS.
IF YOU DO NOT AGREE TO THE TERMS OF THIS LICENCE DO NOT INSTALL OR USE THE SOFTWARE AND RETURN THIS
PRODUCT PROMPTLY, INCLUDING ALL PACKAGING AND WRITTEN MATERIALS, TO THE LICENSOR’S REPRESENTATIVE AND
ANY AMOUNT YOU MAY HAVE PAID WILL BE REFUNDED TO YOU (LESS ANY DELIVERY AND HANDLING CHARGES).
1. The Licensor grants to the Customer a non-exclusive, licence to use: (a) one copy of the Software on one of the Customer’s
handheld devices; and (b) the accompanying materials, including any manuals contained in the Software (the Materials), in
accordance with the terms and conditions of this Licence.
2. Where the Customer uses the Software on a handheld or any other device (the Device) in a vehicle, the Customer must not
place, secure or use the handheld device in a manner that may cause accidents, personal injury or property damage or in any
way obstruct the visibility of the Customer. The Customer is solely responsible for observing safe driving practices and will not
operate the Software while operating a vehicle.
3. The copyright and all other intellectual property rights in the Software and Materials (including any enhancements or
modifications) are vested in the Licensor. The Customer must not rent, lease, reproduce, translate, adapt, vary, reverse-engineer
or modify the Software or Materials nor communicate the same to any person other than in accordance with the terms of this
Licence.
4. The Customer may not copy the Software or Materials except that one copy of the Software may be made to the extent that such
copying is necessary for the Customer’s own backup purposes.
5. Except for the warranty provided by the Licensor for the product that includes the Software, the Licensor expressly excludes to the
fullest extent permitted by law all representations or warranties, express or implied (except any which may not lawfully be
excluded), including the implied warranties of merchantability and fitness for a particular purpose.
6. The Licensor will not in any circumstances be liable under the law of tort, contract or otherwise for any indirect or consequential
loss or damage, including any loss of profits, however caused, arising in connection with the use of, or inability to use, the
Software.
If any limitation or exclusion or liability contained in this Licence is held to be invalid for any reason and the Licensor becomes
liable for loss or damage that would otherwise have been excluded, that liability will be limited to the total amount actually paid by
the Customer for the Software.
7. The Licensor may terminate this Licence immediately if the Customer breaches any of its obligations under this Licence.
Immediately following termination of this Licence, the Customer must deliver to the Licensor’s Representative or destroy all
copies of the Software and Materials in whatever form possessed by the Customer.
Limited Warranty:
IMPORTANT: The following terms and conditions may vary from country to country. Please check with Your NAVMAN dealer from
where You purchased the product.
13
Contact Us
Our
603
866
603
Our
staff are available to answer your product questions at:
577 9600 Tel- outside US and Canada
628 6261 Toll Free from US or Canada
577 9600 Fax
office hours are: Mon-Fri - 0815-1700 EST US
website: www.navmanusa.com
Copyright
Application:
© 2002 Navman NZ Limited, All rights reserved. NAVMAN is a registered trademark of Navman NZ Limited. SmartS and Back-ontrack are trademarks of Navman NZ Limited.
Map data provider:
© 1993-2002 Navigation Technologies B.V. All rights reserved.
Windows® is a registered trademark of Microsoft Corporation in the United States and/or other countries.
iPAQ is a registered trademark of Compaq Information Technologies Group L.P. in the United States and/or other countries.
All other trademarks and registrations are the property of their respective owners.
14